
TR28P - Swimming Pool POLARIS - Free user manual and instructions
Find the device manual for free TR28P POLARIS in PDF.

| Product type | Automatic pressure pool cleaner |
| Brand | Polaris |
| Model | TR28P |
| Category | Pool |
| Usage | In-ground or above-ground pools with dedicated return line |
| Wheel rotation speed | 28 to 32 revolutions per minute (adjustable) |
| Cleaning system | Suction, sweeping and random scrubbing |
| Reverse action | Approximately every 3 minutes and 30 seconds |
| Hose length | Adjustable according to pool depth and distance |
| Wall fitting | Universal threaded wall fitting (UWF) with restrictor disks (blue and red) |
| Relief valve | Yes, integrated |
| In-line filter | Yes, with removable and washable screen |
| Collection bag | All-purpose zippered bag, empty when half full |
| Sweep hose | Adjustable (adjustment screw on the feed hose) |
| Thrust jet | Adjustable at the rear of the cleaner |
| Liner compatibility | Pools with vinyl liner (caution with sensitive patterns) |
| Routine maintenance | Emptying the bag, cleaning the in-line filter, checking floats |
| Safety | Disconnect before chemical treatment or swimming; do not handle while operating |
| Winter storage | Drain water, remove UWF, do not store in sunlight |
| Spare parts | Available from Polaris dealer (ladder protection kit, UWF removal tool, etc.) |
| Warranty | Freeze damage not covered |
Frequently Asked Questions - TR28P POLARIS
User questions about TR28P POLARIS
0 question about this device. Answer the ones you know or ask your own.
Ask a new question about this device
Download the instructions for your Swimming Pool in PDF format for free! Find your manual TR28P - POLARIS and take your electronic device back in hand. On this page are published all the documents necessary for the use of your device. TR28P by POLARIS.
USER MANUAL TR28P POLARIS
natural_image
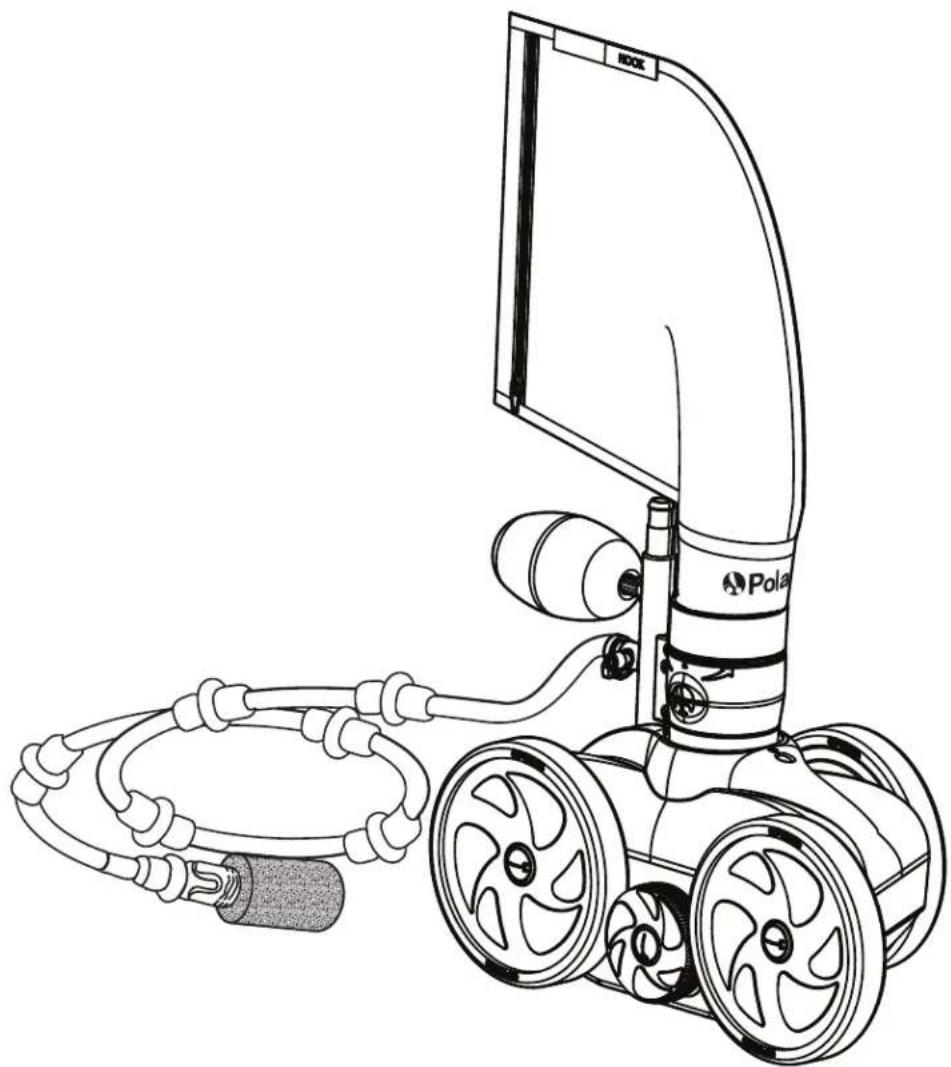
Line drawing of a Pole robotic device with attached cable and wheels (no text or symbols)OWNER'S MANUAL
English | Français | Español
Before You Start: Important Information
- Before installing the Polaris ^ cleaner, make sure the pool filter is clean.
- New plumbing lines should be flushed out before installing the cleaner.
- The cleaner should not be used to remove plaster dust in new pools.
- Except when checking the wheel RPM, do not handle the cleaner while it is operating.
• Always remove the cleaner before swimmers enter the pool. - Disconnect the cleaner from the pool wall when cleaning or backwashing the pool filter.
• Always remove the cleaner from the pool before chemical shock treatments. - After cleaning or backwashing, let the filtration system run for at least five minutes before re-connecting the cleaner.
For customer service or support:
Zodiac Pool Systems LLC
2620 Commerce Way, Vista, CA 92081
1.800.822.7933 | polarispool.com
Zodiac Pool Systems Canada, Inc.
2-3365 Mainway, Burlington, ON L7M 1A6
1.800.822.7933 | ZodiacPoolSystems.ca
Zodiac Pool Care Europe
Boulevard de la Romanerie -BP 90023
49180 St. Barthelemy d'Anjou cedex FRANCE
zodiac-poolcare.fr
Zodiac Group Australia PTY, Ltd.
19 Woodpark Rd. Smithfield
NSW, 2164
1300 763 021 | Zodiac.com.au

WARNING
To avoid risk of potentially serious injury:
- Do not handle the Polaris cleaner while it is operating, except when checking the wheel RPM.
• Always remove the Polaris cleaner before swimmers enter the pool.
CAUTION
USE OF A POLARIS TR28P IN A VINYL LINER POOL
Certain vinyl liner patterns are particularly susceptible to rapid surface wear or pattern removal caused by objects coming into contact with the vinyl surface, including pool brushes, pool toys, floats, fountains, chlorine dispensers, and automatic pool cleaners. Some vinyl liner patterns can be seriously scratched or abraded simply by rubbing the surface with a pool brush. Ink from the pattern can also rub off during the installation process or when it comes into contact with objects in the pool. Zodiac Pool Systems LLC and its affiliates and subsidiaries are not responsible for, and the Limited Warranty does not cover, pattern removal, abrasion or markings on vinyl liners.
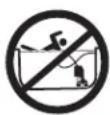
Included in the Box
a - Cleaner Body
b - All-Purpose Zipper Bag
c - Head Float
d - Sweep Hose
e - TailSweep PRO® with Sweep Hose Scrubber
f - Feed Pipe with Elbow
g - Leader Hose
h - Hose Floats
i - Back-up Valve
j - Center Swivel
k - Feed Hose
I - In-Line Filter Assembly
m - Quick Disconnect with Pressure Relief Valve (m ^1 )
n - Universal Wall Fitting (UWF®)
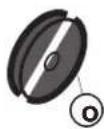
o - Restrictor Disks - (blue disk installed / red disk in bag)
p - Hose Nut
q - Bag Clip
Installing the Cleaner

Read the complete owner's manual before you begin installation.
1 Flush Plumbing Lines
- Turn on the filtration pump, allow to prime. Then turn on the booster pump and flush plumbing lines for five minutes.
- Turn off both pumps.
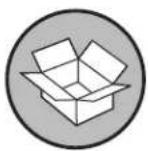
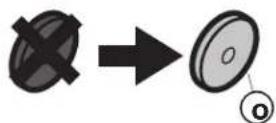
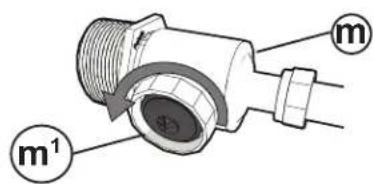
2 Install the Universal Wall Fitting (UWF)
The UWF installs on pools with a dedicated cleaner return line and a threaded 1-1/2" female pipe fitting.
- Remove the Universal Wall Fitting (UWF) (n) with Blue Restrictor Disk (o) from the Quick Disconnect (m).
- Thread the UWF (n) with Blue Restrictor Disk (o) in place, into the dedicated cleaner return line opening.
dedicated
cleaner return
line
natural_image
Technical illustration of a threaded pipe fitting with cross-sectional view (no text or symbols)3
Adjust Hose Assembly
3a. Adjust Leader Hose Length to the Greatest Depth of the Pool

- Straighten the Hose Assembly by laying it out flat in the sun.
-
Identify the Leader Hose section (g), marked Polaris ^® Leader Hose.
-
Measure and mark the greatest depth of the pool, usually at the main drain, by using a telescopic pool pole.
-
Lay the telescopic pool pole next to the Leader Hose (g) starting from the end of the Leader Hose near the Back-Up Valve (i). Transfer the water level mark from the telescopic pole onto the Leader Hose (g).
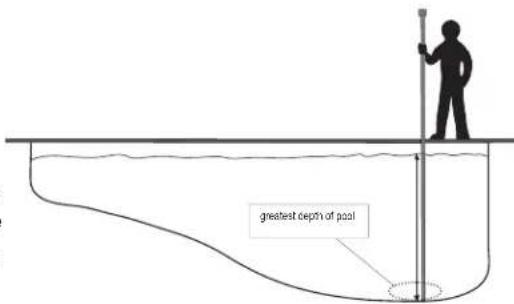
NOTE: If the pool depth is 10 feet (3m) or more, DO NOT cut the Leader Hose. Go to Section 3b: Adjust Feed Hose to Fit Pool Length.
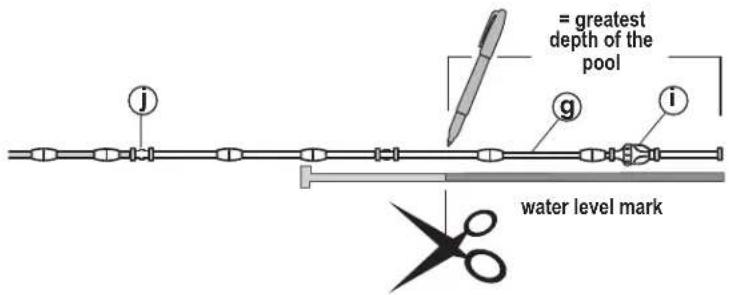
- Cut the Leader Hose (g) at the mark (do not cut off the float). Detach the excess Leader Hose from the swivel and discard.
- Reattach the Leader Hose (g) to the Feed Hose (k) at the swivel.
NOTE: It is easier to reinstall the swivel when hose and swivel are wet.
natural_image
Diagram showing a cable being cut with scissors, no text or symbols present3b. Adjust Feed Hose Length to Fit Pool Length
-
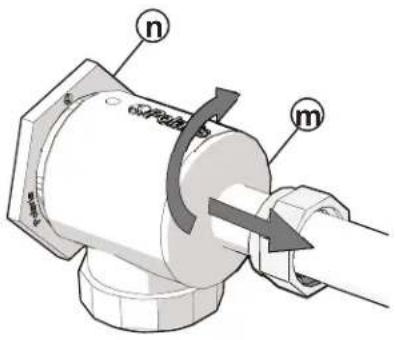
Connect the Hose Assembly to the dedicated cleaner return line opening by turning the Quick Disconnect (m) clockwise into the UWF® (n) and pulling away to secure.
-
Extend the end of the hose to the farthest point of the pool. Do not include steps or seating areas.
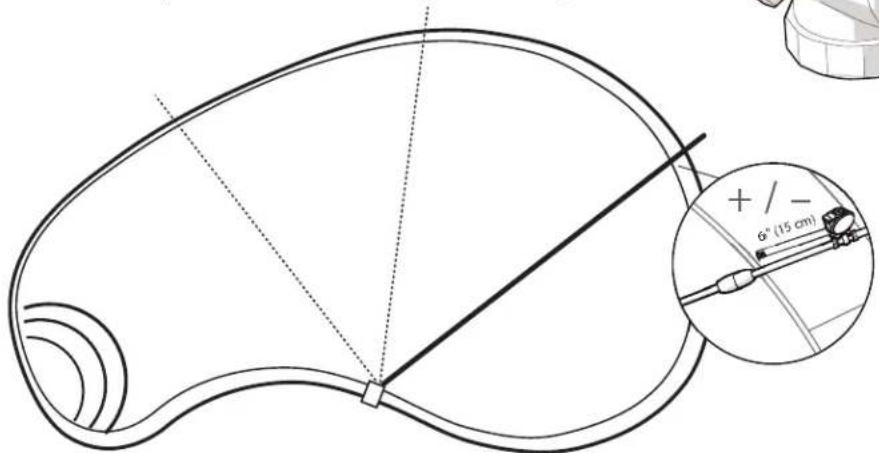
- The cleaner's optimal hose length should be within 6" (15cm), longer or shorter, of the farthest point (see image). The hose portion that extends past the farthest point is the hose overage. See hose adjustment instructions below.
Hose too long?
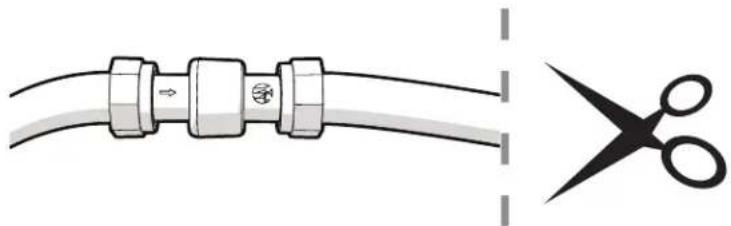
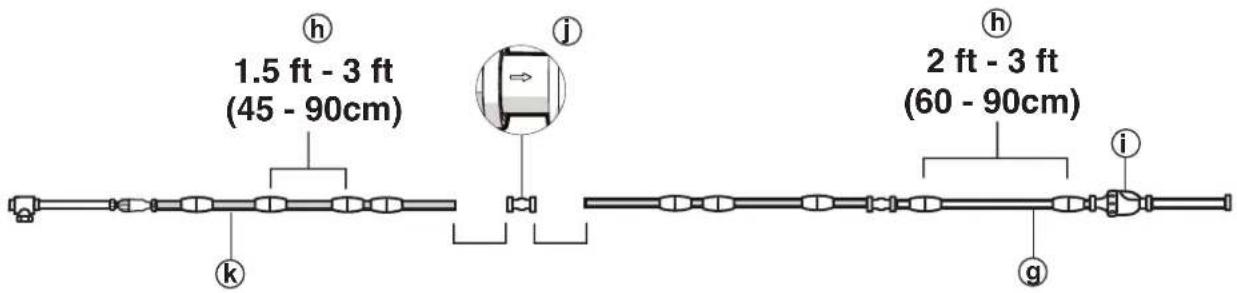
- With the hose assembly laid on the deck, identify the Center Swivel (j).
- Slide the Hose Floats away from the Center Swivel (j) and separate the swivel from the hose.
- Cut half of the overage from each end of the hose sections that attach to the Center Swivel (j).
- Reconnect hose sections with the Center Swivel (j). Make sure the flow direction arrow ( ) on the Center Swivel (j) points toward the cleaner.
Hose too short?
- Add a Feed Hose section with floats, a swivel, and two hose nuts, available through your local Polaris ^® dealer. Do not add more than one 10 ft. (3m) hose section.
-
Adjust to proper length.
-
Position the first Hose Float (h) against the back-up valve (i) and the next Hose Float within 2-3 ft (60-90 cm). Position the remaining Hose Floats (h) 1.5 - 3 ft. on the Hose Assembly as shown.
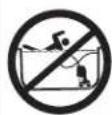
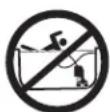
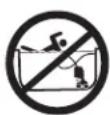
WARNING
To avoid risk of potentially serious injury, do not swim or use the pool when the cleaner is submerged or operating.
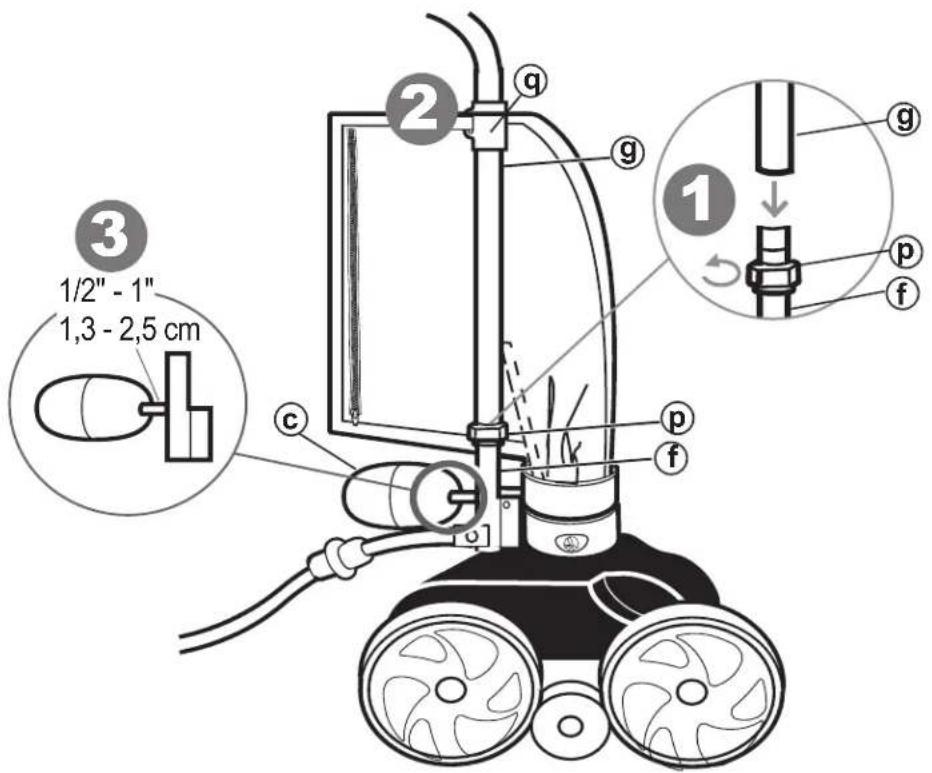
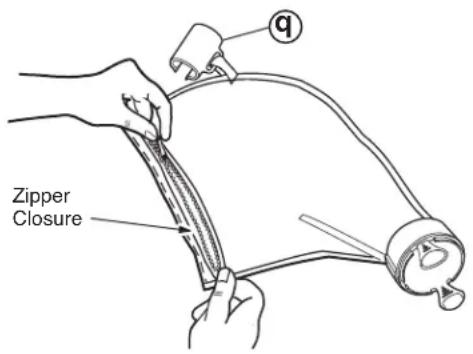
- Use the Hose Nut (p) to attach the Leader Hose (g) to the Feed Pipe (f). NOTE: Tighten the Hose Nut by turning counter-clockwise.
- Attach the bag to the Leader Hose (g) with the Bag Clip (q).
- Position the Head Float (c) 1/2" to 1" back from the Feed Pipe (as shown).
- Turn on the filter pump and allow it to prime before turning on the booster pump.
5
Check for Proper Wheel RPM
Before operating the cleaner, check for proper wheel revolutions per minute (RPM). For maximum efficiency, the cleaner should operate between 28 and 32 RPM.
- Mark the single-side wheel using a piece of tape (or a small leaf tucked into the tire).
- Turn the booster pump on, hold the cleaner below the water level and count wheel revolutions for one minute. Hold the Sweep Hose (d) to avoid getting wet.
- Optimum wheel speed should be between 28 and 32 RPM. If the count is not in target range, refer to section 6: Adjust the Wheel Speed.

28 - 32 RPM
1 min
IMPORTANT
Keep cleaner submerged for accurate wheel speed count.
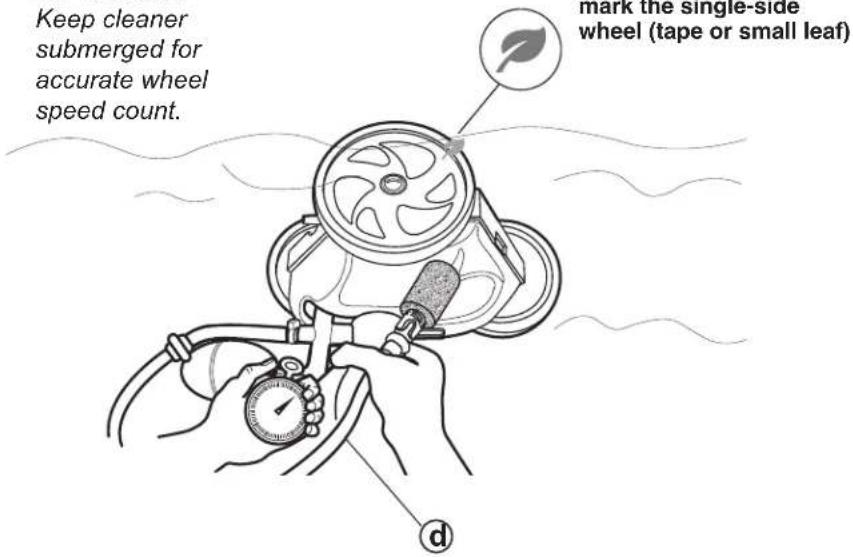
NOTE: If Back-Up Valve engages during timing, start over.
< 28 RPM
- Check the filter screen in the In-Line Filter Assembly (I) for debris and rinse with clean water.
- Clear any debris from the skimmer, filter, and pump basket that could restrict water flow.
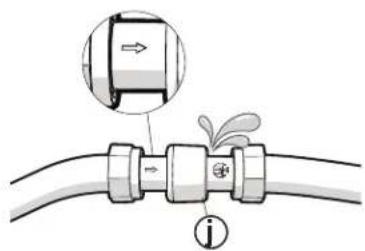
- Check hoses, connections, and swivels (j) for excessive leaking or spraying. Verify flow direction arrow (→) is toward the cleaner.
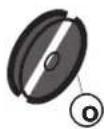
- Remove the blue restrictor disk (o) from the UWF®.
> 32 RPM
- Replace the Blue Restrictor Disk (o) in the UWF with the Red Restrictor Disk (o).
- Loosen the Pressure Relief Valve (m ^-1 ) at the Quick Disconnect (m) until the proper RPM is reached.
NOTE: The Pressure Relief Valve should only be adjusted when a restrictor disk is installed.
Fine Tuning the Cleaner
When operating correctly, the Polaris ^® cleaner vacuums, sweeps and scrubs all surfaces randomly throughout the pool. The climbing ability depends on the pool's shape and water pressure or flow. The cleaner climbs best in pools without sharp angles or curves in the transition from the pool floor to the pool wall. Approximately every 3-1/2 minutes the cleaner goes into back-up mode. This action pulls the cleaner away from pool obstacles and increases its random pattern.
Fine tune your cleaner for optimal operation, as necessary.
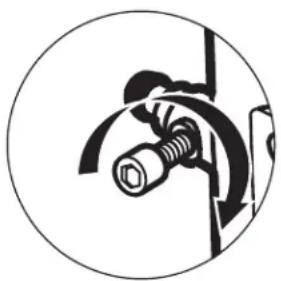
1 Adjust the Sweep Hose
The Sweep Hose (d) should move in a gentle sweeping motion. To increase or decrease sweeping motion:
- Turn the booster pump OFF.
- Rotate the sweep hose screw on the Feed Pipe (f).
natural_image
Circular diagram showing a mechanical or electrical component with no visible text or symbols
Decrease motion

Increase motion
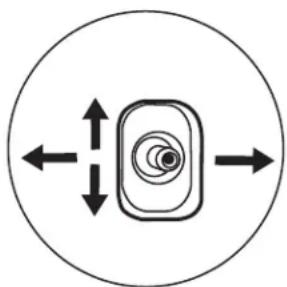
2 Adjust the Thrust Jet
If the cleaner is veering left or right instead of tracking straight, adjust the thrust jet (on the back of the cleaner) for climbing or turning.
NOTE: Factory default setting is straight back. Only adjust the thrust jet to accommodate unique pool shapes.
natural_image
Simple diagram of a camera icon inside a circle with bidirectional arrows indicating left and right motion (no text or symbols)
Turning

Climbing

Routine Maintenance
Perform routine maintenance to prolong the life of your cleaner.
1 Empty the Bag
Empty the bag when it is half full, especially if the debris load is sand.
NOTE: It is easier to empty the bag when it is dry. Alternate between two bags.
- Remove the bag clip (q) from the feed hose.
- Twist the bag connector until it disengages with a clicking sound from the vacuum tube and remove the filter bag.
- Open the zipper and empty out the debris.
- To replace the bag, align the markings on the connector and the vacuum tube.
- Click the connector into position on the vacuum tube and reattach the bag clip to the hose.
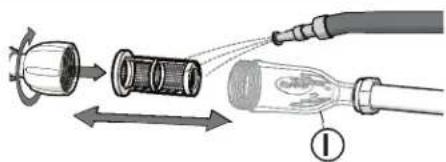
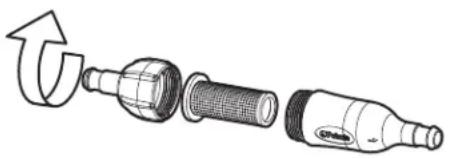
2 Clean the In-Line Filter
To clean the in-line filter screen:
- Remove the filter screen from the assembly, as shown.
- Rinse with clean water.
- Press the filter screen firmly back in place and tighten assembly.
natural_image
Exploded view diagram of a mechanical component showing internal structure and rotation arrow (no text or symbols)3 Storage/Winterizing
NOTE: Never store the cleaner in direct sunlight.
To store the cleaner for the winter:
- Remove cleaner from the pool and drain all water to avoid freezing water damage (freeze damage is not covered under the warranty).
- Remove the UWF from the pool wall using the Quick Disconnect. Use a pulling pressure as you unscrew. If necessary, use the UWF Removal Tool (part #10-102-00) available from any Polaris ^® dealer.
Troubleshooting
| Problem Solution | |
| Cleaner hangs up on steps or other obstacles for longer than 3 minutes. | 1. Check the wheel RPM.2. Verify the back-up valve is cycling.3. Adjust the thrust jet.4. Remove unnecessary pool hardware or install a Ladder Guard Kit (part # G21) from a Polaris® dealer. |
| Cleaner is sluggish, running with less power than normal. | 1. Check the filter screen in the in-line filter and clean, if necessary.2. Clean the skimmer basket, pump basket, and pool filter.3. Check all of the hoses, connections, and swivels for leaks that could cause loss of water pressure.4. Check the wheel RPM. |
| Cleaner flies around the pool and/or does not make contact with the bottom. | 1. Confirm that the blue restrictor disk is installed in the UWF to decrease water flow. Or, install the red restrictor disk to decrease water flow even more.2. Check the wheel RPM. If more than 32 RPM, unscrew the pressure relief valve to decrease water flow to the cleaner. Note: The pressure relief valve should only be adjusted when a restrictor disk is installed.3. Verify the back-up valve is cycling. Hold the valve out of the water and watch the jet. It should come on and go off. |
| Cleaner does not back up. | 1. Verify the back-up valve is cycling.2. Check the wheel RPM.3. If the bag is full, empty it.4. If the head float has water in it, replace it.5. Make sure feed hose is floating. |
| Cleaner only turns in one direction. | 1. Adjust the thrust jet.2. Make sure feed hose is floating. |
| Feed hose becomes tangled. 1. Reme | sure the hose to verify that it is adjusted to the proper length for the pool shape.2. With the cleaner operating, check that the swivels in the hose and the hose connections turn freely.3. Make sure feed hose is floating.4. With the cleaner turned off, spin each of the wheels. All wheels should turn together. |
| Sweep hose is sucked into the vacuum tube. | Make sure the opening at the end of the sweep hose is not blocked by the sweep hose scrubber.Adjust the sweep hose to a gentle sweeping motion. |
| Sweep hose sprays too much water out of the pool. | Verify the TailSweep PRO®is installed correctly.Adjust the speed of the sweep hose by tightening the adjustment screw.Replace the sweep hose scrubber if it is worn or missing.Add a sweep hose weight (part #B2) available through a Polaris®dealer. |
| The cleaner does not clean the entire pool. | Check the hose length reaches within 6” of the farthest point of the pool. If not, order a new hose section from your Polaris dealer.Check thrust jet for straight back position that optimizes random turning.While the cleaner is operating, hold it upside down and look into the vacuum tube. There should be two distinct, even jets of water. If there are not, contact Customer Service or a Polaris dealer for assistance. |
| The cleaner is running in circles on its side. | Check filter bag, if full it can weigh the cleaner down on one side.Remove the head float and shake it. If there is water in the float, order a new one.Check the hose floats to ensure they are spaced evenly. |
CE
Zodiac Pool Systems LLC
2620 Commerce Way, Vista, CA 92081
1.800.822.7933 | polarispool.com
Zodiac Pool Care Europe
Boulevard de la Romanerie -BP 90023
49180 St. Barthelemy d'Anjou cedex FRANCE
zodiac-poolcare.fr
Zodiac Pool Systems Canada, Inc.
2-3365 Mainway, Burlington, ON L7M 1A6
1.800.822.7933 | ZodiacPoolSystems.ca
Zodiac Group Australia PTY, Ltd.
19 Woodpark Rd. Smithfield
NSW, 2164
1300 763 021 | Zodiac.com.au

Polaris® and the 3-wheeled cleaner design are registered trademarks of Zodiac Pool Systems, Inc.
All other trademarks referenced herein are the property of their respective owners.
natural_image
Line drawing of a Polar robotic device with attached cable and wheels (no text or symbols)MANUEL UTILISATEUR
Français
Zodiac Pool Systems LLC
2620 Commerce Way, Vista, CA 92081
1.800.822.7933 | polarispool.com
Zodiac Pool Care Europe
Boulevard de la Romanerie -BP 90023
49180 St. Barthelemy d'Anjou cedex FRANCE
zodiac-poolcare.fr
Zodiac Pool Systems Canada, Inc.
2-3365 Mainway, Burlington, ON L7M 1A6
1.800.822.7933 | ZodiacPoolSystems.ca
Zodiac Group Australia PTY, Ltd.
19 Woodpark Rd. Smithfield
NSW, 2164
1300 763 021 | Zodiac.com.au

AVERTISSEMENT
natural_image
Technical illustration of a threaded pipe fitting with a magnified cross-section view (no text or symbols)3
natural_image
Diagram showing a cable with two connectors and a pair of scissors cutting out (no text or symbols)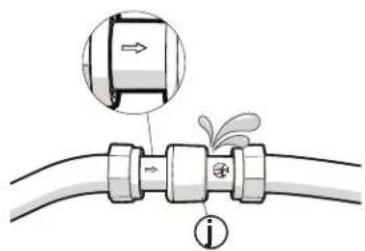
natural_image
Diagram of a mechanical assembly with a bolt and curved pipe, enclosed in a circle (no text or symbols)
natural_image
Simple diagram of a circular object with concentric rings and bidirectional arrows, no text or symbols present.
Tournant

Montée

Maintenance de routine
natural_image
Diagram of a mechanical component with a curved arrow indicating rotation or deformation (no text or symbols present)3 Stockage/hivernage
Zodiac Pool Systems LLC
2620 Commerce Way, Vista, CA 92081
1.800.822.7933 | polarispool.com
Zodiac Pool Care Europe
Boulevard de la Romanerie -BP 90023
49180 St. Barthelemy d'Anjou cedex FRANCE
zodiac-poolcare.fr
Zodiac Pool Systems Canada, Inc.
2-3365 Mainway, Burlington, ON L7M 1A6
1.800.822.7933 | ZodiacPoolSystems.ca
Zodiac Group Australia PTY, Ltd.
19 Woodpark Rd. Smithfield
NSW, 2164
1300 763 021 | Zodiac.com.au

Polaris®
TR28P
natural_image
Line drawing of a Pole robotic device with attached cable and wheels (no text or symbols)MANUAL DEL PROPIETARIO
Español
Zodiac Pool Systems LLC
2620 Commerce Way, Vista, CA 92081
1.800.822.7933 | polarispool.com
Zodiac Pool Systems Canada, Inc.
2-3365 Mainway, Burlington, ON L7M 1A6
1.800.822.7933 | ZodiacPoolSystems.ca
Zodiac Pool Care Europe
Boulevard de la Romanerie -BP 90023
49180 St. Barthelemy d'Anjou cedex FRANCIA
zodiac-poolcare.fr
Zodiac Group Australia PTY, Ltd.
19 Woodpark Rd. Smithfield
NSW, 2164
1300 763 021 | Zodiac.com.au

ADVERTENCIA
natural_image
Technical illustration of a threaded pipe fitting with an arrow indicating direction (no text or symbols present)3
natural_image
Diagram showing a cable with a connector and a pair of scissors cutting through it (no text or symbols)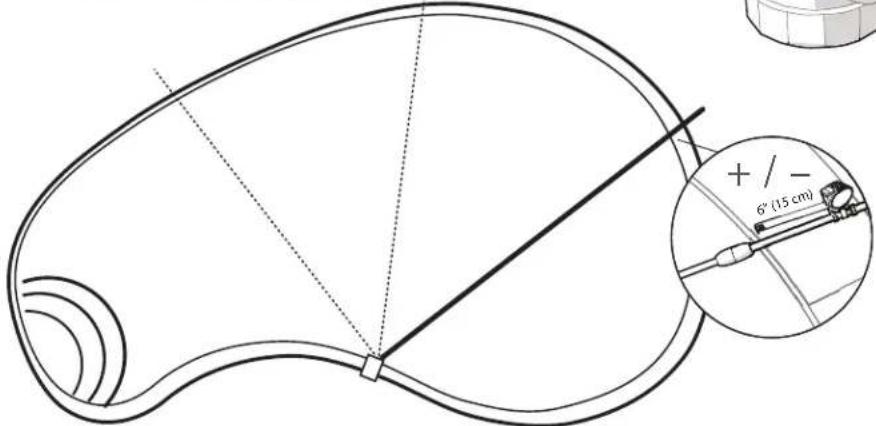
natural_image
Diagram of a mechanical assembly with a bolt and curved components, enclosed in a circle (no text or symbols)
natural_image
Simple diagram of a target with concentric circles and bidirectional arrows, enclosed in a circle (no text or symbols)
Giro

Elevación
natural_image
Exploded view diagram of a mechanical component showing internal parts and an arrow indicating rotation (no text or symbols)Zodiac Pool Systems LLC
2620 Commerce Way, Vista, CA 92081
1.800.822.7933 | polarispool.com
Zodiac Pool Care Europe
Boulevard de la Romanerie -BP 90023
49180 St. Barthelemy d'Anjou cedex FRANCIA
zodiac-poolcare.fr
Zodiac Pool Systems Canada, Inc.
2-3365 Mainway, Burlington, ON L7M 1A6
1.800.822.7933 | ZodiacPoolSystems.ca
Zodiac Group Australia PTY, Ltd.
19 Woodpark Rd. Smithfield
NSW, 2164
1300 763 021 | Zodiac.com.au

- Before You Start: Important Information
- For customer service or support:
- WARNING
- CAUTION
- Installing the Cleaner
- Flush Plumbing Lines
- Install the Universal Wall Fitting (UWF)
- 3
- Adjust Hose Assembly
- 3a. Adjust Leader Hose Length to the Greatest Depth of the Pool
- 3b. Adjust Feed Hose Length to Fit Pool Length
- Hose too long?
- Hose too short?
- 5
- Check for Proper Wheel RPM
- - 32 RPM
- IMPORTANT
- < 28 RPM
- > 32 RPM
- Fine Tuning the Cleaner
- Adjust the Sweep Hose
- Adjust the Thrust Jet
- Routine Maintenance
- Empty the Bag
- Clean the In-Line Filter
- Storage/Winterizing
- Troubleshooting
- CE
- MANUEL UTILISATEUR
- AVERTISSEMENT
- Maintenance de routine
- Stockage/hivernage
- Zodiac Pool Systems LLC
- Zodiac Pool Care Europe
- Zodiac Pool Systems Canada, Inc.
- Zodiac Group Australia PTY, Ltd.
- Polaris®
- TR28P
- MANUAL DEL PROPIETARIO
- ADVERTENCIA
Brand : POLARIS
Model : TR28P
Category : Swimming Pool