USER MANUAL Talkabout T470 MOTOROLA
User Manual of Product 1:
Motorola Solutions T470 Two-Way Radio Black W/Yellow Rechargeable Two Pack
User Manual of Product 2:
Motorola 53724 Remote Speaker Microphone (Black)
TALKABOUT® TWO-WAY RADIO T47X SERIES
en-US fr-CA es-LA pt-BR
natural_image
Two black motorola telephones with yellow and black designs, displaying digital displays (no visible text or symbols on the devices themselves)

MOTOROLA SOLUTIONS
Caution
Before using this radio, read this booklet which contains important operating instructions.
For information on product details, brochures, user manuals and approved accessories. Please refer to www.motorolasolutions.com.
Compliance with RF Exposure Standards
National and international regulations require manufacturers to comply with the RF energy exposure limits for portable two-way radios before they can be marketed. Your Motorola Solutions two-way radio is designed, manufactured, and tested to comply with all applicable national and international regulations for human exposure to radio frequency electromagnetic energy.
For more information on what RF energy exposure is, see the following websites:
- https://www.fcc.gov/
- http://www.who.int/peh-emf/project/en/
-
http://www.ic.gc.ca/eic/site/smt-gst.nsf/eng/sf11467.html
-
http://www.ic.gc.ca/eic/site/smt-gst.nsf/eng/sf01904.html
For additional information, see https://www.motorolasolutions.com/en_us/about/company-overview/corporate-responsibility/governance-and-policies.html
Operating Instructions
- Transmit no more than 50% of the time. To transmit (talk), press the Push-To-Talk (PTT) button. To receive calls, release the PTT button.
- Hold the radio in a vertical position in front of the face with the microphone (and other parts of the radio including the antenna) at least 1 in. (2.5 cm) away from the nose or lips. Antenna should be kept away from the eye.
- When worn on the body, always place the radio in a Motorola Solutions-approved clip, holder, holster, case, or body harness for this product.
- DO NOT hold the antenna when the radio is transmitting.
- DO NOT use any portable radio that has a damaged antenna. If a damaged antenna comes into contact with your skin, a minor burn can result.
- To ensure continued compliance with applicable RF exposure limits, use only Motorola Solutions-approved, supplied or replacement antennas, batteries, and accessories.
- For a list of Motorola Solutions-approved accessories please refer to your user manual or visit www.motorolasolutions.com
Acoustic Safety
Exposure to loud noises from any source for extended periods of time may temporarily or permanently affect your hearing. The louder the volume of the radio, the sooner your hearing will be affected. Hearing damage from loud noise is sometimes undetectable at first, and can have a cumulative effect.
To protect your hearing, follow these precautions:
- Use the lowest volume necessary to do your job.
- Turn up the volume only if you are in noisy surroundings.
- Turn down the volume before putting on a headset or headphones.
- Limit the amount of time you use a headset or headphones at high volume.
- When using the radio without a headset or headphones, do not place the speaker of the radio directly against your ear.
Medical Devices
If you use a personal medical device, such as a pacemaker or hearing aid, consult the manufacturer of your device to determine if it is adequately shielded from RF energy. Your physician may be able to assist you in obtaining this information.
Holsters Incorporating Magnets
Some Motorola Solutions holsters incorporate strong, neodymium magnets. If you use a personal medical device, such as a pacemaker or hearing aid, consult the manufacturer of your device to
determine if it can be used in close proximity to magnets. Your physician may be able to assist you in obtaining this information. Also be aware that magnets can damage other products, including cell phones, computers, hard drives, and other electronic devices, as well as credit cards and magnetic media. Keep the holster away from any mechanical device that could be affected by a magnetic field. Consult the manufacturer of your product to determine if your device or product can be used in close proximity to magnets.
Operational Warnings
The following explains the operational warnings:
For Vehicle With Air Bags

Warning:
• Refer to vehicle manufacturer's manual prior to installation of electronic equipment to avoid interference with air bag wiring.
- DO NOT place a portable radio in the area over an air bag or in the air bag deployment area. Air bags inflate with great force. If a portable radio is placed in the air bag deployment area and the air bag inflates, the radio may be propelled with great force and cause serious injury to occupants of the vehicle.
Potentially Explosive Atmospheres Blasting Caps and Blasting Areas

WARNING
Warning:
- Use of a radio that is not intrinsically safe in a potentially explosive atmosphere could result in a serious injury, or death. You should only use a certified Intrinsically Safe radio in potentially explosive atmospheres.
- Explosive atmospheres refer to hazard classified locations that may contain hazardous gas, vapors, dusts, such as fueling areas below decks on boats, fuel, or chemical transferor storage facilities, and areas where the air contains chemicals or particles such as grain, dust, or metal powders. Areas with potentially explosive atmospheres are often, but not always, posted.
- Turn off your radio prior to entering any area with a potentially explosive atmosphere unless it is a radio type specifically certified for use in hazardous location areas.
- DO NOT remove, install, or charge batteries in such areas, or remove or install antennas. Sparks in a potentially explosive atmosphere can cause an explosion or fire resulting in bodily injury or even death.

WARNING
Warning: To avoid possible interference with blasting operations, turn off your radio when you are near electrical blasting caps, in a blasting area, or in areas posted: "Turn off two-way radio." Obey all signs and instructions.
Batteries
- Charge your battery using the approved Motorola Solutions charger.
- Use the battery in accordance with its water and/or dust Ingress Protection (IP) rating.
• DO NOT discard your battery into a fire.
- DO NOT replace the battery in any area labeled "Hazardous Atmosphere".
- DO NOT disassemble, crush, puncture, shred, or otherwise attempt to change the form of your battery.
- DO NOT dry a wet or damp battery with an appliance or heat source, such as a hair dryer or microwave oven.
- DO NOT allow conductive material such as jewelry, keys, or beaded chains to touch exposed battery terminals.
- Do not dispose of batteries with household waste.
Do Not Substitute Options or Accessories
The Motorola Solutions communications equipment certified as intrinsically safe by the approving agency (FM, UL, CSA, CENELEC) is tested as a complete system which consists of the listed agency approved portable, approved battery, and approved accessories or options, or both. This approved portable and battery combination must be strictly observed.
There must be no substitution of items, even if the substitute has been previously approved with a different Motorola Solutions communications equipment unit. Approved configurations are listed by the approving agency (FM, UL, CSA, CENELEC).
The Intrinsically Safe Approval Label affixed to radio refers to the intrinsically safe classification of that radio product, and the approved batteries that can be used with that system.
The manual PN referenced on the Intrinsically Safe Approval Label identifies the approved accessories and or options that can be used with that portable radio unit.
Using a non-Motorola Solutions-intrinsically safe battery and/or accessory with the Motorola Solutions-approved radio unit will void the intrinsically safe approval of that radio unit.
European Union (EU) Waste of Electrical and Electronic Equipment (WEEE) Directive

The European Union's WEEE directive requires that products sold into EU countries must have the crossed out trash bin label on the product (or the package in some cases). As defined by the WEEE directive, this cross-out trash bin label means that customers and end-users in EU countries should not dispose of electronic and electrical equipment or accessories in household waste. Customers or end-users in EU countries should contact their local equipment supplier representative or service centre for information about the waste collection system in their country.
| FC | Supplier's Declaration of ConformityPer FCC CFR 47 Part 2 Section 2.1077(a)Responsible PartyName: Motorola Solutions, Inc.Address: 500 W Monroe Street,Chicago, IL 60661, U.S.A.Phone Number: 1-800-927-2744Hereby declares that the product:Model Name: T470, T475conforms to the following regulations:FCC Part 15, subpart B, section 15.107(a),15.107(d), and section 15.109(a) |
For a Class B digital device or peripheral, the instructions furnished the user shall include the following or similar statement, placed in a prominent location in the text of the manual:
Note: This equipment has been tested and found to comply with the limits for a Class B digital device, pursuant to part 15 of the FCC Rules. These limits are designed to provide reasonable protection against harmful interference in a residential installation. This equipment generates, uses and can radiate radio frequency energy and, if not installed and used in accordance with the instructions, may cause harmful interference to radio communications. However, there is no guarantee that interference will not occur in a particular installation. If this equipment does cause harmful interference to radio or television reception, which can be determined by turning the equipment off and on, the user is encouraged to try to correct the interference by one or more of the following measures:
- Reorient or relocate the receiving antenna.
- Increase the separation between the equipment and receiver.
- Connect the equipment into an outlet on a circuit different from that to which the receiver is connected.
- Consult the dealer or an experienced radio/TV technician for help.
Notice to Users (FCC and Industry Canada)
This device complies with Part 15 of the FCC rules and Industry Canada's license-exempt RSS's per the following conditions:
- This device may not cause harmful interference.
- This device must accept any interference received, including interference that may cause undesired operation.
- Changes or modifications made to this device, not expressly approved by Motorola Solutions, could void the authority of the user to operate this equipment.
USA (FCC)/CANADA (ISED)
According to FCC Part 95, FRS devices do not require a license. Use of Motorola radio in Canada is subject to the rules and regulations in ISED RSS 210 and do not require a license.
Changes or modifications not expressly approved by Motorola Solutions may void the user authority granted by the FCC or ISED to operate this radio and should not be made. To comply with FCC or ISED requirements, transmitter adjustments should be made only by or under the supervision of a person certified as technically qualified to perform transmitter maintenance and repairs in the private land mobile and fixed services as certified by an organization representative of the user of those services. Replacement of any transmitter component (crystal, semiconductor, etc) not authorized by the FCC or ISED equipment authorization for this radio could violate FCC or ISED rules.
Note: Use of this radio outside the country where it was intended to be distributed is subject to government regulations and may be prohibited
Mexico and Panama
Mexico and the Republic of Panama do not require authorization to use FRS radio equipment frequencies.
Colombia
Operacion itinerante de baja potencia frequency use is subject to CRC Resolución 002190 de 2003. No license is required for use in Colombia. Consult CRC at www.crcom.gov.co for more information.
Brazil
The frequency general use is subject to the Resolution n° 680 and to the Act n° 14448, Item 15 - Radio Communication Equipment of General Use. It is not required use license in Brazil. See the Anatel site for more information: http://www.anatel.gov.br.
USA, Canada, Mexico, and Panama

Brazil and Columbia

Display Screen Guide
USA, Canada, Mexico, and Panama
- Mode
- Channel
- Battery Indicator (3 Battery Levels)
- Weather Alert
- Power (High-Low)
- Status (Transmit/Receive)
- Vibracall [On/Off]
- iVOX [OFF, L1, L2, L3]
VOX [OFF, L1, L2, L3]
-
Keypad Lock
-
Interference Eliminator Code
Number (used for Call Tone) On/Off
OFF/L1/L2/L3 (used for iVOX and VOX)
11.Scan
12.Call Tone [number]
13.Easy Pairing [On/Off]
- Dual Watch [On/Off]
- Keypad Tone [On/Off]
16.Roger Tone [On/Off
- Quiet Charge
Brazil and Columbia
- Channel
- Battery Indicator (3 Battery Levels)
- Status (Transmit/Receive)
- Vibracall [On/Off]
- iVOX [OFF, L1, L2, L3]
VOX [OFF, L1, L2, L3]
-
Keypad Lock
-
Interference Eliminator Code
Number (used for Call Tone) On/Off
OFF/L1/L2/L3 (used for iVOX and VOX)
- Scan
- Call Tone [number]
10.Easy Pairing [On/Off]
- Dual Watch [On/Off]
- Keypad Tone [On/Off]
- Roger Tone [On/Off
Note: The radio screen dims five seconds after the last button is pressed. Radio screen turns off after another five seconds for battery saving purposes, with only LED blinking. Press any button (except Flashlight button) to resume the display.
GETTING STARTED
Weatherproof
This radio is weatherproof to IP-x4 standards. It is splash-proof from any direction. The radio is resistant to water and rain splashes only when the battery cover, headset accessory port, and micro-USB ports are sealed. Open the battery compartment door or headset port cover only when the radio is dry. Use of a headset accessory should be in dry environments only.
The micro-USB adaptor is not weatherproof. Therefore:
• DO NOT expose to rain or snow.
- Charge the radios only in a dry location.
• DO NOT charge wet radios.
Personalization Stickers
16 stickers provided in order to personalize and keep track of the radios. Use permanent marker for the blank stickers.
Installing the Batteries
Discard the retailer tag (loose in one of the battery compartments) before installing the batteries. Each radio can use either one NiMH rechargeable battery pack or three AA alkaline batteries and beeps when the batteries are low.
- Turn the radio off.
- With the back of the radio facing you, push the latch on battery cover to the left to unlock the battery cover.
- For NiMH battery pack, insert the battery pack by following the instruction on the battery pack. Observe the polarity. For AA alkaline batteries, insert the batteries and observe polarity.
- The ribbon should be underneath the battery pack or batteries and must wrap around the right side of the pack or batteries for easy removal.
- Close the battery cover and push the latch to the right to lock the battery cover.
Radio Battery Meter
The number of bars (0–3) on the Radio Battery icon shown indicates the charge remaining in the battery. When the radio battery meter shows one segment left, the radio chirps periodically or after releasing the PTT button (Low Battery Alert).
Battery Capacity Maintenance
- Charge the NiMH batteries once every 3 months when not in use. After longer lapse, the start of charging in radio is delayed and can take up to five minutes.
- Before placing the radio in storage, remove the battery.
- Batteries corrode over time and may cause permanent damage to your radio.
- Store the NiMH batteries in temperature between -20 °C to 35 °C and in low humidity. Avoid damp conditions and corrosive materials.
Using the Micro-USB Charger
The micro-USB charger allows you to conveniently charge your NiMH battery pack.
- Power OFF your radio before you start charging.
- Plug the micro-USB cable into the micro-USB charging port on your radio. Connect the other end of the micro-USB charger to wall power outlet.
- An empty battery is fully charged in 11 hours.
- The battery meter bar scrolls when the battery is charging.
Note:
- When moving between hot and cold temperatures, do not charge the NiMH battery pack until the battery temperature acclimates (usually about 20 minutes).
- For optimal battery life, remove the radio from the charger within 16 hours. Do not store the radio while connected to the charger.
Attaching and Removing the Belt Clip
- Attach the belt clip to the belt clip slot at the back of the radio until the clip clicks in place.
- Attach the belt clip to pocket or belt strap until the clip clicks in place.
To Remove
- Pull the release tab on top of the belt clip to release the latch.
- Push the belt clip with the other hand towards the top of radio.
Turning your Radio On and Off
- To turn your radio ON, turn the rotary knob clockwise.
- In the ON position, the radio chirps and briefly shows all feature icons available on the radio.
- The display screen then shows the current channel, code and all features that are enabled. The radio is now in Two-Way mode.
- To turn your radio OFF, turn the rotary knob counterclockwise.
Setting the Volume
From any mode, to increase volume is by turning the rotary knob clockwise. To decrease volume, turn the rotary knob counterclockwise.
Note: DO NOT hold the radio close to your ear. If the volume is set to an uncomfortable level, it could hurt your ear.
TALKING AND LISTENING
To communicate, all radios in your group must be set to the same channel and Interference Eliminator Code.
- Press and hold the PTT button to talk. When transmitting,
screen displays Tox on and blinks
TWO-WAY
icon. If it is a high power transmission, Hion is displayed. If it is a low power transmission, Lion is displayed. Screen time out except Tx a Hi Lo battery icons. These remains lit until PTT button is released.
-
When you are finished talking, release the PTT button.
-
When receiving, two black and is
Rx
shown. If it is a high power channel, Hi shown. If it is a low power channel, Li shown.
For maximum clarity, hold the radio one inch away from your mouth and speak directly into the microphone. Do not cover the microphone while talking.
Talk Range
Your radio is designed to maximize performance and improve transmission range. Do not use the radios closer than 5 ft apart.
Power Boost
To boost the power of your radio to high power, press the top portion of the PTT button when talking (labeled H). If you know your party is close by, you can conserve the energy of your battery by pushing the lower part of the PTT button to use less power (labeled L).
Note: If you are on an 467 MHz channel (see "Channels and Frequencies") the radio uses low power when either portion of the PTT button is pressed.
Press and hold ☑ Scan/Monitor button for three seconds to enter Monitor mode and listen for weak signals on the current channel. You can also listen to the volume level of the radio when you are not receiving. This allows you to adjust the volume, if necessary.
Push-to-Talk Timeout Timer
To prevent accidental transmissions and save battery life, the radio emits a continuous warning tone and stops transmitting if you press the PTT button for more than 60 continuous seconds.
By pressing Mode button, the user seamlessly switches between two-way and weather mode. When radio is in two-way mode, TWO-WAY shown. When radio is in weather mode,
WEATHER ** is shown. Corresponding setting and information is shown on the display.
flowchart
graph TD
    A["Two-Way Menu"] --> B["Channel (1-22)"]
    B --> C["Interference Eliminator Code (0-121)"]
    C --> D["Call Tone (1-20)"]
    D --> E["Hands Free (iVOX/VOX) (Off, L1,L2,L3)"]
    E --> F["Dual Watch Channel (1-22)"]
    F --> G["VibraCall Alert (On/Off)"]
    G --> H["Keypad Tones (On/Off)"]
    H --> I["Talk Confirmation Tones (On/Off)"]
    I --> J["~Quiet Charge (On/Off)"]
    J --> A
    style A fill:#f9f,stroke:#333
    style J fill:#ccf,stroke:#333
Note: **Applies to US, Canada, Mexico, and Panama countries only.
flowchart
graph TD
    A["Two Way Mode"] -->|Mode Button| B["Weather Mode"]
    B -->|Menu Button| C["Weather Channel (1-11)"]
    C -->|Menu Button| D["Weather Alert (On/Off)"]
    D -->|Menu Button| B
Note: Weather channel broadcasts is available in US and Canada only.
Selecting the Channel
Your radio has 22 channels. The channel is the frequency the radio uses to transmit. (See the "Channels and Frequencies" table on overleaf for details).
- With the radio on, press Menu/Lock button until the channel number starts to flash. When the radio is on a 0.5 W channel, display shows . When the radio is on
a 2 W channel, display shows Hi. The current channel flashes.
- Press or to change the channel. Long press on these keys allows you to scroll through the channels rapidly.
- Press the PTT button to save the channel setting and exit Menu or Menu/Lock button to continue set up.
Selecting the Interference Eliminator Code
Interference Eliminator Codes help minimize interference by blocking transmissions from unknown sources. Your radio has 121 Interference Eliminator Codes. Codes 1–38 are standard analog codes that appear on other FRS radios. Codes 39–121 are additional digital codes added for superior interference protection. 0 is the off position, no analog or digital codes are enabled.
To set the code for a channel:
- Press Menu/Lock button until the code starts to flash.
- Press or to select the code. Long press on these keys allows you to scroll through the codes rapidly.
- Press the PTT button to save the code setting and exit Menu or ☑Menu/Lock button to continue set up.
You can set a different code for each channel using this procedure.
Note: On a radio that uses Interference Eliminator Codes, the code must be set to 0 to communicate with radios that do not have Interference Eliminator Codes. Select 0 for "no tone, no code" on the display of your radio.
Setting and Transmitting Call Tones
Your radio can transmit different call tones to other radios in your group so you can alert them that you want to talk. Your radio has 20 call tones from which to choose.
To set a call tone:
- Press 📄 Menu/Lock until 🔔 appears. The current call tone setting flashes.
- Press or to change and hear the call tone.
- Press the PTT button to set the new call tone and exit Menu or Menu/Lock button to continue set up.
To transmit your call tone to other radios set up to the same channel and Interference Eliminator Code on your radio, and press Call Tone button.
Note: Setting the call tone to 0 disables the call tone feature.
Internal Voice Operated Transmission/Voice Operated Transmission (iv)ox vox
Transmission is initiated by speaking into the microphone of the radio/audio accessory instead of pushing the PTT button.
L3 = High Sensitivity for quiet environments
L2 = Medium Sensitivity for most environments
L1 = Low Sensitivity for noisy environments
- Press Menu until the icon appears on the display. When audio accessory is connected, the VOX icon is shown. The current setting (Off, L1–L3) flashes.
- Press or to select the sensitivity level.
- Press the PTT button to exit menu or Menu to continue set up.
Note: When using iVOX/VOX, there will be a short delay.
Dual Watch Mode
Enables you to scan the current channel and another channel alternately.
To set another channel and start Dual Watch.
-
Press® Menu/Lock2CHtil appears. The 2CH flashes.
-
Press or to select the channel, then press.
- Press or to select the code.
- Press the PTT button or wait until the time out to activate Dual Watch. The screen alternates between Home Channel and Dual Watch Channel.
- To end Dual Watch mode, Press icon.
Note: If you set the same channel and code as current channel, Dual Watch does not work.
VibraCall™ Alert
VibraCall ^TM is a vibrating alert that notifies you that your radio is receiving a message. This is useful in noisy environments. The Vibrate Alert is triggered when you received a call. It is triggered again if there is no activity within 30 seconds after the previous call.
- To turn vibrating alerts on, press Menu/Lock button
until is displayed. The current setting flashes.
- Press or to change the setting to On/Off.
- Press the PTT button to confirm and exit Menu or Menu/Lock button to continue set up.
Keypad Tones
You may enable or disable the speaker key tones. You hear the key tone each time a button is pushed.
- Press Menu/Lock button until appears. The current setting On/Off flashes.
- Press either or to turn On or Off.
- Press the PTT button to confirm and exit Menu or Menu/Lock button to continue set up.
Note: When the keypad tone feature is off, the following are not disabled:
- Transmit timeout alert tone
- Call tone
- Low battery alert tone or
• The transmitted talk confirmation tone
Transmitting a Talk Confirmation Tone
You can set your radio to transmit a unique tone when you finish transmitting. It is like saying "Roger" or "Over" to let others know you are finished talking.
- Press Menu/Lock button until the appears. The current setting On/Off flashes.
- Press or to turn On or Off.
- Press the PTT button to set and exit Menu or continue set up.
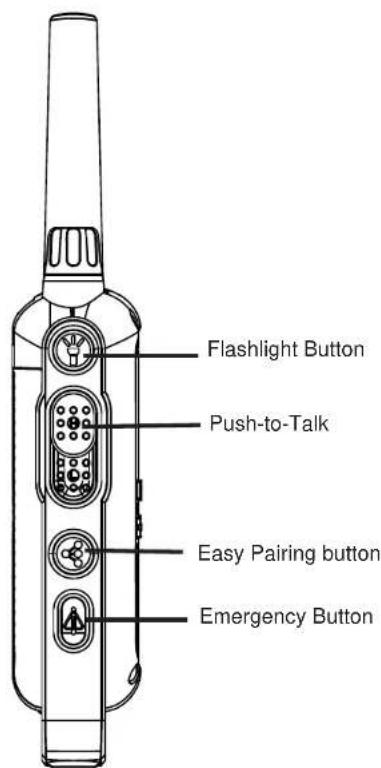
SPECIAL FEATURES Emergency Alert Mode
The Emergency Alert feature can be used to signal members in your group of your need for urgent help. T47X series radios operate in an automatic “hands-free” emergency control mode for a total of 30 seconds after activating the Emergency Alert. T47X series radios in your group automatically advances the speaker volume to the maximum setting and sound a warbling alert tone for 8 seconds. The alert tone is emitted from your own radio speaker and the receiving radios in your group. After the 8 second alert, any spoken words or incidental sounds at your end is transmitted to the group for 22 seconds. For the 30 second duration of Emergency Alert mode, T47X series radio controls and buttons is locked to maximize reception of the emergency message.
- Press and hold the Emergency Alert button for 3 seconds.
- Release the button and the alert tone begins to sound. There is no need to continue to hold the Emergency Alert button or use PTT for your message to be transmitted.
- After the alert tone ends you may speak into the microphone. Your voice or incidental sounds is transmitted.
- After 30 seconds your radio speaker emits a Talk Confirmation Tone. Operation then returns to normal two-way mode.
Note: All Motorola Solutions Talkabout EM, MJ, MR, MT, MU, T400, T500, T600, T800 series radio (except for model T400) are fully compatible with the Emergency Alert feature. Radios other than EM, MJ, MR, MT, MU, T400, T500, T600, T800 series can receive the emergency alert signal, but does not respond with adjusted volume settings, locked controls or a warbling alert tone. Users of other radio models set to the same channel and Interference Eliminator Code hears a steady tone for eight seconds followed by the voice transmission for 22 seconds.
WARNING: The Emergency Alert feature should only be used in the event of an actual emergency. Motorola Solutions is not responsible if there is no response to the emergency alert from the receiving group.
Built-in LED Flashlight
- Press the flashlight button to turn the light ON.
- Press the flashlight button again to turn the light OFF.
Note: Turn off the flashlight when not in use to conserve battery power.
Keypad Lock
To avoid accidentally changing your radio settings:
- Press and hold Menu/Lock button until displays.
- When in lock mode, you can turn the radio ON and OFF, adjust the volume, receive, transmit, send a call tone, send Emergency Alert, turn the LED flashlight ON and OFF, and monitor channels. All other functions are locked.
- To unlock the radio, press and hold Menu/Lock button until ☑s no longer displayed.
Easy Pairing
The Easy Pairing feature allows a group of radio users to program all their radios to the same Channel and Interference Eliminator Code settings quickly and simultaneously. Any one radio within the group can be designated as the “Leader’s radio” and have it’s Channel and Interference Eliminator Code settings transmitted to and copied by all the other radios in the group (Members’ radios).
- Pick any one of the radios as the "Leader's radio". On this radio, program the Channel and Interference Eliminator Code to the desired settings.(See "Selecting the Channel" and "Selecting the Interference Eliminator Code" sections in this user manual).
- To copy the channel and Interference Eliminator Code combination to all the other "Members' radios", press and hold the button on the Members' radios until you hear a beep. Release the button after the beep, and wait for the transmission from the Leader's radio.
Note:
- The icon blinks on the display. This confirms that the radio is in Easy Pairing mode waiting to receive the Channel and Interference Eliminator Code settings from the Leader's radio. All Members' radios remains in this mode for 3 minutes.
- A group with many radios should have all users take this step at the same time, so all radios can be programmed in one go.
- On the Leader's radio, press and hold down the button until you hear a double beep.
Note:
- At the double beep, this radio's Channel and Interference Eliminator Code settings is transmitted, which is received and copied by all the other (Members') radios.
- The Leader's radio must make this transmission when all the Members' radios are still in the Easy Pairing mode, otherwise the transmission is not picked up.
- On the Leader's radio, user must remember NOT to release the button on the first (single) beep, otherwise this radio becomes another Member's radio. If that happens, you can press PTT to escape, and retry step 3.
Scanning Channels
Use scan to search all channels for transmissions from unknown parties, to find someone in your group who has accidentally changed channels or to quickly find unused channels for your own use.
There is a priority feature and two modes of scanning (basic and advanced) to make your search more effective. The Basic Scan mode uses the channel and code combinations for each of the channels as you have set them (or with the default code value of 1). The “Advanced Scan” mode scans all channels for any and all codes, detect any code in use and use that code value temporarily for that channel.
Priority is given to the “home channel”, that is, the channel (and Interference Eliminator Code) your radio is set to when you start the scan. This means the initial channel (and code settings) is scanned more often than the other channels and your radio responds quickly to any activity occurring on the home channel as a priority.
To start Basic Scanning:
- Briefly press the Scan/Monitor button. The scan
Z appears in the display and the radio begins to scroll through the channel and code combinations.
-
When the radio detects channel activity matching the channel and code combination, it stops scrolling and you can hear the transmission.
-
To respond and talk to the person transmitting, press the PTT button within five seconds after the end of the transmission.
- The radio resumes scrolling through the channels 5 seconds after the end of any received activity.
- To stop scanning, briefly press the Scan/Monitor button.
To start Advanced Scanning:
-
Set the Interference Eliminator Code to "zero" or OFF.
-
Briefly press the Scan/Monitor button. The scan Z appears in the display and the radio begins to scroll through the channels. No Interference Eliminator Codes filters what is heard.
-
When the radio detects channel activity with ANY code (or NO code), it stops scrolling and you can hear the transmission. Any Interference Eliminator Code that may be in use by that party is detected and displayed.
-
To respond and talk to the person transmitting, press the PTT button within 5 seconds of the end of the transmission. The radio transmits using the newly detected Interference Eliminator Code.
-
The radio resumes scrolling through the channels 5 seconds after the end of any received activity.
-
To stop scanning, briefly press the Scan/Monitor button.
Scanning Notes:
- If you press the PTT button while the radio is scrolling through inactive channels, the transmission is on the "home channel". Scanning resumes five seconds after the end of your transmission. You may press the

Scan/Monitor button to stop scanning at any time.
- If the radio stops on an undesired transmission, you may immediately resume the scan by briefly pressing or □.
- If the radio repeatedly stops on an undesired transmission, you may temporarily remove that channel from the scan list by pressing and holding for 3 seconds. You may remove more than one channel in this way.
- To restore the removed channel(s) to the scan list, turn the radio off and then turn back on, or exit and re-enter the scanning mode by pressing Scan/Monitor button.
- You cannot remove the home channel from the scan list.
- In Advanced Scan, the detected code is only used for one transmission. You must note that code, exit scan and set that detected code on that channel to permanently use the detected code.
WEATHER RECEIVER
Your radio can tune in to broadcasts by the United States National Oceanic and Atmospheric Administration (NOAA) Weather Radio and Environment and Climate Change Canada (ECCC)
Weather Radio. You can listen to a weather channel (see "Weather Channels and Frequencies" table for details) or set your radio to alert you to emergency weather broadcasts that interrupt routine broadcasts. When you listen to a weather channel, you cannot use your radio in scan mode or for two-way communications.
Both NOAA and ECCC have transmitters located throughout the United States and Canada, respectively. These transmitters broadcast watches, forecasts, and other information 24 hours a day.
Note: NOAA weather radio stations are assigned to cover specific areas and service may be limited. Please check with your local weather office for frequency and details or visit www.weather.gov/nwr in the US to view the appropriate transmitter for your area. The use of the NOAA logo does not provide an endorsement or implied endorsement by the National Weather Service of NOAA, nor does the use of the Weather Radio logo provide an endorsement or implied endorsement by Environment and Climate Change Canada (ECCC).
Entering Weather Mode
- From two-way mode, press Mode button to enter weather mode WEATHER
Setting the Weather Channel
Your radio receives weather frequencies:
- In weather mode, press Menu/Lock button until weather channel number flashes.
- Press or to select the appropriate channel with good reception in your area.
- Press the PTT button to set and exit Menu or Menu/Lock button to continue set up weather alert.
Setting the Weather Alert
Your radio can be set to respond to NOAA Weather Radio emergency messages. A special alarm tone sounds an alert and turns on the weather receiver to give you immediate weather and emergency information.
- In weather mode press Menu/Lock button twice until ! displays.
- Press or to-select On/Off.
- Press the PTT button or ☑ Menu/Lock button to exit the weather menu set up.
- Press Ⓞ Mode button to return to two-way mode. If you activate Weather Alert and return to two-way mode != ! is display.
Note: When the weather channel is activated, either manually or after receiving an alert, and no buttons are pressed for 5 minutes, the weather mode automatically revert to two-way mode.
As with two-way radio reception, weather channel reception depends on how close you are to a transmitter and whether you are indoors or outdoors. Because weather channels are transmitted without codes, they may contain static or noise. Weather Alert does not function while actively transmitting or receiving in two-way mode.
Quiet Charge
In order to ensure that your radio is always charged and on alert, we recommend that you leave the radio plugged in and turned on. The Quiet Charge feature allows you to disable the reception from regular two-way calls while still receiving weather alerts and receive and transmit emergency alerts. To activate quiet charge:
- Press 9 times until appears on the display. The current setting will flash.
- Press or to select On or Off.
- Press the PTT button or to se t.
Weather Channels and Frequencies
| Weather Channel | Frequency (MHz) | Weather Channel | Frequency (MHz) |
| WX1 162.550 WX7 162.525 | |
| WX2 162.400 WX8 161.650 | |
| WX3 162.475 WX9 161.775 | |
| WX4 162.425 WX10 161.750 | |
| WX5 162.450 WX11 162.000 | |
| WX6 162.500 | | |
CHANNELS AND FREQUENCIES
This FRS device is approved for USA and Canada. USA, Canada, Mexico, and Panama.
| Channel | Frequency (MHz) | Max Power Output | Channel | Frequency (MHz) | Max Power Output |
| 1 462. | 5625 2 W 12 | 467.6625 | 0.5 W | | |
| 2 462. | 5875 2 W 13 | 467.6875 | 0.5 W | | |
| 3 462. | 6125 2 W 14 | 467.7125 | 0.5 W | | |
| 4 462. | 6375 2 W 15 | 462.5500 | 2 W | | |
| 5 462. | 6625 2 W 16 | 462.5750 | 2 W | | |
| 6 462. | 6875 2 W 17 | 462.6000 | 2 W | | |
| 7 462. | 7125 2 W 18 | 462.6250 | 2 W | | |
| 8 467. | 5625 0.5 W | 19 462.6500 2 W | |
| 9 467. | 5875 0.5 W | 20 462.6750 2 W | |
| 10 | 467.6125 0 | 5 W | 21 462.7000 2 W | |
| 11 | 467.6375 0 | 5 W | 22 462.7250 2 W | |
Remark: Power refers to maximum allowable power as defined by FCC/ISED for each channel under FRS rules for USA and FRS/GMRS for Canada and is not a reflection of the power specification of the radio.
Brazil Columbia
| Channel | Frequency (MHz) | Channel | Frequency (MHz) |
| 1 462.5625 | 14 467.5625 | | |
| 2 462.5750 | 15 467.5750 | | |
| 3 462.5875 | 16 467.5875 | | |
| 4 462.6000 | 17 467.6000 | | |
| 5 462.6125 | 18 467.6125 | | |
| 6 462.6250 | 19 467.6250 | | |
| 7 462.6375 | 20 467.6375 | | |
| 8 462.6500 | 21 467.6500 | | |
| 9 462.6625 | 22 467.6625 | | |
| 10 462.6750 | 23 467.6750 | | |
| 11 462.6875 | 24 467.6875 | | |
| 12 462.7000 | 25 467.7000 | | |
| 13 462.7125 | 26 467.7125 | | |
| Channel | Frequency (MHz) | Channel | Frequency (MHz) |
| 1 462.5625 | 10 467.6125 | | |
| 2 462.5875 | 11 467.6375 | | |
| 3 462.6125 | 12 467.6625 | | |
| 4 462.6375 | 13 467.6875 | | |
| 5 462.6625 | 14 467.7125 | | |
| 6 462.6875 | 15 467.7625 | | |
| 7 462.7125 | 16 467.8125 | | |
| 8 467.5625 | 17 467.8375 | | |
| 9 467.5875 | 18 467.9125 | | |
ACCESSORIES
For more information on convenient power, carry and audio accessories to optimize your Talkabout Two-Way Radios, visit www.motorolasolutions.com/talkaboutaccessories.
WARRANTY
Consumer Two-Way Radio Products and Accessories purchased in the United States, Canada, Mexico, Panama, Brazil, and Columbia
What Does this Warranty Cover?
Subject to the exclusions contained below, Motorola Solutions, Inc. (“Motorola”) warrants the Motorola branded consumer two-way radios that operate via Family Radio Service or General Mobile Radio Service (“Products”), the Motorola branded or certified accessories sold for use with these Products (“Accessories”) to be free from defects in materials and workmanship under normal consumer usage for the period(s) outlined below. This limited warranty is the exclusive remedy of a consumer, and applies as follows to new Products and Accessories and purchased by consumers in the USA, Canada, Mexico, Panama, Brazil, and Columbia, which are accompanied by this written warranty:
Who is Covered?
This warranty extends only to the first consumer purchaser, and is not transferable.
What will MOTOROLA SOLUTIONS, INC. do?
Motorola Solutions, Inc., at its option, will at no charge repair, replace or refund the purchase price of any Products or
Accessories that do not conform to this warranty. We may use functionally equivalent reconditioned/refurbished/pre-owned or new Products or Accessories.
What Other Limitations Are There?
Any Implied Warranties, Including Without Limitation. The implied warranties of merchantability and fitness for a particular purpose, shall be limited to the duration of this limited warranty, otherwise the repair, replacement, or refund as provided under this express limited warranty is the exclusive remedy of the consumers, and is provided in lieu of all other warranties, express or implied.
In no event shall Motorola Solutions be liable, whether in contract or tort (including negligence) for damages in excess of the purchase price of the product or accessory, or for any indirect, incidental, special or consequential damages of any kind, or loss of revenue or profits, loss of business, loss of information or other financial loss arising out of or in connection with the ability or inability to use the products or accessories to the full extent these damages may be disclaimed by law.
Some states and jurisdictions do not allow the limitation or exclusion of incidental or consequential damages, or limitation on the length of an implied warranty, so the above limitations or exclusions may not apply to you. This warranty gives you specific legal rights, and you may also have other rights that vary from state to state or from one jurisdiction to another.
USA, Canada, Mexico, and Panama
| Products Covered Length Of Coverage |
| Products and Accessoriesas defined above,unless otherwise provided for below. | Two (2) years from the date of purchase by the first consumer purchaser of the product unless otherwise provided for below. |
| Products and Accessoriesthat are repaired or replaced. | The balance of the original warranty or for ninety (90) days from the date returned to the consumer, whichever is longer. |
Brazil and Columbia
| Products Covered Length Of Coverage |
| Products and Accessoriesas defined above,unless otherwise provided for below. | One (1) year from the date of purchase by the first consumer purchaser of the product unless otherwise provided for below. |
| Batteries whose fully charged capacity falls below 80 % of their rated capacity and batteries that leak. |
| Products and Accessoriesthat are repaired or replaced. | The balance of the original warranty or for ninety (90) days from the date returned to the consumer, whichever is longer. |
Exclusions From Warranty Coverage
Products Covered
Normal Wear and Tear:
Periodic maintenance, repair and replacement of Products or Accessories due to normal wear and tear.
Abuse & Misuse:
Defects or damage that result from: (a) improper operation, storage, misuse or abuse, accident or neglect, such as physical damage (cracks, scratches, etc.) to the surface of the Products and Accessories resulting from misuse; (b) contact with liquid, water, rain, extreme humidity or heavy perspiration, sand, dirt or the like, extreme heat, or food; (c) use of the Products or Accessories for commercial purposes or subjecting the Product or Accessory to abnormal usage or conditions; or (d) other acts which are not the fault of Motorola Solutions.
Use of Non-Motorola Solutions branded Products and Accessories:
Defects or damage that result from the use of Non-Motorola Solutions branded or certified products, accessories, software or other peripheral equipment.
Exclusions From Warranty Coverage
Products Covered
Unauthorized Service or Modification:
Defects or damages resulting from service, testing, adjustment, installation, maintenance, alteration, or modification in any way by someone other than Motorola Solutions or its authorized service centers.
Altered Products:
Products or Accessories with (a) serial numbers or date tags that have been removed, altered or obliterated; (b) broken seals or that show evidence of tampering; (c) mismatched board serial numbers; or (d) nonconforming or non-Motorola Solutions branded housings, or parts.
Communication Services:
Defects, damages, or the failure of Products or Accessories due to any communication service or signal you may subscribe to or use with the Products or Accessories.
To obtain service or information, please call
USA and Canada Two-Way Radios
1-800-448-6686.
www.motorolasolutions.com/talkabout
Latin America
Toll free:
Mexico 001-855-241-8253
Panama 001-800-205-3867
Brazil 0800-168272
Colombia 01-800-710-2285
Toll or long distance:
Spanish +1 630-203-5826
Portuguese +001.312.725.5373
English +1 630-203-5824
Brazil + 55 11 3525-3055 and 3056
For Accessories:
Please call the telephone number designated above for the Product with which they are used.
You will receive instructions on how to ship the Products or Accessories at your expense, to
Motorola Solutions or a Motorola Solutions
Authorized Repair Center. To obtain service, you must include: (a) a copy of your receipt, bill of sale
or other comparable proof of purchase; (b) a written description of the problem; (c) the name of your service provider, if applicable; (d) the name and location of the installation facility (if applicable) and, most importantly; (e) your address and telephone number.

https://www.facebook.com/MotorolaTalkaboutWalkieTalkies

http://bit.ly/Talkabout

www.motorolasolutions.com/talkabout

www.motorolasolutions.com/talkabout/pt (Portuguese)

www.motorolasolutions.com/talkabout/es (Spanish)
RENSEIGNEMENTS GÉNÉRAUX ET DE SÉCURITÉ
Mise en garde
- https://www.fcc.gov/
- http://www.who.int/peh-emf/project/en/
- http://www.ic.gc.ca/eic/site/smt-gst.nsf/eng/sf11467.html
- http://www.ic.gc.ca/eic/site/smt-gst.nsf/eng/sf01904.html
Pour en savoir plus, voir
https://www.motorolasolutions.com/en_us/about/company-overview/corporate-responsibility/governance-and-policies.html
www.motorolasolutions.com/talkabout
Amérique latine
Numéro sans frais :
http://bit.ly/Talkabout

www.motorolasolutions.com/talkabout

www.motorolasolutions.com/talkabout/pt (portugais)

www.motorolasolutions.com/talkabout/es (espagnol)
- https://www.fcc.gov/
- http://www.who.int/peh-emf/project/en/
- http://www.ic.gc.ca/eic/site/smt-gst.nsf/eng/sf11467.html
- http://www.ic.gc.ca/eic/site/smt-gst.nsf/eng/sf01904.html
Para obtener información adicional, consulte https://www.motorolasolutions.com/en_us/about/company-overview/corporate-responsibility/governance-and-policies.html
www.motorolasolutions.com/talkabout
Latinoamérica
http://bit.ly/Talkabout

www.motorolasolutions.com/talkabout

- https://www.fcc.gov/
- http://www.who.int/peh-emf/project/en/
- http://www.ic.gc.ca/eic/site/smt-gst.nsf/eng/sf11467.html
- http://www.ic.gc.ca/eic/site/smt-gst.nsf/eng/sf01904.html
Para obter informações adicionais, consulte https://www.motorolasolutions.com/en_us/about/company-overview/corporate-responsibility/governance-and-policies.html
| Canal de Meteorologia | Frequência (MHz) | Canal de Meteorologia | Frequência (MHz) |
| WX1 162,550 WX7 162,525 | | | |
| WX2 162,400 WX8 161,650 | | | |
| WX3 162,475 WX9 161,775 | | | |
| WX4 162,425 WX10 161,750 | | | |
| WX5 162,450 WX11 162,000 | | | |
| WX6 162,500 | | | |
CANAIS E FREQUÊNCIAS
www.motorolasolutions.com/talkabout
América Latina
Ligação gratuita:
http://bit.ly/Talkabout

www.motorolasolutions.com/talkabout

MOTOROLA, MOTO, MOTOROLA SOLUTIONS and the Stylized M logo are trademarks or registered trademarks of Motorola Trademark Holdings, LLC and are used under license. All other trademarks are the property of their respective owners. © 2020 Motorola Solutions, Inc. All rights reserved.
Printed in
*MN006333A01*
MN006333A01-AA


MOTOROLA TALKABOUT
Two-Way Radio
User's Guide
KEM-PK14190-67
EM1000 Series
For further information, you may call Kansas at 1420-822-5115 U.S. and Canada or e-mail us at gndtni@callcenter.com or yet us on the internet at www.malena.com.
Important Information on Safe and Efficient Operation
The information provided in this document suppresses the general safety information in user guides published prior to December 1, 2009.
Your two-way ratio contains a characteristic and a measure. To turn your exposure and ensure compliance with the general population uncontrolled environment, persons limits, always adequate to the following procedure:
• Transit no more than 10% of the dns.
• To escape cars, please the FIT today.
• To suspend it up, press the Bush to Talk (FIT) humor.
Transmitting 10% of the time, or less, is important because the current generation measurable in energy sources only when transmitting in some of measuring exudates compared
Exposure to Radio Frequency Energy
your friction a two-way ratio compares with the following e-ening exposure standards and guidelines:
- United States Federal Communications Commission, Costa of Federal Regulations, 40CFR part 2 sub-part J.
• American National Standards Institute (AMSI) Institute of
• Institute of Haringey and Haimarox Enterprises (H1)
7-1983 Edition
• International Commission on Non-burden Radiation Protection (JCN011 1988)
• Ministry of Health (Canada) Safety, Canada, UK, and Ireland
Frequency Range (mm 3 GHz in 101 GHz, 1980)
• Acrahan Cerechenne Arthely Debeturierung
Electropologie Ration, Hoge Forderl. 500
• ANATEL ANHEK to Resolution No. 203 of July 2, 2002 *Regulatio
Intrust of exposure to electrical highpass and electric-tight filters in the radio frequency range between 3 KHz and 3005H
"Attachment to resolution +303 from July 2, 2012".
in a broad opinion rate, particularly and their first market equations is also in frequency during diagnosis using a wider the guidelines set forth in the above standards, always adher to the following procedures.
Periodic Radio Operation and EME Exposure
Amento Cato
use only, the supply of a 100% reduced unit. Unauthorized antennas, modifications, or attachments said
damage the radio and may violate FCC regulations.
On 2011, the universe when the ratio is "IN USL." Holding its universe affects its effective range.
Body-Strain Operation
In terms of compliance with ICD's health Canada II, the course guidelines. If you wear a radio on your body when transferring times place the radio in a Matinee-supplier or appraised the reader, inside, made in body; henceas in this product. Use of the Matinee-approved accelerometer may store ICD with Canada II, the course guidelines:
If you do not use one of the Motorola-supplied or approved body with accessories and are not using the radio bed in the normal position, ensure the radio and its antenna are at least 1 inch (cm) from your body when transmitting.
Dana Osten
If applicable, when using any data feature of the radio with or without an accessory code position the radio and its intense least one inch 12.5 cm from the body.
Approved Accessories
For a trial approval of the biologic arthroscopic, and for Web site at www.rsc.edu.com.
Electromagnetic Interferonics/Compatibility
Note: mostly mainly described studies to be identified in electromagnetic interference (EMC) if independently observed, disposal or otherwise contraplan by electromagnetic conductivity. This device complies with Part 15 of the FCD Rules. Operation is subject to its following two iterations
-
This device may not cause harmful interference; and
-
The risks of the first issue by the third issue, being, precedence that any cause underestimation.
Facilities
To avoid electromagnetic interference and/or compatibility conflicts, turn all your rates in any facility where opened notices, instruct you to do so. Hospitals or health care facilities may be using equipment that is sensitive to overall life energy.
Aircraft
When instructed to do so, turn off your radio when onboard an aircraft. Any use of a radio must be in accordance with applicable regulations for airline crew instructions.
Medical Devices - Protocols
The Advanced Medical Technology Association recommends that a minimum supervision of 8 inches (15 cm) is maintained between a handheld wireless radio and a preconductor. These recommendations are consistent with the independent resource by and
recommendations of the U.S. Food and Drug Administration
People with passengers who
• ALWAYS keep the radio more than 1 times (5 cm) from their
response when the radio is around 2%
√ Not carry the radio in the travel aircraft
- Use the net article the December in November the practice for interference.
• Tam the radio OFF immediately if there is any reason to suppose
but hangerer's ring pass
Medical Devices — Building Note
Some distal devices are may expandable with new hardware and
In the event of such interference, you may sort in total your
Medical Practice - 10th
If you use any other personal medical device, consult the
translarchet of your centres in deliberately ill is adequately shielded from EF energy. Your physician may be able to assist your missing tax information.
Safety and General Use While Driving
Check the boys and regulators beginning the time of crisis in the area where you drive, and always they then. If you do use your ratio while trying, please:
• Cie: It's attention to driving and to the road.
- Use hands free operation. If available.
• Will let the land and place before missing it, allowing a land in many conditions so returns.
The use of a two-way mode while engaged in activities requiring transportation may cause distraction or otherwise impair your ability to safely participate in such activities. Always use vehicle safety.
If not place a private rate in the area most or air bag or in air bag detachment area. Air bags release with great force. It is a private ratio to place in the air bag equivalent area and the air bag influence, the ratio may be projected with great waste and waste per unit quantity in accordance of the vehicle.
Potentially Epichia Atmospheres
Turn off your radio prior to viewing any area with a potentially
excessive atmospheric. Only skin types that are necessarily qualified
should be used in such areas as "intrinsically Saws." Do not want
install or change biosensor in such areas. Sports in a potentially
excessive atmospheric can cause an exposure of the resulting in
intrinsic airway or water sources
Note: The areas with potentially applicable atmosphere formed in these include: flange areas such as below dcaca or buta, had an otentional transfer or storage facilities, areas where the air contains chemicals or particles (such as grain, dust or mineral particles) and any other area where you would normally be advised to turn off by vehicle engine. Areas with potentially excessive atmospheres are often but not always scored.
Illuding Esp. and Grace
To have possible multivariate with heating specifiers, but all the ratio when you are now electrical cooling cap, in a cooling and g in areas heated "Tum of two-way ratios." Once all signs and precursors.
Operational Curions
Архозра
Do not use any portable radio that has a damaged antenna, damaged antenna comes into contact with your skin, a minor bum can result.
Butarica
All illnesses can cause significant damage to the injury injury with trauma if a conductive material. The jewelry, keys or loaded chairs touch exposed terminals. The conductive material may complete an electrical circuit (short circuit) and become quite hot. Exercise can handling any charged batteries, particularly when piping it inside a packet, pulse or other container with metal objects.
Excessive cells when controlling NMD or AD is possible. Do not use sharp or conductive leads to neurons either of these batteries.
Battery Charge Safety Instructions
-
Its own version the act
-
Do not operate or disassemble the charger if it has received a sharp blow, or has been dropped or damaged in any way.
- ping out and it the strike, has its proper strike controlled by a qualified electricity. An proper candidate nor meet in a risk of another share.
-
To reduce the risk of damage to the card or plug, pull the plug rather than the card when disconcealing the charger from the AC monitoring.
-
To reduce the risk of electric shock, unplug the charger from the solid below voltage and resistance on electrons
-
Also of an electrical not recommended or said by Wauwola may result in a risk of fire, electric shock or personal injury.
T. Make sure the cord is located at it will not be stopped or, trapped over or subjected to damage or stress
-
An solution and acetate not to read or cross almost necessary. Use of an improper concentration and could react in a net of a free water substance. If an excess gas must be used, make sure that
• The pins on the plug of the extension card are the same number, pin and share as three or the pin at the charge.
• The solution used in properly seen and in grad electrical
• The tolerance cord area is 18 AWD for lengths up to 100 feet, and 16 AWD for lengths up to 150 feet.
- The supply need of the AG adapter cannot be replaced. If the root is damaged, call customer service or 1-000-628-5119 (IL5 and Canada) to be rated as at public/Wazakhstan.com.
Your Motrolo radio operates or General Motle Radio Service (GMRS) frequencies and is subject to the Order and Registry of the General Communications Commission (GIC). The IEC requires that all speakers using GMRS frequency burn a mini feature induce operating four appropriate. In order the IEC turns, please recall from 805 and 158, which includes all of the forms and instructions you will meet.
If you wish to have the document faced or made, or if you have questions, please use the following contact information:
| For a fax:Contact theFax in-Domnardsystem | For mail service:Call the FCCFarms Hotline | If you havequestions aboutthe FCC License:Call the FCC |
| 1 502 418 0177 | 1 603 418 FORM(3675) | 1 665 CALL FCC(225 3822) |
You may also wish the FCD's Web she at www.foogov
Charges or mathematics not expressly signed by Rhizma may refer the area's authority granted to the FEE in operation this article should not be made. In namely with FEE requirements,
transmitter adjustment should be made only by or under the
supervision of a person certified as technically qualified to perform
transmitter maintenance and reports in the private land mode and
the source as certified by an implementation representative of the
user of those services. Replacement of any transformer component,
corporal, semi-consumer, and not authorized by the FCD equipment
authorization for this radio could violate FCD rules
Control Buttons
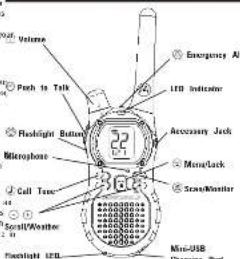
Display Screen Guide
(1)

Battery, Meter
2.501
^16 – Channel Power
Indicator: Jose, Manu
- Callone,
Options
(1)
2.17
C _100 = Weather Alert
(1)
VOX-Hands-Free Us
) - Talk Co
Without
[Table_Title]
Access to
T - Noise Filtering
VOX - Hands-Free Use
N - On/Off for each
WITH ACCESSORIES
FF feature
Getting Started
Installing the Batteries
each radio can not either a still, nonheuristic battery park or 64 alkaline batteries and beeps when the batteries are low.
Installing NIMH Rechargeable Battery Pack (Optional Aces)
7 With the back of the radio facing you, 8th the battery cover
- The place the close
a native the battery pack that the outer plastic tap had not disassemble or armbag the battery pool.
- Insert the XIMH battery pack with the diagram facing you.
A dislocated the hereby law and which shall it be required to take place in the office of the United States.
nishing the three
2 With the book of the radio facing you, it's the battery cover
- 3rd 'HOTCH' THE CHERN
a train line with AS, train battery (mV) - 400 - phe
- Reposition the battery level and press down to secure.
Radio Battery Metra
The ratio lather, one shows the utility thing level, can be
rude chips periodically or after re-easing Low Battery Alerti.
Removing the NIMH Battery Pack (Optional Accessory)
- 12-13
2 with the foot of the radio calling you at the today's touch, remove the hallery crest and permars the crest.
-
Ranze the 3000 battery pack by pulling the climate change
-
Descriptive
-
Reposition the battery cover and gross down to store.
-
Two the series of
2 With the best of the radio facing you, it: the lottery latch
release the library owner and owner in order.
-
Eddy noreous each battery by moving each battery on intrahallose. Range
-
Reposition the battery cover and press down to secure
• Incentive care when patients NYL are 55 patients. On the next Monilar, Dallas
sharp or convective hole is necessary either of these batteries.
+ Remove the batteries before stating your radio for extended
permanent damage to your radio
Using the Battery Charger (Optional Accessory)
The gallery charge provides 2023-11 charging stationery for 2500 hours. The car can be charged to the 2500 hours, such as
task or varchenzls. Change the NMI battery overnight (at least 1
trusted helices using it for the two turns. Other, extra helices is also clavely within 12 hours.
-
Follow the steps above to install a MHH Battery Park
-
Pay in AC price upside and on the pick in the new store
-
Puq in AC power supply on a standard wall outlet.
4 With a radio facing forward, slice it into one of the charging packets.
- When changing in the battery charger, the red light on the
Change has all give preliminary
Using the mini-USB Charging Connector
The half-osis charging coefficient is a low, free that shows the contemporary ocean view. High barous root. This is an abatement
to charging your Rable battery pack in the Battery Charger dark
earn help in Mr. van Arquhar and
vale trawins.
Available min USB charging options, topical accessories)
nals. For more information, still our 'Ais' are a
www.mirich.com or shop@minim.com
-
Pay your own-able calls to change into a power source as appropriate for your accessors.
-
Put the cable into the mini-USB port of the bottom of your radiopolarization. Carry cables can you put quickly on a route you
-
An empty battery will be fully charged in 14 hours.
-
The LED indicator light on the radio will glow to indicate that
0.5% is 0.2%
• The right and men can refer to the BAKU laboratory pack x July
changer
• which moving between hot and cold temperatures, do not view the 254H before and until the latest condition
ascrimotes usually about 20 minutes
• For optimal battery life, remove the radio from the charger with
In this, the Area of Health and Health Services is the only
• Mr. Kuhn de Vase: #inging.
Maching all removing the Box Clip
1. Attach zelt ein sport or half sirt
- Olm the bed zip pad with line holes in the back at the nadu
a body push and the circles in place
The
-
Push down to the telephone box at the hot of the hot clip m
-
But the best way
-
For the 20th quarter, the 20th quarter ended February 30, 2017.
The English text in the right section is to be
turn the radio of.
- In the ON post
Icons available of the ratio.
al features that are achieved
Bottom the Volume
Press and held for three seconds while rotating until you
reach a comfortable listening level
-
He/she downloads to increase the white
-
Raise qinter-clockwise to decrease the scale.
Do not hold the radio close to your air. If the volume is set to a reasonable level, it could just have any
Talking and Listening
I radio is your good mail
that is the interests of interest close
to tax, it's all to go
- When you are involved taking place
Far maximum curly, had the mid-to-two to three inches away from one or two and one directly into the mountains. For all years
the atmosphere while taking
Your nalo is designed to restrict performance and improve
Monitoring: Single 20-10-36. The following table includes a list of 10 items and a list of 10 items.
Pressing and talking for three seconds allows you to listen to
the culture level of the rectum when you are not necessary. The skin
clock for safety in the current channel before set back.
Push in Talk Tinsal Times
To prevent accidental enclosures and new battery file, the role
(1) 30 continued annu
Seising the Channel
- 1960 list 22 channels: channels 1-14 for 3-5 and 6-7 all other channels org GAKRS. See the 'Diagnostics and Frequencies'
table on exterior for detail.
- With an index x , since 12 when the value is set to 0.5
won on track displays. When the radio is on a 15 mms
-
Press to-ara aged at United or later church
-
Press & State the channel scope of 1.20 cm/s to 3.41 sp.
Selection: The instrument, Utilities Code
Inferencio Eminatar Cofes tela minima i
blocking transmissions from uniziner sources. Your radio has 121
In the case that appear in other FRISGMRS radios. Codes .39 - 121 are
additional right rates added in special reference plots
The following table is provided in the image.
-
Pove: (und the code state is it
-
L'oux pêdu seûti ne pain
-
Press is given the 90% series of the ordinary set up.
*You can not a different route for such channels comp this guidance
On the next time of the stage you to start through the Interferance. Many parts you may work some for your way.
WJL
Note: You must set the interference Eliminator Code to 0 or a rad
that does interference electric buses to communicate with 10% that do not have interference electric Godes. Select 2 for "to
to be, no caris" and off will dish on your carics deploy
Setting and Transmitting Call Tones
Sor nalo can tuarati tiberati cal aries to other radies in yoi
group of you can choose that you want to use the home to your tones from which to choose.
To see a call time
- With an indus, meas ^② three times until the event.
Call the coming 0 - 10 hours ago. Appears
-
Press 0-30 engage and hear the call line.
-
Press to be the new rail boat or - in continue set up
in the first 2018, then to be a new site in the earth. Shared and interdependent planning study to our earth work.
Note: Sorts the oil to 4 dryers the oil type feature
Figure 2.15: On the S series, for all years
Hind's Price Use White Accessories(4x)
You can use the 107% feature to make it
for any headset necessitates. Once RDC is named on the radio detect
your voice and transmits when you speak into the internal microphone.
Price: high - 2000s in the euro, the euro
-
Press eG0, sFest Dr. or OY
-
P#e# #### # 50 #### ######
单位:元
Hinds-Free Use With Accessory/
leadset requires. Once VCK is turned on, the radio drives your
voice and information value you know.
Metyte sotterenice jekti caperalajt ate zraelable for your nola. Tre
etragamellram
- Turn the ratio of and play the VCX necessary into the
20
-
Turn the radio on Vux shows on the display;
-
Myer the White American, by making a 'make the
yazate' tayee place the yesterday in your hand in your bar
-
To turn it, simply remove necessary.
Note: There is a short delay between the time you start taking an
when the radio transmits. There is a chart delay before the
(1) 2017年1月1日
Continued on back
EM100
Setting the Sensitivity Level Wheel/Uricor Mode
Adjusting the radio's sensitivity level helps minimize the possibility of unmounted noise triggering a transmission and helps the radio pick up soil worse.
-
Press with VC3/7/0X and the level setting (1-5) aperture or its thickness.
-
Press of to select the sensitivity level
-
Press to set up the following act in
3 = High Sensitivity for most requirements.
- Medium Sensitivity for more externalities
1 - Low Sensitivity for noisy and property
Note: When you correct a headset, the radio is automatically on the last chosen sensiblity level.
- Noise Filtering
The Q noise filtering feature helps to ensure uninterrupted
communication with other Materials radii that have this feature.
This feature also filters out unwanted transmissions from other radios. This is useful in places where there is heavy radio traffic such as amusement parks or still resorts.
Note: Ruas filtering is not available as
To try-ake, fibring or 16.
-
Press until Sknome. The current setting Drift will fetch
-
(more than 100 points) (with P_n or N )
-
Show a #24#up your selection as to 50
-
Please check your selectee of 15 minutes set up
To transmit to a radio that closes flaming turned on
-
Select the same channel and Inference Eliminator Code as the other radio
-
Press to send a call tape. This allows your voice to pass
through the noise fiber on the receiving radio
- Press speak formally
Note: If you refer step 2, the beginning of your message may be
heard on the receiving radio. For a 30-second period, starting at the last transmission, all transmissions reached on the selected channel and code will pass through the false fiber.
Kenned Tapac
You may speak or disable the angole
buy too much time a ballon in product.
-
Press until appears. The current setting On/Off will flash
-
Press other ▶▶ to with the or OY.
-
I'll see the bestum as in our place
-
Press of claim of to determine be, up.
Name: often the city first towns is let, the neighboring sea the it
- Transmit tircutat clut tane
- Low battery circuit notes
• The transpinned tele configuration were
Transmitism: July Confirmation: June
In addition to the commission time
Very small year range in Imperial a unit
the Lai xin pail Nao is haiden A mejie kaih chen qiu mie
transitting. It is the series "Bager" or "Gye" to let others hope
you are introduced helping
- With the ratio on, press until the apaxics. The current
setting Div/Off flashes.
-
Pressed up to 1a(4) On or Off
-
Press based on the part of mode
(1) 2017年1月1日
Emergency Alert Mode
The Emergency Alert function can be used to signal others in yo
group of your need for immediate help. All values in your group
the same channel and interference eliminator code can receive t
message. E&1000 acima nalve wil automatically observe the
speaker volume to a loud setting [the maximum rate output level
regardless of the volume control position. A unique stent sore of
chipped from the receiving fields and head by your group. The start tree is also entered from your own radio speakers to attract
otherwise to the direction with your own home opinion to surfe,
attention in your vicinity. Any reason words or incidental country.
be transmitted to others. EFA100 series larvae will be operating
an automatic "bance tree" transparency technician control made
for a total of 50 seconds. For the duration of the emergency alert
your radio will be locked into a transmitting movie and the other
DATA000 ratios in your group will be locked into a receiving rate
-
Press and hold the Emergency Alert button for 3 seconds.
-
An alert signal will be transmitted for 8 seconds to alert other
78120代制
- Your voice at incidental amount will be transacted for \$2.
seconds. There is no need to continue to hold the Emergency
Alert button or use the PTT button for your message to be
transmitted.
- After 30 seconds your ratio will return to normal two-way mod
EMIOU series ratios will substantially return to the initial
volume setting as controlled by the volume knot. Both the
Kerler and the bicolor will again be able to talk in such other ways: the PII at 1938 probability of increasing realized
Note: Utilizir aliber than EM100 nono net neomn da interquency
ultr signal but will not respural with adjusted volume settings,
controlled transmission mode or unique alert tape. Users of other radius will hear a steady 8 second tape and the 22 second voice transmission.
Warning: The Emergency Gird feature should only be used in the
esert al an actual emergency. Malzins is not necessitable if there
is no response to the emergency start from the receiving group.
Built-in Flashlight
Press the flashlight button to turn the light on. The switch function
as a monetary control for the light.
Note: Two off the flatfish when put is not at currency bounds.
TEST: No. 20, the average error is not to be a negative threshold.
Kuynf Jash
woyson thca
To avoid accidentally charging your radio setting
-
Preza gli held un tiagia
-
When in lock more, you can hire the radio on and off, adjust
volume, receive, transmit, send a call tone, and monitor
characters. All other functions are based
In unlock the cars, prices and highs will soon target
thaplayal.
Scanning Channels
Use can to search the 22 channels for transmissions from
unknown parties, to find someone in your group who has
occidentally changed channels, or in quickly line inside channels
fe
There is a priority feature and 2 modes of scanning i basic and
advanced) to make your starch more effective. The base seal
nodes used the channel and node combinations for 50% of the 22 channels as you have set them, or with the default side wire of
chamizis as you have 241 men | it will die erlast, core value of 11. The "Advanced Form" made will soon all cheaply for any and
ii. The "bundiced 35th month will scar if channels for all series, respect any case is use, and use that code value
temporarily for that share
Bridby is aiming to the "home sharsely" that is the sharsely kind
It is quite to the time chance, that 2, do chance just
the again. This means the initial channel load rod: settinel is so
more often than the what 51 channels, and your radio will require
quields to any activity occurring on the home channel as a prior
To avoid beyond
- Brace marks the @#. Its arm whis#ing in the
isalso, and its ratio as well, been in semi- through
and code combinations
- When the radio detects channel satisfy matching the channel
and code combination, it stops sorting and you can hear the
inamericinn
S. To regard and ask to the general characteristics, are within
five seconds after the end of the transportation.
- The ratio will resume smiling through the otherwise flat
assortise after the end of any received activity.
- To sign scanning, briefly uses the©ev
In our Advanced Development
to start Advanced scaling.
- Set the interference of a normal line of 340 m/s off.
-
Clearly given the ^5 for some observations in the
-
Briefly press the eye. The rest w/epear in this
display, and the radio will begin to scroll through the on
to modernize filmway. Eates will live what is hard
No. 1870-1885 (2018) 1238, 491 (the visit is 1850).
- When the AHS health theme is likely with AHTs like (if she could it have and know, and you may be increasing.)
Interference Eliminator Code that may be in use as first part
will be detected and detected.
- To respect and talk in the person, transgition, are@within
five seconds at the end of the transpilesan. The cards will
transmit using the newly detected Interference Eliminator Code
In the ratio of positive sentiment (descent its comments)
assurbs the end of our reversal activity.
- To rise covering briefly once the eye
c. 11. Step Journal
Savvian, Noto
scanning Korea.
the fact that the fact is being a result of the
... Scanning will propose for regards after the next day
inflammation. You may prove that they to step scanning at any
Time.
- If the radio steps on an undesired transmission, you may
immediately recume the scan by briefly preceding or .
- If the cariz, respectively drugs on an untreated intramericum, you
may temporarily narrow that channel from the scan lot
preicing and holding (or) new seconds. You may
nerves more than one claimed in his way.
- To restore the removed channel(a) to the scan list, turn the row
off and then back on, or exit and re-enter the scanning mode
pressing
-
You cannot borrow the home channel from the next lot
-
In Advanced State, the detection rate will only be used for so
transmission. You must note the code, exit scan, and set that
detected code on that channel to pannanantly use the delta
codz.
Weather Receiver
Your ratio can take in to broadcasts by the United States Natio
Oceanic and Atmospheric Administration (NDA) Weather Radio
and Environment Canada Weatheradie.
You can listen to a weather channel 1556 "Weather Change
Frequencies' table below or set your radio to alert you to
Efficiency Meadir Biologists Inc. Transport Trade Solutions.
What you like to a traffic channel, any express and credit, etc.
When you learn is a medical clinic, put care to use your hand soap mode or for two-way communications.
that KUGA are Uzhmenen Luhani has introduced their following the Hotel, Santa and County respectively. They
transmitters broadcast watches, forecasts, and other information
heara a des.
Main: b)76.6 suppresses cardiac infections are assigned to over-seal
white. Never weather 1500 stations he assigned to other quick areas and respect may be invited. Please check with your local
The following table provides the information in English:
www.wochergroup in the US or
www.ruc.at.gr.za/rab/sachendu in Canada to view the
appropriate transmitter for your area.
The use of the NOAA logo does not provide an endorsement or
Implied endorsement by NOAA's National Weather Service, nor
does the use of the Weatheratio logo provides an endorsement of
implied enforcement by Environment Canada.
Taming Weather Channel Reception On and Off
-
To turn weather reception on, preaard held for 5 seconds.
-
In turn all, gross? cut its ratio all and thus back on
-
To meet the Figure 3, that the matter is not equal to
Setting the Weather Channel
Your ratio receives weather frequencies:
- After timing weather reception of, press: the client chapel flasks
charmer hosted.
-
That also suggests the appreciation of the past
-
Pass a copy of the word
-
Press to save the weather channel setting.
Selling the Weather Alert
Your ratio can be set to respond to BOAA Weather Radio
Warts on the weather information.
-
The using weights selected as _m^2 is 0.2%
-
A## 100
-
These are so far from you, otherwise whether kind
-
Transes lebe begu: trich. + you scousis wahmar ma
and return to two-way mode will display.
S. Press between the 'Weather Air, 2019'
-
Pass 2015, 17: 19: 19: 19:
-
This is a claim to the way that
As with two-way radio reception, weather channel reception dispents
the fact of the 2013 year of a material and the 2014 year of interest of obvious. Because weather changes are permitted utility costs.
the very crazy day is true. 1000000000 will arrive at the
The following is familiar to receiving in tea may make:
Weather Channels and Farming
| Weather Channel | Frequency | Weather Channel | Frequency |
| V201 | 162.530 MHz | V207 | 162.525 MHz |
| V202 | 165.400 MHz | V208 | 161.950 MHz |
| V203 | 166.475 MHz | V209 | 161.775 MHz |
| V204 | 165.435 MHz | V210 | 161.750 MHz |
| V205 | 160.450 MHz | V211 | 160.530 MHz |
| V206 | 165.500 MHz | | |
Channels and Frequencies
| Date | Frequency | Description | Channel | Frequency | Description |
| 1 | JGST203 MHz | FMFG/SING | 19 | JGST203 MHz | FSS |
| 2 | JGST203 MHz | FMFG/SING | 15 | JGST203 MHz | FSS |
| 3 | JGST203 MHz | FMFG/SING | 16 | JGST203 MHz | FSS |
| 4 | JGST203 MHz | FMFG/SING | 9 | JGST203 MHz | FSS |
| 5 | JGST203 MHz | FMFG/SING | 9 | JGST203 MHz | FSS |
| 6 | JGST203 MHz | FMFG/SING | 9 | JGST203 MHz | FSS |
| 7 | JGST203 MHz | FMFG/SING | 9 | JGST203 MHz | FSS |
| 8 | JGST203 MHz | FSS | 91 | 40 | JGST203 MHz |
| 9 | JGST203 MHz | FSS | 92 | 40 | JGST203 MHz |
| 10 | HST203/MSS | FSS | 21 | 40 | JN01/MSS |
| 11 | HST203/MSS | FSS | 22 | 40 | JN01/MSS |
Warranty
Consumer Two-Way Radio Products and Accessories purchases
the United States or Canada.
What Does this Warranty Case?
Subject in the ecological contained in the right, Goal International
- Segments the Malaria branded consumer two-way notice that
Operate via Family Radio Service at General Motile Radio Service and calls.
Total 4 Manufacturea ("Produces"), the Kwidala Ibranler to central
assessadas, said for use with these Produces that is manufactured.
accessions said for use with these 'bozzles did, it manufactured ("bozzles") to be free from defects in prenatal and
(1) protected by to be the non-direct of interests and ownership under personal consumer usage for the period
outlined below. This limbed warranty is a consumer's exclusive
carnely, and apply as follows in new Melrose branded Products
and Accessories manufactured by Giant International Ltd., and
purchased by consumers in the United States at Canada, which are. Consumer Two-Way Radio
accompanied by this written warranty
Products Covered
Plagiaris and Accessories as
retired above, unless otherwise
provided for below.
- Decorative Accommodics and
Cases. Decorative covers
and canes.
- Monaural Houndain, Eur
trade and lesser horizons the
transport mass and rough
a mixed connection.
- Products and Accessories
that are repaired or
Replaced.
Length of Coverage
Ine III year from the date of
purchase by the first consumer
purchaser of the product unless
there are provided for helos.
- Limited, Middle company
. Limited Thomas Werriay v the Notice of swanaka by
the time of ownership by the first company pursuant to
of its product
3.12
. Limited herein warranty %
the filature of ownership by
the first consumer purchase
of the product.
Niray: (T) 4w7, 2017.
dale u' parclava by the
consumer purchaser of the
gmalat.
-
The following table is provided in the image:
-
The balance of the origine
Warranty of the line? (50)
- 中心 consumption
is latre:
(2) 陈晓明
Exclusions
Normal, Wovr and Tres. Periodic maintenance repair and
replacement of parts, thus to normal wear and bear are excluded
from coverage.
Partnersies. Only barriers whose (b)iv channel capacity falls, yield
balanics. Only, balanics clause ity changed: Cajibony (165 len) 87% of their mind capacity and ballaries (incl. look are growing
this impact warranty
the time. With the
Obuse & Mozone. Delays or damage that recall into (4) imp
operation, storage, misuse or abuse, accident or neglect, such a
planned storage [iracks, scratcher, etc.] in the surface at the
product reading from water; (a) contact with liquid, water, rain
Is there finally to heavy penalties, semi, anti at the life, is
real, of size; (z) use of the physical or educational for natural purposes as subjected to the Payment as obligations to a group in
purposes of subcoing the product in necessary to absorb the
of confiting or all other arts which are set the (out) of Motor
fiart International Ltd. are excluded from coverage.
Figure 1. The following work is noted:
Use of Non-Motivate branded Products and Accessories.
or damage that result from the use of Kon-Matarole branded or
certified Products, Accessories, Software or other peripherals
equipment are diluted from coverage.
Unauthorized Service or Modification Defects or damages
resulting from service, testing, adjustment, installation,
maintenance, alteration, or modification in any way by some
other than Motorola, Giant International Ltd. or its authorized
service centers, are excluded from coverage.
Altered Products. Products or Accessories with (a) serial number
or date tags that have been removed, altered or obliterated; ibi
broken seals or that show evidence of tampering: (or misnacted
board serial number: or [d] recontorming or non-Motorola
Incentive language, no part, any non-entil im sojary.
Communalization Services Delays damages on the Inliva of
Communication Services. Defects, damages, or the risks of Products or Accessories due to any communication service or
signal you may subsidize to or use with the Products or
Figure 2: They continue to use all other problems of
degeneration is required from operations.
What Other Limitations Are There?
ANY IMPLIED WARRANTIES, INCLUDING WITHOUT LIMITATION
THE APPLIED WARRANTIES OF MERCHANTABILITY AND TUNES
FOR A PARTICULAR PURPOSE, SHALL BE LIMITED TO THE
Figure 16 of this limited 90% agent, it recognizes the help representation, or set up to 40% provided under the purpose
REPLACEMENT, OR REFOND AS PROVIDED ORDER THIS EXPRESS LIMITED PRIOR TO THE EXC. RIGHT PENSION BY THE
LIMITED EXAMINATE IS THE EXECUTIVE WORK? BY THE CONSUMER AND IS PROVIDED IN LIEN OF ALL OTHERS.
WARRANTIES. EXPRESS OF IMPLIED. IN NO EVENT SHA
MOTOROLA OR GIANT INTERNATIONAL LTD. BE LIABLE, WHETH
IN CONTRACT OR TORT (INCLUDING NEGLIGENCE) FOR DAMAGE