VPIBKK88 - Freezer Veripart - Free user manual and instructions
Find the device manual for free VPIBKK88 Veripart in PDF.


User questions about VPIBKK88 Veripart
0 question about this device. Answer the ones you know or ask your own.
Ask a new question about this device
Download the instructions for your Freezer in PDF format for free! Find your manual VPIBKK88 - Veripart and take your electronic device back in hand. On this page are published all the documents necessary for the use of your device. VPIBKK88 by Veripart.
USER MANUAL VPIBKK88 Veripart
1.1 VEILIGHEIDSWAARSCHUWINGEN EN -VOORSCHRIFTEN

WAARSCHUWING!
text_image
≥38mm ≥560mm ≥550mm 540mm 540mm 45mm 876~886mm 875mm 893mm 820mm 30mm
natural_image
Diagram of a refrigerator interior with two upward-pointing arrows indicating airflow or movement (no text or symbols present)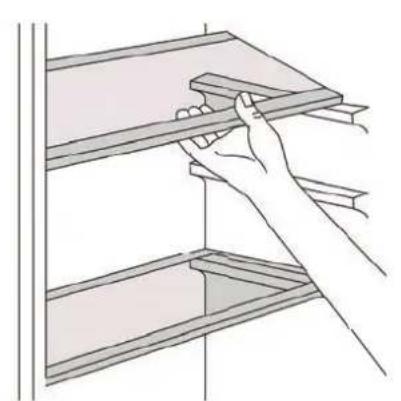
natural_image
Illustration of a hand holding a wooden shelf with a ruler, no text or symbols present3.1 DE DRAAIRICHTING VAN DE DEUR OMKEREN

natural_image
Line drawing of a screwdriver with a pointed tip (no text or symbols)natural_image
Line drawing of a screwdriver with no text or symbolsnatural_image
Line drawing of a mechanical assembly with a lever and pin (no text or symbols)natural_image
Technical line drawing of a structural bracket with a clamp attachment (no text or symbols)natural_image
Technical line drawing of a mechanical bracket with mounting feet and a curved arrow indicating motion (no text or symbols)
natural_image
Pure technical line drawing of a mechanical bracket or frame structure without any text, numbers, or symbolsnatural_image
Technical line drawing of a mechanical clamp or bracket assembly (no text or symbols)natural_image
Diagram of a document with arrows indicating rotational movement, no text or symbols present4. GEBRUIK
Z
text_image
Creative Commons recycling symbol with recycling icon and crossed-out trash bin1.1 Safety warnings and regulations 31
1.2 Safety instructions: Installation 32
1.3 Safety instructions: use 34
2. PRODUCT FEATURES 35
3. INSTALLATION 37
3.1 Reversing the direction in which the door opens 39
4. USE 41
4.1 Setting the temperature 41
4.2 Tips for daily use 42
4.3 Saving energy 43
-
CLEANING AND MAINTENANCE 44
-
TROUBLESHOOTING 46
-
TAKING OUT OF SERVICE 49
-
SAFE DISPOSAL 50
FOREWORD
About this document
- This manual contains all information for the correct, efficient and safe use of the appliance.
- This manual is intended for the end user and/or buyer of this appliance.
- Make sure you have read and understood the instructions in this manual completely before installing or using the appliance. Keep this document for future use as long as you use and/or own the appliance.
- Coolblue B.V. cannot in any way be held liable for material or immaterial damage to you or to others, the appliance, your other belongings or belongings of others caused by not following the instructions in this manual.
- The warnings and safety instructions in this manual do not cover all possible circumstances and situations.
- If you contact our customer service, make sure you have the model number ready. The information can be found on the type plate or on the front of this manual.
Original instructions
This manual was originally written in Dutch. All other languages are translated documents. In the case of translation errors, the Dutch version is leading.
Symbols used
| SYMBOL DESCRIPTION | ||
 | DANGER! | Fire hazard and/or flammable materials. |
 | WARNING! | Indicates a dangerous situation which, if not avoided, may result in serious immaterial damage to you or others. |
 | CAUTION! | Indicates a dangerous situation which, if not avoided, may result in slight immaterial damage to you or others. |
 | ATTENTION! | Indicates a situation related to material damage. |
 | NOTE | Indicates useful additional information. |
Copyright
The data depicted in this manual, including texts, photographs, graphic drawings, trademarks, (trade) names and logos, are the property of Coolblue B.V. and are protected by copyright, trademark law and/or any other intellectual property right, unless these data belong to a third party. You are never allowed to reproduce, transfer, distribute, store or make the contents of the manual available to third parties, in whole or in part, without the prior written consent of Coolblue B.V. and/or the third party to whom the data belong.

NOTE!
- You can also find the latest version of this manual online, at www.coolblue.nl/en if you search for the article number.
Veripart contact details
Veripart is a registered brand of Coolblue B.V.
Customer service can be reached at:
www.coolblue.nl/en/customer-service
1. SAFETY:
1.1 SAFETY WARNINGS AND REGULATIONS

WARNING!
- Keep the vents in the appliance housing open.
- Do not use mechanical devices, electrical appliances (such as a hairdryer or heater) or other means to defrost your refrigerator.
- Ensure that no components of the cooling circuit are damaged during transport and installation of the appliance. (Only in cases where the cooling circuit is freely accessible).
- Do not place electrical appliances in the food storage compartments of the refrigerator (such as ice cream machines) unless they are of a type expressly declared suitable by the manufacturer.
- When positioning the appliance, ensure that the power cable is not stuck or damaged.
- Do not use an extension lead or socket for this appliance.

CAUTION!
- Packaging with flammable gases or liquids may leak at low temperatures, do not store flammable gases or liquids in the appliance.
- Do not store containers containing flammable materials, propellant or explosive substances such as aerosols, refill cartridges for fire extinguishers, etc. in the appliance.
- If you want to avoid forming a combustible gas-air mixture in the event of a leak in the cooling circuit, consider the size of the space in which the appliance is located and the amount of refrigerant used.
- It is dangerous for people other than authorised technicians to carry out maintenance or repairs with cover plates removed. To avoid the risk of electric shocks, do not attempt to repair this appliance yourself.
- This appliance may be used by children from eight years of age and above and by persons with reduced physical, sensory or mental capabilities or lack of experience and knowledge, provided that they are under supervision or have been trained in the safe use of the appliance and that they understand the associated dangers.
! ATTENTION!
- This appliance is not suitable for freezing food.
-
This appliance is intended for domestic use and similar applications such as:
-
staff kitchens in shops, offices and other work environments;
- farms and guests in hotels, motels, B&B and other residential environments;
-
catering and similar non-retail applications.
-
It is dangerous to change the characteristics or specifications of the appliance or to try to modify this product in any way.
- Food storage times recommended by the food manufacturer must be observed.
- Never pull the power cable to disconnect the plug from the socket. Always hold the plug firmly and pull it straight out of the socket.
1.2 SAFETY INSTRUCTIONS: INSTALLATION

DANGER!
Risk of fire / flammable materials.
! CAUTION!
- The appliance is heavy. Take care when handling and wear protective gloves and closed footwear.
- It is dangerous for persons other than authorised service technicians to carry out maintenance on electrical components (plug, power cable, compressor, etc.) or to carry out repairs with the cover plates removed. To avoid the risk of electric shocks, do not attempt to repair this appliance yourself.
- If you detect any damage to the appliance or the power cable, do not connect the appliance but contact the service department (see contact details on page 36).
- The power cable must be attached behind the appliance and must not be exposed or loose.
- Make sure that the power cable of the installed appliance is always easily accessible.
-
This appliance requires a standard 220-240V 50Hz socket with 2-pole earthing. The power cable of this appliance is equipped with a 2-pole plug suitable for standard wall sockets with earthing to minimise the risk of electric shocks.
-
On first installation (or after turning the door) wait at least four hours before connecting the appliance to the power. This allows the oil to flow back into the compressor.
- Ensure that air can circulate around the appliance.
- Pull the plug out of the socket before carrying out any actions on the appliance (e.g. turning the door).
- Incorrect use of the earthed plug may cause an electric shock.
- This appliance is intended for use as a built-in refrigerator.
- The correct operation of the appliance can only be guaranteed if the specified temperature range is respected. If, as a result of another installation, the correct ventilation requirements are not met, the appliance will function correctly, but energy consumption may increase slightly.
- This appliance is not suitable for use with an inverter.
- Do not install the appliance near radiators, stoves, ovens or hobs.
- Do not install the appliance in direct sunlight.
- Do not install this appliance in spaces that are too damp or too cold.
- Do not expose the appliance to rain.
- The total volume of the space in which the appliance is installed divided by the amount of refrigerant of the appliance must not be less than 8 g/m ^3 . The amount of refrigerant contained in the appliance can be found on the type plate.
- The lamp supplied with this appliance is only for use in this appliance and is not intended for other applications.
- The appliance may not operate optimally if it is in a place where the ambient temperature is below the minimum or above the maximum of the temperature range for which the appliance is designed for a longer period of time. Please refer to the "Climate Range" table below.
Climate Range
The information about the climate range of the appliance is stated on the type plate. It indicates at which ambient temperature (or room temperature) the operation of the appliance is optimal (correct). This type of refrigerator has climate range N, ST.
| CLIMATE RANGE PERMISSIBLE AMBIENT TEMPERATURE | |
| SN | From +10°C to +32°C |
| N | From +16°C to +32°C |
| ST | From +16°C to +38°C |
| T | From +16°C to +43°C |
1.3 SAFETY INSTRUCTIONS: USE
! CAUTION!
Observe the following instructions to avoid food contamination:
- When the door is open for a long time, the temperature in the compartments of the appliance can rise considerably.
- Clean surfaces that may come into contact with food and accessible drainage systems regularly.
- Store raw meat and fish in suitable containers in the appliance so that they do not come into contact with or drip on other foods.
- If the appliance will not be used for several months, first switch it off (turn the thermostat button to 0), unplug it from the socket, clean and dry it and leave the door open to prevent mould forming in the appliance.
2. PRODUCT FEATURES
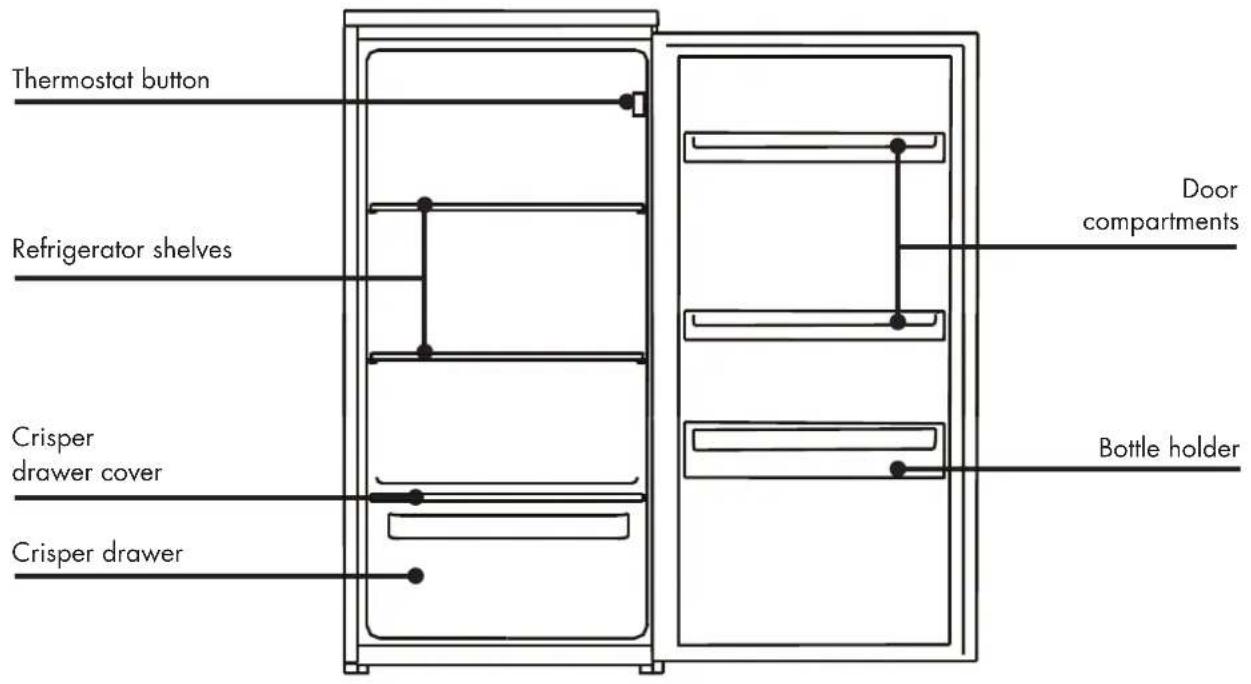
text_image
Thermostat button Refrigerator shelves Crisper drawer cover Crisper drawer Door compartments Bottle holder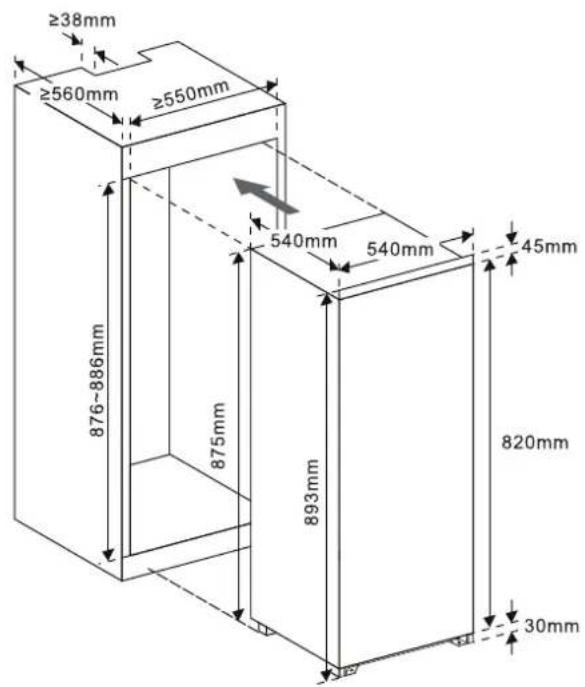
text_image
≥38mm ≥560mm ≥550mm 540mm 540mm 45mm 876~886mm 875mm 893mm 820mm 30mm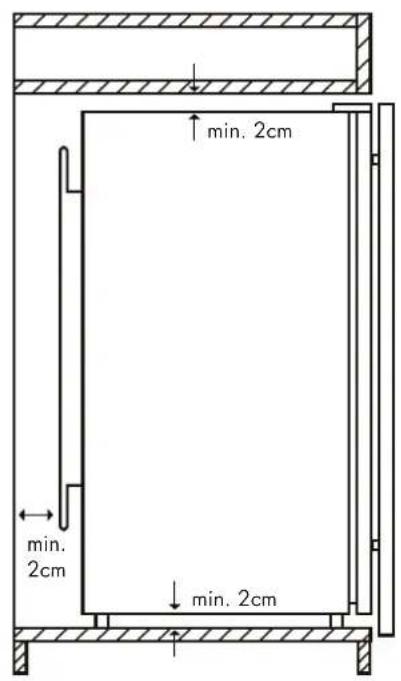
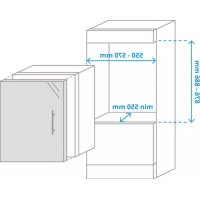
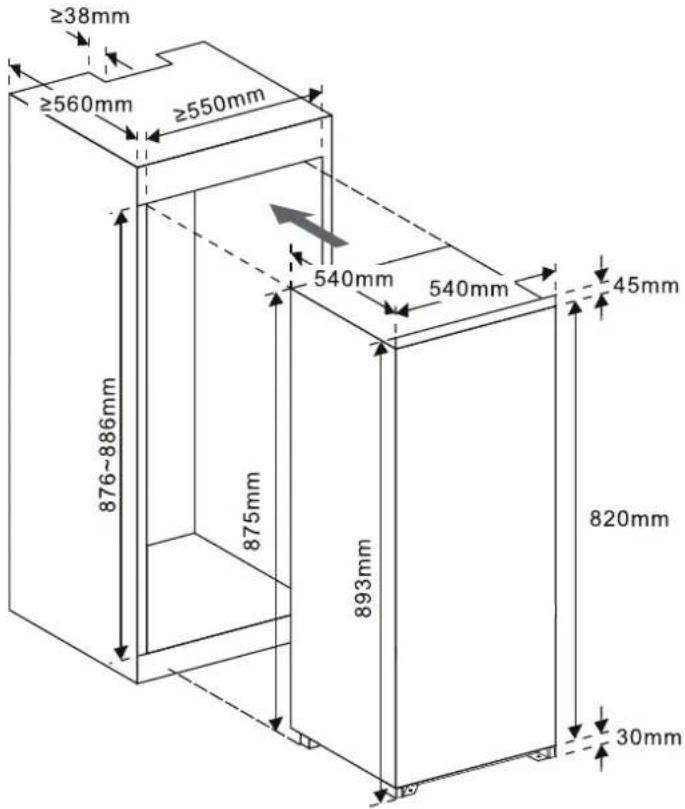
• Figure 1. Required space for enclosure • Figure 2. Air circulation
Figures 1 and 2 illustrate the space required for the appliance.
Does not contain freon
The freon-free refrigerant (R600a) and the environmentally friendly foam insulation (cyclopentane) used for the appliance do not affect the ozone layer and have a very small impact on global warming.

Guarantee
This appliance comes with a guarantee period of two years after purchase. For more information on guarantee conditions, please visit www.coolblue.nl/en/customer-service. In any case, you must have the purchase order with purchase and/or delivery date in order to be able to claim the guarantee.
Spare parts
Spare parts for this appliance are available. To order or find out more, visit www.coolblue.nl/en/customer-service.
Technical data and energy label
The technical data is indicated on the type plate on the inside of the appliance and on the energy label (both also printed on page 2). The QR code on the energy label provided with the appliance provides a web link to the information related to the appliance performance in the EU EPREL database. Keep the energy label for reference together with the user manual and any other documents provided with this appliance. It is also possible to find the same information in EPREL via the link www.eprel.ec.europa.eu and the model name and product number that can be found on the type plate of the appliance. See link www.theenergylabel.eu for detailed information on the energy label.
| VERIPART CONTACT DETAILS | |
| Address: | Weena 664, 3012 CN, Rotterdam |
| Website www.coolblue.nl/en/customer-service | |
3. INSTALLATION
Before installing and assembling the refrigerator, read the safety information (Chapter 1) carefully and the installation guide supplied separately.
1. Unpack
Remove the packaging materials and dispose of them properly. Check that the appliance is not damaged. Do not connect the appliance if it is damaged. Report any damage immediately to the salesperson via customer service. In that case, keep the packaging.
2. Installation Guide
Please read the installation guide carefully before installing the appliance.
3. Wait
Wait four hours before connecting the appliance so the oil can flow back to the compressor.
4. Clean
Clean the interior and all internal accessories with lukewarm water and some neutral soap before first use to remove the typical smell of a brand new appliance. Dry everything carefully. Do not use solvents or abrasive powders; these will damage the coating
5. Location
The location where you place your appliance should be well ventilated and the air should not be too warm. Do not place the appliance near a heat source, such as a stove or boiler, and avoid direct sunlight, so that as to guarantee the cooling effect and save on energy consumption. Do not place the appliance in a damp place so that it cannot rust and there is no leakage current.
6. Heat dissipation area
During operation, the appliance emits heat to the environment. Therefore there must be at least 2 centimeter clearance on the top, at least 2 centimeter on both sides and at least 2 centimeter on the back of the fridge (see also page 35).
7. Installation of the appliance
- This appliance is intended for use as a built-in refrigerator.
- Before plugging in the power cable, check that the voltage and frequency of the type plate match your power supply network. The appliance must be earthed. The power cable is supplied with a contact for this purpose. If the socket is not earthed, connect the appliance to a separate earth according to current regulations and consult a qualified electrician.
8. Mounting accessories
- Adjustable shelves
The walls of the appliance are equipped with a series of guide profi les so that the shelves can be inserted if desired.
- Installing the door compartments
To store food of different sizes, the door compartments can be set to different heights. Proceed as follows: gradually pull the compartment in the direction of the arrows until it comes loose and put it in the desired position.
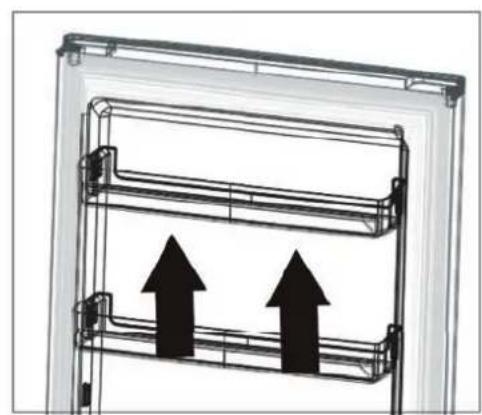
natural_image
Diagram of a refrigerator interior with two upward-pointing arrows indicating airflow or movement (no text or symbols present)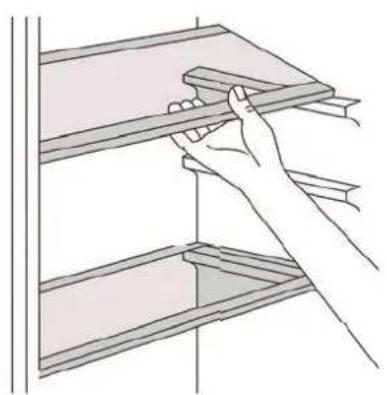
natural_image
Illustration of a hand holding a shelf with a wooden plank (no text or symbols)3.1 REVERSING THE DIRECTION IN WHICH THE DOOR OPENS
To remove the door, the appliance must be tilted backwards. We recommend doing this with two people. Rest the appliance on a firm surface so that it does not slip away as you reverse the door.
Keep all removed parts to remount the door later.
Do not lay the appliance down flat. This can damage the cooling system. If you need to tilt the appliance, wait four hours before connecting the appliance so that the oil can flow back to the compressor.
Necessary tools:

natural_image
Line drawing of a screwdriver with no text or symbols•Crosshead screwdriver

natural_image
Line drawing of a screwdriver with no text or symbols- Flat head screwdriver
-
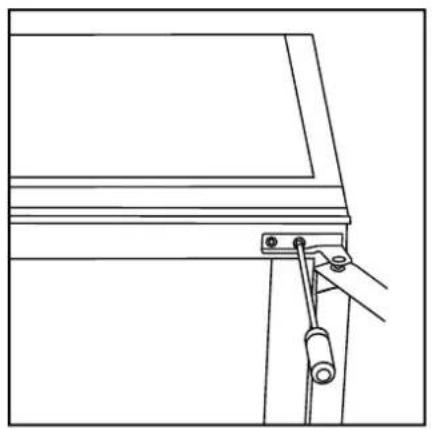
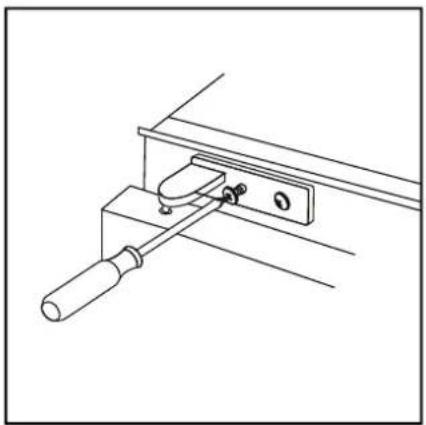
Unscrew the top hinge. Then lift the door out of the hinge and lay it on a soft surface to avoid scratches..
-
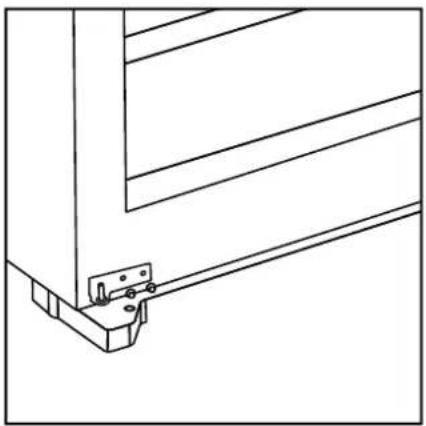
Unscrew the bottom hinge.
natural_image
Line drawing of a mechanical assembly with a lever and attached bracket (no text or symbols)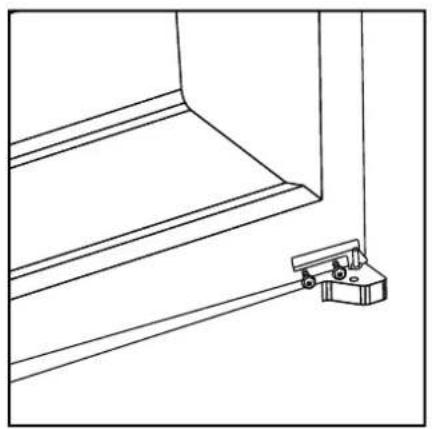
natural_image
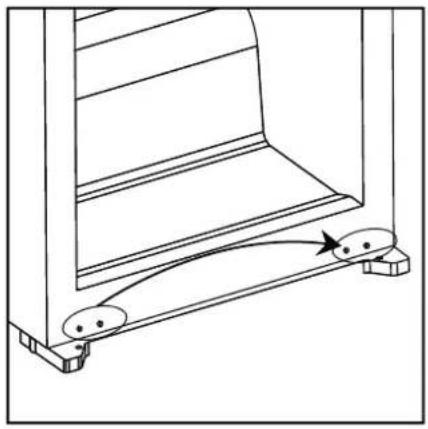
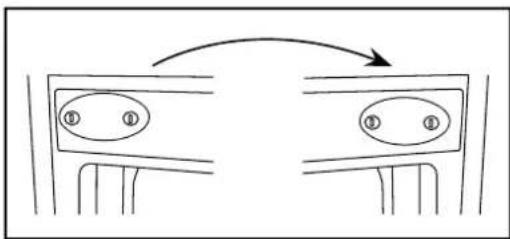
Technical line drawing of a structural bracket with a mounting bracket (no text or symbols)- Unscrew the screws and move the openings at the top and bottom of the built-in cabinet from the left to the right.
natural_image
Technical line drawing of a mechanical bracket with mounting feet and a curved arrow indicating motion (no text or symbols)
flowchart
graph TD
    A["Input Block ①"] --> B["Output Block ③"]
    style A fill:#fff,stroke:#000
    style B fill:#fff,stroke:#000
- Turn over the top hinge and install it at the bottom on the left.
natural_image
Pure technical line drawing of a structural bracket or frame (no text or symbols)- Mount the door. Make sure the door is aligned horizontally and vertically so that the gasket is closed on all sides before tightening the hinge. Then turn over the disassembled bottom hinge and screw it at the top on the front.
natural_image
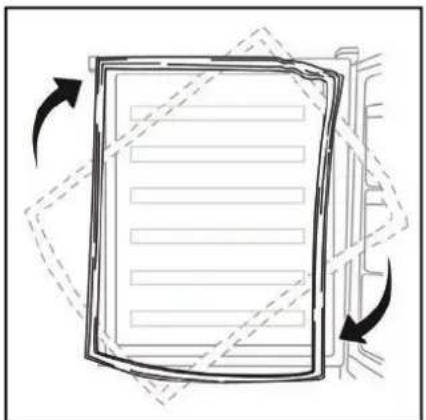
Technical line drawing of a mechanical clamp or bracket assembly (no text or symbols)- Remove the door gaskets, rotate and re-attach them.
natural_image
Diagram of a document with arrows indicating rotational movement (no text or symbols)4. USE
Carefully review the safety information (Section 1) before you start using the appliance.
4.1 SETTING THE TEMPERATURE
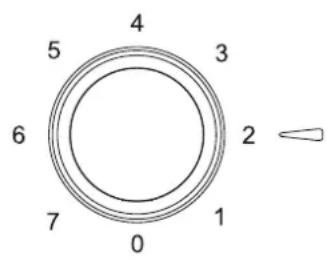
You can set the temperature of the appliance by turning the thermostat button.
- The thermostat can be set between 1 and 7.
- 1 is the warmest setting.
- 7 is the coldest setting.
• The recommended setting is 4. - Turn the dial to 0 to turn the appliance off.
text_image
4 5 3 6 2 7 0 1The internal temperature of the appliance may vary due
to the ambient temperature, the amount of products stored and the frequency with which the door is opened.
Under normal operating conditions we recommend setting the temperature to 4.
In summer, when the ambient temperature is high, we recommend setting the temperature to 5 - 6.
In winter, when the ambient temperature is low, we recommend setting the appliance to 2 - 3.
This appliance is not suitable for freezing food.
4.2 TIPS FOR DAILY USE
Compartments
- Due to the circulation of cold air in the appliance, the temperature in each part of the appliance is different. Therefore, different types of food should be placed in different places.
- Do not place the food close together as this hinders air circulation.
- Divide different food into several compartments according to the table below
| REFRIGERATOR COM-PARTMENTS | TYPE OF FOOD |
| Door compartments in the refrigerator compartment | Food with natural preservatives such as jam, juice, drink, spices. Do not store any products with a limited shelf life here. |
| Crisper drawer | Place fruit, herbs and vegetables separately in the crisper drawer.Do not put bananas, onions, potatoes or garlic in the refrigerator. |
| Refrigerator shelf - centre | Dairy products, eggs. |
| Refrigerator shelf - top | Food that does not require preparation such as ready meals, fine meats, leftovers. |
Cooling food
- Always refer to the expiry date of the products to know how long they can be stored.
- Pack food in resealable plastic bags, especially if it has a strong taste, and place on the glass shelves above the crisper drawer. Store food only one or at most two days in this way.
- Store raw meat and fish in appropriate food containers in the refrigerator so that it does not leak or come into contact with other foods.
- Do not place hot food or hot plastic parts in the appliance. Make sure it has cooled to room temperature before putting it in the appliance.
-
Cooked food that has cooled sufficiently must be covered and can then be placed on any shelf.
-
Do not place foods containing a lot of water too close to the back wall of the refrigerator to prevent them from freezing to the inner wall.
- It is best to clean and dry food before storing it in the appliance. It is advisable to store food in sealed packaging in the appliance. This prevents evaporation of water, which keeps fruit and vegetables fresh and also prevents odours.
4.3 SAVING ENERGY
- The most efficient use of energy is ensured in the configuration with the drawers in the lower part of the appliance and with the shelves evenly distributed. The position of the door trays does not affect energy consumption.
- Do not open the door or leave it open more often than necessary.
- Do not set the temperature too high to save energy unless the characteristics of the food require it.
- If the ambient temperature is high, the temperature control is set to a low temperature and the appliance is fully filled, the compressor can be on continuously, causing ice to form on the evaporator. In this case, set the temperature control to a higher temperature to enable automatic defrosting to save energy.
- Ensure proper ventilation. Do not cover the vents or holes.
- Replace the door gasket in good time to prevent poor door closing.
! ATTENTION!
- The manufacturer's storage recommendations must be strictly followed. Please refer to the respective instructions.
- Do not keep the door open for too long; this can cause a sharp increase in temperature in the compartments of the appliance.
5. CLEANING AND MAINTENANCE
Before cleaning the appliance, carefully review the safety information (Section 1).

For hygienic reasons, the inside of the appliance, including accessories, should be cleaned regularly.
! CAUTION!
- Remove the plug from the socket before cleaning.
- Never touch the plug with wet or moist hands because of the risk of electric shocks and injury.
- Do not spill water directly onto the appliance to prevent rust, leakage and accidents.
- Do not put your hands in the bottom of the fridge as the sharp metal corners can cause scratches.
- Do not use water jets and steam to clean the appliance.
- To prevent damage, do not use a hard brush, steel brush, detergent, soap powder, alkaline detergent, benzene, petrol, acids, chlorine, abrasive powders, hot water or other corrosive or soluble substances to clean the cabinet surface, door gasket or plastic decorative parts etc.
- Do not use mechanical devices, electrical appliances (such as a hairdryer or heater) or other means to defrost your appliance.
! ATTENTION!
- The electrical parts of the appliance may only be cleaned with a dry cloth.
Interior and exterior cleaning
- Food residues in the appliance can cause a bad smell. The appliance should therefore be cleaned regularly. The fresh food compartment is preferably cleaned monthly.
- Remove all shelves, fruit and vegetable compartment, bottle racks, cover plate, drawers, etc. and clean with a soft cloth or sponge moistened with warm water or a neutral detergent.
- If you are using cleaning agents, clean with a soft cloth or sponge, and wipe dry.
- Regularly remove the dust from the back panel and side plates of the appliance. Use a dry cloth for this (no water).
- If the appliance will not be used for several months, first switch it off (turn the thermostat button to 0), unplug it from the socket, clean and dry it and leave the door open to prevent mould forming in the appliance.
6. TROUBLESHOOTING
You can solve some problems easily yourself using the table below.


ATTENTION!
- Before solving the problem, switch off the power supply.
- If the following descriptions do not solve your problem, please contact our customer service: www.coolblue.nl/en/customer-service
- Only a qualified electrician or authorised person may solve the faults not contained in this manual. Repairs carried out by unauthorised persons may cause injury and/or serious damage to persons and property.
| PROBLEM POSSIBLE CAUSE SOLUTIONS | ||
| The appliance does not cool at all | - The thermostat is set to '0'.- The plug is not inserted properly.- There is no voltage on the socket.- The fuse is blown or defective.- The appliance is installed in a place where the ambient temperature is less than 16°C, such as a balcony, garage or storage room. | - Switch the thermostat to another setting (e.g. 4).- Insert the plug properly.- Open the door and check if lamp is on. If the lamp is off, there may be no voltage on the socket. Have the socket repaired by an electrician.- Check the fuse and replace if necessary.- Install the appliance in a protected location where the ambient temperature is higher than 16°C. If the appliance is installed in a room with too low a temperature, the internal cooling system may not operate correctly. |
| Abnormal noise | - The appliance is not stable/level.- The appliance is in contact with the wall or other objects. | - Readjust the appliance's adjusting legs.- Move the appliance slightly. |
| Strange smell in the refrigerator | - Maybe spoiled food?- Do you need to clean the fridge?- Have you packed food with a strong smell? | - Throw away spoiled food.- Clean the refrigerator.- Pack food with a strong smell. |
| The door does not open easily. | - You tried to open the door immediately after closing. | - Wait a few seconds between closing and re-opening the door. |
| Water runs over the back of the appliance | - During the automatic defrosting process, icing thaws against the back wall. | - Wipe up the water with a soft cloth. |
| Water enters the appliance | - Products prevent water from entering the water collection container.- The water collection channel is blocked. | - Ensure products do not touch the back wall.- Clean the water collection channel. |
| There is too much condensation on the back wall of the appliance. | - The door has been opened too often.- The door is not completely closed.- The stored food was not packed. | - Only open the door if necessary.- Make sure the door is completely closed.- Pack food in suitable material before putting it in the appliance. |
| There is water on the floor. | - The defrost water collection channel is not connected to the evaporator container above the compressor. | - Secure the defrost water collection channel to the evaporator container. |
| The temperature in the appliance is too low/high. | - The temperature is not set correctly.- The door is not closed properly.- The temperature of the food in the fridge is too high.- Many products are stored at the same time.- The door has been opened too often. | - Set a higher/lower temperature.- Check whether something is stopping the door from closing. Remove or move possible obstacles- Allow the food to cool to room temperature before preserving.- Preserve fewer products at the same time.- Only open the door if necessary. |
| Strange smell in the refrigerator | - There is spoiled food in the fridge.- The appliance is not clean.- Food with a strong smell is present in the appliance. | - Throw away spoiled food.- Clean the appliance.- Pack food with a strong smell. |
| Poor cooling efficiency | - Hot food has been placed inside the appliance.- The door does not close properly.- The appliance is in direct sunlight or near a stove or heater.- The appliance is built into a cabinet with little space around it.- The temperature in the appliance is set too high. | - Cool hot food before putting it in the appliance.- Check the door and door rubbers and see if the door is blocked.- Place the appliance further away from the heat source.- Ensure sufficient distance to ensure proper ventilation.- Set the appropriate temperature. |
| There is too much frost and ice. | - The door is not closed properly.- The door gasket is deformed or dirty.- The products are not packed correctly.- The temperature is set incorrectly.- The appliance is fully loaded and set to the lowest temperature.- The set temperature in the appliance is too low and the ambient temperature is too high. | - Check whether something is stopping the door from closing. Remove or move possible obstacles.- As a result, the door does not close properly. Clean the seal and repair the deformation. If necessary, replace the seal, contact customer service.- Pack the products better.- Please refer to Section 4.- Set a higher temperature. Please refer to Section 4.- Set a higher temperature. Please refer to Section 4. |
| The compressor works continuously. | - The temperature is set incorrectly.- Many products are placed at the same time.- The room temperature is too high.- The food placed in the appliance was too hot.- The door is not closed properly. | - Please refer to Section 4.- Wait a few hours and then check the temperature again.- Please refer to Section 4.- Allow food to cool to room temperature before storing.- See the previous section. |
| The lamp does not work. | - The lamp is broken.- The lamp is in the standby position. | - Please contact our customer service (or visit the nearest Coolblue shop).- Close and open the door. |
7. TAKING OUT OF SERVICE
Switching off and storage
If the appliance will not be used for several months, first switch it off (turn the thermostat switch to 0) and then pull the plug out of the socket.
- Make sure the appliance is completely thawed.
- Clean the inside thoroughly and carefully wipe everything dry with a soft cloth. To prevent the formation of odours and moulds, leave the door open: block it.
- Clean the door gasket groove with soap and water and carefully wipe everything dry with a soft cloth.
- Do not use a hard brush, steel brush, detergent, soap powder, alkaline detergent, benzene, gasoline, acids, hot water or other corrosive or soluble substances to clean the appliance.
- Store the cleaned appliance in a dry, ventilated place, away from a heat source. Make sure the appliance is on a level surface and do not place heavy objects on top.
- The appliance in storage must not be accessible to children playing.
8. SAFE DISPOSAL
! CAUTION!

Waste processing
- Refrigerants and the cyclopentane foam used for the appliance are flammable. When the appliance is disposed of, it must therefore be kept away from sources of fire and collected or returned to a qualified waste processing company.
- The appliance may not under any circumstances be incinerated to prevent damage to the environment or other damage.
- R-600a is used as a refrigerant in this appliance. Therefore, please contact local authorities regarding the safe disposal of this appliance.
text_image
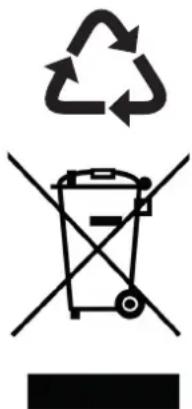
Creative Commons recycling symbol with recycling icon and crossed-out trash binThe materials used in this appliance marked with this symbol are recyclable.
This marking indicates that this product should not be disposed of via household waste throughout the EU. In order to prevent damage to the environment or human health as a result of uncontrolled waste, it must be processed responsibly so that raw materials can be reused sustainably. Use the existing collection systems or contact the shop where you purchased the product if you want to dispose of the used product. There, the product is recycled in an environmentally friendly way.
- Old cooling appliances still have value. Responsible disposal ensures that valuable raw materials can be recycled. Of course, the appliance may not be disposed of with (domestic) residual waste, but it must be collected or returned to the environmental station of your municipal waste processing company.
- The refrigerants and insulation materials used in your appliance require special care. When draining, ensure that the pipes on the back of the appliance are not damaged.
- Avoid damaging the cooling unit, especially the heat exchanger.
- Information on how to dispose of old appliances and packaging correctly can be found at your local municipal waste processing company.
Veripart is a registered trademark of Coolblue B.V.
Weena 664
3012CN, Rotterdam
The Netherlands
Made in China
FR - NOTICE D'UTILISATION
RÉFRIGÉRATEUR ENCASTRABLE

VPIBKK88

veripart
TABLE DES MATIÈRES
AVANT-PROPOS 54
1. SÉCURITÉ 56
text_image
≥38mm ≥560mm ≥550mm 540mm 540mm 45mm 876~886mm 875mm 893mm 820mm 30mm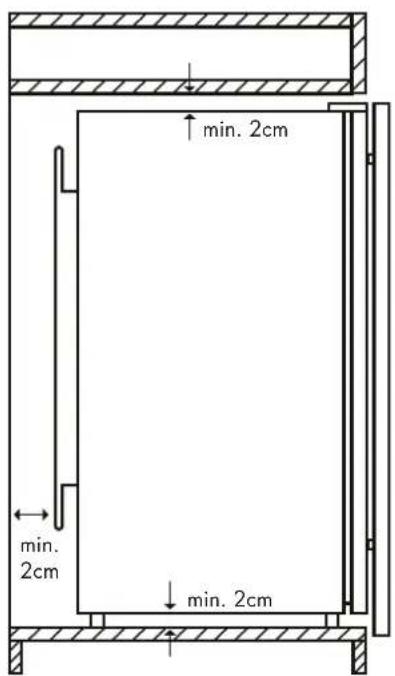
natural_image
Diagram showing two views of a refrigerator shelf with upward arrows indicating movement, alongside a hand holding a tray (no text or symbols)
3.1 INVERSION DU SENS DE ROTATION DE LA PORTE
natural_image
Line drawing of a screwdriver with threaded shaft (no text or symbols)- Tournevis cruciforme

natural_image
Line drawing of a screwdriver with no text or symbols- Tournevis plat
natural_image
Line drawing of a mechanical assembly with a lever and pin (no text or symbols)natural_image
Technical line drawing of a structural bracket with a small mechanical clamp attachment (no text or symbols)natural_image
Technical line drawing of a mechanical bracket with mounting feet and a curved arrow indicating motion (no text or symbols)natural_image
Pure technical line drawing of a mechanical bracket or frame structure without any text, numbers, or symbolsnatural_image
Technical line drawing of a mechanical clamp or bracket assembly (no text or symbols)natural_image
Diagram of a closed notebook with arrows indicating rotation or page movement (no text or symbols)4. UTILISATION
PROBLÈME CAUSE POSSIBLE SOLUTIONS
text_image
Creative Commons recycling symbol with recycling icon, crossed-out trash bin, and blank signtext_image
≥38mm ≥560mm ≥550mm 540mm 540mm 45mm 876~886mm 875mm 893mm 820mm 30mm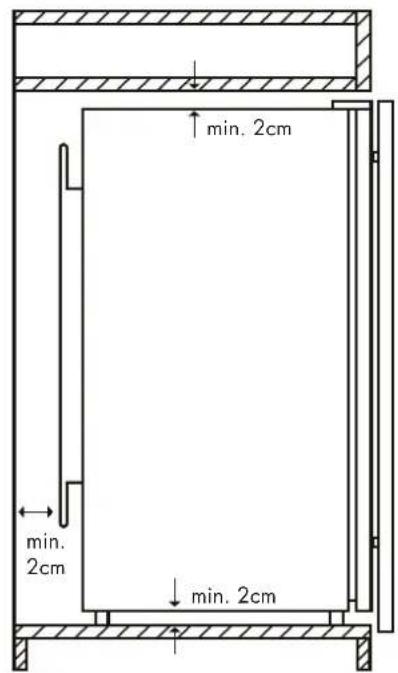
natural_image
Diagram of a refrigerator interior with two upward-pointing arrows indicating ventilation or airflow direction (no text or symbols present)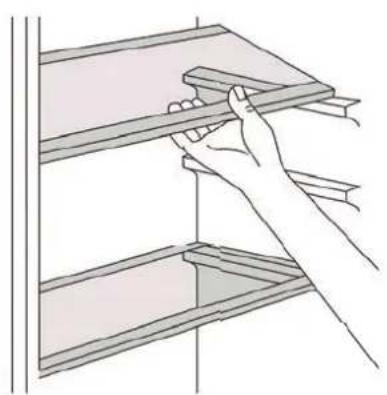
natural_image
Illustration of a hand holding a shelf with a tool, no text or symbols presentnatural_image
Line drawing of a screwdriver with no text or symbolsnatural_image
Line drawing of a screwdriver with no text or symbols•Schraubendreher
natural_image
Line drawing of a mechanical assembly with a lever and bracket (no text or symbols)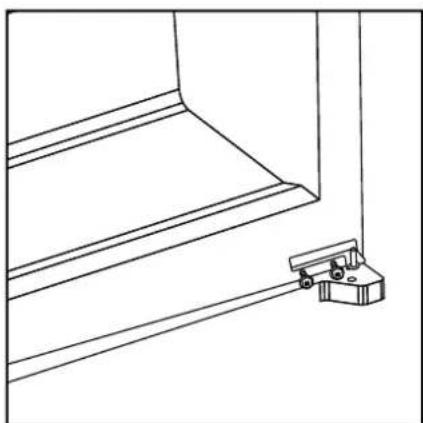
natural_image
Technical line drawing of a structural bracket with a small mechanical clamp attachment (no text or symbols)
natural_image
Technical line drawing of a mechanical bracket with mounting feet and a curved arrow indicating motion (no text or symbols)natural_image
Pure technical line drawing of a structural bracket or frame (no text or symbols)natural_image
Technical line drawing of a mechanical clamp or bracket assembly (no text or symbols)natural_image
Diagram of a document with arrows indicating rotational movement (no text or symbols)
4. BENUTZUNG
text_image
Creative Commons recycling symbol with recycling icon and crossed-out trash binVeripart is a registered trademark of Coolblue B.V.
Weena 664
3012CN, Rotterdam
The Netherlands
Made in China
INSTALLATIEGIDS INBOUW KOELKAST

VPIBKK88
EN Installation guide 10
Built-in Refrigerator
text_image
≥38mm ≥560mm ≥550mm 540mm 540mm 45mm 876~886mm 875mm 893mm 820mm 30mm
natural_image
Person wearing a bright glove installing or adjusting a white cabinet panel (no visible text or symbols)3
natural_image
Close-up of gloved hands holding a white shelf with black gloves, no visible text or symbols
natural_image
Close-up of a hand wearing a green glove with black trim, partially cut off or holding a white tool (no visible text or symbols)4
natural_image
Close-up of a bright lime glove with black soles, partially visible against a white background (no text or symbols)natural_image
Technical line drawing of a screw with a cross mark, crossed out by two diagonal lines (no text or symbols)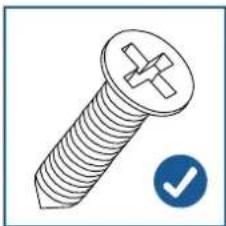
natural_image
Illustration of a screw with a cross mark and a blue checkmark (no text or symbols)natural_image
Person using a power drill into a white appliance (no visible text or symbols)
natural_image
Two-panel photo showing hands using a power tool to install a battery into a white refrigerator (no text or symbols visible)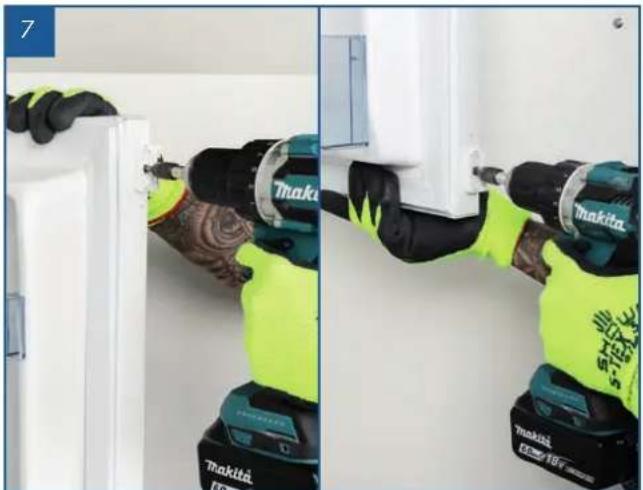
natural_image
Two-panel photo showing a hand operating a Thakita electric drill, with no visible text or symbols.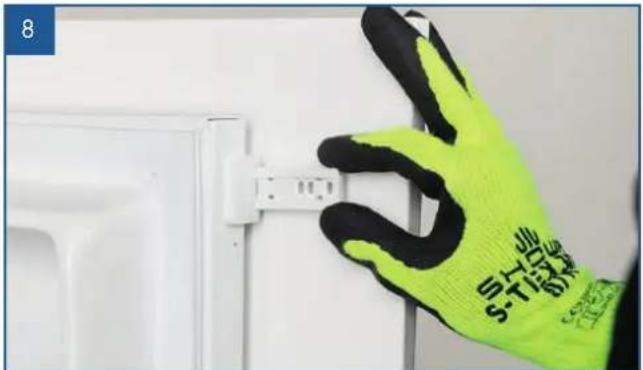
natural_image
Hand in yellow glove installing a white electrical connector on a door (no text or symbols visible)
natural_image
Close-up of a hand holding a red pencil next to a white electrical outlet (no text or symbols visible)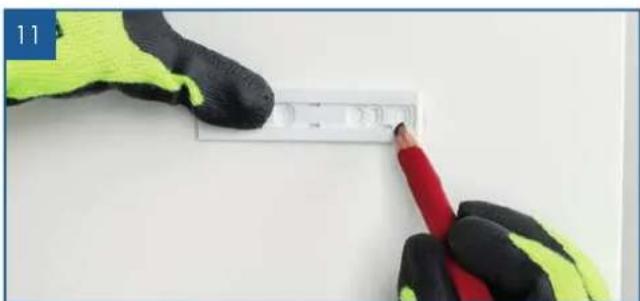
natural_image
Close-up of gloved hands holding a white rectangular object with a red pencil, no visible text or symbols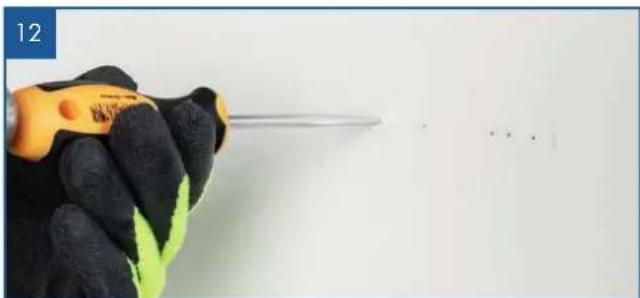
natural_image
Close-up of a gloved hand holding a screwdriver against a plain white background (no text or symbols visible)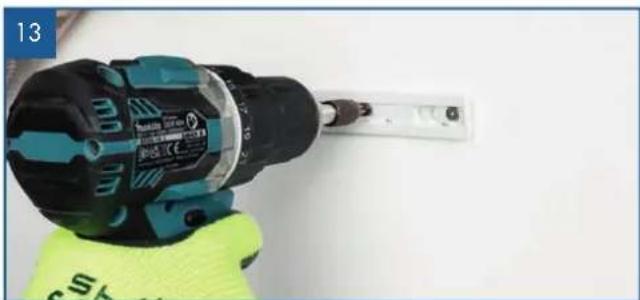
natural_image
Close-up of a power drill putter with a tool, wearing a green glove (no visible text or symbols)natural_image
Close-up of gloved hands holding a small tool, no visible text or symbols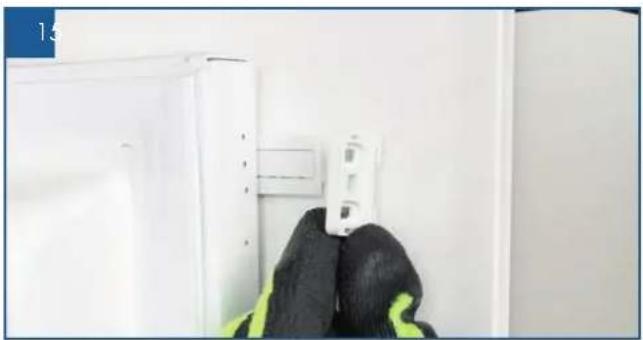
natural_image
Interior view of a kitchen appliance with a white cabinet and black gloves hanging (no visible text or symbols)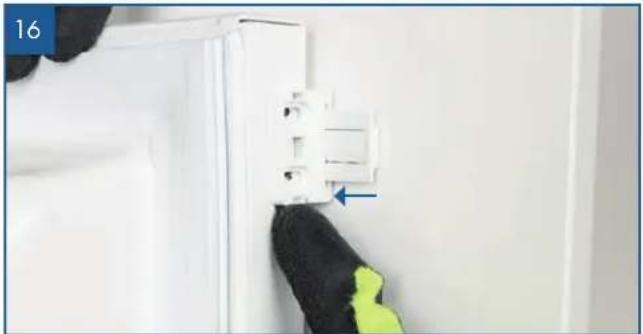
natural_image
Close-up of a hand cleaning a white wall-mounted electrical socket with a blue arrow indicating a component (no text or symbols visible)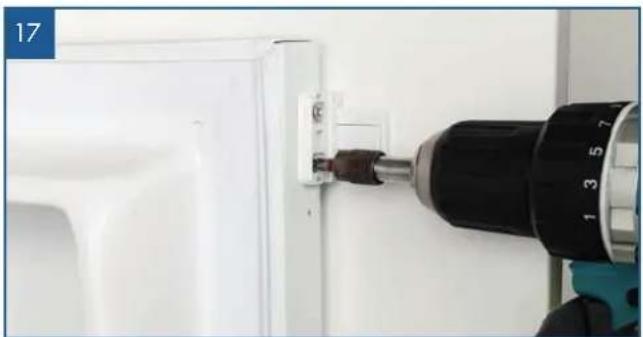
natural_image
Close-up of a hand using a drill bit to press down a white door panel (no visible text or symbols)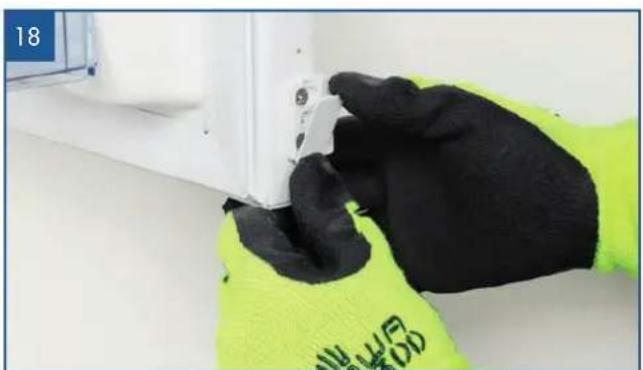
natural_image
Close-up of gloved hands installing or adjusting a white electrical component on a wall (no visible text or symbols)INSTALLATION GUIDE BUILT-IN REFRIGERATOR

VPIBKK88
FOREWORD
About this document
- This manual contains all information for the correct, efficient and safe use of the appliance.
- This manual is intended for the end user and/or buyer of this appliance.
- Make sure you have read and understood the instructions in this manual completely before installing or using the appliance. Keep this document for future use as long as you use and/or own the appliance.
- Coolblue B.V. cannot in any way be held liable for material or immaterial damage to you or to others, the appliance, your other belongings or belongings of others caused by not following the instructions in this manual.
- The warnings and safety instructions in this manual do not cover all possible circumstances and situations.
- If you contact our customer service, make sure you have the model number ready. The information can be found on the type plate or on the front of this manual.
Original instructions
This manual was originally written in Dutch. All other languages are translated documents. In the case of translation errors, the Dutch version is leading.
Copyright
The data depicted in this manual, including texts, photographs, graphic drawings, trademarks, (trade) names and logos, are the property of Coolblue B.V. and are protected by copyright, trademark law and/or any other intellectual property right, unless these data belong to a third party. You are never allowed to reproduce, transfer, distribute, store or make the contents of the manual available to third parties, in whole or in part, without the prior written consent of Coolblue B.V. and/or the third party to whom the data belong.

NOTE!
- You can also find the latest version of this manual online, at www.coolblue.nl/en if you search for the article number.
Veripart contact details
Veripart is a registered brand of Coolblue B.V. Customer service can be reached at: www.coolblue.nl/en/customer-service
1. PACKAGE CONTENTS
Assembly kit

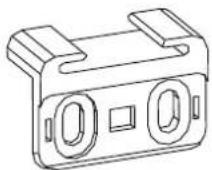
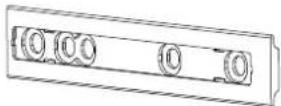
2x guides
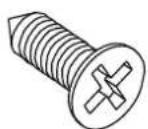
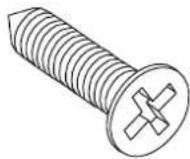
15x short screws
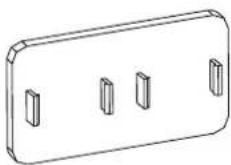
2x guide caps
2x long screws
2x sliding rails
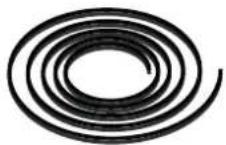
1x rubber gasket
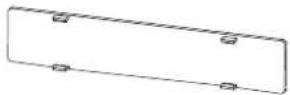
2x sliding rail caps
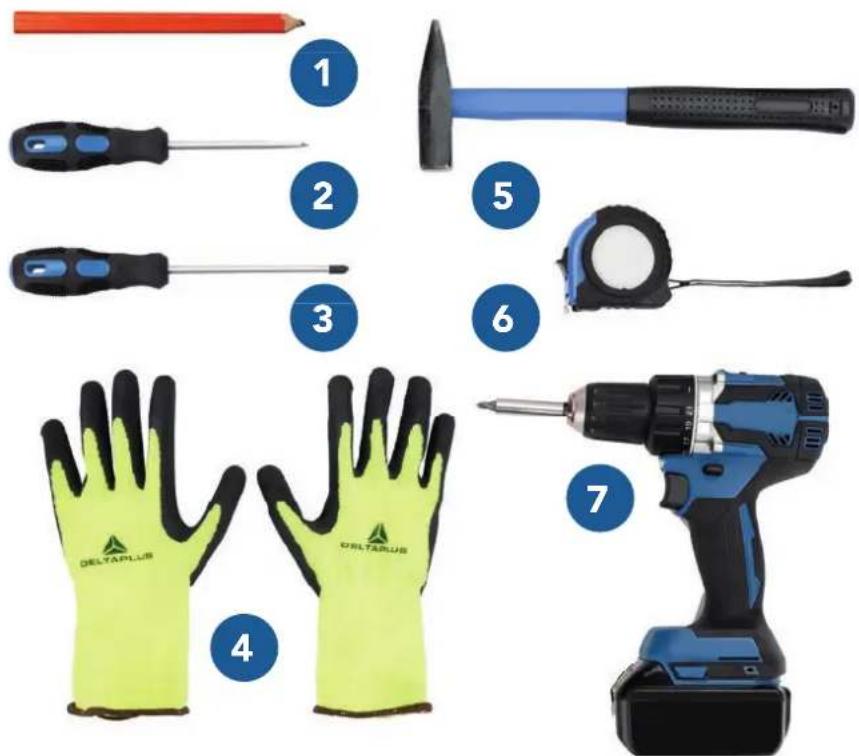
2. NECESSARY TOOLS
- Pencil marker
- Bradawl
- Crosshead screwdriver
- Gloves
- Hammer
- Tape measure
- Cordless drill and screwdriver
- Second person


45 minutes 2 people
text_image
1 2 3 5 6 7 4 DELTAPLUS DELTAPLUS3. LOCATION
The location where you place your appliance should be well ventilated and the air should not be too warm. Do not place the appliance near a heat source, such as a stove or boiler, and avoid direct sunlight, so that as to guarantee the cooling effect and save on energy consumption. Do not place the appliance in a damp place so that it cannot rust and there is no leakage current.
text_image
≥38mm ≥560mm ≥550mm 540mm 540mm 45mm 876~886mm 875mm 893mm 820mm 30mmHeat dissipation area
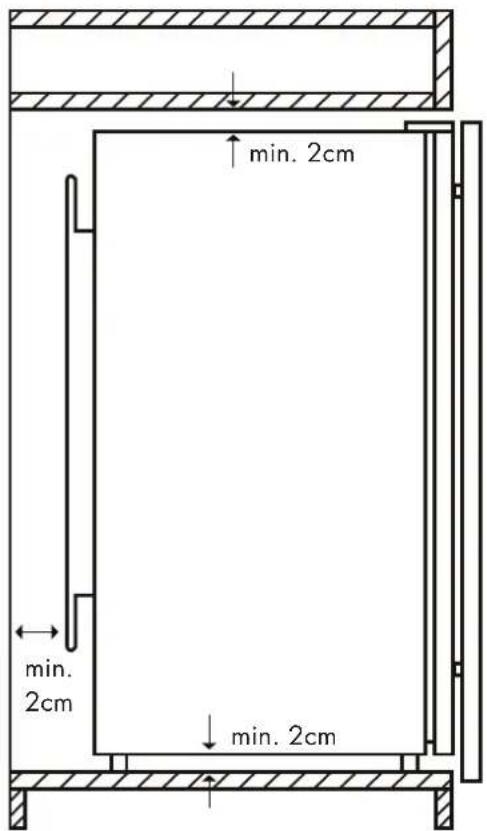
During operation, the appliance emits heat to the environment. Therefore there must be at least 2 centimeter clearance on the top and bottom, at least 2 centimeter on both sides and at least 2 centimeter on the back of the fridge.
- Pull the plug behind your refrigerator along in the direction of the socket, but do not plug it into the socket yet.
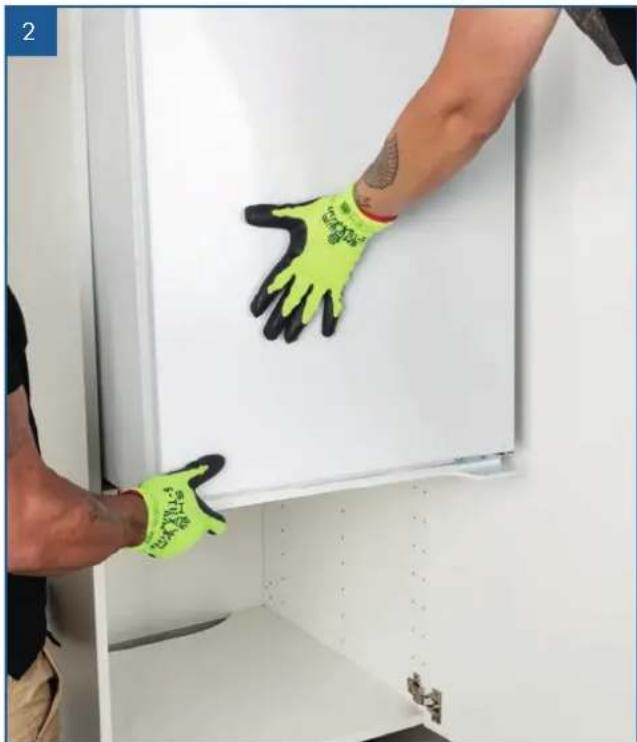
- Place the refrigerator in the cabinet in the right place. Please note:

Lift the appliance at the bottom, not by the door.

Do this with two people.
- Put the spacers at the bottom of the fridge against the edge of the cabinet.
Make sure the profile at the top falls over the edge of the cabinet.
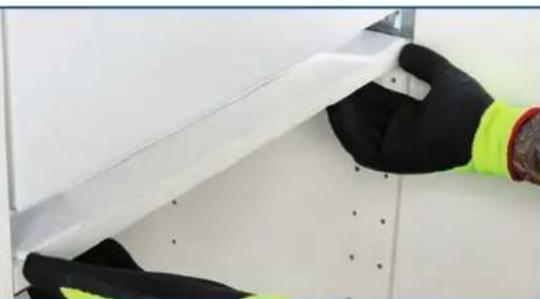
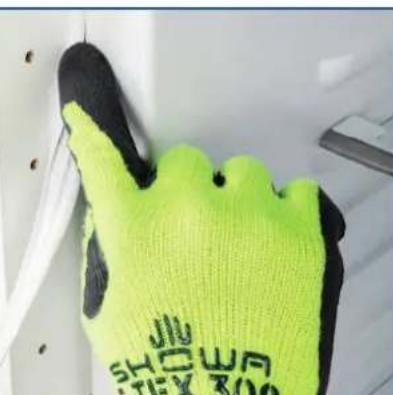
- Place the cover strip provided between the wall and refrigerator and ensure that it is properly secured and closes the space.
natural_image
Person wearing a bright green glove installing or adjusting a white cabinet panel (no visible text or symbols)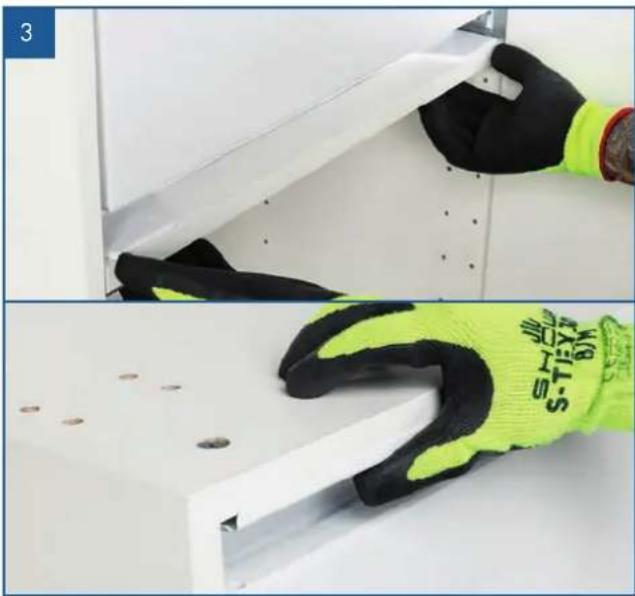
natural_image
Close-up of a hand holding a white shelf with black gloves, next to a close-up of the same gloves (no text or symbols visible)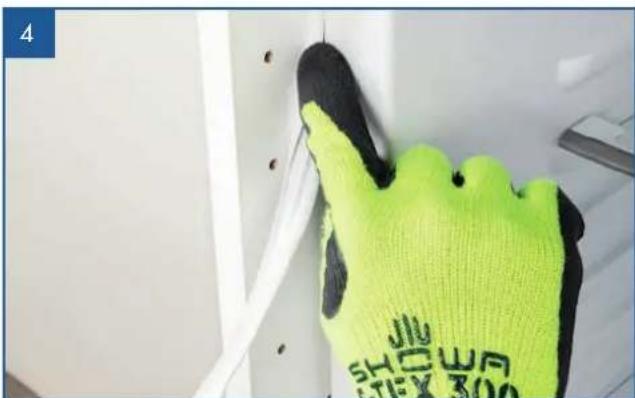
natural_image
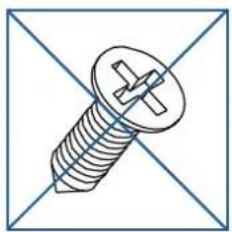
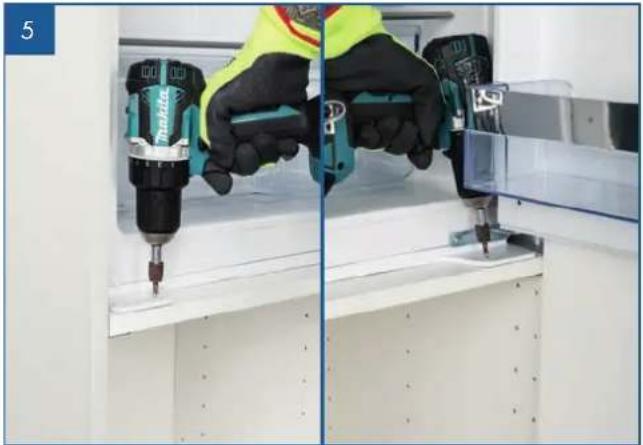
Hand in bright yellow glove cleaning a white wall corner with black dots (no text or symbols visible)- First screw the bottom of the fridge to the cabinet (at two points). Use the long screws for this.
natural_image
Simple line drawing of a screw with a cross mark, crossed out by two diagonal lines (no text or symbols)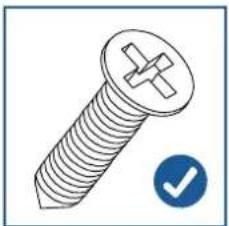
natural_image
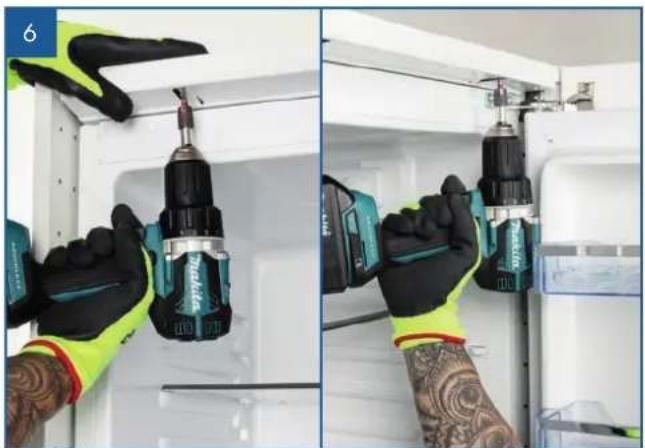
Illustration of a screw with a cross mark and a blue checkmark (no text or symbols)- Then screw the top of the fridge to the cabinet.
In the next steps, you attach the door of the refrigerator to the cabinet door.
-
Screw the guides temporarily to the refrigerator. Note: secure with one screw in the middle hole. (In step 15, the guides must be released again)
-
Slide the guide into the sliding rail.
natural_image
Close-up of hands using a power drill into a white lab or workshop (no visible text or symbols)
natural_image
Two-panel photo showing hands using a power tool to install a white appliance into a kitchen (no text or symbols visible)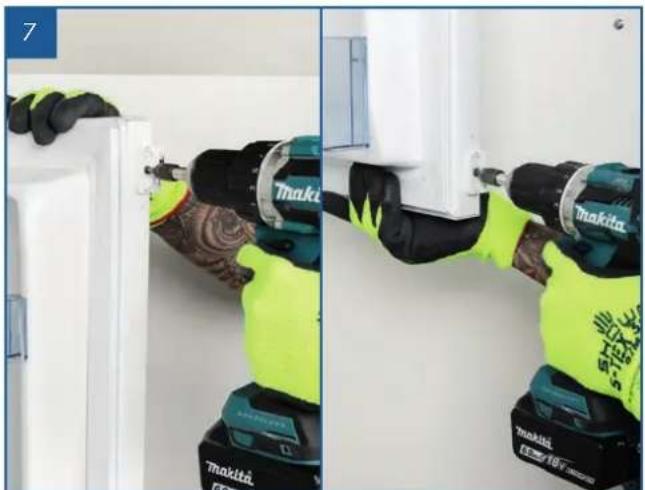
natural_image
Two-panel photo showing a person in a green safety vest using a power tool to lift a white door; no visible text or symbols.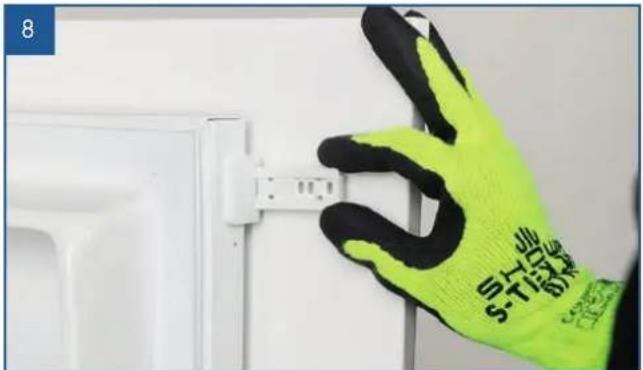
text_image
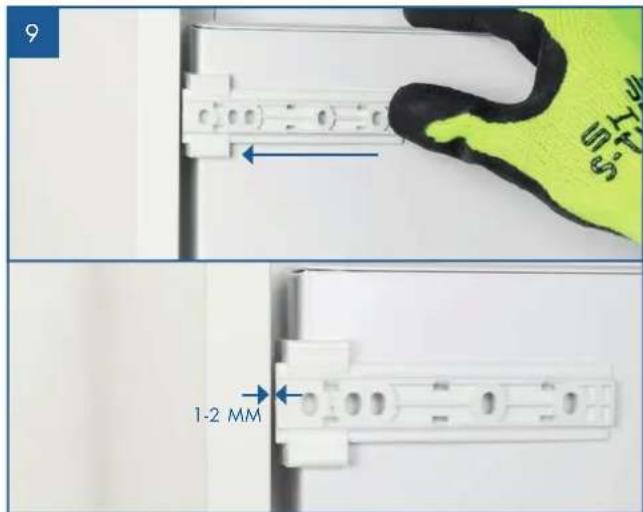
8 S.T.门 S.T.门- Close the door and slide the sliding rail against the inside of the cabinet.
Keep 1 to 2 mm clearance between the sliding rail and the cabinet.
-
Open the fridge door and place it against the cabinet door (without moving the sliding rail). Now mark off the position of the sliding rail with the pencil.
-
Now mark the screw holes of the sliding rail on the door.
-
Create pilot holes using the bradawl.
-
Then screw the sliding rail to the door panel.
text_image
9 1-2 MM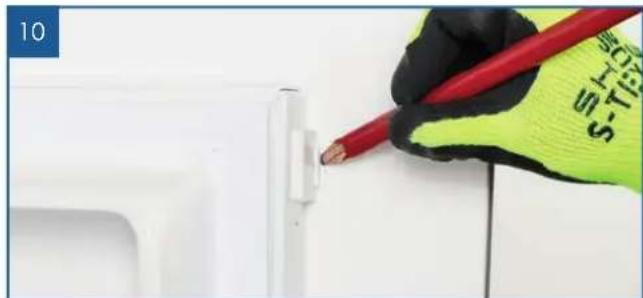
natural_image
Hand in green safety glove using red pencil to apply a white electrical outlet on a white surface (no text or symbols visible)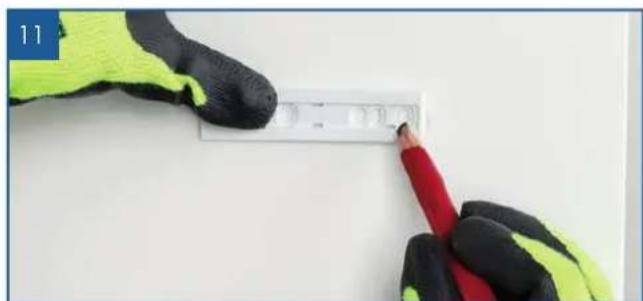
natural_image
Close-up of gloved hands holding a white rectangular object with red and black markings, no visible text or symbols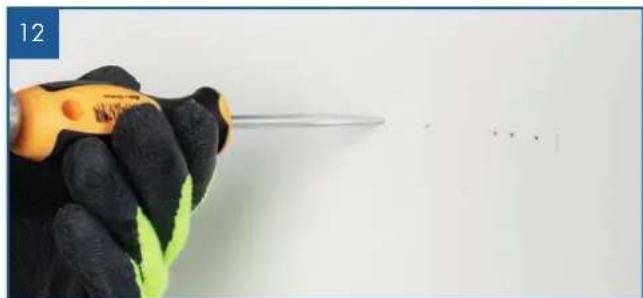
natural_image
Close-up of a gloved hand holding a screwdriver against a plain white background (no text or symbols visible)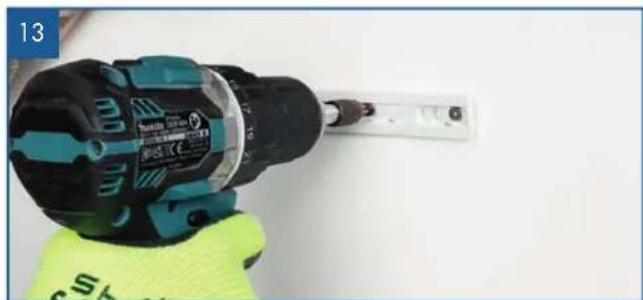
natural_image
Close-up of a power drill putter with a screwdriver, wearing a yellow glove (no visible text or symbols)-
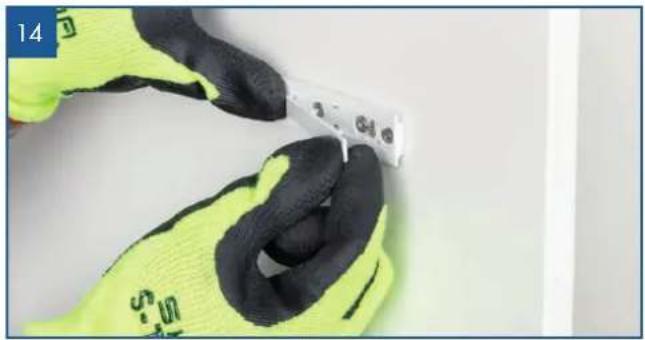
Mount the sliding rail cap.
-
Dismantle the guide of the refrigerator door.
-
Slide the guide onto the sliding rail of the cabinet door, and slide it against the side of the fridge door.
-
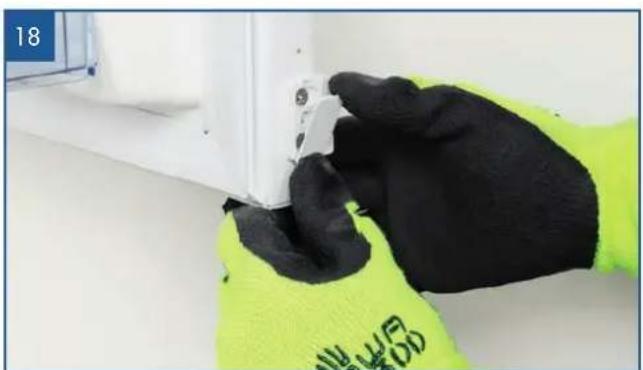
Screw the guides to the fridge door, screw them hand tight. Now test if the fridge door closes properly and draws a vacuum. If this is not the case, you can make the door close properly by adjusting the guides. Then screw the guides firmly.
-
Then mount the guide caps.
Wait at least four hours before putting the plug into the socket; this allows the oil to flow back to the compressor.
natural_image
Close-up of gloved hands holding a small white tool, no visible text or symbols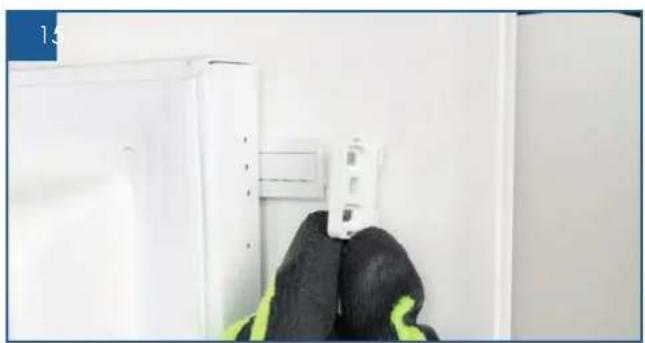
natural_image
Interior view of a kitchen appliance with white cabinet and black gloves, no visible text or symbols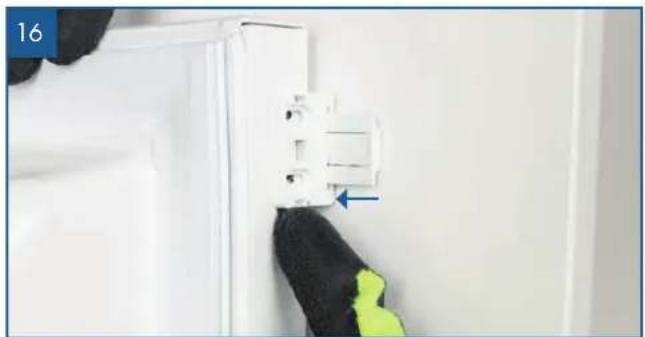
natural_image
Close-up of a hand holding a white electrical outlet with a blue arrow pointing to it, against a plain wall (no text or symbols visible)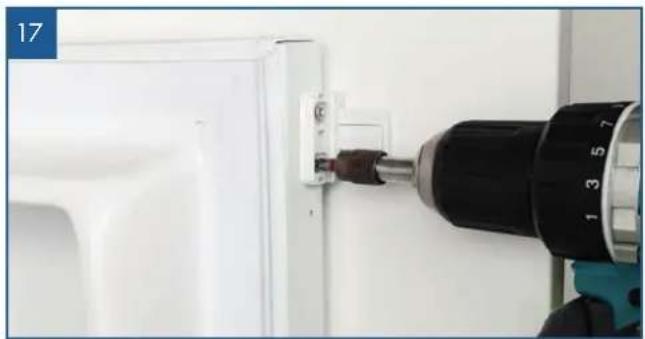
natural_image
Close-up of a hand operating a drill bit on a white appliance door, no visible text or symbols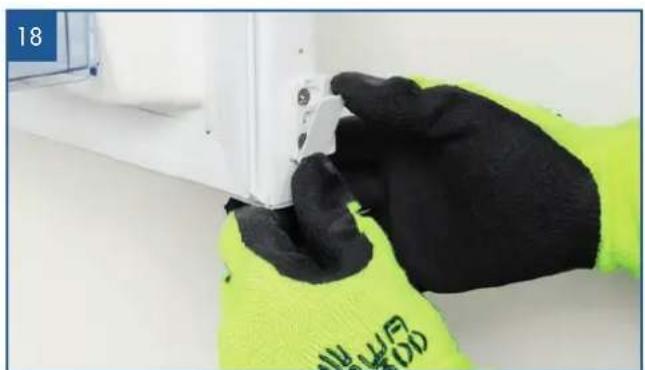
natural_image
Close-up of a gloved hand in bright yellow glove adjusting a white electrical component (no visible text or symbols)GUIDE D'INSTALLATION RÉFRIGÉRATEUR ENCASTRABLE


VPIBKK88
AVANT-PROPOS
natural_image
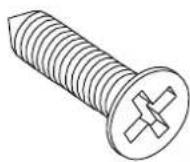
Simple line drawing of a rectangular object with three vertical slots, no text or symbols present.2 x vis longue
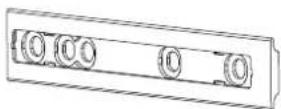
2 x rail
text_image
≥38mm ≥560mm ≥550mm 540mm 540mm 45mm 876~886mm 875mm 893mm 820mm 30mm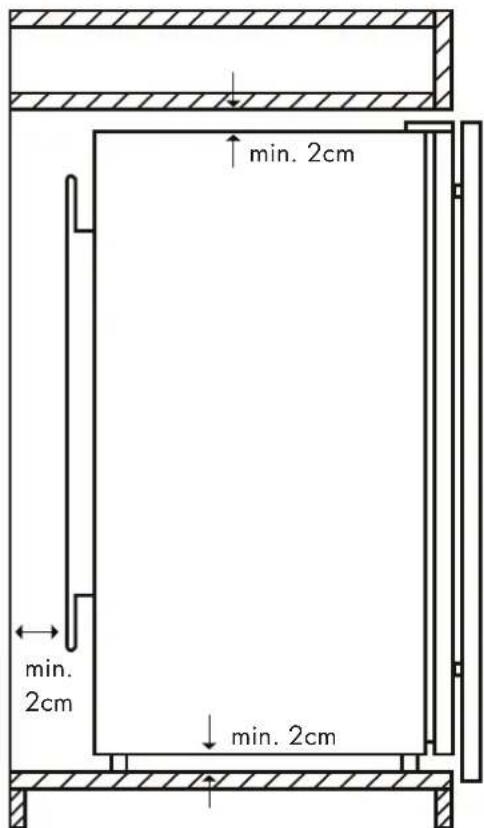
natural_image
Person wearing a bright glove installing or adjusting a white cabinet panel (no visible text or symbols)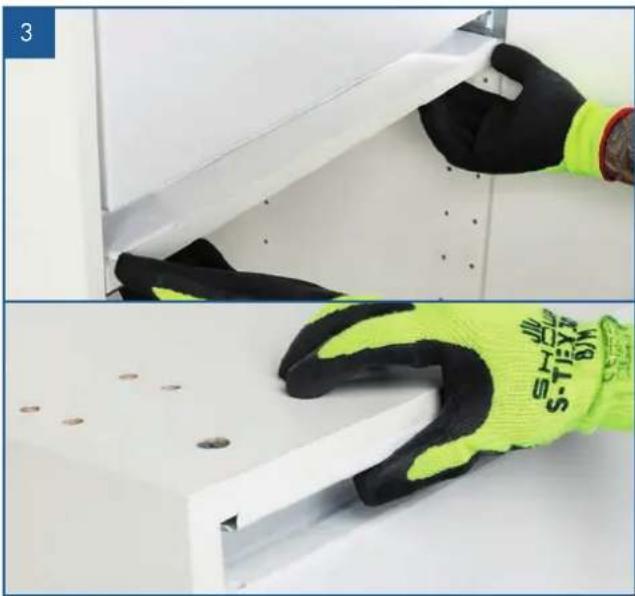
natural_image
Close-up of a gloved hand holding a white shelf with black gloves, next to a close-up of the same gloves (no text or symbols visible)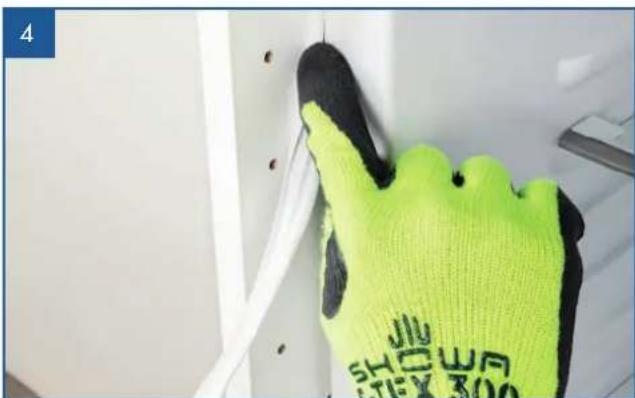
natural_image
Close-up of a gloved hand holding a white wall socket with black screw, no visible text or symbolsnatural_image
Simple line drawing of a screw with a cross mark, crossed out by two diagonal lines (no text or symbols)
natural_image
Illustration of a screw with a cross symbol and a blue checkmark (no text or labels)natural_image
Person using a power tool to work on a white panel, no visible text or symbols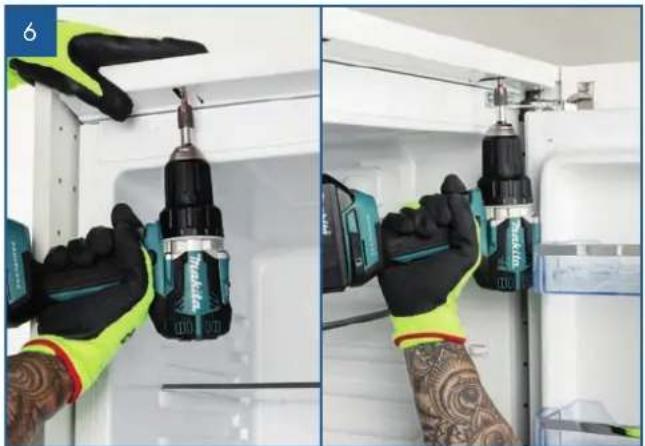
natural_image
Two-panel photo showing hands using a power tool to install a white appliance into a kitchen (no visible text or symbols)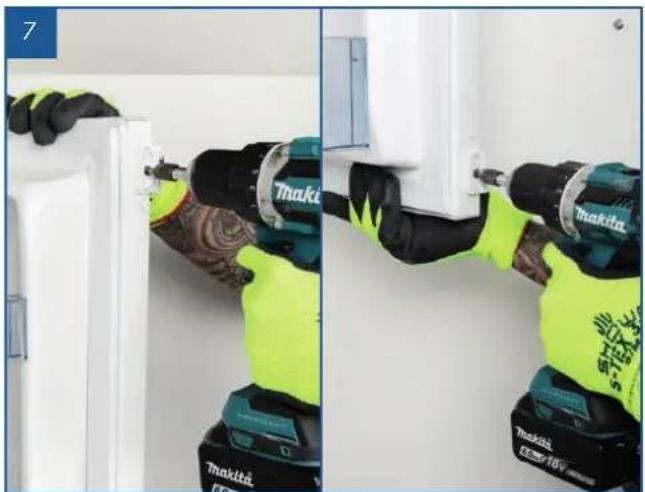
natural_image
Two-panel photo showing a person in a white appliance using a Driller tool, with no visible text or symbols.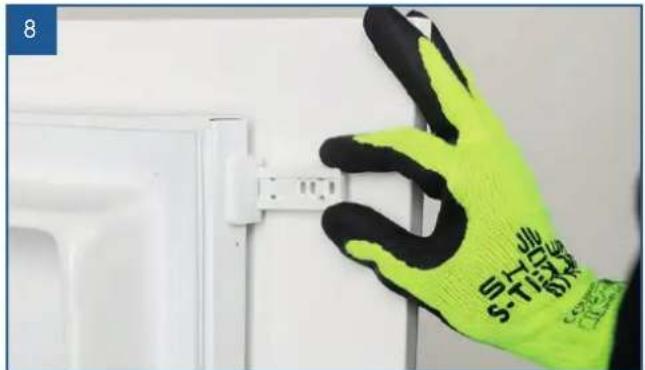
natural_image
Hand in yellow glove installing a white electrical socket on a wall (no text or symbols visible)natural_image
Hand in yellow glove using red pencil to apply or install a white electrical component (no text or symbols visible)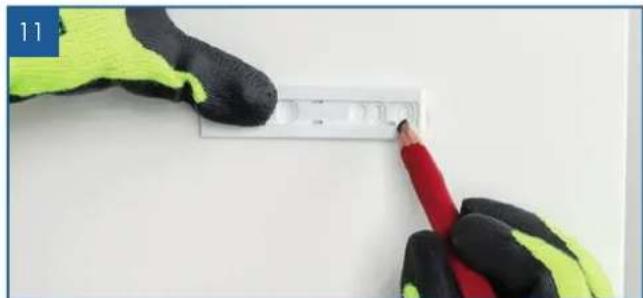
natural_image
Close-up of gloved hands holding a white rectangular object with black and red markings, no visible text or symbols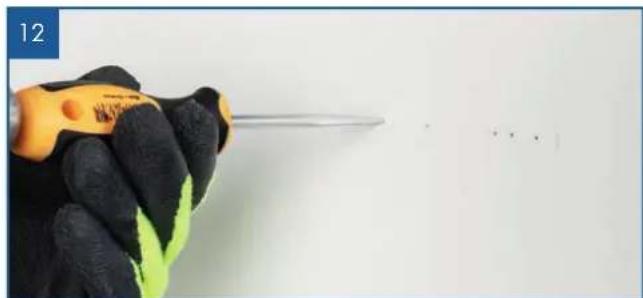
natural_image
Close-up of a gloved hand holding a screwdriver against a plain white background (no text or symbols visible)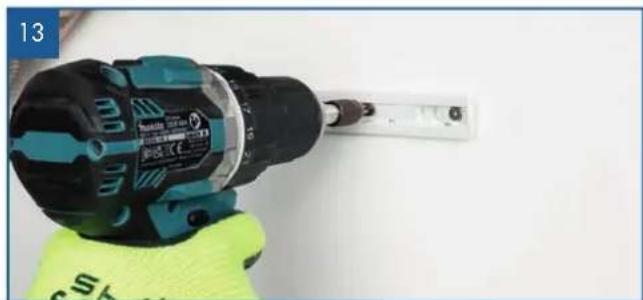
natural_image
Close-up of a power drill putter with a green and black body, no visible text or symbols on the tool or background.natural_image
Close-up of gloved hands holding a small white tool, no visible text or symbols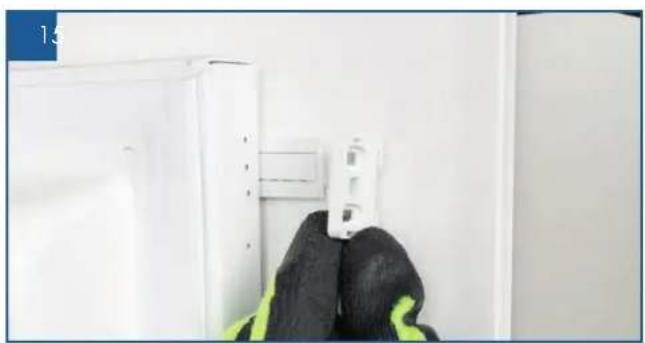
natural_image
Interior view of a kitchen appliance with white cabinet and black fabric, no visible text or symbols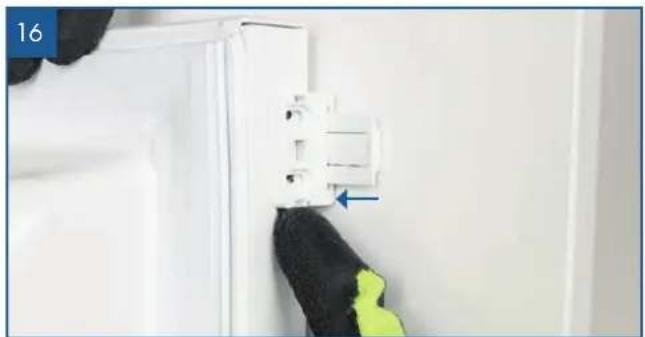
natural_image
Close-up of a hand holding a white plastic door clip with a blue arrow pointing to it, against a plain wall (no text or symbols visible)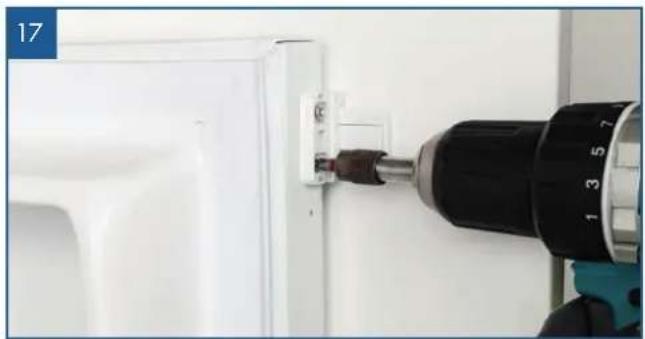
natural_image
Close-up of a hand operating a screwdriver inserted into a white refrigerator (no visible text or symbols)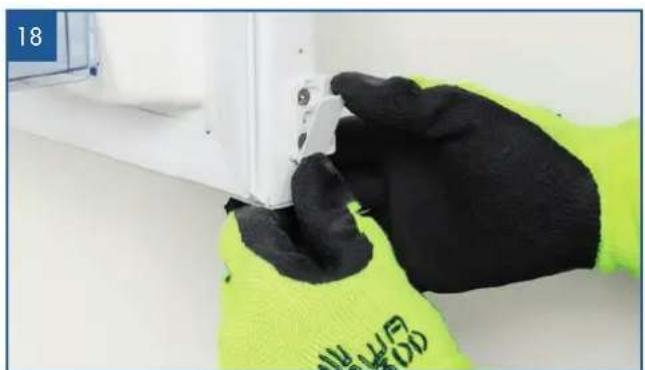
natural_image
Close-up of gloved hands installing or adjusting a white panel on a wall, wearing a bright yellow glove (no visible text or symbols)
text_image
≥38mm ≥560mm ≥550mm 540mm 540mm 45mm 876~886mm 875mm 893mm 820mm 30mmnatural_image
Person wearing a bright glove installing or adjusting a white cabinet panel (no visible text or symbols)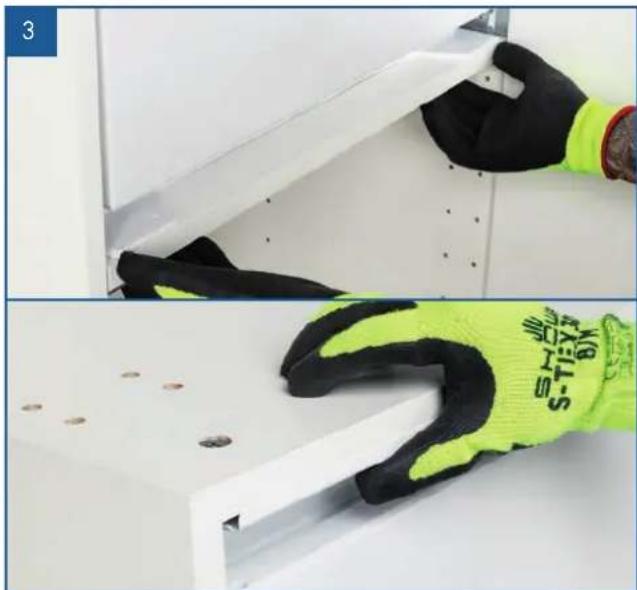
natural_image
Two-panel photo showing a gloved hand holding a white shelf with black gloves, and a close-up of the gloves resting on a white shelf (no visible text or symbols)
natural_image
Hand in bright yellow glove cleaning a white wall with black nail polish (no text or symbols visible)natural_image
Simple line drawing of a screw with a cross mark, crossed out by two diagonal lines (no text or symbols)
natural_image
Illustration of a screw with a cross symbol and a blue checkmark (no text or labels)natural_image
Close-up of hands using a power drill into a white lab or workshop (no visible text or symbols)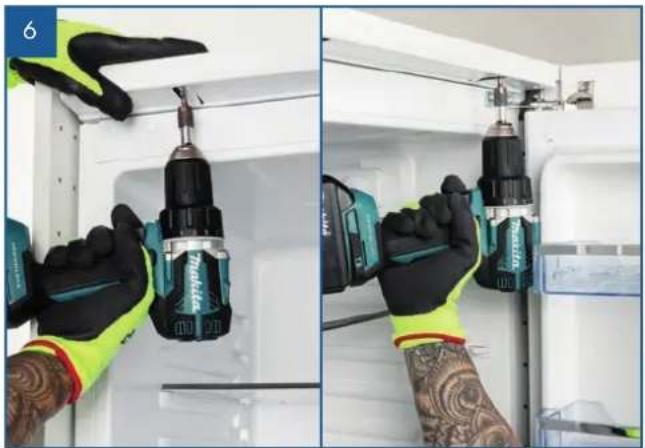
natural_image
Two-panel photo showing hands using a power tool to install a battery into a white appliance (no text or symbols visible)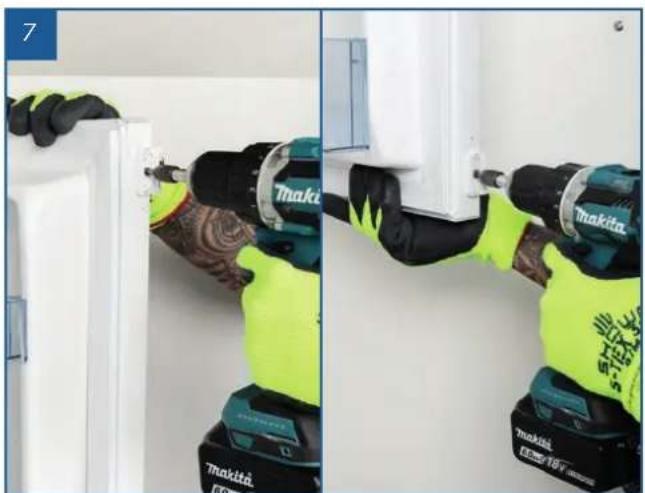
natural_image
Two-panel photo showing a person in a green safety vest using a power tool to clean or install a white door (no text or symbols visible)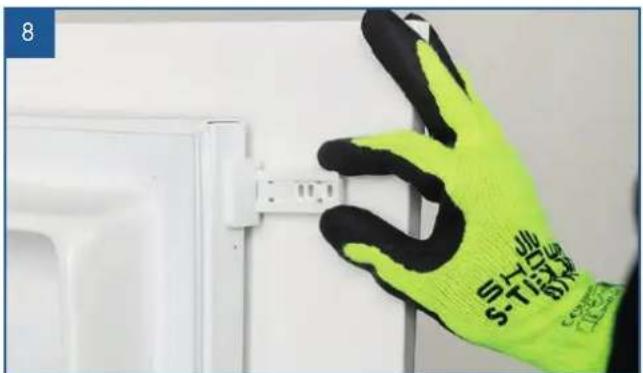
natural_image
Hand in yellow glove installing a white electrical component on a door (no text or symbols visible)
natural_image
Close-up of a hand holding a red pencil next to a white electrical outlet (no text or symbols visible)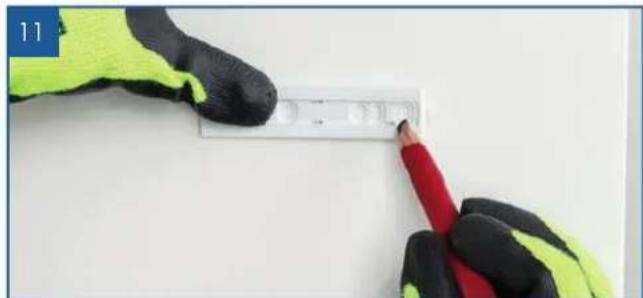
natural_image
Close-up of gloved hands installing a white rectangular object on a white surface, with a red pencil inserted (no text or symbols visible)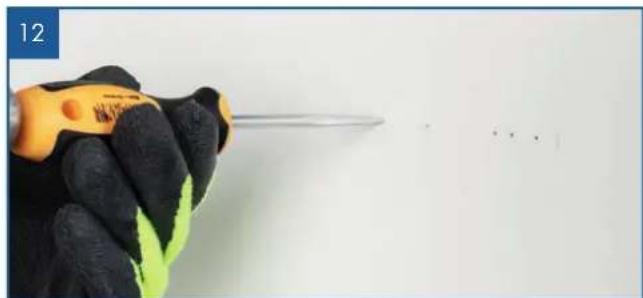
natural_image
Close-up of a hand holding a screwdriver against a plain white background (no text or symbols visible)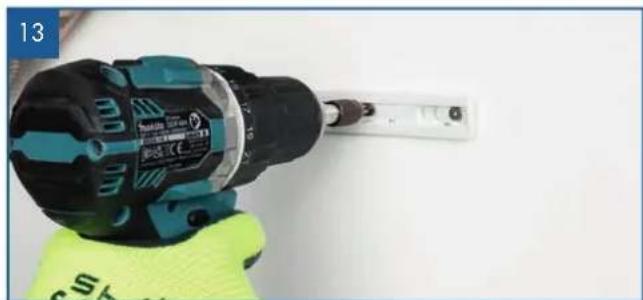
natural_image
Close-up of a power drill putter with a tool, held in a green glove (no visible text or symbols)natural_image
Close-up of gloved hands holding a small tool, no visible text or symbols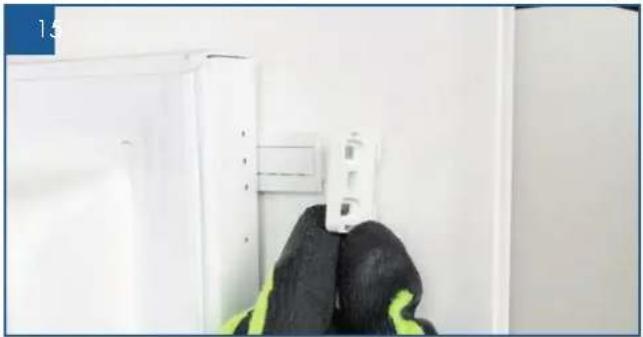
natural_image
Interior view of a white appliance cabinet with a black cloth hanging from the side (no visible text or symbols)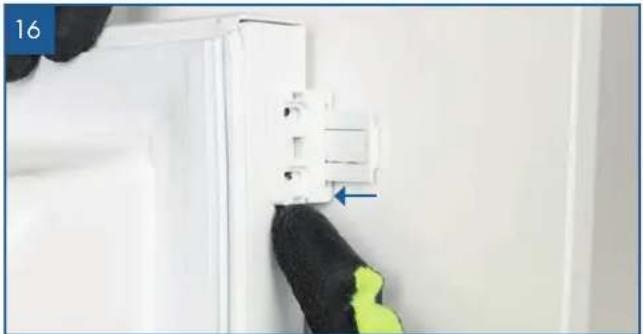
natural_image
Close-up of a hand cleaning a white wall-mounted electrical component with a blue arrow indicating a detail (no text or symbols visible)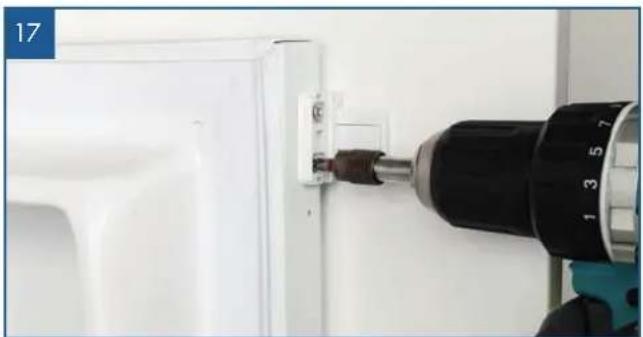
natural_image
Close-up of a hand using a drill bit to press down a white door panel (no visible text or symbols)