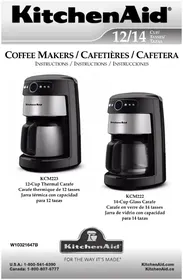
KCM223 - Coffee machine KITCHENAID - Free user manual and instructions
Find the device manual for free KCM223 KITCHENAID in PDF.


| Product Type | Drip Coffee Maker |
| Brand | KitchenAid |
| Model | KCM223 |
| Capacity | 14 cups (glass carafe) / 12 cups (thermal carafe) |
| Power | 1100 W |
| Voltage | 120 V~, 60 Hz |
| Carafe Type | Glass carafe (14 cups) or thermal carafe (12 cups) |
| Included Filter | Gold-tone permanent filter |
| Measuring Spoon | Included (1 scoop per cup) |
| Auto Shut-off | Programmable from 0 to 4 hours (in 30-min increments) |
| Brew Timer | 24-hour clock, program up to 24 hours in advance |
| Pause and Pour | Yes (allows serving a cup before brewing ends) |
| Brew Strength | Regular (REG) or Bold (BOLD) |
| Variable Heat Plate | Models with glass carafe: High, Medium, Low |
| 1-4 Cup Function | Optimizes brewing for small quantities |
| Clean Indicator | Indicates when descaling is needed |
| Water Reservoir | Removable, with level indicators |
| Brew Basket | Removable, compatible with paper or permanent filters |
| Cleaning | Basket and permanent filter dishwasher-safe (top rack) |
| Descaling | Use white vinegar or descaling product |
| Water Filter | Optional, replaceable (every 3 months recommended) |
| Safety | Grounded plug, do not immerse, hot surfaces |
| Warranty | 1-year limited (hassle-free replacement in USA/Canada) |
Frequently Asked Questions - KCM223 KITCHENAID
User questions about KCM223 KITCHENAID
0 question about this device. Answer the ones you know or ask your own.
Ask a new question about this device
Download the instructions for your Coffee machine in PDF format for free! Find your manual KCM223 - KITCHENAID and take your electronic device back in hand. On this page are published all the documents necessary for the use of your device. KCM223 by KITCHENAID.
USER MANUAL KCM223 KITCHENAID
natural_image
Exterior view of a KitchenAid coffee maker with black and silver casing (no visible text or symbols beyond branding)KCM223
natural_image
Exterior view of a KitchenAid coffee maker with black and silver casing (no visible text or symbols on device body)KCM222
DISPLAY AND CONTROL PAD FEATURES....7
COFFEE BREWING SUGGESTIONS: ADVICE FOR GREAT TASTE ....8
PREPARING YOUR COFFEE MAKER FOR USE......8
KITCHENAID® COFFEE MAKER USE......10
Pause and Pour Feature ....12
Automatic Brew Timer 12
Brew Strength 12
Variable Warmth Control/Selectable Automatic Shutoff ....12
COFFEE MAKER CARE ....13
Cleaning Needed Indicator ....13
Clean 13
TROUBLESHOOTING....14
PROOF OF PURCHASE AND PRODUCT REGISTRATION ....15
WARRANTY....16
TABLE DES MATIÈRES
SÉCURITÉ DE LA CAFETIÈRE .....18
SPÉCIFICATIONS ÉLECTRIQUES .....19
CARACTÉRISTIQUES DE LA CAFETIÈRE KITCHENAID®......20
AFFICHAGE ET CARACTÉRISTIQUES DE LA TOUCHE DE COMMANDE......23
SUGGESTIONS D'INFUSION DE CAFÉ : CONSEIL POUR UN ARÔME IDÉAL......24
PRÉPARATION DE LA CAFETIÈRE POUR UTILISATION....25
UTILISATION DE LA CAFETIÈRE KITCHENAID®......26
CARACTÉRISTIQUES AVANCÉES DE LA
CAFETIÈRE....29
CÓMO PREPARAR LA CAFETERA PARA SU USO....44
USO DE LA CAFETERA KITCHENAID®......46
CARACTERÍSTICAS SUPERIORES DE LA
CAFETERA 48
Your safety and the safety of others are very important.
We have provided many important safety messages in this manual and on your appliance. Always read and obey all safety messages.

This is the safety alert symbol.
This symbol alerts you to potential hazards that can kill or hurt you and others.
All safety messages will follow the safety alert symbol and either the word "DANGER" or "WARNING." These words mean:
DANGER
You can be killed or seriously injured if you don't immediately follow instructions.
WARNING
You can be killed or seriously injured if you don't follow instructions.
All safety messages will tell you what the potential hazard is, tell you how to reduce the chance of injury, and tell you what can happen if the instructions are not followed.
IMPORTANT SAFEGUARDS
When using electrical appliances, basic safety precautions should always be followed, including the following:
■ Read all instructions.
■ Do not touch hot surfaces. Use handles or knobs.
■ To protect against electrical shock, do not immerse cord, plugs, or coffee maker in water or other liquid.
■ Close supervision is necessary when any appliance is used by or near children.
■ Unplug coffee maker from outlet when not in use and before cleaning. Allow to cool before putting on or taking off parts.
■ Do not operate any appliance with a damaged cord or plug or after the appliance malfunctions or has been damaged in any manner. Return appliance to the nearest Authorized Service Facility for examination, repair or adjustment.
■ The use of accessory attachments not recommended by the appliance manufacturer may cause injuries.
■ Do not use outdoors.
■ Do not let cord hang over edge of table or counter, or touch hot surfaces.
■ Do not place on or near a hot gas or electric burner, or in a heated oven.
■ Do not use appliance for other than intended use.
■ Do not use appliance without lid properly placed on container (carafe).
■ The container (carafe) is designed for use with this appliance. It must never be used on a range top or in a microwave oven.
■ Do not set a hot container (carafe) on a wet or cold surface.
■ Do not use a cracked container (carafe) or a container having a loose or weakened handle.
■ Do not clean container with abrasive cleaners, steel wool pads, or other abrasive material.
■ This product is designed for household use only.
SAVE THESE INSTRUCTIONS
ELECTRICAL REQUIREMENTS
WARNING

Electrical Shock Hazard
Plug into a grounded 3 prong outlet.
Do not remove ground prong.
Do not use an adapter.
Do not use an extension cord.
Failure to follow these instructions can result in death, fire, or electrical shock.
Volts: 120 volts AC only.
Hertz: 60 Hz
NOTE: This coffee maker has a 3-prong grounded plug. To reduce the risk of electrical shock, this plug will fit in an outlet only one way. If the plug does not fit in the outlet, contact a qualified electrician. Do not modify the plug in any way.
Do not use an extension cord. If the power supply cord is too short, have a qualified electrician or serviceman install an outlet near the appliance.
A short power supply cord (or detachable power supply cord) should be used to reduce the risk resulting from becoming entangled in or tripping over a longer cord.
Longer detachable power supply cords or extension cords are available and may be used.
If a longer detachable power supply cord or extension cord is used:
■ The marked electrical rating of the cord set or extension cord should be at least as great as the electrical rating of the appliance.
■ The cord should be arranged so that it will not drape over the countertop or tabletop where it can be pulled on by children or tripped over unintentionally.
If the appliance is of the grounded type, the extension cord should be a grounding-type 3-wire cord.
KITCHEN AID® COFFEE MAKER FEATURES
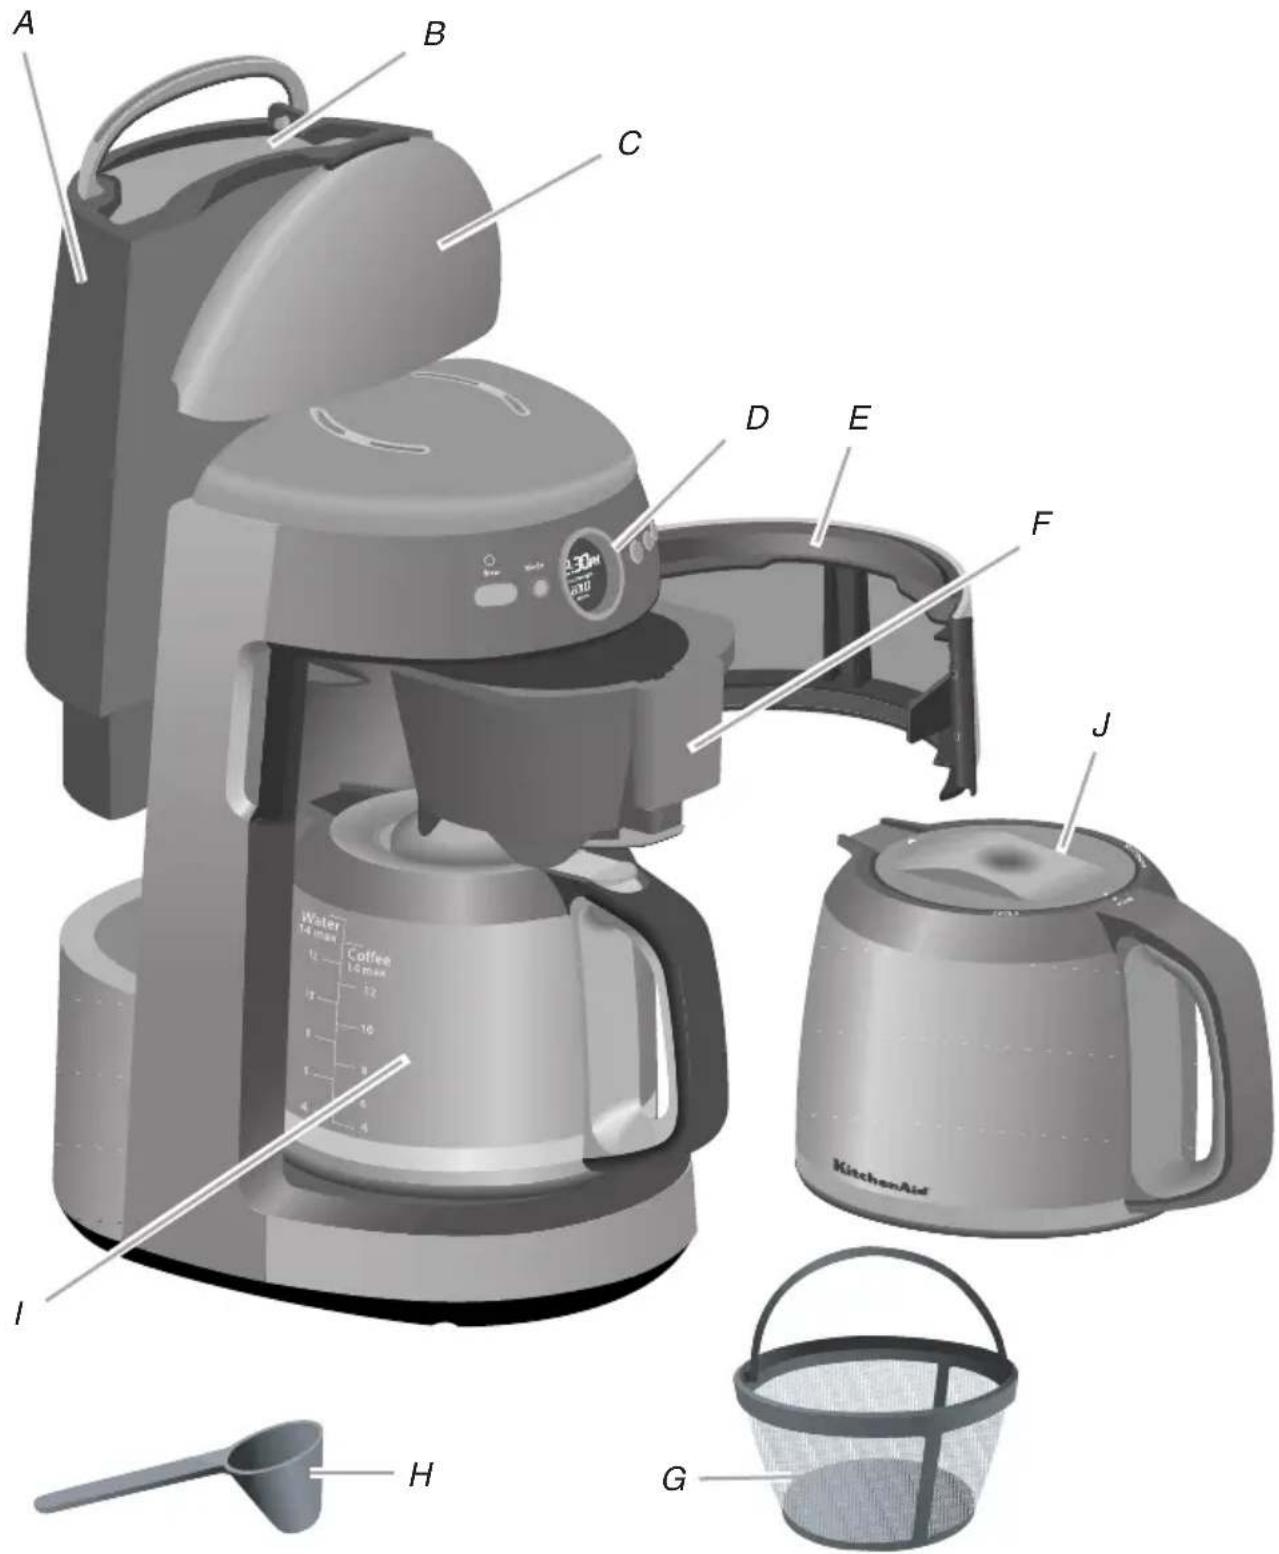
A. Removable water tank
B. Water tank fill channel
C. Water tank lid
D. Programmable display
E. Hinged brew basket door
F. Brew basket
G. Gold Tone permanent filter
H. Coffee scoop
I. Glass carafe (on glass carafe models only)
J. Thermal carafe (on thermal carafe models only
1-4 Cup Feature
This feature ensures optimum flavor even when you're not brewing a full pot.
Clean Alert and Clean Feature
The Clean Alert indicator reminds you when the coffee maker needs to be cleaned. The Clean Mode can then be activated to descale your coffee maker.
Pause and Pour Feature
Pause and pour lets you remove the carafe and pour a cup of coffee before brewing is finished. A special valve seals the brew basket tightly, eliminating most drips.
End-Of-Brewing Tone
A tone sounds when coffee is finished brewing.
Selectable Automatic Shutoff
This feature allows you to select automatic shutoff times from 0-4 hours in 30-minute increments.
Brew Basket Door
Access the removable brew basket by opening the brew basket door manually. The spring loaded/dampened door includes a detent to assure the door is closed completely.
Brew Basket
Open the brew basket door to access the removable brew basket. The brew basket holds paper coffee filters or the Gold Tone permanent filter. The brew basket can be washed in the top rack of a dishwasher.
Removable Water Tank
The coffee maker features a convenient removable water tank with water level indicators. Remove the tank and add water directly to the water tank or lift the lid to add water. It is recommended that the tank be hand washed.
Automatic Brew Timer
An easy to set 24 hour brew timer will brew coffee at the selected time, day or night.
Fresh Brew Timer
The Fresh Brew Timer is programmable from 0-240 minutes in 30-minute increments. After the brew process is complete, the time since brewed will be displayed in 1-minute increments.
Glass or Thermal Carafe
The 14-cup glass and 12-cup thermal carafes feature a dripless pouring spout and comfortable soft grip handle. Both carafes can be washed in the top rack of a dishwasher.
Gold Tone Permanent Filter
The high-performance Gold Tone filter eliminates the need for paper coffee filters. Coffee maker can also use paper filters, if desired. The Gold Tone Filter can be washed in the top rack of a dishwasher.
Water Filter (not shown)
The replaceable carbon filter can be found at your local retailer or on www.kitchenaid.com.
Coffee Scoop
Use one level scoop of ground coffee for each cup desired.
Power Interrupt
If the power is interrupted for less than 1 minute, the coffee maker will remember the preprogrammed settings.
Clock Display
Displays the time of day with AM and PM indicators. The energy saving sleep mode feature dims the clock display when the coffee maker is not in use.
Variable Brew Strength Selector
Allows you to select between REG and BOLD brew strengths.
Full-Length Cord Storage (not shown)
Compartment in the back of the coffee maker keeps excess cord out of the way.
Variable Warmth Control (glass carafe models only)
Allows you to select High, Medium, or Low settings for the carafe heating plate.
Heat Pump (not shown)
Powerful heat pump brews rich, flavorful coffee.
Electronic Temperature Control
Electronic temperature control regulates the powerful 1100-watt heat pump to ensure consistent brewing every time.
DISPLAY AND CONTROL PAD FEATURES
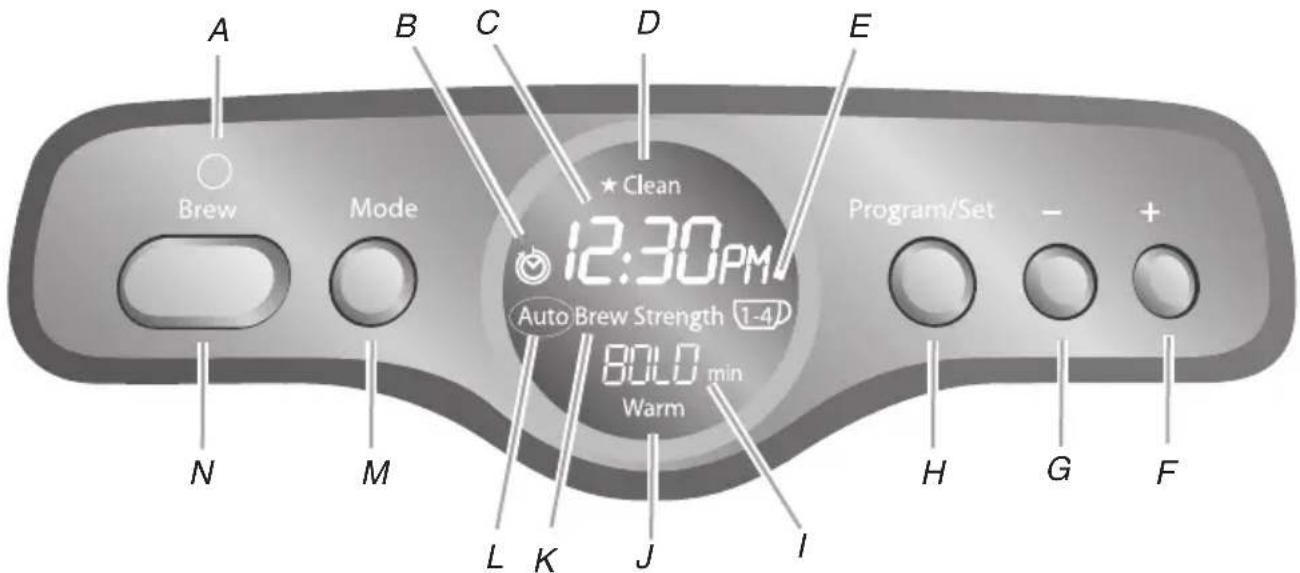
A. Power indicator
B. Clock/warm timer indicator
C. Clock/automatic brew time display
D. Cleaning needed indicator
E. 1-4 cup indicator
F. “+” (plus) button
G. “-” (minus) button
H. Program/set button
I. Mode selection/brew strength/time since brewed indicator area
J. Warm indicator
K. Brew strength indicator
L. Auto indicator
M. Mode button
N. Brew button
DISPLAY FEATURES:
Clock Display
Shows the time-of-day with AM or PM indicator and automatic brew time.
Time Since Brew Display
(glass carafe models only)
Display shows the time elapsed since the completion of the brewing cycle. Time will be displayed in minutes up to the maximum of 240 minutes. The display will alternate between “Time Since Brew” and the temperature (HIGH, MED, or LOW).
Cleaning Needed Indicator
The indicator will light after brewing if the coffee maker requires descaling.
1-4 Cup
This special cycle ensures optimum flavor when brewing small pots of coffee. An indicator light shows when the 1-4 cup brew cycle is activated.
Brew Strength Indicator
Indicates brew strength (REG or BOLD).
Auto Indicator
Display is on when in the "Automatic Brew" mode.
CONTROL PAD FEATURES:
Brew Button
Press to turn the coffee maker on or off. Press and hold to set the "Auto" mode.
Mode Button
Press to select program modes.
Program/Set Button
Press to enter program modes. Press and hold to set the mode.
“+” (plus) and “-” (minus) Buttons
Use the “+” (plus) and “-” (minus) buttons to program the coffee maker features.
COFFEE BREWING SUGGESTIONS:
ADVICE FOR GREAT TASTE
Fresh Coffee Beans
Truly great coffee can only come from fresh coffee beans. To preserve the freshness of your beans, keep the beans in an opaque, airtight container and store them in a cool, dry place. Refrigeration is not recommended since condensation tends to form on the beans whenever the container is opened. Freezing can help preserve beans stored for an extended period, but it will also impair flavor.
The Right Grind
The best cup of coffee comes from coffee beans that are properly ground just before brewing. When grinding, be sure to grind your coffee to a medium grind level, the appropriate grind for automatic drip coffee makers.
Look for the KitchenAid® blade or burr coffee grinders at your local retailer or online at www.kitchenaid.com.
The Proper Amount of Ground Coffee
A good starting point is one scoop of coffee (scoop provided) for every cup of brew water marked on the glass carafe or the water tank. Finer grinds usually require less coffee but may also produce bitterness and clog the filter.
For weaker coffee, brew using the suggested ratio of coffee grounds and water, then dilute with hot water. This maximizes flavor and minimizes bitterness.
Brew Water Purity
Great tasting coffee starts with fresh water. The removable water tank is easy to fill with water to give you great tasting coffee every time. It's also easy to clean so you can always make your coffee with the freshest water.
Where local water is extremely poor, you may wish to use bottled water. Do not use distilled water or mineral water since they can damage your coffee maker.
Coffee Maker Cleanliness
Since the coffee oils that build up on the brew basket and carafe can go stale and impair the flavor of the brewed coffee, it's important that these two items are cleaned daily in order to make the best tasting coffee.
PREPARING YOUR COFFEE MAKER FOR USE
Pre-Use Cleaning
Wash the brew basket, Gold Tone permanent filter, and carafe in hot, soapy water, then rinse with clean water and dry. Do not use abrasive cleansers or scouring pads.
Installing the Water Filter
Use of the water filter is strongly recommended. Use of the filter is optional. The coffee maker will operate normally without it.
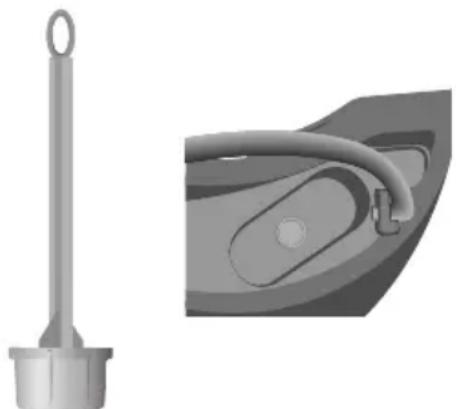
- The filter consists of a long handle with a filter cartridge at the end.
- Place the filter cartridge in a separate container filled with fresh, cool water. The cartridge should remain submerged in the water for 10 minutes. Rinse the filter under running water for 2 seconds after soaking.
-
Lift the water tank lid using the tab on the rear of the lid.
-
Place the filter cartridge in the well at the bottom of the water tank. Push the cartridge slightly to make sure it fits snugly.
natural_image
3D rendered image of a mechanical component with a vertical rod and handle, alongside a close-up view of the handle (no text or symbols)- Every time you install a new filter, run the coffee maker through a complete brewing cycle without coffee. Use a full carafe of clean, cool water.
To Set the Time-of-Day Clock
WARNING

Electrical Shock Hazard
Plug into a grounded 3 prong outlet.
Do not remove ground prong.
Do not use an adapter.
Do not use an extension cord.
Failure to follow these instructions can result in death, fire, or electrical shock.
- When the coffee maker is first plugged in or when power is restored after an interruption, the brew timer display will initially show 12:00 PM.
- For glass carafe models, press the MODE button 5 times to enter the Time/Clock Setting mode.
NOTE: For thermal carafe models, press the MODE button 4 times to enter the Time/Clock Setting mode.
The Clock indicator will flash while the time is being set.
- Press the PROGRAM/SET button. The hours digits will flash for the hours adjustment.
- Press the “+” (plus) or “-” (minus) buttons to increase or decrease the hours.
- Press the PROGRAM/SET button again. The minutes digits will flash for the minutes adjustment.
- Press the “+” (plus) or “-” (minus) buttons to increase or decrease the minutes.
- Press the PROGRAM/SET button again. The AM or PM indicator will flash for the AM/PM adjustment.
- Press the “+” (plus) or “-” (minus) buttons to select AM or PM.
- Press and hold the PROGRAM/SET button to program the settings. A short beep will sound indicating programming is complete.
NOTE: If you do not hold the Program/Set button until a short beep is heard, the settings will be maintained and the coffee maker will exit to the default mode.
- Plug into a grounded 3-prong outlet.
KITCHEN AID® COFFEE MAKER USE
Brewing Coffee
NOTE: Brew one pot of fresh, cool water and discard before brewing the first pot of coffee (first time use only).
- Remove the water tank and fill with enough fresh, cool water to make the desired amount of coffee. A graduated scale on the tank measures the amount of water needed. When replacing the tank, make sure to align it with the tab(s).
NOTE: The tank can be filled using the carafe without removing the tank from the coffee maker.
For glass carafe models only, the right side of the scale (“coffee”) is a measurement of coffee volume. The left side of the scale (“water”) is based upon 4 ^3/4 oz (140 mL) cups.
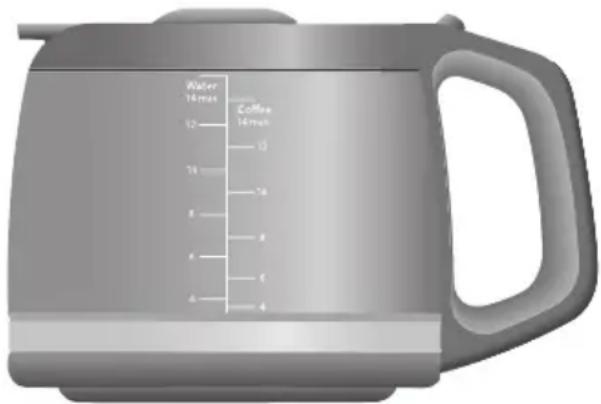
After filling the water tank, place the carafe in the coffee maker.
IMPORTANT: Make sure the lid is securely in position and the bottom of the carafe is fully seated. If the carafe is not seated, the Pause and Pour feature may not engage and may cause water and coffee to overflow the brew basket.
To maximize coffee temperature, it is recommend that you fill and empty the carafe with hot water to preheat the carafe.
For thermal carafes only, it is recommended that the lid be positioned in the “Pour” or “Lock” position while brewing. The “Lock” position will reduce heat loss from the carafe. Position in the “Unlock” position to remove the lid.
IMPORTANT: Be sure to empty the carafe before brewing coffee.
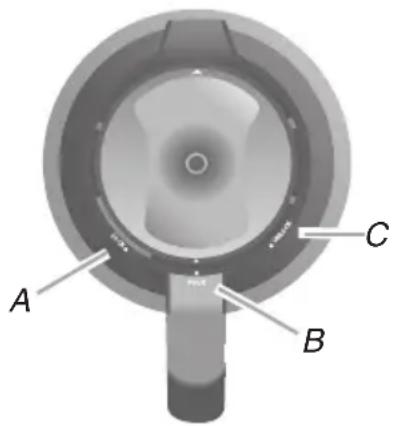
A. Lock position
B. Pour position
C. Unlocked position
- Open the brew basket door and remove the brew basket from the front of the coffee maker.
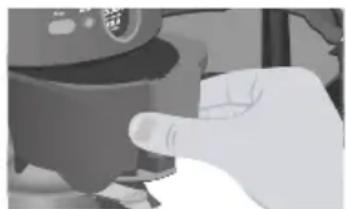
natural_image
Close-up of a hand pressing down on a mechanical component (no visible text or symbols)- Insert a 12-14 cup flat bottom paper filter or the Gold Tone permanent filter into the brew basket.
IMPORTANT: Do not use both types of filters at the same time. Using both filters might cause water and coffee to overflow the brew basket.
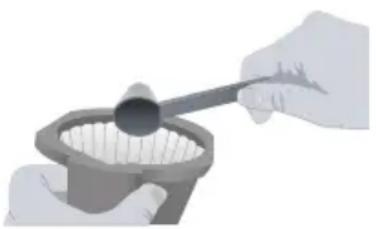
- Use the included scoop and fill the filter with one level scoop of ground coffee for each cup desired. Use a medium grind appropriate for automatic drip coffee makers.
IMPORTANT: Too fine a grind will produce bitterness and may clog the coffee filter.
natural_image
Illustration of hands using a tool to filter contents in a container (no text or symbols visible)NOTE: Always place the filter and coffee into the removable brew basket. Do not operate the coffee maker without the brew basket in place.
- Shake the brew basket slightly to even out the bed of coffee. Place the basket into the coffee maker and push it in to seat it securely. Be sure the brew basket door is fully closed before brewing.
Brewing 4+ Cups of Coffee
- Press the BREW button to begin brewing coffee.
- For glass carafes only, the coffee maker will sound the end-of-brewing tone and the "Warm" indicator will turn on when brewing is complete.
- For glass carafes only, the Time Since Brew display will alternate between the temperature setting (HIGH, MED, or LOW) and the time elapsed since the completion of the brewing cycle.
- For glass carafes only, at the end of programmed Keep Warm Time (the default is 2 hours), the coffee maker will automatically shut off. To turn off the coffee maker manually, press the BREW button. The outside of the carafe may be warm to the touch after brewing. Use discretion when placing the carafe on uncovered surfaces immediately after brewing.
- Repeat the procedure in the “Brewing Coffee” and “Brewing 4+ Cups of Coffee” sections to brew additional carafes of coffee. Always turn off the coffee maker and allow it to cool for 5 minutes before starting the next brew cycle.
Brewing 1-4 Cups of Coffee
NOTE: Brew one pot of fresh, cool water and discard before brewing the first pot of coffee (first time use only).
- Repeat steps 1-5 in the "Brewing Coffee" section.
- Press the MODE button 1 time to enter the 1-4 Cups mode. The "1-4" indicator will flash.
-
Press the PROGRAM/SET button. The "1-4" cups and "ON" or "OFF" indicators will flash. Press the "+" (plus) or "-" (minus) buttons until ON is displayed.
-
Press and hold the PROGRAM/SET button to program the 1-4 Cups mode. A short beep will sound indicating programming is complete.
NOTE: If you do not hold the PROGRAM/SET button until a short beep is heard, the settings will be maintained and the coffee maker will exit to the default mode.
- Press the BREW button to begin brewing coffee.
- The coffee maker will sound the end-of-brewing tone when brewing is complete.
- On glass carafe models only, the Time Since Brew display indicates the time elapsed since the completion on the brewing cycle. At the end of programmed Keep Warm Time (the default is 2 hours), the coffee maker will automatically shut off. To turn off the coffee maker manually, press the BREW button.
NOTE: The outside of the carafe may be warm to the touch after brewing. Use discretion when placing the carafe on uncovered surfaces immediately after brewing. - Repeat the procedure in the “Brewing Coffee” and “Brewing 1-4 Cups of Coffee” sections to brew additional carafes of coffee. Always turn off the coffee maker and allow it to cool for 5 minutes before starting the next brew cycle.
- Repeat steps 1-8 to brew additional carafes of coffee. Always turn off the coffee maker and allow it to cool for 5 minutes before starting the next brew cycle.
COFFEE MAKER ENHANCED FEATURES
Pause and Pour Feature
The Pause and Pour feature enable you to remove the carafe from the coffee maker and pour a cup of coffee before brewing is finished. When the carafe is removed, a special valve stops the flow of coffee from the brew basket. However, brewing does not stop. If the carafe is not placed back in the coffee maker within 25 seconds, water and coffee will overflow the brew basket.
Automatic Brew Timer
The coffee maker can be programmed to brew coffee at a preset time, making it easy to wake up to fresh coffee every morning.
To program and activate the Automatic Brew Timer:
- Press the MODE button 3 times to enter the "Auto Brew Timer" mode. The "Auto" indicator will flash until this programming cycle is complete.
-
Press the PROGRAM/SET button. The "Auto" indicator and hours digits will flash. Press the "+" (plus) or "-" (minus) button to set the hour.
-
Press the PROGRAM/SET button. The "Auto" indicator and minutes digits will flash. Press the "+" (plus) or "-" (minus) button to set the minutes.
-
Press the PROGRAM/SET button. The "Auto" and "AM/PM" indicators will flash. Press the "+" (plus) or "-" (minus) button to select AM or PM.
-
Press and hold the PROGRAM/SET button to program the Automatic Brew Timer setting. A short beep will sound indicating programming is complete.
-
Press and hold the BREW button. The "Auto" indicator will turn on and the coffee maker will begin brewing at the programmed time. The time that is set will be displayed for 3 seconds as a reminder of the set time. The programmed time will remain active until steps 1-5 are repeated or power is interrupted for more than 60 seconds.
NOTE: To reactivate the programmed time, press and hold the BREW button. The “Auto” indicator will turn on and the coffee maker will begin brewing at the programmed time.
Brew Strength
The coffee maker can be programmed to brew coffee at regular (REG) or bold (BOLD) strengths.
NOTE: If you do not complete the programming steps within 10 seconds, the settings will be maintained and the coffee maker will exit to the default mode.
To program and activate the Brew Strength:
- Press the MODE button 2 times to enter the "Brew Strength" mode. The "Brew Strength" indicator will flash until this programming cycle is complete.
-
Press the PROGRAM/SET button. The strength (REG or BOLD) indicator will flash. Press the “+” (plus) or “-” (minus) button to select the brew strength desired (REG or BOLD). The programmed strength will remain active until steps 1-2 are repeated or power is interrupted for more than 60 seconds.
-
Press and hold the PROGRAM/SET button to program the Brew Strength setting. A short beep will sound, indicating programming is complete.
NOTE: If you do not hold the PROGRAM/SET button until a short beep is heard, the settings will be maintained and the coffee maker will exit to the default mode.
Variable Warmth Control/ Selectable Automatic Shutoff
For glass carafe models only, the coffee maker can be programmed to keep coffee warm for a specific length of time and temperature. This feature is not available on thermal carafe models.
NOTE: If you do not complete the programming steps within 10 seconds, the settings will be maintained and the coffee maker will exit to the Default mode.
To program and activate the Warm Timer/Temperature setting:
-
Press the MODE button 4 times to enter the "Warm Timer / Temperature" mode. The "Warm" indicator will flash until this programming cycle is complete.
-
Press the PROGRAM/SET button. The "Warm" indicator and time digits will flash. Press the "+" (plus) or "-" (minus) button to select the length of warm time desired. The time range can be selected between 0 and 4 hours in 30-minute increments.
-
Press the PROGRAM/SET button. The "Warm" indicator and temperature setting (LO, MED, or HIGH) will flash. Press the "+" (plus) or "-" (minus) button to select the temperature (LO, MED, or HIGH). The programmed temperature will remain active until steps 1-5 are repeated or power is interrupted for more than 60 seconds.
-
Press and hold the PROGRAM/SET button to program the Warm Timer/Temperature setting. A short beep will sound, indicating programming is complete.
NOTE: If you do not hold the PROGRAM/SET button until a short beep is heard, the settings will be maintained and the coffee maker will exit to the default mode.
COFFEE MAKER CARE
Cleaning the Coffee Maker
- Remove the brew basket and carafe from the coffee maker.
- Wash the brew basket and Gold Tone permanent filter in hot, soapy water and rinse with hot water. Do not use abrasive cleansers or scouring pads. These parts can also be washed in the upper rack of a dishwasher.
- Unplug the coffee maker and wipe the housing with a warm, soapy cloth. Then wipe clean with damp cloth and dry with a soft cloth. Do not use abrasive cleansers or scouring pads.
Descaling the Coffee Maker
The coffee maker can be descaled using a packaged descaling agent or vinegar. Always mix the descaling solution using cool water.
■ When using a descaling agent, follow the directions on the package for the recommended amounts of descaling agent and water to use.
■ When using vinegar, fill the carafe with a solution consisting of 12 vinegar and 12 water.
Cleaning Needed Indicator
Calcium deposits (scale) from water will build up in the coffee maker heat pump over time and impair brewing efficiency and coffee quality. When the coffee maker needs to be cleaned, the “*Clean” indicator will flash after a brewing cycle is complete. Once this occurs, descaling should be done as soon as possible to preserve the performance and life of your coffee maker.
NOTE: You may want to clean your coffee maker prior to the “Cleaning Needed” indicator flashing under heavy use or hard water conditions.
Clean
- Before descaling, always remove the water filter (see the "Installing the Water Filter" section) and make sure the brew basket contains no coffee or coffee filters.
- Run the coffee maker through a complete Clean cycle using a full tank of the descaling solution.
NOTE: If you do not complete the programming steps within 10 seconds, the settings will be maintained and the coffee maker will exit to the default mode.
- For glass carafe models, press the MODE button 6 times to enter the Clean mode.
NOTE: For thermal carafe models, press the MODE button 5 times to enter the Clean mode.
The “Clean” indicator will flash until this programming cycle is complete. - Press the PROGRAM/SET button. The "Clean" and "ON" or "OFF" indicators will flash. Press the "+" (plus) or "-" (minus) button to select "ON."
- Press and hold the PROGRAM/SET button to program the Clean setting. A short beep will sound, indicating programming is complete.
NOTE: If you do not hold the PROGRAM/SET button until a short beep is heard, the settings will be maintained and the coffee maker will exit to the default mode.
- Press the BREW button to start the cleaning cycle. Once the cleaning cycle is complete, the "Clean" indicator will turn off.
- Rinse the coffee maker by running it through 2 brewing cycles using a full water tank of fresh, cool water each time.
- Wash the brew basket in hot, soapy water and rinse with hot water. The brew basket can also be washed in the upper rack of the dishwasher.
- Reinstall or replace the water filter. Replace the filter every 3 months under normal use. Replace it more often under heavy use or hard water conditions.
TROUBLESHOOTING
■ If the brew timer display is not illuminated:
Check to see whether the coffee maker is plugged into a grounded 3-prong outlet. If it is, check the fuse or circuit breaker on the electrical circuit the coffee maker is connected to and make sure the circuit is closed.
■ If only a portion of the water added to the coffee maker actually brews:
The coffee maker requires immediate descaling. Please refer to “Descaling the Coffee Maker” in the “Coffee Maker Care” section.
■ If "Err4" appears on the brew button timer display:
A button may be jammed. Unplug the coffee maker and press each button several times.
WARNING

Electrical Shock Hazard
Plug into a grounded 3 prong outlet.
Do not remove ground prong.
Do not use an adapter.
Do not use an extension cord.
Failure to follow these instructions can result in death, fire, or electrical shock.
Plug the coffee maker into a grounded 3-prong outlet.
If "Err4" appears again on the display, repeat this procedure.
■ If “Err1,” “Err2” or “Err3” appear on the brew timer display:
Press the POWER/BREW button to reset the coffee maker. If the coffee maker has been stored or used in a cool environment, warm the coffee maker to normal room temperature before doing this. If the error code reappears, there is a problem with the coffee maker electronics.
■ If the problem cannot be corrected:
See the KitchenAid warranty section. Do not return the coffee maker to the retailer; retailers do not provide service.
PROOF OF PURCHASE AND PRODUCT REGISTRATION
Always keep a copy of the sales receipt showing the date of purchase of your coffee maker. Proof of purchase will assure you of in-warranty service.
Before you use your coffee maker, please fill out and mail your product registration card packed with the unit. This card will enable us to contact you in the unlikely event of a product safety notification and assist us in complying with the provisions of the Consumer Product Safety Act. This card does not verify your warranty. Please complete the following for your personal records:
Model Number
Serial Number
Date Purchased
Store Name and Location
KITCHENAID® COFFEE MAKER WARRANTY
| Length of Warranty: KitchenAid Will Pay For: KitchenAid | Will Not Pay For: | |
| 50 United States, the District of Columbia, Canada, and Puerto Rico: One-year limited warranty from date of purchase. | 50 United States, the District of Columbia and Canada: Hassle-free replacement of your coffee maker. See the following page for details on how to arrange for replacement.ORIn Puerto Rico: The replacement parts and repair labor costs to correct defects in materials and workmanship. Service must be provided by an Authorized KitchenAid Service Center. To arrange for service, follow the instructions in the “How to Arrange for Warranty Service in Puerto Rico.” | A. Repairs when coffee maker is used in other than normal single family home use.B. Damage resulting from accident, alteration, misuse or abuse or use with products not approved by KitchenAid.C. Replacement parts or repair labor costs for coffee maker when operated outside the country of purchase. |
DISCLAIMER OF IMPLIED WARRANTIES; LIMITATION OF REMEDIES IMPLIED WARRANTIES, INCLUDING TO THE EXTENT APPLICABLE WARRANTIES OF MERCHANTABILITY OR FITNESS FOR A PARTICULAR PURPOSE, ARE EXCLUDED TO THE EXTENT LEGALLY PERMISSIBLE. ANY IMPLIED WARRANTIES THAT MAY BE IMPOSED BY LAW ARE LIMITED TO ONE YEAR, OR THE SHORTEST PERIOD ALLOWED BY LAW. SOME STATES AND PROVINCES DO NOT ALLOW LIMITATIONS OR EXCLUSIONS ON HOW LONG AN IMPLIED WARRANTY OF MERCHANTABILITY OR FITNESS LASTS, SO THE ABOVE LIMITATIONS OR EXCLUSIONS MAY NOT APPLY TO YOU.
IF THIS PRODUCT FAILS TO WORK AS WARRANTED, CUSTOMER'S SOLE AND EXCLUSIVE REMEDY SHALL BE REPAIR OR REPLACEMENT ACCORDING TO THE TERMS OF THIS LIMITED WARRANTY. KITCHENAID AND KITCHENAID CANADA DO NOT ASSUME ANY RESPONSIBILITY FOR INCIDENTAL OR CONSEQUENTIAL DAMAGES. This warranty gives you specific legal rights and you may also have other rights which vary from state to state or province to province.
Hassle-Free Replacement Warranty – 50 United States and District of Columbia
We're so confident the quality of our products meets the exacting standards of KitchenAid that, if your coffee maker should fail within the first year of ownership, KitchenAid will arrange to deliver an identical or comparable replacement to your door free of charge and arrange to have your original coffee maker returned to us. Your replacement unit will also be covered by our one year limited warranty. Please follow these instructions to receive this high-quality service.
If your KitchenAid® coffee maker should fail within the first year of ownership, simply call our toll-free Customer Satisfaction Center at 1-800-541-6390 Monday through Friday, 8 a.m. to 8 p.m. (Eastern Time), or Saturday, 10 a.m. to 5 p.m. Give the consultant your complete shipping address. (No P.O. Box numbers, please.) When you receive your replacement coffee maker, use the carton and packing materials to pack up your original coffee maker. In the carton, include your name and address on a sheet of paper along with a copy of the proof of purchase (register receipt, credit card slip, etc.).
Hassle-Free Replacement Warranty – Canada
We're so confident the quality of our products meets the exacting standards of the KitchenAid® brand that, if your coffee maker should fail within the first year of ownership, KitchenAid Canada will replace your coffee maker with an identical or comparable replacement. Your replacement unit will also be covered by our one year limited warranty. Please follow these instructions to receive this high-quality service.
If your KitchenAid ^® coffee maker should fail within the first year of ownership, take the coffee maker or ship collect to an Authorized KitchenAid Service Centre. In the
carton include your name and complete shipping address along with a copy of the proof of purchase (register receipt, credit card slip, etc.). Your replacement coffee maker will be returned prepaid and insured. If you are unable to obtain satisfactory service in this manner call our toll-free Customer eXperience Centre at 1-800-807-6777.
Or write to: Customer eXperience Centre KitchenAid Canada 200 - 6750 Century Ave. Mississauga, ON L5N 0B7
How to Arrange for Warranty Service in Puerto Rico
Your KitchenAid ^® coffee maker is covered by a one-year limited warranty from the date of purchase. KitchenAid will pay for replacement parts and labor costs to correct defects in materials and workmanship. Service must be provided by an Authorized KitchenAid Service Center.
Take the coffee maker or ship prepaid and insured to an Authorized KitchenAid Service Center. Your repaired coffee maker will be returned prepaid and insured. If you are unable to obtain satisfactory service in this manner, call toll-free 1-800-541-6390 to learn the location of a Service Center near you.
How to Arrange for Service after the Warranty Expires – All Locations
Before calling for service, please review the "Troubleshooting" section.
For service information in the 50 United States, District of Columbia, and Puerto Rico,
call toll-free 1-800-541-6390.
Or write to:
Customer Satisfaction Center
KitchenAid Portable Appliances
P.O. Box 218, St. Joseph, MI 49085-0218
Or contact an Authorized Service Center near you.
For service information in Canada, call toll-free 1-800-807-6777.
Or write to:
Customer eXperience Centre
KitchenAid Canada
200 - 6750 Century Ave.
Mississauga, ON L5N 0B7
How to Arrange for Service Outside these Locations
Consult your local KitchenAid dealer or the store where you purchased the coffee maker for information on how to obtain service.
For service information in Mexico, call the KitchenAid® line 01-800-002-2767
How to Order Accessories and Replacement Parts
To order accessories or replacement parts for your coffee maker in the 50 United States, District of Columbia, and Puerto Rico,
call toll-free 1-800-541-6390 Monday through Friday, 8 a.m. to 8 p.m. (Eastern Time), or Saturday, 10 a.m. to 5 p.m.
Or write to:
Customer Satisfaction Center
KitchenAid Portable Appliances
P.O. Box 218
St. Joseph, MI 49085-0218
To order accessories or replacement parts for your coffee maker in Canada, call toll-free 1-800-807-6777.
Or write to:
Customer eXperience Centre
KitchenAid Canada
200 - 6750 Century Ave.
Mississauga, ON L5N 0B7
To order accessories or replacement parts for your coffee maker in Mexico, call the KitchenAid® line 01-800-002-2767
SÉCURITÉ DE LA CAFETIÈRE
natural_image
Warning symbol with exclamation mark inside a triangle (no text or numbers)natural_image
3D rendered mechanical component with a vertical rod and attached lever (no text or symbols visible)natural_image
Close-up of a hand adjusting a mechanical component (no visible text or symbols)natural_image
Illustration of hands using a tool to filter or remove a container (no text or symbols visible)natural_image
Warning symbol with exclamation mark inside a triangle (no text or numbers)CÓMO PREPARAR LA CAFETERA PARA SU USO
natural_image
3D rendered image of a mechanical component with a vertical rod and handle, alongside a close-up view of the handle (no text or symbols visible)natural_image
Close-up of a hand pressing a button on a mechanical component (no visible text or symbols)natural_image
Illustration of hands using a tool to filter or remove a circular object into a container (no text or symbols visible)Customer Satisfaction Center KitchenAid Portable Appliances
P.O. Box 218, St. Joseph, MI 49085-0218
Customer eXperience Centre
KitchenAid Canada
200 - 6750 Century Ave.
Mississauga, ON L5N 0B7
Customer Satisfaction Center KitchenAid Portable Appliances
P.O. Box 218
St. Joseph, MI 49085-0218
Customer eXperience Centre
KitchenAid Canada
200 - 6750 Century Ave.
Mississauga, ON L5N 0B7

- TABLE DES MATIÈRES
- CARACTÉRISTIQUES AVANCÉES DE LA
- CARACTERÍSTICAS SUPERIORES DE LA
- Your safety and the safety of others are very important.
- DANGER
- WARNING
- IMPORTANT SAFEGUARDS
- SAVE THESE INSTRUCTIONS
- ELECTRICAL REQUIREMENTS
- Electrical Shock Hazard
- KITCHEN AID® COFFEE MAKER FEATURES
- 1-4 Cup Feature
- Clean Alert and Clean Feature
- Pause and Pour Feature
- End-Of-Brewing Tone
- Selectable Automatic Shutoff
- Brew Basket Door
- Brew Basket
- Removable Water Tank
- Automatic Brew Timer
- Fresh Brew Timer
- Glass or Thermal Carafe
- Gold Tone Permanent Filter
- Water Filter (not shown)
- Coffee Scoop
- Power Interrupt
- Clock Display
- Variable Brew Strength Selector
- Full-Length Cord Storage (not shown)
- Variable Warmth Control (glass carafe models only)
- Heat Pump (not shown)
- Electronic Temperature Control
- DISPLAY AND CONTROL PAD FEATURES
- DISPLAY FEATURES:
- Time Since Brew Display
- Cleaning Needed Indicator
- 1-4 Cup
- Brew Strength Indicator
- Auto Indicator
- CONTROL PAD FEATURES:
- Brew Button
- Mode Button
- Program/Set Button
- “+” (plus) and “-” (minus) Buttons
- COFFEE BREWING SUGGESTIONS:
- ADVICE FOR GREAT TASTE
- Fresh Coffee Beans
- The Right Grind
- The Proper Amount of Ground Coffee
- Brew Water Purity
- Coffee Maker Cleanliness
- PREPARING YOUR COFFEE MAKER FOR USE
- Pre-Use Cleaning
- Installing the Water Filter
- To Set the Time-of-Day Clock
- KITCHEN AID® COFFEE MAKER USE
- Brewing Coffee
- Brewing 4+ Cups of Coffee
- Brewing 1-4 Cups of Coffee
- COFFEE MAKER ENHANCED FEATURES
- Brew Strength
- Variable Warmth Control/ Selectable Automatic Shutoff
- COFFEE MAKER CARE
- Cleaning the Coffee Maker
- Descaling the Coffee Maker
- Clean
- TROUBLESHOOTING
- PROOF OF PURCHASE AND PRODUCT REGISTRATION
- KITCHENAID® COFFEE MAKER WARRANTY
- Hassle-Free Replacement Warranty – 50 United States and District of Columbia
- Hassle-Free Replacement Warranty – Canada
- How to Arrange for Warranty Service in Puerto Rico
- How to Arrange for Service after the Warranty Expires – All Locations
- For service information in the 50 United States, District of Columbia, and Puerto Rico,
- How to Arrange for Service Outside these Locations
- How to Order Accessories and Replacement Parts
- To order accessories or replacement parts for your coffee maker in the 50 United States, District of Columbia, and Puerto Rico,
- SÉCURITÉ DE LA CAFETIÈRE
- CÓMO PREPARAR LA CAFETERA PARA SU USO
Brand : KITCHENAID
Model : KCM223
Category : Coffee machine