7h G3 - Tablet Arnova - Free user manual and instructions
Find the device manual for free 7h G3 Arnova in PDF.

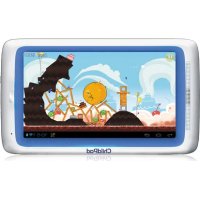
| Product type | Touchscreen tablet |
| Brand | Arnova |
| Model | 7h G3 |
| Dimensions (approx.) | 190 x 110 x 10 mm |
| Weight (approx.) | 300 g |
| Screen | 7 inch, capacitive touchscreen |
| Operating system | Android |
| Power supply | Rechargeable battery via micro-USB |
| Ports | micro-USB, headphone jack, micro-SD slot |
| Connectivity | WiFi 802.11 b/g/n |
| Camera | Built-in camera |
| Buttons | Volume, Power, Reset |
| Battery life | Varies by usage, can be optimized by reducing brightness and turning off WiFi |
| Maintenance | Clean with a soft, dry cloth |
| Security | Screen lock via pattern, PIN code or password |
| Repairability | Accessible Reset button for forced restart |
| General information | User manual available as PDF on notice-facile.com |
Frequently Asked Questions - 7h G3 Arnova
User questions about 7h G3 Arnova
0 question about this device. Answer the ones you know or ask your own.
Ask a new question about this device
Download the instructions for your Tablet in PDF format for free! Find your manual 7h G3 - Arnova and take your electronic device back in hand. On this page are published all the documents necessary for the use of your device. 7h G3 by Arnova.
USER MANUAL 7h G3 Arnova
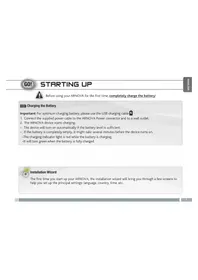
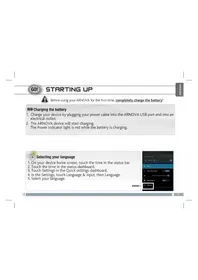
Before using your ARNOVA for the first time, completely charge the battery!
Charging the battery
- Charge your device by plugging your power cable into the ARNOVA USB port and into an electrical outlet.
- The ARNOVA device will start charging.
The charging indicator is red while the battery is charging.
The charging indicator becomes green when the battery is charged.

Installation Wizard
The first time you start up your ARNOVA, the installation wizard will bring you through a few screens to help you set up the principal settings: language, country, time, etc.
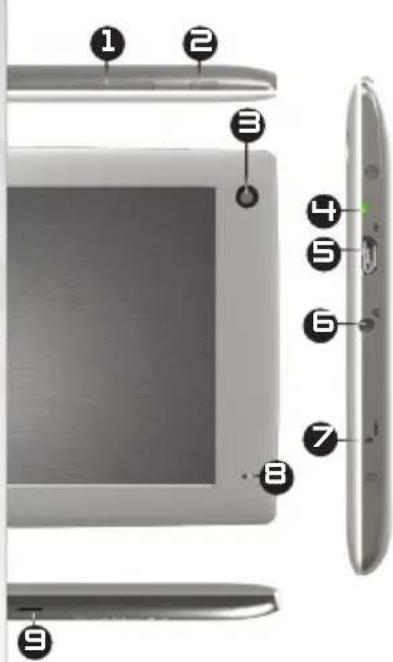
DESCRIPTION OF THE DEVICE
- Volume buttons
- On/Off button: enables to turn on or turn off the device.
- Camera
- Charging indicator
-
Micro-USB port:
-
to charge the battery of your ARNOVA
-
to connect your ARNOVA to your computer using the included USB cable in order to transfer files
-
Headphone jack
- Reset button
- Microphone
- Micro-SD card slot

Your device is frozen. You can turn it off. Press the ON/OFF button for 10 seconds.


CONNECTING TO THE WIFI NETWORK

For this procedure to work, you need to be in a WiFi zone that will allow you to connect to it. Every time the ARNOVA is in range of a network that you have already configured once, it will attempt to make a connection.
How to configure a WiFi network
From the status bar, at the bottom right hand of the screen, you can access the WiFi settings quickly.
- Touch the time in the status bar. The status dashboard is displayed.
- Touch the time in the status dashboard. The setting dashboard is displayed below.
- Touch WiFi to open the WiFi settings.
- If the WiFi is off, slide the WiFi switch to the On position. Once the WiFi is on, the ARNOVA will scan for available WiFi networks. Secured networks are indicated with a Lock icon. If the device finds a network that you connected to previously, it connects to it.
- Touch the network you want to connect to.
-
Enter the required network information* and touch Connect. We recommend that you select Show password in order to be able to see the characters you are typing. Your ARNOVA will attempt to establish a connection to that WiFi access point.
-
For free access WiFi points, there is no need to enter any special information. For secured networks, you will need a key (a series of numbers and/or letters) of the type WEP, WPA, or WPA2. To obtain the exact connection parameters required, contact the Internet service provider.

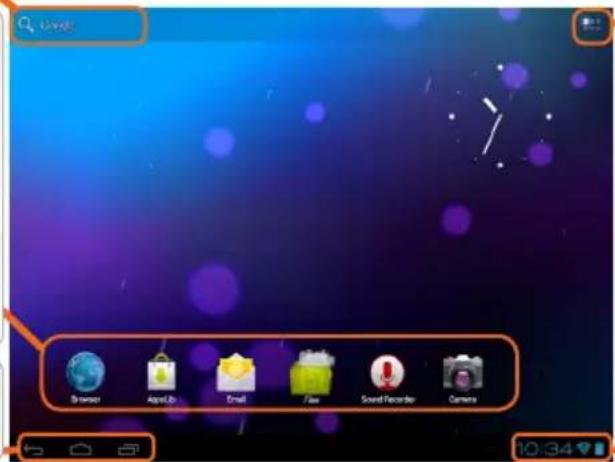
Touch for text search
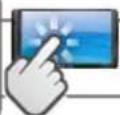
Your ARNOVA device is equipped with a capacitive touchscreen. Use your fingertip to navigate.
These are default AndroidTM applications. Tap on an icon to open the corresponding application. You can customize the Home screen by adding/ removing shortcuts and widgets, changing the wallpaper etc. See next page.
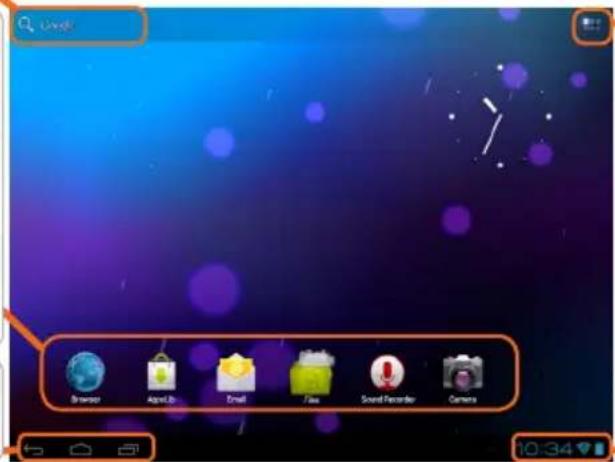
All apps button
Tap on this icon to reveal all the Android™ applications and widgets installed on your ARNOVA (games, various tools, etc.). You can copy them onto the Home screen. You can get more Android™ applications from AppsLib

The navigation bar displays the Back, Home and Recent Apps buttons.
Main Touchscreen buttons
The status bar displays notifications and system icons.

The Back button - to go back to your previous screen.

The Search button - to type terms to search your tablet and the web.

The Home button - to return to the main screen.

The All apps button - to find all your apps and widgets.

The Recent Apps button - to navigate among your apps. - to remove a thumbnail from the list, swipe it left or right.
CUSTOMIZING YOUR PRODUCT
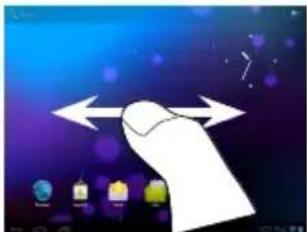
The extended Home screen
Navigate between different home screen panels by swiping left and right.

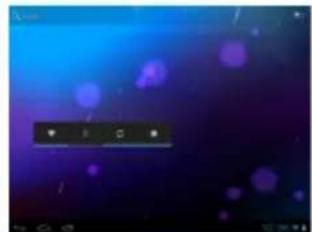
Customizing the Home screen panels
- To change your wallpaper, hold your finger on the screen at an empty location, then choose from the list.
Arranging & working with apps
- To move a Home screen item, touch and hold your finger onto it until the positioning gridlines appear, then slide it to the desired location, and release your finger.
- To remove a Home screen item, touch and hold it, slide your finger towards the top of the screen and drop it over the Remove icon. Removing an item from the All apps screens will uninstall the item.
Zoom: In some apps (such as Browser, and Gallery) you can zoom in and out by placing two fingers on the screen at once and pinching them together (to zoom out) or spreading them apart

Creating application folders: you can combine several application icons in a folder. Drop one app icon over another on a Home screen and the two icons will be combined.

Changing the Settings
Tap on Settings and choose a menu among these categories: Wireless & networks, Device, Personal, System.
Adding more applications with APPSLIB : with the ARNOVA connected to the WiFi, tap on the AppsLib icon. This online library has thousands of applications to download and use.
CUSTOMIZING YOUR PRODUCT
Add widgets
- Widgets are like windows into your apps. They're available from an All Apps tab for you to move onto your Home screens.
To see your widgets:
- Touch the All Apps icon your Home screen.
- Touch Widgets at the top of the screen.
-
From the main Widgets screen, you can:
-
move between screens: Swipe left or right.
-
drag a widget to a Home screen. Touch and hold the widget's icon, slide your finger where you want to place it and lift your finger. You may be asked to make further choices before the widget activates. If there isn't room where you have dropped it, the widget won't be added to the Home screen.
Use the lock screen
To protect personal information, you can adjust your tablet's lock settings:
- From the Home or All Apps screen, touch the Settings icon.
- Scroll down and touch Security.
- Touch Screen lock.
- Touch the type of lock you'd like to use. After you set a lock here, a lock screen is displayed whenever your screen wakes up, requesting the pattern, PIN or other specified key.
Extend the life of your battery
- If you aren't using WiFi, use the Settings app to turn it off.
- Turn down screen brightness and set a shorter Sleep timeout: Settings > Device > Display.
If you don't need it, turn off automaticyncing for all apps: Settings > Personal > Accounts & sync. Note that this means you need to sync manually to collect messages, email, and other recent information, and won't receive notifications when updates occur.
TRANSFERRING MEDIA
- Turn on your ARNOVA.
- Connect the supplied USB cable to the ARNOVA and to a running computer.
- The ARNOVA will ask you if you want to connect it. Tap on Turn on USB storage to connect it and press OK to confirm.
Within a few seconds the ARNOVA will appear as an icon on your computer.
- You can transfer your media files to the ARNOVA either by copy/pasting them into the respective folders using Windows Explorer (or the Finder on a Mac), or by using Windows Media Player. Open Windows Media Player and then use the Sync tab to synchronize your music, videos, and photos onto your ARNOVA. See Windows Media Player's Help to learn more about this.
- Once all your file transfers are finished, close Windows Explorer and any other program that may have read or written to the ARNOVA. Click on the 'safely remove' icon in the system tray, next to the clock. You can now unplug the USB cable.

REGISTER YOUR PRODUCT!
On the web at http://arnovatech.com/register
We recommend that you take a few minutes to register it (http://arnovatech.com/register). This will allow you to get access to ARNOVA technical support (http://arnovatech.com/support).
?
NEED HELP?

On our Website: see the Frequently Asked Questions section on http://arnovatech.com/faq

Contact our Technical Support Team: visit http://arnovatech.com/support for e-mail support. Please register your product before contacting Technical Support (see Register your Product).
As we are often updating and improving our products, your device's software may have a slightly different appearance or modified functionality than presented in this Quick Start Guide.
GO!
PREMIÈRE UTILISATION

ANPASSEN IHRES PRODUKTES
ANPASSEN IHRES PRODUKTES
Widgets hinzufugen
PERSONALISEER UW PRODUCT
PERSONALISEER UW PRODUCT
Widgets toevoegen
KhoN OCHOBHOO ceHCOPHOro 3KpaHa
Khonnka «Bce npnloxehnra HaKmnte Ha 3Tu NIKTORpAMMy, yTO6bl NOKa3aTb BCE pnpnoXeHn H BuaKeTb Android, ycTaHOBHeHbIe B BaWeM yCtpoiCTBe ARNOVA (IrpbI, pa3NCHbIe INHCTpyMeHTbI, nT. I). Bb MoKeTe cKOnIpOBaTb nxHa Domaun HkpaH. DoONHHTeNbHbIe npnloXeHnra Android MOKHO NOJyHTb B KaTaNore AppsLib
B cTpokc coctoHn oTo6paXaOTcYBeDOMLeHn N CNTeMHbI NIKTORpaMMbl.

KhoKa Ha3aI - Bo3BpaT K npedbIyUeMy 3kpaHy.

KhoNka «ДOMO» - BO3BpaT Ha OCHOBHON 3KpaH.

I3MeHeHneMacuTa6a BHeKoToPbIX
B HeKOTopbIX
pnpIOXKeHnX
(B YaCTHOCTN, B
[Bpay3ep]N「TanepeeMOKHO yBENuHTbUymeHbWNTb MacuTa6npocmOTpa, NomeCTNBdBa
naibaHa 3kpaH OINHOpeMeHHO, n6nKAAnx (ymeHbWeHn) nn pa3dBnra (yBennueHn).


N3MeHeHne HacTpoE
HaKMITE Ha NIKTORpAMMy Settings (HAcTpoKn) N Bbl6epnte MEHO ONDH NcNdykoXnx Kateropn: Wireless & networks (6ecnpoBnHn CBA3b n cTeN), Device (ycTpoIcTBO), Personal (nHhie), System (CnCTema).
IodabJIeHne npJIOXeHn npn noMoU n APPSLIB: NOKJIIOuHB yCTpoiCTBO ARNOVA K cetN WiFi, haxMnte nIKTORpamMy AppsLib
B30nHTEpaKTHBHO6b6NIOTeKeXpaHrTcTBICaHnpuIooKeHHJ43aRpy3KnNcNoJIb3OBaHN.
ACTPOИKA BALSEERO ПОДУКТА
DobabneneBnDxTeOB
BnJKeTbI -3To 06BeKtB, noOo6HbIe OKHAM npNIOXeHNI. IV MoKHO npOCMOTpeTb Ha BkJaDke «Bce npNIOXeHNI» I nepeMeCTNTb Ha DOMaSHH N KpaH.
Длп порсмогра ИмeюциХСВИДжeTOВ:
- ПпкочиТecь КпКТограмme «Вce пиложеня» Домашем ЭКран. <|im_start|>assistant
- Всгдддддддддддддддддддддддддддддддддддддддддддддддддддддддддддддддддддддддддддддддддддддддддддддддддддд
- Всгдддддддддддддддддддд
- Всгсгсгсгсгсгсгсгсгсгсгсгсгсg
- Всгсгсгсгсгсгсg
- Всгсгсгсg
- Всгсg
- W
- W
- W
- W
- W
- W
- W
- W
- W
- W
- W
- W
- W
- W
- W
- W
- W
- W
- W
- W
- W
- W
- W
- W
- W
- W
- W
- W
- W
- W
- W
- W
- W
- W
- W
- W
- W
- W
- W
- W
- W
- W
- W
- W
- W
- W
- W
- Bb6epnte Widgets (BnJKeTbI) B BepxHeu qactn 3KpaHa.
- Ha ochoBHOM kpaHe BnKKeTOB Bbl MoKeTe:
-перемаТьсмжду ЭкраHamN: провиTe пальсem Влево ИИВправО. - NepetaTb BnJKeT Ha DomaHn 3KpaH. PpNKoCHNTecb K NIKTORpamme BnJKeTa H, ydePknBaI naJeU, nepemeCTnte ee B HxKHOe NOLOKeHne, nocne Yero OTNcyTnte.
IpepeaBuaueBnJxetaMOxetOTobpa3ntbCpnpEnoKeHne Bb6paTbDONONHTeBhIEOuN.EcINByka3aHHOM Bam MeCTe HeIOCTaTOUHO IpocTpaHCTBa IyBnXeTa,To OH He 6ydet DoabHeHa DomaHn 3KpaH.
IcnoJIb3OBAHne 6JOKIpOBKn 3KpaHa
BbMOKeTe HAcTpOuNb6IOKnPOBky CBOero nlaHweta 3aunTb IINyHONHOpMaUN:
1.ПикочпесьКпнTORpamme Settings (HacTpoKn)HaДOMaш hemЗкpaHe ИИн Ha ЗкpaHe «Вce npINIOXKeHnA
2. Onyctntecb BnH3 no cnNcKu N Bbl6epnte no3nucu Security (3aunTa).
3. Bb6epnte onuio Screen lock (6IOKnpOBka 3kpaHa).
4. BbI6epnte TnBLOKINOBKN, KOtOpbIM XOTnTe BOCnONb3OBAbCra. Iocne Toro, KaK 6yJeT 3aDaHa 6LOKINOBKa, npu np6yJKeHnn 3KpaHa 6yEt OTo6paKaTbcr OKHO 6LOKINOBKn C npEINOKeHnEM BBecTN KOMBuHaCuHcMBOJOB, PIN nHn DpyroYka3aHHbIKIOU.
PpOdJIeHHe cpoKa cIyK6bI 6aTapei
-
Ecnn Bbl He nCnOlb3yeTe WiFi, BblKnIouHte ero B pa3Je HacTpoeK.
-
Ymehbinte npKoCTb 3kpaHa n 3aJaTe 6OJIee KOpOTKn INTepBaI OXnDaHn Daero otKIOUChn (Sleep timeout): Settings > Device > Display.
- Bыклioчnte abTomatueckyo cHxpoHn3aunIO BCex npinloKeHHc, ecn OHa He hyxHa: Settings > Personal > Accounts & sync. YtTe, yTo Bam npndetc BbInonHrTb cHxpoHn3aunIO BpyHyU, yTo6bl nOlyuHTb coo6iEHHa, noTy u npyryu HOByu INΦopMaunIO; Kpome TOrO, He 6ydyT npINHMaTcBc yBeDOMneHn o6 o6HOJIeHNax.
ПЕPEDАЧА МEDИАФАЛОВ
- BkIouTe yCTpoiCTBO ARNOVA.
- ПпсocoинITE устpoистBO ARNOVA K Вкlio ueHHOMу kOMьютepy пи помоши пплагаemoro kaбеля USB.
- Ha ekpahe ARNOVA noBntc 3anpoc Ha noTbepxdeHne noKluoyehn. Bbi6epnte Turn on USB storage (BkIouHTb hakOniTb USB), qTo6bl noKluoytB erO n Haxmnte OK dIra noTbepxdeHn. Upe3 Heckolbko cekyHd Ha ekpaHe KOMnbIoTepa OTo6pa3NTc r NIKTORpaMMA ARNOVA.
- Bb moxe Te nepenecn CBOI MeiaaaiB ARNOVA, BbnoHna KOnnpoBaHne/ BCTabky B COOTBeTCTByIOUe napan npn nomou npoBoHNka Windows (nn nporpaMMbI Finder B KOMnbTepe Mac), IIN60 npn nomou nponrpBbATEJr Windows Media Player. OTKpoTe Windows Media Player n BocnoJIb3yITecb BKlaADKOJ Sync dJa cIHxPOHn3aucn My3bIKN, BNdeO n foToRpaΦn C yCTpOInCTBOM ARNOVA. O6paTntEcB K cnpaBke Windows Media Player 3a DOnoJIHnTeJBHbIMn CBeDeHnMn o6 3TOJ onepaun.
- 3aBepuBnB nepecbInky faJIOB, 3aKpOte PpoBODnK Windows® nIi npryU nporpaMMy, c NOMOuio KOtOpoi BbINOnHAnocb UTeHne nIi 3aNcB B ARNOVA. HaxMnte Ha NIKTORpAMMy «Be30NaChoe n3BNeueHne» B o6naCTn yVeDomJIeHni prAOM C yacAmN. Nocne 3TOro Bbl MoXeTe OTKnIOuNTb USB-Ka6eJIb.

3APENTPNPYTE CBOE YCTPOINCTBO!
B cetn INHTepHET no aDpecy http://arnovatech.com/register
Mbl peKOMeHdyem 3aTpaTnTb HeCKoJIbKO MmHyT Ha perIcTpaCnIO (http://arnovatech.com/register).To dact Bam Bo3MOxHocTb NOlb3OBaTbcra TexHnuecko nOndepKko ARNOVA (http://arnovatech.com/support).
? TPEBYETCJ NOMOJIb?

Ha haem Be6-caTe: 6paTntecb K pa3dJeIy qacto 3aJaBaEmbIX BOpocOB nO aDpecy http://arnovatech.com/faq
CbJNTEcB c HaSeI rpynnoTexHnuecko nOdEprKKn: nepeiNTe Ha cTpaHnUy http://arnovatech.com/support, yTo6bl o6paITbcra 3a noDepKKoN NO 3neKTPOHHo NooTe. Ppei o6paueHnem B Cnykby TexHnuecko nOdEprKKn 3aperncTpnpuYte cBoe yCTpoiCTBO (cm. pa3dien «3aperncTpnpuYte cBoe yctpoiCTBO»).
Tak KaK MbI qaTo 06HOBJIaEM n IyUHaem CBOIO npOdyKUIO, rpaHueckn INHTepeicu ININ yHKUHOHaBHe BcO3MOxHocTN npOrpAMMHorO oecneueHna BaIero yCTpoiCTBa MOrY HeCKoJIbKO OTInuA TcR O TpeIcTaBNeHHbIX B HactoIeM KpaTKOM pyKOBOCTBe NOJb3OBATeJI.
64
National restrictions
This device is intended for home and office use in all EU countries (and other countries following the EU directive 1999/5/EC) without any limitation except for the countries mentioned below:
Country Restriction ReasonRemark
Bulgaria None General authorization required for
outdoor use and public service
France Outdoor use
limited to 10mW e.i.r.p. within the band 2454-2483.5 MHz
Military Radiolocation use. Refarming of the 2.4 GHz band has been ongoing in recent years to allow current relaxed regulation. Full implementation planned 2012
Italy None If used outside of own premises, general
authorization is required.
Luxembourg None General authorization required for
network and service supply (not for spectrum)
Norway Implemented This subsection does not apply for the
geographical aera within a radius of 20km from the centre of Ny-Alesund
Russian Federation None Only for indoor applications
Note: Frequency 2454-2483.5MHZ are restricted to indoor use in France.
Consult the declaration of conformity on http://www.arnovatech.com/products/declaration_conformity.html
Open Source Software Offer
The software bundle with this product includes software files subject to certain open source license requirements. Such open source software files are subject solely to the terms of the relevant open source software license. Such open source software is provided on an "AS IS" basis to the maximum extent permitted by applicable law.
For the open source files contained herein, please access "Open source license" section located at: Settings\About tablet\Legal information on the device for the relevant copyright and licensing terms. You may obtain a copy of Apache License, Version 2.0 at http://www.apache.org/licenses/License-2.0. You may also obtain a copy of GNU General Public License, Version 2 at the Free Software Foundation, INC, 51 Franklin Street, Fifth Floor, Boston, MA 02110-1301, USA.
Until the date that is three years after our last shipment of this product, you may obtain a copy of the source code corresponding to the binaries for any GPL-Licensed file by contacting ARNOVA customer service at http://www.arnovatech.com and ARNOVA will send you a link to such source code or will provide instructions to get the source on a physical medium.
This offer is valid to anyone in receipt of this information.