Neutron 021090 - Elliptical bike Rössler - Free user manual and instructions
Find the device manual for free Neutron 021090 Rössler in PDF.

User questions about Neutron 021090 Rössler
0 question about this device. Answer the ones you know or ask your own.
Ask a new question about this device
Download the instructions for your Elliptical bike in PDF format for free! Find your manual Neutron 021090 - Rössler and take your electronic device back in hand. On this page are published all the documents necessary for the use of your device. Neutron 021090 by Rössler.
USER MANUAL Neutron 021090 Rössler
021090 Neutron Crosstrainer 8kg
natural_image
Line drawing of a stationary exercise bike with adjustable arms and legs (no text or symbols)Garantie
Montage
Computerinstructies
Algemene fi tnesstips
Warranty
Assembly Instructions
Computer Instruction
General fitness tips
General safety instructions....24
Online Registration 26
Warranty 27
General reference drawing....28
Parts list 29
Assembly Instructions 30
1. Install the Front and Rear Stabilizers .... 30
2. Install the Handlebars Post ....31
3. Install the Swing rod....32
4. Install the Right and Left Pedal tube ....33
- Install the ight and Left Pedal tube to Swing rod.....34
- Install the Handles 35
- Install the Pedals 36
- Install the Rod covers....37
- Install the Handlebars 38
- Install the Computer 39
- Install the Transformer 39
Computer Instruction....40
General fi tness tips 42
TABLE DES MATIÈRES
Onderdelenlijst
| nr. Omschrijving Aantal nr. Omschrijving | Aantal | ||||
| 1 Computer 1 33 Alloy wrap 1 4 | |||||
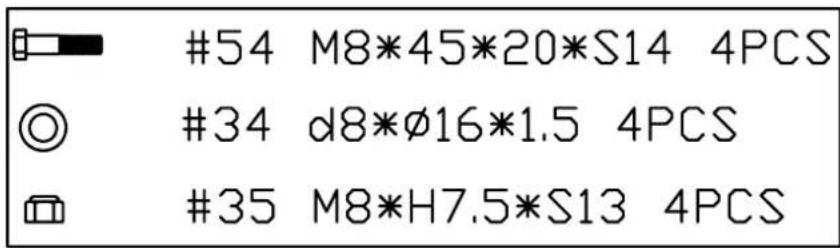
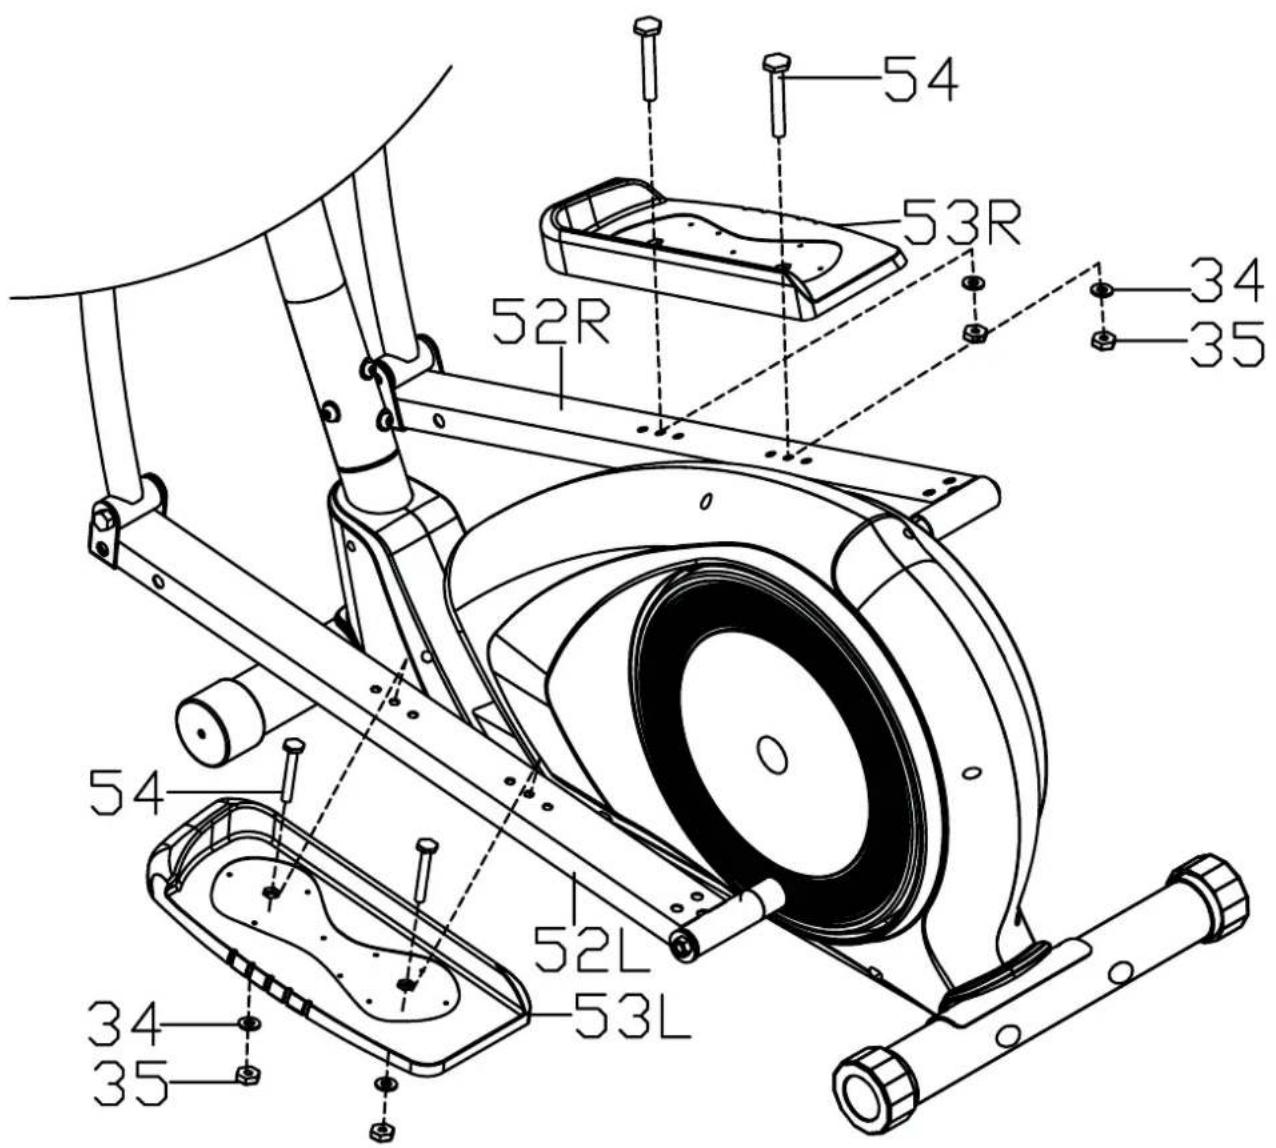
| 2 Foam grip ∅23*5*500 2 34 Washer d8* | ∅16*1.5 6 | ||||
| 3 Hand pulse grip 2 35 Nylon nut M8*H7.5* | S13 6 | ||||
| 4 Middle handle bar | 1 36 | Transformer | 1 | ||
| 5 | End cap ∅25*16 | 2 | 37 | Arc washer d8*∅20*2*R30 | 8 |
| 6 Washer d6*∅12*1 | 2 38 | Bolt M8*16*S6 | 4 | ||
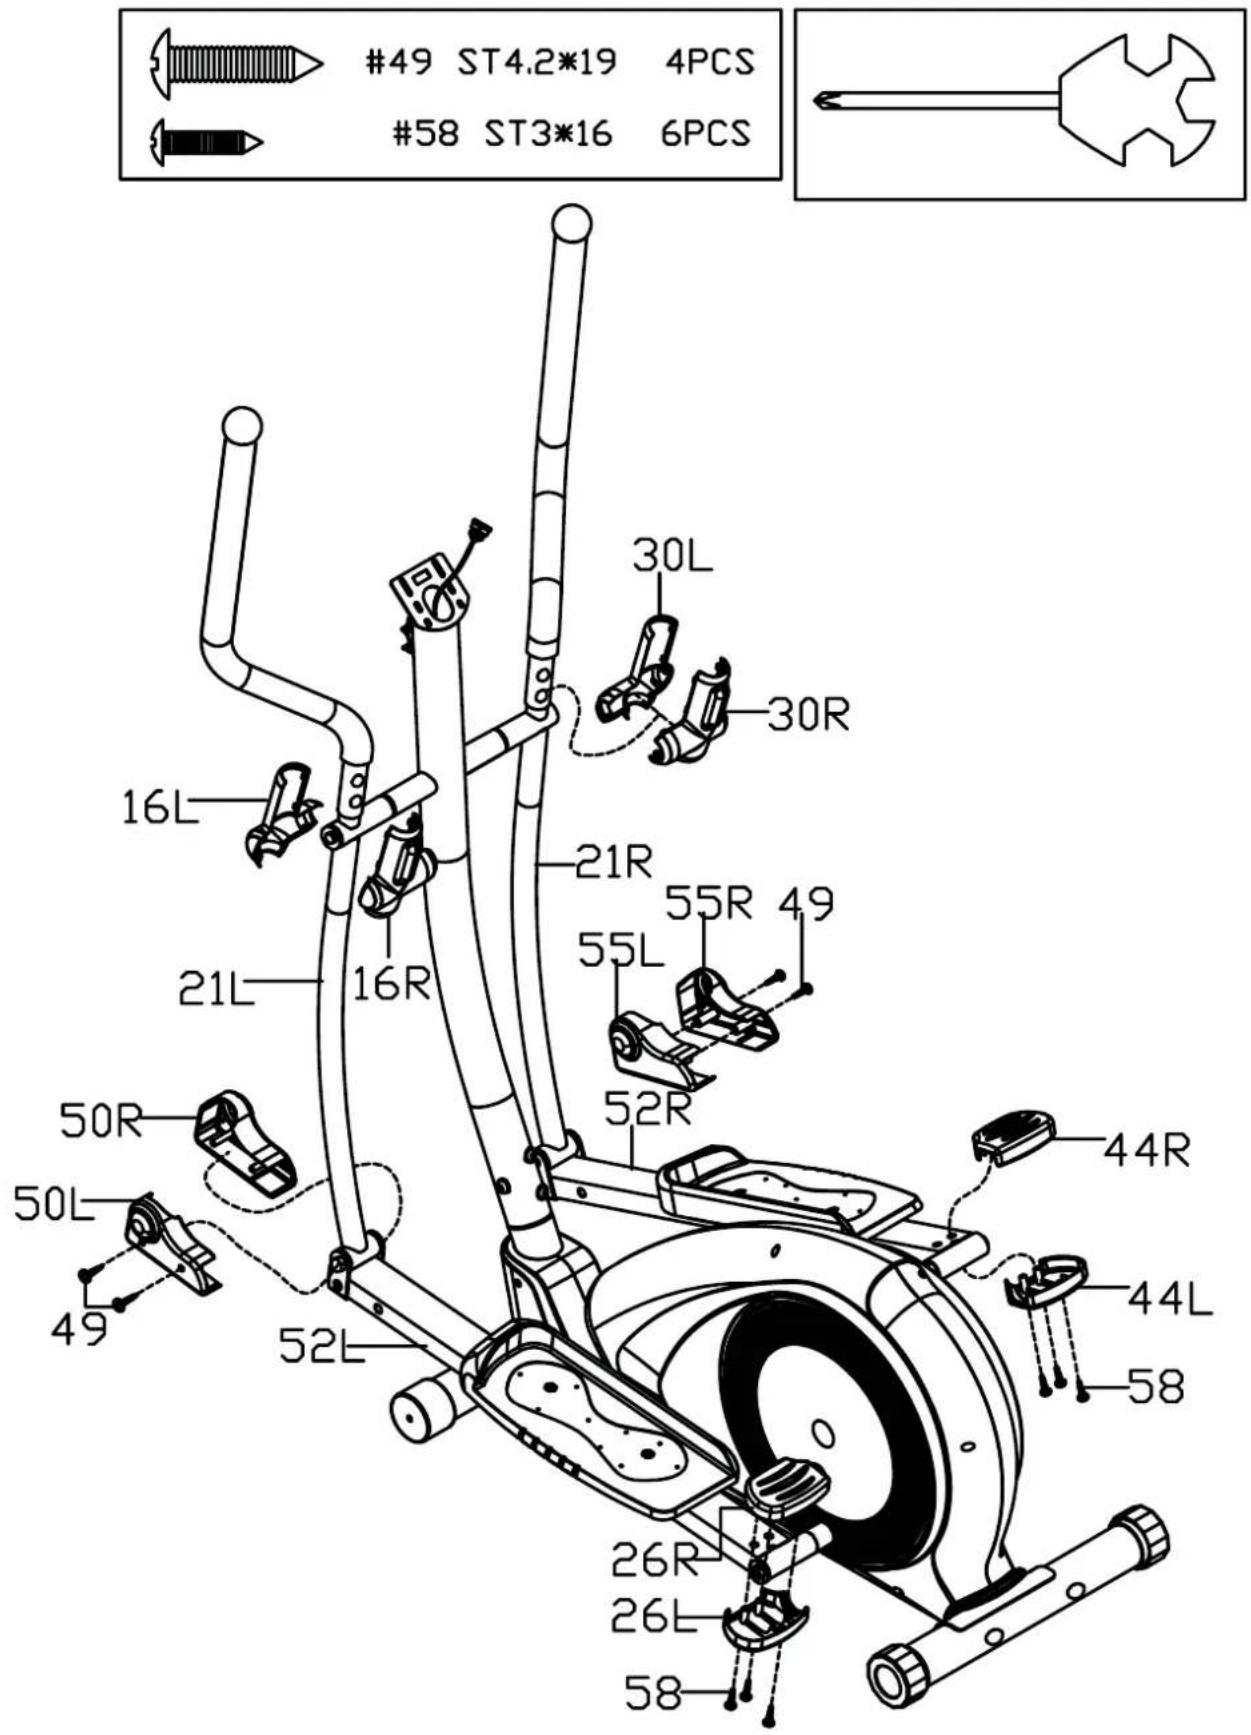
| 7 | Screw ST4*19 | 2 | 39L/R | End cap ∅60*∅70*95 | 2 |
| 8 Spring washer d8 | 4 40 | Front bottom tube | 1 | ||
| 9 Bolt M8*30*S6 | 2 41 | Bolt M8*73*20*H5 | 4 | ||
| 10 | Handlebar clamp cover 71*58*40 | 1 | 42 | Screw ST3*10 | 2 |
| 11 | Plug ∅12*11*∅3 | 1 | 43 | Trunk wire 2 | 1 |
| 12 | Hand pulse wire | 1 | 44L/R | Right rear rod cover | 2 |
| 13 | End cap ∅32*46*∅50 | 2 | 45 | Main frame | 1 |
| 14L/R | Handle bar | 2 | 46 | Cap nut M8*H16*S13 | 4 |
| 15 | Foam grip ∅30*5*670 | 2 | 47 | End cap ∅60 | 2 |
| 16L/R | Left Swing rod cover | 2 | 48 | Rear bottom tube | 1 |
| 17 | Bolt M6*16*S5 | 4 49 Screw ST4.2*19 | 4 | ||
| 18 | Bolt ∅8*27.5*H4*M6 | 4 | 50L/R | Left front rod cover | 2 |
| 19 | Bolt M8*16*S14 | 2 | 51 | End cap J60*30*15 | 2 |
| 20 | Washer d8*∅32*2 | 2 | 52L/R | Pedal tube | 2 |
| 21L/R | Swing rod | 2 | 53L/R | Pedal | 2 |
| 22 | Alloy wrap 2 | 8 | 54 | Bolt M8*45*20*S14 | 4 |
| 23 | Wave washer d19*∅25*0.3 | 4 | 55L/R | Right front rod cover | 2 |
| 24 | Long spacer ∅31.8*∅19.2*76 | 2 | 56 | Nylon nut M10*1.25*H9.5*S17 | 2 |
| 25 | Front tube | 1 | 57 | Washer d10*∅32*2 | 2 |
| 26L/R | Left rear rod cover | 2 | 58 | Screw ST3*16 | 6 |
| 27 | Short spacer ∅32*∅19.2*30 | 2 | 59 | Wrench S13-14-15 | 1 |
| 28 | Bolt M5*10 | 2 60 Wrench S5 | 1 | ||
| 29 | Trunk wire 1 | 1 61 Wrench S6 | 1 | ||
| 30L/R | Right Swing rod cover | 2 | 62 | Wrench S13-14 | 1 |
| 31 | Bolt M8*75*13*S14 | 2 63 Wrench S17-S19 1 | |||
| 32 | Spacer ∅14*∅8.3*59 | 2 | |||
LET OP:
STAP 2
Watt Control Program
Body Fat Measurement Program
| Age/FAT% Gender\Body Shape | Slim | Healthy | Fleshy | Over WT | Obese |
| BODY1 | BODY2 | BODY3 | BODY4 | BODY5 | |
| Male/≤30 years old | <14% | 14%~20% | 20.1%~25% | 25.1%~35% | >35% |
| Male/>30 years old | <17% | 17%~23% | 23.1%~28% | 28.1%~38% | >38% |
| Female/≤30 years old | <17% | 17%~24% | 24.1%~30% | 30.1%~40% | >40% |
| Female/>30 years old | <20% | 20%~27% | 27.1%~33% | 33.1%~43% | >43% |
3.Pulse Recovery Test
INPUT: AC (The voltage depends on different country)
OUTPUT: 8VDC 500mA AC-DC ADAPTOR
Algemene fi tnesstips
Copyright (c) 1997 American Heart Association
Warming-up – Cooling down
natural_image
Line drawing of a person in a neck and shoulders (no text or symbols)
natural_image
Simple line drawing of a person in a relaxed pose (no text or symbols)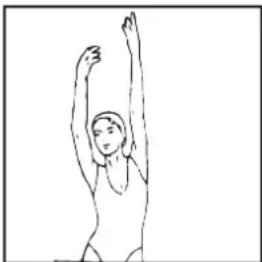
natural_image
Simple line drawing of a person performing a stretching or dance pose (no text or symbols)
natural_image
Line drawing of a person in motion, possibly dancing or performing a exercise (no text or symbols)
natural_image
Line drawing of a seated human figure in a crouching position (no text or symbols)Tenen aanraken
natural_image
Line drawing of a person bending forward with legs raised (no text or symbols)Hamstrings oefeningen
natural_image
Line drawing of a person performing a seated leg stretch (no text or symbols)Kuit/achilles oefeningen
natural_image
Line drawing of a person in motion, possibly dancing or gesturing (no text or symbols)General safety instructions
In the design and the production of this fitness equipment, much attention has been paid to safety. Nevertheless, you need at all times to remain conscious of certain safety measures. Make certain that you have carefully read through the whole user manual prior to your use of the equipment. Keep in mind the following points:
- This equipment has not been designed to be used as a toy and must only be used for the purposes described in this manual. Read the instructions below carefully before using this equipment.
- Keep children and animals away from the equipment. Children's enthusiasm may well lead to incorrect use of the equipment. If children are allowed to use the equipment, they should only do so under supervision and after receiving instructions regarding its proper use. Under no circumstances should the equipment be used as a toy.
- Always consult with your physician prior to making use of this equipment or any other fitness equipment.
- Always wear safe and comfortable clothing when you are using fitness equipment. Preferably, wear sports shoes or aerobic footwear.
- In the event you should feel faint or suffer other discomforts, stop using the equipment. You also need to stop when you experience pain in or pressure on your joints.
- Make certain that no more than one user is occupying the equipment at one time. Place the equipment on a level surface; the space required is approximately 2 x 1 metres.
- Make certain that the equipment has been correctly assembled prior to its use. Ensure that all screws, nuts and bolts have been fitted correctly and tightened properly. Use only the parts that are recommended by the importer and that have been delivered with the equipment.
- Do not use the equipment if it is damaged or has broken down.
- Pay attention to how your body reacts after using the equipment. Dizziness is a sign that you worked out too intensely. If you feel dizzy, stretch out on the floor and do not try to get back on your feet until the dizziness has disappeared.
- Always use the equipment on a level and clean surface. Never use the equipment outdoors or in water.
- Avoid that your arms and legs come too close to the moving parts. Do not stuff articles inside the existing openings in the equipment.
- Use this equipment only for the purposes as described in this user manual. Do not use parts that were not recommended by the manufacturer.
- Ascertain that there are no sharp and pointed objects in the immediate vicinity of the equipment.
- We advise physically challenged individuals to use this fitness equipment only under the supervision of qualified instructors.
- The equipment must have come to a complete standstill before stepping down.
- Use the equipment as laid down in the manual. Misuse of the equipment can lead to physical injuries.
- This fitness equipment has been produced in accordance with EN-norm 957-5 class HA. Up to taxable weight: 100 kilogrammes.
- This fitness equipment is not suitable for rehabilitation goals.
- Excessive and incorrect training may result to injuries and health problems.
Warning
Consult with your physician prior to starting your exercises. A frequent and intensive training programme should first be approved by your family physician. This is especially important for individuals above 35 years of age or for those with physical problems. Carefully read through the entire user manual before you start exercising. We are in no wise responsible for personal injury or physical strains and discomforts that are caused by the use of this equipment and cannot be held liable in case of their occurrence. Carefully save these instructions. Incorrect or extreme use may lead to personal injury.
Note: the maximum permissible weight on this equipment is 100 kg.
Assembly
This user manual has been put together in order to simplify the assembly of the equipment and at the same time to explain its correct use. Please make certain to carefully read through this manual. In order to familiarise yourself with the parts of the equipment, we recommend that you carefully study the general reference drawing prior to starting the assembly and the use of the equipment.
Place all parts needed for the assembly on the floor in an orderly manner and remove all packing material. Check the list of parts to verify what items are present. For the actual assembly we make referral to the following pages.
Thank you for your purchase
We thank you for your purchase of this fitness equipment. This equipment will help you in improving your general conditioning and in developing your muscles in the correct way. In addition, you can now enjoy all of these benefits inside your own home.
Maintenance and use
Consult your physician before starting the exercises. A frequent and strenuous workout program must be approved by your physician first.
- The equipment requires a regular check-up to prevent physical injury. This means that bolts and nuts should be frequently checked for their proper tightening and that the equipment in general should be checked for cracks and sharp edges etc.
- Defective components must be replaced immediately. If this is not feasible, the equipment must be put out of order until the required repairs have been made.
• NB! Do not smoke or use fire near the equipment, as some of the plastic components are flammable. - Do not use the equipment in front of a burning stove and/or fire place.
• Persons suffering from a plastics allergy should consult their physician before using the equipment. - Do not touch any cylinders on the equipment as they become extremely hot during use.
- If you wish to dissemble the device, reverse the procedure given in the assembly instructions.
PACKAGING
Environmentally friendly, recyclable materials
- Outer packaging of the cardboard
- Form parts of foamed, CPC-free polystyrene(PS)
- Foils and bag of polyethylene (PE)
• Tension bands of polypropylene (PP)
DISPOSAL
Please undertake environmentally friendly disposal.
For further guidance contact your local authority refuse department.


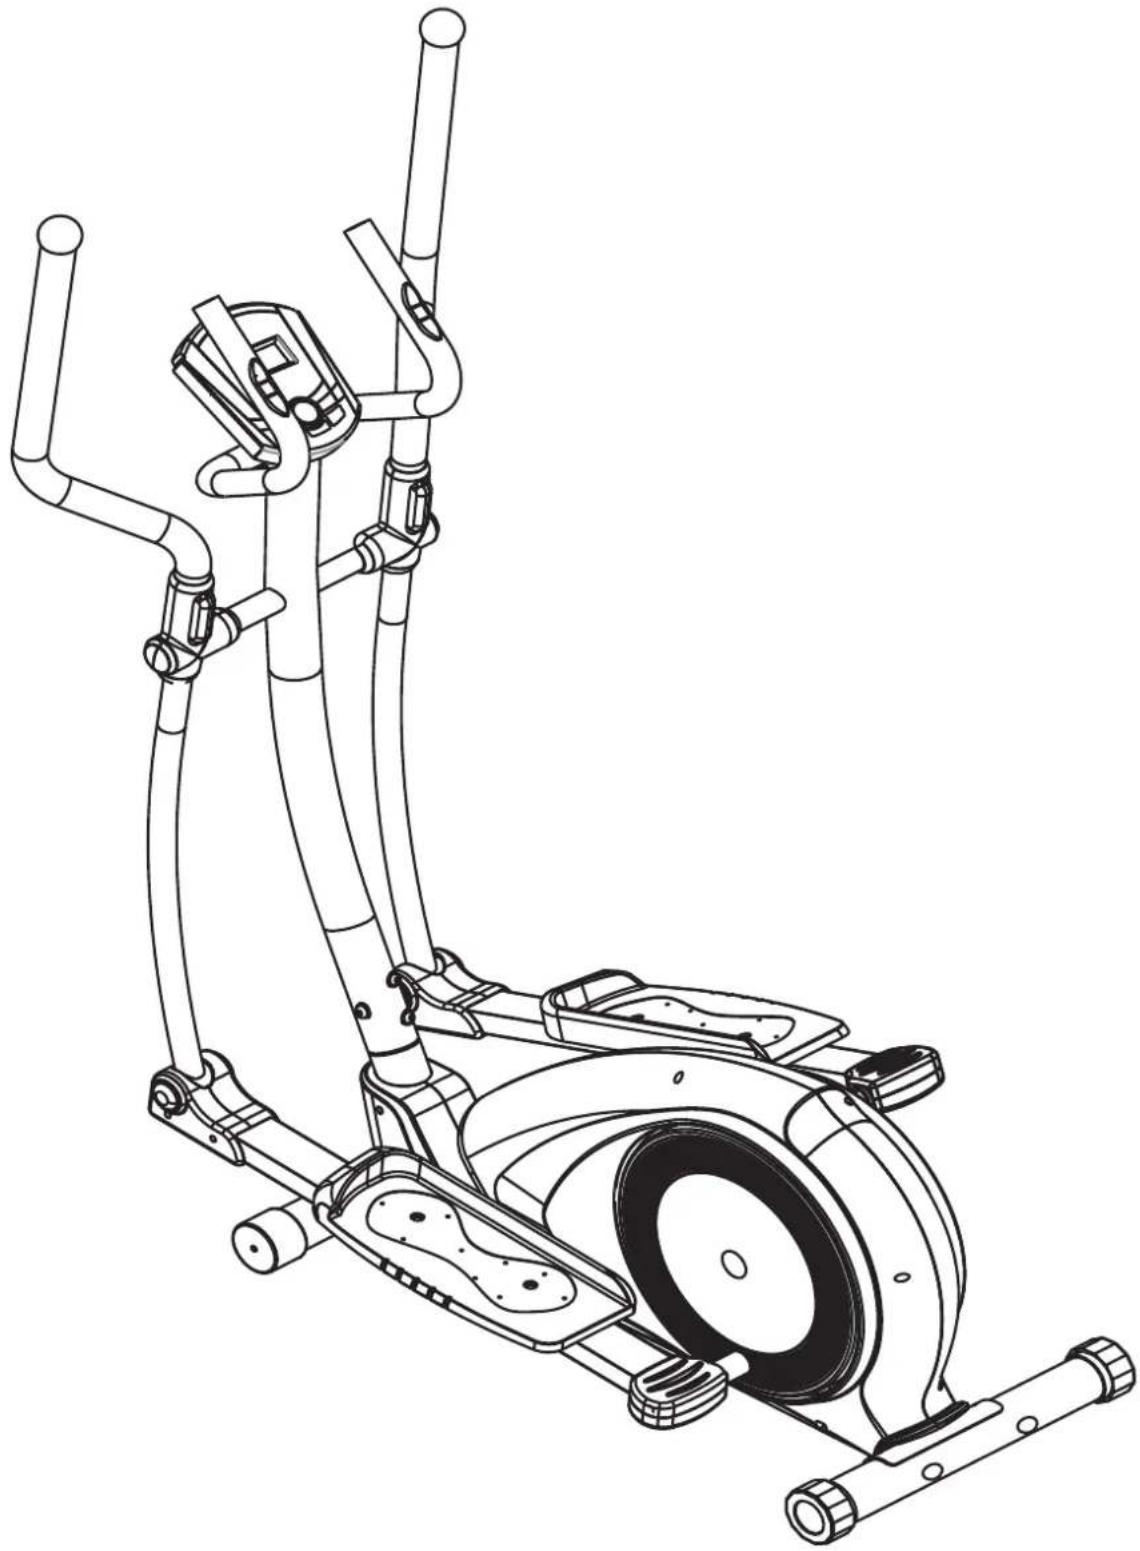
General reference drawing
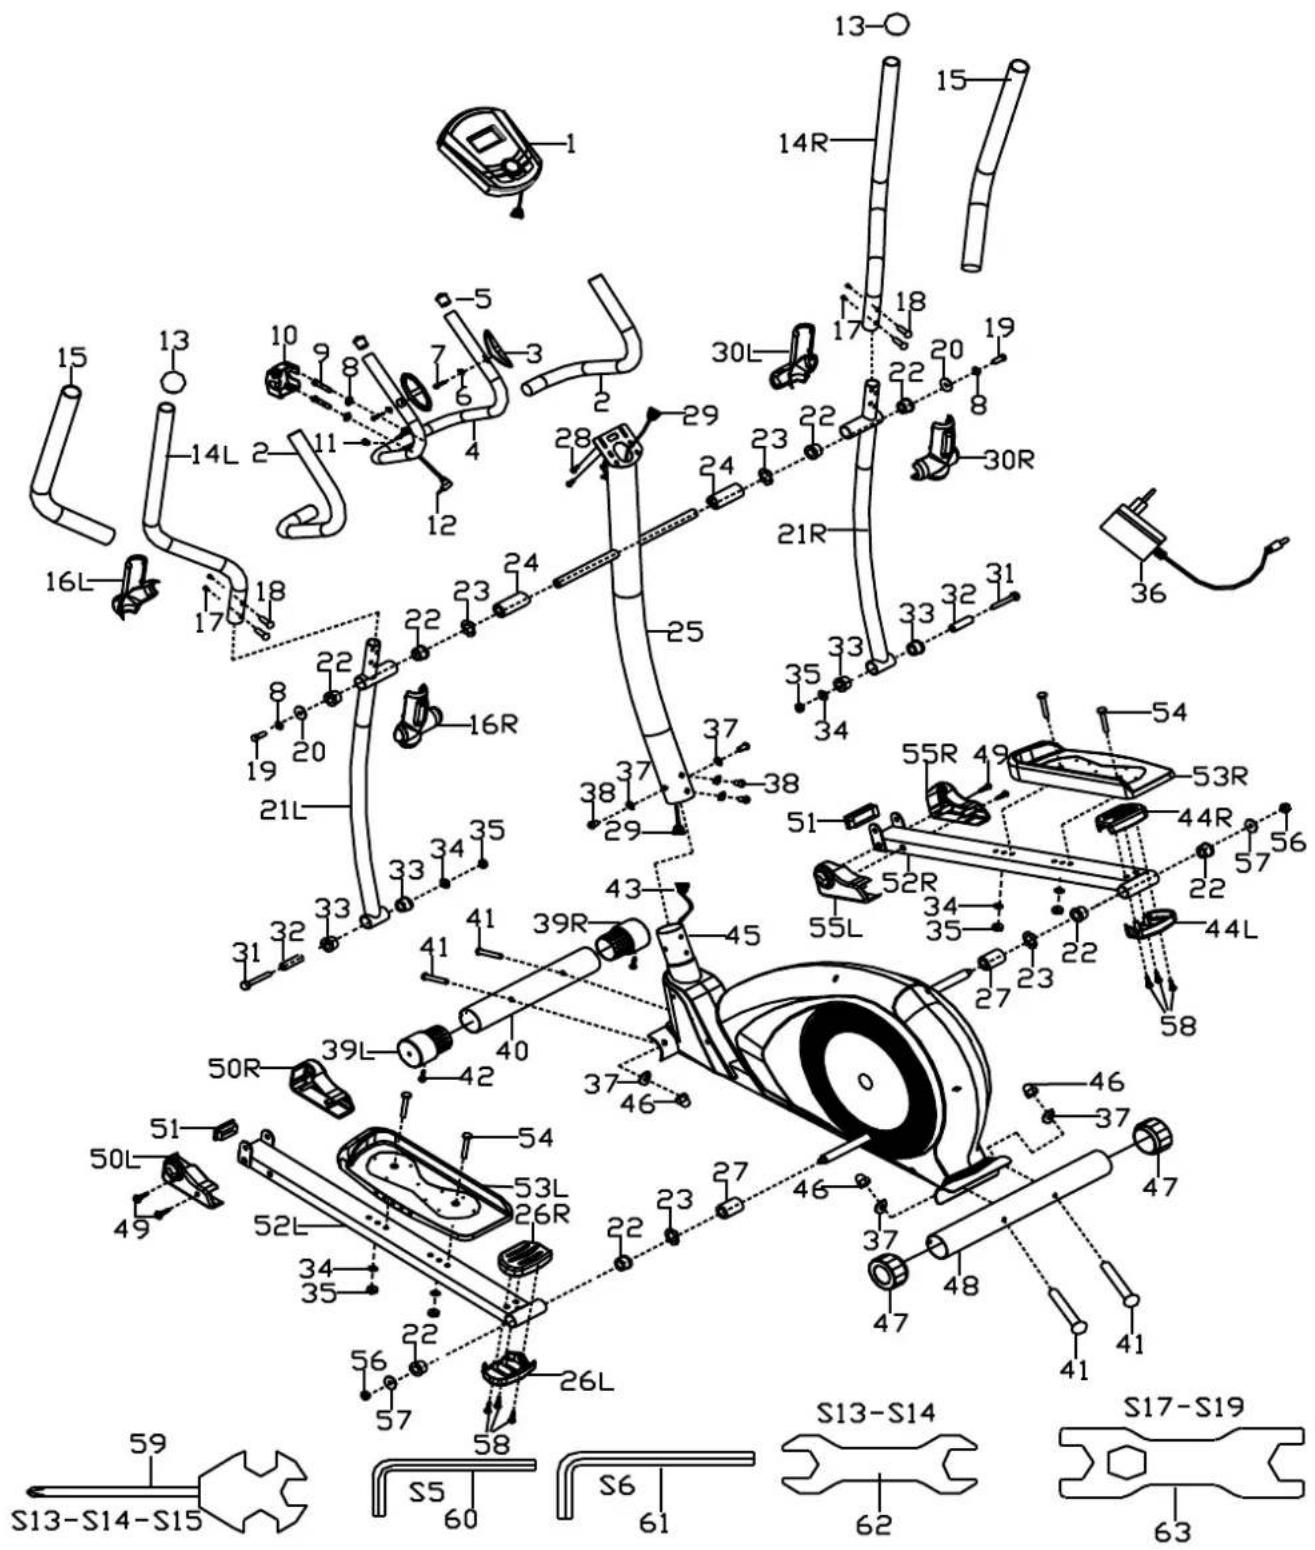
Parts list
| no. Discription Quantity no. Discription Quantity | |||||
| 1 Computer 1 33 Alloy wrap 1 4 | |||||
| 2 Foam grip ∅23*5*500 2 34 Washer | d8*∅16*1.5 | 6 | |||
| 3 Hand pulse grip 2 35 Nylon nut M8*H7.5*S13 | 6 | ||||
| 4 Middle handle bar 1 36 | Transformer | 1 | |||
| 5 | End cap ∅25*16 | 2 | 37 | Arc washer d8*∅20*2*R30 | 8 |
| 6 Washer d6*∅12*1 2 38 | Bolt M8*16* | S6 | 4 | ||
| 7 | Screw ST4*19 | 2 | 39L/R | End cap ∅60*∅70*95 | 2 |
| 8 Spring washer d8 4 40 | Front bottom tube | 1 | |||
| 9 Bolt M8*30*S6 2 41 | Bolt M8*73* | 20*H5 | 4 | ||
| 10 | Handlebar clamp cover 71*58*40 | 1 42 Screw | ST3*10 | 2 | |
| 11 | Plug ∅12*11*∅3 | 1 | 43 | Trunk wire 2 | 1 |
| 12 | Hand pulse wire | 1 | 44L/R | Right rear rod cover | 2 |
| 13 | End cap ∅32*46*∅50 | 2 | 45 | Main frame | 1 |
| 14L/R | Handle bar | 2 | 46 | Cap nut M8*H16*S13 | 4 |
| 15 | Foam grip ∅30*5*670 | 2 | 47 | End cap ∅60 | 2 |
| 16L/R | Left Swing rod cover | 2 | 48 | Rear bottom tube | 1 |
| 17 | Bolt M6*16*S5 | 4 49 Screw | ST4.2*19 | 4 | |
| 18 | Bolt ∅8*27.5*H4*M6 | 4 | 50L/R | Left front rod cover | 2 |
| 19 | Bolt M8*16*S14 | 2 | 51 | End cap J60*30*15 | 2 |
| 20 | Washer d8*∅32*2 | 2 | 52L/R | Pedal tube | 2 |
| 21L/R | Swing rod | 2 | 53L/R | Pedal | 2 |
| 22 | Alloy wrap 2 | 8 | 54 | Bolt M8*45*20*S14 | 4 |
| 23 | Wave washer d19*∅25*0.3 | 4 | 55L/R | Right front rod cover | 2 |
| 24 | Long spacer ∅31.8*∅19.2*76 | 2 | 56 | Nylon nut M10*1.25*H9.5*S17 | 2 |
| 25 | Front tube | 1 | 57 | Washer d10*∅32*2 | 2 |
| 26L/R | Left rear rod cover | 2 | 58 | Screw ST3*16 | 6 |
| 27 | Short spacer ∅32*∅19.2*30 | 2 | 59 | Wrench S13-14-15 | 1 |
| 28 | Bolt M5*10 | 2 60 Wrench S5 | 1 | ||
| 29 | Trunk wire 1 | 1 | 61 | Wrench S6 | 1 |
| 30L/R | Right Swing rod cover 2 62 Wrench S13-14 | 1 | |||
| 31 | Bolt M8*75*13*S14 | 2 | 63 | Wrench S17-S19 | 1 |
| 32 | Spacer ∅14*∅8.3*59 | 2 | |||
NOTE:
Most of the listed assembly hardware has been packaged separately, but some hardware items have been preinstalled in the identified assembly parts. In these instances, simply remove and reinstall the hardware as assembly is required.
Please reference the individual assembly steps and make note of all preinstalled hardware.
PREPARATION:
Before assembling, make sure that you will have enough space around the item; Use the present tooling for assembling; before assembling please check whether all needed parts are available.
It is strongly recommended this machine to be assembled by two or more people to avoid possible injury.
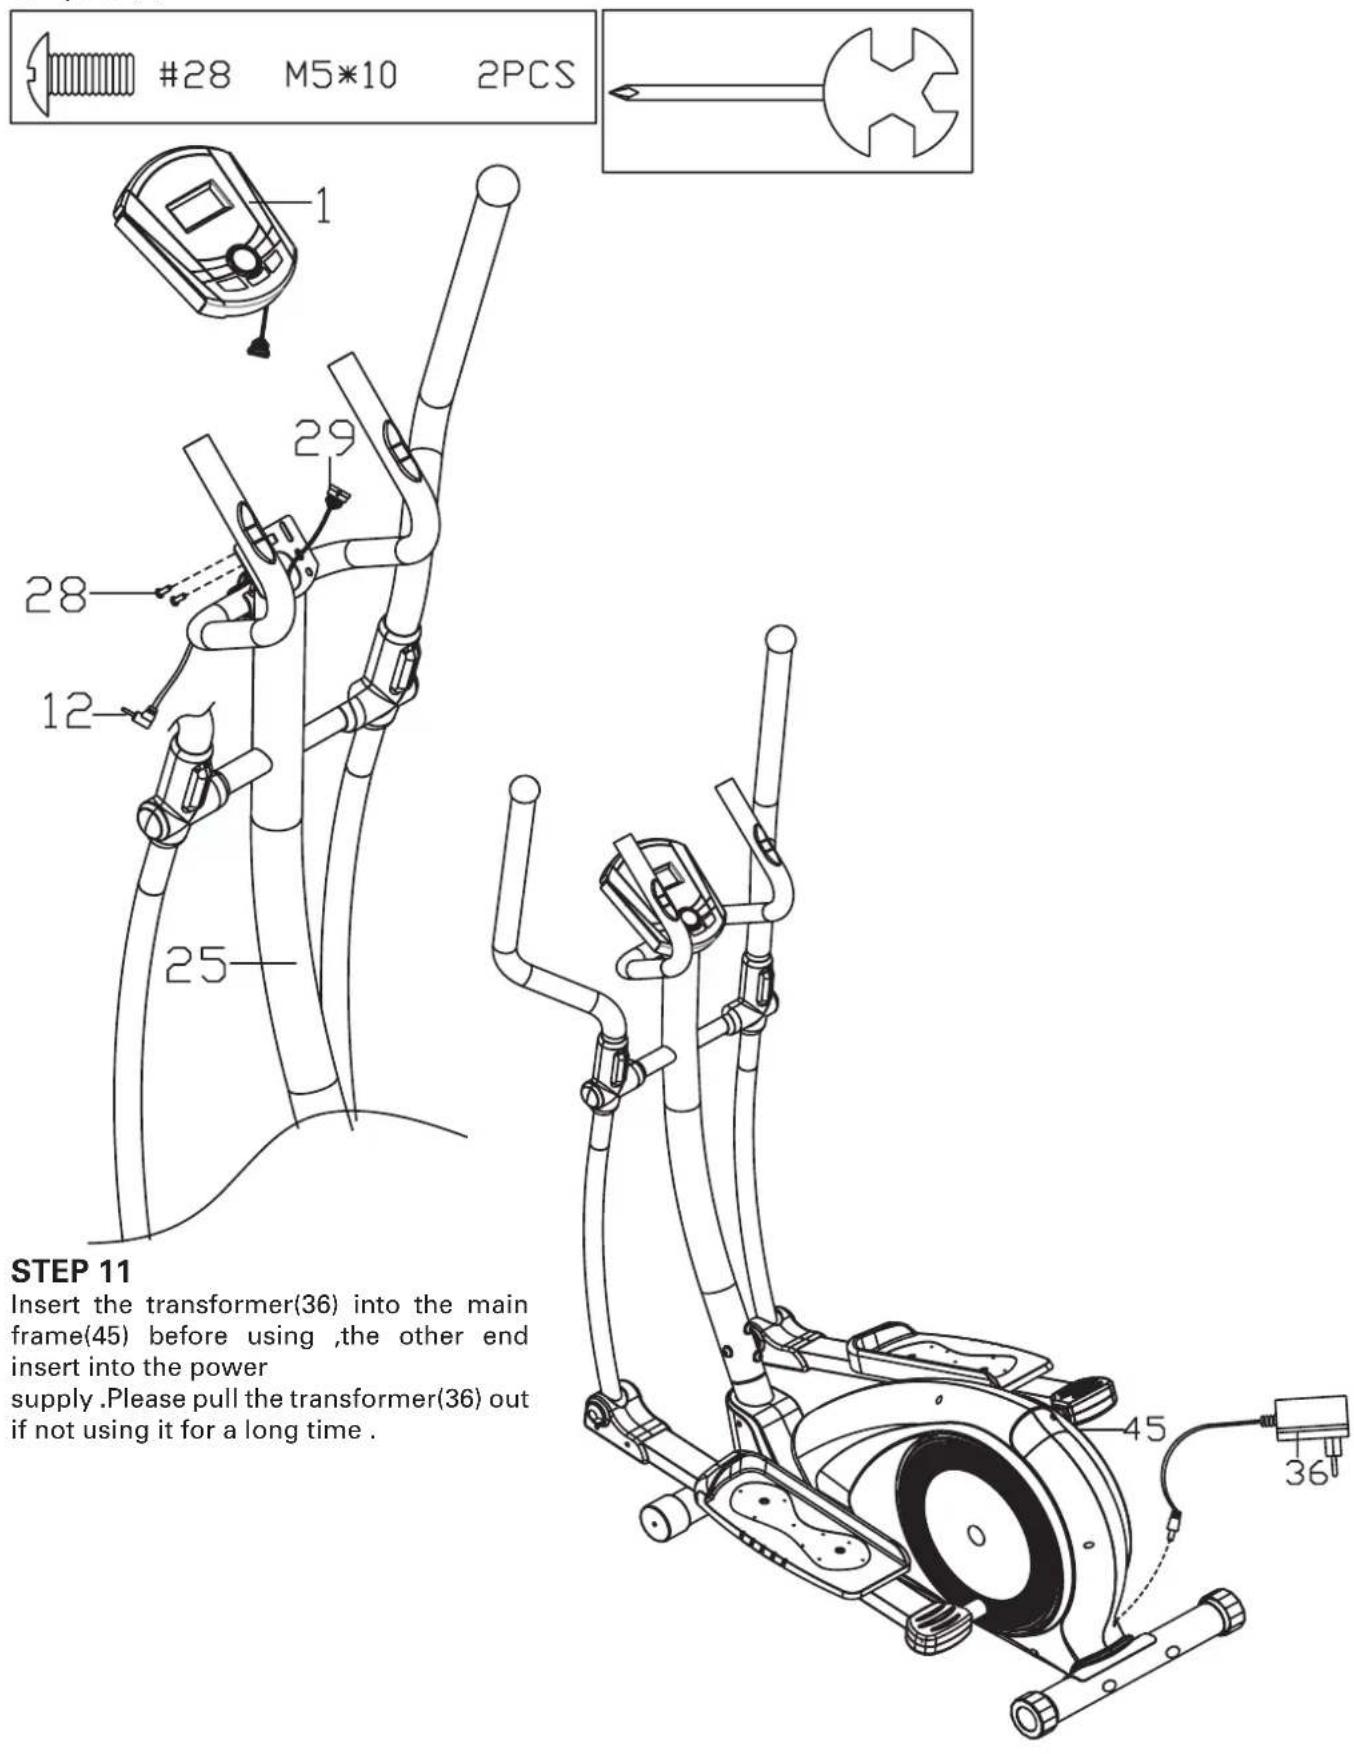
Assembly Instructions
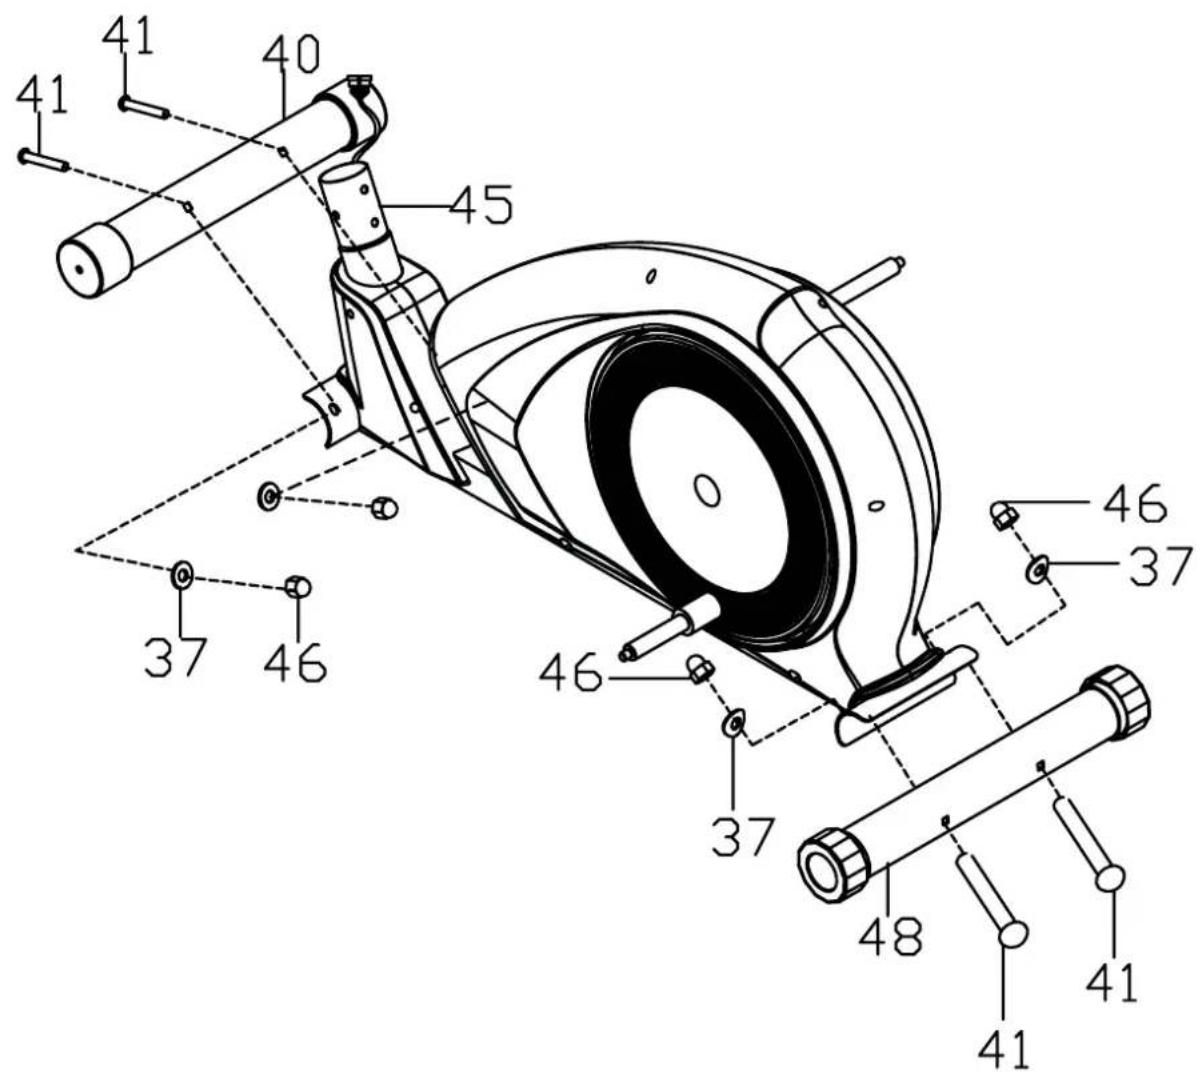
STEP 1:
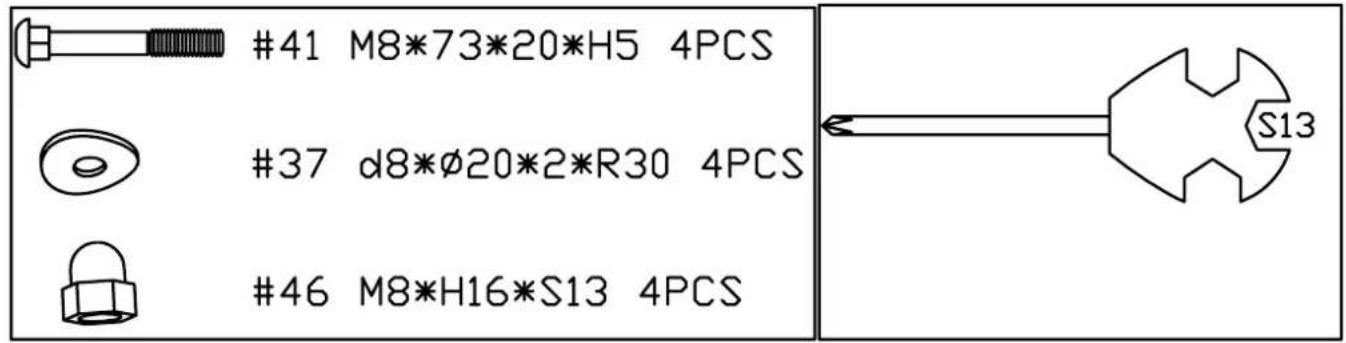
Secure front bottom tube(40) and rear bottom tube(48) to main frame(45) with bolts(41), arc washers(37) and cap nuts(46).
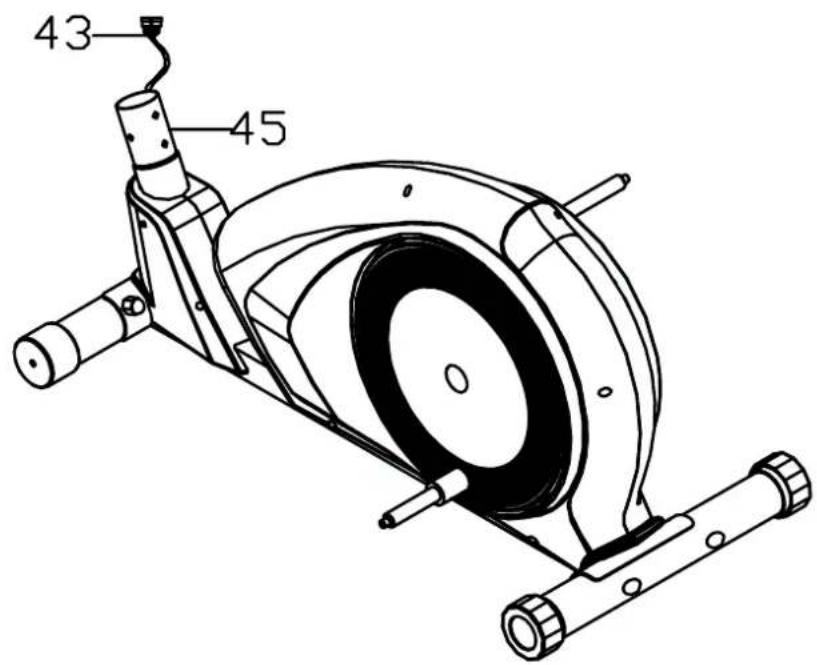
STEP 2:
a. Connect well the trunk wire 1(29) and trunk wire 2(43);
b. Insert front tube(25) into main frame(45), then Secure them with bolts(38) and arc washers(37).


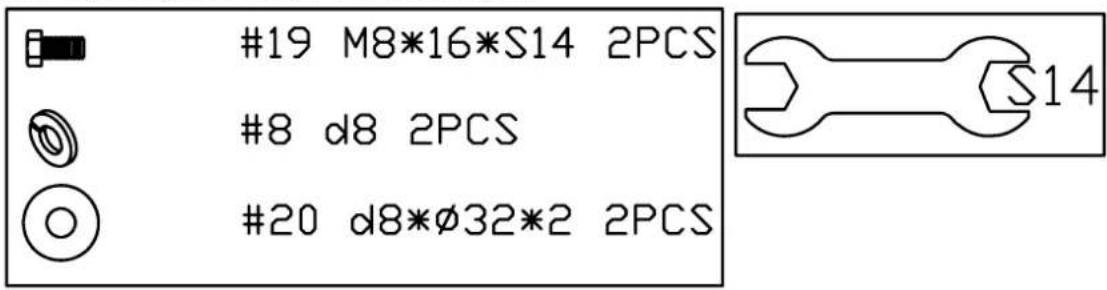
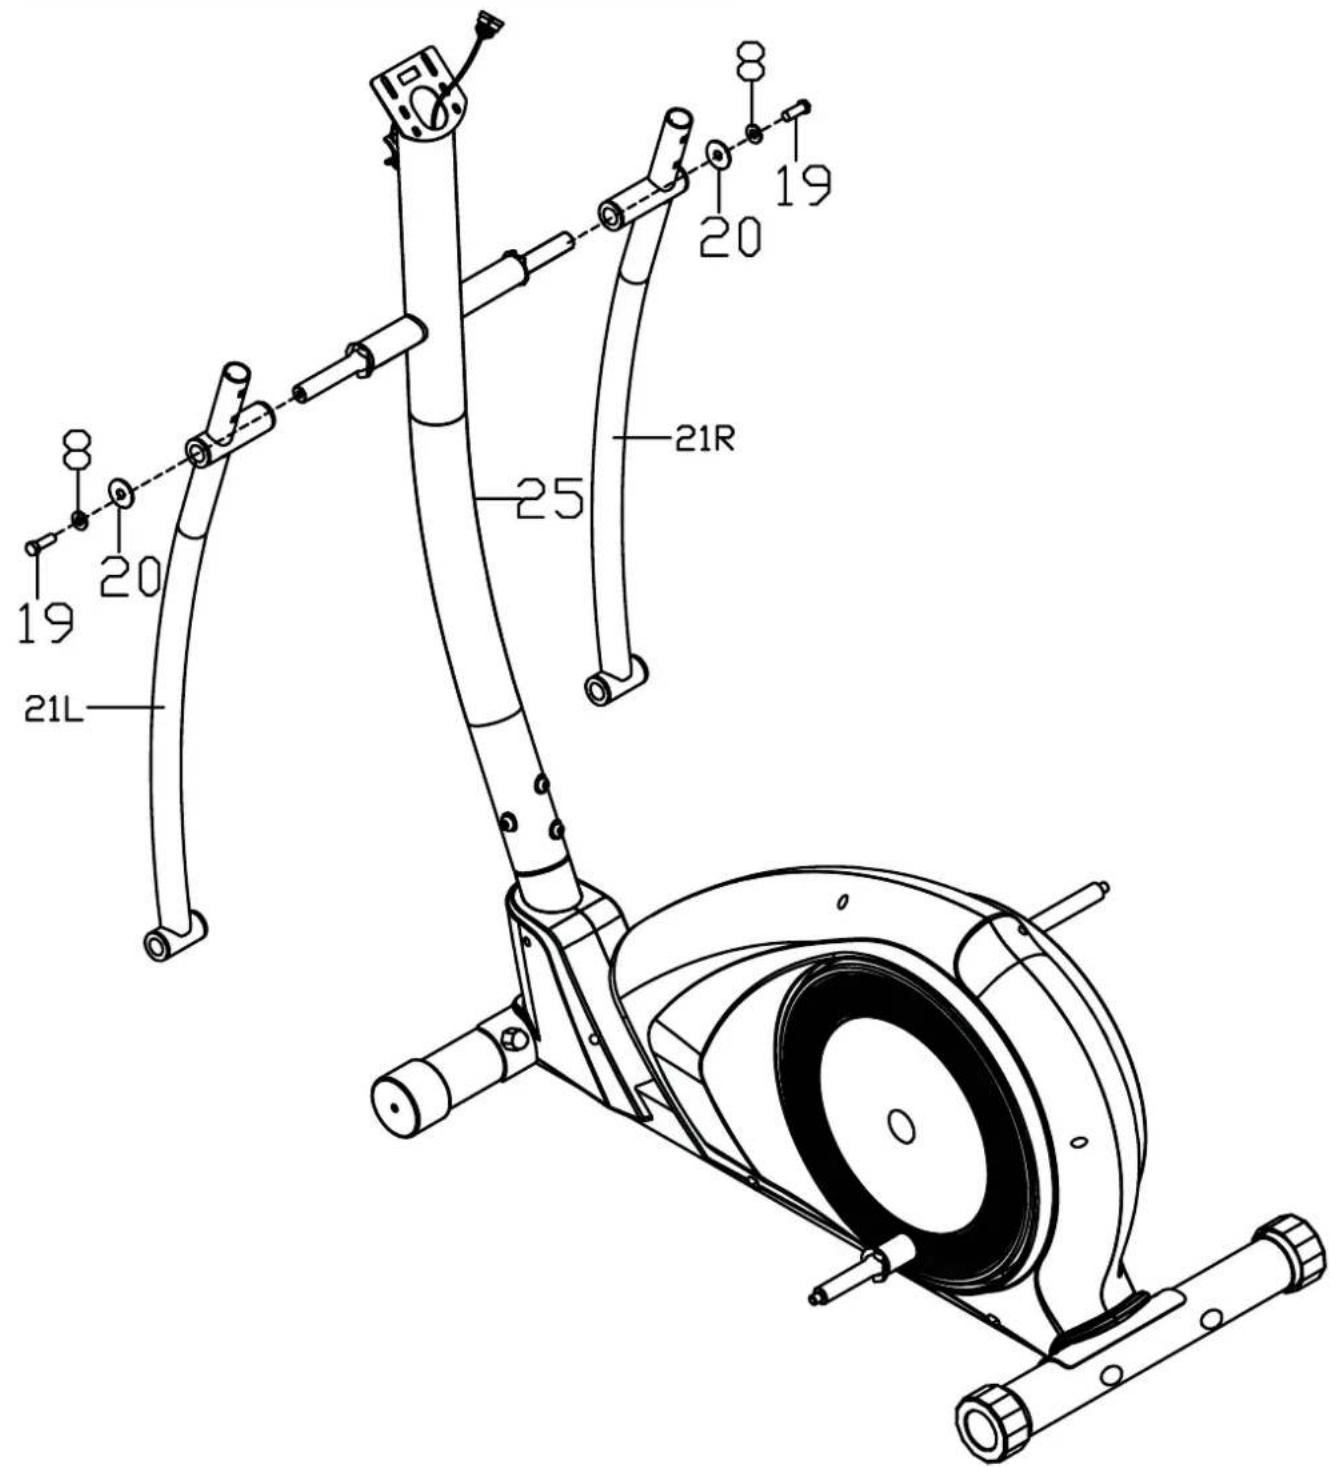
STEP 3:
Attach swing rod(21L/R) to the axle of front
tube(25), then Secure them with
bolts(19), spring washers(8) and washers(20).
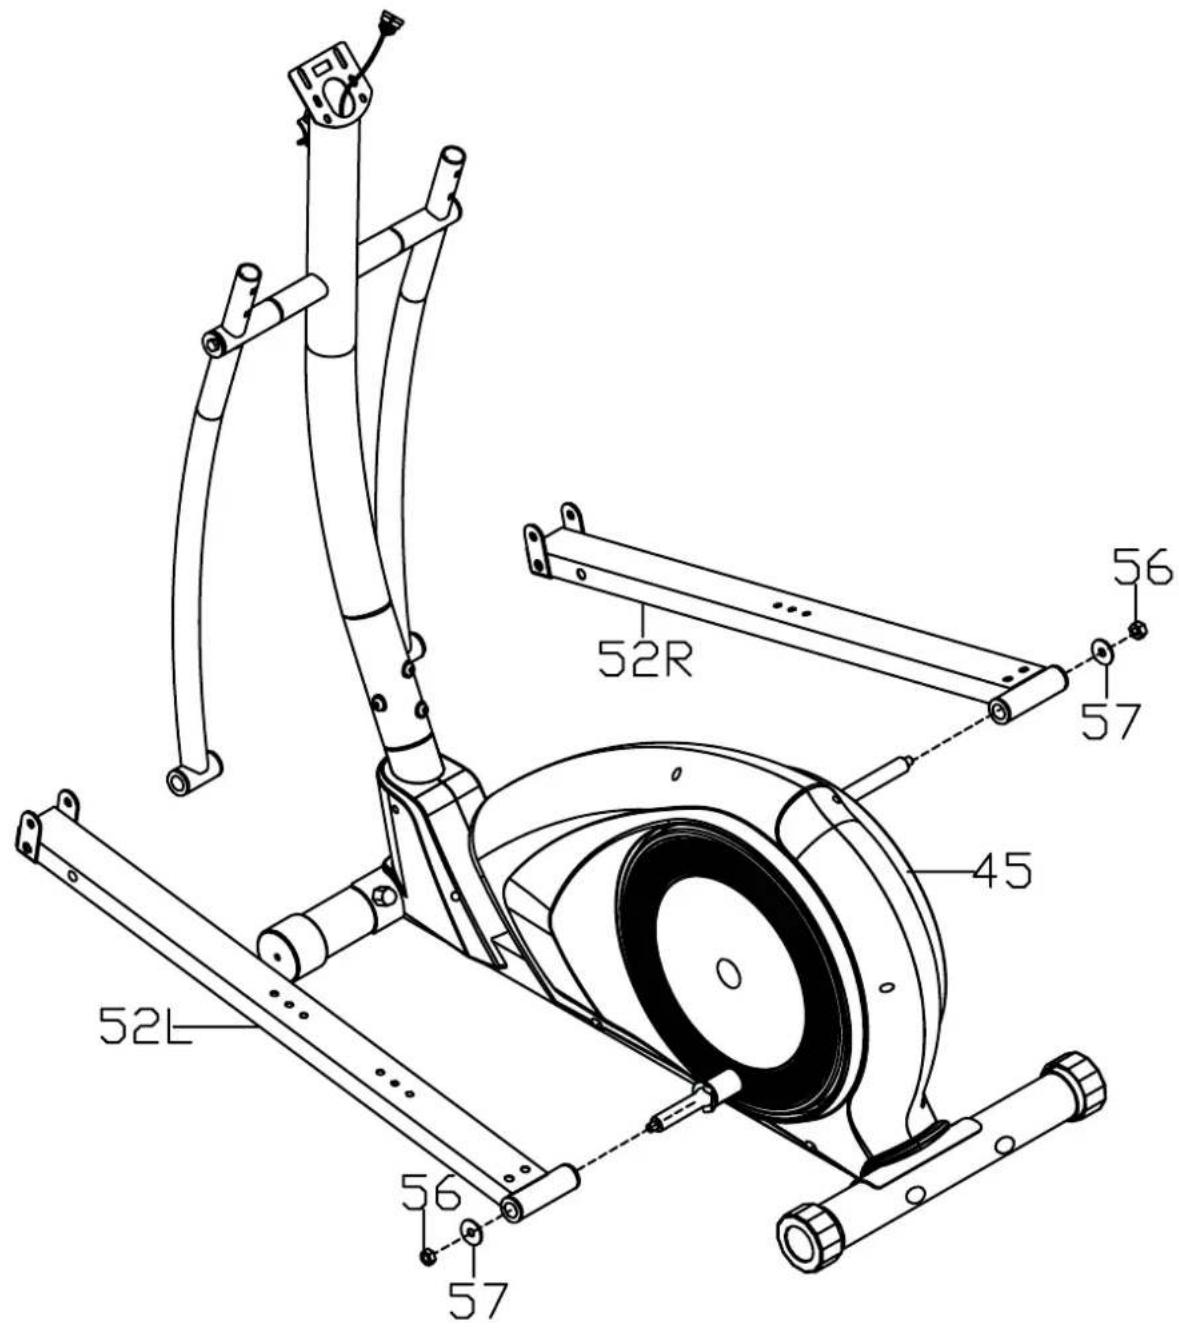
STEP 4:
Secure pedal tube (52L/R) on the L&R crank of main frame (45) with nuts(56) and washers(57).
Note:
Don't tighten the above Bolts till complete this assembly.

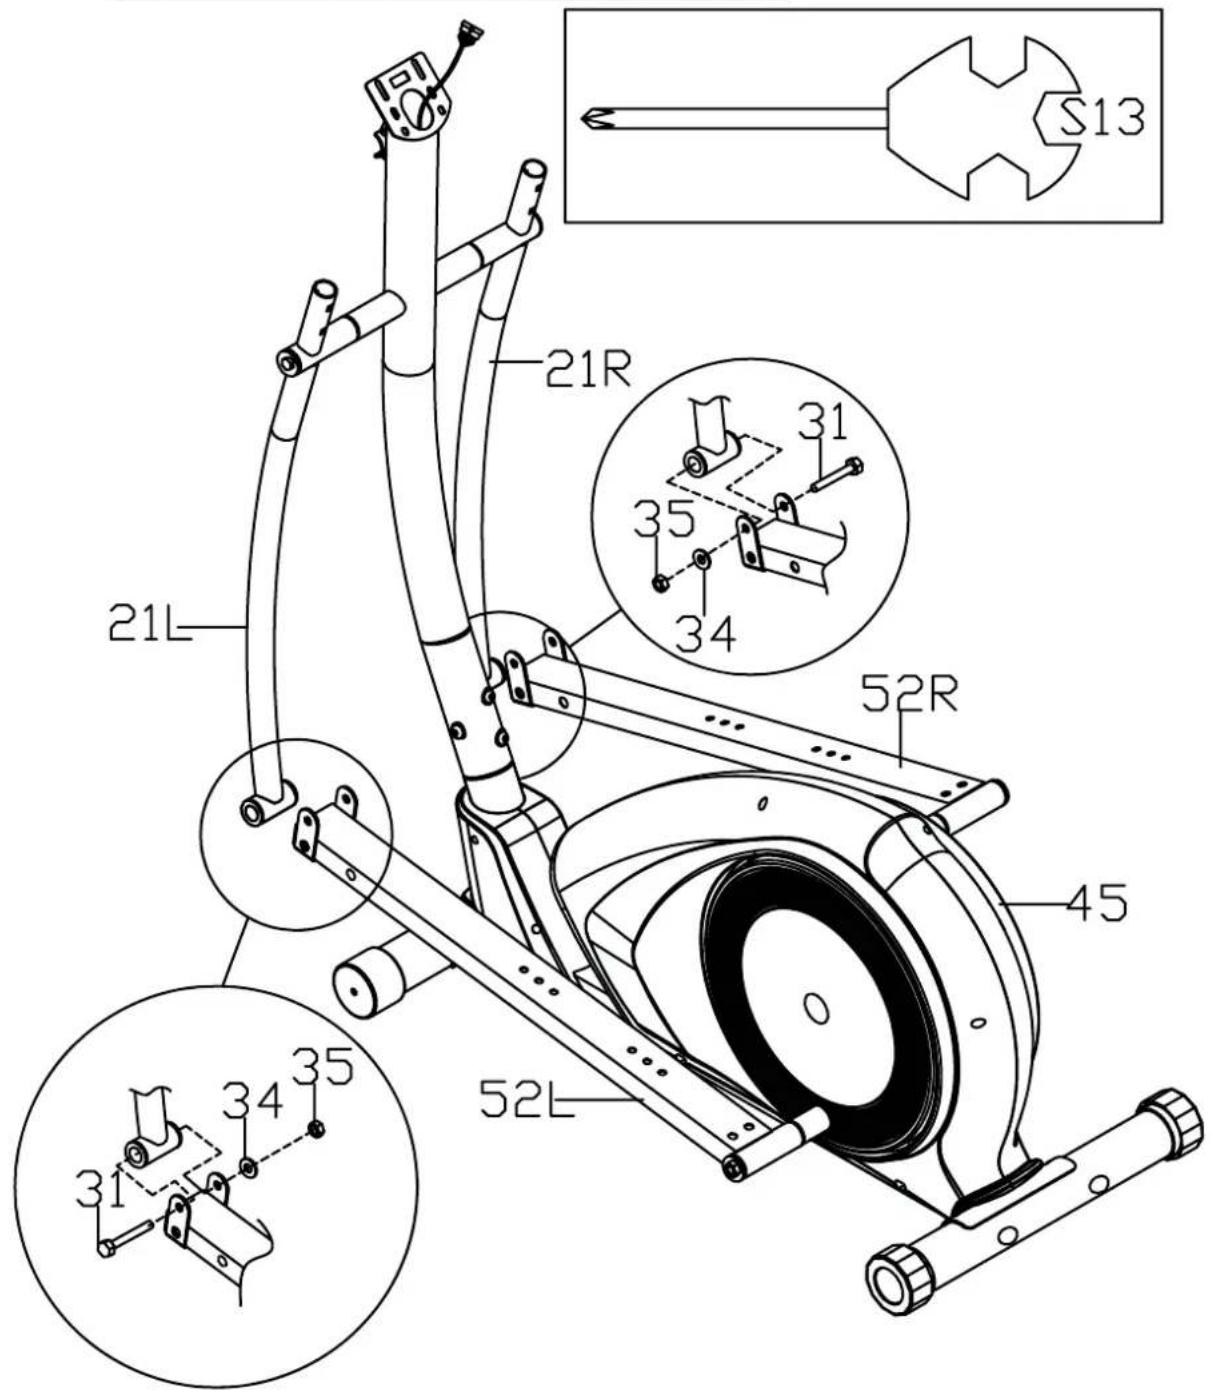
STEP 5:
Secure swing rod(21L/R) on pedal tube(52L/R) with bolts(31), washers(34) and nylon nuts(35).
Note:
The pedal has been labeled L for Left & R for Right.

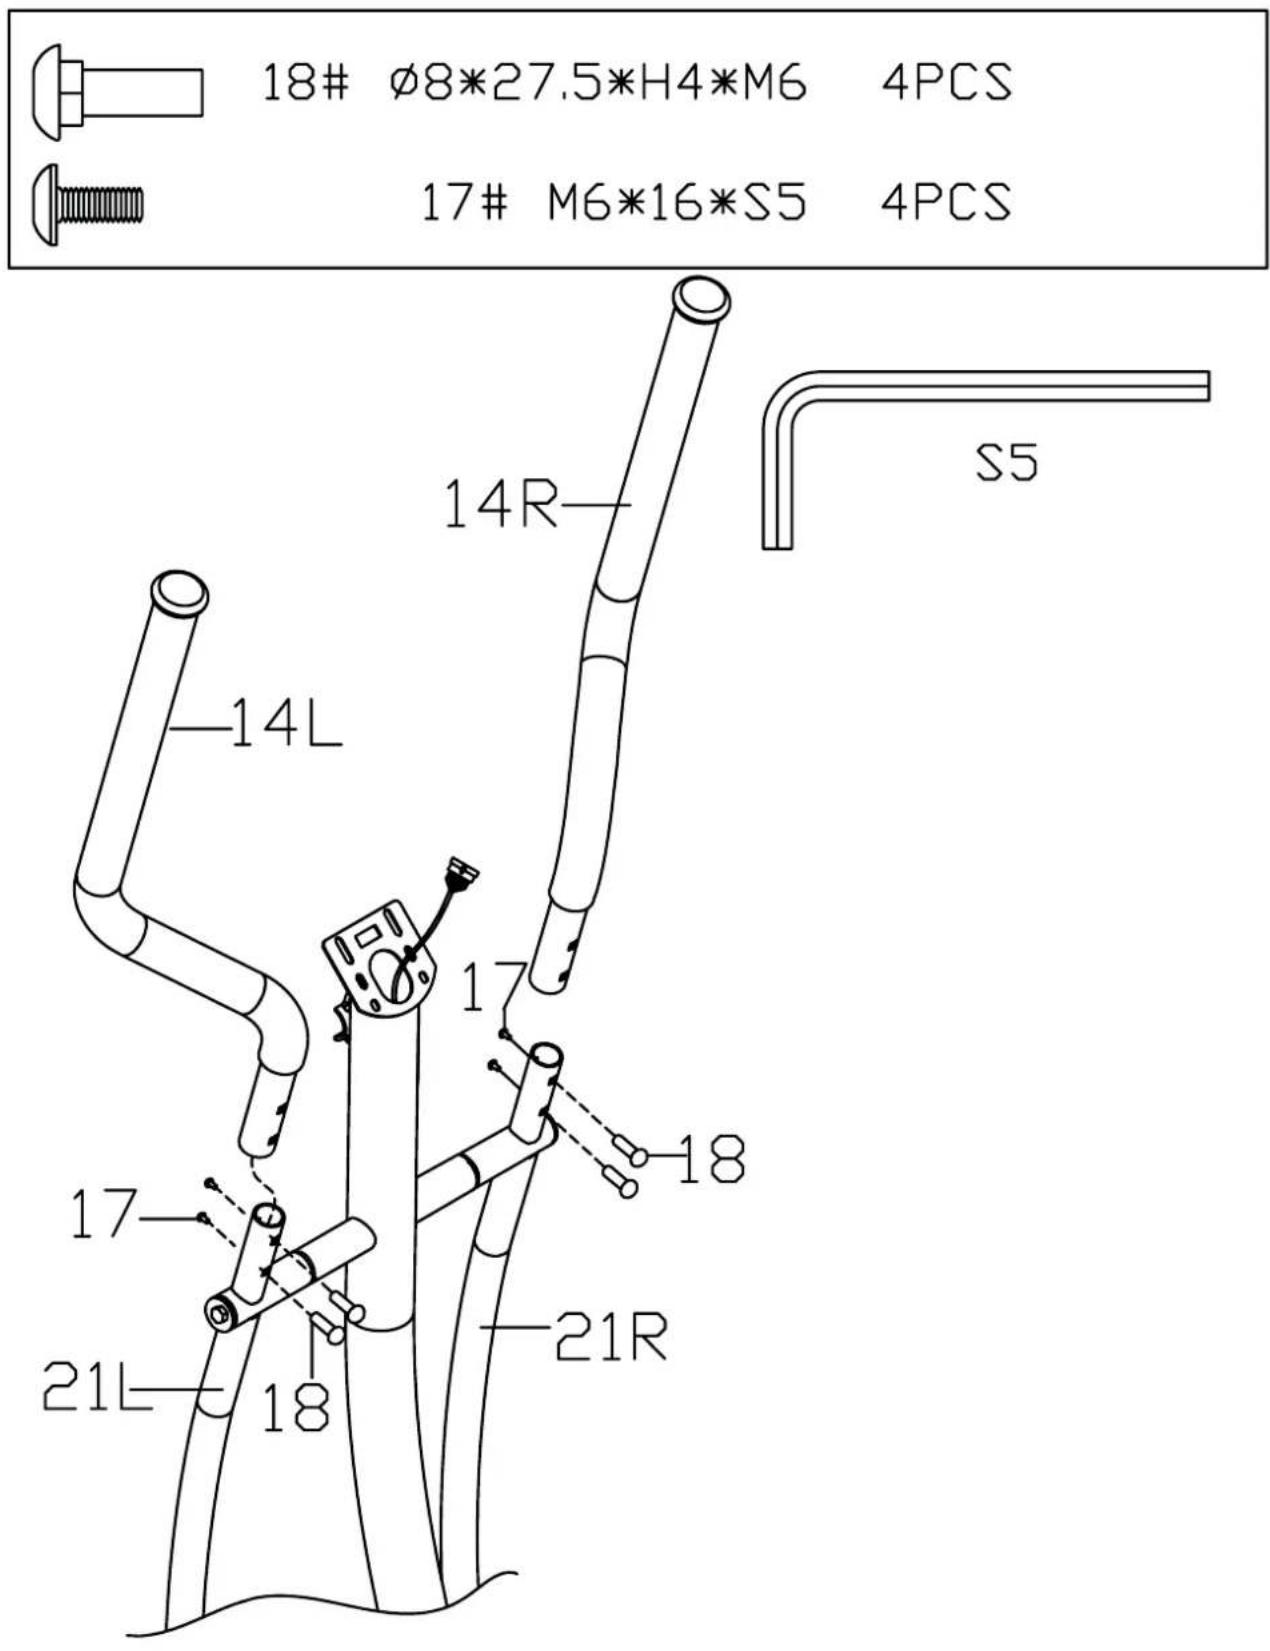
STEP 6:
Secure handle bar(14L/R) to swing rod(21L/R) with bolts(18) and bolts(17).
STEP 7:
Secure pedal(53L/R) to pedal tube(52L/R) with bolts(54), washers(34) and nylon nuts(35).
STEP 8:
a. Attach left and right rear rod cover(26L/R) (44L/R) to pedal tube(52L/R) with screws(58);
b. Attach left and right front rod cover(50L/R) (55L/R) to pedal tube(52L/R) with screws(49);
c. Attach left and right swing rod cover(16L/R) (30L/R) to swing rod(21L/R).
STEP 9
Secure middle handle bar(4) to front tube(25) with bolts(9) and spring washers (8), then cover the handlebar clamp cover(10).

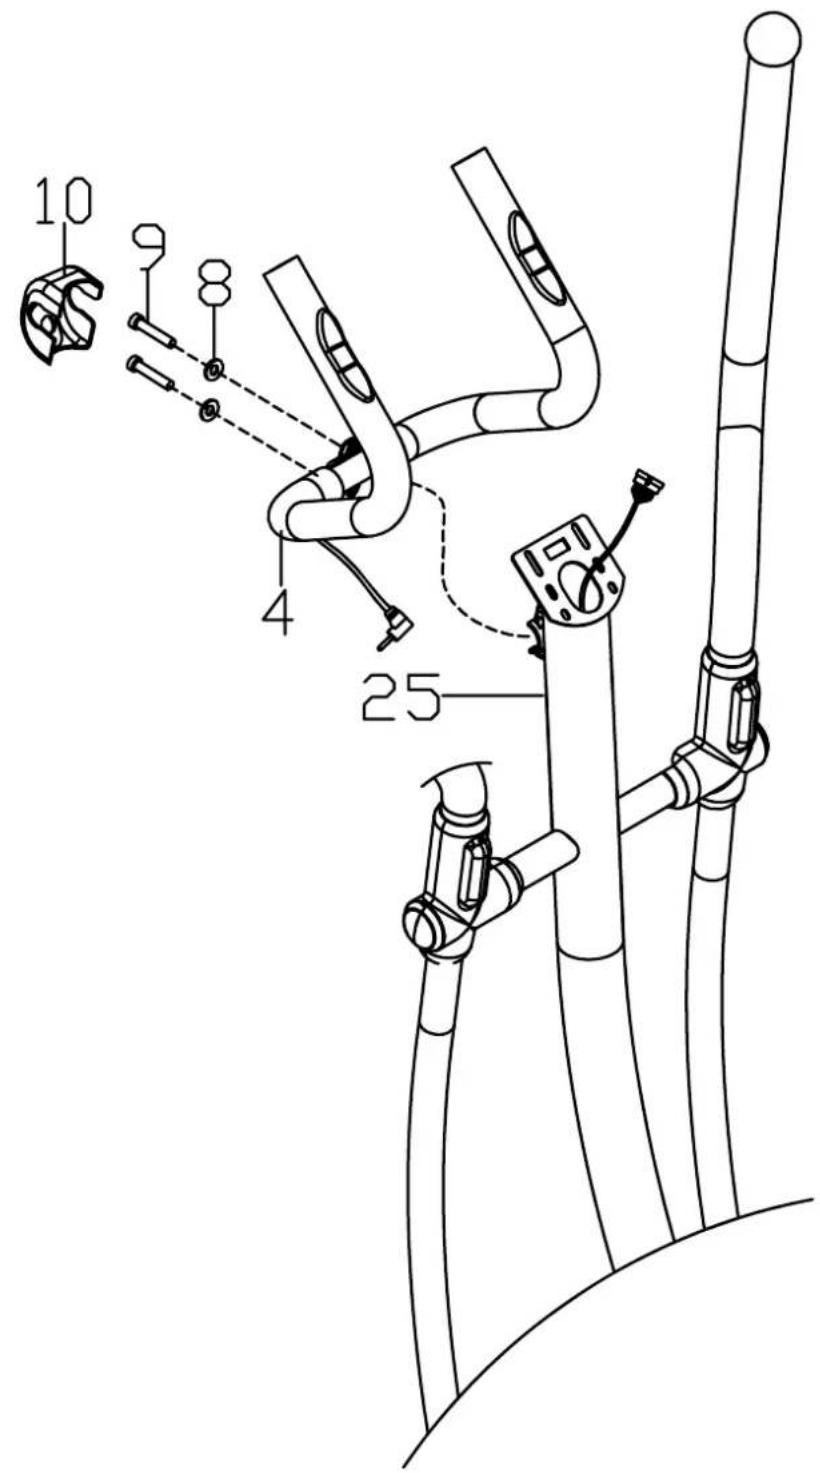
STEP 10
a. Connect the wire of computer(1) and trunk wire 1(29);
b. Lock computer(1) on the front tube(25) with bolts(28), then insert the handle pulse wire(12) into the hole on the back of the computer(1).
Functions
Program: 21 programs as following
A: 1 Manual Program
B: 10 Preset Program Profi le
P1: ROLLING P2: VALLEY P3: FATBURN P4: RAMP P5: MOUNTAIN
P6: INTERVAL P7: CARDIO P8: ENDURANCE P9: SLOPE P10: RALLY
C: 1 Watt Control Program
D: 4 Heart Rate Control Program
55%H.R, 75%H.R, 90%H.R and TARGET H.R
E: 4 User Setting Programs: CUSTOM1 to CUSTOM4
F: 1 Body Fat Measuring Program
-
Record the user's data of GENDER, HEIGHT, WEIGHT and AGE even cut off the power.
-
Dot matrix display showing your current status.
-
Simulative ECG measuring the heart rate
-
Display Speed(RPM), TIME, DIST., CAL., WATT, PULSE, LEVEL at the same time.
-
The computer will turn off automatically if there is no operation, speed signal and pulse signal over
4 minutes. Meanwhile, it will store your current exercise data and turn the loading resistance to the minimum. Once you press any button or in motion, the computer will turn on automatically.
- Finger-touch-button
Buttons
1. ENTER:
In "stop" mode(display STOP), press ENTER button to enter into program selection and setting value which flash in related window.
A: When you choose the program, press Enter to confirm the one you like.
B: When in setting, press ENTER to confirm the value that you would like to preset.
During the start mode(display START), press ENTER to choose display the speed or RPM, or switch automatically.
During any mode, hold down this button for 2 seconds to totally reset the computer.
2. START/STOP:
Press START/STOP button to start or stop the programs.
During any mode, hold down this button for 2 seconds to totally reset the computer.
3. UP:
In stop mode and the dot matrix character fl ash, press this button to select the program up. If the related window value fl ash, press this button to increase the value.
During the start mode(display START), press this button to increase the training resistance.
4. DOWN:
In stop mode and the dot matrix character flash, press this button to select the program down. If the related window value flash, press this button to decrease the value.
During the start mode(display START), press this button to decrease the training resistance.
5. PULSE RECOVERY:
First test your current heart rate and show your heart rate value, press this button to enter into pulse recovery testing. When you are in pulse recovery mode, press this button to exit.
NOTE:
It is suggested to cover your fi nger within the marked region to select functions in case of any wrong action.
Operation
1. Turn on the computer
Plug in one end of the adaptor to the AC electrical source and connect the other end to the computer.
The computer will beep and enter into initial mode.
2. Program select and value setting
Manual Program and Preset Program P1 P10
A. Press UP, DOWN button to select the program that you like.
B. Press ENTER button to confirm the selected program and enter time setting window.
C. The time will flash, and then press UP, DOWN button to set up your desired time.
Press ENTER to confirm the value.
D. The distance will flash, and then press UP, DOWN to set up the desired distance value.
Press ENTER to confirm the value.
E. The calories will flash, and then press UP, DOWN to set up the desired calories to be consumed.
Press ENTER to confirm the value.
F. Press START/ STOP to begin exercise.
Watt Control Program
A. Press UP, DOWN to select the watt control program
B. Press ENTER to confirm the selected watt control program, and enter into time setting window.
C. The time will fl ash, and then press UP, DOWN button to set up the desired time,.
Press ENTER to confirm the value.
D. The distance will fl ash, and then press UP, DOWN to set up the desired distance value.
Press ENTER to confirm the value.
E. The calories will flash, and then press UP, DOWN to set up the desired calories to be consumed.
Press ENTER to confirm the value.
F. The watt display will flash, and then press UP, DOWN to set up the watt to do the exercise.
Press ENTER to confirm the value.
G. Press START/ STOP to begin exercise
HEART RATE CONTROL PROGRAM: 55%H.R, 75% H.R and 90% H.R
The maximum heart rate depends on different age and this program will ensure you do the healthy exercise within maximum heart rate.
A. Press UP, DOWN to choose the heart rate control program
B. Press ENTER to confirm the heart rate control program, and enter into time setting window.
C. The time will flash, and then press UP, DOWN button to set up the desired time.
Press ENTER to confirm the value.
D. The distance will flash, and then press UP, DOWN to set up the desired distance value.
Press ENTER to confirm the value.
E. The calories will flash, and then press UP, DOWN to set up the desired calories to be consumed.
Press ENTER to confirm the value.
F. The age will flash, and then press UP, DOWN to set the user's age. Press ENTER to confirm the value.
G. When the target heart rate control program flash, the computer will display the user's target heart
rate according to user's age.
H. Press START/ STOP to begin exercise.
HEART RATE CONTROL PROGRAM: TARGET HEART RATE
The user can set any target heart rate to do the exercise.
A. Press UP, DOWN to select TARGET HEART RATE program.
B. Press ENTER to confirm your choice and enter time setting window.
C. The time display will flash, and then press UP, DOWN to set the desired time to do the exercise.
Press ENTER to confirm the value.
D. The distance will flash, and then press UP, DOWN to set up the desired distance value.
Press ENTER to confirm the value.
E. The calories will flash, and then press UP, DOWN to set up the desired calories to be consumed.
Press ENTER to confirm the value.
F. The target heart rate will flash, and then press UP, DOWN to set up your target heart rate.
Press ENTER to confirm the value.
G. Press START/ STOP to begin exercise.
NOTE: During exercise, the user's heart rate value depends on resistance level and speed. The heart rate control program is to ensure your heart rate within the preset value. When the computer detect your current heart rate is higher than preset, it will decrease the resistance level automatically or you may slow down exercise. If your current heart rate is lower than preset, it will increase resistance and you may speed up.
User Profi le Programs: CUSTOM1-CUSTOM4
A. Press UP, DOWN to select the user
B. Press ENTER to confirm your choice, and enter into time setting window.
C. The time display will flash, and then press UP, DOWN to set up the desired time to do the exercise. Press ENTER to confirm the value.
D. The distance will flash, and then press UP, DOWN to set up the desired distance value. Press ENTER to confirm the value.
E. The calories will flash, and then press UP, DOWN to set up the desired calories to be consumed. Press ENTER to confirm the value.
F. The first resistance level will fl ash, and then press UP, DOWN to set the desired load resistance. Press ENTER to confirm. Then repeat above operation to set the resistance from 2 to 10.
G. Press START/ STOP to begin exercise.
Body Fat Measurement Program
A. Press UP, DOWN to select BODY FAT TEST program
B. Press ENTER to confirm your choice, and enter into height setting mode
C. The height display will flash, and then press UP, DOWN to set up your height. Press ENTER to confirm the value.
D. The weight display will flash, and then press UP, DOWN to set up your weight. Press ENTER to confirm the value.
E. The age display will flash, and then press UP, DOWN to set up your age. Press ENTER to confirm the value.
F. The gender display will flash, and then press UP, DOWN to set up your gender. Press ENTER to confirm.
G. Press START/STOP to begin testing your body fat.
NOTE:
-
During the body fat measurement, place both your palms on the contact pads.
The test result are: FAT%, BMR(Basal Metabolic Rate), BMI(Body Mass Index), BODY and body shape.
FAT%: The total body fat in our body measured by percentage
BMR Basal Metabolic Rate (metabolism) is the energy (measured in calories) expended by the body at rest to maintain normal bodily function.
BMI: means Body Mass Index, which is used for body shape building -
During the body fat measurement, if your palms do not contact the pulse sensor well, the computer cannot receive any signal and it will display ERROR2. Press START/STOP to try again.
-
During the test, you cannot exit the test when press any button. After the test fi nish, press UP, DOWN to exit the body fat measurement program and switch to other program.
-
Comparison sheet of Body fat and Obese
| Age/FAT% Body Shape | Slim | Healthy | Fleshy | Over WT | Obese |
| BODY1 | BODY2 | BODY3 | BODY4 | BODY5 | |
| Male/≤30 years old | <14% | 14%~20% | 20.1%~25% | 25.1%~35% | >35% |
| Male/>30 years old | <17% | 17%~23% | 23.1%~28% | 28.1%~38% | >38% |
| Female/≤30 years old | <17% | 17%~24% | 24.1%~30% | 30.1%~40% | >40% |
| Female/>30 years old | <20% | 20%~27% | 27.1%~33% | 33.1%~43% | >43% |
3.Pulse Recovery Test
The pulse recovery test is to compare your heart rate before and after exercise. It is target to determine your heart strength via the measuring. Please do the test as below:
A. Both your hands hold the pulse sensor or via wireless transmitter belt to test the pulse(if applicable), the computer will display your current pulse value.
B. Press RECOVERY to enter the pulse recovery test and the computer program will enter the stop status.
C. Keep pulse detecting.
D.Time will count down from 60 seconds to 0 second.
E. When time reaches 0, the test result (F1-F6) appears on the display.
F1=Excellent F2=Good F3=Fair F4=below average F5=No Good F6=Poor
F. If the computer does not detect your current heart rate first, pressing RECOVERY will not enter into pulse recovery test. During the pulse recovery test, press RECOVERY to exit the test and return to the stop status.
- Pulse Measurement
Please place both your palms on the contact pads and the computer will show your current heart beat rate in beats per minute (BPM) on the LCD after 3\~4 seconds. During the measurement, heart icon will flash with simulative ECG showing.
Remark: During the process of pulse measurement, because of the contact jamming, the measurement value may not be stable when start, then it will return to normal level. The measurement value cannot be regarded as the basis of medical treatment.
NOTE: If the computer is also equipped with wireless heart rate measuring via the transmitter belt, and with hand pulse function, the hand-measurement-signal-detecting is preferred.
Specifications
Speed KM/H(M/H): showing your current speed. Range: 0.0-99.9 KM/H(M/H).
RPM: showing the current rotate per minute. Range : 0-999.
TIME: the accumulative exercise time, range : 0:00-99M59S.
the preset time range is 5:00-99M00S. The computer will start to count down from preset time to 0:00 with average time for each resistance level. When it reaches to zero, the program will stop and computer alarm. If you do not preset the time, it will run with one minute decrement each resistance level.
DIST: the exercise accumulative distance. Range : 0.0-99.9-999KM(MILE) the preset distance range :1.0-99.0-999. When the distance reaches 0, the program will stop and the computer will alarm.
CALORIE: the exercise accumulative calories burnt. Range : 0.0-99.9-999 the preset calories range :10.0-90.0-990. When the calorie reaches 0, the program will stop and the computer will alarm.
PULSE: showing the exercise heart rate value.
Range: 30-240BPM(beat per minute)
RESISTANCE LEVEL: showing resistance level. Range:1-16
WATT: show the exercise watt
BREAKDOWN DISPLAY
-
When the computer displays ERROR1, please check if the motor is good and if the motor wires connect well.
-
When the computer displays ERROR2, please check if your hands contact the sensors well as there no body fat signal detected.
AUDIO AMPLIFIER AND SPEAKER (IF HAVE)
Connect the audio input plug to the audio player, then turn on the audio switch that in the right side of the computer. In that case, the audio can be in play.
NOTE: During play mp3, the audio frequency is very near by the heart rate frequency, so sometimes the heart rate will fl ash or get the wrong heart rate value it is normal. so suggest not to use mp3 when measure the heart rate.
ADAPTOR
INPUT: AC (The voltage depends on different country)
OUTPUT: 8VDC 500mA AC-DC ADAPTOR
General fitness tips
Consult your physician
Before you start using this fitness equipment, it is recommended that you first get a physical examination by your family physician or by a specialist. Before starting regular exercises on this equipment, you must first get your doctor's approval. When you feel discomfort during your training on the equipment, you need to immediately consult your family physician. Intelligent use, meaning responsible use of this equipment is crucial. Make sure that no children are near you when you are using this equipment. Moreover, make sure to store the equipment in a safe place away from children.
Wear comfortable clothing
Always wear comfortable clothing when you are using the equipment, including gym shoes. Do not wear loose clothing that can tear during use.
Inspect your equipment
Prior to using your equipment, make sure that all nuts and bolts are properly tightened. Regular maintenance is very important to keep the equipment in good condition.
Set your own pace
The intensity level of your workout on this equipment depends on your own condition. If you have not been in training for some years or if you are overweight, it is recommended that you start slowly with only a few minutes per week.
At first you will be able to do the exercises for only a few minutes but this will improve within 6 to 8 weeks. Do not let yourself get discouraged if this takes a few weeks more. It is important for you to set your own pace. In the end you will be able to keep on exercising for more than 30 minutes. The better your condition, the more difficult it will become to stay at this level. But be aware of the following:
- Consult with your physician before you start your training programme. Let him/her advise you about the training programme as well as about your diet.
- Start your training at an easy pace and do not aim too high at first. Aside from this exercise with the equipment, also engage in extra activities, for instance, jogging, swimming, dancing, and biking. Regularly check your heart rate. If you do not have a counter, ask your family physician how you can best check your heart rate. Determine your desired heart rate. Take into consideration your age and condition.
- Make sure that you drink enough when training on this equipment. You need to keep drinking to prevent dehydration. The liquids you take in must be at room temperature. Limit your intake of cold drinks.
Check your heart rate
To be able to check your heart rate, you first need to know how to measure it. The easiest way is to press your fingertips against the artery in your neck, between the muscles and the air passages. Count the number of pulses for 10 seconds and multiply by 6. This will give you your heart rate per minute.
Exercise within your own capabilities
What level of heart rate do you have to maintain during your exercises? Ask your physician to give you guidelines that are relevant for you.
| Age | Heartbeat level 50-75% (beats per minute) | Maximum heart rate 100% |
| 20 Jaar 100-150 200 | ||
| 25 Jaar 98-146 195 | ||
| 30 Jaar 95-142 190 | ||
| 35 Jaar 93-138 185 | ||
| 40 Jaar 90-135 180 | ||
| 45 Jaar 88-131 175 | ||
| 50 Jaar 85-127 170 | ||
| 55 Jaar 83-123 165 | ||
| 60 Jaar 80-120 160 | ||
| 65 Jaar 78-116 155 | ||
| 70 Jaar 75-113 150 | ||
Copyright (c) 1997 American Heart Association
Warming-up – Cooling down
A successful exercise starts with a warm-up and is completed with a cool-down. Run through all of the exercises two or three times a week and take a day off in between the exercise days. After a few months you can extend the number of exercises to 5 to 6 times a week. The warm-up is of crucial importance before starting your workout. You will be preparing your body for the effort you are about to exert. In order to prevent muscle problems, you need to cool down after the exercises. We recommend the following warm-up and cool-down exercises.
Head exercises
Turn your head to the right and feel the tension in your neck. Turn your chin up to the ceiling while opening your mouth. Turn your head to the right and finally let it drop to your chest. Repeat this exercise several times.
Shoulder exercises
Raise your left shoulder and then your right shoulder while you are dropping your left shoulder down again at the same time.
Stretching exercises for your arms
Stretch your left arm towards the ceiling. Then do the same with your right arm while you drop your left arm down again at the same time. Feel the tension in your right and left sides. Repeat this several times.
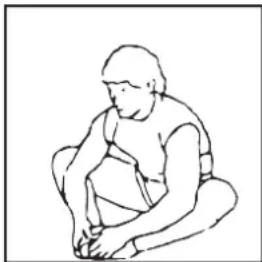
Thigh stretching exercises
Sit on the floor and place your feet together so that your knees are pointing outwards. Pull your feet as closely as possible against and into your groin area. Carefully push outwards on your knees towards the floor. If you can, repeat 15 times.
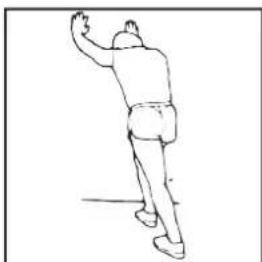
Stretch inner thigh and legs
Place one hand against the wall and reach back with your other hand to lift up your right foot. Bring your heel as closely as possible against your thigh. Repeat this 15 times, then do the same with your left foot.

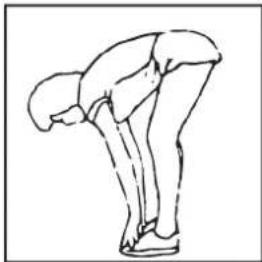
Touching your toes
Slowly bend forward and try to reach your feet with your hands. Stretch down as far as possible and repeat this 15 times.
natural_image
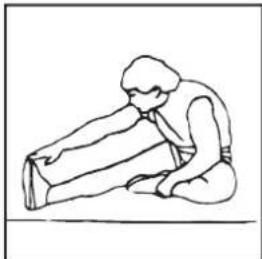
Line drawing of a person bending forward with legs raised (no text or symbols)Hamstring exercises
Sit on the floor and stretch your right leg. Bend your left leg and place your foot against your right upper leg. Reach for your right foot with your right arm. Repeat this 15 times and do the same exercise with your left leg.
natural_image
Simple line drawing of a person sitting on the ground, holding an object (no text or symbols)Calf/achilles exercises
Place both hands against a wall and lean the weight of your whole body on your hands. Move your legs to the rear, alternating one with the other. The leg in the rear position will be stretched. Repeat this for each leg 15 times.
natural_image
Line drawing of a person in motion, possibly dancing or gesturing (no text or symbols)Aerobic exercises & Weights
Aerobic exercises
Aerobic exercises promote a good oxygen supply to your muscles via your heart and lungs, the most important muscles in your body. It is an essential part of all exercises and needs to be considered when engaging in any sports activity.
Weight training
Aerobic exercises are useful in assisting you to reduce excessive body fat. In contrast, weight training helps you to build up and firm your muscles.
But one last warning: always consult with your physician before you start your training
Article 7 Droit applicable
Liste des pièces
| N° Nom | et spécifi cations | Quantité | N° Nom et | spécifi cations | Quantité |
| 1 Computer 1 33 Alloy wrap 1 4 | |||||
| 2 Foam grip ∅23*5*500 2 34 Washer d8*∅16*1.5 | 6 | ||||
| 3 Hand pulse grip 2 35 Nylon nut M8*H7.5*S13 | |||||
| 4 Middle handle bar 1 36 Transformer | 1 | ||||
| 5 | End cap ∅25*16 | 2 | 37 | Arc washer d8*∅20*2*R30 | 8 |
| 6 Washer d6*∅12*1 | 2 38 | Bolt M8*16*S6 | 4 | ||
| 7 | Screw ST4*19 | 2 | 39L/R | End cap ∅60*∅70*95 | 2 |
| 8 Spring washer d8 | 4 40 | Front bottom tube | 1 | ||
| 9 Bolt M8*30*S6 | 2 41 | Bolt M8*73*20*H5 | 4 | ||
| 10 | Handlebar clamp cover 71*58*40 | 1 42 Screw | ST3*10 | 2 | |
| 11 | Plug ∅12*11*∅3 | 1 | 43 | Trunk wire 2 | 1 |
| 12 | Hand pulse wire | 1 | 44L/R | Right rear rod cover | 2 |
| 13 | End cap ∅32*46*∅50 | 2 | 45 | Main frame | 1 |
| 14L/R | Handle bar | 2 | 46 | Cap nut M8*H16*S13 | 4 |
| 15 | Foam grip ∅30*5*670 | 2 | 47 | End cap ∅60 | 2 |
| 16L/R | Left Swing rod cover | 2 | 48 | Rear bottom tube | 1 |
| 17 | Bolt M6*16*S5 | 4 49 Screw | ST4.2*19 | 4 | |
| 18 | Bolt ∅8*27.5*H4*M6 | 4 | 50L/R | Left front rod cover | 2 |
| 19 | Bolt M8*16*S14 | 2 | 51 | End cap J60*30*15 | 2 |
| 20 | Washer d8*∅32*2 | 2 | 52L/R | Pedal tube | 2 |
| 21L/R | Swing rod | 2 | 53L/R | Pedal | 2 |
| 22 | Alloy wrap 2 | 8 | 54 | Bolt M8*45*20*S14 | 4 |
| 23 | Wave washer d19*∅25*0.3 | 4 | 55L/R | Right front rod cover | 2 |
| 24 | Long spacer ∅31.8*∅19.2*76 | 2 | 56 | Nylon nut M10*1.25*H9.5*S17 | 2 |
| 25 | Front tube | 1 | 57 | Washer d10*∅32*2 | 2 |
| 26L/R | Left rear rod cover | 2 | 58 | Screw ST3*16 | 6 |
| 27 | Short spacer ∅32*∅19.2*30 | 2 | 59 | Wrench S13-14-15 | 1 |
| 28 | Bolt M5*10 | 2 60 Wrench S5 | 1 | ||
| 29 | Trunk wire 1 | 1 61 Wrench S6 | 1 | ||
| 30L/R | Right Swing rod cover | 2 | 62 | Wrench S13-14 | 1 |
| 31 | Bolt M8*75*13*S14 | 2 | 63 | Wrench S17-S19 | 1 |
| 32 | Spacer ∅14*∅8.3*59 | 2 | |||
REMARQUE :
Assembly Instructions
ÉTAPE 1 :
ÉTAPE 2 :
| Age/FAT% Body Shape | Slim | Healthy | Fleshy | Over WT | Obese |
| BODY1 | BODY2 | BODY3 | BODY4 | BODY5 | |
| Male/≤30 years old | <14% | 14%~20% | 20.1%~25% | 25.1%~35% | >35% |
| Male/>30 years old | <17% | 17%~23% | 23.1%~28% | 28.1%~38% | >38% |
| Female/≤30 years old | <17% | 17%~24% | 24.1%~30% | 30.1%~40% | >40% |
| Female/>30 years old | <20% | 20%~27% | 27.1%~33% | 33.1%~43% | >43% |
3.Pulse Recovery test
Copyright (c) 1997 American Heart Association
Exercices abdo-fessiers
natural_image
Line drawing of a person in a neck and shoulders (no text or symbols)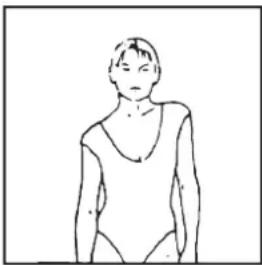
natural_image
Simple line drawing of a person in a relaxed pose (no text or symbols)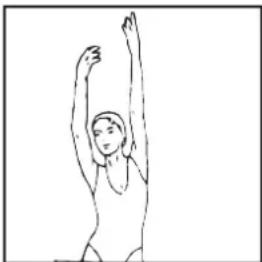
natural_image
Simple line drawing of a person with arms raised, no text or symbols present
natural_image
Line drawing of a person in motion, possibly dancing or performing a exercise (no text or symbols)