
AccuSync LCD203WM - Monitor NEC - Free user manual and instructions
Find the device manual for free AccuSync LCD203WM NEC in PDF.
User questions about AccuSync LCD203WM NEC
0 question about this device. Answer the ones you know or ask your own.
Ask a new question about this device
Download the instructions for your Monitor in PDF format for free! Find your manual AccuSync LCD203WM - NEC and take your electronic device back in hand. On this page are published all the documents necessary for the use of your device. AccuSync LCD203WM by NEC.
USER MANUAL AccuSync LCD203WM NEC
www.tcodevelopment.com
Congratulations!
The display you have just purchased carries the TCO'03 Displays label. This means that your display is designed, manufactured and tested according to some of the strictest quality and environmental requirements in the world. This makes for a high performance product, designed with the user in focus that also minimizes the impact on our natural environment.
Some of the features of the TCO'03 Display requirements:
Ergonomics
- Good visual ergonomics and image quality in order to improve the working environment for the user and to reduce sight and strain problems. Important parameters are luminance, contrast, resolution, reflectance, colour rendition and image stability.
Energy
- Energy-saving mode after a certain time - beneficial both for the user and the environment
- Electrical safety
Emissions
- Electromagnetic fields
- Noise emissions
Ecology
- The product must be prepared for recycling and the manufacturer must have a certified environmental management system such as EMAS or ISO 14 001
-
Restrictions on:
-
chlorinated and brominated flame retardants and polymers
- heavy metals such as cadmium, mercury and lead.
The requirements included in this label have been developed by TCO Development in co-operation with scientists, experts, users as well as manufacturers all over the world. Since the end of the 1980s TCO has been involved in influencing the development of IT equipment in a more user-friendly direction. Our labelling system started with displays in 1992 and is now requested by users and IT-manufacturers all over the world.
For more information, please visit
www.tcodevelopment.com
Manufacturer's Recycling and Energy Information
NEC DISPLAY SOLUTIONS is strongly committed to environmental protection and sees recycling as one of the company's top priorities in trying to minimize the burden placed on the environment. We are engaged in developing environmentally-friendly products, and always strive to help define and comply with the latest independent standards from agencies such as ISO (International Organisation for Standardization) and TCO (Swedish Trades Union).
Disposing of your old NEC product
The aim of recycling is to gain an environmental benefit by means of re-use, upgrading, reconditioning or reclamation of material. Dedicated recycling sites ensure that environmentally harmful components are properly handled and securely disposed. To ensure the best recycling of our products, NEC DISPLAY SOLUTIONS offers a variety of recycling procedures and gives advice on how to handle the product in an environmentally sensitive way, once it has reached the end of its life.
All required information concerning the disposal of the product and country-specific information on recycling facilities can be found on our following websites:
http://www.nec-display-solutions.com/greencompany/ (in Europe),
http://www.nec-display.com (in Japan) or
http://www.necdisplay.com (in USA).
Energy Saving
This monitor features an advanced energy saving capability. When a VESA Display Power Management Signalling (DPMS) Standard signal is sent to the monitor, the Energy Saving mode is activated. The monitor enters a single Energy Saving mode.
| Mode Power | consumption LED colour | |
| Normal Operation | Approx. 39W (LCD193WM), Approx. 49W (LCD203WM), Approx. 55W (LCD223WM) Green | |
| Energy Saving Mode | Less than 2W Amber | |
| Off Mode Less | than 1W Unlit | |
WEEE Mark (European Directive 2002/96/EC)


Within the European Union
EU-wide legislation, as implemented in each Member State, requires that waste electrical and electronic products carrying the mark (left) must be disposed of separately from normal household waste. This includes monitors and electrical accessories, such as signal cables or power cords. When you need to dispose of your NEC display products, please follow the guidance of your local authority, or ask the shop where you purchased the product, or if applicable, follow any agreements made between yourself and NEC.
The mark on electrical and electronic products only applies to the current European Union Member States.
Outside the European Union
If you wish to dispose of used electrical and electronic products outside the European Union, please contact your local authority so as to comply with the correct disposal method.
Chinese RoHS-information relevant for Chinese market
TO PREVENT FIRE OR SHOCK HAZARDS, DO NOT EXPOSE THIS UNIT TO RAIN OR MOISTURE. ALSO, DO NOT USE THIS UNIT'S POLARIZED PLUG WITH AN EXTENSION CORD RECEPTACLE OR OTHER OUTLETS UNLESS THE PRONGS CAN BE FULLY INSERTED REFRAIN FROM OPENING THE CABINET AS THERE ARE HIGH VOLTAGE COMPONENTS INSIDE. REFER SERVICING TO QUALIFIED SERVICE PERSONNEL.

CAUTION
RISK OF ELECTRIC SHOCK·DO NOT OPEN

CAUTION: TO REDUCE THE RISK OF ELECTRIC SHOCK, DO NOT REMOVE COVER (OR BACK). NO USER SERVICEABLE PARTS INSIDE. REFER SERVICING TO QUALIFIED SERVICE PERSONNEL.

This symbol warns user that uninsulated voltage within the unit may have sufficient magnitude to cause electric shock. Therefore, it is dangerous to make any kind of contact with any part inside this unit.

This symbol alerts the user that important literature concerning the operation and maintenance of this unit has been included. Therefore, it should be read carefully in order to avoid any problems.
Declaration of the Manufacturer
We hereby certify that the colour monitor AccuSync LCD193WM (L196H5)/AccuSync LCD203WM (L206H6)/AccuSync LCD223WM (L226H7) are in compliance with
Council Directive 73/23/EEC:
EN 60950-
Council Directive 89/336/EEC: EN 55022
-EN61000-3-2
-EN61000-3-3
-EN55024
and marked with

NEC Display Solutions, Ltd.
4-13-23, Shibaura,
Minato-Ku
Tokyo 108-0023, Japan
Contents

Users Manual
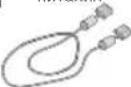
Power Cord
Cable Holder

Audio
Cable
Video Signal
Cable
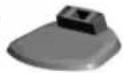
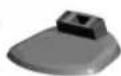
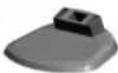
Base
Stand
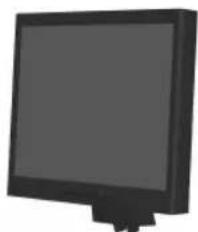
AccuSync LCD monitor (base stand not connected)
Your new NEC AccuSync LCD monitor box* should contain the following:
- AccuSync LCD monitor with tilt base
Audio Cable - Power Cord
V ideo Signal Cable
Use r's Manual
CD-ROM - Base Stand
Cable Holder - Remember to save your original box and packing material to transport or ship the monitor.
Quick Start
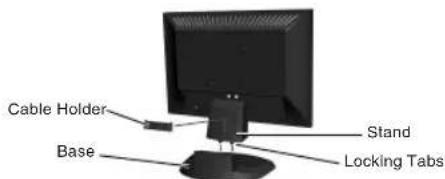
Figure S.1
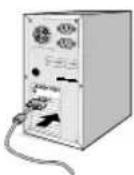
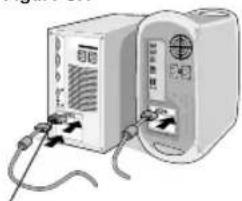
Figure A.1 FigureA2 Cable
Adapter (not included)

Power Cord
Figure B.1
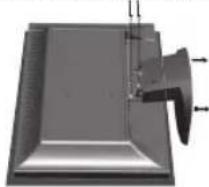
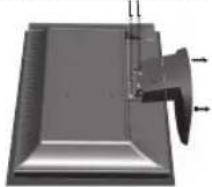
To attach the Base to the LCD Stand:
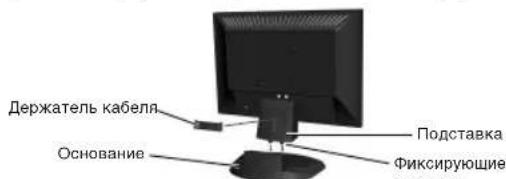
- Attach the Base to the Stand. The locking tabs on the Stand should fit into the hole on the centre back of the Base (Figure S.1).
To attach the Cable Holder: - Insert the tabs of Cable Holder into the hole of Stand and slide the Cable Holder downward into place (Figure S.1).
NOTE: Please confirm that the tabs are completely secure.
To attach the AccuSync LCD monitor to your system, follow these instructions:
- Turn off the power to your computer.
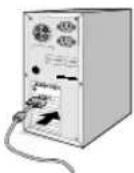
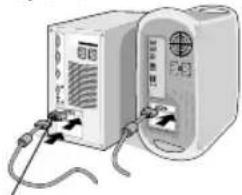
- For the PC with Analog output: Connect the 15-pin mini D-SUB signal cable to the connector of the display card in your system (Figure A.1). Tighten all screws.
For the Mac: Connect the MultiSync Macintosh cable adapter (not included) to the computer. Attach the 15-pin mini D-SUB signal cable to the MultiSync Macintosh cable adapter (Figure A.2). Tighten all screws.
NOTE: Some Macintosh systems do not require a Macintosh cable adapter.
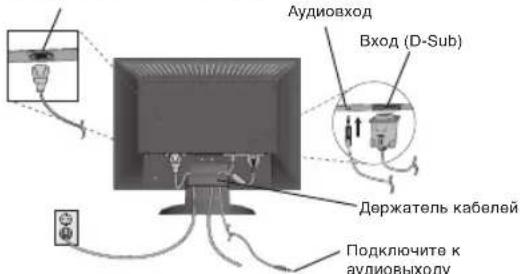
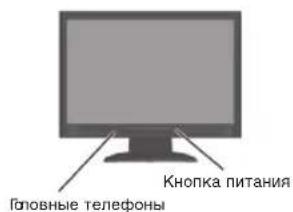
3. Connect the 15-pin mini D-SUB of the video signal cable and Audio Cable to the appropriate connector on the back of the monitor (Figure B.1). Connect the Headphone (not included) to the appropriate connector at the front of the monitor (Figure C.1).
4. Connect one end of the power cord to the monitor and the other end to the power outlet. Place the Video Signal Cable and power cord to the Cable holder (Figure B.1).
NOTE: Adjust position of cable that place under the Cable holder to avoid damage for cable or monitor.
NOTE: Please refer to Caution section of this manual for proper selection of power cord.
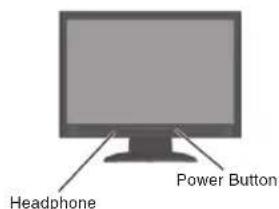
Figure C.1
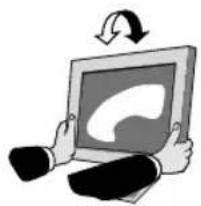
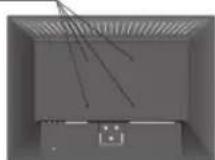
Figure TS.1
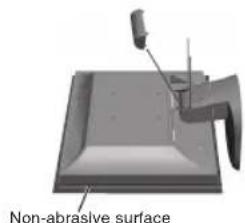
Figure R.1
3 screws (LCD193WM) - 4 screws (LCD203WM/LCD223WM)
Figure R.2
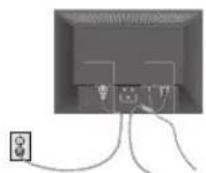
Figure R.3
Specifications
4-SCREWS (M4
(MAX depth: 10 mm)
If use other
screw, check
depth of hole.
Weight of LCD assembly: 4.3 kg - LCD193WM (MAX)
4.9 kg - LCD203WM (MAX)
5.3 kg - LCD223WM (MAX)
-
Turn on the monitor with the front power button and the computer (Figure C.1).
-
No-touch Auto Adjust automatically adjusts the monitor to optimal settings upon initial setup for most timings.
For further adjustments, use the following OSD controls:
- Auto Adjust Contrast
- Auto Adjust
Refer to the Controls section of this User's Manual for a full description of these OSD controls.
NOTE: If you have any problem, please refer to the Troubleshooting section of this User's Manual.
Tilt
Grasp both sides of the monitor screen with your hands and adjust the tilt as desired (Figure TS.1).
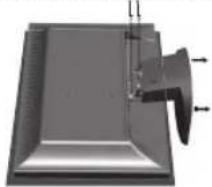
Remove Monitor Stand for Mounting
To prepare the monitor for alternative mounting purposes:
- Disconnect all cables.
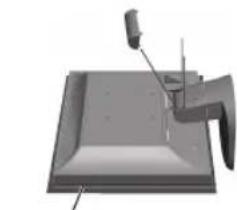
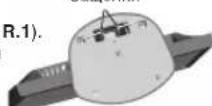
- Remove the hinge cover (Figure R.1).
- Place monitor face down on a non-abrasive surface (Figure R.1).
- Remove the 3 screws (LCD193WM) or the 4 screws (LCD203WM/ LCD223WM) connecting the monitor to the stand and remove the stand as indicated (Figure R.2).
The monitor is now ready for mounting in an alternative manner.
-
Connect the AC cord and signal cable to the back of the monitor (Figure R.3).
-
Reverse this process to re-attach stand.
NOTE: Use only VESA-compatible alternative mounting method.
NOTE: Handle with care when removing monitor stand.
Removing the Base
NOTE: Always remove the Base when shipping the LCD.
- Place monitor face down on a non
abrasive surface (Figure R.1) - While using your fingers, press the locking tabs to unlock the Base.
- Pull out the unlocked Base.
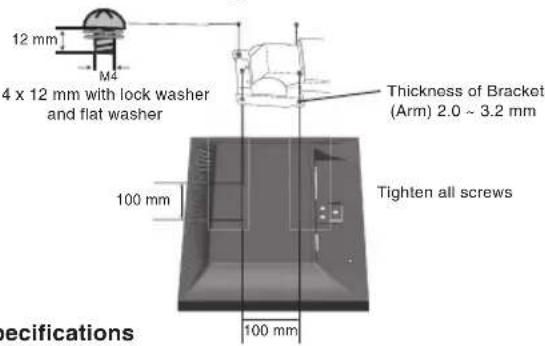
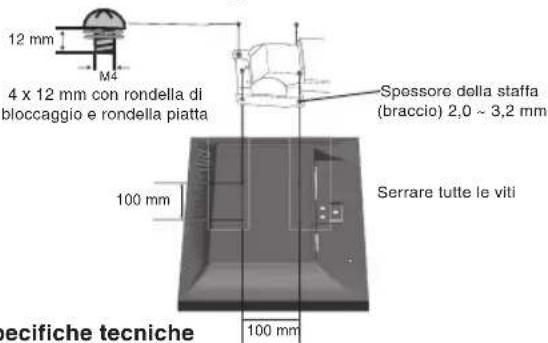
Connecting a Flexible Arm
This LCD monitor is designed for use with a flexible arm.
Please use the attached screws (4pcs) as shown in the picture when installing. To meet the safety requirements, the monitor must be mounted to an arm which guarantees the necessary stability under consideration of the weight of the monitor.
The LCD monitor shall only be used with an approved arm (e.g. GS mark).
Controls
OSD (On-Screen Display) control buttons on the front of the monitor function as follows:
- Basic function at pressing each key
| Button | SELECT | - | + | AUTO/RESET |
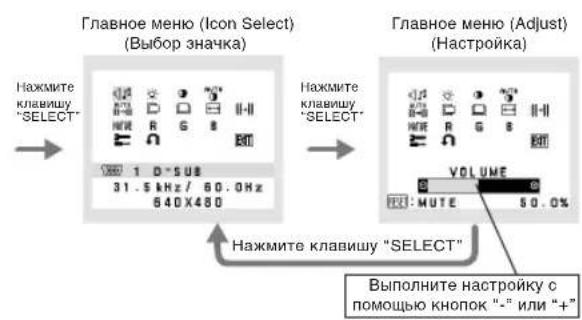
| At No OSD showing | Showing OSD. Shortcut to Bright adjust window. | Shortcut to Volume adjust window. | "Auto adjust" operate. | |
| At OSD showing (Icon selection stage) | Go to Adjustment stage. Cursor goes to left. Cursor goes to right. | |||
| At OSD showing (Adjustment stage) | Go to Icon selection stage. Adjust value decrease or Cursor for adjust goes to left. | Adjust value increase or Cursor for adjust goes to right. | Reset operation. Mute off/on switch on Volume adjustment window. | |
2. OSD structure
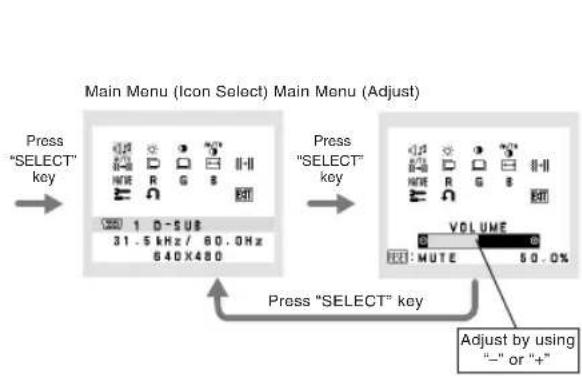

AUDIO
Controls the volume of the speakers or headphones. To mute the speaker output, press the "AUTO/RESET" button.
BRIGHTNESS
Adjusts the overall image and background screen brightness.
CONTRAST
Adjusts the image brightness in relation to the background.
AUTO AUTO CONTRAST
Adjusts the image displayed for non-standard video inputs.
AUTO AUTO ADJUST
Automatically adjusts the Image Position, the H. Size and Fine setting.
LEFT/RIGHT
Controls Horizontal Image Position within the display area of the LCD.
DOWN/UP
Controls Vertical Image Position within the display area of the LCD.
H.SIZE
Adjusts the horizontal size by increasing or decreasing this setting.
FINE
Improves focus, clarity and image stability by increasing or decreasing this setting.
NATIc COLOUR CONTROL SYSTEMS
Five colour presets (9300/7500/sRGB/USER/NATIVE) select the desired colour setting.
R COLOUR RED
Increase or decreases Red. The change will appear on the screen.
G COLOUR GREEN
Increase or decreases Green. The change will appear on screen.
B COLOUR BLUE
Increase or decreases Blue. The change will appear on screen.
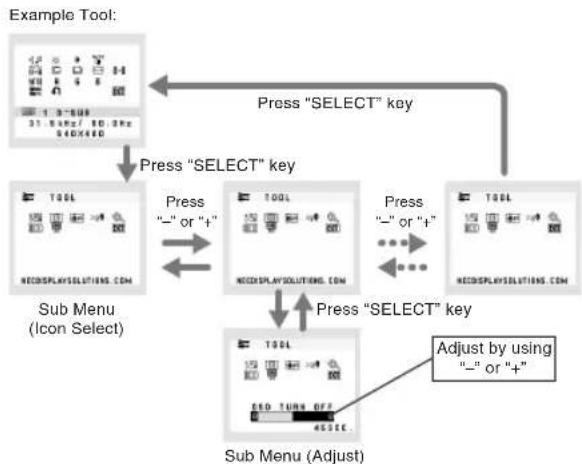
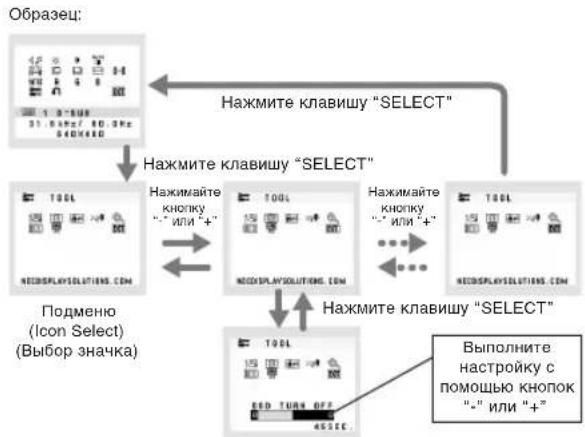
TOOL
Selecting TOOL allows you to get into the sub menu.
FACTORY PRESET
Selecting Factory Preset allows you to reset all OSD control settings back to the factory settings. The RESET button will need to be held down for several seconds to tage effect. Individual settings can be reset by highlighting the control to be reset and pressing the RESET button.
EXT EXIT
Selecting EXIT allows you exit OSD menu/ sub menu.
LANGUAGE
OSD control menus are available in nine languages.
图 OSDTURNOFF
The OSD control menu will stay on as long as it is in use. In the OSD Turn OFF submenu, you can select how long the monitor waits after the last touch of a button to shut off the OSD control menu. The preset choices are 10 - 120 seconds by 5 seconds step.
OSD LOCK OUT
This control completely locks out access to all OSD control functions without Brightness and Contrast. When attempting to activate OSD controls while in the Lock Out mode, a screen will appear indicating the OSD are locked out. To activate the OSD Lock Out function, press "AUTO/RESET", then "+" key and hold down simultaneously. To de-activate the OSD Lock Out, press "AUTO/RESET", then "+" key and hold down simultaneously.
xuRESOLUTION NOTIFIER
If ON is selected, a message will appear on the screen after 45 seconds, notifying you that the resolution is not at optimal resolution.
EXPANSION
Selects the zoom mode.
FULL: The image is expanded to 1440 x 900 (LCD193WM) or 1680 x 1050 (LCD203WM/LCD223WM), regardless of the resolution.
ASPECT: The image is expanded without changing the aspect ratio.
DDC DDC/CI
Turns ON or OFF the two way communication and control of the monitor.
MONITOR INFO
Indicates the model and serial numbers of your monitor.
OSD Warning
OSD Warning menus disappear with SELECT button.
NO SIGNAL: This function gives a warning when there is no signal present. After power is turned on or when there is a change of input signal or video is inactive, the No Signal window will appear.
RESOLUTION NOTIFIER: This function gives a warning of use with optimized resolution. After power is turned on or when there is a change of input signal or the video signal doesn't have proper resolution, the Resolution Notifier window will open. This function can be disabled in the TOOL menu.
OUT OF RANGE: This function gives a recommendation of the optimized resolution and refresh rate. After the power is turned on or there is a change of input signal or the video signal doesn't have proper timing, the Out Of Range menu will appear.

WARNING

SETZEN SIE DAS GERAT WEDER REGEN NOCH FEUCHTIGKEIT AUS, DA ES ANDERNFALLS ZU FEUER ODER STROMSchLagen KOMMEN KANN. VERWENDEN SIE DEN NETZTECKER DIESES GRÄTS KEINS FAMIL. EIN ZEILSFRS KABEL ODER EINERE STECKDOSENLEISTE, WENN DIE STECKERSTIFTE NICT VOLLSTANDIG EINGEFUHRT WERDEN KONNEN.
NEC Display Solutions, Ltd. 4-13-23, Shibaura,
Minato-Ku
Tokyo 108-0023, Japan
StandfuB AccuSync LCD-M
NEC Display Solutions, Ltd.
4-13-23. Shibaura.
Minato-Ku
Tokyo 108-0023, Japon
Contenido

Manual del usuario
NEC Display Solutions, Ltd.
4-13-23. Shibaura.
Minato-Ku
Tokyo 108-0023, Japan
Sommaire
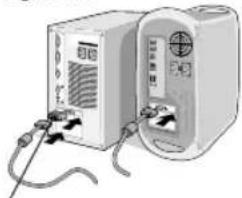
Figure A.1 Figure A.2
3 vis (LCD193WM)- 4 vis (LCD203WM/LCD223WM)
Figure R.2
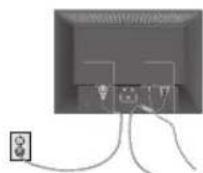
Figure R.3
NEC Display Solutions, Ltd. 4-13-23, Shibaura, Minato-Ku Tokyo 108-0023, Giappone
Contenuo
Manuale Utente
3 viti (LCD193WM)- 4 viti (LCD203WM/LCD223WM)
Figura R.2
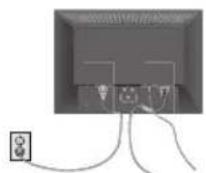
Figura R.3
Specifiche tecniche
4 VIT1 (M4)
IDPKACATbCHK KAKUM-DMOO DETAURIM BHVTDM YCTPOOKCTBA
TOTY
P 1
A
3100 yctpowTBA.190rmy ee HecoxDIMO BnM
3aBHeHne H3ROTOBNTeJIa
MbHACTOIMNODTBePDKaEM,TOIeTHoMOnHTOpAccuSync LCD193WM(L196H5)/AccuSyncLCD203WM(L206H6)/AccuSync LCD223WM(L226H7)coOTBETCTBYOT
DnpeKtNbBe CoBeta 73/23/EEC:
EN60950-1
DnpeKtNbBe Cobeta 89/336/EEC:
-EN55022
EN61000-3-2
-EN61000-3-3
-EN55024

AR46
H CODEPKNOTMTK

NEC Display Solutions, Ltd.
4-13-23, Shibaura,
Minato-Ku
Tokyo 108-0023, Japan
Copepkmoe
PykoBOOCTBO

NOHB3OBATEN
Kabenb
aynocnHaBndeocnHa

Kabelb
NNTAHNA
Kabenb
eocnHana

CD-ROM

Depkataenb
PnOCTaBka
OCHOBAHNA
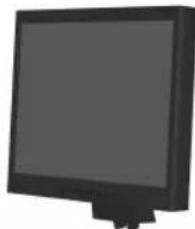
MonHot AccuSync LCD
(NoCTaBkaOCHOBAHHe
NoDcOeDnHeHa)
B ynakoobouhno kopo6ke* HOBOrO MOHITopa NEC AccuSync LCD donkho 6bIb cneyuooee:
- MoHtOp AccuSync LCD c wapHnphoon onopoi
Ka6eIb aydnocnHana
KabenntaHn
Kabel BndeocnHa
PykoBOcTBoNb3OBaTeNa
-
nck CD-BOM
-
Π ΑCTaBka OCHOBaHnA
-Дерхатenvькавета
- O6RaTeNbHO COxpaHnte Kopo6ky uynakOBouHyb mATEpHaI dIa
TpaHCnOPTNPOBKN HNN NpepeBO3KN MOHHTOPA.
Kpatkoe pyKOBOdTBO no Haay pa60TbI
Pucyok S.1
PcyhokA.1 PcyhokA2
Macintosh (w-pxq)
MOMONK (No Bx)B KOMNNEKT)
KabeJIb nHTaHn
AynOBxOa
Pucyok B.1
PnKIOHHTe K
aydnoBbIXOy
KOMnbIOTepa
YTO6bI NOCDOeHNHTb OCHOBAHNE K NOCTABKe KKJ:
1.3aKpENHToNDCTABKY HA OCHOBAHN.3aUeKNHa NOCDTABKe DOnHHB BOITN B COOTBCTBYOoo OTBepCTHe NO CEHTpy OCHOBAHN (PucyHok S.1).
YTO6bI yCTaHOBnTB DePKxATENB Ka6eNr:
1.Bctabte 3aueKn depKaTeN B COOTBETCTBYOoee OTBepCTne HA NOCTABKE N, CdBYNB DEpKaTeNb BHM3, YCTAHOBITE ETO HA MEcTO (PcyHOK S.1).IPIMEHAHE.N.Y6eNTecB, YTO 3aueKn HAdexHO dmKcnpyoT depKaTeNb.
YTO6bI NOJKNIOHTB KKD MOHNTOP AccuSync LCD K CnCTeMe,
BbINOHNHe CNeDyIOUne INHCTpyKUNn:
1.OTKIOUHTe NITaHne KOMNbIOTepa.
2.ДЯнКcaHAnorOBbIM BbIXOdOM:NoDcoeHNHTe15-WtBpbKOBbI
MHH-pa3bem D-SUB ka6ena BndeocnHana K pa3bemy nataBi
BndeoandaTepe B KOMnbIOTepe (PncyHok A.1).3aTAHNTe BCE BNHTbI
DnMa: POnCoeDInHte aanTep kabeIaMuliSync Macintosh (He
BXOIND TB KOMNNEKT) K KOMNBIOTepy. NOKNIHOHTe Ka6eBb BUNDeoCnHana
c 15-utbipkbOBbIM MmH-paBemOM D-SUB KaanTepy Kaenr dA
MultiSync Macintosh (PucyHok A.2).3aTAHTE BCE BHTbl.
PIMMEAHNE. HeKoTOpbIX KOMNbIeTpOB Macintosh aanTep Ka6JI MaCintosh He Tpe6yETc.
- POKIOHHe 15-ITbIPbKObB MmHnpa3bEm D-SUB BnDeokabena n ayDIOKAbeN K COOTBCTBYOuIM pa3bEmaH Ha zADHn PAHEN MOHTopa (Pcyhok B.1). POKIOHHe HayUHKn (HE BXoT B KOIMNEKT) K COOTBCTBYOuEMy pa3bEmy HA nepeHn PAHEN MOHTopa (Pcyhok C.1)
4.ПОДКЛЮНЕ OДМ.NOHOU.Ka6eJI NITAHNY K MOHNTOPY,а ДPyгг--K pO3EТК 3JNEKTPONITAHNY.NOMeCTNTE Ka6eJI BUNDEOCINHANAи Ka6eJI NITAHNY B DEpXeTIEL (PmCyHOK B.1).
PIMMEUHNE. OtperynnpyTe nonoXeHne KaBEn noD epKaTeNEM
KaBene, YTO6bI PDEOTBPaNTb NOBpExdHne
KabENR NNN MOHNTOPA.
INPMUEAHNE. PekomeHdaun no npabnblHomy Bb6opy kaebna
NITAHNA. Bpa3dene "BHMaHne" HactoJUero
pykoBOdCTBa.
Pycckn-1
Pucyok C.1

PcyHOK TS.1
Heaepa3nBHa nOBepxHocTb PcyHok R.1
"OprabI ynpaBHeHn" 3Toro pyKOBOCTBa NJIb3OBATEJRA.
IPMUEAHHE.B cnyae kakoi-ni6o HenoiaKn 6opatntecb Ka3dny UcTpaHHeNcnpaBHOcte TTO pyKOBOCTBA NOh3bOATEn.
Haklloh
YcTaHOBHTpe6yEmbHaKIOH3KpaHaMOHToPa,epKaero pykAmnC0eHXCTOpOH(PucyHOKTS.1).
OToeHHeHne NOCTaBKn MOHTopa nepeD yctAHOBKo
TTO6bI NOIROTOBUT MOHITOP K yCTAHOBKE B pyrom IIOJNOXeHIM
1.OTcoeHNHe Bce Ka6en.
- CHIMMTE KpbIUKy wapHnpa (PncyHOK R.1).
3.ПОLOXКITE MOHITOP 3KpaHOM BnH3 Ha Hea6pa3NBIHO NOBepxHOCTb(PucyHOK R.1). - OTBePHTE 3 BnHTa (LCD193WM) mIu 4 BnHTa (LCD203WM/ LCD223WM), c NOMOJIbIO KOTOPKMOHOTOP KpENITCR K NOCTABKe, n CHIMMITE NOCTABKY, KaK NOKa3AHO Ha PmCyHKe (PncyHok R.2).
Tenepb MOHOTOP rotOB K yctaHOBKe dpyrM cnocobm
5.ПлобсенинATEКавелNBITANHINPEREMEHNOROTOKAиКавелcURHANAкЗдемпанЕМОнТOPA(PucyhoK R.3).
6. Nobtopnte npouecB o6paTHOM nopAKe, YTO6bI CHOBa NOCDoeDHHb NOCTabKy.
PIMMEAHNE. pyrtnecnoB3yEmble MeToDbl yCTaHOBKn DOJXHbYIOBNETBOpTb Tpe6oBaHnM VESA.
PIMMEAHNE. Co6nOdaIte OCTOPOXHOCTb npi CHATNI NOCTABKN MOHITOPA.
CHATNE OCHOBAHNA
PIMMEUAHNE. Ipn TpaHcnpTPOBKe MOHITOPa KKID BCERda CHMMAIte OCHOBAHNE.
1.Noonoxte MOHITOP 3KpaHOM BHN3 Ha Heabpa3nBHyIO NOBepxHOCTb (PcyHOK R.1).
2.Пальцами нажмITE назацелк,在TO6blOCBO6OДТБ OCHOBAHNE.
3. OToeMHHTe OCHOBAHne.
PoiocoeinHne noDbXHHoro KpOHTeHa
3TOTKKMOHITOPnpedHa3HaueHdIINcnoIb3OBAHnC NOBHXHBKPOHHTeHOM.
PnycTahOBke hcnonb3yTe npnlaraeMbe BNHTb (4 wT.), kAk nOKa3aHO h paCynHc. B enzai coBnOHeN npabn b6eONaCHocTN MOHITOP cneDyET yCTAHABINBaTb H kPOHtWeH, oBeCEHBAKUeM Heo6xOHNMyO yTOHmBOCTb C yETOp BECA MOHTopA.
KKMOHHTOP CNEyET NCONBJ30BAbT ToJIbKO C PpeHa3HaueHHbIM DnA Hero KPOHHTeHOM (HanpIMep, MapKn GS).
OprAhbyynpaBneHn
KhONKn ynpabHeHHa 3kpaHbIM MeHIO Ha nepeHne NaHEn MOHITopa BbINONHHT CJeDyOuNe FyHKn:
1.OchOBHAn FyHKnI npHaKATn KaJdoN KOnKn
| Button | SELECT | - | + | AUTO/RESET |
| Korda He otobpajaetcnaKpahanbnuHnDnkaTOp | Отообрахени Meнko OSD. | Буstры Bvybop Okhapeулрови Rpkoctn. | Буstры Bvybop Okhapeулрови Гомкoctn. | РавotasгФундьагВвтогострпс"Auto adjust". |
| Korda otobpajaetcnaKpahanbnuHnDnkaTOp(cstdya bvybopa 3naHcKa) | Перекю КстадиAdjustment (PeynilpoBvka). | Перекюшени КчсорabLbeNo. | Перекюшени КчсорabnPaBo. | |
| Korda otobpajaetcnaKpahanbnuHnDnkaTOp(cstdya Adjustment(PeynilpoBvka)) | Перекю Кстади bvybopa 3naHcKa. | Умени SHaЧени SHaЧени SHaСТрочи SHaПаншени SHaСТрочи SHaПаншени SHaСТрочи SHaПаншени SHaСТрочи SHaПанш苇 | Уmени SHaЧени SHaCH苇 Mute off/on(BkILOchENb/OTKIOCHENe 3BykA)В ожене ретулрови Гомкoctn Volume. |
2.CtpyKtypa MeHIO OSD
POnMeHIO(Adjust)(HacTpoKa)
AUDIO (3BYK)
PeynpOBKa ypOBHr pOMKoCTn 3Byka DnHaAMNKOB n HayuHKnOB.
IaorOTKNIOeHnRA 3Byka B DnHaAMKax HAKMITE KHOKNy AUTO/RESET.
BRIGHTNESS (RPKOCTb)
Hactpoika 06eepkoctnn3o6paekhen nfoha 3kpaHa.
CONTRAST (KOHTPACTHOCTb)
HactpoKa npKoCTn 306paXeHHNo OTHOWeHHK pOHy.
AUTO AUTO CONTRAST (ABTOKOHTPACTHOCTb)
Koppekunna 3n06paekhenra, COOTBETCTByHOJero HecTaHApTbHM BXODHBIM BNDEOCHHAAM.
AUTO AUTO ADJUST (ABTOHACTPOJKA)
AROMaTnueckn HAcTpnoKa npamaTePoB nNoXeHn, roPn3oHTaIbHO rpo3mepu nHTKocTN.