
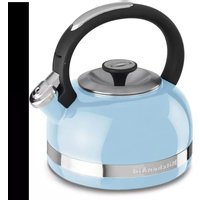
KEK1322SS - Kettle KITCHENAID - Free user manual and instructions
Find the device manual for free KEK1322SS KITCHENAID in PDF.

| Product Type | Glass Electric Kettle for Tea |
| Brand | KitchenAid |
| Model | KEK1322SS |
| Power | 1500 W |
| Voltage | 120 V AC, 60 Hz |
| Body Material | Glass |
| Capacity | 1.7 L (approx.) |
| Temperature Settings | 80°C, 85°C, 90°C, 95°C, 100°C |
| Keep Warm Function | Yes (70°C / 158°F for 30 min) |
| Removable Infuser | Yes, for loose leaf or tea bags |
| Infuser Holder | Yes, built-in |
| Base with Cord | Yes, with cord storage |
| Automatic Shut-Off | Yes, after 30 min in warm mode |
| Cleaning | Hand wash only, do not immerse |
| Descaling | Recommended with white vinegar |
| Warranty | 1 year (hassle-free replacement) |
Frequently Asked Questions - KEK1322SS KITCHENAID
User questions about KEK1322SS KITCHENAID
0 question about this device. Answer the ones you know or ask your own.
Ask a new question about this device
Download the instructions for your Kettle in PDF format for free! Find your manual KEK1322SS - KITCHENAID and take your electronic device back in hand. On this page are published all the documents necessary for the use of your device. KEK1322SS by KITCHENAID.
USER MANUAL KEK1322SS KITCHENAID
natural_image
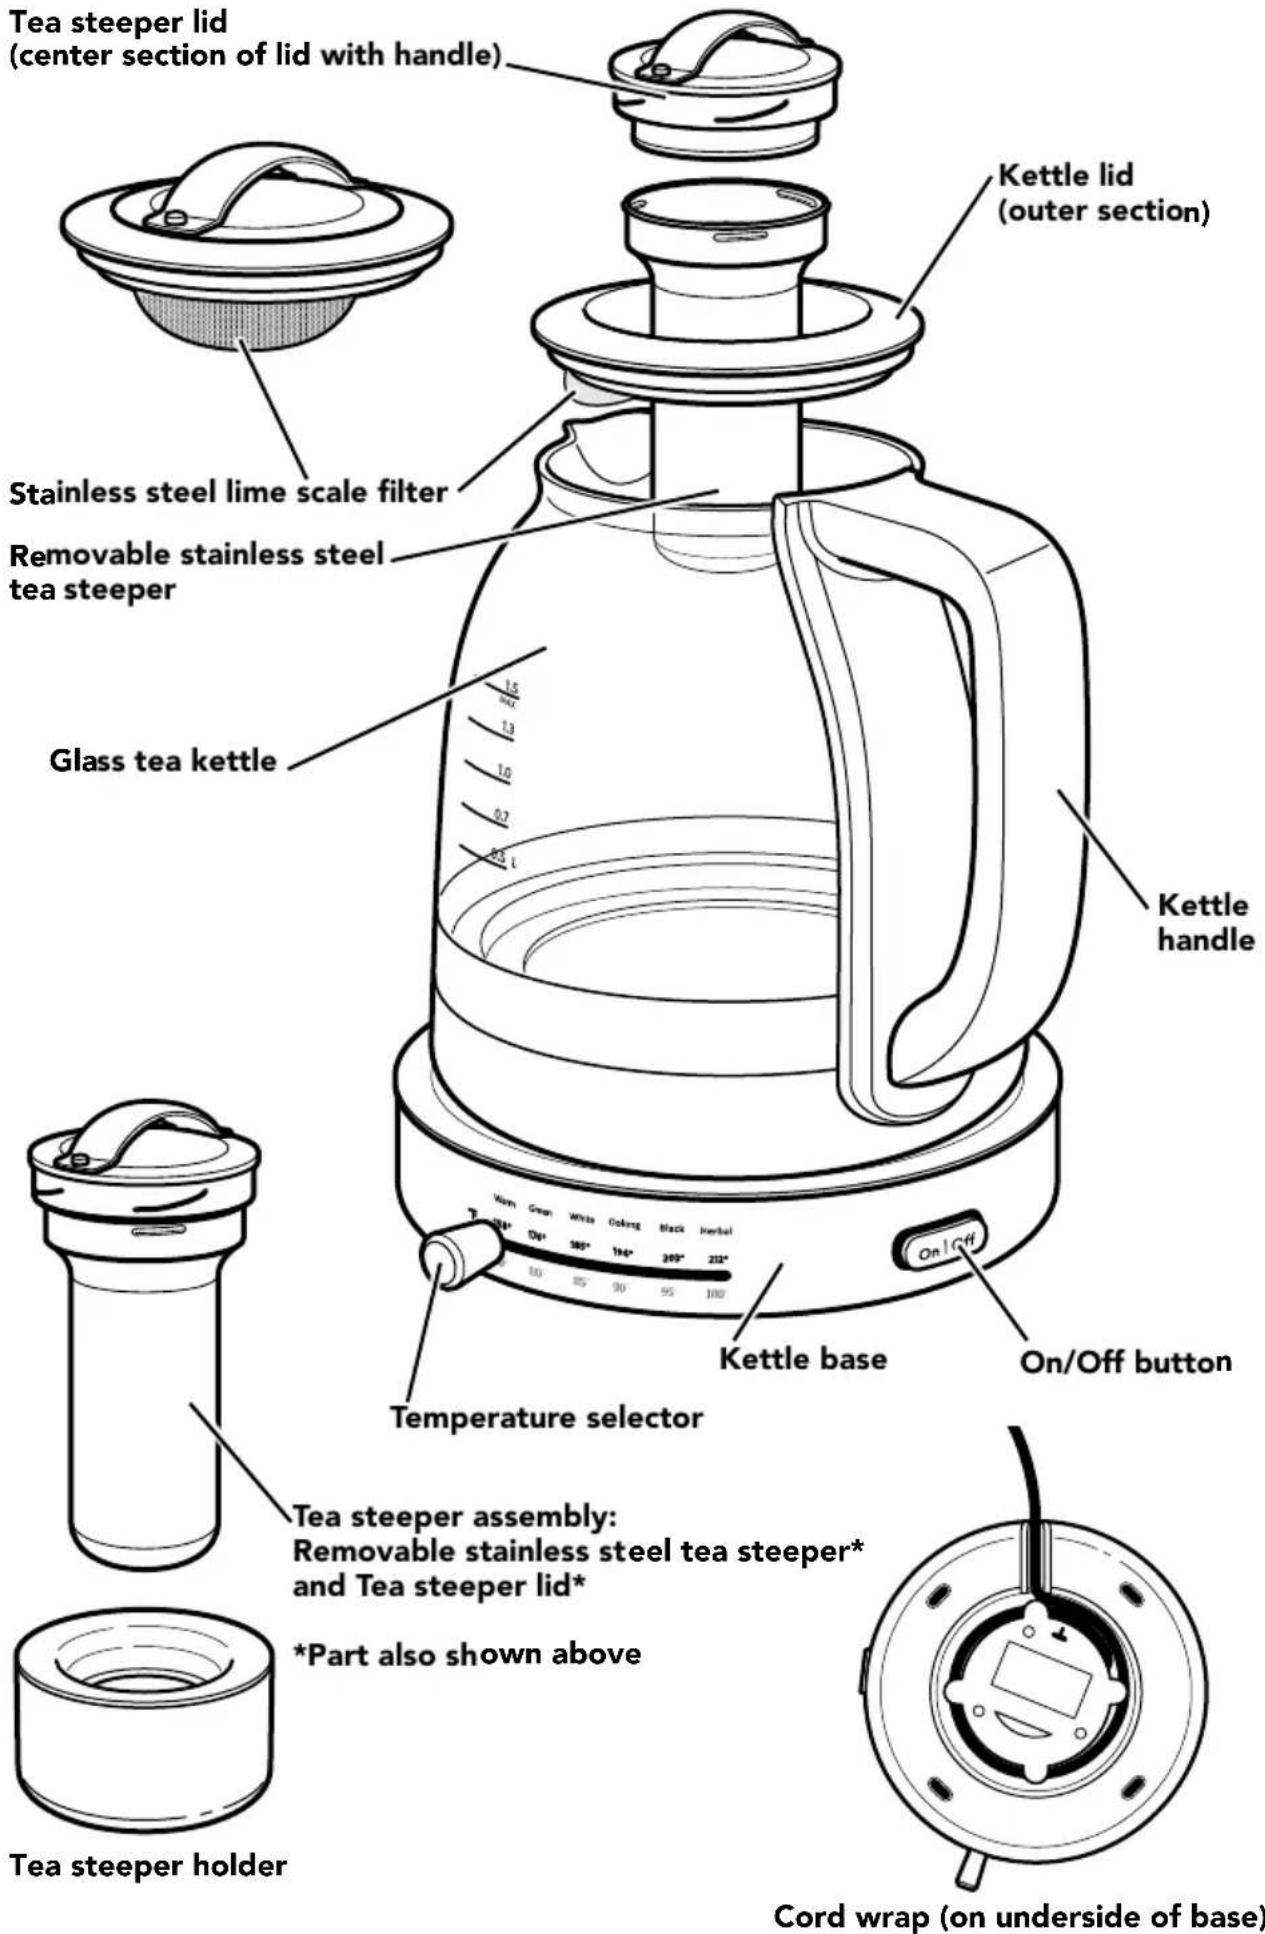
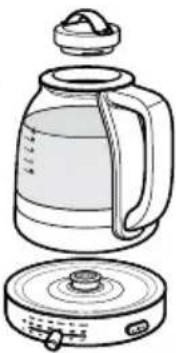
Exterior view of a modern kitchen aid kit with glass lid and digital temperature scale (no text or symbols on main body)PARTS AND FEATURES
PARTS AND ACCESSORIES
Your safety and the safety of others are very important.
We have provided many important safety messages in this manual and on your appliance. Always read and obey all safety messages.

This is the safety alert symbol.
This symbol alerts you to potential hazards that can kill or hurt you and others.
All safety messages will follow the safety alert symbol and either the word "DANGER" or "WARNING." These words mean:
! DANGER
You can be killed or seriously injured if you don't immediately follow instructions.
WARNING
You can be killed or seriously injured if you don't follow instructions.
All safety messages will tell you what the potential hazard is, tell you how to reduce the chance of injury, and tell you what can happen if the instructions are not followed.
State of California Proposition 65 Warnings:
WARNING: This product contains one or more chemicals known to the State of California to cause cancer.
WARNING: This product contains one or more chemicals known to the State of California to cause birth defects or other reproductive harm.
IMPORTANT SAFEGUARDS
When using electrical appliances, basic safety precautions should always be followed, including the following:
- Read all instructions.
- Do not touch hot surfaces. Use handles or knobs.
- To protect against fire, electrical shock and injury to persons do not immerse base, cord, plug, or the Glass Tea Kettle in water or other liquids.
- Close supervision is necessary when any appliance is used by or near children.
- Unplug the Glass Tea Kettle from outlet when not in use and before cleaning. Allow to cool before putting on or taking off parts.
- Do not operate any appliance with a damaged cord or plug or after the appliance malfunctions or has been damaged in any manner. Return appliance to the nearest Authorized Service Facility for examination, repair, or adjustment.
- Use of replacement parts or accessory attachments not recommended by manufacturer may result in fire, shock, or injury to persons.
- Do not use outdoors.
- Do not let cord hang over counter or table edges, or allow to come into contact with heated surfaces.
- Do not place on or near a hot gas or electric burner, or in a heated oven.
GLASS TEA KETTLE SAFETY
- The Glass Tea Kettle should only be used to heat water.
- Do not use the Glass Tea Kettle without lid properly closed.
- Do not use the Glass Tea Kettle with loose or weakened handle.
- Do not use the appliance for other than intended use.
- Do not clean the Glass Tea Kettle with abrasive cleaners, steel wool, or other abrasive materials.
- This product is designed for indoor household use only. Not designed for commercial use.
- Do not overfill the Glass Tea Kettle.
SAVE THESE INSTRUCTIONS
ELECTRICAL REQUIREMENTS
Voltage: 120 V.A.C.
Frequency: 60 Hz
Wattage: 1500 W
NOTE: The Glass Tea Kettle has a 3 prong grounded plug. To reduce the risk of electrical shock, this plug will fit in an outlet only one way. If the plug does not fit in the outlet, contact a qualified electrician. Do not modify the plug in any way.
Do not use an extension cord. If the power supply cord is too short, have a qualified electrician or serviceman install an outlet near the appliance.
A short power supply cord (or detachable power supply cord) should be used to reduce the risk resulting from becoming entangled in or tripping over a longer cord.
Longer detachable power supply cords or extension cords are available and may be used. If a longer detachable power supply cord or extension cord is used:
- The marked electrical rating of the cord set or extension cord should be at least as great as the electrical rating of the appliance.
- If the appliance is of the grounded type, the extension cord should be a grounding type 3-wire cord.
- The cord should be arranged so that it will not drape over the countertop or tabletop where it can be pulled on by children or tripped over unintentionally.
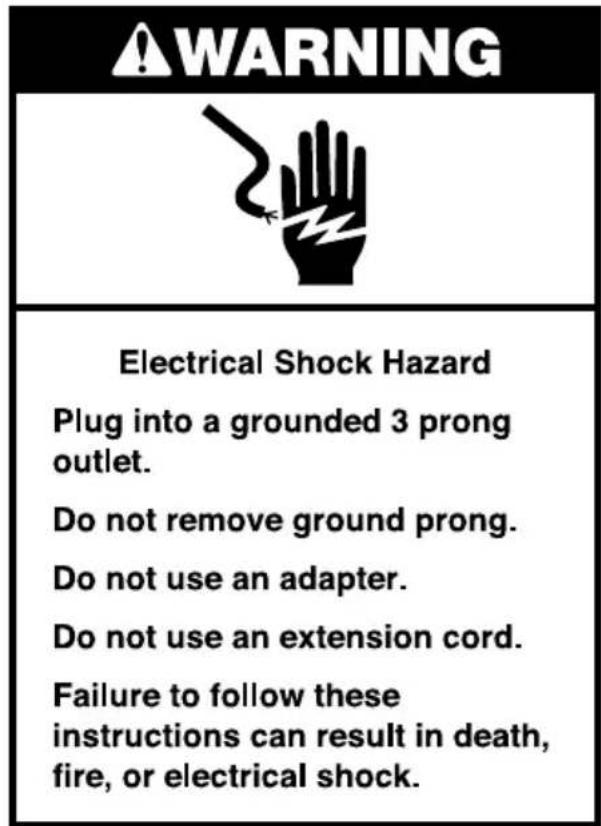
WARNING

Electrical Shock Hazard
Plug into a grounded 3 prong outlet.
Do not remove ground prong.
Do not use an adapter.
Do not use an extension cord.
Failure to follow these instructions can result in death, fire, or electrical shock.
Before first use
Before using your Glass Tea Kettle for the first time, wash the kettle and steeper assembly, including the lid, in hot, soapy water, then rinse with clean water and dry. Fill the Glass Tea Kettle with water to the MAX fill line, place the steeper assembly in the Glass Tea Kettle, and run one cycle at the maximum temperature. To avoid damage, do not fully immerse the Glass Tea Kettle in water, and do not use abrasive cleaners or scouring pads.
NOTE: The entire Glass Tea Kettle is hand-wash only. To avoid damage, do not wash any part of the Glass Tea Kettle, steeper, lids, steeper holder or the base with power cord in a dishwasher.
natural_image
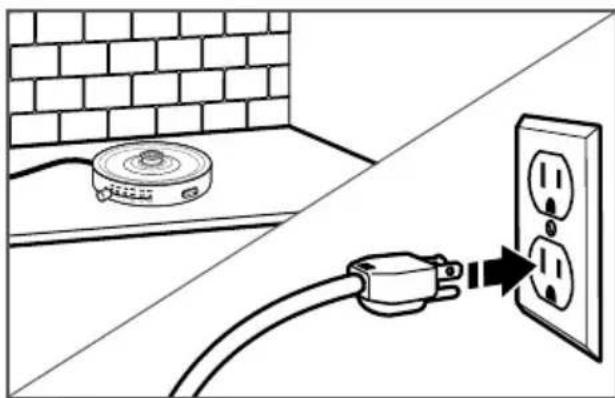
Line drawing of an electrical outlet connected to a power plug, with a mounted appliance on the wall (no text or symbols)Place the base with power cord on a flat, sturdy surface and plug it into a 3 prong grounded outlet, a chime will sound indicating that the power is on. If desired, wrap excess cord around the cord holder on the bottom of the base.
FOR DETAILED INFORMATION ON USING THE GLASS TEA KETTLE
Visit kitchenaid.com/quickstart for additional instructions with videos, inspiring recipes, and tips on how to use your Glass Tea Kettle.
USING THE GLASS TEA KETTLE
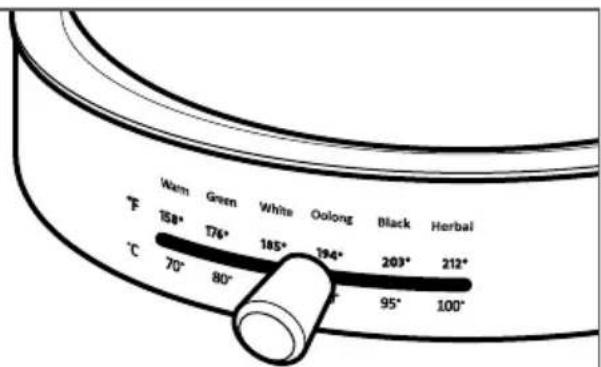
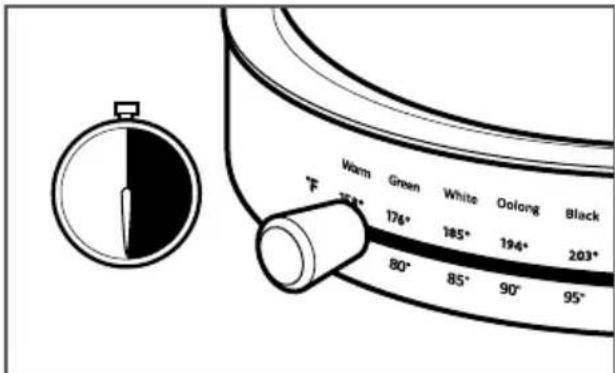
STEEPING CHART
NOTE: Making the perfect cup of tea is easy with the KitchenAid Glass Tea Kettle. Water temperature and steep time are two key elements for optimal tea flavor. For best results, follow the recommendation on your tea's packaging for suggested water temperature and steep times. If it does not have these suggestions, see the chart below. Keep in mind, steep time determines flavor, so use a timer to find your perfect strength.
| TEA TYPE GREEN WHITE OOLONG BLACK HERBAL | |||||
 | [0254] |  | [KZD0] | [0477] | |
| SUGGESTED TEMPERATURE SETTING (C°/F°) | 80° 85° | 90° 95° 100° | |||
| 176° 185° | 194° 203° 212° | ||||
| SUGGESTED STEEP TIME (MINUTES) | 1-3 3-5 3-5 4-5 5-7 | ||||
Warm Mode: Warm is designed to keep your tea warm at the optimal drinking temperature 70^ C/158°F.
NOTE: Some teas call for different temperatures. Check your tea package for suggested steeping times and temperatures.
OPTIONAL METHOD — BREWING WITH TEA BAGS
The Glass Tea Kettle may be used for tea bags as well as loose leaf tea. Use the following methods if you prefer to use tea bags.
natural_image
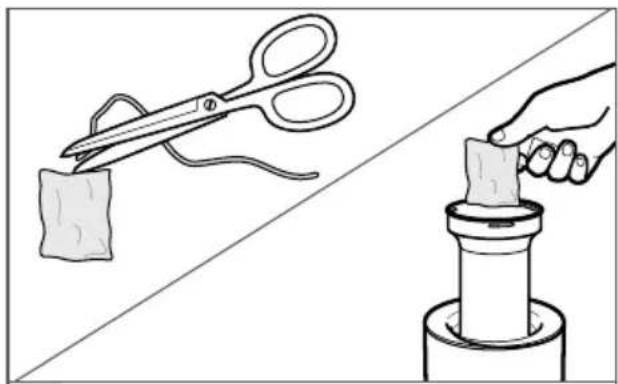
Illustration showing scissors cutting fabric and holding a small object, with no text or symbols present.1
Using the Glass Tea Kettle tea steeper: After the water reaches the correct temperature for brewing (see the "Steeping chart"), cut any strings or tags off of the tea bag, and place the tea bag directly into the tea steeper. Brew your tea as normal.

natural_image
Illustration of a coffee maker being heated by a hand using a stand mixer (no text or symbols present)2
Placing tea bags directly into the Glass Tea Kettle: After the water reaches the correct temperature for brewing (see the "Steeping chart"), lift the tea steeper lid off of the Glass Kettle, and place the tea bag string over the inner edge of the kettle lid. Then, insert and twist the tea steeper lid to catch the string and suspend the tea bag in the water. Brew your tea as normal.
USING THE GLASS TEA KETTLE
BREWING TEA
1
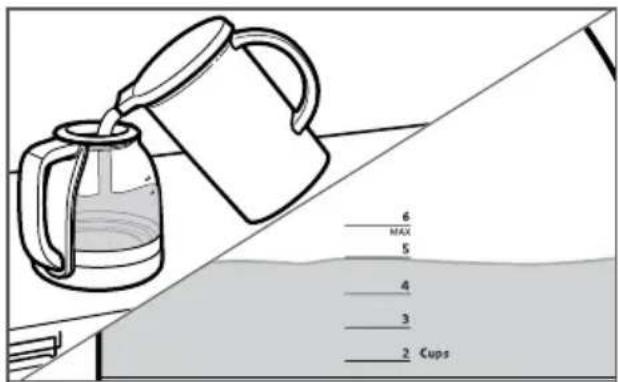
Fill the Glass Tea Kettle with filtered water up to the desired level for the amount of tea you want to brew. Do not fill past the Max line.

natural_image
Line drawing of a kettle with lid and side panel, showing internal structure (no text or symbols)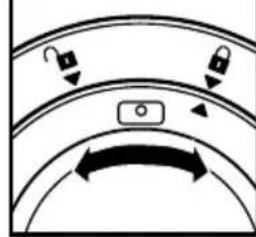
natural_image
Diagram showing a curved surface with directional arrows and a central object, no text or symbols present.2
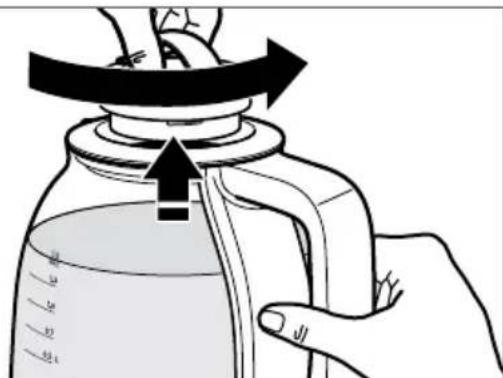
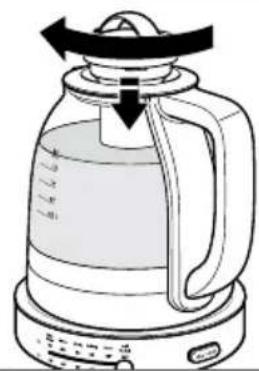
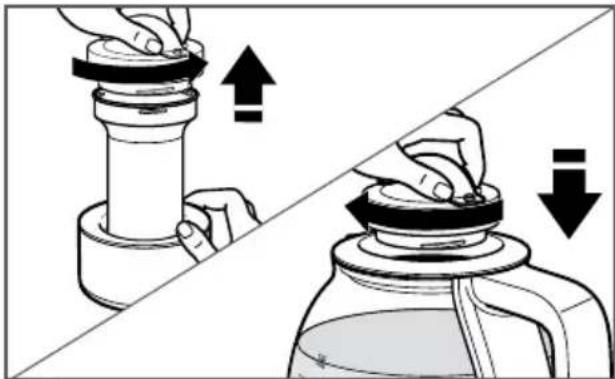
Put the lid back on the Glass Tea Kettle, without the steeper. The two lids are properly locked into each other when the indicator on the tea steeper lid is lined up with the indicator next to the locked symbol on the kettle lid. After locking the lids together, place the Glass Tea Kettle onto the power base.
IMPORTANT: We recommend adding tea and the steeper only after the water is heated.
3
Select the appropriate temperature for the kind of tea you are brewing by sliding the temperature selector to the correct setting. See the "Steeping chart" for more detailed information.
natural_image
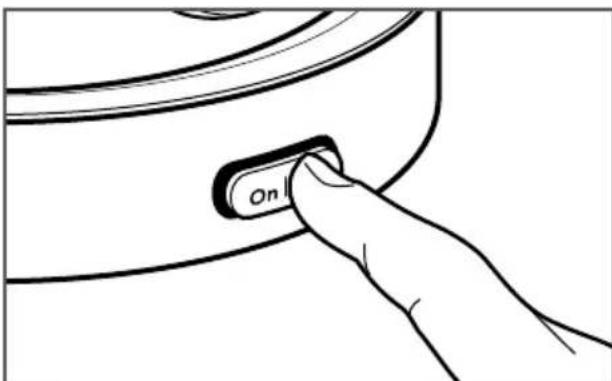
Line drawing of a hand pressing a button labeled 'On' on a curved surface (no text or symbols beyond the label)4
Press the ON/OFF button on the base to start heating the water. The light around the button will flash while the water is heating in the Glass Tea Kettle.
USING THE GLASS TEA KETTLE
natural_image
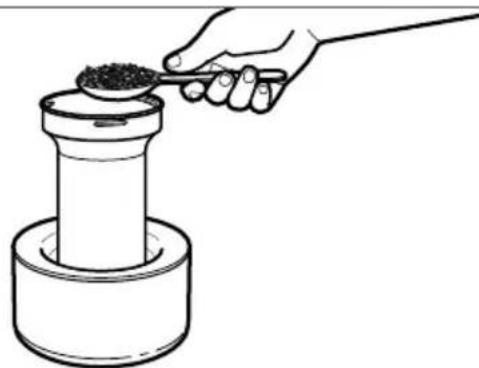
Line drawing of a hand using a tool to place food into a cylindrical container (no text or symbols)5
While the water is heating, place the tea steeper in the tea steeper holder to keep it steady while filling it with tea leaves (or tea bags). Follow the instructions on the tea packaging for the amount of tea to use.
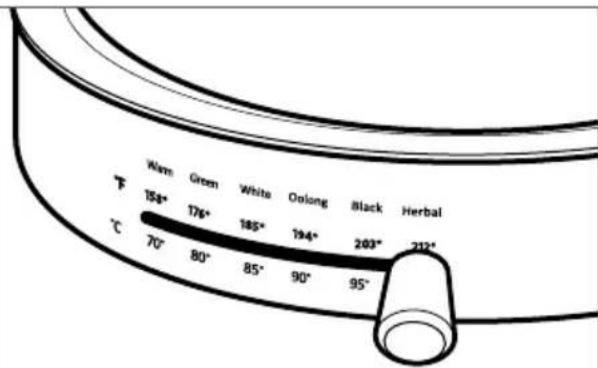
OPTIONAL: To boil water instead of steeping tea, slide the temperature selector to HERBAL (100°C/212°F).
NOTE: For tea that does not include brewing directions, start with 1 Tbsp. per 10 oz. cup. Add more tea if the flavor is too weak, and less tea if the flavor is too strong. Experiment for the best flavor.
TIP: For best results, we recommend pre-wetting the tea leaves in the steeper with a little warm water before the steeper is added to the kettle. (This can be done while the steeper is in the steeper holder). This will allow the leaves to settle into the steeper during the steeping process.
natural_image
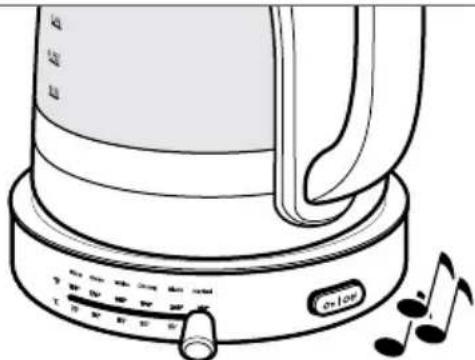
Line drawing of a kettle with control knob and musical notes (no text or symbols)6
Once the water reaches the correct temperature for brewing your selected tea, a chime will sound and the light around the ON/OFF button will stop flashing, but remain lit, indicating that the water is ready for steeping the tea.
7
Remove the tea steeper lid from the kettle after the desired temperature is reached.
USING THE GLASS TEA KETTLE
natural_image
Two-panel illustration showing hands performing a mechanical press or stamping operation on a cylindrical component, with no text or symbols present.8
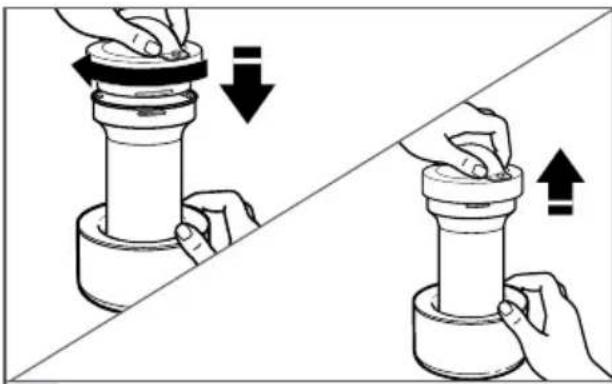
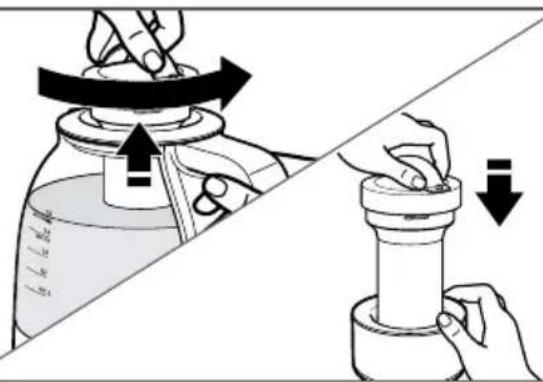
Hold the tea steeper lid in one hand, and grip the tea steeper holder in the other hand. With slight downward pressure, rotate the tea steeper lid into place on the tea steeper. Then, using the handle, lift the steeper assembly up, out of the steeper holder.
natural_image
Line drawing of a kettle with a lid and handle, showing liquid level and control buttons (no text or symbols)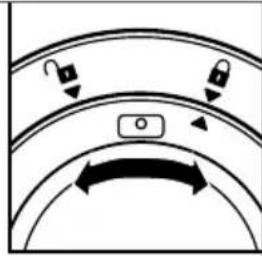
natural_image
Diagram of a curved road with directional arrows and a central object, no text or symbols present9
Place the tea steeper lid assembly inside the kettle lid. Twist the handle so that the tea steeper lid locks into place in the kettle lid. When locked into place, the indicator on the tea steeper lid will line up with the indicator next to the locked symbol on the kettle lid.
natural_image
Line drawing of a kettle and a stopwatch (no text or symbols)10
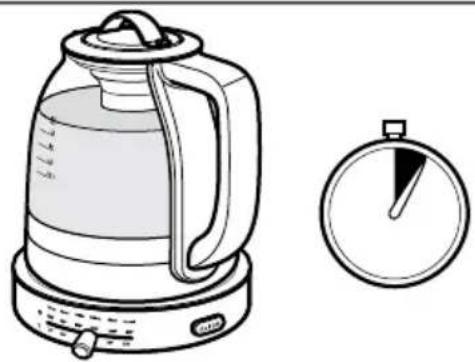
Use a timer to brew your tea for the appropriate time. See the "Steeping chart" for more detailed information.
11
After steeping for the desired amount of time, twist the lid to release and lift the steeper assembly from the Glass Tea Kettle. Using the handle on the tea steeper lid, place the tea steeper assembly back in the tea steeper holder.
NOTE: Use the handle to remove. The steeper cylinder will be hot.
USING THE GLASS TEA KETTLE
natural_image
Diagram showing two hands operating a valve on a cylindrical component, with arrows indicating upward and downward motion (no text or symbols)Hold the tea steeper lid in one hand, and grip the tea steeper holder in the other hand. With slight downward pressure, rotate the tea steeper lid off of the tea steeper. Then, place the tea steeper lid back inside the kettle lid, twisting to lock into place.
The kettle automatically goes into Warm mode after reaching temperature and holds for 30 minutes at Warm (158°F/70°C). The light around the ON/OFF button will remain lit while the Glass Tea Kettle is in Warm mode. If the kettle is removed, to keep the kettle warm after replacing it on the base, slide the temperature selector over to WARM and press the ON/OFF button again.
NOTE: Use the handle to remove. The steeper cylinder will be hot.
TIP: If the tea steeper lid is stuck on the tea steeper, this issue may be caused by twisting the tea steeper lid too tightly onto the tea steeper. Use a slight pressure to rotate the tea steeper lid when placing on the tea steeper. Do not over-rotate.
FOR DETAILED INFORMATION ON USING THE GLASS TEA KETTLE
Visit kitchenaid.com/quickstart for additional instructions with videos, inspiring recipes, and tips on how to use your Glass Tea Kettle.
CARE AND CLEANING
DESCALING THE GLASS TEA KETTLE
Calcium deposits (scale) from water will build up in the Glass Tea Kettle over time and impair brewing efficiency and tea quality. If you notice scale buildup inside your kettle or that it takes longer than usual to brew, then it is time to descale. To get the best performance from your Glass Tea Kettle, clean frequently. The cleaning interval will depend on the hardness of the water you put into the Glass Tea Kettle. Descaling should be done as soon as possible to preserve the performance and life of your Glass Tea Kettle.
To descale the Glass Tea Kettle:
- Fill the Glass Tea Kettle with white vinegar to the MIN (0.5 L) mark.
- Add water to the 1.0 L mark.
- Boil and allow to stand overnight.
- Empty the solution from the Glass Tea Kettle.
- Fill the Glass Tea Kettle with water, bring to a boil and drain out the water. Repeat this step twice. The Glass Tea Kettle is now ready to use.
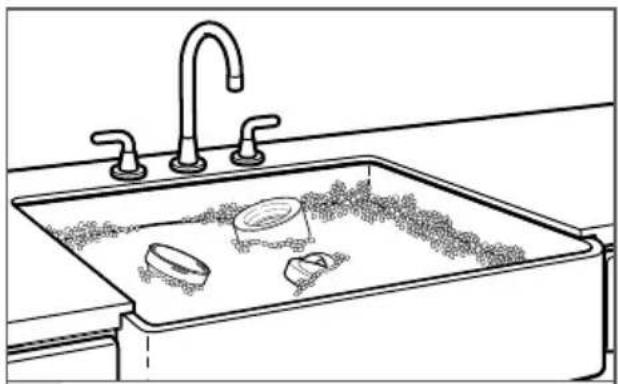
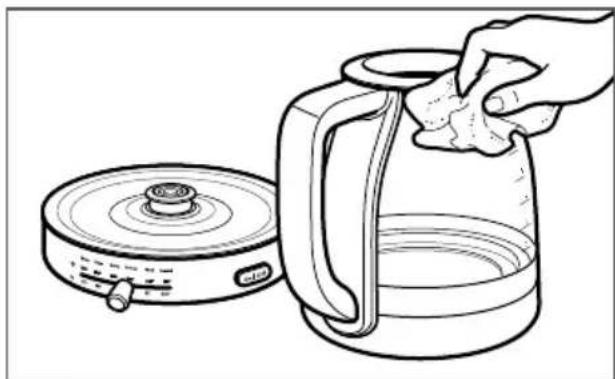
CLEANING THE GLASS TEA KETTLE AND ACCESSORIES
IMPORTANT: To avoid damage, never immerse the Glass Tea Kettle or the base in water or place in the dishwasher.
natural_image
Line drawing of a stainless steel kitchen sink with faucet and sink (no text or symbols)After using the Glass Tea Kettle, remove the lids and steeper. Wash the lid parts, steeper, and steeper holder by hand with a soft cloth, in warm sudsy water.
natural_image
Line drawing of a hand placing a piece of food into a kettle next to a circular fan (no text or symbols)2 Clean the Glass Tea Kettle and base by hand only. Wash with a soft, damp cloth. Dry thoroughly with a soft, dry cloth. Do not wash in the dishwasher. Do not immerse in water.
NOTE: After washing, store your Glass Tea Kettle out of the reach of small children.
FOR DETAILED INFORMATION ON CLEANING THE GLASS TEA KETTLE
Visit kitchenaid.com/quickstart for additional instructions with videos, inspiring recipes, and tips on how to use your Glass Tea Kettle.
WARRANTY
KITCHENAID® GLASS TEA KETTLE WARRANTY
FOR THE 50 UNITED STATES, THE DISTRICT OF COLUMBIA,
PUERTO RICO, AND CANADA
This warranty extends to the purchaser and any succeeding owner for Glass Tea Kettles operated in the 50 United States, the District of Columbia, Puerto Rico, and Canada.
Length of Warranty: One Year Full Warranty from date of purchase.
KitchenAid Will Pay Hassle-Free Replacement of your Glass Tea Kettle.
for Your Choice of: See the next page for details on how to arrange
for service, or call the Customer eXperience Center
toll-free at 1-800-541-6390.

OR
The replacement parts and repair labor costs to correct defects in materials and workmanship. Service must be provided by an Authorized KitchenAid Service Center.
KitchenAid Will A. Repairs when your Glass Tea Kettle is used in
Not Pay for: other than normal single family home use.
B. Damage resulting from accident, alteration, misuse or abuse.
C. Any shipping or handling costs to deliver your Glass Tea Kettle to an Authorized Service Center.
D. Replacement parts or repair labor costs for Glass Tea Kettles operated outside the 50 United States, District of Columbia, Puerto Rico, and Canada.
DISCLAIMER OF IMPLIED WARRANTIES; LIMITATION OF REMEDIES
IMPLIED WARRANTIES, INCLUDING TO THE EXTENT APPLICABLE WARRANTIES OF MERCHANTABILITY OR FITNESS FOR A PARTICULAR PURPOSE, ARE EXCLUDED TO THE EXTENT LEGALLY PERMISSIBLE. ANY IMPLIED WARRANTIES THAT MAY BE IMPOSED BY LAW ARE LIMITED TO ONE YEAR, OR THE SHORTEST PERIOD ALLOWED BY LAW. SOME STATES AND PROVINCES DO NOT ALLOW LIMITATIONS OR EXCLUSIONS ON HOW LONG AN IMPLIED WARRANTY OF MERCHANTABILITY OR FITNESS LASTS, SO THE ABOVE LIMITATIONS OR EXCLUSIONS MAY NOT APPLY TO YOU.
IF THIS PRODUCT FAILS TO WORK AS WARRANTED, CUSTOMER'S SOLE AND EXCLUSIVE REMEDY SHALL BE REPAIR OR REPLACEMENT ACCORDING TO THE TERMS OF THIS LIMITED WARRANTY. KITCHENAID AND KITCHENAID CANADA DO NOT ASSUME ANY RESPONSIBILITY FOR INCIDENTAL OR CONSEQUENTIAL DAMAGES. This warranty gives you specific legal rights and you may also have other rights which vary from state to state or province to province.
We're so confident the quality of our products meets the exacting standards of KitchenAid that, if your Glass Tea Kettle should fail within the first year of ownership, KitchenAid will arrange to deliver an identical or comparable replacement to your door free of charge and arrange to have your original Glass Tea Kettle returned to us. Your replacement unit will also be covered by our one year limited warranty.
If your Glass Tea Kettle should fail within the first year of ownership, simply call our toll-free Customer eXperience Center at 1-800-541-6390 Monday through Friday. Please have your original sales receipt available when you call. Proof of purchase will be required to initiate the claim. Give the consultant your complete shipping address. (No P.O. Box numbers, please.)
When you receive your replacement Glass Tea Kettle, use the carton, packing materials, and prepaid shipping label to pack up your original Glass Tea Kettle and send it back to KitchenAid.
HASSLE-FREE REPLACEMENT WARRANTY – CANADA
We're so confident the quality of our products meets the exacting standards of the KitchenAid brand that, if your Glass Tea Kettle should fail within the first year of ownership, we will replace your Glass Tea Kettle with an identical or comparable replacement. Your replacement unit will also be covered by our one year limited warranty.
If your Glass Tea Kettle should fail within the first year of ownership, simply call our toll-free Customer eXperience Center at 1-800-807-6777 Monday through Friday. Please have your original sales receipt available when you call. Proof of purchase will be required to initiate the claim. Give the consultant your complete shipping address.
When you receive your replacement Glass Tea Kettle, use the carton, packing materials, and prepaid shipping label to pack up your original Glass Tea Kettle and send it back to KitchenAid.
ARRANGING FOR SERVICE AFTER THE WARRANTY EXPIRES, OR ORDERING ACCESSORIES AND REPLACEMENT PARTS
In the United States and Puerto Rico:
For service information, or to order accessories or replacement parts, call toll-free at 1-800-541-6390 or write to: Customer eXperience Center, KitchenAid Small Appliances, P.O. Box 218, St. Joseph, MI 49085-0218
Outside the United States and Puerto Rico:
Consult your local KitchenAid dealer or the store where you purchased the Glass Tea Kettle for information on how to obtain service.
For service information in Canada: Call toll-free 1-800-807-6777.
For service information in Mexico: Call toll-free 01-800-0022-767.
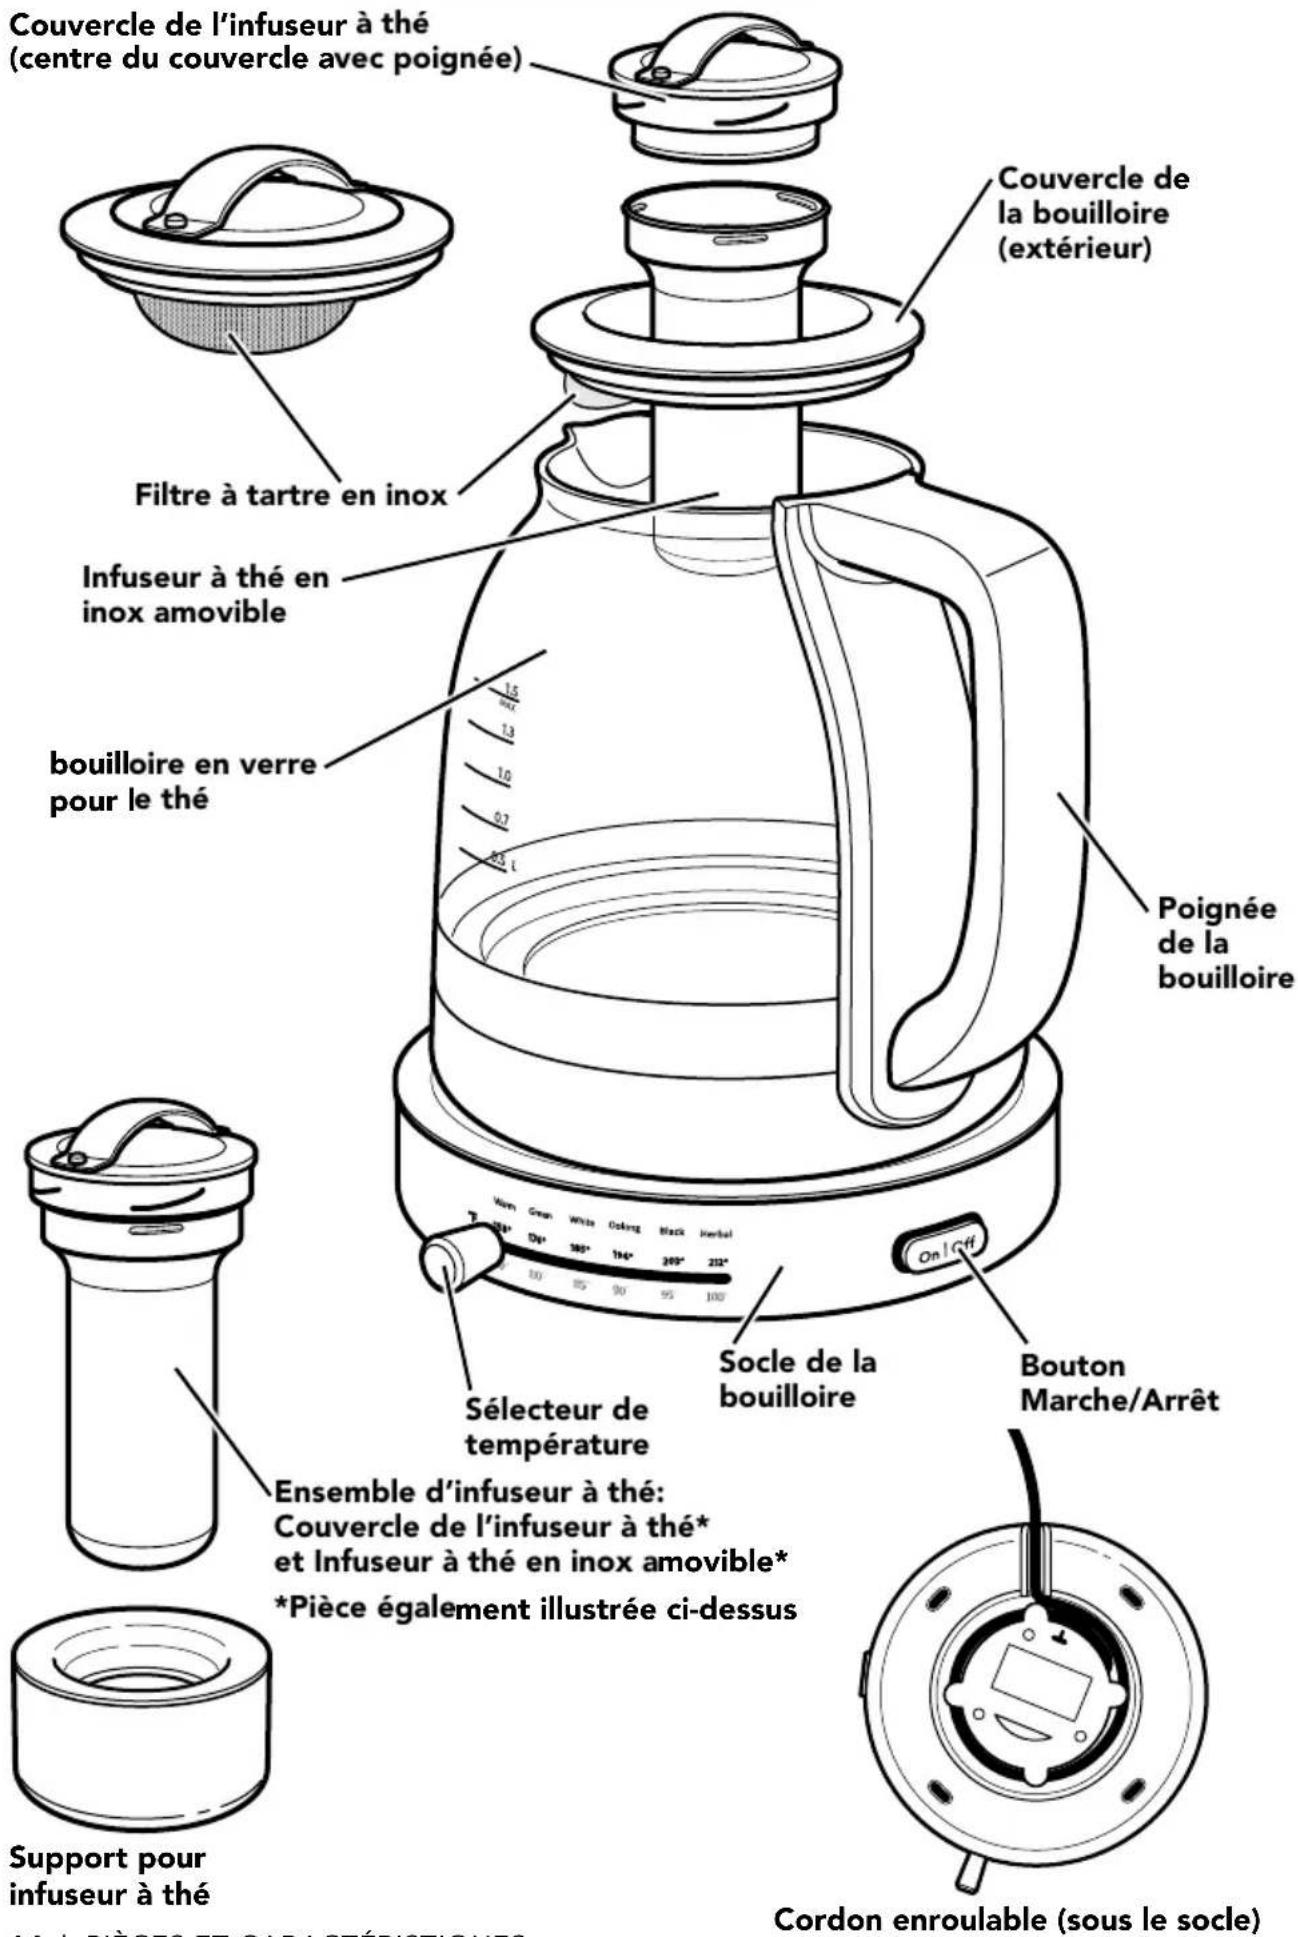
PIÈCES ET CARACTÉRISTIQUES
PIÈCES ET ACCESSOIRES
natural_image
Diagram showing a power outlet connected to a wall-mounted appliance, with no text or symbols present.natural_image
Illustration showing scissors cutting fabric next to a hand holding a small object, with no text or symbols present.natural_image
Illustration of a kettle being heated by a hand using a stand-over tool, showing liquid level and cooling effect (no text or symbols)natural_image
Hand pressing a button labeled 'On' on a curved surface (no text or symbols beyond the label)natural_image
Hand pouring granular material into a cylindrical container (no text or symbols visible)5
natural_image
Line drawing of a kettle with control knob and musical notes (no text or symbols)natural_image
Two-step diagram showing hand positioning of a mechanical component, one with downward arrow and one with upward arrow (no text or symbols)natural_image
Line drawing of a kettle with a lid and heat sink, showing liquid level and control panel (no text or symbols)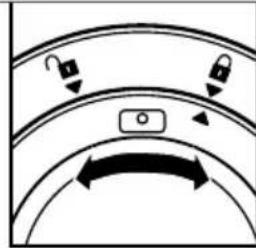
natural_image
Diagram of a curved mechanical or electrical component with directional arrows and a central button (no text or symbols)natural_image
Line drawing of a kettle and a stopwatch (no text or symbols)10
11
natural_image
Diagram showing two hands operating a valve mechanism, one with upward and one with downward arrows indicating movement (no text or symbols)natural_image
Line drawing of a kitchen sink with sink faucet and two circular fixtures on the floor (no text or symbols)natural_image
Line drawing of a hand cleaning a kettle next to a circular fan (no text or symbols)Customer eXperience Center, KitchenAid Small Appliances, P.O. Box 218, St. Joseph, MI 49085-0218
natural_image
Line drawing showing a power outlet connected to a wall-mounted appliance (no text or symbols present)natural_image
Illustration showing scissors cutting fabric next to a hand holding a small object, with no text or symbols present.natural_image
Illustration of a coffee maker being heated by a hand using a stand mixer, showing the process (no text or symbols)natural_image
Hand pressing a button labeled 'On' on a curved surface (no text or symbols beyond the icon)natural_image
Line drawing of a hand using a tool to place food into a cylindrical container (no text or symbols)5
natural_image
Line drawing of a kettle with control knob and musical notes (no text or symbols)6
7
natural_image
Two-step diagram showing hand positioning of a mechanical component, one with downward arrow and one with upward arrow (no text or symbols)8
natural_image
Line drawing of a kettle with a rotating knob and lid, showing liquid level (no text or symbols)
natural_image
Diagram of a curved mechanical or electrical component with directional arrows and a central button (no text or symbols)9
natural_image
Line drawing of a kettle and a stopwatch (no text or symbols)10
natural_image
Illustration of two hands operating a jar and a mechanical component, showing opposing movement directions (no text or symbols)11
natural_image
Diagram showing two hands operating a valve with upward and downward arrows indicating movement (no text or symbols)natural_image
Line drawing of a stainless steel kitchen sink with faucet and sink (no text or symbols)natural_image
Line drawing of a hand placing a piece of paper into a kettle next to a circular stove (no text or symbols)natural_image
Red background with a white telephone handset icon (no text or symbols)PRODUCT QUESTIONS OR RETURNS
QUESTIONS SUR LE PRODUIT OU LES RETOURS
MEXICO: KitchenAid.com.mx
LATIN AMERICA: KitchenAid-latam.com
natural_image
Silhouette of a kitchen mixer with a bowl (no text or symbols)KitchenAid®
®/TM © 2016 KitchenAid. All rights reserved. The design of the Stand Mixer is a trademark in the U.S. and elsewhere. Used under license in Canada.

- PARTS AND FEATURES
- PARTS AND ACCESSORIES
- Your safety and the safety of others are very important.
- ! DANGER
- WARNING
- IMPORTANT SAFEGUARDS
- When using electrical appliances, basic safety precautions should always be followed, including the following:
- GLASS TEA KETTLE SAFETY
- SAVE THESE INSTRUCTIONS
- Before first use
- FOR DETAILED INFORMATION ON USING THE GLASS TEA KETTLE
- USING THE GLASS TEA KETTLE
- STEEPING CHART
- OPTIONAL METHOD — BREWING WITH TEA BAGS
- 5
- 6
- 7
- CARE AND CLEANING
- DESCALING THE GLASS TEA KETTLE
- CLEANING THE GLASS TEA KETTLE AND ACCESSORIES
- FOR DETAILED INFORMATION ON CLEANING THE GLASS TEA KETTLE
- WARRANTY
- HASSLE-FREE REPLACEMENT WARRANTY – CANADA
- ARRANGING FOR SERVICE AFTER THE WARRANTY EXPIRES, OR ORDERING ACCESSORIES AND REPLACEMENT PARTS
- In the United States and Puerto Rico:
- Outside the United States and Puerto Rico:
- PIÈCES ET CARACTÉRISTIQUES
- PIÈCES ET ACCESSOIRES
- KitchenAid®
Brand : KITCHENAID
Model : KEK1322SS
Category : Kettle