821452 - Pump Wetelux - Free user manual and instructions
Find the device manual for free 821452 Wetelux in PDF.

| Product type | Solar pond aerator pump |
| Brand | Wetelux |
| Model | 821452 |
| Rated voltage (pump) | 6 V |
| Rated power (pump) | 0.7 W |
| Max. air flow | 100 l/h |
| Cable length (pump) | 3 m |
| Air hose length | 2 m |
| Protection rating (pump) | IP44 |
| Solar panel - P_mpp | 0.7 W |
| Solar panel - U_mpp | 5 V |
| Solar panel - I_mpp | 120 mA |
| Solar panel - U_OC | 6 V |
| Solar panel - I_SC | 140 mA |
| Solar panel dimensions | 17.5 x 13 x 2 cm |
| Total weight | 241 g |
| Power supply | Solar, no mains electricity |
| Main functions | Water circulation, oxygen enrichment for small ponds |
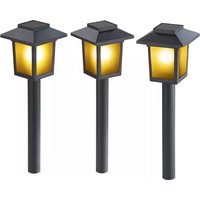
| Included parts | Pump, solar panel, ground stake, extension cord, stand, air hose 2 m, air stone |
| Maintenance and cleaning | Clean the panel glass with glass cleaner, soft brush; clean the air stone regularly; check electrical connections |
| Safety | Do not submerge the pump; do not disassemble; fragile glass, risk of injury; frost-free, store indoors |
| Repairability | No user-replaceable parts; contact customer service in case of problems |
Frequently Asked Questions - 821452 Wetelux
User questions about 821452 Wetelux
0 question about this device. Answer the ones you know or ask your own.
Ask a new question about this device
Download the instructions for your Pump in PDF format for free! Find your manual 821452 - Wetelux and take your electronic device back in hand. On this page are published all the documents necessary for the use of your device. 821452 by Wetelux.
USER MANUAL 821452 Wetelux
GB Original Instructions
natural_image
Outdoor ecological setup with ferns, a solar panel, and aquatic plants near water (no visible text or symbols)Instruction manuals provide valuable hints for using your new device. They enable you to use all functions, and they help you avoid misunderstandings and prevent damage. Please take the time to read this manual carefully and keep it for future reference.
Chers clients,
natural_image
Close-up of a black electronic device with a cable and mounting bracket (no visible text or symbols)Please note the included General Safety Notes and the following safety notes to avoid malfunctions, damage or physical injury:
- Please read this manual carefully and use the device only according to this manual.
■ Dispose of used packaging material carefully or store it out of the reach of children. There is a danger of suffocation!
- Persons with limited physical, sensorial or mental abilities are not allowed to use the device, unless they are supervised and briefed for their safety by a qualified person.
■ The solar pond aerator is not a toy. Keep it out of reach of children.
■ Treat the solar module as a glass product. Do not walk on it.
- Do not operate the pump under water. Place the pump at the pond edge at a dry and flood protected place.
■ Make sure the air hose and the power cord cannot become a tripping hazard.
- Do not continue to use the unit if the pump or the solar module becomes damaged. Repair work must be done by a qualified service technician.
- Do not disassemble the unit or attempt to repair it yourself. It does not contain parts serviceable by you. In case of questions or problems, please turn to our customer support.

Operation
Intended Use
The pond aerator is designed for light water circulation and thus for oxygenation of small garden ponds. In summer when high temperatures are present, a kind of “film” can build up on the pond surface and the surface does not absorb oxygen. The oxygen level decreases. Due to the rising air bubbles created by the pond aerator, the pond surface is constantly in motion and oxygen can be absorbed at the surface.
Install the pump on the edge of the pond. The pump is powered via the solar module and operated independently from the mains in direct sunlight. The pump pumps the air through a 2 meter silicone tube to the aeration stone. Using the ground stake the solar panel can be attached on the ground.
Assembling and Using
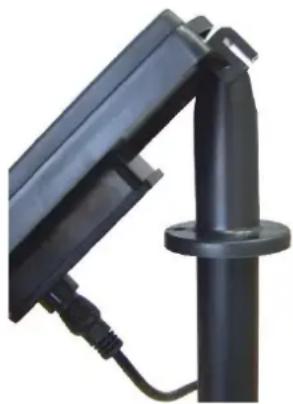
- Connect the plug of the pump cable (1) to the socket at the rear of the solar module (2). Adjust the front side of the solar module directly towards the position of the sun at noontime. Setup the solar module by using the ground stake (5) that can be extended with the extension piece (4). Attach the solar module holder (3) to the top part of the solar module (see picture on the right). Avoid any form of shading in order to achieve the highest possible yield.
natural_image
Close-up of a black electronic device with a cable and mounting bracket (no visible text or symbols)- Put the aeration stone (7) on the one end of the air hose (6).
- Connect the other end of the air hose to the pump (1).
- Roll out the cable of the pump and install the pump on the edge of the pond.
- Put the aeration stone into the pond (approx. 30 cm below the pond surface). If possible, put the aeration stone on top of some stones in the pond and not directly onto the ground level of the pond to avoid soiling of the capillary pin holes of the stone.
Notes:
- The performance of the pump depends on the season and on the position and orientation of the solar module. If there is too little sunlight, the pump may not start. In this case please use a different method to aerate the pond.
- Keep the openings of the pump free from any obstructions. Do not operate the pump under water.
-
Clean the aeration stone in regular intervals.
-
The surface of the solar module is made of glass. Be careful when assembling the system. Do not break it. There is risk of injury. A broken module cannot be repaired it has to be disposed of environmentally compatible.
- During the winter time store all components of the solar pond aerator indoors at place that is protected from dust, dirt and extreme temperatures. Clean all parts thoroughly before storing.
Cleaning the Solar Module
- Soiling on the front-side of the glass surface will reduce the incidence of light onto the solar cells and this will decrease the output of electrical power.
- In case of heavy soiling, clean the glass with usual glass cleaners. To avoid scratching the glass surface, use plenty of water and a soft brush or a cloth.
Check the electrical cables at regular intervals for any form of damage or corrosion and for firm fit on the cable connections.
Technical Data
Pump:
Nominal Voltage: 6 V ---
Nominal Power: 0,7 W
Max. Air Volume: 100 l/h
Power Cord Length: 3 m
Air Hose Length: 2 m
Degree of Protection: IP44
Solar Module:
P_mpp : 0,7 W
U_mpp : 5V ---
I_mpp : 120 mA
U_oc : 6 V ---
I_sc : 140 mA
Dimensions: 17,5 x 13 x 2 cm
Weight: 241 g
CONSIGNES DE SÉCURITÉ

natural_image
Close-up of a black electronic device with a cable and mounting bracket (no visible text or symbols)natural_image
Close-up of a black electronic device with a cable and mounting bracket (no visible text or symbols)Nominale spanning: 6 V ---
Nominaal vermogen: 0,7 W
Max. Luchtvolume: 100 l/h
Kabellengte: 3 m
declare by our own responsibility that the product
Solar-Teichbelüfter
Solar Pond Aerator
Article No. 82 14 52
is according to the basic requirements, which are defined in the European Directives and their amendments.
2011/65/EU Restriction of the Use of certain hazardous Substances in electrical and electronic Equipment (RoHS)
The technical documentations are on file at the QA department of the Westfalia Werkzeug company.
natural_image
Symbol of a trash bin with crossed lines indicating no waste or discharge (no text or labels)Werter Kunde,
Please help avoid waste materials.
If you at some point intend to dispose of this article, then please keep in mind that many of its components consist of valuable materials, which can be recycled. Please do not discharge it in the rubbish bin, but check with your local council for recycling facilities in your area.