
2160FL - Kitchen appliance Flama - Free user manual and instructions
Find the device manual for free 2160FL Flama in PDF.

| Brand | Flama |
| Model | 2160FL |
| Product type | Multifunctional kitchen appliance |
| Main functions | Sauté, Grill, Slow cooking, Manual, Steam, Keep warm, Stew, Rice |
| Control panel | Digital with display screen and Menu, Temperature/Time, Start/Stop, ON/OFF buttons |
| Temperature range | 40 °C to 200 °C depending on function (increments of 5 °C) |
| Time range | 1 minute to 24 hours depending on function |
| Included accessories | Heating base, non-stick cooking tray, non-stick grill, steaming tray, glass lid with handle |
| Coating | Non-stick on cooking tray and grill |
| Power supply | 220-240 V ~ 50/60 Hz (estimate) |
| Safety | Hot surface (caution), automatic shut-off in Keep Warm mode, child protection (supervision for under 8 years) |
| Cleaning and maintenance | Tray, grill, steam tray and lid washable with hot water and mild detergent; base cleaned with damp cloth; do not use abrasive cleaners |
| Spare parts and repairability | Repair only by an authorized technical support service; do not disassemble yourself |
| Warranty | 36 months after purchase date upon presentation of proof of purchase |
| Certifications | Compliant with EC directives (electromagnetic compatibility and low voltage) |
| Manual available in | FR, EN, ES, PT and others upon request by email |
Frequently Asked Questions - 2160FL Flama
User questions about 2160FL Flama
0 question about this device. Answer the ones you know or ask your own.
Ask a new question about this device
Download the instructions for your Kitchen appliance in PDF format for free! Find your manual 2160FL - Flama and take your electronic device back in hand. On this page are published all the documents necessary for the use of your device. 2160FL by Flama.
USER MANUAL 2160FL Flama
natural_image
Black FLAMA cooking pot with digital display and control buttons (no visible text or symbols on the device itself)2160FL
PT MÁQUINA DE COZINHA 3
ES ROBOT DE COCINA 13
EN MULTICOOKER
FR APPAREIL DE CUISINE 33
IEC 60417 - 5041 (DB:2002 / 10)
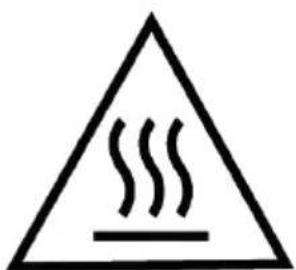
ATTENTION - HOT SURFACE - Accessible surface temperatures can be high during appliance operation.
Função GRILL (grelhar)
Coloque os ingredientes placa de grelhar.
natural_image
Symbol of a trash bin with crossed lines indicating no waste or discharge, and a solid black rectangle below (no text or labels)Carefully read these instructions before using the appliance for the first time and save them for future reference. Using the appliance in a manner that does not comply with these instructions relieves Flama of all responsibilities.
Do not touch the glass lid when hot. Use the handles or hot mitts to move the cooking dish, the grill plate and the steamer dish.
This appliance is not a toy. Children should be monitored to make sure they do not play with the appliance. This appliance should never be used by children.
This appliance may be used by children 8 years and older if they are supervised or have received instruction on how to safely use the appliance and understand the risks involved.
The cleaning and maintenance of the appliance should not be performed by children unless they are over 8 years old and are supervised.
Keep the appliance and its power cord out of the reach of children under 8 years old.
The appliance may be used by those with physical, sensory or mental disabilities or who lack experience or knowledge if they are supervised or have received instruction on how to safely use the appliance and understand the risks involved.
Children should not play with the appliance.
Do not use the appliance if the power cord or plug are damaged. Do not use the appliance if it has fallen, is damaged, has been left out in open air or exposed to water.
If any of these incidents should occur, take the appliance to an authorized technical assistance service for assessment or repair.
Regularly inspect the appliance to ensure there are no damages that may present a risk.
To protect against the risk of electric shock, do not submerge the power cord, plug or appliance in water or any other liquid. This
may cause injury and/or damage to the appliance.
Keep the power cord away from hot surfaces and do not cover the appliance's ventilation systems.
Do not leave the power cord hanging from the edge of a table or countertop.
Do not place the appliance near or on top of a gas stove, any type of electric stove, electric cooktops or hot oven.
Turn off the appliance by removing the plug from the electrical socket after each use and when cleaning. Let the appliance cool before cleaning or storing it.
All maintenance aside from cleaning should be performed by an authorized technical assistance service.
The use of accessories not recommended or sold by Flama may cause fires, electric shock, injuries or damage to the appliance. Only use the provided cooking trays and grill plate. Do not use any other cooking tray or grill plate on the heating base.
The appliance is not meant to be operated using an external timer or separate remote control system.
This appliance was designed exclusively for domestic use, not for professional or industrial use. Do not use the appliance in moving vehicles or boats. Improper use may cause injuries.
This appliance is not meant to be used in domestic and analogous situations such as:
- Cooking areas reserved for employees of stores, offices and other professional environments.
- Country homes.
- By clients of hotels, motels and other residence-type environments.
- In guesthouse environments.
To protect against fire, do not use the appliance in the presence of explosive and/or flammable vapors.
Be very careful moving the appliance when it contains food or other hot liquids. Do not move the appliance while it is cooking.
Place the appliance on a dry, stable, flat and heat- and water-resistant surface, away from water splashes and any other sources of heat.
This appliance must be positioned in a stable manner, away from any heat source and with the handles positioned to avoid spilling hot liquids.
Position the appliance far away from walls, curtains and other materials sensitive to heat and steam. The appliance should be placed at least 20 cm (8 in) away from any other object. When using the appliance, provide adequate space above and on all sides for air to circulate.
Always make sure the appliance is correctly assembled before use. Never turn on the appliance if either the cooking tray or grill plate is not on the heating base.
Do not place foods or liquids directly on the heating base. Only the cooking tray and the grill plate were designed to work with the heating base.
Never operate the appliance without foods and liquids in the cooking tray or grill plate.
Make sure that the foods or liquids being cooked fill the cooking tray at least halfway before turning on the appliance.
The glass lid is not unbreakable. If hit with strength, the glass may break or weaken and later break into small pieces with no apparent cause.
Make sure that the lid is correctly placed on the cooking tray or steam tray.
Do not place the cooking tray or grill plate on any surface that could be damaged by heat.
Do not use the cooking tray, the grill plate, the steam tray or the lid in a conventional oven.
Do not let water drip from the lid to the heating base.
Keep the appliance and all components clean. Follow the cleaning and maintenance instructions.
Do not leave plastic or heat-sensitive utensils inside the cooking
tray or grill plate during operation.
Always plug the appliance into a grounded outlet.
Keep the appliance and its power cord out of the reach of children.
If the power cord is damaged, it must be replaced by the manufacturer or a qualified technical assistance service to avoid danger.
This product complies with the Low-Voltage and Electromagnetic Compatibility Directives.
This instruction manual is also available in PDF format at www.flama.pt.
ADDITIONAL SAFETY INSTRUCTIONS
Do not cover the appliance and let it cool completely before storing it.
To avoid burns, remove the lid slowly and allow the steam to escape gradually by inclining the lid away from you. Do not get close to the appliance while in operation
Do not heat or preheat the appliance while empty.
Only use the appliance with the provided parts.
The cooking tray or grill plate will not withstand abrupt changes in temperature. Always make sure that the cooking tray or grill plate are at room temperature before adding hot or cold items.
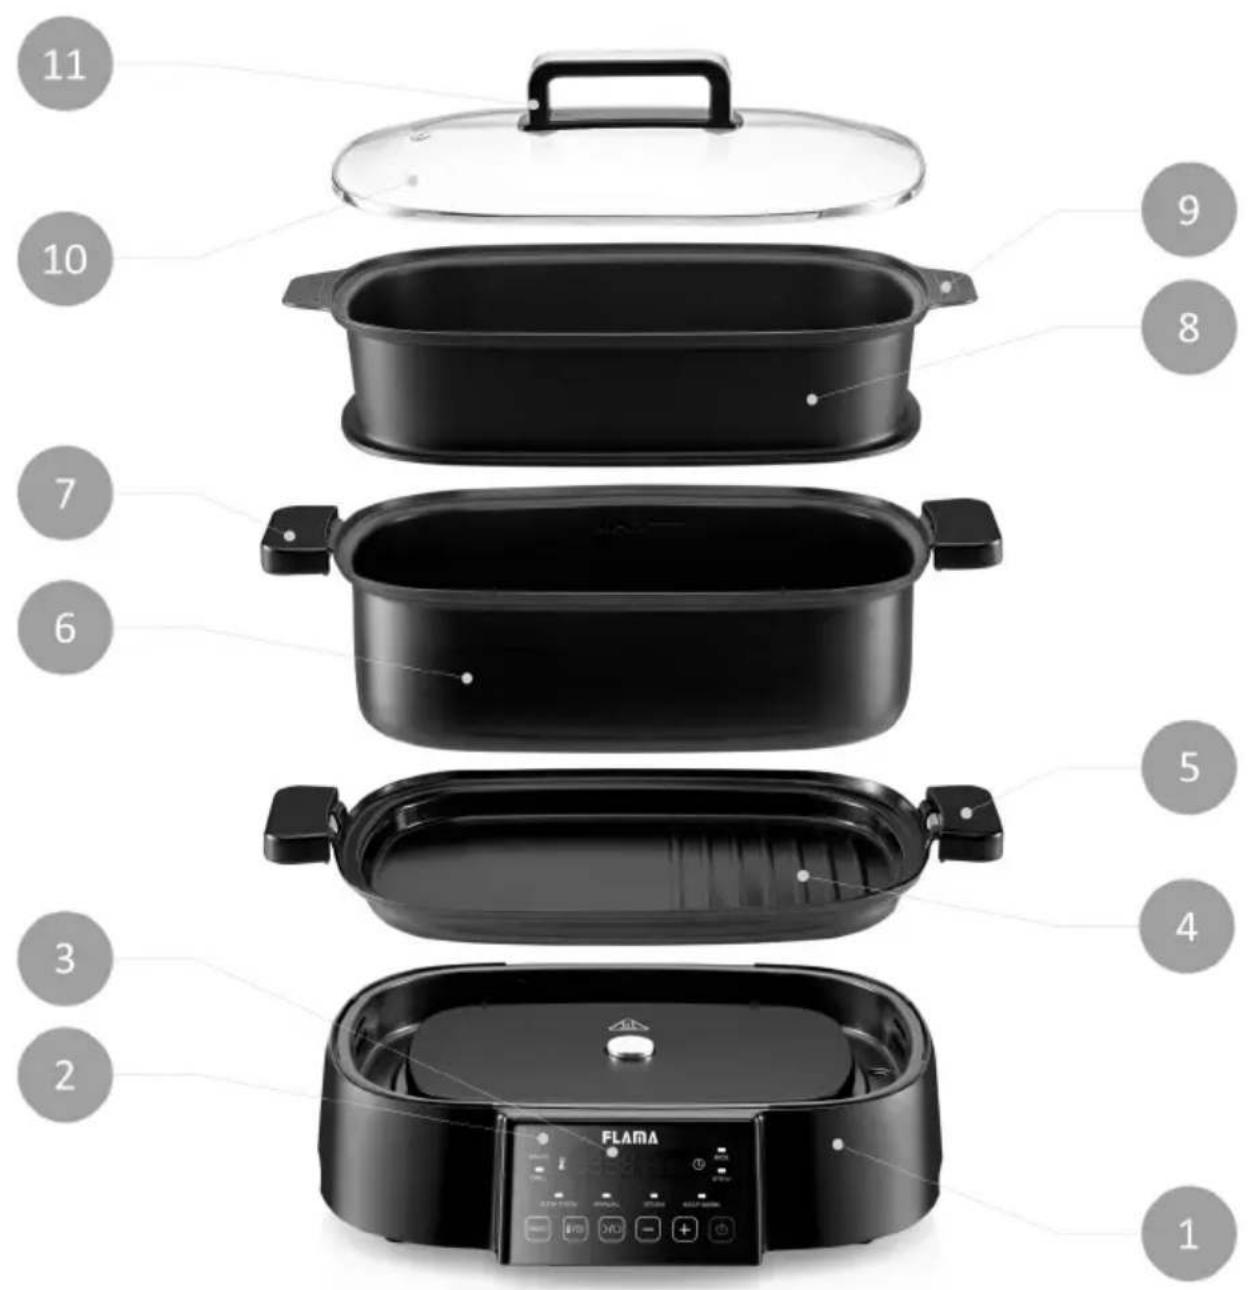
DESCRIPTION
- Heating base
- Digital control panel
- Display
- Grill plate
- Grill plate handles
CONTROL PANEL
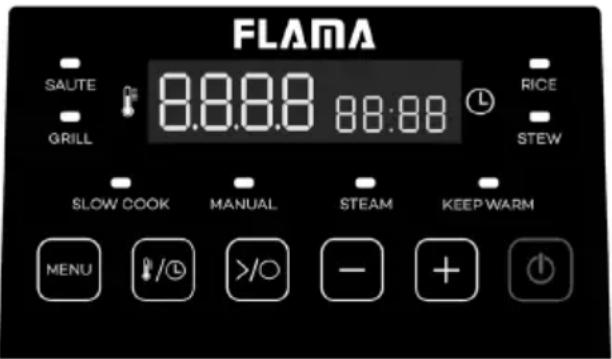
| MENU | Menu Button - use this button to select a function. Press until the desired function is selected. |
| Temperature/Time Button - use this button to select the temperature and/or cook time. | |
| Start/Stop Button - use this button to start or stop the cooking process. | |
| Use this button to reduce the temperature or cook time. | |
| Use this button to increase the temperature or cook time. | |
| ON/OFF Button - use this button to turn the appliance on or off. The control panel lights up or turns off when the ON/OFF button is pressed. |
- Cooking tray
- Cooking tray handles
- Steam tray
- Steam tray handles
- Glass lid
- Glass lid handle
Change the temperature scale
Press the ON/OFF button: the display will show “----”. Press the button for 5 seconds to switch between Celsius (°C) and Fahrenheit (°F).
BEFORE FIRST USE
Read all the safety instructions and additional instructions.
Remove all packaging materials and check that all parts are in good condition.
Tear up all plastic bags and discard them appropriately, as they can present an asphyxiation or choking risk for children.
Wash the cooking tray, the lid, the steam tray and the grill plate in warm, soapy water. Rinse and dry well.
Place the appliance on a dry, stable, flat and heat- and water-resistant surface, away from water splashes and any other sources of heat. Keep the appliance at least 20 cm (8 in) away from any other object.
When using the appliance for the first time, it may give off a faint smoke and/or odor. This is normal with many heating appliances and does not affect the safety of the appliance.
OPERATING INSTRUCTIONS
WARNING – Only the cooking tray and the grill plate may be placed on the heating base; it may damage the other parts.
Before using the cooking tray or grill plate, always make sure that their exterior is clean and dry. This will ensure adequate contact with the heating base.
When using the Grill function, place the grill plate on the base.
When using other functions, place the cooking tray on the base.
When using the Steam function, place the cooking tray with water at the bottom and then place the steam tray on top of the cooking tray.
The glass lid may be used with the cooking tray and the steam tray. Do not use the glass lid with the grill plate.
FUNCTIONS
SAUTÉ Function
Place the ingredients in the cooking tray.
Place the cooking tray on the heating base.
Press the ON/OFF button to turn on the appliance.
Press the MENU button until the SAUTÉ function is selected.
The default temperature is 175^ C ( 347^ F) and the default time is 1 hour.
Press the “Temperature/Time” button and the temperature will flash, press “-” and “+” to adjust the temperature (between 120°C and 200°C) (248°F and 392°F).
Press the “Temperature/Time” button again and the time will flash, press “-” and “+” to adjust the time between 5 min and 1 hour. Press the START/STOP button to start
heating; the timer dots will flash.
Once the programmed time is up, the appliance will enter KEEP WARM mode.
Note - This function works best when the lid is used.
GRILL Function
Place the ingredients on the grill plate.
Place the grill plate on the heating base.
Press the ON/OFF button to turn on the appliance.
Press the MENU button until the GRILL function is selected.
The default temperature is 200^ C ( 392^ F) and the default time is 1 hour.
Press the “Temperature/Time” button and the temperature will flash, press “-” and “+” to adjust the temperature (between 160°C and 200°C) (248°F and 392°F).
Press the “Temperature/Time” button again and the time will flash, then press “-” and “+” to adjust the time between 10 min and 1 hour.
Press the START/STOP button to start heating; the timer dots will flash.
Once the programmed time is up, the appliance will enter KEEP WARM mode.
Warning - Do not place the glass lid on the grill plate while cooking and while the plate is warm.
SLOW COOK Function
Place the ingredients in the cooking tray.
Place the cooking tray on the heating base.
Press the ON/OFF button to turn on the appliance.
Press the MENU button until the SLOW COOK function is selected.
The temperature is fixed and cannot be adjusted.
The default time is 4 hours and can be adjusted using the "Temperature/Time" button and the "+" and "-" buttons. The time interval is 30 min to 24 hours.
Press the START/STOP button to start heating; the timer dots will flash.
Once the programmed time is up, the appliance will enter KEEP WARM mode.
Note - This function works best when the lid is used.
MANUAL Function
Place the ingredients in the cooking tray.
Place the cooking tray on the heating base.
Press the ON/OFF button to turn on the appliance.
Press the MENU button until the MANUAL function is selected.
The default temperature is 100^ C ( 212^ F) and the default time is 4 hours.
Press the “Temperature/Time” button and the temperature will flash, press “-” and “+” to adjust the temperature (between 40°C and 200°C) (248°F and 392°F).
Press the “Temperature/Time” button again and the time will flash, then press “-” and “+” to adjust the time between 5 min and 12 hours.
Press the START/STOP button to start heating; the timer dots will flash.
Once the programmed time is up, the appliance will enter KEEP WARM mode.
Note - This function works best when the lid is used.
STEAM Function
Place water in the cooking tray and the ingredients in the steam tray.
Place the cooking tray on the heating base and fit the steam tray into the cooking tray.
Press the ON/OFF button to turn on the appliance.
Press the MENU button until the STEAM function is selected.
The temperature is fixed and cannot be adjusted.
The default cook time is 15 minutes and can be adjusted using the "Temperature/Time" button and the "+" and "-" buttons. The time interval is 1 min to 2 hours.
Press the START/STOP button to start heating; the timer dots will flash.
Once the programmed time is up, the appliance will enter KEEP WARM mode.
Note - This function works best when the lid is used.
KEEP WARM Function
Place the ingredients in the cooking tray.
Place the cooking tray on the heating base.
Press the ON/OFF button to turn on the appliance.
Press the MENU button until the KEEP WARM function is selected.
The temperature is fixed and cannot be adjusted.
The default cook time is 4 hours and can be adjusted using the "Temperature/Time" button and the "+" and "-" buttons. The time interval is 1 to 10 hours.
Press the START/STOP button to start heating; the timer dots will flash.
Note - This function works best when the lid is used.
STEW Function
Place the ingredients in the cooking tray.
Place the cooking tray on the heating base.
Press the ON/OFF button to turn on the appliance.
Press the MENU button until the STEW function is selected.
The default temperature is 90^ C ( 194^ F) and the default time is 2 hours.
Press the “Temperature/Time” button, the temperature will flash. Press “-” and “+” to adjust the temperature (between 79°C and 99°C) (174°F and 210°F).
Press “Temperature/Time” again and the time will flash, then press “-” and “+” to adjust the time between 15 min and 4 hours.
Press the START/STOP button to start heating; the timer dots will flash.
Once the programmed time is up, the appliance will enter KEEP WARM mode.
Note - This function works best when the lid is used.
RICE Function
Place the rice and water in the cooking tray.
Place the cooking tray on the heating base.
Press the ON/OFF button to turn on the appliance.
Press the MENU button until the RICE function is selected.
No temperature is shown with this function and the cooking time is calculated automatically. The time will appear on the display and will countdown for the last 10 minutes of the cooking process.
Press the START/STOP button to start heating; the timer dots will flash.
Once the programmed time is up, the appliance will enter KEEP WARM mode.
Note - This function works best when the lid is used.
CLEANING AND MAINTENANCE
Clean the device and parts after each use.
Before cleaning, unplug the appliance and let it cool down completely.
Wash the cooking tray, grill plate, steam tray and lid in hot water and a mild detergent.
Clean and dry with a soft, dry cloth.
Do not use abrasive cleaning products as they may damage the non-stick surface.
Clean the base only with a damp cloth and dry with a soft, dry cloth – do not immerse in liquids.
Never immerse the base in water.
NOTE: Do not use abrasive cleaners, scourers, or products that are not considered safe to use on non-stick coatings.
Any other service/repair must be performed by an authorized service representative.
DEFAULT TEMPERATURE AND TIME TABLE
| Function | Default temperature | Temperature range | Default time | Time range | Increment (time/temperature) |
| SAUTÉ | 175°C(347°F) | 120-200°C248°F-392°F) | 1 hour 5 | 60 min | 5min/5°C(41°F) |
| GRILL | 200°C(347°F) | 160-200°C320°F-400°F) | 1 hour 10 | 60 min | 5min/5°C(41°F) |
| SLOW COOK | // 4 hours | 30 min – 24 hours | 30 min | ||
| MANUAL | 100°C(212°F) | 40-200°104°F-392°F) | 4 hours | 5 min – 12 hours(40-60°C)(104°F-140°F)5 min – 4 hours(70-100°C)(158°F-212°F)5 min – 1 hour(100°C +)(212°F +) | 5 min(1 min – 1 hour)30 min(1 – 4 hours)1°(40-50°C)(104°F-122°F)5°(50-200°C)(122°F-392°F) |
| STEAM / | / 15 min 1 – 120 min 1 min | ||||
| KEEP WARM | // 4 hours | 1 – 10 hours | 30 min | ||
| STEW 90°C | (194°F) | 79-99°C174°F-210°F) | 2 hours 15 min – 4 hours | 5min/1°C(34°F) | |
| RICE // | / | / | / | ||
ANOMALIES AND REPAIR
In case of malfunction, please take the appliance to an authorized Technical Assistance Service. Do not attempt to disassemble or repair the appliance, as this may be dangerous.
PROTECTING THE ENVIRONMENT
This symbol indicates the separate collection of electrical and electronic equipment.

natural_image
Symbol of a trash bin with crossed lines indicating no waste or discharge, and a solid black rectangle below (no text or labels)The main objective of the separate collection of this waste is to reduce the quantity to be disposed of, promote reuse, recycling and other forms of recovery in order to reduce its negative effects on the
environment.
When it is no longer in use, this appliance must not be disposed of together with other unsorted municipal waste.
The user is responsible for delivering it free of charge to the selective collection facilities available for that purpose.
Pieces of equipment that are no longer in use can also be taken back at points of sale, by purchasing new pieces of equipment that are equivalent and have the same functions.
For more detailed information on collection points, please contact your City Council or a point of sale for this equipment.
APPAREIL DE CUISINE
DYSFONCTIONNEMENTS ET RÉPARATIONS
natural_image
Symbol of a trash bin with crossed lines indicating no waste or discharge (no text or labels)This page has been deliberately left blank
This page has been deliberately left blank
This page has been deliberately left blank
- Keep the proof of purchase (receipt) for this product carefully. When a repair is made under these conditions, the technician will require proof of purchase. This assistance can only be provided once you have proven, with the proof of purchase, that your appliance is within the warranty period.
- The warranty period for this appliance is defined by the respective EU Directive in force on the date of purchase/delivery.
- Within the guarantee period, we will repair or replace, free of charge, any parts which, during the normal use of the appliance, have deteriorated as a result of a proven material or manufacturing defect.
- This warranty does not cover consumable items, light bulbs, easily breakable parts made of glass or plastic, or any other defects that do not impair its proper functioning.
- We accept no liability for damage caused by incorrect or careless use of the appliance, by its connection to an electrical current other than that indicated on the appliance's rating plate, by faulty electrical installation, or by atmospheric, chemical or electrochemical causes. Other claims or demands for compensation relating to objects which are not an integral part of the appliance will be denied.
- The provision of assistance under warranty does not extend the warranty period. Only within this period will assistance be provided under warranty. The right to assistance is only granted to the first purchaser of the device and cannot be transferred to a third party.
- The warranty expires when unauthorized persons have attempted to repair, modify or replace parts of the appliance.
- All expenses and risks of transportation to our factory or vice versa will always be borne by the buyer.
WARRANTY CONDITIONS
To benefit from the Technical Assistance service during the 36-month warranty period after the date of purchase, you will need to:
Present the Invoice/Proof of Purchase, stating the model and the manufacturing number of the product (whenever possible).
Note: Failure to present the aforementioned documents will be grounds for not providing services under warranty.
CONDITIONS DE GARANTIE
CONDITIONS DE GARANTIE

- Função GRILL (grelhar)
- This product complies with the Low-Voltage and Electromagnetic Compatibility Directives.
- ADDITIONAL SAFETY INSTRUCTIONS
- DESCRIPTION
- Change the temperature scale
- BEFORE FIRST USE
- OPERATING INSTRUCTIONS
- FUNCTIONS
- SAUTÉ Function
- GRILL Function
- SLOW COOK Function
- MANUAL Function
- STEAM Function
- KEEP WARM Function
- STEW Function
- RICE Function
- CLEANING AND MAINTENANCE
- ANOMALIES AND REPAIR
- PROTECTING THE ENVIRONMENT
- APPAREIL DE CUISINE
- DYSFONCTIONNEMENTS ET RÉPARATIONS
- WARRANTY CONDITIONS
- CONDITIONS DE GARANTIE
Brand : Flama
Model : 2160FL
Category : Kitchen appliance