BX 3SCT - Stapler HILTI - Free user manual and instructions
Find the device manual for free BX 3SCT HILTI in PDF.
| Product type | Battery-powered stapler (concrete nailer) |
| Brand | Hilti |
| Model | BX 3SCT |
| Weight (battery included) | 4.0 kg |
| Power supply | Hilti Li-Ion battery B22 series, 21.6 V |
| Barrel | X-FG B3-SCT 02 |
| Compatible fasteners | X-M6-8-52 DP7 SCT B3, X-M6-8-62 DP7 SCT B3, X-M6-8-87 DP7 SCT B3 (lengths 52 mm, 62 mm, 87 mm) |
| Fastener diameter | 3.5 mm |
| Driving stroke | 12 mm |
| Contact pressure | 50 N to 70 N |
| Maximum recommended firing rate | 650 shots/hour |
| Operating temperature | -15 °C to 50 °C |
| Fastener use temperature | 10 °C to 50 °C |
| Status display | Green, red, yellow LED (depending on status) |
| Battery charge indicator | 4 green LEDs (10-100 %) |
| Safety function | Fall protection with Hilti tool lanyard #2261971 |
| On/Off | On/Off button |
| Cleaning | Dry brush for ventilation slots; slightly damp cloth for housing |
| Maintenance | Remove battery before cleaning; regularly check condition of parts |
| Spare parts and repairability | Original Hilti accessories and parts; repair by Hilti service center |
| Warranty | Contact your local Hilti partner |
| General information | Product intended for professionals; read the instruction manual before use |
Frequently Asked Questions - BX 3SCT HILTI
User questions about BX 3SCT HILTI
0 question about this device. Answer the ones you know or ask your own.
Ask a new question about this device
Download the instructions for your Stapler in PDF format for free! Find your manual BX 3SCT - HILTI and take your electronic device back in hand. On this page are published all the documents necessary for the use of your device. BX 3SCT by HILTI.
USER MANUAL BX 3SCT HILTI
2

natural_image
Exterior view of a handheld electric shock absorber with attached spring and cable (no text or symbols visible)3
natural_image
Illustration of a handheld electric drill bit with a hand holding a tool, no text or symbols present
natural_image
Illustration of a hand holding a plastic object with a cross mark, no text or symbols present4

natural_image
Close-up of hands using a handheld tool to lift a wrist, with a checkmark indicating the digit (no text or symbols present)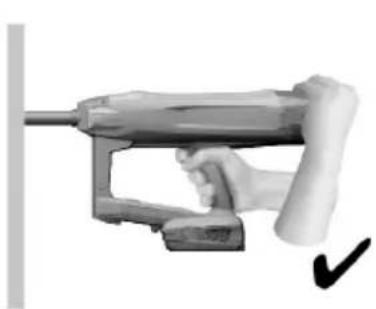
natural_image
Hand holding a fuel pump gun with a checkmark indicating inspection (no text or symbols visible)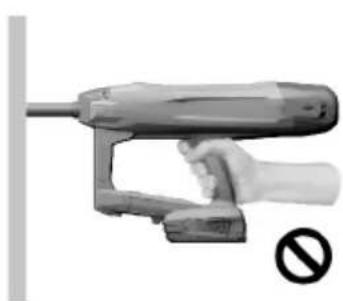
natural_image
Hand holding a handheld electrical tool with a prohibition symbol (no text or labels on the tool itself)BX 3-SCT
en Original operating instructions .... 1
Original operating instructions
1 Information about the documentation
1.1 About this documentation
- Read this documentation before initial operation or use. This is a prerequisite for safe, trouble-free handling and use of the product.
- Observe the safety instructions and warnings in this documentation and on the product.
- Always keep the operating instructions with the product and make sure that the operating instructions are with the product when it is given to other persons.
1.2 Explanation of symbols used
1.2.1 Warnings
Warnings alert persons to hazards that occur when handling or using the product. The following signal words are used:

DANGER
DANGER!
- Draws attention to imminent danger that will lead to serious personal injury or fatality.

WARNING
WARNING!
- Draws attention to a potential threat of danger that can lead to serious injury or fatality.

CAUTION
CAUTION!
- Draws attention to a potentially dangerous situation that could lead to personal injury or damage to the equipment or other property.
1.2.2 Symbols in the documentation
The following symbols are used in this document:

Read the operating instructions before use.

Instructions for use and other useful information

Dealing with recyclable materials

Do not dispose of electric equipment and batteries as household waste
1.2.3 Symbols in the illustrations
The following symbols are used in illustrations:

These numbers refer to the corresponding illustrations found at the beginning of these operating instructions

The numbering reflects the sequence of operations shown in the illustrations and may deviate from the steps described in the text

Item reference numbers are used in the overview illustrations and refer to the numbers used in the product overview section

This symbol is intended to draw special attention to certain points when handling the product.
1.3 Product-dependent symbols
1.3.1 Symbols on the product
The following symbols can be used on the product:
 | General symbol for "must do" |
 | Wear eye protection |
 | Wear hearing protection |
 | Wear a hard hat |
 | Direct current (DC) |
 | The power tool supports near-field communication (NFC) technology, which is compatible with iOS and Android platforms. |
 | Hilti Li-ion battery type series used. Observe the information given in the section headed In-tended use. |
 | Never use the battery as a striking tool. |
 | Do not drop the battery. Never use a battery that has suffered an impact or is damaged in any other way. |
 | If applied on the product, the product has been certified by this certification body for the US and Canadian markets according to the applicable standards. |
1.4 Product information
HILTI products are designed for professional users and only trained, authorized personnel are permitted to operate, service and maintain the products. This personnel must be specifically informed about the possible hazards. The product and its ancillary equipment can present hazards if used incorrectly by untrained personnel or if used not in accordance with the intended use.
The type designation and serial number are printed on the rating plate.
Write down the serial number in the table below. You will be required to state the product details when contacting Hilti Service or your local Hilti organization to inquire about the product.
Product information
| Type: BX 3-SCT | |
| Generation: 02 | |
| Serial number: |
2 Safety
2.1 General power tool safety warnings
WARNING
Read all safety warnings and all instructions. Failure to follow the warnings and instructions may result in electric shock, fire and/or serious injury.
Save all warnings and instructions for future reference.
Work area safety
- Keep work area clean and well lit. Cluttered or dark areas invite accidents.
- Do not operate power tools in explosive atmospheres, such as in the presence of flammable liquids, gases or dust. Power tools create sparks which may ignite the dust or fumes.
- Keep children and bystanders away while operating a power tool. Distractions can cause you to lose control.
Electrical safety
- Avoid body contact with earthed or grounded surfaces, such as pipes, radiators, ranges and refrigerators. There is an increased risk of electric shock if your body is earthed or grounded.
- Do not expose power tools to rain or wet conditions. Water entering a power tool will increase the risk of electric shock.
Personal safety
Stay alert, watch what you are doing and use common sense when operating a power tool. Do not use a power tool while you are tired or under the influence of drugs, alcohol or medication. A moment of inattention while operating power tools may result in serious personal injury.
▶ Use personal protective equipment. Always wear eye protection. Protective equipment such as dust mask, non-skid safety shoes, hard hat, or hearing protection used for appropriate conditions will reduce personal injuries.
▶ Prevent unintentional starting. Ensure the switch is in the off-position before connecting to battery pack, picking up or carrying the tool. Carrying power tools with your finger on the switch or energising power tools that have the switch on invites accidents.
Remove any adjusting key or wrench before turning the power tool on. A wrench or a key left attached to a rotating part of the power tool may result in personal injury.
Do not overreach. Keep proper footing and balance at all times. This enables better control of the power tool in unexpected situations.
- Dress properly. Do not wear loose clothing or jewellery. Keep your hair, clothing and gloves away from moving parts. Loose clothes, jewellery or long hair can be caught in moving parts.
If devices are provided for the connection of dust extraction and collection facilities, ensure these are connected and properly used. Use of dust collection can reduce dust-related hazards.
Power tool use and care
Do not force the power tool. Use the correct power tool for your application. The correct power tool will do the job better and safer at the rate for which it was designed.
Do not use the power tool if the switch does not turn it on and off. Any power tool that cannot be controlled with the switch is dangerous and must be repaired.
- Disconnect the battery pack from the power tool before making any adjustments, changing accessories, or storing power tools. Such preventive safety measures reduce the risk of starting the power tool accidentally.
- Store idle power tools out of the reach of children and do not allow persons unfamiliar with the power tool or these instructions to operate the power tool. Power tools are dangerous in the hands of untrained users.
- Maintain power tools. Check for misalignment or binding of moving parts, breakage of parts and any other condition that may affect the power tool's operation. If damaged, have the power tool repaired before use. Many accidents are caused by poorly maintained power tools.
- Keep cutting tools sharp and clean. Properly maintained cutting tools with sharp cutting edges are less likely to bind and are easier to control.
▶ Use the power tool, accessories and tool bits etc. in accordance with these instructions, taking into account the working conditions and the work to be performed. Use of the power tool for operations different from those intended could result in a hazardous situation.
Battery tool use and care
▶ Recharge only with the charger specified by the manufacturer. A charger that is suitable for one type of battery pack may create a risk of fire when used with another battery pack.
▶ Use power tools only with specifically designated battery packs. Use of any other battery packs may create a risk of injury and fire.
When battery pack is not in use, keep it away from other metal objects, like paper clips, coins, keys, nails, screws or other small metal objects, that can make a connection from one terminal to another. Shorting the battery terminals together may cause burns or a fire.
▶ Under abusive conditions, liquid may be ejected from the battery; avoid contact. If contact accidentally occurs, flush with water. If liquid contacts eyes, additionally seek medical help. Liquid ejected from the battery may cause irritation or burns.
Service
▶ Have your power tool serviced by a qualified repair person using only identical replacement parts. This will ensure that the safety of the power tool is maintained.
2.2 Tacker safety warnings
▶ Always assume that the tool contains fasteners. Careless handling of the tacker can result in unexpected firing of fasteners and personal injury.
Do not point the tool towards yourself or anyone nearby. Unexpected triggering will discharge the fastener causing an injury.
HILTI
- Do not actuate the tool unless the tool is placed firmly against the workpiece. If the tool is not in contact with the workpiece, the fastener may be deflected away from your target.
- Disconnect the tool from the power source when the fastener jams in the tool. While removing a jammed fastener, the tacker may be accidentally activated if it is plugged in.
▶ Use caution while removing a jammed fastener. The mechanism may be under compression and the fastener may be forcefully discharged while attempting to free a jammed condition.
- When fastening electrical cables, make sure the cables are not energized. Hold the tacker only by insulated gripping surfaces. Use only fasteners designed for electrical cable installations. Inspect that the fastener has not damaged the insulation of the electrical cables. A fastener that damages the insulation of electric cables can lead to electric shock and fire hazards.
2.3 Safety instructions
Basic information concerning safety
⚠ WARNING! Read all safety precautions and other instructions. Failure to observe the safety precautions and other instructions may result in electric shock, fire and/or serious injury.
Keep all safety precautions and instructions for future reference.
Requirements to be met by users
▶ Only authorized, appropriately trained persons may operate or service this tool.
Personal protective equipment
▶ You and all other persons in the vicinity must wear suitable eye protection (ANSI Z87.1 (CAN/CSA Z94.3)) and a hard hat when the tool is in use.
▶ Wear hearing protection (ANSI S12.6 (S3.19)).
▶ Exposure to noise can cause hearing loss.
Personal safety
▶ Observe the information printed in the operating instructions concerning operation, care and maintenance.
- Stay alert, watch what you are doing and use common sense when operating a direct fastening tool. Do not use the tool when you are tired or under the influence of drugs, alcohol or medication. Take a break if you experience pain or feel unwell. A moment of inattention while operating tools may result in serious personal injury.
- Avoid awkward postures. Make sure you work from a safe stance and stay in balance at all times.
▶ Take breaks between working and do relaxation and finger exercises to improve the blood circulation in your fingers.
▶ Wear non-skid shoes.
- Keep the arms slightly bent while operating the tool (do not straighten the arms).
- Keep other people away from the working area, especially children.
Risk of injury by falling tools and/or accessories. Before starting work, check that installed accessories are secure.
Use and care of direct fastening tools
WARNING! Danger of fastener penetrating right through! Before driving fasteners, check to make sure that no one is present behind or below the object into which the fastener is to be driven.
▶ Use the right tool for the work you are carrying out. Do not use the tool for purposes for which it was not intended. Use it only as directed and when in faultless condition.
▶ Never leave a loaded tool unattended.
▶ Transport and store the tool in a secured toolbox.
▶ Always switch the tool off before cleaning, maintenance, changing the fastener guide, before work breaks and before storing the tool.
- When not in use, the tool should be unloaded and stored in a locked, dry place where it is inaccessible to children.
▶ Check the tool and the accessories for any damage. Check that moving parts function faultlessly, without sticking, and that no parts are damaged.
All parts must be fitted correctly and fulfill all conditions necessary for correct operation of the tool. Damaged parts must be properly repaired or replaced by Hilti Service unless otherwise stated in the operating instructions.
Before beginning work, check the working area (e.g. using a metal detector) to ensure that no concealed electric cables or gas and water pipes are present. External metal parts of the power tool may become live, for example, when an electric cable is damaged accidentally.
- Do not attempt to drive fasteners into unsuitable materials.
- Unsuitable materials are glass, marble, plastic, bronze, brass, copper, insulating material, hollow brick, ceramic brick, thin sheet metal (< 4 mm) and cellular concrete. Driving a fastener into these materials may cause the fastener to break, splinter the material or to be driven right through.
▶ Pull the trigger only when the tool is fully pressed against the working surface at right angles. - When driving fasteners, always hold the fastening tool at right angles to the working surface in order to prevent the fastener being deflected by the surface.
- Keep the grips dry, clean and free from oil and grease.
▶ Never drop the tool.
Do not use the tool in places where there is a risk of fire or explosion unless the tool is specially approved for this type of use.
Workplace
- Keep the workplace tidy. Clear the work zone of objects that could cause injury.
▶ Untidiness in the working area can lead to accidents.
▶ Make sure that the working area is well lit and well ventilated.
Mechanical safety rules
- Do not tamper with or modify the tool or parts of it, especially the piston.
▶ Use only fasteners of a type approved for use with the tool.
Thermal safety rules
- Do not exceed the recommended maximum fastener driving rate (see the section headed "Technical data").
▶ If the tool has overheated, allow it to cool down.
- Do not dismantle the tool while it is hot. Allow the tool to cool down.
2.4 Careful handling and use of batteries
Observe the special guidelines applicable to the transport, storage and use of lithium-ion batteries.
- Do not expose batteries to high temperatures, direct sunlight or fire.
- Do not disassemble, crush or incinerate batteries and do not subject them to temperatures over 80 °C (176 °F).
- Do not use or charge batteries that have suffered mechanical impact, have been dropped from a height or show signs of damage. In this case, always contact your Hilti Service.
If the battery is too hot to touch it may be defective. Put the battery in a place where it is clearly visible and where there is no risk of fire, at an adequate distance from flammable materials. Allow the battery to cool down. If it is still too hot to touch after an hour, the battery is faulty. Contact Hilti Service.
3 Description
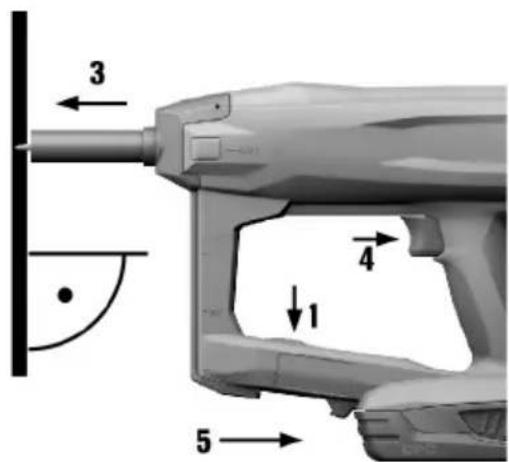
3.1 Product overview
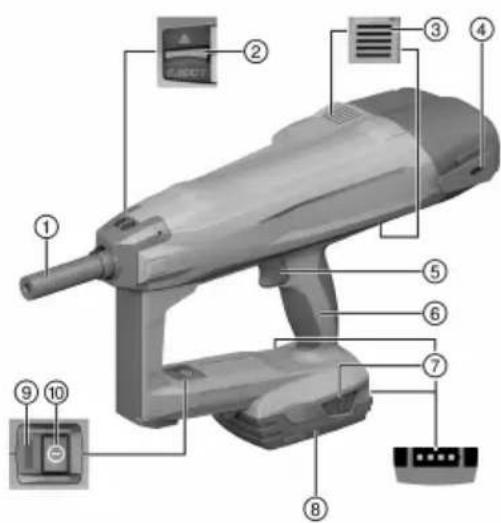
① Fastener guide
② Fastener guide locking catch
③ Air vents
④ Belt hook
⑤ Trigger
⑥ Grip
⑦ Release buttons (also used to activate the charge status indicator)
⑧ Li-ion battery
⑨ Status indicator
⑩ On/off button
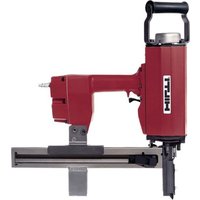
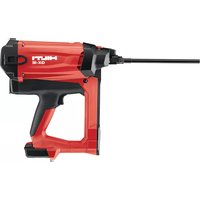
3.2 Intended use
The product is a hand-held, cordless fastening tool. It is designed for driving fasteners into concrete. Use only approved fasteners in combination with the corresponding fastener guide.

CAUTION
Incorrect estimate of concrete strength Use of the wrong fastener guide or the wrong fastener can lead to poor-quality driving of the fastener and subsequently to misjudgment of concrete strength.
▶ Always use the correct fastener guide!
▶ Always use the right fastener!
The fastening tool, battery and fasteners together form a technical entity. Use the Hilti fasteners specially manufactured for the tool and the batteries and chargers recommended by Hilti. The fastening and application recommendations made by Hilti apply only when these conditions are observed.
▶ The fastening tool is for hand-held use only.
- Misuse must be ruled out. Misuse includes triggering without a fastener inserted in the fastener guide.
- Use only Hilti lithium-ion batteries of the B 22 series with this product.
- Use only Hilti-approved battery chargers to charge these batteries. More information is available from your Hilti Store or from www.hilti.group
3.3 Status indicator
The status indicator provides information about the status of the fastening tool.
| Status Meaning | |
| Off The fastening tool is switched off | |
| The LED shows green. The fastening tool is switched on and ready for use | |
| The LED flashes green every 3 seconds. The fastening tool is in stand-by mode. Press the nose of the tool against the working surface to switch it on | |
| The LED flashes steadily green. The fastening tool is too hot or the battery has insufficient power; see “Troubleshooting” | |
| The LED flashes red. | Malfunction; see “Troubleshooting” |
| The LED shows red. | Malfunction; see “Troubleshooting” |
| The LED flashes yellow. | Bring the fastening tool toHilti Service. |
3.4 Indication of battery charge status
When one of the battery release buttons is pressed, the display indicates the battery's state of charge.

Reliable indication of the charge status is not possible while a fastener is being driven or immediately after a fastener is driven.
| Status Meaning | |
| All four LEDs show green. | Charge status is 75 % to 100 %. |
| Three LEDs show green. | Charge status is 50 % to 75 %. |
| Two LEDs show green. | Charge status is 25 % to 50 %. |
| One LED shows green. | Charge status is 10 % to 25 %. |
| One LED flashes green. | Charge status is below 10 %. |
3.5 Items supplied
BX 3-SCT fastening tool, operating instructions.
Other system products approved for use with this product can be found at your local Hilti Store or at: www.hilti.group
4.1 Fastening tool
| Weight including battery B22/2.6 | 4.0 kg(8.8 lb) |
| Fastener guide | X-FG B3-SCT 02 |
| Fasteners | • X-M6-8-52 DP7 SCT B3• X-M6-8-62 DP7 SCT B3• X-M6-8-87 DP7 SCT B3 |
| Length, fastener | 52 mm / 62 mm / 87 mm(2.0 in / 2.4 in / 3.4 in) |
| Fastener diameter | 3.5 mm(0.14 in) |
| Compression stroke | 12 mm(0.5 in) |
| Contact pressure | 50 N ... 70 N(11 lb ... 16 lb) |
| Application temperature (ambient temperature) | -15 °C ... 50 °C(5 °F ... 122 °F) |
| Application temperature, fastener | -10 °C ... 50 °C(14 °F ... 122 °F) |
| Recommended maximum driving rate | 650/h |
| Rated voltage | 21.6 V |
5 Preparing the tool for use
5.1 Inserting the battery

WARNING
Risk of injury by short circuit or falling battery!
Before inserting the battery, make sure that the contacts on the battery and the contacts on the product are free of foreign matter.
▶ Make sure that the battery always engages correctly.
- Charge the battery fully before using it for the first time.
- Push the battery into the product until it engages with an audible click.
- Check that the battery is seated securely.
5.2 Removing the battery
- Press the battery release buttons.
- Remove the battery from the tool.
5.3 Charging the battery
- Before charging the battery, read the operating instructions for the charger.
- Make sure that the contacts on the battery and the contacts on the charger are clean and dry.
- Use an approved charger to charge the battery.
5.4 Removing the fastener guide
- Switch off the fastening tool.
- Remove the battery.
- Remove the fastener from the fastener guide.
- Slide the fastener guide locking catch as far as it will go in the direction of the arrow.
▶ The fastener guide will be released.
- Remove the fastener guide.
5.5 Inserting the fastener guide
-
Switch off the fastening tool.
-
Remove the battery.
-
Slide the fastener guide locking catch as far as it will go in the direction of the arrow and hold it in this position.
-
Slide the fastener guide into the nosepiece until it engages with an audible click.
-
Release the fastener guide locking catch.
▶ The fastener guide jumps to the middle position.
- Grip and pull the fastener guide to check that it is securely seated.
5.6 Fall arrest 2

WARNING
Risk of injury by falling tool and/or accessory!
▶ Use only the Hilti tool tether recommended for your product.
Prior to each use, always check the attachment point of the tool tether for possible damage.
- Do not secure a tool tether to the belt hook. Do not use a belt hook to lift the product.

Comply with the national regulations for working at heights.
As drop arrester for this product, use only the Hilti tool tether #2261971.
▶ Use the loop to secure the tool tether to the product as shown in the illustration. Check that it holds securely.
- Secure the carabiner to a load-bearing structure. Check that the carabiner holds securely.

Comply with the operating instructions of the Hilti tool tether.
6 Operation
6.1 Switching on the fastening tool

WARNING
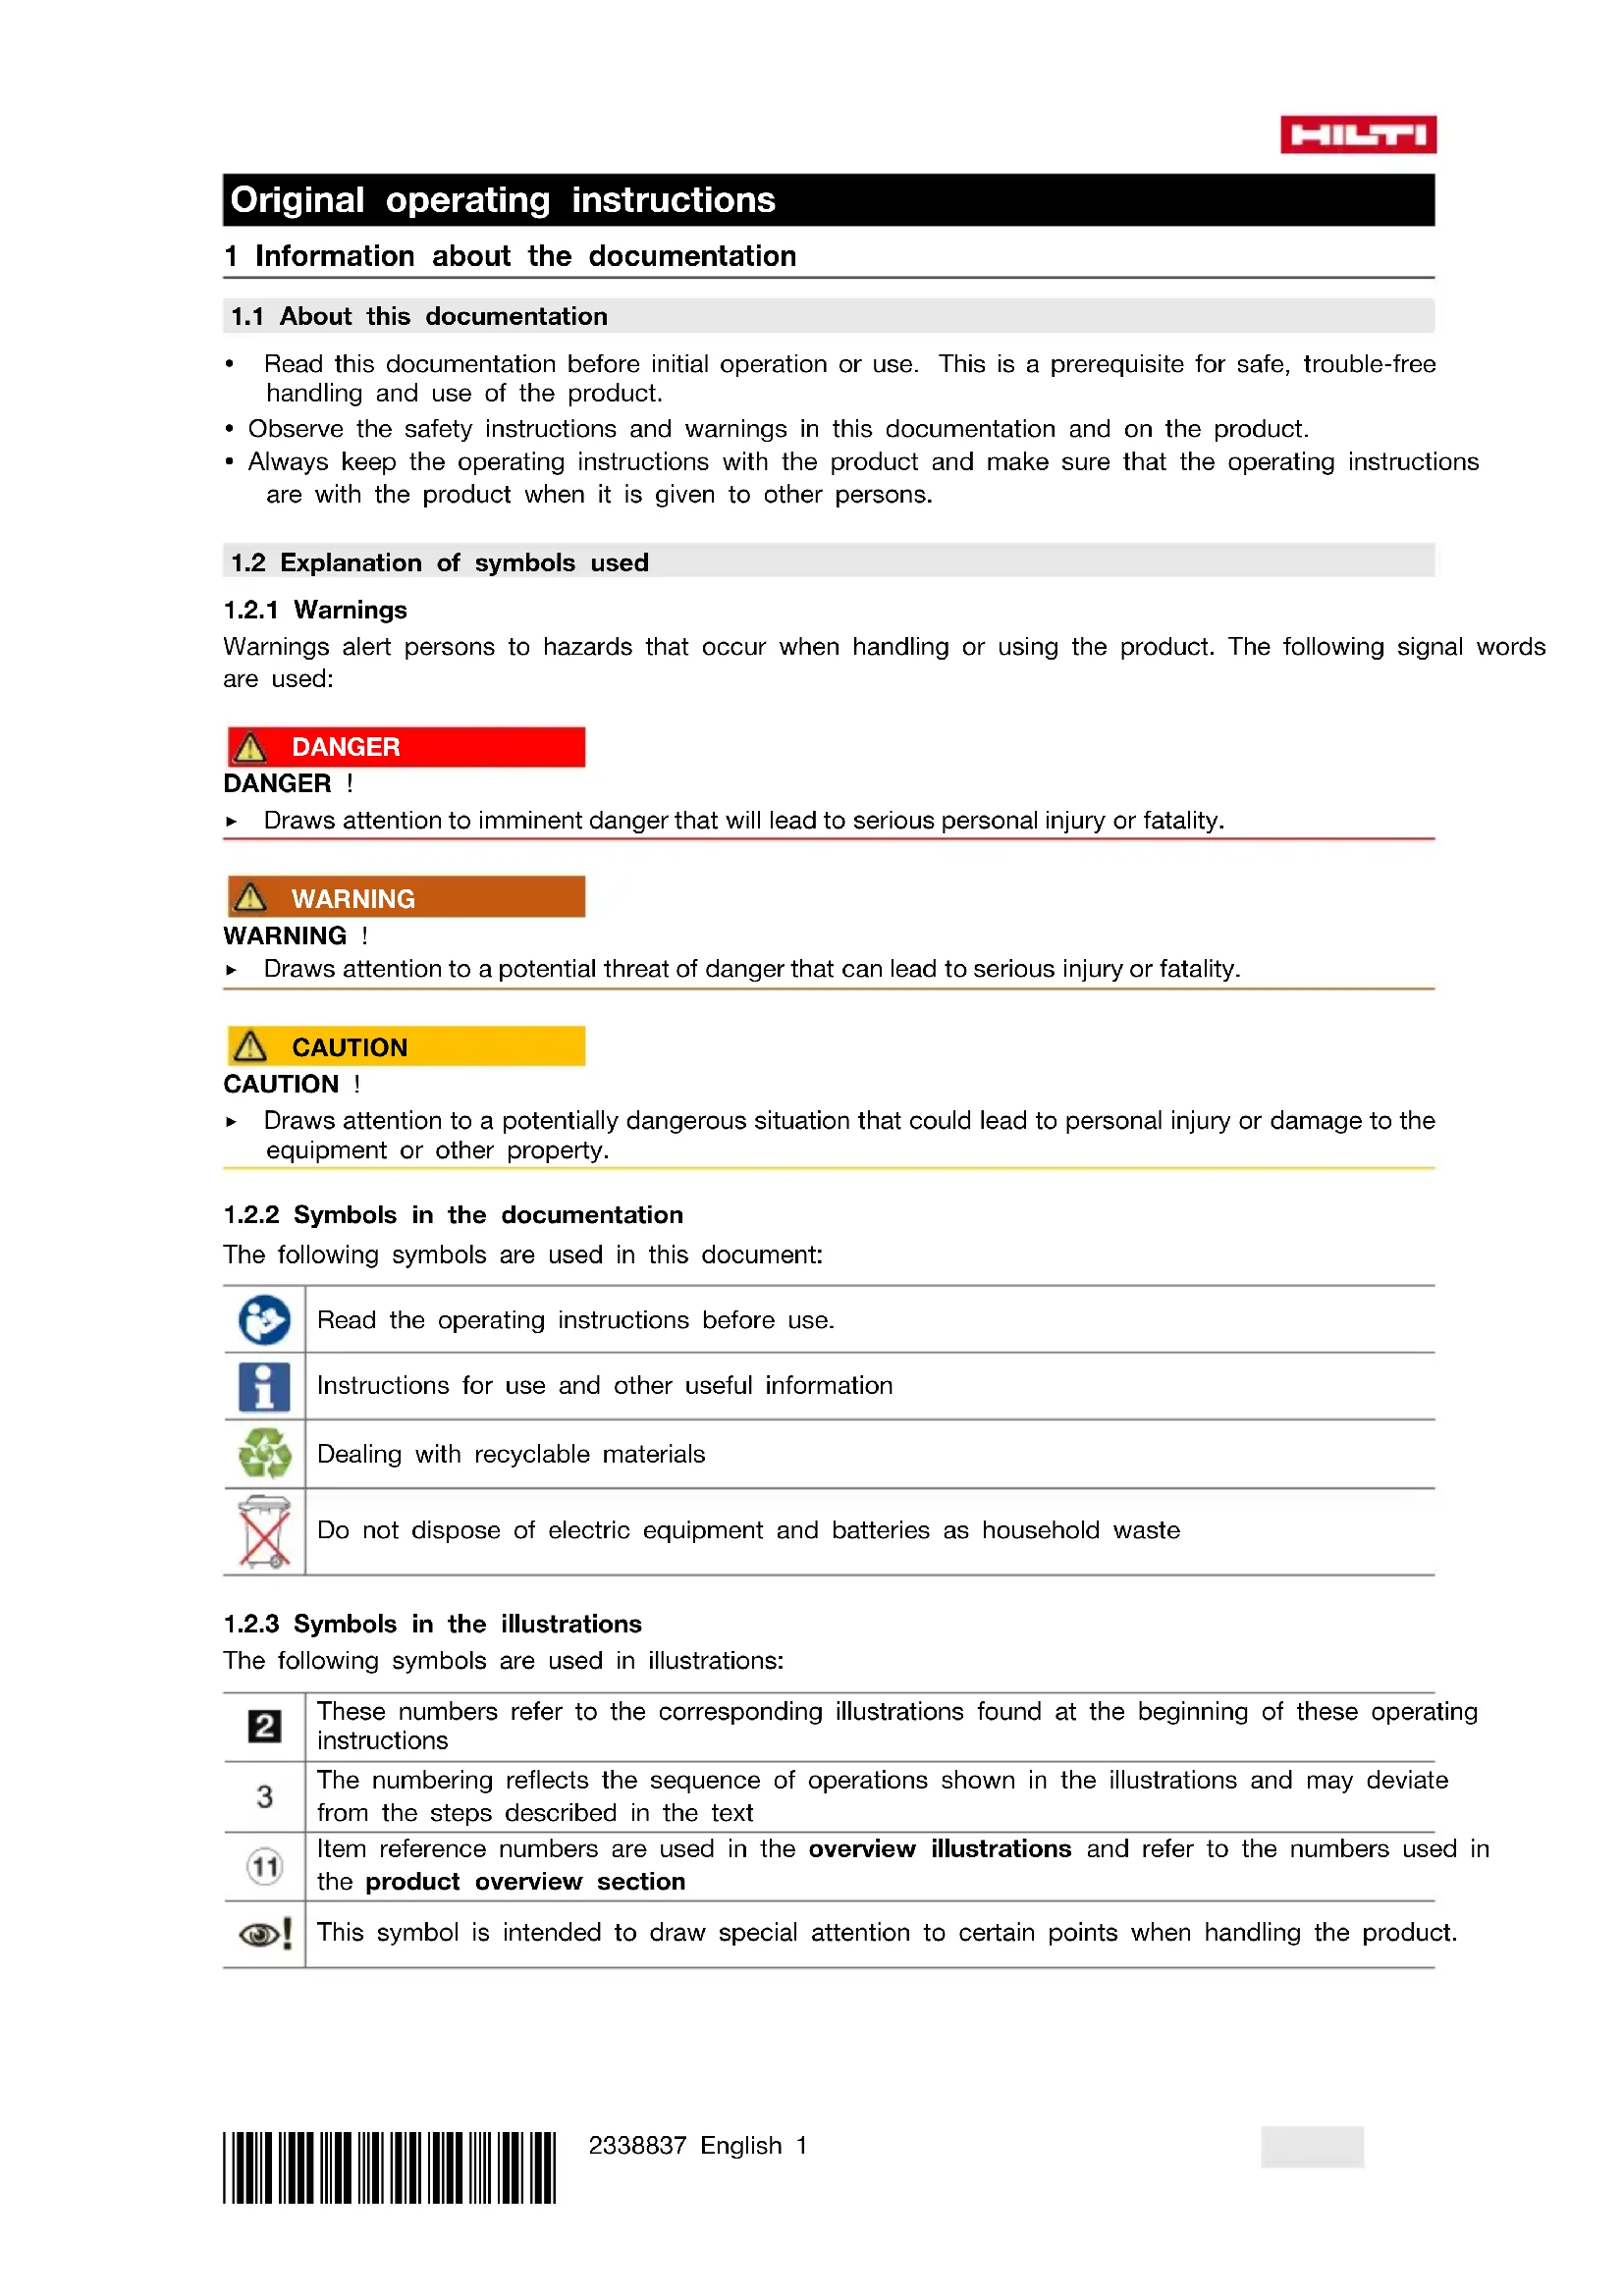
Risk of injury! Pressing the nosepiece of the fastening tool against a part of the body may lead to serious injury due to inadvertent firing and release of a fastener.
▶ Never press the nosepiece of the fastening tool against your hand or any other part of the body.

WARNING
Risk of injury! Under certain circumstances, pulling the fastener guide back by hand could make the tool ready to fire. When the tool is ready to fire, fasteners or the piston could be driven inadvertently into parts of the body.
▶ Never attempt to pull the fastener guide back by hand.
▶ Press the on/off button.
The spring mechanism audibly builds up tension and the status indicator shows green.

Battery performance drops at low temperatures.
When battery performance drops, tensioning of the spring mechanism takes longer than with a fully charged battery.
If you continue to operate the fastening tool after battery performance drops, the fastening tool will switch itself off automatically before damage to the battery cells occurs.
6.2 Switching off the fastening tool
▶ Press the on/off button.
The spring mechanism audibly relieves its tension and the status indicator goes out.
6.3 Driving a fastener

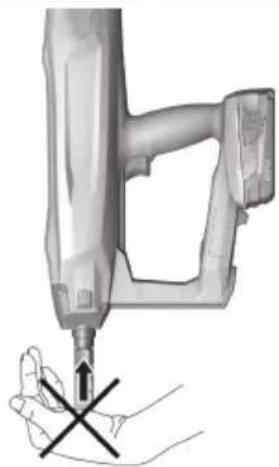
WARNING
Risk of injury by incorrect handling and/or splintering material!
Risk of driving a nail through your hand! Always use both hands to operate the product! Always hold the product firmly with your second hand as illustrated.
▶ Never press the nosepiece of the fastening tool against your hand or any other part of the body! By unintentionally triggering a driving operation, this can cause severe injury.
- Wear personal protective equipment and always wear protective glasses and protective gloves. Other persons in the vicinity must also wear eye protection and a hard hat. When fasteners are being driven, there is a risk of injury to the body and eyes caused by material splintering off the working surface and also if there are foreign bodies in the area of the fastener guide.
▶ Never attempt to clear malfunctions of the tool by continuing to trigger the tool!

CAUTION
Risk of injury and damage to the fastening tool!
▶ Never attempt to re-drive the fastener! This can lead to fastener breakages and jamming of the fastener.
▶ Use only approved, genuine Hilti accessories with this tool. The use of unsuitable material and accessories can lead to injuries and damage the fastening tool.
-
Switch on the fastening tool. → page 8
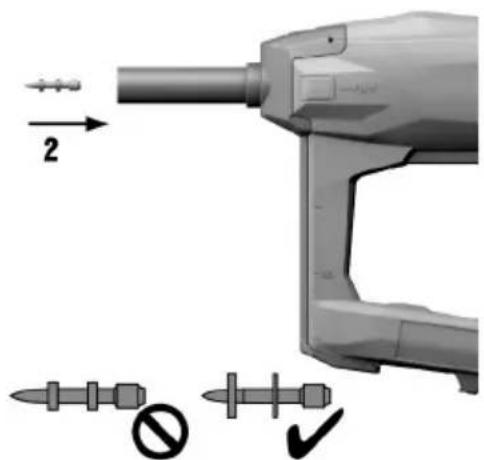
-
Insert the fastener.
-
Hold the fastening tool perpendicular to the working surface and press it against the surface, pushing the fastener guide in as far as it will go.
-
Drive the fastener by pulling the trigger.

After driving each fastener, use the test gauge to check that the stud has been driven to the correct preset depth.
- Lift the fastening tool completely clear of the working surface after driving a fastener.

- The fastening tool switches itself off automatically if the fastener guide is pressed against the working surface for longer than 6 seconds without a fastener being driven. The fastening tool can be switched on again by pressing the on/off button.
Never attempt to re-drive the fastener!
- The fastening tool switches itself off automatically if it is not used for 6 minutes.
7 Care and maintenance
7.1 Care and maintenance

WARNING
Risk of injury with battery inserted!
▶ Always remove the battery before carrying out care and maintenance tasks!
Care and maintenance of the tool
- Switch off the fastening tool.
- Remove the battery.
- Remove the fastener from the fastener guide.
- Carefully remove any dirt that may be adhering to parts.
- Clean the air vents carefully with a dry brush.
- Use only a slightly damp cloth to clean the casing. Do not use cleaning agents containing silicone as these can attack the plastic parts.
Care of the lithium-ion batteries
- Keep the battery free from oil and grease.
- Use only a slightly damp cloth to clean the casing. Do not use cleaning agents containing silicone as these may attack the plastic parts.
- Avoid ingress of moisture.
Maintenance
- Check all visible parts and controls for signs of damage at regular intervals and make sure that they all function correctly.
- Do not operate the product if signs of damage are found or if parts malfunction. Have it repaired immediately by Hilti Service.
• After cleaning and maintenance, fit all guards or protective devices and check that they function correctly.

To help ensure safe and reliable operation, use only genuine Hilti spare parts and consumables. Spare parts, consumables and accessories approved by Hilti for use with the product can be found at your local Hilti Store or online at: www.hilti.group.
8 Transport and storage of cordless tools
Transport
▶ Switch off the fastening tool.

CAUTION
Accidental starting during transport!
▶ Always transport your products with the batteries removed!
▶ Remove the battery.
- Remove the fastener from the fastener guide.
▶ Never transport batteries in bulk form (loose, unprotected).
▶ Check the tool and batteries for damage before use after long periods of transport.
Storage

WARNING
Accidental damage caused by defective or leaking batteries!
▶ Always store your products with the batteries removed!
- Store the tool and batteries in a place that is as cool and dry as possible.
▶ Never leave batteries in direct sunlight, near sources of heat or behind glass. - Store the tool and batteries in a place where they cannot be accessed by children or unauthorized persons.
▶ Check the tool and batteries for damage before use after long periods of storage.
9 Troubleshooting
If the trouble you are experiencing is not listed in this table or you are unable to remedy the problem by yourself, please contact Hilti Service.
| Trouble or fault Possible cause Action to be taken | ||
| The spring element is not ten-sioned; no status indication. | -The battery is empty. ▶ Change | the battery. |
| The battery is not fitted correctly. | ▶ Insert the battery. → page 7 | |
| The spring element is not ten-sioned, the status indicatorblinks green and 1 batterycharge status LED blinks. | -The battery is empty. ▶ Change | the battery. |
| Battery temperature too low. | ▶ Allow the battery to warm upslowly to room temperature. | |
| The spring element is not re-tensioned, the status indicator blinks green and 4 batterycharge status LEDs blink. | The fastening tool has overheated. | ▶ Allow the fastening tool to cooldown. |
| The spring element is not ten-sioned and the status indicator blinks red. | -The fastener guide is not fittedcorrectly. | ▶ Insert the fastener guide. |
| The spring element is not ten-sioned and the status indicator lights red. | -System fault | ▶ Remove the battery. → page 7 |
| ▶ Insert the battery. → page 7 | ||
| Fastener driven at an angle. | Too much contact pressure applied through the grip to the fastening tool. | ▸ Apply less pressure to press the fastening tool against the surface. |
| Fastening tool was angled off the driving axis when pressed against the surface. | ▸ Press the fastening tool at right angles against the surface, applying pressure to the grip surface on the back of the fastening tool. | |
10 Disposal

WARNING
Risk of injury due to incorrect disposal! Health hazards due to escaping gases or liquids.
▶ DO NOT send batteries through the mail!
▶ Cover the terminals with a non-conductive material (such as electrical tape) to prevent short circuiting.
- Dispose of your battery out of the reach of children.
- Dispose of the battery at your Hilti Store, or consult your local governmental garbage disposal or public health and safety resources for disposal instructions.

Most of the materials from which Hilti products are manufactured can be recycled. The materials must be directly separated before they can be recycled. In many countries, your old tools, machines or appliances can be returned to Hilti for recycling. Ask Hilti Service or your Hilti sales representative for further information.

- Do not dispose of power tools, electronic equipment or batteries as household waste!
11 Manufacturer's warranty
▶ Please contact your local Hilti representative if you have questions about the warranty conditions.
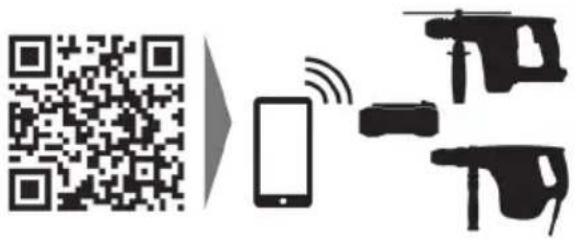
12 Further information
For more information on operation, technology, environment and recycling, follow this link: qr.hilti.com/manual/?id=2338837
This link is also to be found at the end of the documentation, in the form of a QR code.
13 FCC statement (applicable in US) / IC statement (applicable in Canada)
The product complies with part 15 of the FCC Rules and RSS-210 of the IC.
Operation is subject to the following two conditions:
- This device shall cause no harmful interference.
- This device must accept any interference received, including interference that may cause undesired operation.

Changes or modifications not expressly approved by Hilti can restrict the user's right to operate the device.
natural_image
Icon of a person reading a book inside a circle with a right-pointing arrow (no text or symbols)

Hilti Corporation
LI-9494 Schaan
Tel.:+423 234 21 11
Fax:+423 234 29 65
www.hilti.com