
EFWU Jumbo 102 - Clock Eurochron - Free user manual and instructions
Find the device manual for free EFWU Jumbo 102 Eurochron in PDF.

User questions about EFWU Jumbo 102 Eurochron
0 question about this device. Answer the ones you know or ask your own.
Ask a new question about this device
Download the instructions for your Clock in PDF format for free! Find your manual EFWU Jumbo 102 - Eurochron and take your electronic device back in hand. On this page are published all the documents necessary for the use of your device. EFWU Jumbo 102 by Eurochron.
USER MANUAL EFWU Jumbo 102 Eurochron
Jumbo Radio Wall Clock with outdoor temperature
Item no. 1600381
Intended use
The purpose of the radio wall clock is to decode the DCF radio signal of the caesium atomic clock in Braunschweig, to display the time, date and the indoor and outdoor temperatures as well as to provide an alarm function.
The product consists of a base station for displaying the measured data and an outdoor sensor, which wirelessly transmits the outdoor temperature values to the base station by radio.
The jumbo radio wall clock and the outdoor sensor are designed exclusively for battery operation. Do not use any other power supply. The correct battery type is specified in the "Technical Data" section.
The jumbo radio wall clock is intended for indoor use only. Only the sensor can be installed outdoors. Contact with moisture, e.g. in bathrooms, must be avoided under all circumstances.
For safety and approval purposes, you must not rebuild and/or modify this product. If you use the product for purposes other than those described above, the product may be damaged. In addition, improper use can cause hazards such as short circuit or fire. Read the instructions carefully and keep them. Make this product available to third parties only together with its operating instructions.
This product complies with the statutory national and European requirements. All company names and product names are trademarks of their respective owners. All rights reserved.
Delivery content
- Radio-controlled wall clock
- Outdoor sensor
- Operating instructions

Latest operating instructions
Download the latest operating instructions via the link www.conrad.com/downloads or scan the QR code shown. Follow the instructions on the website.
Explanation of symbols

An exclamation mark in a triangle indicates important instructions in this operating manual that absolutely have to be observed.
The arrow symbol indicates specific tips and advice on operation.
Safety instructions

Read the operating instructions carefully and especially observe the safety information. If you do not follow the safety instructions and information on proper handling in this manual, we assume no liability for any resulting personal injury or damage to property. Such cases will invalidate the warranty/ guarantee.
a) General
- The device is not a toy. Keep it out of the reach of children and pets.
- Do not leave packaging material lying around carelessly. This may become dangerous playing material for children.
- Protect the product from extreme temperatures, direct sunlight, strong jolts, high humidity, moisture, flammable gases, vapours and solvents.
- Do not place the product under any mechanical stress.
-
If it is no longer possible to operate the product safely, take it out of operation and protect it from any accidental use. Safe operation can no longer be guaranteed if the product:
-
is visibly damaged,
- is no longer working properly,
- has been stored for extended periods in poor ambient conditions or
-
has been subjected to any serious transport-related stresses.
-
Please handle the product carefully. Jolts, impacts or a fall even from a low height can damage the product.
- Never use the product immediately after it has been brought from a cold room into a warm one. The condensation generated could destroy the product. Allow the device to reach room temperature before connecting and using it. This may take several hours.
- Do not hang any objects on the product.
- Avoid installing the product near sources of interference e.g. computers or TV sets.
- Do not use this product in hospitals or medical facilities. Although the radio signals emitted by the outdoor sensor are quite weak, they might cause functional impairment of life-support systems nearby. The same could also apply to other facilities.

- The outdoor sensor is suitable for outdoor use. However, it should not be used underwater.
- Consult an expert when in doubt about operation, safety or connection of the device.
- Maintenance, modifications and repairs are to be performed exclusively by an expert or at a qualified shop.
- If you have questions which remain unanswered by these operating instructions, contact our technical support service or other technical personnel.
b) (Rechargeable) batteries
- Correct polarity must be observed while inserting the (rechargeable) batteries.
- (Rechargeable) batteries should be removed from the device if it is not used for a long period of time to avoid damage through leaking. Leaking or damaged (rechargeable) batteries might cause acid burns when in contact with skin, therefore use suitable protective gloves to handle corrupted (rechargeable) batteries.
- (Rechargeable) batteries must be kept out of reach of children. Do not leave (rechargeable) batteries lying around, as there is risk, that children or pets swallow them.
- All (rechargeable) batteries should be replaced at the same time. Mixing old and new (rechargeable) batteries in the device can lead to (rechargeable) battery leakage and device damage.
- (Rechargeable) batteries must not be dismantled, short-circuited or thrown into fire. Never recharge non-rechargeable batteries. There is a risk of explosion!
Operating controls
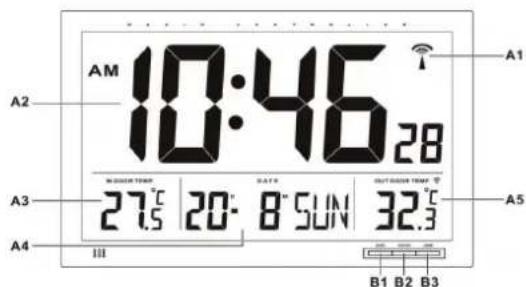

A1 DCF symbol
A2 Time display
A3 Indoor temperature display
A4 Date display B4 button + 12/24
A5 Outdoor temperature display B5 button - °C/°F
B1 MODE button
B2 SNOOZE button
B3 ALARM button
C1 Suspension eyes
C2 Battery compartment
C3 Support
B6 SEARCH button
B7 RESET button
B8 ALERT button
Inserting/replacing the batteries
First insert the batteries into the base station and afterwards, insert the batteries into the outdoor sensor (batteries not included).
- Open the cover of the battery compartment (C2) on the back of the base station.
- Insert four new 1.5 V Mignon cells (AA) in the battery compartment, paying attention to the correct polarity. The correct polarity is indicated in the battery compartment.
- Close the battery compartment of the base station again.
- Within 3 minutes, insert the batteries into the outdoor sensor.
- Open the battery compartment cover on the reverse side of the outdoor sensor and insert two new 1.5 V Micro cells (AAA) into the battery compartment in the upright position. The correct position is shown in the battery compartment.
- Reclose the battery compartment of the outdoor sensor.
- The clock first searches for the temperature signal of the outdoor sensor. After receiving the signal of the outdoor sensor, the clock displays the outdoor temperature in the outdoor temperature display (A5).
- Afterwards, the clock starts searching for the DCF signal and tries to tune in.
- When the display contrast fades or when the display light no longer works, the batteries of the base station are flat and need to be replaced as described above.
- If the batteries in the outdoor sensor have lost their charge, a battery symbol will appear both in the sensor's display and beside the outdoor temperature gauge (A5). In this instance change the outdoor temperature gauges batteries as described above.
- To ensure a long battery life, use only alkaline types.
Once the batteries are inserted, the base station starts searching for the signal of the outdoor sensor. If you do not insert the batteries into the outdoor sensor during this time period, the search for the sensor must be started manually. This step is also necessary after a battery replacement in the outdoor sensor.
To start the sensor search manually, press and hold the SEARCH button (B6) on the base station for three seconds. Then press the RESET button in the battery compartment of the outdoor sensor with a sharp object (e.g. an open paper clip) in order to activate the transmission function.
DCF reception
Immediately after the reception of the outdoor sensor's signal, the device makes the first attempt to receive the DCF signal. After a successful DCF reception, the clock is automatically set to the current time.
The detection and interpretation of the DCF signal can take about five minutes. Do not move the radio-controlled clock during this time. Do not press any buttons or switches!
To cancel the DCF reception attempt, press and hold the -^ / ^ button (B5) for three seconds until the DCF symbol (A1) in the display goes out.
Bad reception can occur, for example, by metallised insulated glass, reinforced concrete buildings, coated special wallpapers, proximity to electronic devices, or installation in cellars.
If after 10 minutes the clock has not set the current time, change the location of the radio clock and press the ^ C / ^ (B5) button for three seconds until the DCF symbol (A1) flashes in the display.
This will start a new reception attempt.
The reception attempt for the daily automatic synchronisation with the DCF time is done at 03.00 AM. One successful reception per day is sufficient to keep the deviation to less than one second.
The DCF signal is encoded and transmitted via a DCF transmitter in Mainflingen (near Frankfurt am Main). Its range is up to 1,500 km and, under ideal reception conditions, even up to 2,000 km.
Among other things, the DCF signal includes the precise time (theoretical deviation of 1 second in a million years!) and the date.
Naturally, this also eliminates the hassle of manually setting summer and winter times.

Installation/set-up
The base station can be placed on a surface or hung on the wall:
- To set up the clock, fold out the support (C3) and place the clock on a level surface.
- Protect valuable furniture surfaces by using an appropriate underlay; otherwise, it may cause scratches.
- For wall mounting, there are suspension eyes (C1) provided on the back of the device.
- Secure the clock in place with one or several screws that protrude a few millimetres from the wall. Then hang the clock on the screw head with the suspension eyes (C1).
Outdoor sensor
- Secure the outdoor sensor in place with one screw or a nail that protrudes a few millimetres from the wall. Then hang the sensor on the screw or nail head with the suspension eye on the back of the device.
- Alternatively the outdoor sensor can be opened. In order to do this you should flip open the foot of the battery compartment.
The outdoor sensor is suitable for use in protected outdoor areas. It should be placed so that it is not exposed to direct sunlight, since this can result in a false temperature reading. Precipitation falling on the outdoor sensor will also lead to a false temperature reading, since this cools the housing.
Therefore, we recommend you choose the installation place carefully, so the outdoor sensor measures the correct temperature.
Never dip the outdoor sensor in or under water; this may destroy it!
DCF Time Adjustment
- After inserting the batteries and the reception of the outdoor sensor's signal, the clock starts searching for the DCF signal automatically. This is indicated by the flashing DCF symbol (A1) on the top right in the display. Normally, the synchronisation process is completed within a few minutes.
- As soon as the DCF signal is decoded, the DCF icon (A1) will appear continuously and the current time and date are shown in the display.
- In normal mode, the clock starts a reception attempt at 03:00 AM. If the clock does not receive any signal, the DCF icon (A1) goes out and the clock starts a new reception attempt at 04:00 AM, 05:00 AM and 06:00 AM.
- To start a manual reception attempt, press and hold the -^ / ^ button (B5) for three seconds until the DCF symbol (A1) flashes in the display.
If there is interference with the reception of the DCF signal, try to find a new location and/or leave the clock near a window overnight.
At night the reception is better, so the clock is normally synchronised the next morning.
The message DST (Daylight Saving Time) in the display, located beside the DCF symbol, shows that the device is displaying the summertime setting.
Setting the time manually
If no keystroke is performed for more than 15 seconds while setting the time, the clock exits the manual setting mode and returns to the previous screen.
- During the normal time mode, press and hold the MODE button (B1) until the hour display flashes.
- Set the hours by using the buttons + 12/24 (B4) and - °C/°F (B5).
- Press the MODE button (B1) again. The minute display flashes.
- Set the minutes by using the buttons + 12/24 (B4) and - °C/°F (B5).
- Now set the seconds, the year, the date format, the month, the date, the language for the weekday display and the time zone as described above.
The Languages available for the weekday display are:
English (ENG), German (GER), French (FRA), Spanish (ESP), Italian (ITA), Dutch (NET), Danish (DAN) and Russian (RU).
- Press the MODE button (B1) again to save the setting.
- The time zone setting needs only to be adjusted if the time zone differs from the DCF time zone. Otherwise, leave the time zone at the value 00.
12/24 hour display
- Press the + 12/24 (B4) key to swap between the 12h and the 24h display.
Thermometer
The clock displays the room temperature in the indoor temperature display (A3) and the outdoor temperature in the outdoor temperature display (A5).
- Press the - ^ C / ^ (B5) button on the base station to switch between the display in ^ C and ^ F .
- Press the -^ / ^ button in the battery compartment of the outdoor sensor to switch between the display in ^ C and ^ F on the outdoor sensor.
- If the temperature lies outside the measurement range, the temperature displays show "LL.L" (temperature too low) or "HH.H" (temperature too high).
Temperature alarm
The outdoor thermometer is equipped with an alarm function which indicates an alarm if the outdoor temperature lies outside an adjustable temperature range.
- Press the ALERT button (B8) on the base station to switch the temperature alarm on or off. When the temperature alarm is switched on, two arrow symbols are shown next to the outdoor temperature display (A5).
- Press and hold the ALERT button (B8) until the upper arrow flashes.
- Set the upper alarm temperature by using the buttons + 12/24 (B4) and - °C/°F (B5).
- Press the ALERT button (B8) again and set the lower alarm temperature by using the buttons + 12/24 (B4) and - °C/°F (B5).
- Press the ALERT button (B8) again to save the settings.
- If the outdoor temperature exceeds or falls below one of the two alarm temperatures, an alarm signal is emitted. To turn off the alarm signal, press the ALERT button (B8).
Alarm function
Programming the alarm time
- Press the MODE button (B1) once so that the alarm time (AL) is shown in the display.
- Press and hold the MODE button (B1) until the hour display of the alarm flashes
- Set the hours by using the buttons + 12/24 (B4) and - °C/°F (B5).
- Press the MODE button (B1) again. The minute display flashes.
- Set the minutes by using the buttons + 12/24 (B4) and - °C/°F (B5).
- Press the MODE button (B1) again to save the setting.
To activate / deactivate the alarm
- Press the button ALARM (B3) in order to activate or deactivate the alarm function.
- A bell symbol appears in the display, if the alarm function is activated.
- To cancel the alarm tone and to activate the snooze function during the alarm, press the SNOOZE (B2) button.
- While the alarm tone is interrupted, the symbol "Zz" flashes in the display. The alarm resume after 5 minutes. This procedure can be repeated up to seven times.
- To turn off the alarm tone entirely when the alarm is activated, press any button except SNOOZE (B2). This will turn off the alarm tone for 24 hours and it will be started at the next day.
The alarm tone switches off automatically after two minutes if it has not been turned off before then.
Troubleshooting
The clock does not synchronise or only has temporary reception:
- The distance to the DCF transmitter is too long or restricted by geographical conditions.
- Relocate the product; switch off interfering devices such as TV sets, computers or microwave ovens.
- Avoid a location in the vicinity of large metal surfaces, which may shield the radio signals. Windows with a vapour deposited metal layer can also influence the signal reception.
- Place the clock near a window for synchronisation, and align the front or back side in the direction of Frankfurt (Germany).
- Leave the clock switched on overnight to avoid atmospheric interference.
The displayed temperature value is not correct:
- The clock or the outdoor sensor is exposed to direct sunlight.
- The clock or the outdoor sensor is located too close to a heat source (heater, electronic device, etc.)
The device does not react when buttons are pressed, the display shows strange symbols, or the display is blank:
- Press the RESET (B7) button with a pointed object (e.g. a ball pen tip). By doing so, the built-in micro processor will be reset and restarted.
The display of the base station has spots:
- The display has been subjected to stress. The spots will disappear by themselves. This may take a while, depending on the ambient temperature.
Care and cleaning
- Remove the batteries from the product before cleaning.
- Do not use any aggressive cleaning agents, rubbing alcohol or other chemical solutions as they can cause damage to the housing and malfunctioning.
- Clean the outside of the product with a soft, dry, liber-free cloth.
- Do not immerse the product in water.
Declaration of Conformity (DOC)
Conrad Electronic SE, Klaus-Conrad-Straße 1, D-92240 Hirschau hereby declares that this product conforms to the 2014/53/EU directive.

Click on the following link to read the full text of the EU declaration of conformity: www.conrad.com/downloads
Select a language by clicking on a tag symbol and enter the product order number in the search box. You can then download the EU declaration of conformity in PDF format.
Disposal
a) Product

Electronic devices are recyclable waste and must not be disposed of in the household waste. At the end of its service life, dispose of the product according to the relevant statutory regulations.
Remove any inserted (rechargeable) batteries and dispose of them separately from the product.
b) (Rechargeable) batteries

As the end user, you are required by law (Battery Ordinance) to return all used (rechargeable) batteries; disposal of them in the household waste is prohibited!
Contaminated (rechargeable) batteries are labelled with this symbol to indicate that disposal in the domestic waste is forbidden. The designations for the heavy metals involved are: Cd = Cadmium, Hg = Mercury, Pb = Lead (name on (rechargeable) batteries, e.g. below the trash icon on the left).
Used (rechargeable) batteries can be returned to collection points in your municipality, our stores or wherever (rechargeable) batteries are sold.
You thus fulll your statutory obligations and contribute to the protection of the environme
Technical data
Batteries .4 x 1.5 V Mignon cell (AA) (base station)
2 x 1.5 V Micro cell (AAA) (outdoor sensor)
Battery life.. approx. 2 years
Radio frequency 433 MHz
Transmission range.. up to 100 m (free held, direct visual contact)
Time protocol DCF
Alarm tone duration/repeated alarm. 2 min/5 min
Time format 12/24 h
Measuring range of thermometer......indoors 0 to +50^ /outdoors-20to +50^
Dimensions W× H× D 368 x 229 x 30 mm (base station)
101 × 62 × 23 ~mm (outdoor sensor)
Weight 900 g (base station)
65 g (outdoor sensor)