
CB2485U - Fridge SMEG - Free user manual and instructions
Find the device manual for free CB2485U SMEG in PDF.

| Brand | SMEG |
| Model | CB2485U |
| Product Type | Refrigerator with freezer compartment |
| Power supply | 120 V / 60 Hz, 15 A fuse |
| Maximum freezing capacity | 3 kg per 24 hours |
| Default refrigerator temperature | 5 °C |
| Default freezer temperature | -18 °C |
| Fresh zone | Yes, range -3 to +3 °C |
| Quick cooling function | Yes (24 h at 2 °C) |
| Quick freezing function | Yes (24 h at -25 °C) |
| Holiday function | Yes (refrigerator at 17 °C) |
| Smart function | Yes |
| Defrost | Automatic (frost-free system) |
| Vegetable drawer with humidity control | Yes |
| Door reversibility | Yes |
| Installation type | Built-in (possible to embed) |
| Warranty | 2 years full, 3-5 years limited on sealed system |
| Recommended maintenance | Interior cleaning with baking soda solution |
| Safety | Unplug before maintenance; do not repair yourself |
| Included accessories | Glass shelves, door bins, vegetable drawers |
Frequently Asked Questions - CB2485U SMEG
User questions about CB2485U SMEG
0 question about this device. Answer the ones you know or ask your own.
Ask a new question about this device
Download the instructions for your Fridge in PDF format for free! Find your manual CB2485U - SMEG and take your electronic device back in hand. On this page are published all the documents necessary for the use of your device. CB2485U by SMEG.
USER MANUAL CB2485U SMEG
natural_image
Front view of a white rectangular electronic device with visible internal components and mounting brackets (no text or symbols)BUILT-IN REFRIGERATOR-FREEZER
CB2485U
CONTENT
IMPORTANT NOTICE----2
APPLIANCES COMPONENTS----3
INSTALLATION AND OPERATING CONDITIONS OF THE APPLIANCE 4
INSTALLATION INSTRUCTION 6
DOOR REVERSAL----11
BEFORE FIRST USE 13
STORAGE INSTRUCTION 15
CONTROLS----17
DE-FROSTING 18
CARE AND CLEANING 19
TROUBLESHOOTING----20
WARRANTY 21
IMPORTANT NOTICES
- Some provisions in this user manual apply to refrigerating products of different types e.g. (for a refrigerator, refrigerator-freezer or freezer) The Manufacturer shall not be held liable for damage arising from the failure to observe the instructions contained in this manual. Please refer to the warranty booklet.
- Keep this manual for future reference, or to provide to the next user.
- The appliance operates properly at the ambient temperature 16 °C (61°F) \~32 °C (90°F). Do not use it in the conditions that are out of those recommended.
- When placing, moving or lifting the appliance, do not hold the door handles, do not pull the condenser at the rear part of the refrigerator and do not touch the compressor unit.
- When transporting, moving or positioning the appliance, do not tilt it by more than 40^ from the vertical position. Should such a situation occur, the appliance should not be switched on for a minimum 2 hours.
- Remove the plug from the outlet before any maintenance activity.
- The “cracking” sound, which the appliance may emit is caused by the expansion and contraction of parts as a result of temperature variations during its cooling and defrost recycles.
- For safety reasons never repair the appliance yourself. Repairs carried out by persons who do not have the required qualifications may result in serious injury for the user of the appliance.
- Do not refreeze partly thawed products.
- Do not store beverages in bottles and cans, especially carbonated beverages, in the freezer compartment. The cans and the bottles may explode.
- Do not put frozen products, taken out directly from the freezer (candies, ice cubes, etc.) into your mouth, their low temperature may cause severe frost-bite.
- Make sure you do not damage the cooling system, by puncturing the refrigerant tubing in the evaporator or breaking the tubes. The refrigerant is flammable. If the refrigerant comes into contact with the eyes, rinse them with clean water and call for medical assistance immediately.
- This appliance is intended for food and beverage storage, do not use it for other purposes.
- When performing activities, such as cleaning, maintenance or moving, the appliance must be completely disconnected from power supply (by removing the plug from the wall outlet or turning off the breaker)
- This appliance should not be used by children under 8 years of age or by persons with physical, mental or sensory handicaps, or by those who are inexperienced or unfamiliar with the appliance, unless they are supervised or have been instructed how to safely use the appliance and are familiar with risks associated with the use of the appliance. Ensure that children do not play with the appliance. Cleaning and maintenance of the appliance should not be performed by children unless they are 8 years or older and are supervised by a competent person.
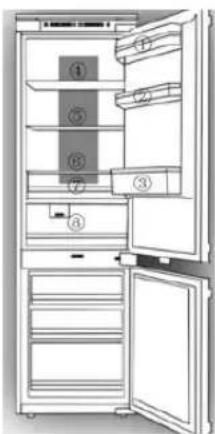
APPLIANCE COMPONENTS
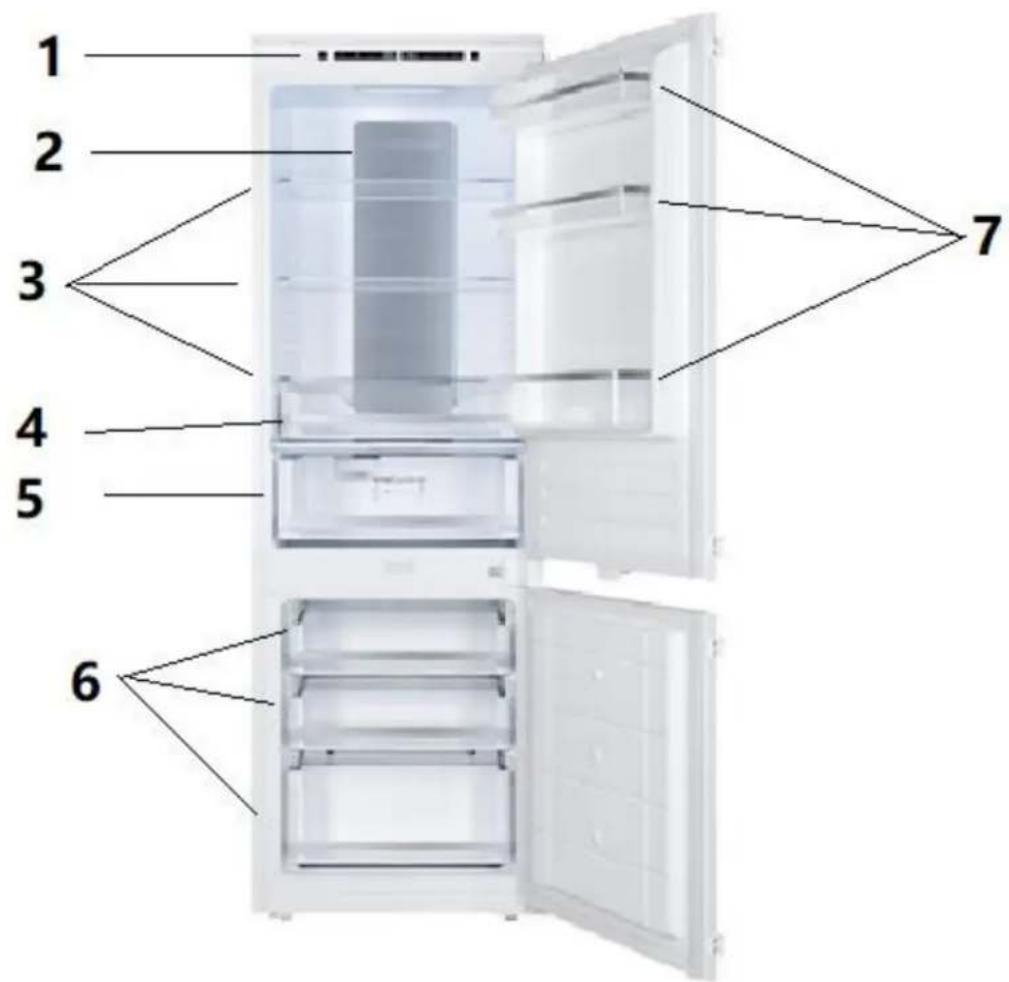
- Control panel
- Air duct panel
- Glass shelves
- Crispers
- Fresh zone
- Drawers
- Door bins
INSTALLATION AND OPERATING CONDITIONS OF THE APPLIANCE
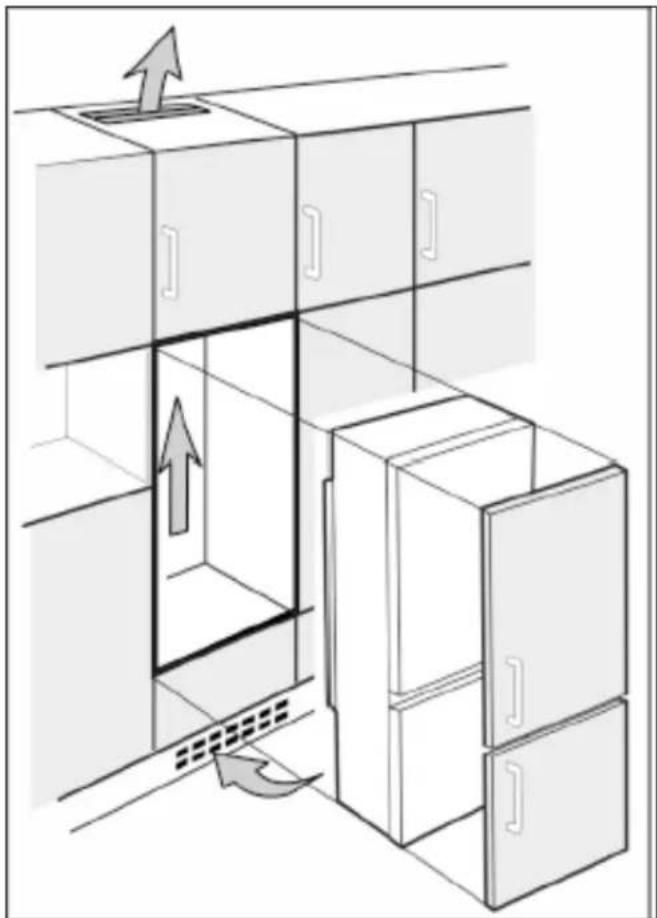
Placement of the Refrigerator in cabinetry
- This drawing shows the placement of the refrigerator in the cabinet, the airflow through the entire cabinet, the platform base that the refrigerator sits on, as well as the cabinet doors as they overlay the refrigerator doors.
natural_image
Diagram of a multi-level refrigerator with an upward arrow indicating airflow or movement, showing no text or symbols.INSTALLATION AND OPERATING CONDITIONS OF THE APPLIANCE
Connect to the power supply
• This appliance should be connected to AC 120V/60Hz supply socket. The socket must be fitted properly and must be supplied with a power cord with a 3-prong plug and a 15A fuse.
- It is a legal requirement that the appliance is properly grounded. The manufacturer will not be held liable for any damage or injury which may result from the failure to fulfill this requirement.
- Do not use adapters, multiple sockets and cords.
• See the serial plate at the lower part of the internal wall of the appliance for detailed specifications**.
Disconnecting the power supply
• Make sure the appliance can be easily disconnected from the outlet, either by pulling the plug out of the outlet, or by switching off the breaker.
Minimum distances from the heat sources
• from the electric, gas and other ovens - 30 mm / 1 inch,
• from oil or coal fired ovens - 300 mm / 12 inches,
• from built-in ovens - 50 mm / 2 inches
• Use an appropriate insulation panel between them when there is no possibility of ensuring the specified distances.
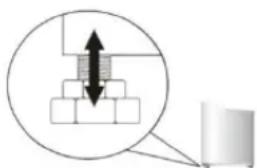
Installation before using the appliance for the first time
• Make sure there is enough space around the refrigerator to allow it work properly. A free space of 1cm (1/2 inch) is required on the rear of the appliance so that the air can be circulated to cool the compressor and condenser. And 30cm (12 inches) space above the refrigerator.
• Make sure the appliance is placed in level position by adjusting the 2 adjustable front legs.
natural_image
Diagram showing a mechanical assembly with stacked blocks and an upward arrow, no text or symbols presentShelves
• The fridge shelves can be moved according to the storage requirements within the fridge section
• To move the shelf, lift the rear section and then pull it outwards
• To replace, slide the shelf back into the slot, and then lower the rear section
INSTALLATION INSTRUCTION
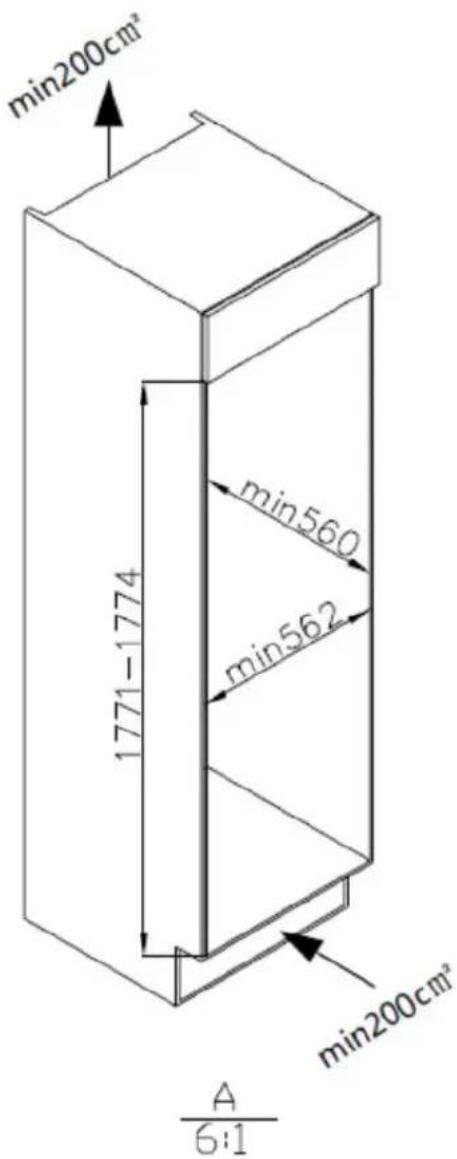
Ventilation is the main consideration when installing any refrigeration unit into a custom kitchen.
The heat removed from the cooling and/or freezing compartments needs to be dissipated into the atmosphere.
Incorrect ventilation can lead to premature compressor failure, excessive power consumption, moisture buildup and mold, total system failure and will likely invalidate the warranty provided with the appliance. For products intended to be installed into a cabinet, the following requirements must be met:
Ventilation from underneath through the base of the kitchen cabinet must be set up with the supplied ventilation grill or an air vent with at least a 31 in ^2 (200 cm ^2 ) cross section area.
• Installing the cabinet base air ventilation grill:
- Cut a hole in the plinth/kick plate of the kitchen cabinet below the refrigerator: 17.64 in. (448 mm) wide and 2.6 in. (55mm) high.
- Insert the ventilation grill into the cut out in the cabinet base.
- Secure the grill with the 4 screws, 1 in each corner.

AIR FLOW
recommended 50cm / 20 inches x 4cm / 2 inches
IMPORTANT!
An air passageway must be provided in the top of the cabinet run to allow free air in and out.
There must be space at the rear of the cabinet to allow cool air to be drawn into the condenser.
INSTALLATION INSTRUCTIONS
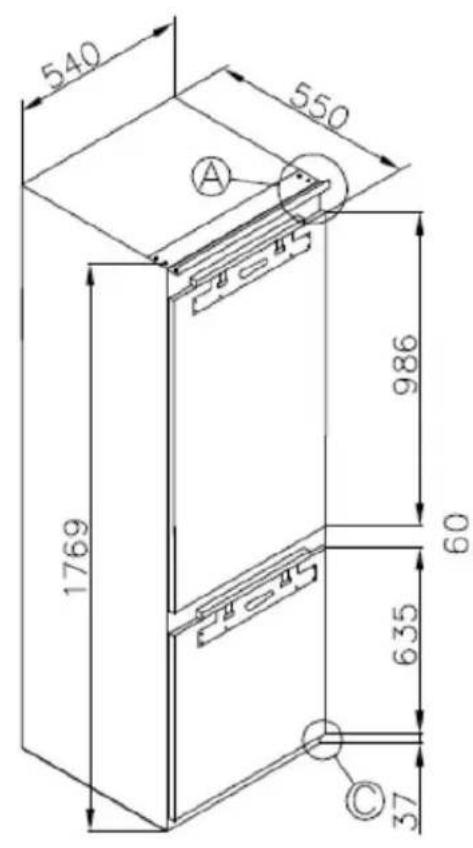
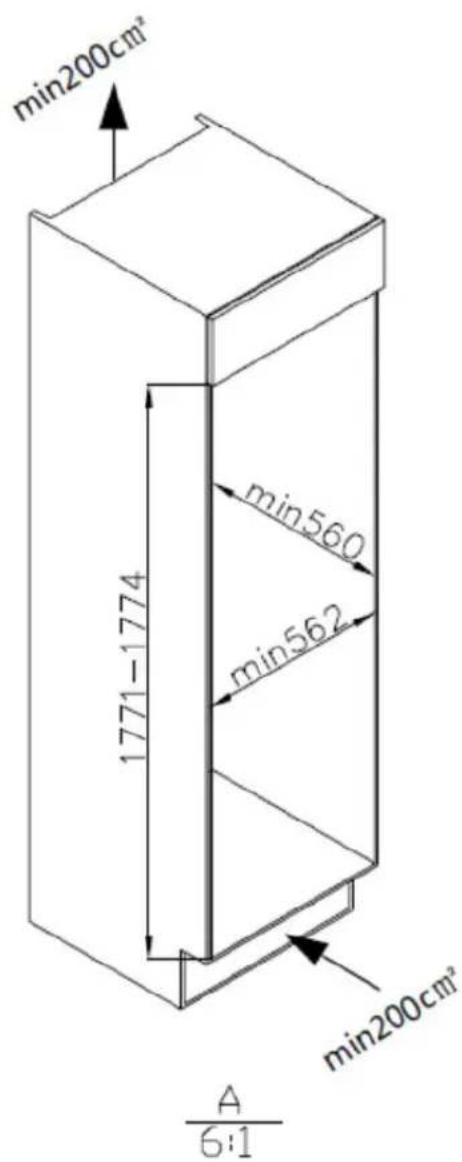
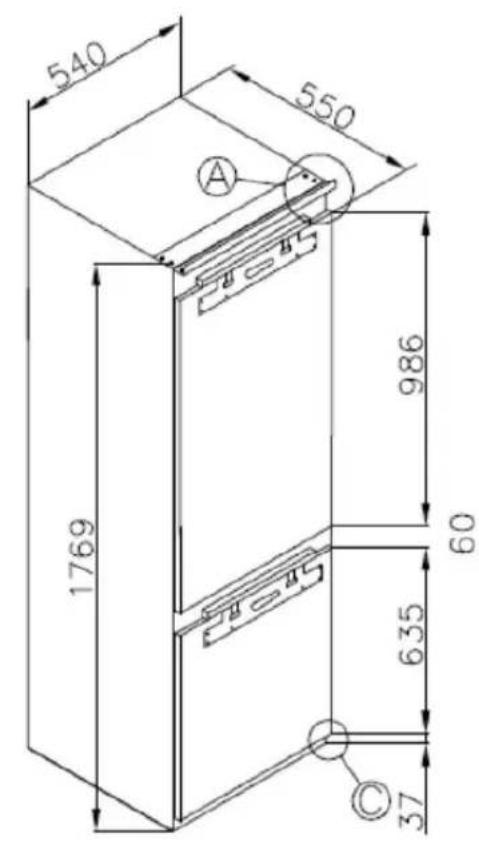
Unit and Cavity Dimensions
This built-in appliance is completely enclosed by a kitchen cabinet. The cabinet surrounding the appliance must be designed in accordance with the specified dimensions and must allow sufficient air circulation to ensure correct operation of the appliance.
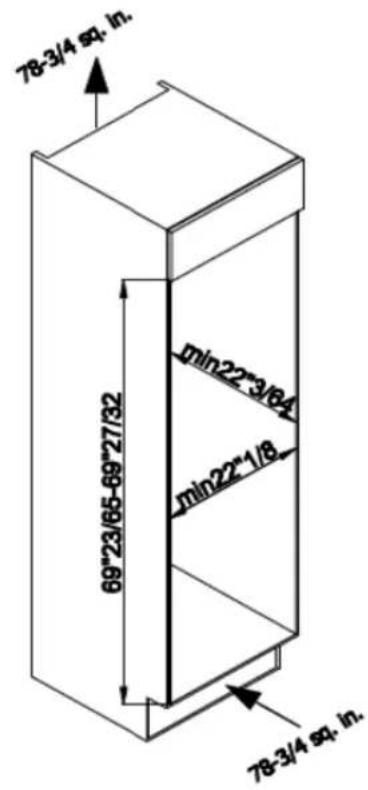
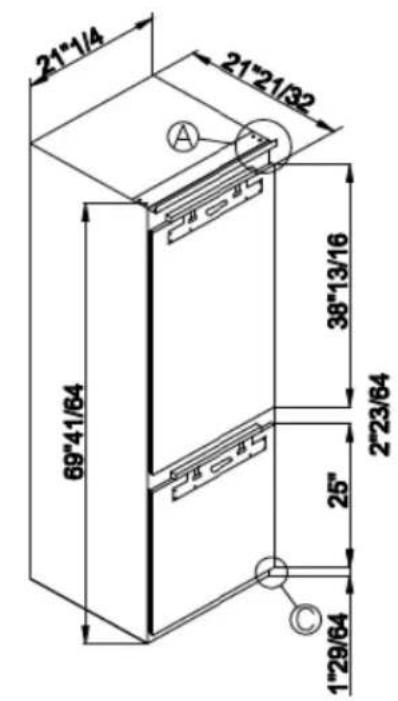
| Unit Cavity | |
| Width21 ^1/_4" 540mm | WidthMin. 22 ^1/_8" Min. 560mm |
| Height69 ^41/_64" 1769mm | Height69 ^23 /65" – 69 ^27 / _32" 1771 – 1774mm |
| Depth21 ^21 / _32" 550mm | DepthMin. 22 ^3 / _64" Min 560mm |
Cabinet Door Dimensions
This appliance requires 2 doors. One for the refrigerator section and one for the freezer section. The custom doors must be at least 5/8" (16 mm) thick and no more than 3/4" (19mm) thick. The space between the top and bottom doors must be at least 1/8" (3mm), the same as the appliance door space. Similar space is required between the top door and the cabinet door above the appliance (if applicable) – 1/8" (3mm).
Spacing between the cabinet doors and the existing cabinets should comply with the existing kitchen cabinets, typically 1/8" (3mm) should be allowed. The cabinet doors must follow the recommended weight requirements –
Fridge compartment door 37.5 lbs (17 kg)
Freezer compartment door 26.5 lbs (12 kg)
Detailed specs for custom doors for appliance: Specs provided for the width of the appliance doors in the diagram. Detail for designers/planners.
Fridge 38
$$ { } ^ { 1 3 } / _ { 1 6 } \text { " } ( 9 8 8 \mathrm{mm} ) $$
Freezer 25" (640 mm)
REQUIRED CAVITY DIMENSION

INSTALLATION INSTRUCTION
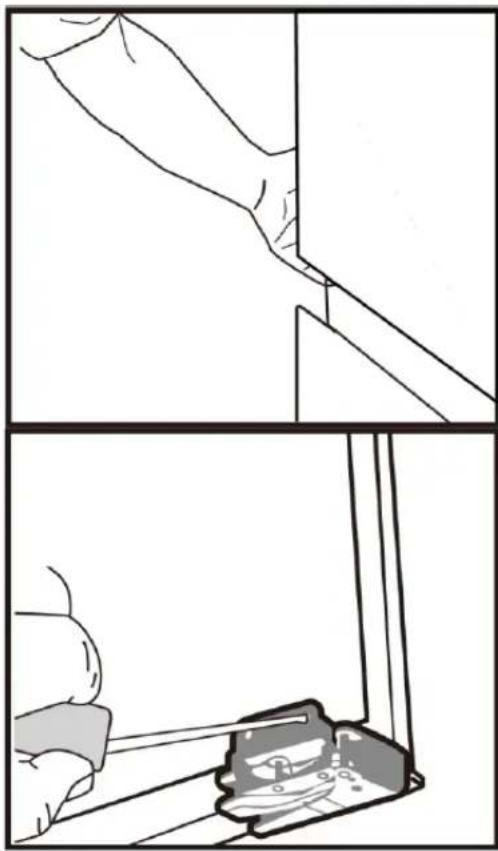
Push the appliance carefully into the cabinet, make sure the appliance is centered in the cavity. Follow the steps below to fit the cabinet door panel, ensuring the door can be opened and closed properly then tighten the screws at the top and bottom.
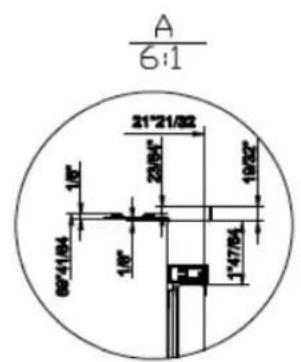
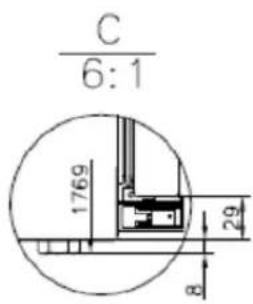
Fitting the cabinet door bracket
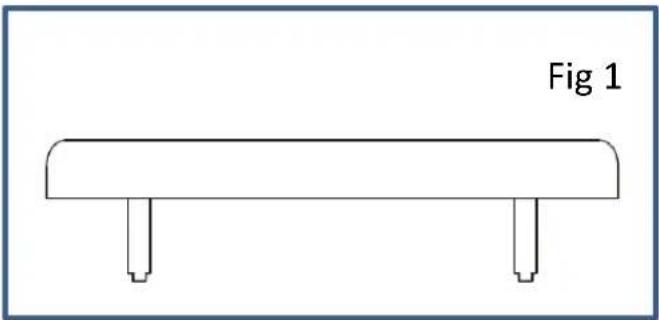
Remove the white decorative cover
Fig. 1- by lifting it upwards.
Fig. 2- Obtain the below measurements:
Dimension B= Measure from the underside surface of cabinet ceiling to the bottom of fixing bracket.
Dimension C= Determine which gap
you need between the cabinet ceiling or panel above.
Often this will align with the adjacent cabinet doors.
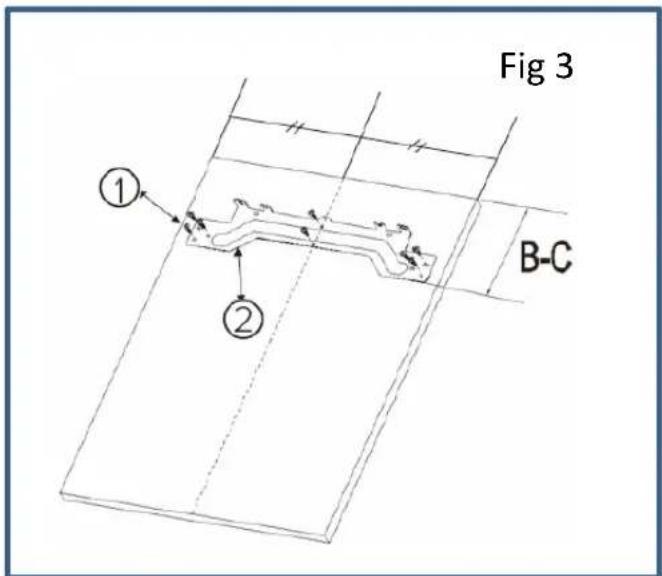
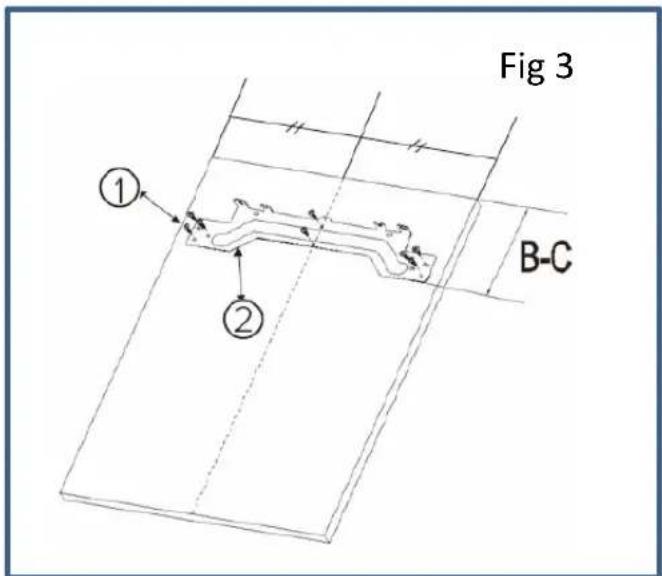
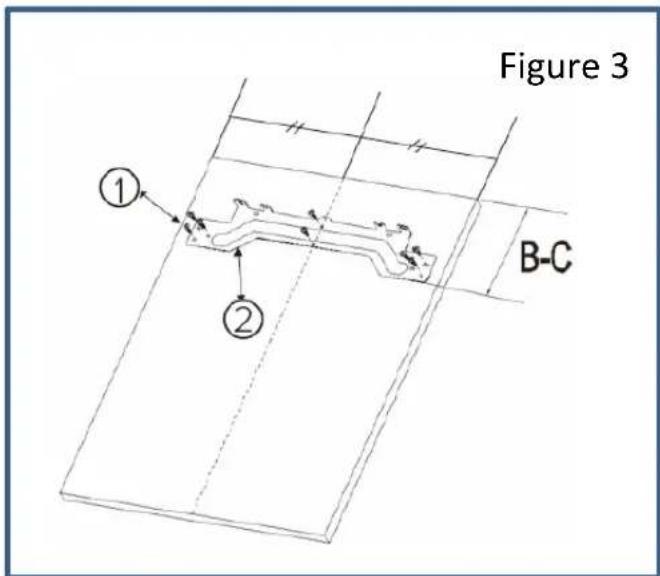
Fig. 3 - Fitting the decor door bracket
Subtract C from B and put the fixing bracket (2) in place using this measurement for vertical position and center horizontally.
Secure the fixing bracket (2) using screws (1) x8.
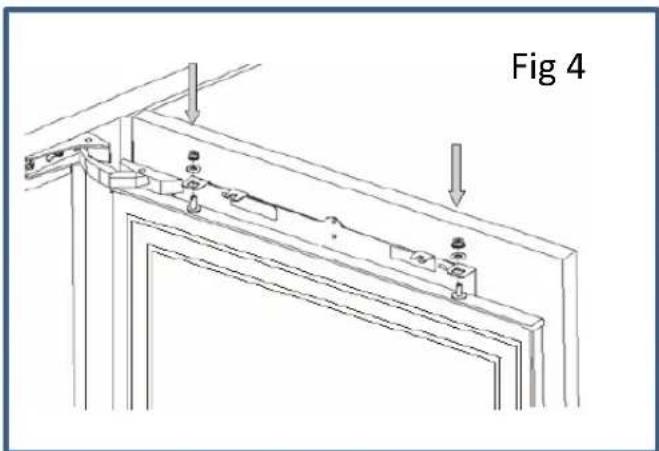
Fig. 4 - Fitting the cabinet door
Place the cabinet door onto the appliance door by inserting adjustment bolts into the slots on the fixing bracket. Locate the washers and screw the nuts onto the adjustment bolts. Do not tighten fully yet.
natural_image
Technical line drawing of a mechanical assembly with two downward arrows indicating force or movement (no text or symbols present)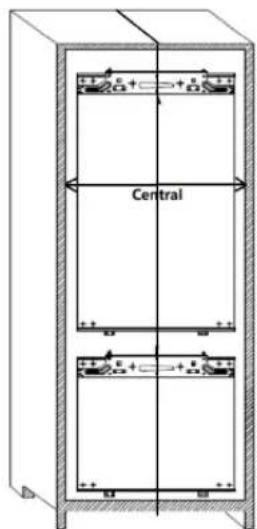
natural_image
Simple line drawing of a bench with two legs and a flat top, labeled 'Fig 1' (no other text or symbols)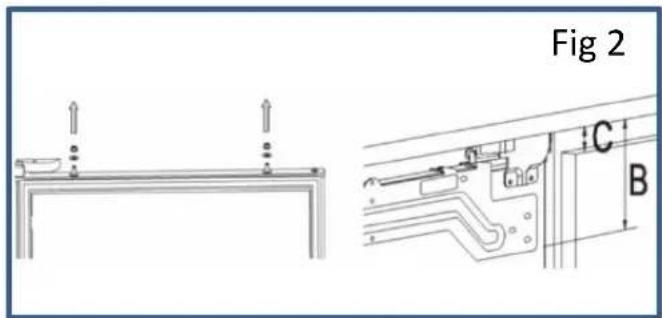
INSTALLATION INSTRUCTION
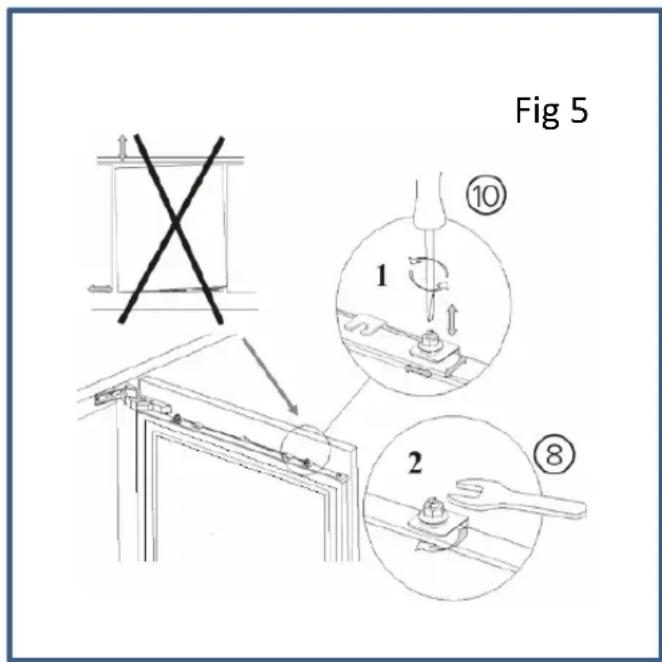
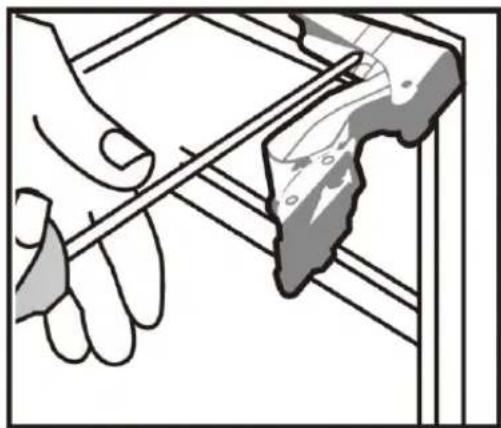
Fig. 5 - Aligning the panel door
Close the door and check the alignment with the other unit door (if applicable) or adjacent cabinets. Adjust the cabinet door by screwing or unscrewing the adjustment/angle alignment bolts for vertical adjustment and by the help of the slots on the fixing bracket for other directions. Lock the screws into place as shown in Fig. 5.
Fitting the cabinet door bottom brackets
With the appliance door open, locate the metal door lower f fixing brackets and screw the bracket to the cabinet door. You may need to remove and re-fit these brackets depending upon the cabinet door style used.
Fitting the decorative cover
Re-fit the decorative cover, that you removed in the first step, on to the cabinet door upper bracket.
Check that the whole door assembly operates smoothly and that the door seals are still creating a good seal.
Tip: If you hear wood touch wood when a door closes, it's possible the door panel is contacting the cabinet gable and potentially preventing a tight gasket seal. Adjust the panel further away from the appliance door to ensure a small gap between the cabinet panel and the gable.
Ensuring the door seals correctly:
It is normal for the seal to be compressed after the door has been reversed.
With the door closed, use a hair dryer to expand the seal and fill the gap between the door and the body of the appliance.
Take care not to use the hair dryer too close to the appliance, which could damage the seal.
A distance of approximately 10 cm / 4 inches should be adequate.
When completed, allow the seal and door to cool before touching them.
Once done, the seal will remain in position.
DOOR REVERSAL
CHANGE THE OPENING DIRECTION OF YOUR PRODUCT (1/2)
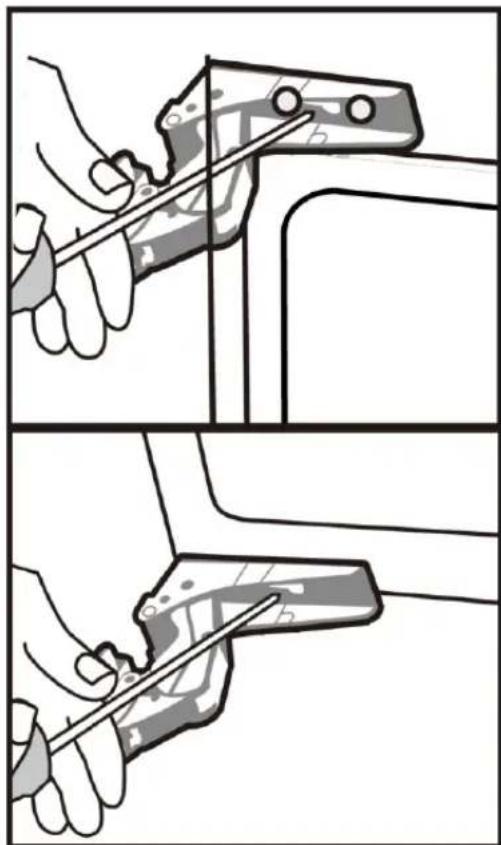
- Remove the screw caps on the front of the product.
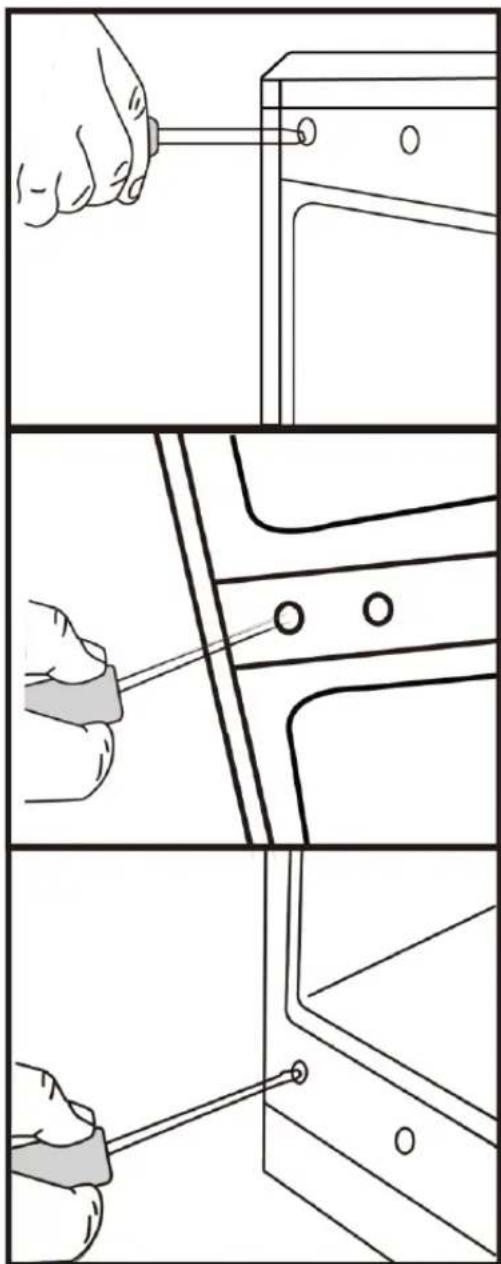
- With the door closed remove the screws from the top and bottom hinges that hold the appliance door to the hinges. Remove the screws from the top hinge first. Support the door at the bottom and open the hinge away from the appliance door.

natural_image
Two-panel illustration showing a hand using a tool to clean or repair a mechanical component, no text or symbols present.DOOR REVERSAL
CHANGE THE OPENING DIRECTION OF YOUR PRODUCT (2/2)
- Carefully lift the appliance door, ensuring you don't damage the hinges or the door.
natural_image
Two-panel line drawing showing a hand interacting with a wall and a device in a corner (no text or symbols)-
Use the same method to remove the other doors (if applicable)
-
With the top hinge open, remove the screws from the top hinge that fix the hinge to the cabinet of the appliance.
natural_image
Illustration of hands using a tool to draw or install a piece of wood (no text or symbols present)- Flip over the top hinge by 180^ and fix it in place on the diagonally opposite corner of the appliance cabinet (Upper hinge becomes lower and vice versa). Reattach the door by fixing the outside screws of the hinge to the door.
natural_image
Two-panel illustration showing hands using a tool to cut or mark a mechanical component, no text or symbols present.BEFORE FIRST USE
You must allow the unit to settle for at least twenty-four hours after transport prior to switching the power on. It is recommended that you clean the interior of the appliance prior to first use, using a solution of baking soda (sodium bicarbonate) and warm water and then thoroughly drying the interior. The unit may have an odor to it at first use. This will disappear as the unit cools.
Please note:
The unit will start with a default set temperature of 5^ C ( 41^ F) for fridge, 2^ C ( 36^ F) for special refrigerator compartment and -18^ C ( 0^ F) for freezer and work continuously until it achieves the correct temperatures. If the appliance is switched off, you should allow five minutes before switching it on again to prevent unnecessary strain to the compressor.
Never store inflammable or explosive items and strong corrosive acids or alkalis in the unit. This fridge cools your food by making the inner back of the cavity cold. It is normal for frost to build up on its surface; it then turns into liquid during compressor off-cycles and drains through a small drain at the bottom, where it evaporates harmlessly. The presence of frosting or moisture at the back is normal.
Refrigerator storage
- Never put liquids in the refrigerator uncovered.
- Never put hot foods in the refrigerator. Warm food should be allowed to cool to room temperature before being put into the refrigerator.
- Nothing should rest against the rear wall of the refrigerator, as this will cause frost and possible condensation problems which could be difficult to remove.
- Make sure food is clean and any extra water is wiped away before putting into the refrigerator.
- Wrap or cover food before putting into the fridge. This will help prevent the loss of moisture, keep food fresh and avoid unpleasant odors.
- Any foods to be used soon should be stored at the front of the shelf to prevent deterioration caused by the door being open for prolonged periods.
- Do not overfill the refrigerator. There should be sufficient space between the foods to allow the cool air to circulate.
- Thawing frozen foods in the refrigerator compartment will help to keep the temperature low and save energy.
- Never store raw meats on shelves above cooked meats or other produce. This will help to prevent juices from raw meat contaminating other food items.
Freezer storage
- The freezer compartments are designed to store only frozen food.
- Never put hot or warm foods in the freezer, allow them to cool fully before putting them into the freezer.
- Follow the instructions on the food packaging for storage of frozen food. If no information is provided, foods should not be stored for more than three months after the purchase date.
- Store food in small packages (ideally less than 1 kg / 2.2 lbs). This reduces the freezing time and improves the quality of the food after thawing.
- Wrap food before putting into the freezer. To stop the wrapping sticking together, ensure it is dry.
- Label the food before freezing with information including type of food and dates of storage and expiry.
- Once food is thawed, it must not be refrozen. Only defrost as much food as is required to prevent waste.
- Bottled or canned drinks should not be stored in the freezer compartments as they could explode.
- The maximum amount of fresh food that can be frozen within a 24-hour period is 3 kg / 6.6 lbs.
- Do not attempt to freeze more than the maximum amount.
STORAGE INSTRUCTION
The refrigerator section is for short-term food storage. Although low temperatures can be maintained, extended periods of food storage are not recommended.
As the cold air circulates within the fridge, the temperature can vary between the different sections. As such, foods
should be stored in different sections according to type.
-
Butter, cheese, etc.
-
Food in jars and bottles
-
Drinks, e.g. milk
-
Cooked food
-
Yoghurts, preserves, etc.
-
75 ml / 2.5 oz bottles or ready meals, etc.
-
Fresh meat and fish
-
Fruit and vegetables
natural_image
Interior view of a refrigerator with numbered compartments (no text or symbols visible)• The shelves can be moved according to the storage requirements within the refrigerator section.
• To move the shelf, lift the rear section up and then pull it outwards.
• To replace, slide the shelf back into the slot, and then lower the rear section.
Refrigerator storage
◆ Never put uncovered liquids in the refrigerator
◆ Never put hot foods in the refrigerator. Warm food should be allowed to cool to room temperature before being put into the refrigerator
◆ Nothing should rest against the rear wall of the refrigerator, as this will cause frost and possible condensation problems which will be difficult to remove
◆ Make sure food is clean and any extra water is wiped away before putting into the fridge
◆ Wrap or cover food before putting into the refrigerator. This will help prevent the loss of moisture, keep food fresh and avoid unpleasant odors
Do not overfill the refrigerator. There should be sufficient space between the foods to allow the cool air to circulate
◆ Thawing frozen foods in the refrigerator compartment will help to keep the temperature low and save energy
◆ Never store raw meats on shelves above cooked meats or other produce
Freezer storage
◆ The freezer compartments are designed to store only frozen food
◆ Never put hot or warm foods in the freezer, allow them to cool fully before putting them into the freezer
◆ Follow the instructions on the food packaging for storage of frozen food. If no information is provided, foods should not be stored for more than three months after the purchase date
◆ Store food in small packages (ideally less than 1 kg / 2.2 lbs). This reduces the freezing time and improves the quality of the food after thawing
◆ Once food is thawed, it must not be refrozen. Only defrost as much food as is required to prevent waste
◆ Bottled or canned drinks should not be stored in the freezer compartments as they could explode
The maximum amount of fresh food that can be frozen within a 24-hour period is 3kg / 6.6 lbs. Do not attempt to freeze more than the maximum amount
STORAGE INSTRUCTION
Fresh zone
◆ The fresh zone means that you can control its temperature independently.
◆ Fresh zone temperature ranges from -3^ ( 27^ ) to 3^ ( 37^ ).
The fresh zone is designed to make it easier to handle ingredients in a short period of time, when you handle frozen foods.
Zero-degrees preservation technology guarantees a relatively stable, independent, very close to -3 °C (27 °F), but not less than -3 °C (27 °F) fresh-keeping compartment, maintaining a steady temperature level - so that the food will be kept fresh for a longer period of time and will not be frozen
◆ Suggestions for use: It is recommended to store fresh fish, fresh meat and dried fruit in condition of -2^ C ( 28^ F) to 0^ C ( 32^ F). Put the frozen ingredients into the fresh zone 4/5 hours before use, you can cut or cook frozen foods effortlessly and enjoy a faster and healthier cooking experience.
It is recommended to store vegetables and fruits at 0^ C ( 32^ F) to 3^ C ( 37^ F).
Note: If you want to store easy-drying ingredients such as meat into the zero-temperature zone for more than 4 hours, you should use plastic wraps to avoid excessive moisture loss and affect the taste.
Crisper drawer humidity adjustment
The crisper drawer within this appliance features a humidity level adjustment slider. Vegetables and similar produce that are subject to wilting (e.g. arugula, spinach leaves, herbs such as basil etc.) should be kept in the crisper drawer and the adjustment slider kept closed (fully to the left - high). By keeping the adjustment slider closed, water vapor is held in the drawer and subsequently greens are kept crisper and fresher for longer
By contrast, fruits that are susceptible to rotting should be stored in the crisper drawer with the humidity adjustment slider fully open (to the right - low). This will allow gases, emitted by certain produce and that accelerate the rotting process, to exit the crisper drawer
◆ The drawer is marked high and low with vegetable and fruit symbols to aid you
CONTROLS

-
At first use, or after a power failure, the appliance always works at: 5°C (41°F) for refrigerator, 0°C (32°F) for fresh zone and -18°C (0°F) for freezer. If you want to adjust the temperature or functions manually, press any button to activate the control panel.
-
Refrigerator temperature adjustment: press button D on left-hand part of control panel multiple times to cycle through temperatures from 2^ C (36°F) to 8^ C (46°F).
-
Freezer temperature adjustment: press button E on right-hand part of control panel multiple times to cycle through temperatures from -15^ ( 5^ ) to -25^ (-13°F).
-
Fast-cooling function: press button B; button illuminates and fast cooling function is turned on, fridge will work automatically at temperature setting of 2^ C ( 36^ F). Mode expires automatically after 24 hours operation and illumination of button ceases. Mode can be canceled manually by pressing the button again.
-
Holiday function: press button C; button illuminates, holiday function is turned on and whole appliance will work automatically at settings: fridge at 17^ C (63 °F ) and freezer at -18^ C (0 °F ).
-
Smart function: press button F; button illuminates, fridge compartment operates at setting 5°C (41°F) and freezer compartment works at setting of -18°C (0°F). The Fresh zone works at setting of 0°C (32°F).
-
Fast-freezing function: press button G; button illuminates and freezer will operate at temperature setting -25°C (-13°F). After 24 hours, fast freezing function quits automatically, or can be ended manually at any time by pressing the button again.
-
Press button H for 3 seconds to switch off your appliance: the button lights up indicating unit is powered but in a standby mode. Press the button H for 3 seconds to switch on your appliance.
-
Press the button A to temporarily turn on the display section corresponding to the fresh zone, press the button A again to adjust the temperature. Temperature ranges of fresh zone from -3°C (27 °F) to 3°C (37 °F).
-
Fault display
This unit has a 'Fault display & alarm' function. If a fault is detected, there are alarms displayed on the temperature display, the appliance still cools but professional service technician should be called to check the appliance.
F1 - Sensor of fridge evaporator
F2 – Sensor of fresh zone
F3 – Sensor of fridge compartment
F4 – Sensor of freezer compartment
F5 – Sensor of defrosting
2E – Fault of fan/motor in freezer
EC – Communication fault between main panel and display panel.
PS: Main board is located in the compressor compartment
DEFROSTING
The product has a no frost system which is designed to prevent the heavy build up of ice. Under normal use, there should be no need to regularly defrost the freezer system.
Please note: If you are regularly finding a heavy build up of ice, or pools of water, in the freezer section then it is likely that the door is not sealing properly. This could be due to a defective door seal or an incorrectly fitted, or overly heavy, decor door. For more information see the troubleshooting section on ice.
CARE AND CLEANING
Always disconnect the appliance from the outlet before any cleaning or maintenance.
The refrigerator and freezer sections should be cleaned using a solution of baking soda and lukewarm water. Do not use abrasive products or detergents. After washing, rinse and dry thoroughly.
Clean the shelves and door bins separately by hand with a mild solution of mild dish detergent and water. Do not put them in the dishwasher.
If the appliance is not to be used for prolonged periods of time, unplug and clean the appliance. The doors should be left slightly ajar to prevent the formation of mildew and unpleasant odors.
TROUBLE-SHOOTING
If you have any problems with your appliance, you should check the troubleshooting prior to calling Customer Care.
If the appliance is not working, check:
That there is power to the appliance.
The house fuses are intact and the fuse in the plug has not blown.
The unit has not been turned off.
The outlet is functioning fine. To check this, plug another electrical appliance in to see if the socket is faulty.
If the appliance is working, but not very well, check:
The appliance is not overloaded.
The thermostat is set to an appropriate temperature.
The doors are closing properly.
The cooling system at the rear of the appliance is clean and free of dust, and not touching the rear wall.
There is enough ventilation at the side and rear walls.
If the appliance is noisy, check:
The appliance is level and stable.
The side and rear walls are clear, and there is nothing resting on the appliance.
Note: The cooling gas in the refrigerator may make a slight bubbling or gurgling noise, even when the compressor is not running.
If the appliance is beeping, check:
That the doors are closed. An alarm will sound after 60 seconds of a door being open.
If ice has formed on the back wall of the fridge:
It is normal for some ice droplets to form on the back wall of the fridge. This does not constitute a fault with the appliance.
Ensure that no items inside the fridge are in contact with the back wall.
Check that there is some resistance when opening the door of the appliance. If it opens at the slightest touch it may mean that the door seal needs to be replaced.
Check the door seal for any kinks, debris or damage. If you notice any, and are unable to resolve the issue yourself, contact Customer Care so that the seal can be replaced.
This can be due to the door panel(s) not being properly fitted. If you are at all unsure, ask your installer to check the door panel(s).
If excessive ice has formed in the freezer:
Check that there is some resistance when opening the door of the appliance. If it opens at the slightest touch it may mean that the door seal needs to be replaced.
Check the door seal for any debris or damage. If you notice any, and are unable to resolve the issue yourself, contact Customer Care so that the seal can be replaced.
This can be due to the door panel(s) not being properly fitted. If you are at all unsure, ask your fitter to check the door panel(s).
If one or more of the LED units within the appliance is not working:
Contact Customer Care to arrange a service visit.
SMEG REFRIGERATOR WARRANTY FULL TWO-YEAR WARRANTY
For two years from the date of the original purchase, SMEG USA, Inc. ("SMEG") will repair or replace (at its option) any part of the refrigerator which fails due to a defect in materials or workmanship. During this full two-year warranty, SMEG will provide, free of charge all labor and in-home service to repair or replace the defective part(s). This warranty is valid for properties designated for residential use only.
LIMITED THIRD THROUGH FIFTH YEAR WARRANTY
For the period from the third year, from the date of the original purchase, through the fifth year, SMEG will repair or replace (at its option) any part(s) of the sealed refrigeration system (consisting of the compressor, exposed evaporator, exposed condenser, drier, original refrigerant, and original connecting tubing) which fails in normal home use. If any new part is required, this will be supplied by SMEG free of charge. All other costs, including labor to repair or replace the defective part or parts, mileage, transportation, trip charge and diagnostic charge, if required, shall be the responsibility of the owner.
This warranty is valid only for the United States of America and Canada and applies only when the appliance is used in the country in which it was purchased. Outside the United States of America and Canada, this warranty does not apply. This warranty can be transferred.
WARRANTY
EXCLUSIONS
This warranty does not cover any defect or damage, which is not the direct fault of SMEG USA or Smeg S.p.A.; this includes, but is not limited to:
- Service trips to your residence to instruct you on how to use the product.
- Service trips to your residence during which no fault is found.
- Damages occurred during transit, handling and/or installation of the product.
- Damages occurred in case the product has not been installed duly following the manufacturer's installation instructions, as well as any and all local codes or regulations. This warranty does not cover any performance issue related to improper installation.
- Damages to the product due to failure in following the manufacturer's recommended care, cleaning and maintenance instructions. This warranty does not cover any performance issue related to improper care, cleaning or maintenance.
- Any repair, modification, alteration, or adjustment performed by any person or service company not authorized by SMEG or its service partners.
- Failure of the product if it is abused, misused or used for other than the intended purpose or if used in a commercial or industrial environment. Commercial and industrial are defined as an environment where the product is used for a business purpose or profit-generating activity.
- If the appliance is installed to an incorrect electric current, voltage, circuit breaker rating, extension cord, transformer, or power supply.
- Damage to electronic parts resulting from a power surge.
- Improper setting of any control on the appliance that requires service.
- Replacement of residential circuit breakers or resetting of circuit breakers.
- Replacement of light bulbs or LED lights.
- Replacement of water filter (on certain models) due to expired date or external issues.
- Replacement of air filter (on certain models) due to expired date or external issues.
- Normal wear and tear of the appliance or its cosmetic part(s). Wear and Tear is defined as scratches, dents, or other damage to the finish of the appliance unless it is the result of defects in material or workmanship and is reported to an authorized service partner within 30 days from date of purchase.
- Any substance, accumulating in or on any part or component of the product that causes a performance issue.
- Damages to anything situated next to the product, including but not limited to, ceiling, floor, wall, or cabinets. Products that are installed in cabinets or other built-in furniture that are not accessible for service. Smeg is also not responsible for disassembly or the reassembly of cabinets.
- The warranty does not cover any food loss due to refrigeration or product failures.
- Damage to the product caused by accident, fire, floods or act(s) of God.
- Expenses for travel and transportation to locations more than 30 miles from an authorized SMEG servicer.
- Products where the original serial numbers have been removed, damaged or defaced.
- NOTE: The cost of labor repair or any replacement part(s) for the above EXCLUSIONS will be the responsibility of the appliance owner.
- Any appliance that is replaced or defective part replaced shall become Smeg's property.
- This warranty is not valid for and does not apply for appliances installed on boats, ships, yachts or any other marine vessel.
- This warranty is not valid for and does not apply for appliances installed on passenger, cargo, commercial or private aircraft.
- This warranty is not valid for and does not apply for appliances installed on RV's, house trailers, mobile homes or any other structure which can be transported from one location to another.
The remedies described above are the only ones which SMEG will provide, either under this warranty or under any warranty arising by operation of law. SMEG will not be responsible for any consequential or incidental damages arising from the breach of this warranty or any other warranty, whether express, implied or statutory.
Some states do not allow the exclusion or limitation of incidental or consequential damages. This warranty gives you specific legal rights, and you may also have other rights which vary from state to state. To know what your legal rights are, consult your local state consumer affairs office or your state's Attorney General.
How to Obtain Service, Inquiries on Parts or Technical Questions:
- Within the United States: contact ADCO, SMEG USA's service partner at 1.888.763.4782
- Within Canada: contact Euro-Parts, SMEG USA's service partner at 1.844.778.7634
For all other inquiries please email service@smegservice.com
IMPORTANT: YOU MUST REGISTER YOUR PRODUCT WITHIN 30 DAYS FROM DATE OF PURCHASE.
IN THE US, CONTACT ADCO SERVICE: 1.888.763.4782 IN CANADA, CONTACT EURO-PARTS CANADA: 1.884.778.7634
CONTENIDO
NOTA IMPORTANTE 25
natural_image
Diagram showing a magnified view of stacked blocks with an upward arrow, next to a separate 3D block structure (no text or symbols)natural_image
Two-panel illustration showing a hand using a tool to adjust or install a mechanical component, no text or symbols present.APERTURA DE PUERTA
natural_image
Two-panel line drawing showing a person interacting with a wall and a device in a room (no text or symbols)natural_image
Illustration of hands using a tool to adjust or install a mechanical component (no text or symbols visible)natural_image
Two-panel illustration showing hands using a tool to cut or adjust a mechanical component, no text or symbols present.natural_image
Technical line drawing of a mechanical assembly with two downward arrows indicating force or movement (no text or symbols present)

natural_image
Simple line drawing of a horizontal beam with two vertical supports at both ends, labeled 'Fig 1' (no other text or symbols)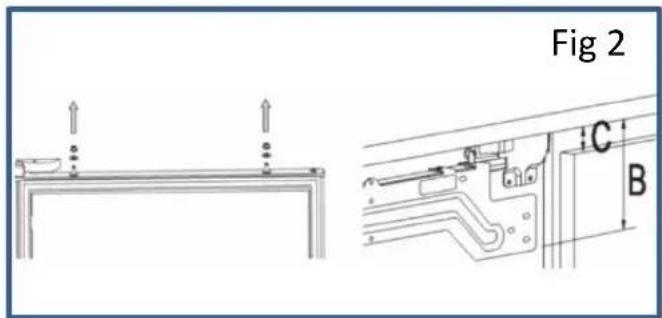
natural_image
Diagram showing a magnified view of stacked blocks with an arrow indicating upward motion, next to a separate 3D block structure (no text or symbols)natural_image
Two-panel illustration showing a hand using a tool to clean or repair a mechanical component, no text or symbols present.CHANGEMENT DU CÔTÉ D'OUVERTURE DE LA PORTE
CHANGEMENT DU CÔTÉ D'OUVERTURE DE LA PORTE DE VOTRE APPAREIL (2/2)
natural_image
Two-panel line drawing showing a hand holding a wall and a close-up of a device inside a window (no text or symbols)natural_image
Illustration of hands using a tool to adjust or install a mechanical component (no text or symbols visible)natural_image
Two-panel illustration showing hands using a tool to cut or mark a mechanical component, no text or symbols present.INSTRUCTIONS D'INSTALLATION
AIR FLOW
Recommendation : 50 x 4cm (18 x 2 po)
DIMENSIONS REQUISES DE LA CAVITÉ

INSTRUCTIONS D'INSTALLATION
natural_image
Simple line drawing of a rectangular object with two vertical supports at the base, labeled 'Figure 1' (no other text or symbols)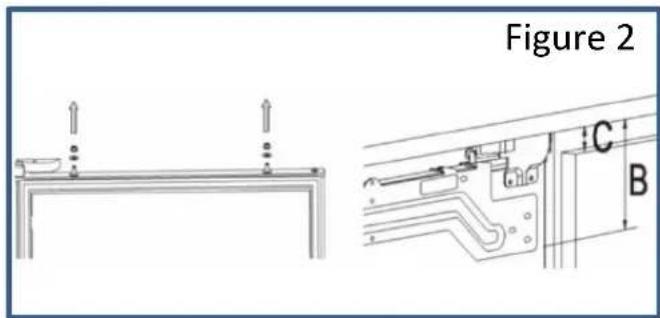
- CONTENT
- IMPORTANT NOTICES
- APPLIANCE COMPONENTS
- INSTALLATION AND OPERATING CONDITIONS OF THE APPLIANCE
- Placement of the Refrigerator in cabinetry
- Connect to the power supply
- Disconnecting the power supply
- Minimum distances from the heat sources
- Installation before using the appliance for the first time
- Shelves
- INSTALLATION INSTRUCTION
- IMPORTANT!
- INSTALLATION INSTRUCTIONS
- Unit and Cavity Dimensions
- Cabinet Door Dimensions
- Fitting the cabinet door bracket
- Fig. 5 - Aligning the panel door
- Fitting the cabinet door bottom brackets
- Fitting the decorative cover
- Ensuring the door seals correctly:
- DOOR REVERSAL
- CHANGE THE OPENING DIRECTION OF YOUR PRODUCT (1/2)
- CHANGE THE OPENING DIRECTION OF YOUR PRODUCT (2/2)
- BEFORE FIRST USE
- Please note:
- Refrigerator storage
- Freezer storage
- STORAGE INSTRUCTION
- Fresh zone
- Crisper drawer humidity adjustment
- CONTROLS
- DEFROSTING
- CARE AND CLEANING
- TROUBLE-SHOOTING
- If the appliance is not working, check:
- If the appliance is working, but not very well, check:
- If the appliance is noisy, check:
- If the appliance is beeping, check:
- If ice has formed on the back wall of the fridge:
- If excessive ice has formed in the freezer:
- If one or more of the LED units within the appliance is not working:
- SMEG REFRIGERATOR WARRANTY FULL TWO-YEAR WARRANTY
- LIMITED THIRD THROUGH FIFTH YEAR WARRANTY
- WARRANTY
- EXCLUSIONS
- How to Obtain Service, Inquiries on Parts or Technical Questions:
- CONTENIDO
- APERTURA DE PUERTA
- CHANGEMENT DU CÔTÉ D'OUVERTURE DE LA PORTE
- INSTRUCTIONS D'INSTALLATION
Brand : SMEG
Model : CB2485U
Category : Fridge