
inteso4 - Slicer Ritter - Free user manual and instructions
Find the device manual for free inteso4 Ritter in PDF.



| Brand | Ritter |
| Model | inteso4 |
| Product type | Universal slicer |
| Intended use | Domestic use, for cutting food |
| Cutting thickness range | Approx. 0 mm to 23 mm |
| Blade material | Stainless steel |
| Operating modes | Short-time mode (pulse) and continuous mode (max 5 minutes) |
| Power supply | Mains voltage and power according to rating plate (under the appliance) |
| Power cable | With integrated cord storage, extendable length |
| Carriage and food pusher | Included, removable for cleaning |
| Thickness adjustment knob | Graduated, position 0 to cover the blade |
| Slice receiving tray | Removable, slides out to the left |
| Safety | Very sharp blade, do not touch, mandatory stop before cleaning, not for children |
| Cleaning | Removable blade, clean with hot water (not dishwasher), wipe housing, lubrication recommended |
| Maintenance | Occasional lubrication of carriage guidance with Ritter grease or petroleum jelly |
| Special accessories | Smooth blade for meat and cold cuts, Ritter maintenance grease |
| Warranty | 2 years, according to manufacturer's conditions (see website) |
| Compliance | EC regulations |
| After-sales service | Contact local service center, spare parts available |
| Weight | Not specified in the manual |
| Dimensions | Not specified in the manual |
Frequently Asked Questions - inteso4 Ritter
User questions about inteso4 Ritter
0 question about this device. Answer the ones you know or ask your own.
Ask a new question about this device
Download the instructions for your Slicer in PDF format for free! Find your manual inteso4 - Ritter and take your electronic device back in hand. On this page are published all the documents necessary for the use of your device. inteso4 by Ritter.
USER MANUAL inteso4 Ritter
natural_image
Line drawing of a mechanical device with a power outlet and labeled 'solida⁵' (no other text or symbols)
natural_image
Technical line drawing of a mechanical device with labeled parts (12 and 5), no readable text or symbols beyond labels| deenfr | |||
| 1 Anschlagplatte Stop plate Plaque protège-lame | |||
| 2 Restehalter Left-over holder Pousse-restes | |||
| 3 Schneidgutschlitten Slice carriage Chariot | |||
| 4 Entriegelungsknopf a) | Release button a) | Bouton de déverrouillage a) | |
| 5 Messerverschluss b) | Blade catch b) | Dispositif de serrage de la lame b) | |
| 6 Messerabdeckung Blade cover Recouvrement de la lame | |||
| 7 Einschalter (Kurzbetrieb / Dauerbetrieb) | Switch (intermittent/ continuousoperation) | Commutateur (Mode courte durée/Mode continu) | |
| 8 Netzkabel Power cord Câble secteur | |||
| 9 Kabeldepot Cable compartment Range cordon | |||
| 10 | Typenschild | Type label | Plaque signalétique |
| 11 | Schneidgut-Auffangschale a) | Slice tray a) | Plateau de réception des tranches a) |
| 12 | Schnittstärke-Verstellknopf | Slice thickness adjustment knob | Bouton de réglage de l'épaisseur de coupe |
| 13 Rundmesser | Rotary blade | Lame | |
| a) bei Modell solida 1 / inteso4b) hinter der Messer abdeckung | a) on model solida 4 / inteso4b) Behind blade cover | a) sur le modèle solida 4 / inteso4b) derrière la protection de la lame | |
| bg | cs | da | |
| 1 | Ограничителна плоча | Opěrná deska | Stopplade |
| 2 | Държач за остатъка | Posuvný držák | Sikkerhedsholder |
| 3 | Направляваща повърхност за нарязвания продукт | Saně pro krájený materiál | Skiveslæde |
| 4 | Бутон за освобождаване a) | Uvolňovací tlačítko a) | Oplåsningsknap a) |
| 5 | Блокировка за ножа b) | Uzávěr nože b) | Knivlås b) |
| 6 | Капак за ножа Kryt nože | Knivafdækning | |
| 7 | Превключвател(кратковременен/продължите-лен режим на работа) | Spínač (krátkodobý/trvalý chod) | Kontakt (Kortvarig drift / permanent drift) |
| 8 | Мрежов кабел | Sít'ový kabel | Netledning |
| 9 | Отделение за съхранение на кабела | Schránka na kabel | Ledningsrum |
| 10 | Фирмена табелка | Typový štítek | Typeskilt |
| 11 | Тава за събиране на нарязвания продукт a) | Záchytná miska pro krájený materiál a) | Opsamlingsskål til madvarer a) |
| 12 | Бутон за регулиране на дебелината на рязане | Kotouč pro seřízení tloušťky řezu | Justeringsknap for skivetykkelse |
| 13 | Дисков нож | Kotoučový nůž Rundkniv | |
| a) при модел solida 4/ inteso 4б) зад капака за ножа | a) u modelu solida 4/ inteso 4b) za krytem nože | a) ved modellen solida 4/ inteso 4b) bag knivafdækningen | |
| es | |||
| 1 | Placa de tope | 8 | Cable de red |
| 2 | Sujetarrestos | 9 | Compartimento para cable |
| 3 | Carro para el producto | 10 | Placa de identificación |
| 4 | Botón de desbloqueoa) | 11 | Bandeja de recepción del producto cortadoa) |
| 5 | Cierre de la cuchillab) | 12 | Regulador del grosor de corte |
| 6 | Cubierta de la cuchilla | 13 | Cuchilla circular |
| 7 | Interruptor de encendido(Funcionamiento breve / Funcionamientocontinuo)fi hrhu | a) en el modelo solida4/ inteso4b) detrás de la cubierta de la cuchilla | |
| 1 Rajoitinlevy Zaustavna ploča Ütközõlap | |||
| 2 Leikkuutuki Držač ostataka namirnica Elõtoló | |||
| 3 Leikkuukelkka Klizna vodilica Csúszka | |||
| 4 Vapautuspainike a) | Gumb za deblokiranjea) | Kioldógomb a) | |
| 5 Terän lukitsin b) | Zatvarač nožab) | Késrögzítő zár b) | |
| 6 Teränsuojus Pokrov noža Késfedél | |||
| 7 Käynnistyskytkin (lyhyt/jatkuva käyttö) | Sklopka (kratkotrajni rad/ trajni rad) | Bekapcsológomb (rövid használat / tartós használat) | |
| 8 Verkkovirtajohto Mrežni kabel Hálózati kábel | |||
| 9 | Johtolokero | Spremnik za kabel | Vezetéktartó |
| 10 | Tyyppikilpi | Tipska pločica | Típusjelzés |
| 11 | Viipaleiden keruualusta a) | Posuda za narezane namirnice a) | Szeletgyüjtő tálca |
| 12 | Leikkauspaksuuden säädin | Gumb za podešavanje debljine rezanja | Szeletvastagság-beállító gomb |
| 13 | Pyöröterä | Okrugli nož | Vágókés (körkés) |
| a) mallissa solida4 / inteso4b) teränsuojuksen takana | a) kod modela solida4 / inteso4b) iza pokrova noža | a) solida4/ inteso4 modell eseténb) a késfedél mögött | |
| itnl | no | ||
| 1 Piano mobile | Aanslagplaat | Stoppeplate | |
| 2 Pressasalumi | Restenhouder Sikkerhetsholder | ||
| 3 Carrello | Snijwarenslede | Skyvebrett | |
| 4 Tasto di sblocco a) | Ontgrendelingsknop a) | Frigjøringsknapp a) | |
| 5 Dispositivo di serraggio della lama b) | Messluiting b) | Knivlås b) | |
| 6 Copertura di protezione della lama | Mesafdekking | Knivdeksel | |
| 7 Interruttore (Utilizzo breve / Utilizzo continuato) | Aan-/uitschakelaar (korte werking / continue werking) | Startknapp (momentinnstil-ling/fast innstilling) | |
| 8 | Cavo elettrico | Netsnoer | Ledning |
| 9 | Alloggiamento per il cavo | Snoeropbergvak | Ledningsrom |
| 10 | Targhetta | Typeplaatje | Typeskilt |
| 11 | Vassoio per alimenti a) | Opvangschaal voor snijwaren a) | Oppsamlingsbrett for oppskjær a) |
| 12 | Manopola di regolazione dello spessore del taglio | Snijdikteknop | Justeringsknapp for skivetykkelse |
| 13 | Lama | Rond mes | Rundkniv |
| a) per il modello solida 4/ inteso 4b) dietro la copertura di protezione della lama | a) bij model solida 4/ inteso 4b) achter de mesafdekking | a) ved modell solida 4/ inteso 4b) bak knivdekselet | |
| pl | |||
| 1 | Płyta oporowa | 8 Przewód | sieciowy |
| 2 | Popychacz małych produktów | 9 | Zasobnik na przewód |
| 3 | Prowadnica produktów | 10 | Tabliczka znamionowa |
| 4 | Przycisk odblokowujący a) | 11 | Tacka na pokrojone produkty a) |
| 5 | Blokada noża b) | 12 | Pokrętło regulacji grubości krojenia |
| 6 | Pokrywa noża | 13 | Nóż obrotowy |
| 7 | Włącznik (praca krótka / praca ciągła)ro | ru | a) przy modelu solida4/ inteso4b) za pokrywą nożask |
| 1 | Placă opritoare | Упорная пластина | Dorazová doska |
| 2 | Suport pentru resturi | Держатель для остатков | Prítlačná doska |
| 3 | Sanie pentru produsul de tăiat | Направляющие | Posúvač rezanej suroviny |
| 4 Buton de deblocarea) | Кнопка деблокирования a) | Odblokovací gombíka) | |
| 5 Dispozitiv de blocarea cuțitului b) | Предохранитель для ножа b) | Uzáver noža b) | |
| 6 Protectie cuțit | Кожух ножа | Kryt noža | |
| 7 Comutator(regim scurt/regim continuu) | Выключатель(кратковременный режим /продолжительный режим) | Zapínač(krátkodobá prevádzka /dlhodobá prevádzka) | |
| 8 | Cablu de alimentare | Сетевой шнур | Sietový kábel |
| 9 | Compartiment pentru cablu | Кабеленакопитель | Priehradka na kábel |
| 10 | Plăcuță de identificare | Маркировка | Typový štítok |
| 11 | Tavă pentru colectarea feliilor a) | Поддон для разрезаемыхпродуктов a) | Zachytávacia miska odrezkov a) |
| 12 Buton de reglare a grosimii detăiere | Колесико для регулированиятолщины нарезки | Regulátor hrúbky rezu | |
| 13 | Cuțit rotativ | Дисковый нож | Kotúčový nôž |
| a) pentru modelulsolida4/ inteso4b) în spatele protectiei cuțitului | a) у модели solida4/ inteso4b) позади кожуха ножа | a) pri modeli solida4/ inteso4b) za krytom noža | |
| sl | sv | tr | |
| 1 | Prislonska plošča | Stopplatta | Durdurma plakası |
| 2 | Držalo za živilo | Resthållare | Artik haznesi |
| 3 Sani za živilo Matarvagn | Dilimleme kizağı | ||
| 4 Gumb za sprostitev a) | Spärrknapp a) | Kilit açma düğmesi a) | |
| 5 Zapiralna odprtina na rezilu b) | Klinglás b) | Bicak tutucusu b) | |
| 6 | Pokrov noža | Klingskydd | Bicak koruması |
| 7 Stikalo (kratkotrajno/neprekinjeno delovanje) | Strömbrytare (tillfällig drift/kontinuerlig drift) | Açma düğmesi(kısa süreli çalıştırma/süreklicalıştırma) | |
| 8 Napajalni kabel Nätkabel | Elektrik kablosu | ||
| 9 | Prostor za shranjevanje kabla | Kabelfack | Kablo yuvası |
| 10 | Tipska ploščica | Typskylt | Bilgi etiketi |
| 11 | Prestrezna posoda za rezanoživilo a) | Skivfângarbricka a) | Dilimleme tepsisi a) |
| 12 Gumb za nastavitev debelinerezanja | Inställningsvred för skivtjocklek | Dilim kalınlığı ayar düğmesi | |
| 13 Okroglo rezilo Klinga | Döner bîçak | ||
| a) velja za model solida4/ inteso4b) za pokrovom rezila | a) vid modell solida4/ inteso4b) bakom klingskyddet | a) solida4/ inteso4modelindeb) Bicak korumasının arkasında | |
natural_image
Technical line drawing of a mechanical device with a handle and base plate (no text or symbols)
natural_image
Technical line drawing of a mechanical device with a paper clip and directional arrow (no text or symbols)
natural_image
Technical line drawing of an electrical enclosure with internal components and wiring (no text or symbols)
natural_image
Technical diagram showing a mechanical component with directional arrows indicating motion or force (no text or symbols present)
natural_image
Illustration of a hand using a tool to clean or adjust a material on a machine (no text or symbols visible)
natural_image
Illustration of hands using a tool to clean or wear a textured object on a device (no text or symbols visible)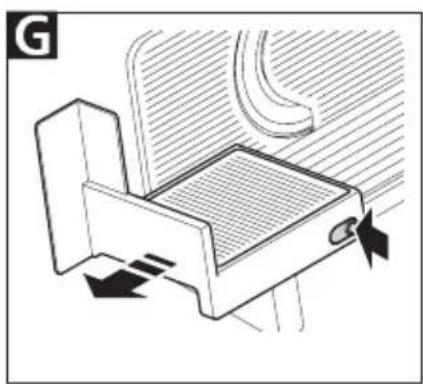
natural_image
Technical line drawing of a mechanical device with directional arrows indicating movement (no text or symbols)
natural_image
Technical illustration of a mechanical component with a cutting edge and directional arrow (no text or symbols)
natural_image
Hand operating a circular mechanical component with a knob (no text or symbols visible)K
ritterwerk Made in Germany
natural_image
Technical line drawing of a mechanical device with a black arrow indicating a downward motion (no text or symbols present)
natural_image
Technical line drawing of a mechanical device with a highlighted component (no text or symbols)
natural_image
Technical line drawing of an electrical enclosure with wiring and plug (no text or symbols)
natural_image
Mechanical diagram showing a rotating component with directional arrows indicating motion (no text or symbols)
natural_image
Illustration of hands using a tool to clean or adjust a surface, no text or symbols present
natural_image
Illustration of a hand placing a textured object onto a wooden surface, with no visible text or symbols.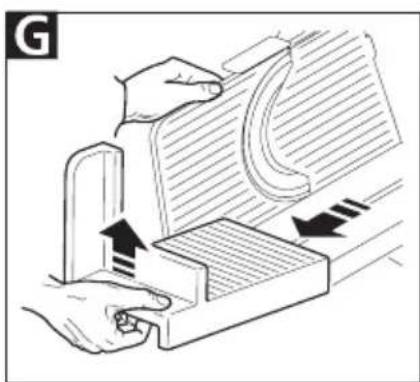
natural_image
Illustration of hands using a mechanical device to interact with a sheet metal component (no text or symbols visible)
natural_image
Technical illustration of a mechanical component with a circular cutter and directional arrow (no text or symbols)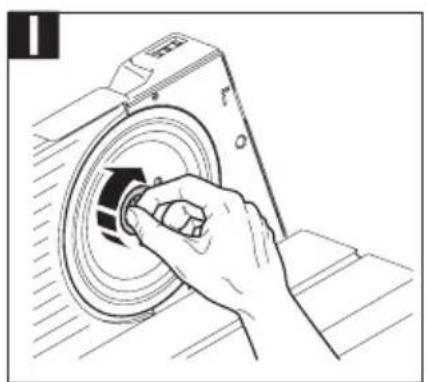
natural_image
Hand operating a circular mechanical component with a knob (no text or symbols visible)K
ritterwerk Made in Germany
GENERAL SAFETY INSTRUCTIONS
To avoid personal injury or damage to the appliance, please observe the following safety instructions:
- The food slicer is to be used for domestic purposes only and must not be used commercially.
– Never set the appliance down on hot surfaces or close to a naked flame.
- Use the accessories included in the delivery specification only.
- Use suitable extension cables only.
- Do not bend the power cord. Never wrap the cable around the appliance.
- Route the power cord so that it does not come into contact with hot or sharp-edged objects.
- Only start to use the appliance after it has been securely set up.
– Persons with reduced physical, sensory or intellectual capabilities or lacking in relevant experience and/or knowledge
may only use this appliance if they do so under supervision or have been instructed in the safe use of the appliance and understand the potential risks associated with its use.
- Do not allow children to play with the appliance.
- Always disconnect the appliance from the mains whenever it is to be left unsupervised, and also prior to assembly, dismantling and cleaning.
- This appliance must not be used by children. Keep the appliance and its connection cable out of reach of children.
- Only connect the appliance to a suitable AC power source that complies with the specifications on the type label.
– Never leave the appli- ance unattended while it is operating.
- Do not use it to cut frozen foods, hot foods, bones, food containing large stones, roast meats encased in netting or packaged foods!
– Never allow the appliance to run for more than 5 minutes at a time.
Risk of electric shock
- Always remove the power plug from the socket in the event of a malfunction, before cleaning and when the appliance is not in use. When doing so, pull on the plug and not on the cable. - Never immerse the appliance in water. Never expose the appliance to rain or any other form of moisture. If the appliance falls into water, unplug the cable from the mains socket before removing the appliance from the water. Have the appliance inspected at an authorized service location before using it again.
- Always ensure that your hands are completely dry before using the appliance. Do not use the appliance if it is wet or damp or while you are standing on a damp surface. Do not use the appliance outdoors.
- Stop using the appliance immediately if any parts are damaged and contact the ritter after-sales service.
- If the power cord is damaged, it must be replaced by the manufacturer, the manufacturer's after-sales service or a similarly qualified person to eliminate risk of personal injury.
Risk of injury
- This appliance must not be used without a slice carriage or a left-over holder, unless the size and shape of the food to be sliced means that these parts cannot be used.
- Before replacing accessories or add-on parts that move when operated, the appliance must be switched off and disconnected from the mains.
– The rotary blade is extremely sharp.
- Never touch the rotating blade when operating the appliance!
- Switch the appliance off before cleaning it; pull the power plug out of the socket and turn the slice thickness adjustment knob to the "0" position.
- The rotary blade will continue to run for a short time after being switched off.
Unfold the illustrations at the front and back of this manual.
Please read these instructions thoroughly before you start to use the appliance. Keep these operating instructions in a safe place and ensure that they are included with the appliance if passing it on to a third party.
Alternatively, the current operating instructions are available at www.ritterwerk.de.
INTENDED USE
The food slicer is used for the slicing of household foods.

The food slicer is suitable for contact with foodstuffs.
If the appliance is used for a purpose other than this, or if it is operated incorrectly, severe injuries may occur or the appliance may be damaged. All warranty and liability claims will be rendered null and void in this case.
BEFORE USING THE APPLIANCE FOR THE FIRST TIME
Preparation
Remove the appliance carefully from the packaging. Remove all packaging components and keep them in a safe place along with the packaging itself. Clean the appliance before allowing it to come into contact with any food (see CLEANING).
Setting up the appliance
- Set the appliance down on a flat, non-skid surface close to a mains socket.
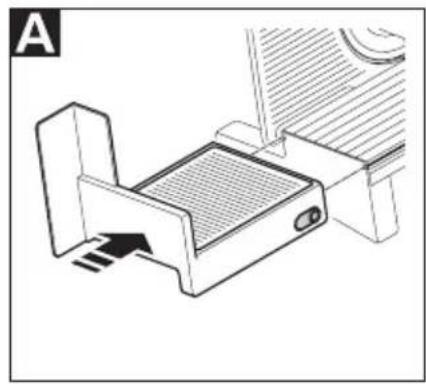
A solida ^4 / inteso ^4
Slide the slice carriage (3) into the guide grooves on the appliance.
Using a small amount of force, push the slice carriage (3) vertically into the guide groove on the appliance until it audibly locks into place.
B Slide the left-over holder (2) onto the slice carriage's handle.
C Unwind the power cord (8) to the length required from the cable compartment (9) under the appliance.
- Plug the cable into the socket.
SLICING
D Use the slice thickness adjustment knob (12) to set the required thickness.
Info:
The slice thickness adjustment scale is not a millimetre scale. For safety reasons, the "0" position is designed to cover the blade.
E Place the food to be sliced onto the slice carriage (3). Use the left-over holder (2) to press it up against the stop plate (1).
F Protect your hands by always using the slice carriage and, where applicable, the left-over holder.
Exception: Excessively large foods to be sliced.
- Turn the appliance on using the switch (7). Two operating modes are available:
Intermittent operation (PositionII):
The rotary blade (13) runs as long as the switch is pressed and held down in this position.
Continuous operation (Positionl):
The rotary blade runs without the switch being pressed and held down until you move the switch to the "0" position.
Info:
Never use the appliance for more than a maximum of 5 minutes in continuous operation.
- With the appliance running, gently feed the food to be sliced into the path of the rotary blade.
- When finished slicing, wait until the rotary blade has come to a complete stop.
• After each use, turn the slice thickness adjustment knob to the "0" position, in order to cover up the sharp rotating blade and to avoid any injuries.
CLEANING
Caution:
Switch the appliance off before cleaning it; pull the power plug out off the socket and turn the slice thickness adjustment knob (12) to the "0" position.
Clean the food slicer regularly to prevent the accumulation of food residue. The rotary blade must also be cleaned regularly as described below to prevent its surface from rusting.
Info:
Over time, an accumulation of food residue may cause damage to the surface of the rotary blade, causing it to rust.
Preparation
solida ^4 / inteso ^4
- Pull the slice tray (11) to the left and out of the appliance.
- Removing the left-over holder (2).
G solida ^4 / inteso ^4
Press the release button (4) and pull the slice carriage (3) off the appliance.
Pull the slice carriage (3) forward and then lift it up and out of the guide groove.
Removing the rotary blade:
H Remove the blade cover (6).
Open the blade catch (5), by turning it in a clockwise direction.
- Remove the blade catch.
• Take hold of the rotary blade (13) at its rotational centre and remove it.
Cleaning after each use
- Wipe down the housing and all removed parts, including the rotary blade, with a damp cloth.
Occasional cleaning
- Give all removed parts, including the rotary blade, a thorough wash in warm soapy water (not in the dishwasher!).
- Clean the housing behind the blade using a dry cloth/brush. Info:
Do not use any abrasive cleansers, sponges with rough surfaces or hard brushes.
- Dry all parts that you have washed.
- Grease the rotary blade's gear wheel with a little ritter maintenance grease (alternatively with a little Vaseline).
Assembling the appliance
- Carefully insert the rotary blade.
- Insert the blade catch.
- Close the blade catch by turning it in an anticlockwise direction.
- Mount the blade cover.
A solida ^4 / inteso ^4
Slide the slice carriage (3) into the guide grooves on the appliance.
Using a small amount of force, push the slice carriage (3) vertically into the guide groove on the appliance until it audibly locks into place.
MAINTENANCE
Your food slicer is maintenance-free. However, we recommend that you occasionally apply a little extra ritter maintenance grease or Vaseline to the rails of the slice carriage to keep them lubricated and ensure that the carriage continues to move easily.
STORAGE
Keep the appliance out of the reach of children.
To store the cable, always use the cable compartment integrated into the appliance.
DISPOSAL OF WASTE ELECTRICAL AND ELECTRONICEQUIPMENT
This symbol indicates that this product must not be disposed of with unsorted municipal
waste. There is a separate (free) system for the collection and return of waste electrical and electronic equipment. For more information, please contact your local authority or the shop where you purchased the product. By ensuring that this product is disposed of correctly, you will help prevent potential negative consequences for the environment and human health and contribute to the conservation of natural resources.
REACH DIRECTIVE
A special, non-toothed rotary blade is also available for use with sliced meat, sausage and ham.
The original ritter maintenance grease is available for delivery for maintaining (regreasing) the food slicer.
SERVICE, REPAIRS AND SPARE PARTS
Please contact your local after-sales service for all service, repairs and spare parts issues. See www.ritterwerk.de
TECHNICAL DATA
The appliance complies with the CE specifications.
Mains voltage/power consumption: Refer to the type label on the underside of the appliance.
Slice thickness:
0 mm to approx. 23 mm
WARRANTY
This ritter appliance comes with a two-year manufacturer's warranty, starting with the date of purchase and in accordance with the EU warranty directives. Your legal warranty claims according to § 437 ff. BGB (German Civil Code) remain unaffected by this regulation. The manufacturer warranty applies to all devices sold within the European Union. For details of the warranty conditions, see www.ritterwerk.de/warranty. In the event of a warranty claim or for servicing, the appliance must always be sent to the appropriate national customer service centre.
INSTRUCTIONS DE SÉCURITÉ GÉNÉRALES
SERVICE, REPARATIONER OCH RESERVDELAR


- ritterwerk Made in Germany
- GENERAL SAFETY INSTRUCTIONS
- Risk of electric shock
- Risk of injury
- INTENDED USE
- BEFORE USING THE APPLIANCE FOR THE FIRST TIME
- Preparation
- Setting up the appliance
- A solida 4 / inteso 4
- SLICING
- Intermittent operation (PositionII):
- Continuous operation (Positionl):
- CLEANING
- Caution:
- solida 4 / inteso 4
- G solida 4 / inteso 4
- H Remove the blade cover (6).
- Open the blade catch (5), by turning it in a clockwise direction.
- Cleaning after each use
- Occasional cleaning
- Assembling the appliance
- MAINTENANCE
- STORAGE
- DISPOSAL OF WASTE ELECTRICAL AND ELECTRONICEQUIPMENT
- REACH DIRECTIVE
- SERVICE, REPAIRS AND SPARE PARTS
- TECHNICAL DATA
- WARRANTY
- INSTRUCTIONS DE SÉCURITÉ GÉNÉRALES
- SERVICE, REPARATIONER OCH RESERVDELAR
Brand : Ritter
Model : inteso4
Category : Slicer