
DF36650 - Cooker WOLF - Free user manual and instructions
Find the device manual for free DF36650 WOLF in PDF.
| Product type | Gas/electric range |
| Brand | Wolf |
| Model | DF36650 |
| Width | 48 in (122 cm) |
| Power source | Gas for surface burners, electric for oven |
| Surface burners | 4 burners: 20,000 BTU (front left), 18,000 BTU (front right), 9,200 BTU (rear left), 15,000 BTU (rear right) |
| Oven cooking modes | 10 modes: Bake, Roast, Broil, Convection, Convection Roast, Gourmet, Proof, Stone Baking, Dehydrate, Keep Warm |
| Control panel | Interactive touchscreen with selector knob and temperature button |
| Temperature probe | Integrated, for all modes except broil, proof, and dehydrate |
| Special features | Gourmet mode (6 categories), timed cooking, delayed start, Sabbath mode, Wi-Fi connectivity |
| Oven capacity | Double oven (as per illustration) or single? The DF36650 model is a single oven (based on content). Capacity not specified. |
| Cleaning | Pyrolytic cleaning (self-cleaning) approximately 4 hours |
| Material | Stainless steel, porcelain interior |
| Safety | Anti-tip device, control lock, automatic shut-off after 12 h, gas shut-off in case of leak (not specified) |
| Oven light | 40 W halogen bulb: one top, one bottom (replaceable) |
| Included accessories | Oven racks (standard and full-extension), broiler pan (pan and grid), hook for center rack (optional) |
| Additional options | Charcoal griller, griddle, French cooktop (optional) |
| Warranty | 2 years full, 5 years limited (selected parts) |
| Customer service | USA: 800-222-7820; website: wolfappliance.com |
Frequently Asked Questions - DF36650 WOLF
User questions about DF36650 WOLF
0 question about this device. Answer the ones you know or ask your own.
Ask a new question about this device
Download the instructions for your Cooker in PDF format for free! Find your manual DF36650 - WOLF and take your electronic device back in hand. On this page are published all the documents necessary for the use of your device. DF36650 by WOLF.
USER MANUAL DF36650 WOLF
3 Safety Precautions
6 Dual Fuel Range Features
7 Oven Operation
18 Wolf Cooking Guide
21 Surface Operation
24 Care Recommendations
25 Troubleshooting
27 Wolf Warranty
Customer Care
The model and serial number are printed on the enclosed product registration card. Both numbers are also listed on the product rating plate. Refer to page 6 for rating plate location. For warranty purposes, you will also need the date of installation and name of your authorized Wolf dealer. Record this information below for future reference.
SERVICE INFORMATION
| Model Number |
| Serial Number |
| Date of Installation |
| Certified Service Name |
| Certified Service Number |
| Authorized Dealer |
| Dealer Number |
If your product ever needs attention, be sure to use a Wolf Factory Certified Service provider recommended by our Customer Care Center, or select one from our list of providers available at wolfappliance.com/locator. All Factory Certified Service providers are carefully selected and thoroughly trained by us.
Important Note
To ensure this product is installed and operated as safely and efficiently as possible, take note of the following types of highlighted information throughout this guide:
IMPORTANT NOTE highlights information that is especially important.
CAUTION
Indicates a situation where minor injury or product damage may occur if instructions are not followed.
WARNING
States a hazard that may cause serious injury or death if precautions are not followed.
IMPORTANT NOTE: Throughout this guide, dimensions in parentheses are millimeters unless otherwise specified.
IMPORTANT INSTRUCTIONS
WARNING
If the information in this guide is not followed exactly, a fire or explosion may result, causing property damage, personal injury, or death.
Do not store or use gasoline or other flammable vapors and liquids in the vicinity of this or any other appliance.
WHAT TO DO IF YOU SMELL GAS:
- Do not try to light any appliance.
- Do not touch any electrical switch.
- Do not use any phone in your building.
- Immediately call your gas supplier from a neighbor's phone. Follow the gas supplier's instructions. If you cannot reach your gas supplier, call the fire department.
This appli ance must be properly installed and serviced by a qualified installer, service agency, or gas supplier and grounded by a qualified technician.
WARNING
A child or adult can tip this appliance and be killed.
Verify the anti-tip device has been properly installed and engaged. Ensure the anti-tip device is re-engaged when this appliance is moved. Refer to the illustrations below for how to verify correct installation.
Do not operate this appliance without the anti-tip device in place and engaged. Failure to do so can result in death or serious burns to children or adults.
To reduce the risk of burns, do not move this appliance while hot.
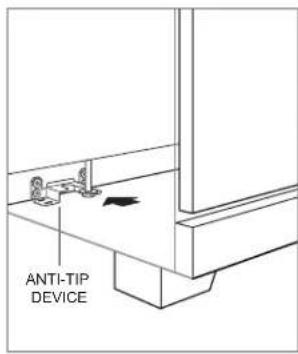
Anti-tip device location
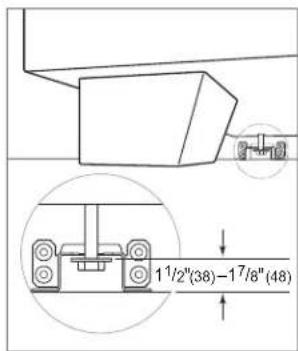
Anti-tip device engaged
IMPORTANT INSTRUCTIONS
GENERAL SAFETY PRECAUTIONS
- Read this guide carefully before using this appliance to reduce risk of fire, electric shock, or injury.
- Before performing service, shut off the gas supply by closing the gas shut-off valve and shut off electricity to this appliance.
- Keep the appliance area clear and free from combustible material.
- For safety when cooking, set burner controls so the flame does not extend beyond the bottom of pan.
- Exercise caution when opening the oven door. Let hot air or steam escape before looking or reaching into oven.
- Do not install a ventilation system that blows air downward toward this gas cooking appliance. This type of ventilation system may cause ignition and combustion problems with this gas cooking appliance resulting in personal injury or unintended operation.
- Do not use aluminum foil to line any part of this appliance.
- Never use this appliance to warm or heat the room. Doing so may result in carbon monoxide poisoning.
- Be sure the oven cool air intake (above the door) and oven exhaust vent (below the door) are unobstructed at all times.
-
Do not touch, or let clothing or other combustible materials touch, the rangetop and the surrounding area until they have had sufficient time to cool. These areas may become hot enough to cause burns.
-
Wear proper apparel. Loose-fitting or hanging garments should never be worn using this appliance.
- Use extreme caution when moving a grease kettle or disposing of hot grease.
- Always use dry pot holders when removing pans from this appliance. Wet or damp pot holders can cause steam burns. Do not use a towel or bulky cloth in place of pot holders.
- Position oven racks in the desired locations when the oven is cool. If a rack must be repositioned after the oven is already hot, be sure the pot holder does not contact a hot heating element in the oven.
- Clean only those parts listed in this guide.
- Do not use oven cleaners. No commercial oven cleaner or oven liner protective coating of any kind should be used in or around any part of the oven.
- Before using self-clean, remove the oven racks, oven rack guides, and any other cookware or utensils.
- Do not repair or replace any part of this appliance unless specifically recommended in literature accompanying this appliance.
- Do not obstruct the flow of air to ensure proper combustion and ventilation.
- When using this appliance, do not touch grates, burner caps, burner bases or any other parts in proximity to the flame. These components may be hot enough to cause burns.
IMPORTANT INSTRUCTIONS
GENERAL SAFETY PRECAUTIONS
- Do not clean the oven gasket; rubbing or moving the gasket may compromise the door seal.
- Do not use water on grease fires. Smother the flame or use a dry chemical or foam-type extinguisher.
- Do not touch heating elements or interior surfaces of the oven. Heating elements may be hot even though they are dark in color. Interior surfaces become hot enough to cause burns. During and after use, do not touch or let clothing or other flammable materials contact heating elements or interior surfaces of the oven until they have had sufficient time to cool.
- Never leave this appliance unattended when in use. Boilovers and greasy spills may smoke or ignite.
- Do not leave children alone or unattended in the area where this appliance is in use. Never allow children to sit or stand on the appliance.
- Do not store items of interest to children above or at the back of this appliance, as they could climb on the appliance to reach items and be injured.
- Do not heat unopened food containers, such as baby food jars and cans. Pressure build-up may cause the container to burst and cause injury.
- Do not store flammable materials in an oven, near burners, or let grease or other flammable substances accumulate on this appliance.
WARNING
PROPOSITION 65 FOR CALIFORNIA RESIDENTS
Cancer and Reproductive Harm—www.P65Warnings.ca.gov
COMMONWEALTH OF MASSACHUSETTS
- Installations and repairs must be performed by a qualified or licensed contractor, plumber, or gas fitter, qualified or licensed by the state, province, or region where this appliance is being installed.
- Use only gas shut-off valves approved for use within the state, province, or region where this appliance is being installed.
- A flexible gas connector, when used, must not exceed 3' (.9 m).
Dual Fuel Range Features
FEATURES
| 1 | Product Rating Plate |
| 2 | Control Panel (press to access) |
| 3 | Oven Control Bezel and Knob |
| 4 | Convection Oven |
| 5 | Surface Burner |
| 6 | Optional Charbroiler |
| 7 | Optional Griddle |
| 8 | Optional French Top (not shown) |
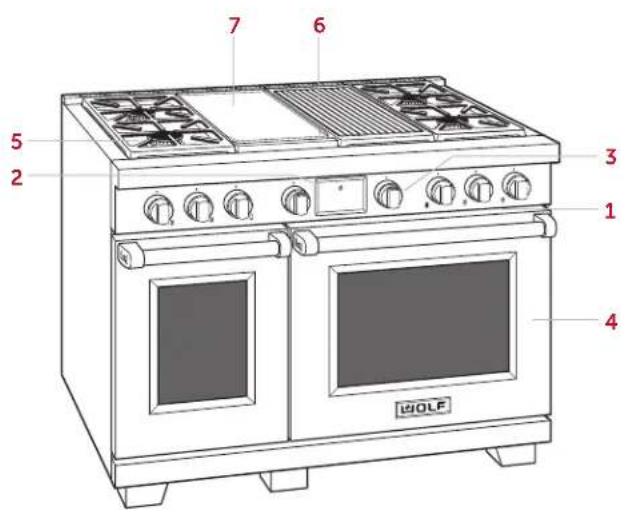
48" Dual Fuel Range shown
Getting Started
We know you are eager to start cooking, but before you do, please take some time to read this use and care guide. Whether you are an occasional cook or an expert chef, it will be to your benefit to familiarize yourself with the safety practices, features, operation, and care recommendations of your Wolf Dual Fuel Range.
- To ensure all residual oil from the manufacturing process has been removed, clean the range thoroughly with hot water and mild detergent prior to use. Rinse and dry with a soft cloth. Refer to Care Recommendations on page 24.
- Verify the surface burner components are assembled correctly.
- The optional charbroiler, griddle, and French top require special attention. Refer to pages 22–23.
- To ensure the best results, review the cooking modes and special features on page 13.
CAUTION
Do not place cookware on the oven floor or use aluminum foil or other material to line the oven floor or side walls. Failure to adhere to this notice will damage the porcelain interior and will void your warranty.
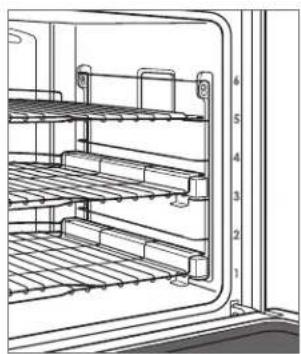
Oven Racks
OVEN RACK POSITION
The oven racks can be placed in any of the six positions labeled on the front face of the oven. Refer to the illustration below.
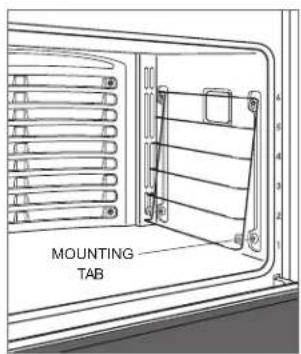
OVEN RACK GUIDES
To insert the rack guides in the oven, locate the mounting screws on the oven side walls. Place the rack guide mounting tabs over the top screws, pivot inward and slide down until fully seated. Refer to the illustration below.
natural_image
Technical line drawing of a refrigerator interior showing shelves and door frame (no text or symbols)Oven rack position
Oven rack guide
OVEN RACKS
To insert a standard rack in the oven, place the rack anti-tip lock under the side rack guide rails. Slide the rack back and lift up to clear the rack stops. Continue to slide the rack back until completely inside the oven. Refer to the illustration below.
To insert a full-extension rack, place the two rear tabs onto the rack guide (one tab above and one below). Refer to the illustration below. Angle the rack slightly and slide back until the front rack notch engages the front rack guide.
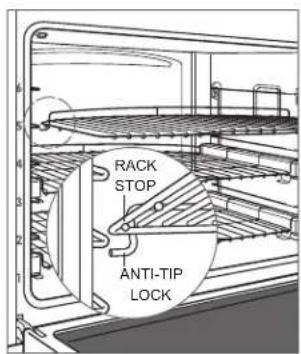
Oven rack anti-tip lock
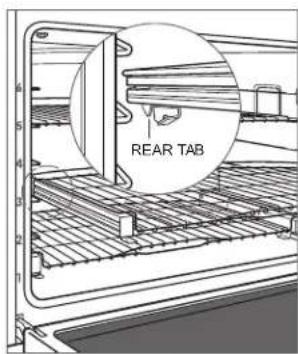
Full-extension rack
Oven Operation
Wolf Dual Fuel Ranges use a combination of an interactive touch screen control panel, cooking mode selector bezel, and oven temperature control knob to select desired cooking modes, oven temperature, and exclusive features. The control panel must be open to access Gourmet mode and exclusive features. Refer to the illustration below.
The oven has ten cooking modes—Bake, Roast, Broil, Convection Roast, Convection, Gourmet, Proof, Stone, Dehydrate, and Warm. Stone is not available for the 18" (457) oven. Stone and Dehydrate require accessories.
To start cooking:
1 Rotate the selector bezel to the desired cooking mode. --- appears on the oven knob display.
2 Turn the control knob to increase or decrease the temperature or touch Start on the control panel. Either action completes the second step of the process and preheat begins.
For Bake, Roast, Broil, Convection Roast, Convection, Gourmet, and Stone modes, a slight rotation of the control knob adjusts the temperature by 5^ F ( 1^ C). A full rotation adjusts the temperature by 25^ F ( 5^ C). For Proof, Dehydrate, and Warm modes, a slight rotation of the control knob adjusts the temperature by 1^ . A full rotation adjusts the temperature by 5^ .
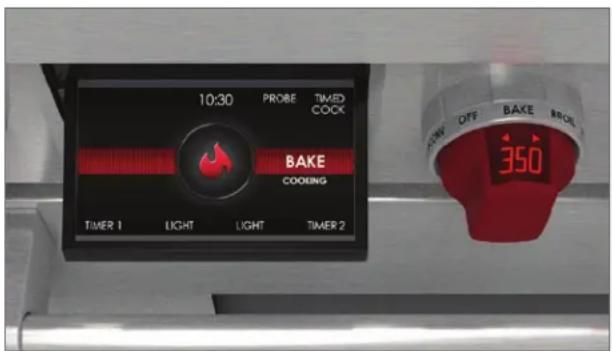
Oven control panel and knob
The interactive control panel uses touch technology to select cooking modes and other functions. Refer to the illustrations below.
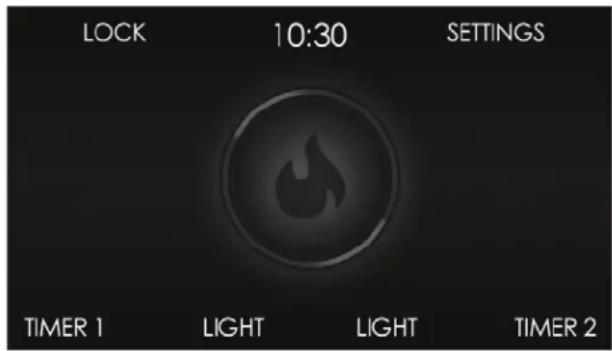
Home screen (double oven shown)
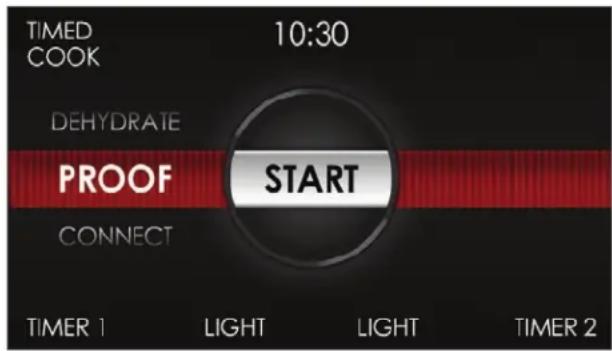
More screen (double oven shown)
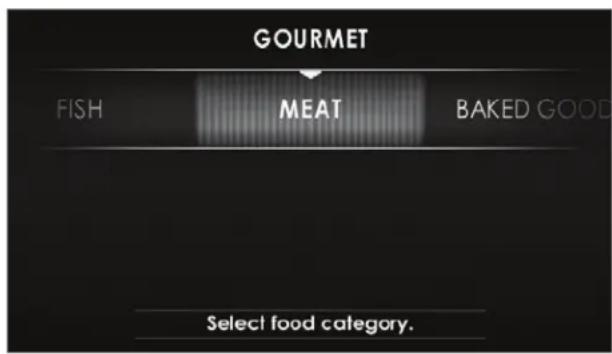
Gourmet screen
Oven Operation
PRIOR TO USE
To ensure all residual oil from the manufacturing process has been removed, each oven must go through the following procedure:
1 Clean the oven thoroughly with hot water and a mild detergent. Rinse and dry with a soft cloth.
2 Turn on ventilation. Some smoke and odor is normal.
3 Rotate the selector bezel to Roast and adjust the temperature to 500°F (260°C) for one hour.
4 Rotate the bezel to Off and allow the oven to cool with the door closed.
CONTROL LOCK
The lock feature prevents unwanted control panel operation. The lock feature must be reset after a power outage.
To lock or unlock:
1 Touch and hold Lock for 3 seconds.
OVEN LIGHT
The oven light turns on automatically when the door is open and off when closed. To turn the light on while the door is closed, touch Light on the control panel.
PREHEAT
During preheat, the oven is heated as quickly and evenly as possible and is not ideal for cooking. Preheat should be used for all cooking modes except Broil, Proof, Dehydrate, Warm, and some modes in Gourmet. Once preheat is complete, a chime indicates the oven has reached set temperature.
Oven Operation
CLOCK
The clock is visible on the control panel during all cooking modes. It is very important the clock be set to the correct time if a timed cook feature is used. The clock must be reset after a power outage.
The clock sets automatically if the unit is connected to Wi-Fi. Refer to Connect This Appliance on page 11.
Setting clock:
1 Touch Settings, then select Time.
2 Touch 12 Hour or 24 Hour mode.
3 Use the slide bar to set the time of day, select AM or PM, then touch Set. A chime indicates the clock is set.
Time can also be adjusted by touching the time display on the home screen.
TIMER
Each timer can be set for a maximum of 11 hours and 59 minutes. Once a time is set, the countdown appears on the touchscreen. The timer is independent from the oven. Setting the timer does not impact cook time or stop time.
Setting timer:
1 Touch Timer 1 or Timer 2.
2 Use the slide bars to set the duration, then touch Set. A chime indicates the timer is set.
3 To edit the timer, touch the countdown time on the touchscreen, then use the slide bars to set the duration.
4 To cancel the timer, touch the countdown time on the touchscreen, then touch ✗.
5 The timer chimes with one minute remaining. The timer chimes and flashes when complete.
6 Touch the flashing time to clear.
Extended Options
Touch Settings to access extended options. Use the slide bar to scroll to the desired option and touch the option to select. If more information is needed, touch Info.
OPTIONS
Time Select 12 hour or 24 hour.
Sabbath Turn Sabbath on or off.
Clock Select digital, analog, blank, or logo.
Connect Turn connect on or off.*
Standby Turn standby power on or off.
Language Select: English, Spanish, French, Italian, German, Dutch, or Chinese.
Units °F/Imperial or °C/Metric.
Showroom For showroom use only.
Info Access helpful tips and product information.
About For service only.
Temp Offset For service only.
Calibration Adjust touchscreen calibration.
Sound Mute, 1-5 and high, medium, low.
Brightness Adjust touchscreen brightness: 0-100%.
*To connect to the Sub-Zero Group Owner's App, connect must be turned on.
Connect This Appliance
Connect this appliance to remotely monitor and control it. Connecting requires a wireless router, an Internet connection with a network name and password, and a compatible mobile device. There is no limit to the number of appliances you can connect to an account. Connect products from multiple homes to the same account. Connecting appliances is optional.
1 Download the free Sub-Zero Group Owner's App from the Apple App Store or Google Play.
2 With Bluetooth enabled on the device, stand within a few feet of the appliance, open the app, and follow the on-screen instructions.
3 Log in or create an account.
4 Tap Add An Appliance or tap + in upper right of the screen to add appliances. To identify which appliance to pair, open the appliance door.
5 Tap + next to the appliance to select it. If identical appliances appear, an additional step identifies which appliance to pair.
6 Tap Pair Via Bluetooth. Wait for setup to complete, then tap Set Up Your Appliance For Pairing.
7 Tap Choose a Network on the Connect Your Appliance to Wi-Fi screen.
8 Select the home Wi-Fi network and enter the network password.
9 Tap Turn on Notifications to allow notifications about the appliance (for example, door left ajar).
10 Tap Done on the Success screen to complete the setup.
Cooking Modes
GOURMET
Gourmet provides a variety of quick and convenient meal preparations. Choose from six categories—Meat, Fish, Baked Goods, Pizza, Vegetables, and One Dish Meals.
After a selection is made, Gourmet recommends the proper rack position, sets the cooking mode, and automatically adjusts the temperature—sometimes using multiple modes and temperatures. Refer to the instructions on the control panel to determine whether preheat is required. The oven does not turn off automatically when the cook time is complete.
For more information regarding Gourmet, refer to the techniques and recipes guide included with your appliance or visit subzero-wolf.com/wolf-technique-guides.
Setting controls:
1 Rotate the bezel to

2 Use the control panel to select the desired settings.
GOURMET GUIDE
| MEAT Beef steak, tenderloin, roast, prime rib, meatloaf, slow cook | |
| Poultry whole bird, fresh pieces, whole breast | |
| Pork ribs, tenderloin, roast, steak, chop, whole ham | |
| Lamb leg, roast, rib rack | |
| FISH Steak | |
| Fillet | |
| Breaded | |
| BAKED GOODS Cookies | |
| Cake sheet, fluted, angel, pound, cupcakes | |
| Pie single crust, double crust | |
| Bread quick bread, yeast loaf, yeast rolls, biscuits | |
| PIZZA* Fresh | |
| Par-Baked | |
| Calzone | |
| VEGETABLES | Roasted |
| Sweet Potato | |
| Baked Potato | |
| ONE DISH MEALS | Casserole |
| Lasagna | |
| Quiche | |
*Not available for 18" (457) oven.
Cooking Modes
MODE PRESET RANGE PROBE USES
| BAKE 350°F | (175°C) | 200–550°F(95–290°C) | Best for single-rack cooking, primarily baked foods. Use for standard recipes. |
| ROAST 350°F | (175°C) | 200–550°F(95–290°C) | Best for roasting less tender cuts of meat, such as chuck roasts and stew meat that should be covered. |
| BROIL BR3 | 550°F (290°C) | BR3 550°F (290°C)BR2 450°F (230°C)BR1 350°F (175°C) | Best for broiling meats, fish, and poultry pieces up to 1" thick.Use a two-piece broiler pan and always broil with the oven door closed. |
| CONVECTION ROAST 325°F | (165°C) | 200–550°F(95–290°C) | Gently browns exterior and seals in juices. Perfect for roasting tender cuts of beef, lamb, pork, and poultry. |
| CONVECTION 325°F | (165°C) | 200–550°F(95–290°C) | Uniform air movement makes it possible to multi-level rack cook with even browning. |
| GOURMET | — | — | Gourmet provides quick and convenient meal preparations with recommendations for cooking mode and rack position. Refer to page 12. Preset temperature and range are dependent on food and desired doneness. |
| PROOF 85°F | (30°C) | 85–110°F(30–45°C) | Ideal for proofing or rising bread dough. |
| STONE 450°F | (230°C) | 200–550°F(95–290°C) | Baking on a ceramic stone. Great for pizza and bread. Stone accessory required. |
| DEHYDRATE | 135°F(60°C) | 110–170°F(45–75°C) | Dry a variety of fruits, vegetables, herbs, and meat strips.Accessory racks required. |
| WARM 180°F | (80°C) | 140–200°F(60–95°C) | Designed to keep foods at serving temperature. |
NOTE: The temperature probe can be used with all cooking modes except Broil, Proof, and Dehydrate.
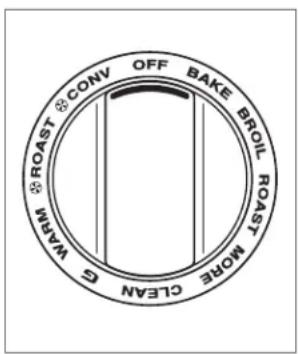
Oven knob selector bezel
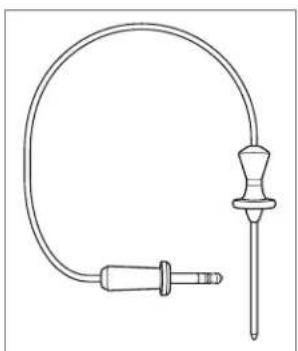
Temperature Probe
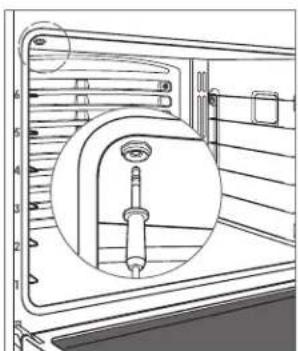
Use only the temperature probe shipped with this appliance. Refer to the illustration below. The temperature probe measures the internal temperature of food while cooking. The probe can be used to monitor the temperature without setting a desired temperature and can be used with all cooking modes except Broil, Proof, and Dehydrate.
Setting controls:
1 Preheat the oven to the desired oven temperature in the desired mode.
2 Completely insert the probe sensor into the thickest area of the food.
3 When preheat is complete, place food in the oven.
4 Insert the probe into the probe receptacle. Refer to the illustration below. Close the oven door.
5 Touch Probe.
6 Touch Set to select the preset temperature. To change the temperature, use the control knob to select the desired temperature, then touch Set.
7 A chime indicates the temperature is 5^ F ( 1^ C) below the set temperature. The oven chimes and the set temperature flashes when the internal temperature reaches the setpoint.
8 Remove, then reinsert the probe to verify the internal temperature.
9 Touch the flashing temperature to clear.
natural_image
Line drawing of a medical catheter with attached tubing and connector (no text or symbols)Temperature probe
natural_image
Technical line drawing of a mechanical assembly with a magnified inset showing internal components (no text or symbols)Probe receptacle
CAUTION
Pull straight down when removing the probe from the receptacle. Bending or pulling the probe at an angle during removal may damage the probe and oven. Do not place a rack or accessory in rack position six when using the probe, as it interferes with probe removal.
CAUTION
The probe and probe receptacle will be very hot. Handle with care.
Auto Program
TIMED COOK
Timed Cook automatically turns the oven off at a specified time. The oven begins to heat immediately and turns off at the desired stop time. If preheat is required, the preheat time must be accounted for when determining the cooking duration. The clock must be set to the correct time to function properly. Use in any cooking mode except Broil, Gourmet, or Stone. The temperature probe cannot be used during Timed Cook.
Setting controls:
1 Rotate the selector bezel to the desired cooking mode and turn the control knob to adjust the temperature.
2 Touch Timed Cook, then select the desired cooking duration.
3 Touch Set twice to start.
4 To cancel, touch the duration/stop time on the touchscreen, then touch Ⓗ.
5 The oven turns off automatically when the cook time is complete.
6 Rotate the selector bezel to Off to clear.
DELAYED START
Delayed Start automatically turns the oven on and off at specified times. The oven remains idle until the desired start time and turns off at the desired stop time. If preheat is required, the preheat time must be accounted for when determining the cooking duration. The clock must be set to the correct time to function properly. Use in any cooking mode except Broil, Gourmet, or Stone. The temperature probe cannot be used during Delayed Start.
Setting controls:
1 Rotate the selector bezel to the desired cooking mode and turn the control knob to adjust the temperature.
2 Touch Timed Cook, then select the desired cooking duration.
3 Use the slide bar to select the desired stop time, then touch Set.
4 To cancel, touch the duration/stop time on the touchscreen, then touch ✗.
5 The oven turns off automatically when the cook time is complete.
6 Rotate the selector bezel to Off to clear.
Clean
During Clean, the oven is heated to an extremely high temperature to burn off food soil. The oven lights are disabled. Clean lasts approximately four hours.
IMPORTANT NOTE: For double ovens, the other oven cannot be used during Clean.
Setting controls:
1 Turn on ventilation. Some smoke and odor is normal.
2 Rotate the selector bezel to Clean.
3 Touch Start.
4 Remove the oven racks and rack guides, then touch Ok.
5 The oven door locks and remains locked until cleaning is complete and the oven temperature is below 550^ F ( 290^ C).
6 Rotate the selector bezel to Off to clear.
Porcelain is made from natural products and, therefore, can chip or develop fine lines and cracks due to the expansion and contraction that occurs as oven temperature fluctuates (particularly when the self-cleaning function is employed). This can result in cosmetic imperfections, such as a cloudy, dull or scratched appearance. Cosmetic imperfections may be more visible in a colored oven cavity.
DELAYED CLEAN
Setting controls:
1 Turn on ventilation. Some smoke and odor is normal.
2 Rotate the selector bezel to Clean.
3 Touch Delayed Clean and use the slide bar to select the desired stop time, then touch Set.
4 Remove the oven racks and rack guides, then touch Ok.
5 The oven door locks and remains locked until cleaning is complete and the oven temperature is below 550^ F ( 290^ C).
6 Rotate the selector bezel to Off to clear.
CAUTION
During Clean, exterior surfaces may get hotter than usual. Children should be kept away.
Sabbath
This appliance is certified by Star-K to meet strict religious regulations in conjunction with specific instructions found on www.star-k.org.
Bake, Roast, Proof, and Warm modes can be used in Sabbath.
Setting controls:
1 Turn the oven light on or off.
2 Touch Settings, then select Sabbath.
3 Touch On, then touch Set.
4 Rotate the selector bezel to the desired cooking mode and turn the control knob to adjust the temperature, then touch Start.
5 To change the oven temperature while in Sabbath, turn the control knob. Each turn increases or decreases the temperature by 25^ F or 5^ C. The temperature changes randomly after the new temperature is selected.
6 Rotate the selector bezel to Off to clear.
Oven Light
WARNING
Verify power is disconnected from the electrical box before replacing a light bulb.
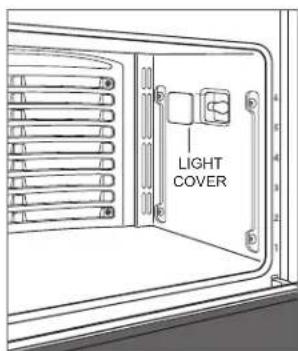
Allow the oven to cool completely, then remove the oven racks and rack guides. To remove the light cover, gently pry the bottom edge with a flat screwdriver. Remove the existing bulb and replace with a 40-watt halogen bulb. Refer to the illustration below. Do not touch the new bulb with bare hands. Wear rubber gloves or use a paper towel to hold the bulb during installation.
To replace the light bulb located on the top of the oven cavity, contact Wolf Factory Certified Service. For the name of the nearest Wolf Factory Certified Service, check the Product Support section of our website, wolfappliance.com, or call Wolf Customer Care at 800-222-7820.
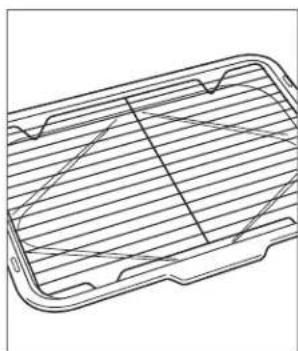
Broiler Pan
For broiling, use the two-piece broiler pan and rack included with the range. Refer to the illustration below.
Light bulb replacement
natural_image
Technical line drawing of a rectangular frame with internal grid lines and mounting brackets (no text or symbols)Broiler pan and rack
Wolf Cooking Guide
FOOD RACK(S) MODE OVEN TEMP POSITION TIME NOTES
| BREADS | |||||
| Biscuits 1 Roast 400°F (205°C) 3 5–10 min | |||||
| 2 Convection 425°F (220°C) 2, 5 | 5–10 min | ||||
| 3 Convection 425°F (220°C) 1, 3, 5–10 min | |||||
| Cinnamon rolls | 1 Bake | 350°F (175°C) | 3 | 20–25 min | |
| 2 Convection | 325°F (165°C) 2, 5 | 20–25 min | |||
| 3 Convection | 325°F (165°C) | 1, 3, 5 | 20–25 min | ||
| Garlic bread | 1 Broil | Med | 5 | ||
| Muffins | 1 Bake | 400°F (205°C) | 3 | 15–20 min | |
| 2 Convection | 375°F (190°C) 2, 5 10–15 min | ||||
| 3 Convection | 375°F (190°C) | 1, 3, 5 | 10–15 min | ||
| Quick breads | 1 Bake | 350°F (175°C) | 3 | 40–50 min | |
| Toast | 1 Broil | High | 5 | ||
| Yeast bread (loaf pan) | 1 Bake | 350°F (175°C) | 3 | 20–45 min | |
| Yeast bread (no pan) | 1 Stone | 450°F (230°C) | 1 | 15–45 min | |
| Yeast rolls | 1 Convection | 375°F (190°C) | 3 | 10–20 min | |
| 2 Convection | 375°F (190°C) 2, 5 | 10–20 min | |||
| 3 Convection | 375°F (190°C) | 1, 3, 5 | 10–20 min | ||
| CAKES | |||||
| Angel food cake | 1 Bake | 350°F (175°C) | 1 | 35–45 min | |
| Bundt or pound cake | 1 Bake | 350°F (175°C) | 3 | 40–50 min | |
| Cupcakes | 1 Bake | 350°F (175°C) | 3 | 20–25 min | |
| 2 Convection | 325°F (165°C) 2, 5 15–25 min | ||||
| 3 Convection | 325°F (165°C) | 1, 3, 5 | 15–25 min | ||
| Mixes or from scratch | 1 Bake | 350°F (175°C) | 3 | 20–30 min | |
| 2 Convection | 325°F (165°C) 2, 5 20–30 min | ||||
| 3 Convection | 325°F (165°C) | 1, 3, 5 | 20–30 min | ||
| COOKIES | |||||
| Cookies or bars | 1 Bake | 350°F (175°C) | 3 | 10–25 min | |
| 2 Convection | 325°F (165°C) | 2, 5 | 10–25 min | ||
| 3 Convection | 325°F (165°C) | 1, 3, 5 | 10–25 min | ||
| PIES | |||||
| Cream puffs | 1 Convection | 400°F (205°C) | 3 | 20–30 min | |
| Double-crust or streusel topped | 1 Bake | 375°F (190°C) | 3 | 40–45 min | |
| Lemon meringue | 1 Broil | Low | 3 | 10–15 min | |
| Pie crust (empty) | 1 Bake | 425°F (220°C) | 3 | 10–15 min | |
| Puff pastry | 1 Bake | 400°F (205°C) | 3 | 10–15 min | |
| 2 Convection | 375°F (190°C) 2, 5 10–15 min | ||||
| 3 Convection | 375°F (190°C) | 1, 3, 5 | 10–15 min | ||
| Pumpkin or custard | 1 Bake | 425°F (220°C) / 325°F (165°C) | 3 | see note | Bake for 15 min at 425°F, reduce temp to 325°F, and bake until pie is set, 45–60 min. |
Consuming raw or undercooked meats, poultry, seafood, shellfish, or eggs may increase your risk of foodborne illness.
Wolf Cooking Guide
FOOD MODE OVEN TEMP RACK TIME PROBE TEMP NOTES
| BEEF | ||||||
| Chuck roast | Conv Roast | 325°F (165°C) | 3 | 20–25 min/lb | Med 150°F (65°C) | Place in dish with liquid 1/2 the height of the meat. |
| Roast 350°F (175°C) | 3 20–25 min/lb | Med 150°F (65°C) | ||||
| Ground patties Broil High 5 10–15 min Turn over at 7 min. | ||||||
| Prime rib | Roast | 450°F (230°C) / 225°F (105°C) | 2 | see note | Rare 130°F (55°C) | No preheat required. Roast for 30 min at 450°F, reduce temp to 225°F, and cook to desired internal temp. |
| Roast | Roast | 425°F (220°C) / 325°F (165°C) | 2 | see note | Rare 135°F (60°C) | Roast for 30 min at 425°F, reduce temp to 325°F, and cook to desired internal temp. |
| Slow roast | Bake | 300°F (150°C) | 2 | Place in covered dish with liquid 1/4 the height of the meat. | ||
| Steaks (< 1" thick) | Broil | High | 5 | 10–15 min | Turn over at 6 min. | |
| Steaks (> 1" thick) | Broil | High | 5 | 10–20 min | Turn over at 8 min. | |
| Tenderloin | Conv Roast | 450°F (230°C) | 3 | 10–20 min/lb | Rare 130°F (55°C) | |
| POULTRY | ||||||
| Chicken, bone-in | Conv Roast | 325°F (165°C) | 5 | 20–25 min | Thigh 180°F (80°C) | |
| Chicken boneless breast (flattened to 1/2" thick) | Broil | Med | 5 | 10–15 min | Turn over halfway through broiling. | |
| Conv Roast | 350°F (175°C) | 3 | 15–20 min | Breast 165°F (75°C) | ||
| Chicken quarters, thighs | Broil | Med | 5 | 20–25 min | Turn over halfway through broiling. | |
| Roast | 350°F (175°C) | 3 | 30–40 min | Thigh 180°F (80°C) | ||
| Conv Roast | 325°F (165°C) | 3 | 30–40 min | Thigh 180°F (80°C) | ||
| Bake | 350°F (175°C) | 3 | 30–40 min | Thigh 180°F (80°C) | ||
| Chicken, whole | Conv Roast | 325°F (165°C) | 2 | 10–20 min/lb | Thigh 180°F (80°C) | |
| Cornish hen | Conv Roast | 325°F (165°C) | 3 | 1 hour | Thigh 180°F (80°C) | |
| Roast | 350°F (175°C) | 3 | 1 hour | Thigh 180°F (80°C) | ||
| Duck | Conv Roast | 325°F (165°C) | 2 | 15–20 min/lb | Thigh 180°F (80°C) | |
| Goose | Conv Roast | 325°F (165°C) | 2 | 15–20 min/lb | Thigh 180°F (80°C) | |
| Turkey breast, whole | Conv Roast | 325°F (165°C) | 2 | 15–20 min/lb | Breast 165°F (75°C) | |
| Roast | 350°F (175°C) | 2 | 15–20 min/lb | Breast 165°F (75°C) | ||
| Turkey pieces | Conv Roast | 325°F (165°C) | 3 | 30–40 min | Thigh 180°F (80°C) | |
| Roast | 350°F (175°C) | 3 | 30–40 min | Thigh 180°F (80°C) | ||
| Turkey, whole (brined) | Bake | 350°F (175°C) | 1 | 10–15 min/lb | Thigh 180°F (80°C) | |
| Turkey, whole | Conv Roast | 325°F (165°C) | 1 | 10–15 min/lb | Thigh 180°F (80°C) | |
| Roast | 325°F (165°C) | 1 | 10–15 min/lb | Thigh 180°F (80°C) | ||
Consuming raw or undercooked meats, poultry, seafood, shellfish, or eggs may increase your risk of foodborne illness.
Wolf Cooking Guide
FOOD MODE OVEN TEMP RACK TIME PROBE TEMP NOTES
| PORK | ||||||
| Chops, steaks (1⁄2" thick) | Broil | High | 5 | 5-10 min | Turn over halfway through broiling. | |
| Conv Roast 350°F (175°C) 3 10-15 min | ||||||
| Ham steak (< 1" thick) | Broil | High | 5 | 5-10 min | Turn over halfway through broiling. | |
| Ham steak (> 1" thick) | Broil | High | 5 | 10-15 min | Turn over halfway through broiling. | |
| Ham, whole | Bake | 335°F (170°C) | 2 | 10-15 min/lb | 160°F (70°C) | Cover and rest 15 min. |
| Ribs | Bake | 300°F (150°C) | 3 | Place in foil packets or covered dish with liquid 1⁄4 the height of the meat. | ||
| Slow roast | Bake | 300°F (150°C) | 2 | Place in covered dish with liquid 1⁄4 the height of the meat. | ||
| Tenderloin | Conv Roast | 400°F (205°C) | 3 | 15-20 min/lb | Rare 130°F (55°C) | |
| LAMB | ||||||
| Chops, steaks (3⁄4" thick) | Broil | High | 5 | 5-10 min | Turn over halfway through broiling. | |
| Crown rack | Conv Roast | 325°F (165°C) | 2 | 15-20 min/lb | 145°F (65°C) | |
| Leg | Conv Roast | 425°F (220°C) / 325°F (165°C) | 2 | see note | 145°F (65°C) | Roast for 30 min at 425°F, reduce temp to 325°F, and cook to desired internal temp. |
| Veal roast | Conv Roast | 300°F (150°C) | 2 | 30-35 min/lb | 140°F (60°C) | |
| FISH | ||||||
| Fillet (< 1" thick) | Broil | Med | 5 | 10-20 min | ||
| Fillet (> 1" thick) | Conv Roast | 375°F (190°C) | 5 | 15-25 min | ||
| PIZZA | ||||||
| Calzones | Stone | 375°F (190°C) | 1 | 10-15 min | ||
| French bread pizza | Broil | Med | 5 | 10-15 min | ||
| Homemade pizza | Stone | 450°F (230°C) | 1 | 5-15 min | ||
| VEGETABLES | ||||||
| Mixed vegetables | Conv Roast | 400°F (205°C) | 4 | 10-20 min | ||
| Potatoes, sweet potatoes | Bake | 350°F (175°C) | 3 | 45-60 min | ||
| OTHER | ||||||
| Meatloaf | Roast | 425°F (220°C) / 325°F (165°C) | 2 | see note | 165°F (75°C) | Roast for 20 min at 425°F, reduce temp to 325°F, and cook to desired internal temp. |
| Nachos | Broil | Low | 3 | 15-20 min | ||
| One dish meals | Bake | 350°F (175°C) | 3 | 45-60 min | 175°F (80°C) | |
| Quiche | Bake | 350°F (175°C) | 3 | 40-50 min | ||
| Sausage, bratwurst (fresh) | Broil | Med | 5 | 10-15 min | Turn over halfway through broiling. | |
Consuming raw or undercooked meats, poultry, seafood, shellfish, or eggs may increase your risk of foodborne illness.
Surface Burners
CAUTION
Remove all stainless steel covers and cutting boards prior to use.
CAUTION
Using large diameter cooking vessels can cause adjacent surfaces, including stainless steel covers, to become very hot.
To light a burner, push and turn the corresponding control knob counterclockwise to Hi. The igniter clicks until the burner lights. Once lit, continue to turn the knob counterclockwise to the desired setting. The light halo around the bezel illuminates and stays illuminated until the burner is turned off.
To select a simmer setting, turn the control knob to the detent at the lowest setting. Push and continue to turn counterclockwise. The flame transitions to the second tier on the burner. Continue to turn the knob to the desired simmer setting.
During a power outage, surface burners can be lit manually. Turn the knob to Hi and light using a multi-purpose lighter.
SURFACE BURNER RATING
The front left burner is 20,000 Btu. Any additional front burners to the right are 18,000 Btu. The rear left burner is 9,200 Btu. Any additional rear burners to the right are 15,000 Btu.
CAUTION
Never leave pans on a high setting unattended. Be careful when cooking food in fat or grease; it can become hot enough to ignite.
CONTROL KNOBS
ICON CONTROL KNOB SETTINGS

Surface Burner Hi-Lo / Sim Hi-Lo

Charbroiler Hi-Lo

Griddle 100°F–450°F

French Top Hi-Lo
Charbroiler
CAUTION
Remove all stainless steel covers and cutting boards prior to use.
The charbroiler has an infrared burner that transfers intense heat to food, searing the outside. Cook food directly on the charbroiler grate. Do not use cookware.
1 Turn on ventilation.
2 Push and turn the control knob counterclockwise to Hi. The igniter clicks until the burner lights.
3 The light halo around the bezel illuminates and stays illuminated until the burner is turned off. Turn the knob to the desired setting.
4 Allow the charbroiler to preheat for 10 minutes.
Griddle
CAUTION
Remove all stainless steel covers and cutting boards prior to use.
The infrared griddle is thermostatically controlled to maintain a consistent temperature.
To prevent food from sticking, it is necessary to "season" the griddle prior to use.
Season the griddle:
1 Turn on ventilation.
2 Clean thoroughly with hot water and a mild detergent. Rinse and dry with a soft cloth.
3 Push and turn the control knob counterclockwise to 350^ F ( 175^ C) and heat for 30 minutes. After 30 minutes, turn the knob to Off and allow the surface to cool.
4 While the surface is slightly warm, pour a small amount of peanut or vegetable oil on a paper towel and spread evenly.
5 Push and turn the control knob to 350^ F ( 175^ C). Heat until the griddle begins to smoke, then turn the knob to Off and allow the surface to cool. Once cool, wipe off any excess oil.
GRIDDLE OPERATION
1 Turn on ventilation.
2 Push and turn the control knob counterclockwise to the desired temperature. The igniter clicks until the burner lights. The double griddle has separate controls for each side.
3 The light halo around the bezel illuminates until the griddle reaches the set temperature. The light cycles on and off as more heat is required to maintain the set temperature.
French Top
CAUTION
Remove all stainless steel covers and cutting boards prior to use.
The French top is a graduated cooking surface with the highest temperature under the center plate. Always use cookware. Do not cook food directly on the surface. For higher cooking heat, place cookware closer to the center and for lower heat, closer to the edges. Refer to the illustration below.
To protect the surface from food splatters and moisture, it is necessary to "season" the French top prior to use.
Season the French top:
1 Turn on ventilation.
2 Clean thoroughly with hot water and mild detergent. Rinse and dry with a soft cloth.
3 Push and turn the control knob counterclockwise to Hi and heat for 30 minutes. After 30 minutes, turn the knob to Off and allow the surface to cool.
4 While the surface is slightly warm, pour a small amount of peanut or vegetable oil on a paper towel and spread evenly. Once cool, wipe off any excess oil.
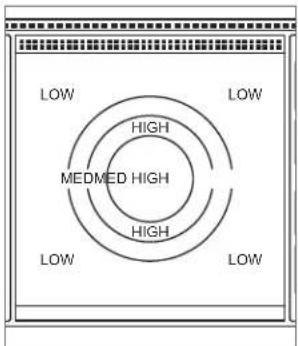
French top heating zones
1 Turn on ventilation.
2 Push and turn the control knob counterclockwise to Hi. The igniter clicks until the burner lights.
3 The light halo around the bezel illuminates and stays illuminated until the French top is turned off.
4 Allow the French top to preheat for 30 minutes.
CAUTION
Never leave pans on a high heat zone unattended. Be careful when cooking food in fat or grease; it can become hot enough to ignite.
CENTER PLATE
The French top burner is located below the center plate. To remove, use the center plate hook provided with the range as shown in the illustration below. Never remove the center plate while cooking.
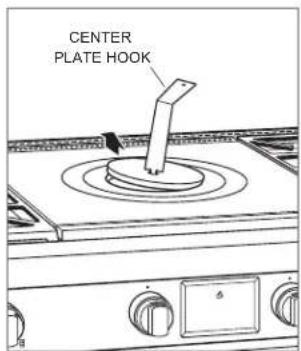
Center plate removal
Care Recommendations
CLEANING
| Stainless steel | Use a nonabrasive stainless steel cleaner and apply with a soft lint-free cloth. To bring out the natural luster, lightly wipe the surface with a water-dampened microfiber cloth followed by a dry polishing chamois. Always follow the grain of the stainless steel. |
| Powder coating Using a damp cloth, wipe with a mild detergent; rinse and dry. | |
| Oven racks and rack guides | Remove and place on a flat surface near the sink. Clean with hot water and mild detergent or a paste of baking soda and water. Do not immerse in water. Towel dry. |
| Burner grates | Remove and place on a flat surface near the sink. Clean with hot water and mild detergent or a paste of baking soda and water. Towel dry. |
| Burner pan | Remove surface debris before cleaning to help speed up the cleaning process and decrease the chance of scratching the surface during cleaning. Using mild abrasive cleaners or spray degreasers, clean and rinse the surface, and dry immediately to avoid streaking. To clean hard water stains, use white vinegar and water. Rinse and dry immediately. |
| Surface burners | Allow to cool. Use a mild detergent or spray degreaser to clean. Rinse with water and towel dry. |
| Charbroiler | After cooking is complete, allow the charbroiler to remain on for 10 minutes. High heat helps burn off excess food particles. When cool, remove the grate and place in the sink. Cover with wet dish towels and pour hot water over it to help loosen residue. Clean with soap and a scouring pad. Rinse and dry. |
| Griddle | Scrape grease into the grease collection tray after each use. When the surface has cooled, wipe with a paper towel to remove excess grease or oil. After each use, reapply a small amount of peanut or vegetable oil on a paper towel and spread evenly. Occasionally, remove the seasoning. Pour 12 cup (120 ml) warm water and 1 teaspoon (5 ml) griddle cleaner onto the griddle and scrape residue into the grease collection tray, then empty. When dry, reapply a small amount of oil for seasoning. |
| French top | Clean the entire surface after each use while slightly warm. Wipe with mild detergent and water. Rinse and dry. After each use, reapply a small amount of peanut or vegetable oil on a paper towel and spread evenly. Occasionally, remove the seasoning. Apply a small amount of white vinegar and water to the surface while slightly warm. Scrub and repeat until the excess oil has been removed. Reapply a small amount of oil for seasoning. |
| Control knobs | Using a damp cloth, wipe with a mild detergent or spray degreaser; rinse and dry. Do not place in the dish-washer. |
| Control panel | Touch and hold Lock for 3 seconds to lock the control panel. Use a spray degreaser to remove fingerprints and food soil. Spray on a cloth before wiping the panel.IMPORTANT NOTE: Do not spray cleaners directly on the control panel. |
| Oven interior | IMPORTANT NOTE: Remove all food spills (especially sugary, acidic, and tomato-based sauces) when the oven interior is safe to touch. Some blemishes are permanent, but do not affect the function of the porcelain.Before using the Clean feature, use a razor blade to gently lift baked on foods from the oven cavity and window. For stubborn stains, spray with a mild abrasive cleaner or spray degreaser and scrub with a no-scratch Scotch-BriteTM pad (pink or blue). Wash the entire oven cavity with soap and water to remove cleaning chemicals before entering Clean mode. If residue is not cleaned from the cavity, etching of the porcelain may occur. Once the Clean cycle is complete, allow the oven to cool completely and wipe out ash with a damp cloth. |
| Broiler pan | To clean the rack, use a mild detergent and scouring pad. Rinse and dry. To clean the pan, discard grease and wash with hot water and mild detergent. Rinse and dry. |
Troubleshooting
OPERATION
Range does not operate.
- Verify power is on.
- Verify electrical power to the range and home circuit breaker is on.
- The oven automatically turns off after 12 hours of continual use, except in Dehydration or Sabbath mode.
Clock turns off.
- The unit is in standby power mode. Refer to page 11 to turn standby power off.
OVEN
Oven temperature issue.
- Contact Wolf Customer Care at 800-222-7820.
No oven control knob display.
- Remove and reinstall the knob. Turn the circuit breaker off for 20 seconds, then turn it back on.
No response from control panel.
- Turn the circuit breaker off for 20 seconds, then turn it back on.
"SAb" displayed on the oven control knob.
- Unit is in Sabbath mode (is displayed on the control panel), refer to page 17.
Error displayed on the control panel.
- Contact Wolf Factory Certified Service.
- Normal with new oven cavity expansion and contraction.
- Run a Clean cycle. If it persists, contact Wolf Customer Care at 800-222-7820.
Oven "pops" or "bangs" during preheat or cool down.
Oven door is locked.
- The oven door locks and remains locked until the Clean cycle has ended and the oven temperature is below 550°F (290°C).
RANGE SURFACE
Erratic flame, poor ignition, or no ignition.
- Verify the burner caps are positioned properly.
- Clean the burner and igniter properly.
- If water spilled over recently, let the area dry completely. Use a hair dryer, if desired.
- Push in the knob, then release. Verify the knob springs back.
Troubleshooting
SERVICE
- Maintain the quality built into your product by contacting Wolf Factory Certified Service. For the name of the nearest Wolf Factory Certified Service, check the Product Support section of our website, wolfappliance.com, or call Wolf Customer Care at 800-222-7820.
- When contacting service, you will need the model and serial number of your product. Both numbers are listed on the product rating plate. Refer to page 6 for rating plate location.
- For warranty purposes, you will also need the date of installation and name of your authorized Wolf dealer. This information should be recorded on page 2 of this guide.
Sub-Zero, Sub-Zero & Design, Sub-Zero & Snowflake Design, Dual Refrigeration, The Living Kitchen, Great American Kitchens The Fine Art of Kitchen Design, Wolf, Wolf & Design, Wolf Gourmet, W & Design, red colored knobs, Cove, and Cove & Design are registered trademarks and service marks of Sub-Zero Group, Inc. and its subsidiaries. All other trademarks are property of their respective owners in the United States and other countries.
Wolf Appliance Residential Limited Warranty
FOR RESIDENTIAL USE
FULL TWO YEAR WARRANTY\*
For two years from the date of original installation, this Wolf Appliance product warranty covers all parts and labor to repair or replace, under normal residential use, any part of the product that proves to be defective in materials or workmanship. All service provided by Wolf Appliance under the above warranty must be performed by Wolf Factory Certified Service, unless otherwise specified by Wolf Appliance, Inc. Service will be provided during normal business hours.
LIMITED FIVE YEAR WARRANTY
For five years from the date of original installation, Wolf Appliance will repair or replace the following parts that prove to be defective in materials or workmanship: gas burners (excludes appearance), electric heating elements, blower motors (ventilation hoods), electronic control boards, magnetron tubes and induction generators. If the owner uses Wolf Factory Certified Service, the service provider will repair or replace these parts with the owner paying for all other costs, including labor. If the owner uses non-certified service, the owner must contact Wolf Appliance, Inc. (using the information below) to receive repaired or replacement parts. Wolf Appliance will not reimburse the owner for parts purchased from non-certified service or other sources.
TERMS APPLICABLE TO EACH WARRANTY
The warranty applies only to products installed for normal residential use. The warranty applies only to products installed in any one of the fifty states of the United States, the District of Columbia or the ten provinces of Canada. This warranty does not cover any parts or labor to correct any defect caused by negligence, accident or improper use, maintenance, installation, service or repair.
THE REMEDIES DESCRIBED ABOVE FOR EACH WARRANTY ARE THE ONLY ONES THAT WOLF APPLIANCE, INC. WILL PROVIDE, EITHER UNDER THIS WARRANTY OR UNDER ANY WARRANTY ARISING BY OPERATION OF LAW. WOLF APPLIANCE, INC. WILL NOT BE RESPONSIBLE FOR ANY CONSEQUENTIAL OR INCIDENTAL DAMAGES ARISING FROM THE BREACH OF THIS WARRANTY OR ANY OTHER WARRANTY, WHETHER EXPRESS, IMPLIED OR STATUTORY.
Some states do not allow the exclusion or limitation of incidental or consequential damages, so the above limitation or exclusion may not apply to you. This warranty gives you specific legal rights and you may also have other legal rights that vary from state to state.
To receive parts and/or service and the name of Wolf Factory Certified Service nearest you, contact Wolf Appliance, Inc., P.O. Box 44848, Madison, WI 53744; check the Product Support section of our website, wolfappliance.com, email us at customerservice@subzero.com or call 800-222-7820.
*Stainless steel (doors, panels, handles, product frames and interior surfaces) are covered by a limited 60-day parts and labor warranty for cosmetic defects.
*Replacement filters for ventilation hood recirculating kits are not covered by the product warranty.

Contenido
natural_image
Technical line drawing of a refrigerator interior showing shelves and grilles (no text or symbols)natural_image
Line drawing of a medical or laboratory device with a curved tube and two vertical pins (no text or symbols)Sonda de temperatura

natural_image
Technical line drawing of a mechanical component with a circular inset showing a cylindrical feature (no text or symbols)natural_image
Technical line drawing of a mechanical component with internal grid lines (no text or symbols)natural_image
Technical line drawing of a refrigerator interior showing shelves and door frame (no text or symbols)natural_image
Line drawing of a medical catheter device with a curved tube and connector (no text or symbols)natural_image
Technical line drawing of a mechanical component with a circular inset showing a cylindrical feature (no text or symbols)Prise de la sonde
MISE EN GARDE
natural_image
Technical line drawing of a rectangular frame with internal grid lines and curved edges (no text or symbols)WOLF APPLIANCE, INC. P.O. BOX 44848 MADISON, WI 53744 WOLFAPPLIANCE.COM 800.222.7820
9069899 REV-A 03/2025
