
Mixx carry cot - Stroller Nuna - Free user manual and instructions
Find the device manual for free Mixx carry cot Nuna in PDF.
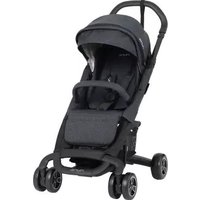
| Product Type | Stroller Bassinet |
| Brand | Nuna |
| Model | Mixx Carry Cot |
| Maximum Child Weight | 9 kg |
| Usage | For infants unable to sit up, roll over, or get on hands and knees without assistance |
| Chassis Compatibility | Nuna MIXX |
| Rain Cover Included | Yes |
| Dream Drape™ Included | Yes |
| Storage Compartment | Maximum capacity 1.3 kg |
| Adjustable Handle | Yes, with adjustment button |
| Canopy | Yes, with fold-down back panel for ventilation |
| Mattress | Mattress pad included, removable and washable |
| Bassinet Cover | Removable and washable |
| Chassis Attachment | Click-lock, side ejection buttons |
| Care | Clean with a damp cloth; do not use abrasives or bleach |
| Safety | Do not leave unattended; do not use for prolonged sleep; keep away from heat sources |
| Spare Parts | Use only genuine Nuna parts |
| Warranty | Personalized warranty from purchase date (see Nuna website) |
| Manufacturer | NUNA International B.V. |
Frequently Asked Questions - Mixx carry cot Nuna
User questions about Mixx carry cot Nuna
0 question about this device. Answer the ones you know or ask your own.
Ask a new question about this device
Download the instructions for your Stroller in PDF format for free! Find your manual Mixx carry cot - Nuna and take your electronic device back in hand. On this page are published all the documents necessary for the use of your device. Mixx carry cot by Nuna.
USER MANUAL Mixx carry cot Nuna
natural_image
Illustration of a blue umbrella with geometric teal lines against a beige background, no text or symbols present.Designed around your life
nuna®
natural_image
Simple line drawing of a rounded object with a curved handle and a small protrusion (no text or symbols)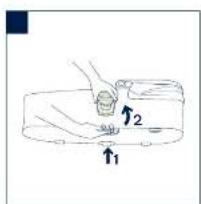
natural_image
Simple line drawing of a bathtub with arrows indicating direction (no text or symbols)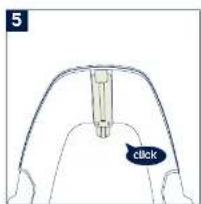
natural_image
Illustration of a medical device with a box and tubing, showing internal components and directional arrows (no text or symbols)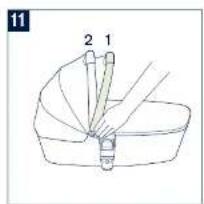
natural_image
Top-down line drawing of a car with two arrows indicating direction (no text or symbols)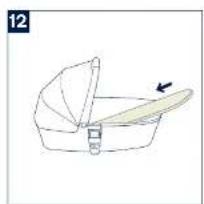
natural_image
Simple line drawing of a baby's seat with a bandage and arrow indicating direction (no text or symbols)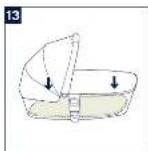
IMPORTANT! READ THESE INSTRUCTIONS CAREFULLY BEFORE USE AND KEEP THEM FOR FUTURE REFERENCE.
Contents
Product Information
Product Registration 3
Warranty
Child Usage Requirements 4
Warnings
Parts List 8
Product Set Up 9
Product Use 9
Cleaning and Maintenance 11
Francais (FR) 13
Deutsch (DE) 25
Nederlands (NL) 37
Italiano (IT) 49
Espanol (ES)
Portuguese (PT) 73
Polish (PL)
Czech (CZ)
Slovak (SK) 109
Greek (EL)
Product Information
Model Number:
Manufactured Date:
Product Registration
Please fill in the above information. The model number and the manufactured date are located on the mattress board inside the carry cot, under the soft goods.
To register your product please visit:
www.nunababy.com
Click the "Register Gear" link on the homepage.
Warranty
We have purposely designed our high-quality products so that they can grow with both your child and your family. Because we stand by our product, our gear is covered by a custom warranty per product, starting from the day it was purchased. Please have the proof of purchase, model number and manufactured in date available when you contact us.
For warranty information please visit:
www.nunababy.com
Click the "Warranty" link on the homepage.
Contact
For replacement parts, service, or additional warranty questions, please contact our customer service department.
info@nunababy.com
www.nunababy.com
In the United Kingdom:
infouk@nunababy.com
www.nunababy.com
NUNA International B.V.
This carry cot is suitable for use with children who meet the following requirements:
Weight: Up to 9 kg
EN
WARNING
Failure to follow these warnings and the instructions could result in serious injury or death.
Any damage caused by the use of accessories not supplied by Nuna will not be covered in terms of warranty.
A child's safety is your responsibility.
Be aware of the risk of open fire or other source of strong heat, such as electric bar fires, gas fires, etc., in the near vicinity of carry cot.
Before carrying or lifting, make sure that the handle is in the correct position of use.
Check that the attachment devices are correctly engaged before use.
Ensure that all the locking devices are engaged before use.
Keep small parts away from children as they pose a choking hazard.
Only use on a firm, horizontal level and dry surface.
Overloading, incorrect folding, and the use of accessories e.g. child seats, bag hooks, rain covers, buggy boards, etc... other than those approved by Nuna may damage or make carry cot unsafe.
The carry cot is NOT to be used for long term sleeping.
The carry cot is not suitable for running or skating.
The carry cot is only suitable for a child who cannot sit up unaided, roll over and cannot push itself up on its hands and knees. Maximum weight of the child: 9kg.
The handle and the bottom should be inspected regularly for signs of damage and wear.
The head of the child in the carry cot should never be lower than the body.
To avoid any danger of suffocation, remove all plastic covers before using this item and destroy or keep away from babies and children.
To avoid injury ensure that your child is kept away when unfolding and folding the carry cot.
DO NOT leave the child unattended.
DO NOT store the carry cot in a damp place. Always allow the fabric to dry naturally away from direct heat.
DO NOT carry additional children, goods, accessories in or on the carry cot except as permitted in this leaflet. They may cause the carry cot to become unstable.
DO NOT use or add any mattress other than the one supplied with the carry cot by Nuna.
DO NOT let the child play with the carry cot.
DO NOT use the carry cot if any part of the carry cot is broken, torn or missing.
DO NOT let other children play unattended near the carry cot.
EN
EN
DO NOT place the carry cot near an open fire or other source of strong heat.
NEVER use the carry cot on a stand.
NEVER place the child with their head at the foot end of the carry cot.
NEVER leave a child in the carry cot when ascending or descending stairs or escalators, or when traveling on other forms of transport.
NEVER carry more than one child at a time in the carry cot.USE original Nuna parts and accessories only.
USE ONLY replacement parts supplied or approved by Nuna.
WARNING Any load attached to the handle or canopy affects the stability of the carry cot.
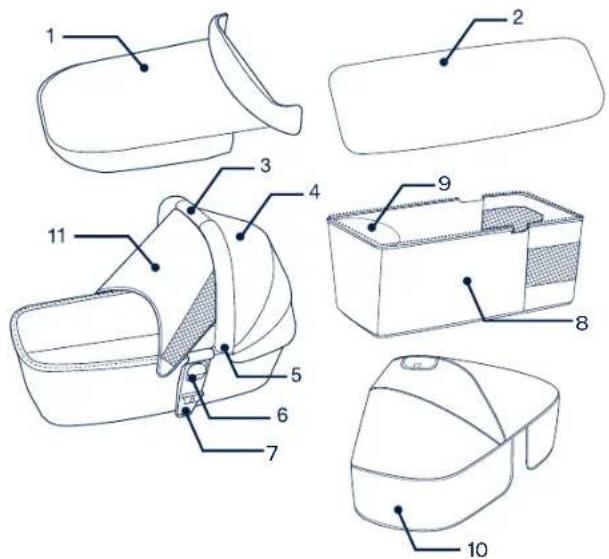
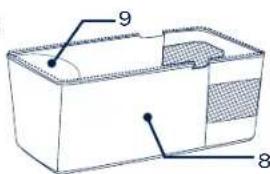
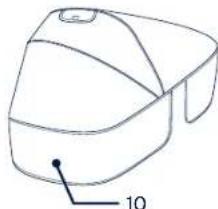
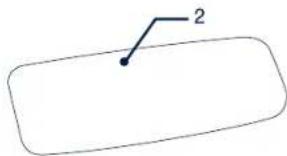
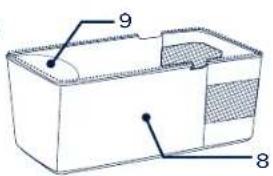
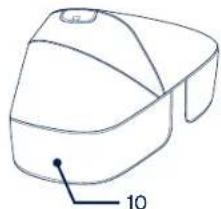
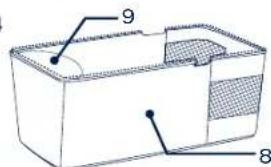
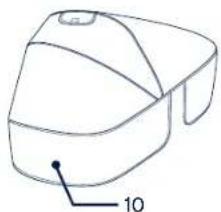
Parts List
Make sure all parts are available before assembly. If any part is missing, please contact local retailer. No tools are required for assembly.
1 Carry Cot Cover
2 Mattress Pad
3 Handle
4 Canopy
5 HandleAdjustmentButton
6 Carry Cot Release Button
7 Attachment Mount
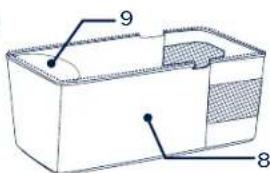
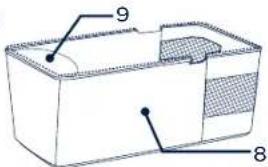
8 Carry Cot Lining
9 Storagecompartment (maximum load = 1.3 kg)
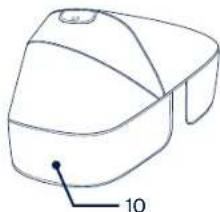
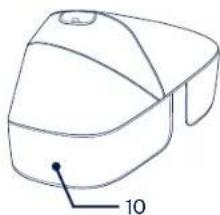
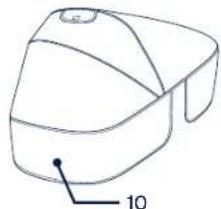
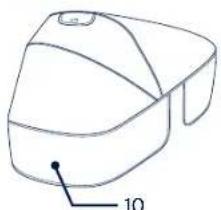
10 Rain Cover
11 Dream Drape™
Product Set Up
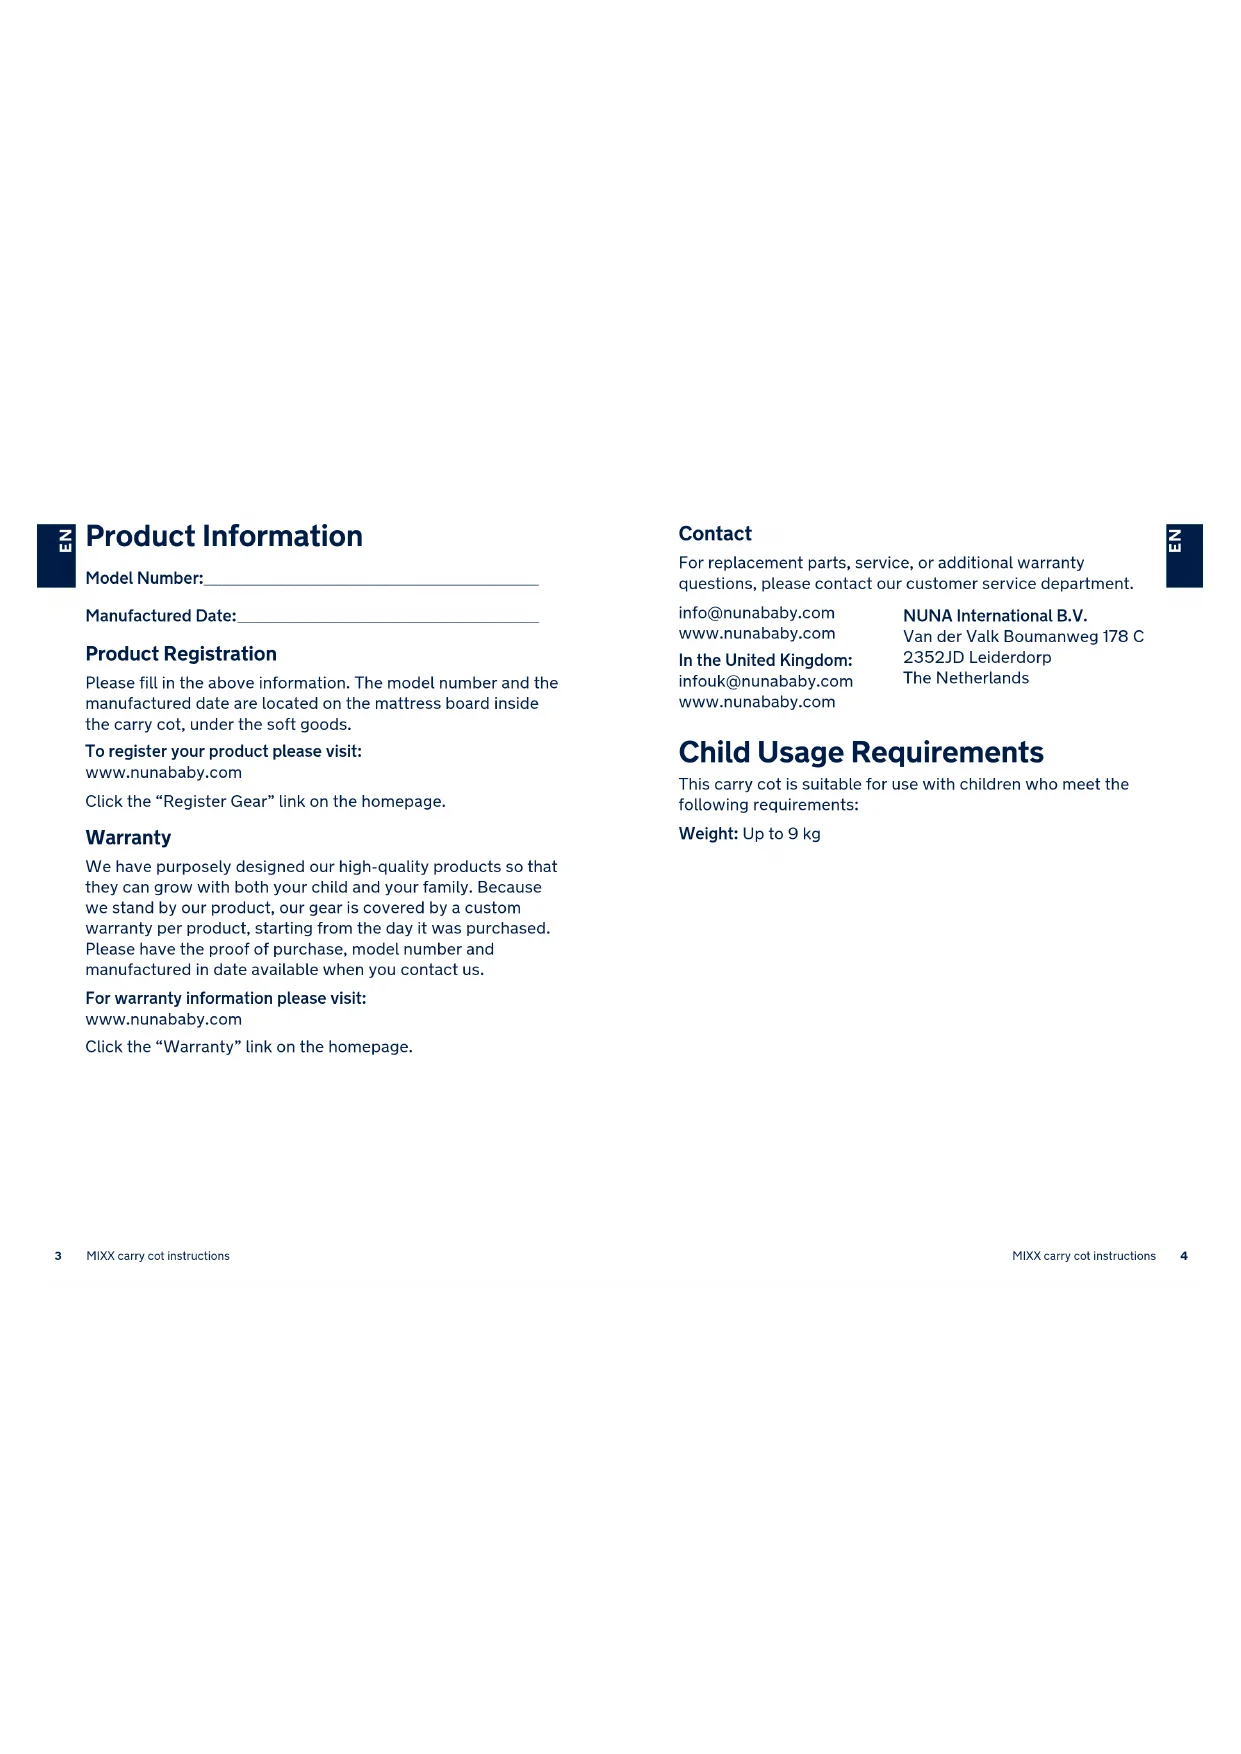
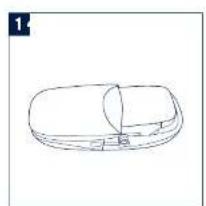
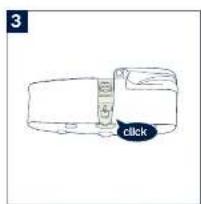
1 Please ensure that both attachment mounts, located on the sides, are securely attached. (1)(2)(3) To release the attachment mounts, please see image (4)
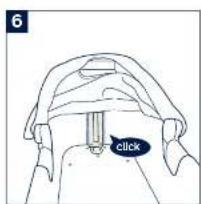
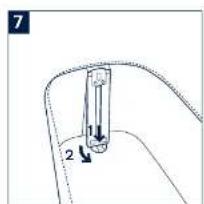
2 Please ensure the 2 support mounts are securely attached.
(5)(6)
To release the support mounts, please see image (7).
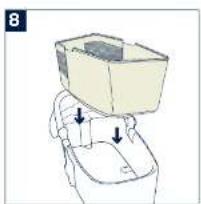
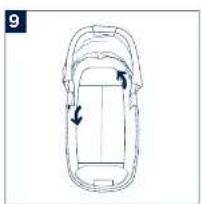
3 Place the inner mattress inside the frame and zip the zipper. (8)(9)
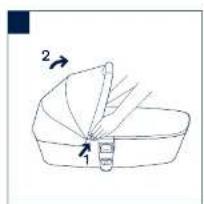
4 Pull up the canopy as illustrated while pressing the buttons on both sides. (10)
5 Check to make sure the handle is secure before placing the child in the carry cot. (11)-1
Please make sure that the handle is in the correct position of use before carrying or lifting.
6 Always use the mattress when using the carry cot. (12)(13) Mattress cover can easily be removed to wash.
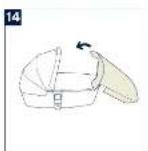
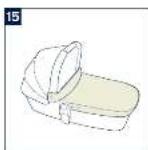
7 Assemble the carry cot cover and shade panel as shown in (14)(15).
Product Use
Canopy
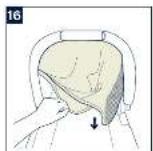
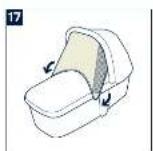
1 Pull the dream drape™ out from under the carry cot canopy, then secure it to the two sides of carry cot with magnets. (16)(17)
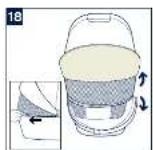
2 Fold the rear panel of the canopy up, and the rear panel of the carry cot down for more ventilation. (18)
Carry Cot Attachment on Stroller Frame
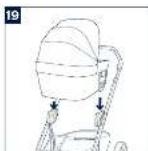
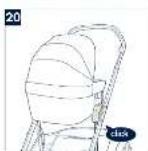
1 Place the carry cot directly down until it latches into place. (19)
2 The carry cot is securely attached with a positive "click". (20) Always remove the stroller seat before using the carry cot. Please do not fold the stroller when the carry cot is still attached.
3 The carry cot can be used with the MIXX series strollers.
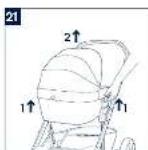
Carry Cot Removal
Press each release side button as shown (21), while lifting up the handle simultaneously.
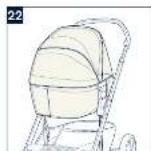
Rain Cover
To assemble the carry cot rain cover, place it over the carry cot, and attach the hook and loop fasteners on the front of rain cover. (22)
Please always check ventilation, especially in hot weather when the rain cover is on the product.
Please check that the rain cover has been cleaned and dried before folding.
Cleaning and Maintenance
Clean the frame, plastic parts, and fabric with a damp cloth, but do not use abrasives or bleach. Do not use silicon lubricants as they will attract dirt and grime. Do not store the carry cot in a damp place.
To ensure long-lasting use, wipe this product off with a soft, absorbent cloth after using it in rainy weather and before storing away.
Refer to the care labels attached to the soft goods for washing and drying instructions.
It is normal for fabric to color from sunlight and to show wear and tear after a long period of use, even when used normally.
For reasons of safety, only use original Nuna parts.
Check regularly if everything functions properly. If any parts are torn, broken, or missing, stop using this product.
NUNA International B.V. Nuna and all associated logos are trademarks.
IMPORTANT- LISEZ ATTENTIVEMENT TOUTES LES INSTRUCTIONS AVANT D'UTILISER LE PRODUIT ET CONSERVEZLES POUR RÉFÉRENCE FUTURE.
Sommaire
natural_image
Simple line drawing of a rounded rectangle with a small dot and a labeled line (no text or symbols beyond the number 2)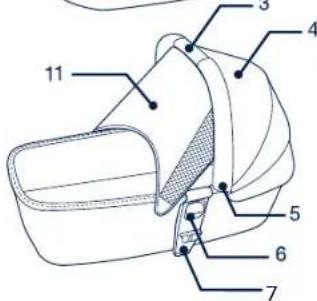
natural_image
Line drawing of a small robotic device with a labeled component (no text or symbols present)Produkt aufbauen
Installeren
natural_image
Simple line drawing of a rounded rectangle with a small dot and a labeled line (no text or symbols)
natural_image
Line drawing of a small electronic device with a labeled component (no text or symbols on the device itself)natural_image
Simple line drawing of a rounded rectangle with a small dot and label '2' (no text or symbols beyond the number)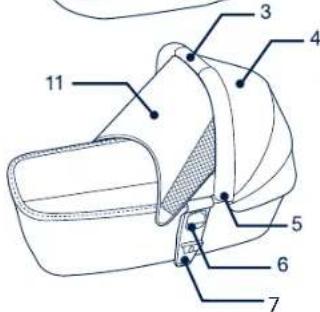
natural_image
Line drawing of a 3D object resembling a robot or vehicle (no text or symbols)natural_image
Simple line drawing of a rounded rectangle with a small dot and a labeled line (no text or symbols)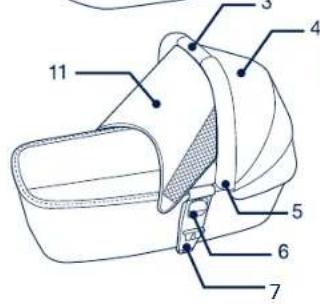

natural_image
Line drawing of a robotic device with a numbered label '10' pointing to its base (no text or symbols on the device itself)Montagem do produto
natural_image
Simple line drawing of a rectangle with a small dot and a labeled arrow (no text or symbols)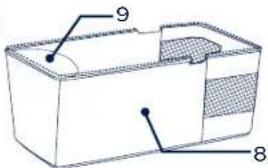
natural_image
Line drawing of a robotic device with a labeled component (10), no text or symbols presentMontaż produktu
natural_image
Simple line drawing of a rounded rectangle with a small dot and a diagonal line labeled '2' (no text or symbols beyond the number)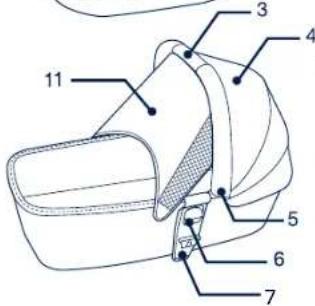
natural_image
Line drawing of a 3D object resembling a robot or vehicle (no text or symbols)Sestavení produktu
natural_image
Simple line drawing of a rounded rectangle with a small dot and a diagonal line labeled '2' (no text or symbols beyond the number)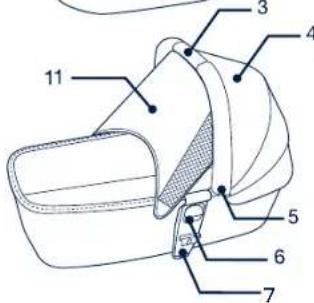
natural_image
Line drawing of a 3D object resembling a robotic or mechanical device with a labeled dimension line (10), no text or symbols present.Zostavenie výrobku
natural_image
Simple line drawing of a rounded rectangle with a small dot and the number 2 on top (no text or symbols beyond the number)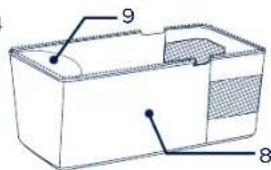
natural_image
Line drawing of a robotic device with a numbered label pointing to the base (no text or symbols on the device itself)EL

产品组装
组装睡箱
安装睡箱
(8)(9)
移除睡箱
使用雨篷
使用产品
使用遮阳篷
(16)(17)

维护与保养
NUNA International B.V.


- IMPORTANT! READ THESE INSTRUCTIONS CAREFULLY BEFORE USE AND KEEP THEM FOR FUTURE REFERENCE.
- Contents
- Product Information
- Product Registration
- Warranty
- Contact
- WARNING
- EN
- Parts List
- Product Set Up
- Product Use
- Canopy
- Carry Cot Attachment on Stroller Frame
- Carry Cot Removal
- Rain Cover
- Cleaning and Maintenance
- IMPORTANT- LISEZ ATTENTIVEMENT TOUTES LES INSTRUCTIONS AVANT D'UTILISER LE PRODUIT ET CONSERVEZLES POUR RÉFÉRENCE FUTURE.
- Sommaire
- Produkt aufbauen
- Installeren
- Montagem do produto
- Montaż produktu
- Sestavení produktu
- Zostavenie výrobku
- 产品组装
- 使用产品
- 维护与保养
Brand : Nuna
Model : Mixx carry cot
Category : Stroller