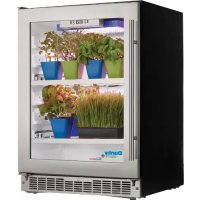
DFG26A1B - Herb grower DANBY - Free user manual and instructions
Find the device manual for free DFG26A1B DANBY in PDF.

| Product Type | Indoor Herb Cultivator |
| Brand | Danby |
| Model | DFG26A1B |
| Dimensions (approx.) | Height: 89 cm, Width: 46 cm, Depth: 51 cm |
| Weight (approx.) | 23 kg |
| Power Supply | 120 V, 60 Hz, 3-prong grounded plug |
| Lighting Type | LED grow panel |
| Timer | Preset cycles P1 (12 h) and P2 (18 h), customizable settings |
| Temperature Control | Digital display, temperature settings for light and fan |
| Ventilation | Built-in fan with temperature adjustment |
| Capacity | 2 metal shelves, 2 drain trays |
| Door | Reversible glass door |
| Recommended ambient temperature range | 13 °C to 32 °C (55 °F to 90 °F) |
| Recommended humidity | Below 80% |
| Maintenance and cleaning | Clean drain trays and interior monthly. Use hydrogen peroxide solution if mildew occurs. |
| Safety | Grounding required. Do not use outdoors. Do not expose LED panel to water. |
| Warranty | 2 years parts (in-shop repair) |
| Country of Origin | Not specified |
Frequently Asked Questions - DFG26A1B DANBY
User questions about DFG26A1B DANBY
0 question about this device. Answer the ones you know or ask your own.
Ask a new question about this device
Download the instructions for your Herb grower in PDF format for free! Find your manual DFG26A1B - DANBY and take your electronic device back in hand. On this page are published all the documents necessary for the use of your device. DFG26A1B by DANBY.
USER MANUAL DFG26A1B DANBY
Welcome to the Danby family. We are proud of our quality products and we believe in dependable service. We suggest that you read this owner's manual before plugging in your new appliance as it contains important operation information, safety information, troubleshooting and maintenance tips to ensure the reliability and longevity of your appliance.
Visit www.Danby.com to access self service tools, FAQs and much more. For additional assistance call 1-800-263-2629.
Note the information below; you will need this information to obtain service under warranty.
You must provide the original purchase receipt to validate your warranty and receive service.
Any returned appliances must include the original grow light system.
Model Number:
Serial Number:
Date of Purchase:
Need Help?
Before you call for service, here are a few things you can do to help us serve you better.
Read this owner's manual:
It contains instructions to help you use and maintain your appliance properly.
If you receive a damaged appliance:
Immediately contact the retailer or builder that sold you the appliance.
Save time and money:
Check the troubleshooting section at the end of this manual before calling. This section will help you solve common problems that may occur.

1-800-26-Danby
(1-800-263-2629)

Important Safety Information READ AND FOLLOW ALL SAFETY INSTRUCTIONS
SAFETY REQUIREMENTS
This appliance is not intended for use by persons (including children) whose physical, sensory or mental capabilities may be different or reduced, or who lack experience or knowledge, unless such persons receive supervision or training to operate the appliance by a person responsible for their safety.
Children should be supervised to ensure that they do not play with the appliance.
To avoid risk of electric shock, do not operate this appliance in an area that is likely to accumulate standing water. If this condition develops, disconnect the power supply before stepping into the water.
Do not store or use combustible materials such as gasoline or other flammable vapors or liquids in the vicinity of this or any other appliance.
Do not cover or block the intake and exhaust openings.
This appliance is intended for indoor, residential applications only. Do not use this appliance outdoors. Do not use this appliance for commercial or industrial applications.
DANGER: Risk of child entrapment. Before throwing away an old appliance:
- Remove the door or lid.
- Leave shelves in place so that children may not easily climb inside.
GROUNDING INSTRUCTIONS
This appliance must be grounded. Grounding reduces the risk of electrical shock by providing an escape wire for the electrical current.
This appliance has a cord that has a grounding wire with a 3-prong plug. The power cord must be plugged into an outlet that is properly grounded. If the outlet is a 2-prong wall outlet, it must be replaced with a properly grounded 3-prong wall outlet. The serial rating plate indicates the voltage and frequency the appliance is designed for.
WARNING - Improper use of the grounding plug can result in a risk of electric shock. Consult a qualified electrician or service agent if the grounding instructions are not completely understood, or if doubt exists as to whether the appliance is properly grounded.
Do not connect the appliance to extension cords, adapters or together with another appliance in the same wall outlet.
Do not splice the power cord. Do not under any circumstances cut or remove the third ground prong from the power cord.
If the power supply cord is damaged, it must be replaced by the manufacturer, its service agent or similar qualified person in order to avoid hazard.
For lighting equipment with cords please ensure that the cords:
1)Are not concealed or extended through a wall, floor, ceiling, or other parts of the building structure, 2)Are not located above a suspended ceiling or dropped ceiling, 3)Are not permanently affixed to the building structure, 4)Are routed so that they are not subject to strain and are protected from physical damage, 5)Are visible over their entire length, and 6)Are used within their rated ampacity as determined for the maximum temperature of the installed environment specified in the instructions.
SAVE THESE INSTRUCTIONS!
OPERATING INSTRUCTIONS
LOCATION
Select a location with a strong level floor that can support the weight of the appliance and the plants grown inside.
Allow 5 inches (12.7cm) between the back of the appliance and the wall. Allow 1 inch (2.5cm) of space between the sides of the appliance and any adjacent walls.
Avoid direct sunlight and heat. Direct sunlight may affect the acrylic coating of the appliance or the growing cycle of your plants. Nearby heat sources can overheat the unit and cause high internal temperatures that may harm your plants.
Ensure that the appliance is turned off and unplugged before any changes are made to the light system.
Keep the door closed during operation.
Only use genuine spare parts from Danby or those that have been CSA, UL or CE approved.
The LED light panel is not water proof. Do not spray water on the surface, sides or back of the light panel.
Do not look directly at the LED light with the naked eye as this can cause retinal damage.
Recommended ambient operating temperature is between 13^ - 32^ (55^ - 90^) .
Recommended operating humidity is below 80% .
The LED panel cannot be exposed to corrosive materials.
The LED panel is for indoor growing only and should not be used outdoors.
Do not touch the surface of the light system while the power is connected as it can get hot.
Do not use the LED panel during a thunderstorm to avoid a surge that could damage the light system.
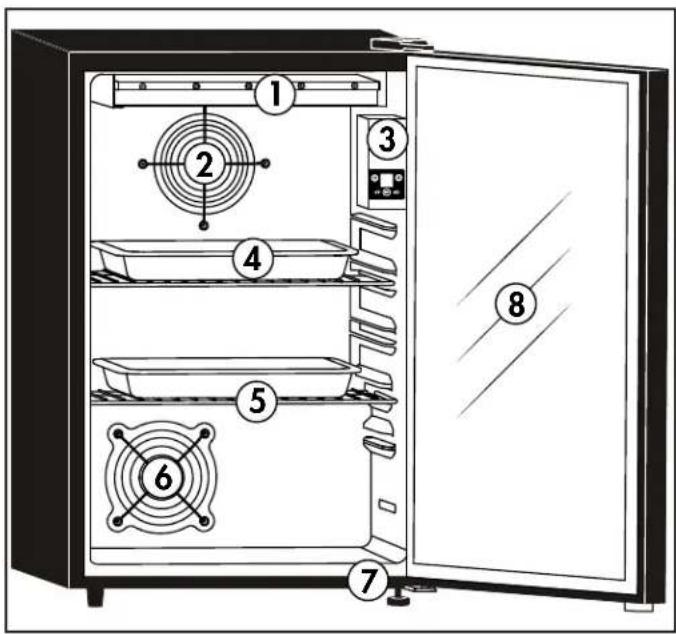
FEATURES
- LED grow light system
- Air outlet
- Control box
- Drip tray (x2)
- Wire shelf (x2)
- Air inlet
- Adjustable foot
- Glass door
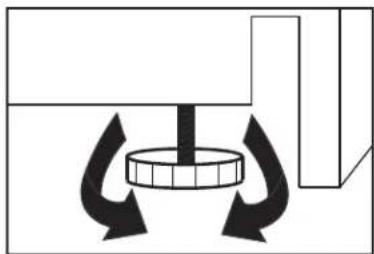
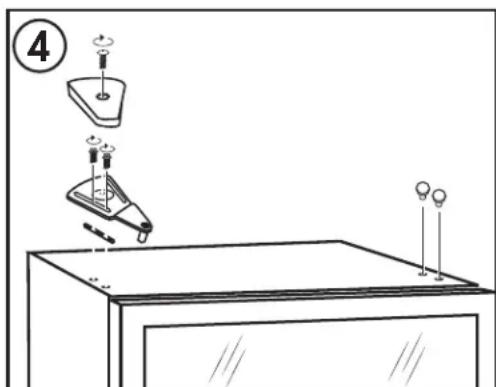
LEVELING INSTRUCTIONS
There is an adjustable foot on the bottom of the appliance that can be turned up or down to ensure that the appliance is level.
- Turn the leveling foot counter-clockwise until the top of the foot is touching the bottom of the cabinet.
- Slowly turn the leveling foot clockwise until the appliance is level.
OPERATING INSTRUCTIONS
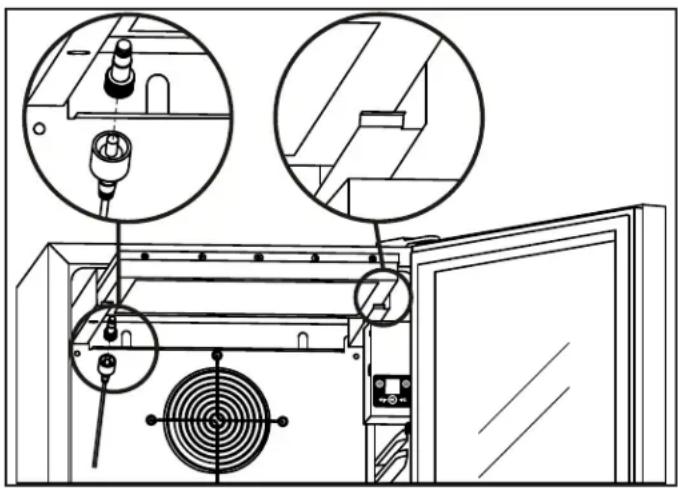
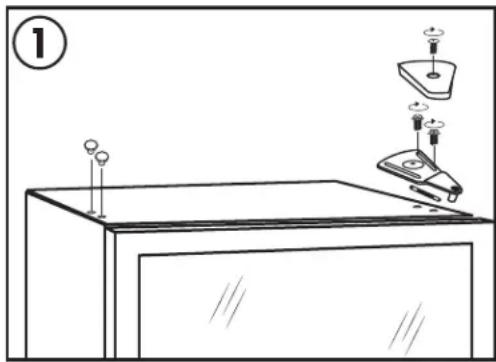
LIGHT INSTALLATION INSTRUCTIONS
The grow light system will ship inside the appliance and must be installed by the end user.
- Remove the light system from the box and remove any packaging.
- Connect the wire coming from the back of the light system to the receptacle on the back wall of the appliance.
- Slide the light system into the two "L" shaped brackets installed on the ceiling of the cabinet.
To remove the light system, first disconnect the light from the receptacle and then push the end of the "L" shaped bracket down and slide the light out.
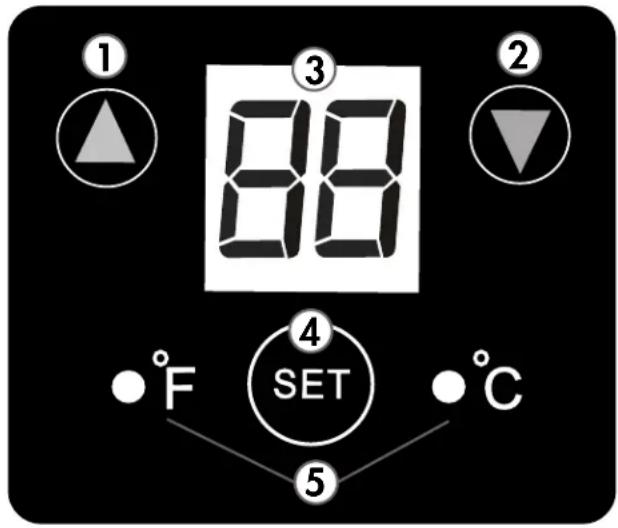
CONTROL PANEL
The control panel is located on the control box on the upper right side of the cabinet.
- Up arrow: Press and hold the up arrow for 5 seconds to manually turn the light system on or off. Press again to resume normal functioning.
- Down arrow: Press and hold the down arrow for 5 seconds to manually turn the fan on or off. Press again to resume normal functioning.
- Display screen: The display screen will show the current internal temperature and the timer settings.
- Set button: The set button is used to set the timer function.
- ^ C / F indicator lights: The light will illuminate to indicate which temperature scale is being displayed. To change the temperature scale, press the set button. The default setting is Fahrenheit.
OPERATING INSTRUCTIONS
TIMER OPERATION
The timer will turn the light system on and off based on the chosen settings, creating a regular light and dark cycle for plants just as they would experience when growing outdoors.
Different plants will grow best under different light cycle conditions; some need more light and some need less. Check the back of the seed packet for information on the best light cycle to set for the plants being grown.
To program the timer:
- Press and hold the set button for 5 seconds until "TS" appears on the display.
- Press the up and down arrows to set the current time to the nearest hour. The default time is 12:00 am, indicated by a '0'.
- Once the current time is set, there are two preset operating modes to choose from.
- Press the up arrow to choose preset P1.
P1: 12 hour light cycle, meaning the lights will be on for 12 hours and off for 12 hours.
- Press the down arrow to choose preset P2.
P2: 18 hour light cycle, meaning the lights will be on for 18 hours and off for 6 hours.
Note: The timer is a 24 hour clock and can only be set to the closest hour.
For example, if the current time is 3:45 pm, set the clock to 16 indicating 4:00 pm. Always set the current time to the nearest hour.
The timer will not display the current time. It uses the set time as a guideline for the day and night cycle and to count the hours before turning the light on or off.
TIMER OPERATION
The preset modes can be altered by following the steps below.
- Press and hold the set button for 5 seconds until "TS" appears on the display.
- Press the set button repeatedly to choose from the settings outlined in the below charts.
- Use the up and down arrows to modify the chosen setting.
Mode P1
H1
The time when the light will turn on
The default is 7:00 am
L1
The number of hours that the light will remain on
The default is 12 hours
Mode P2
H2
The time when the light will turn on
The default is 6:00 am
L2
The number of hours that the light will remain on
The default is 18 hours
Light Temperature Setting
T1
- The temperature at which the light will turn off
Default: 32^ (90^) - Temperature range: 30^ - 35^ (86°F - 95°F)
T2
The temperature at which the light will turn on Default: 30^ (86^)
- Temperature, range: 26^ C - 34^ C( 79^ F - 93^ F)
Note: T1 must be higher than T2
Fan Temperature Setting
F1
- The temperature at which the fan will turn off
Default: 17^ (63^) - Temperature range: 16^ - 20^ (61°F - 68°F)
F2
The temperature at which the fan will turn on
Default: 19^ (66^)
- Temperature range: 18^ C - 22^ C( 64^ F - 72^ F)
Note: F1 must be higher than F2
OPERATING INSTRUCTIONS
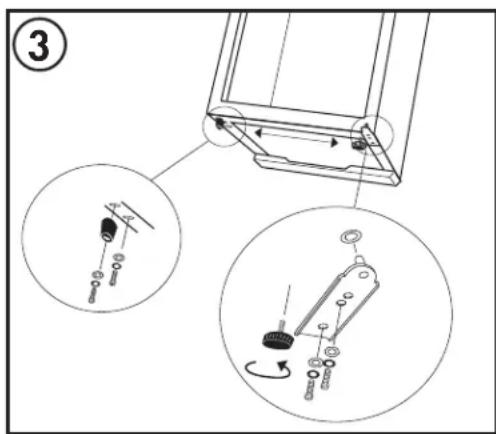
DOOR REVERSAL INSTRUCTIONS
- Remove the hinge cover and the upper hinge from the upper right side of the cabinet. Remove the hinge hole covers from the upper left side of the cabinet. Remove the door from the cabinet.
- Remove the hinge hole cover from the top left side of the door and place it in the hinge hole on the top right side of the door.
- Remove the solid foot from the lower left side of the cabinet and remove the adjustable foot and lower hinge from the lower right side of the cabinet. Install the hinge and adjustable foot on the lower left side of the cabinet. Install the solid foot on the lower right side of the cabinet.
- Install the door on the cabinet and install the upper hinge on the upper left side of the cabinet. Before tightening the screws on the upper hinge, ensure that the top of the door is level with the top of the cabinet and that the rubber gasket is making a good seal with the cabinet all the way around. Install the hinge hole covers in the hinge holes on the top right side of the cabinet.
OPERATING INSTRUCTIONS
GROWING TIPS
- Keep pots or planters in the provided drip tray to avoid water spillage.
Plants grow best when the ambient room temperature is between 13^ - 32^ (55°F - 90°F) - Keep the growing environment clean. Clean the drip try and the inside of the cabinet at least once a month to avoid the growth of mold and mildew.
- If powdery, white mildew forms on plants they can be sprayed with a solution of hydrogen peroxide and water. Use 1 teaspoon of 17% - 35% food-grade hydrogen peroxide to 1 liter of water and only spray the soil as this can cause rot if sprayed on leaves or flowers.
- Do not overwater plants, especially seedlings as they can drown. There is space between the particles of soil that is filled with oxygen. Soil that is constantly wet will not carry enough oxygen and the plants will not be able to breathe.
- As a general rule, soil should be damp but not wet. Check the seed packet for specific information on watering instructions.
In general, for most herbs and vegetables, the following light cycles are recommended:
Growth Cycle: 18 hours on / 6 hours off for approximately 20 - 30 days.
- Bloom Cycle: 12 hours on / 12 hours off for approximately 20 - 30 days.
- Most herbs and vegetables have a maturity date between 45 - 90 days. How long the plants take to mature will depend on the type of plants being grown. Check the seed packet for specific information on growth cycles, germination and flowering times.
GROWING TIPS
Seeds must be germinated before they will grow and bloom. For best results in germination, consult the tips below.
- Spread potting soil evenly in a pot or tray.
- Spread seeds evenly over the surface of the soil.
- Add enough water so that the soil is damp but not sodden. Using a spray bottle to add water is recommended to avoid over-watering seeds.
- The use of a humidity dome or plastic bag over the seeds is recommended to trap heat and humidity around the seeds.
- Place the pot or tray in a dark place. The bottom of the Danby Fresh Grower is ideal for this purpose.
- Leave the humidity dome or plastic bag in place for 2 - 3 days or until sprouts are visible.
- Remove the humidity dome or plastic bag and place the pot or tray on the wire shelf in the Danby Fresh Grower.
- Set the desired light cycle based on the information on the seed packet using the timer instructions on page 5.
Water your plants as required based on the information on the seed packet. - Most microgreens reach maturity within 1 - 2 weeks.
Note: Seedling chambers, humidity domes and germination bags are not included with this appliance and must be purchased separately.
Note: Danby Products Ltd. will accept no liability for lost plants or weak harvests based on inappropriate use of the timer and light cycle system.
LIMITED "CARRY IN" WARRANTY
This quality product is warranted to be free from manufacturer's defects in material and workmanship, provided that the unit is used under the normal operating conditions intended by the manufacturer.
This warranty is available only to the person to whom the unit was originally sold by Danby Products Limited (Canada) or Danby Products Inc. (U.S.A.) (hereafter "Danby") or by an authorized distributor of Danby, and is non-transferable.
TERMS OF WARRANTY
Plastic parts are warranted for thirty (30) days from the date of purchase, with no extensions provided.
First 24 months During the first twenty four (24) months, any functional parts of this product found to be defective, will be repaired or replaced, at warrantor's option, at no charge to the original purchaser.
To obtain service Contact the dealer where the unit was purchased, or contact the nearest authorized Danby service depot, where service must be performed by a qualified service technician. If service is performed on the unit by anyone other than an authorized service depot, all obligations of Danby under this warranty shall be void.
It is the responsibility of the purchaser to transport the appliance to the nearest authorized service depot.
Transportation charges to and from the service location are not protected by this warranty and are the responsibility of the purchaser.
Nothing within this warranty shall imply that Danby will be responsible or liable for any spoilage or damage to food or other contents of this appliance, whether due to any defect of the appliance, or its use, whether proper or improper.
EXCLUSIONS
Save as herein provided, by Danby, there are no other warranties, conditions, representations or guarantees, express or implied, made or intended by Danby or its authorized distributors and all other warranties, conditions, representations or guarantees, including any warranties, conditions, representations or guarantees under any Sale of Goods Act or like legislation or statute is hereby expressly excluded. Save as herein provided, Danby shall not be responsible for any damages to persons or property, including the unit itself, howsoever caused or any consequential damages arising from the malfunction of the unit and by the purchase of the unit, the purchaser does hereby agree to indemnify and hold harmless Danby from any claim for damages to persons or property caused by the unit.
GENERAL PROVISIONS
No warranty or insurance herein contained or set out shall apply when damage or repair is caused by any of the following:
1 Power failure.
2) Damage in transit or when moving the appliance.
3) Improper power supply such as low voltage, defective house wiring or inadequate fuses.
4) Accident, alteration, abuse or misuse of the appliance such as inadequate air circulation in the room or abnormal operating conditions (ie. extremely high or low room temperature).
5) Use for commercial or industrial purposes (ie. If the appliance is not installed in a domestic residence).
6) Fire, water damage, theft, war, riot, hostility, acts of God such as hurricanes, floods etc.
7) Service calls resulting in customer education.
8) Improper Installation (ie. Building-in of a free standing appliance or using an appliance outdoors that is not approved for outdoor application, including but not limited to: garages, patios, porches or anywhere that is not properly insulated or climate controlled).
Proof of purchase date will be required for warranty claims; retain bills of sale. In the event that warranty service is required, present the proof of purchase to our authorized service depot.
Warranty Service
Carry In
Danby Products Limited
PO Box 1778, Guelph, Ontario, Canada N1H 6Z9
Telephone: [519] 837-0920 FAX: [519] 837-0449
1-800-263-2629
04/17
Danby Products Inc.
PO Box 669, Findlay, Ohio, U.S.A. 45840
Telephone: (419) 425-8627 FAX: (419) 425-8629
Bienvenue
Danby Products Limited
PO Box 1778, Guelph, Ontario, Canada N1H 6Z9
Telephone: (519) 837-0920 FAX: (519) 837-0449
1-800-263-2629
04/17
Danby Products Inc.
PO Box 669, Findlay, Ohio, U.S.A. 45840
Telephone: (419) 425-8627 FAX: (419) 425-8629
Danby
MODEL • MODELE • MODELO DFG26A1B
Danby Products Limited, Guelph, ON, Canada N1H 6Z9 Danby Products Inc., Findlay, Ohio, USA 45840