Variant View S1616SV - Sauna HARVIA - Free user manual and instructions
Find the device manual for free Variant View S1616SV HARVIA in PDF.

| Product Type | Sauna |
| Brand | Harvia |
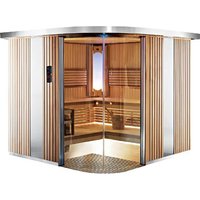
| Model | Variant View S1616SV |
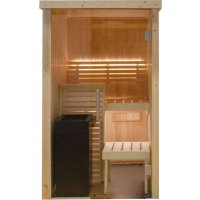
| External Dimensions (W x D x H) | 1635 x 1608 x 2020 mm |
| Main Material | Spruce wood |
| Glass Type | Tempered glass (door and fixed panels) |
| Lighting | LED (model SAS21060T included) |
| Power Supply | Connection by a qualified electrician (heater not included) |
| Care and Cleaning | Damp cloth and hot water only, no detergent |
| Safety | Minimum distance of 5 cm from walls, pre-drilled screw holes |
| Assembly | Instructions included, requires 2 people and basic tools |
| Tools Required | Hammer, screwdriver, drill bits (3, 10, 20-30 mm), spirit level, 1.5 mm Allen key |
| Resin Cleaning | Scrape after hardening or use a cloth soaked in acetone |
| Included Accessories | Ventilation register, heater mounting kit at bench foot, mounting hardware |
| Available Options | RGBW LED tubes, Xenio RGBW control, DMX driver |
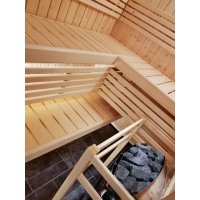
| Bench Dimensions (upper) | 1440 x 600 x 90 mm |
| Bench Dimensions (lower) | 1440 x 400 x 90 mm |
| Usable Interior Height | Approximately 1900 mm (height of wall elements) |
| Repairability | Spare parts available from dealer |
Frequently Asked Questions - Variant View S1616SV HARVIA
User questions about Variant View S1616SV HARVIA
0 question about this device. Answer the ones you know or ask your own.
Ask a new question about this device
Download the instructions for your Sauna in PDF format for free! Find your manual Variant View S1616SV - HARVIA and take your electronic device back in hand. On this page are published all the documents necessary for the use of your device. Variant View S1616SV by HARVIA.
USER MANUAL Variant View S1616SV HARVIA
36 Valo (SAS21060T) 1200x100x65 1200x100x65
1.Preparing for installation_3
1.1. Tools required 4
1.2. Maintenance and cleaning 5
1.3. Disposal.5
1.4. Parts list for Mini S1212SV and Small S1616SV.6
1.5. Parts list for Medium S1620SV and Large S2020SV 8.
2. Floor plan 10
2.1. Variant View Mini S1212SV...10
2.2. Variant View Small S1616SV 10
2.3. Variant View Medium S1620SV.11
2.4. Variant View Large S2020SV_11
3. Assembling the cabin 12
3.1. Assembling the base frame 12
3.2.Assembling the cabin walls 12
3.3.Assembling the roof elements 12
3.4. Assembling the benches 12
3.5. Assembling the glass elements 13
3.6.Installing roof trim 13
3.7. Mounting the cover slats 13
3.8.Drill hole for electrical cable 13
3.9.Mounting the light 13
3.10. Installation KIT for heater installation at the bench foot 13
Illustrations for the parts list
(following the last language of the instructions) 15
Assembly illustrations
(following the last language of the instructions) 16
1. Preparing for installation
Read these assembly instructions carefully and keep them within reach when using the sauna so that you can look up product information at any time.

These assembly instructions can also be found in the customer service section of our website: www.harvia.com
Important note:
- Before you begin work, check the parts list to ensure that all the individual parts have been delivered. If you discover any missing parts, notify your dealer within 14 days of receiving the sauna cabin.
- The room that the sauna is installed in must be dry and ensure an appropriate amount of air circulation.
- The floor must be level and even, preferably a stone or tiled floor.
- A minimum room height of 230 cm is required for the cabin installation work.
- A distance of at least 5cm from the wall must be maintained.
- The inside of the wooden parts used must not be handled with any impregnating material.
- You need an assistant for the installation.
- Wood is a natural product that can swell, shrink or warp, despite good storage. For this reason, some force may be necessary during the installation.
- All screw fittings must be pre-drilled.
Attention! The electrical connection may only be performed by a qualified electrician or similarly qualified person.
1.1. Tools required
- Hammer with a wooden head or a mallet
- Cordless screwdriver with bits for cross-head screws and Torx
- Roller tape measure
- Drill bits with a diameter of 3mm , 10mm , 20 - 30mm (for sauna heater power cable)
Spirit level
1.5 mm hexagonal socket wrench
Utility knife
Ladder

This symbol indicates tips and useful information
Pre-drill

Nailing

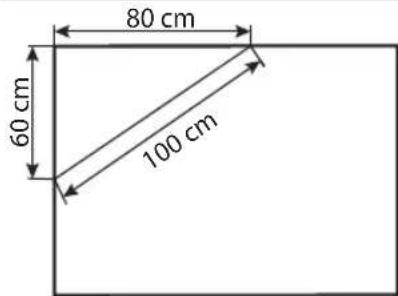
Check the right angle:

Handle glass with care: Special care must be taken with the edges of the glass - hardened glass can shatter into small pieces in the event of impact. Insert protective cushioning (e.g: cardboard box) under the edge of the glass.

1.2. Maintenance and cleaning
- The sauna should be cleaned with a damp cloth. Only use warm water – no cleaning products.
- We recommend heating the cabin once a month if the sauna is not used for a long time.

Pitch pockets are not grounds for return, since they can always appear in spruce wood and the depth at which they lie cannot be detected during the sorting-out process.
If these are just under the surface, heat can cause them to soften and "bleed".
The leaking pitch can be removed with a rag soaked in acetone. If only droplets of pitch occur, allow these to harden and then carefully scrape them off with a knife.
1.3. Disposal

- Dispose of packaging materials in accordance with the applicable waste disposal regulations.
- Used devices contain reusable materials as well as hazardous substances. Therefore, do not dispose of your used device with household waste, but do so in accordance with the locally applicable regulations.
EN
1.4. Parts list for Mini S1212SV and Small S1616SV
Illustrations for parts on page 11 (following the last language of the instructions)
| No. Name Pcs Dimensions (mm) | Pcs Dimensions (mm) | ||
| S1212SV | S1616SV | ||
| Base frame | |||
| 1 Base frame 1 1097x68x43 1 1522x68x43 | |||
| 2 Base frame 1 1142x68x43 1 1567x68x43 | |||
| 3 Base frame ventilation aperture 1 1097x68x43 1 1522x68x43 | |||
| Wall elements | |||
| 4 Wall elements 510 4 1900x510x75 2 1900x510x75 | |||
| 4 Wall elements 935 | 2 1900x935x75 | ||
| 5 Electrical element 510 1 1900x510x75 | |||
| 5 Electrical element 935 | 1 1900x935x75 | ||
| 6 Ventilation element 510 1 1900x510x75 | 1 1900x510x75 | ||
| Corner posts | |||
| 7 Corner post A 1 1949x85x45 2 1949x85x45 | |||
| 8 Corner post B 1 1949x73x45 | |||
| 9 Corner post G 1 1836x77x76 1 1836x77x76 | |||
| 10 Corner post H 1 1836x77x44 1 1836x77x44 | |||
| Roof elements | |||
| 11 Roof element 1 1144x1172x64 | 1 1597x883x64 | ||
| 12 Roof element | 1 1597x686x64 | ||
| 13 Roof frame 1 1142x45x32 2 1395x45x32 | |||
| 13 Roof frame 2 970x45x32 1 1567x45x32 | |||
| 13 Roof frame | |||
| 14 Roof rim 2 1210x95x15 2 1605x95x15 | |||
| 14 Roof rim 2 1183x95x15 2 1633x95x15 | |||
| Corner covers | |||
| 15 Inner roof corner trims 2 1005x18x15 2 1430x18x15 | |||
| 15 Inner roof corner trims 1 1022x18x15 1 1447x18x15 | |||
| 16 Inner corner trim 2 1025x20x20 2 1025x20x20 | |||
| 17 Outer corner covers 2 1900x77x15 2 1900x77x15 | |||
| 18 Outer corner covers 1 1900x64x15 1 1900x64x15 | |||
| 19 Outer corner covers 1 1900x64x15 1 1900x64x15 | |||
| No. Name Pcs Dimensions (mm) S1212SV S1616SV | |||
| Glass front | |||
| 20 Aluminium U-profile 1 402x22x12 2 409x22x12 | |||
| 21 Glass 1 1939x411x8 2 1939x417x8 | |||
| 21 Glass door 1 1897x600x8 1 1897x600x8 | |||
| 22 Spacer strip above glass door 1 610x20x8 1 610x20x8 | |||
| 23 Door handle set 1 300x158x30 1 300x158x30 | |||
| 24 Door hinges 2 | 2 | ||
| Interior fittings | |||
| 25 Upper sauna bench 1 1015x500x90 1 1440x600x90 | |||
| 25 Upper sauna bench | 1 680x500x90 | ||
| 25 Upper sauna bench | 1 500x285x90 | ||
| 25 Lower sauna bench | 1 1440x400x90 | ||
| 26 Bench foot | 1 1143x510x90 | 2 1143x510x90 | |
| 27 Foot step | 1 475x400x90 | ||
| 28 Feet | 4 431x90x28 | ||
| 29 Bench screen | 1 525x402x42 1 137 | 0x402x42 | |
| 30 Backrests | 1 978x270x36 1 140 | 0x270x36 | |
| 30 Backrests | 1 1234x270x36 | ||
| 30 Backrests | 1 840x270x36 | ||
| 31 Bench support slat | 2 495x99x29 2 900x90x29 | ||
| 32 Bench support slat | |||
| 33 Bench support slat | 1 468x90x29 2 900x90x29 | ||
| 33 Bench support slat | 2 700x90x29 | ||
| Accessories | |||
| 35 Ventilation slit | 1 260x87x20 1 260x87x20 | ||
| 36 Light (SAS21060T) | 1 200x100x65 1 200x100x65 | ||
| 37 Installation material | 1 | 1 | |
| 38 Kit for heater mounting on bench foot | 1 | 1 | |
| 39 Assembly instructions | 1 | 1 | |
| Accessories (optional) | |||
| RGBW LED Tube | 2 LED-tube 900 | 1 LED-tube 700 | |
| RGBW LED Tube | 1 LED-tube 1200 | ||
| RGBW LED Tube | 1 LED-tube 1300 | ||
| Xenio RGBW colour light control | 1 | 1 | |
| DMX-Driver (DMX-C) | 1 | 1 | |
| Power supply unit (LED-PWS-24-XX) | 1 40 W | 1 90 W | |
1.5. Parts list for Medium S1620SV and Large S2020SV
Illustrations for parts on page 11 (following the last language of the instructions)
| No. | Name Pcs Dimensions (mm) | Pcs Dimensions (mm) |
| S1620SV S2020SV | ||
| Base frame | ||
| 1 | Base frame 1 1522x68x43 1 1947x68x43 | |
| 2 | Base frame 1 1992x68x43 1 1992x68x43 | |
| 3 | Base frame ventilation aperture 1 1522x68x43 1 1947x68x43 | |
| Wall elements | ||
| 4 | Wall elements 935 2 1900x935x75 4 1900x935x75 | |
| 4 | Wall elements 510 2 1900x510x75 | |
| 5 | Electrical element 935 | 1 1900x935x75 1 1900x935x75 |
| 6 | Ventilation element 935 | 1 1900x935x75 1 1900x935x75 |
| Corner posts | ||
| 7 | Corner post A | 2 1949x85x45 2 1949x85x45 |
| 9 | Corner post G | 1 1836x77x76 1 1836x77x76 |
| 10 | Corner post H | 1 1836x77x44 1 1836x77x44 |
| Roof elements | ||
| 11 | Roof element | 1 2022x883x64 1 2022x1112x64 |
| 12 | Roof element | 1 2022x687x64 1 2022x883x64 |
| 13 | Roof frame | 1 1992x45x32 1 1992x45x32 |
| 13 | Roof frame | 2 1395x45x32 2 1819x45x32 |
| 14 | Roof rim | 2 2058x95x15 2 2058x95x15 |
| 14 | Roof rim | 2 1605x95x15 2 2033x95x15 |
| Corner covers | ||
| 15 | Inner roof corner trims | 1 1868x18x15 1 1868x18x15 |
| 15 | Inner roof corner trims | 2 1426x18x15 2 1850x18x15 |
| 16 | Inner corner trim | 2 1025x20x20 2 1025x20x20 |
| 17 | Outer corner covers | 2 1900x77x15 2 1900x77x15 |
| 18 | Outer corner covers | 1 1900x64x15 1 1900x64x15 |
| 19 | Outer corner covers | 1 1900x64x15 1 1900x64x15 |
| No. Name Pcs Dimensions (mm) S1620SV S2020SV | |||
| Glass front | |||
| 20 Aluminium U-profile 2 621x22x12 2 621x22x12 | |||
| 21 Glass 2 1939x629x8 2 1939x629x8 | |||
| 21 Glass door 1 1897x600x8 1 1897x600x8 | |||
| 22 Spacer strip above glass door 1 610x20x8 1 610x20x8 | |||
| 23 Door handle set 1 300x158x30 1 300x158x30 | |||
| 24 Door hinges 2 2 | |||
| Interior fittings | |||
| 25 Upper sauna bench 1 1865x600x90 1 1865x600x90 | |||
| 25 Upper sauna bench 1 680x500x90 1 1165x500x90 | |||
| 25 Upper sauna bench 1 500x285x90 1 582x500x90 | |||
| 25 Lower sauna bench 1 1865x400x90 1 1865x500x90 | |||
| 26 Bench foot | 2 | 1143x510x90 | 2 1143x510x90 |
| 29 Bench screen | 1 1795x402x42 1 1795x402x42 | ||
| 30 Backrests | 1 1828x270x36 1 1828x270x36 | ||
| 30 Backrests | 1 1234x270x36 1 1720x270x36 | ||
| 30 Backrests | 1 839x270x36 1 136x270x36 | ||
| 32 Bench support slat | 2 850x99x29 2 1050x90x29 | ||
| 33 Bench support slat | 1 950x90x29 2 1050x90x29 | ||
| 33 Bench support slat | 1 700x90x29 | ||
| 34 Bench support leg | 1 845x68x44 1 845x68x44 | ||
| 34 Bench support leg | 1 395x68x44 1 395x68x44 | ||
| Accessories | |||
| 35 Ventilation slit | 1 260x87x20 1 260x87x20 | ||
| 36 Light (SAS21060T) | 1 200x100x65 1 200x100x65 | ||
| 37 Installation material | 1 1 | ||
| 38 Kit for heater mounting on bench foot | 1 1 | ||
| 39 Assembly instructions | 1 | 1 | |
| Accessories (optional) | |||
| RGBW LED Tube | 1 | LED-tube 700 | 1 LED-tube 1200 |
| RGBW LED Tube | 1 | LED-tube 1200 | 1 LLED-tube 1600 |
| RGBW LED Tube | 2 | LED-tube 1300 | 2 LED-tube 1800 |
| Xenio RGBW colour light control | 1 1 | ||
| DMX-Driver (DMX-C) | 1 1 | ||
| Power supply unit (LED-PWS-24-XX) | 1 | 160 W | 1 160 W |
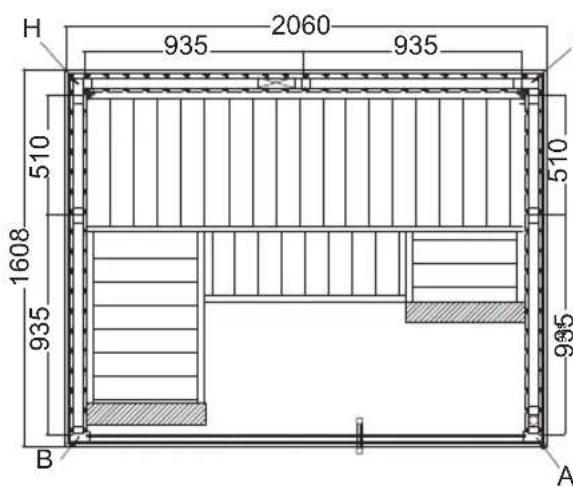
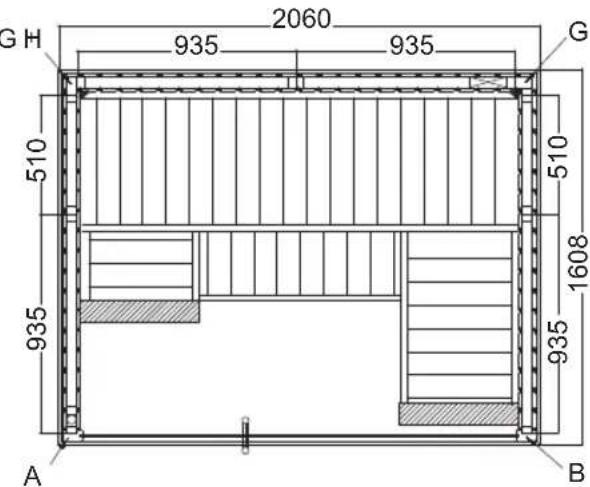
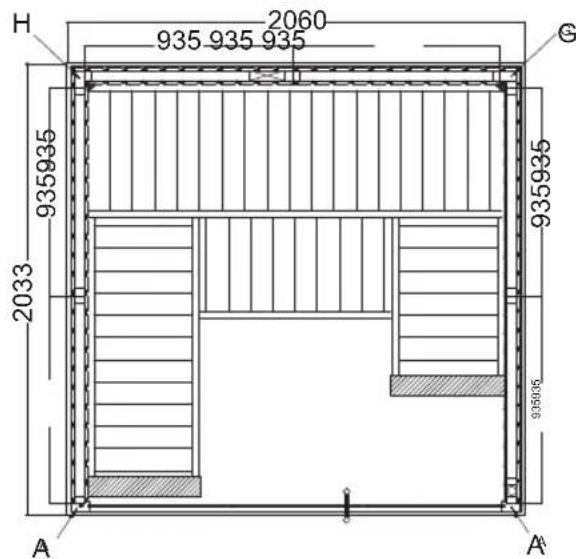
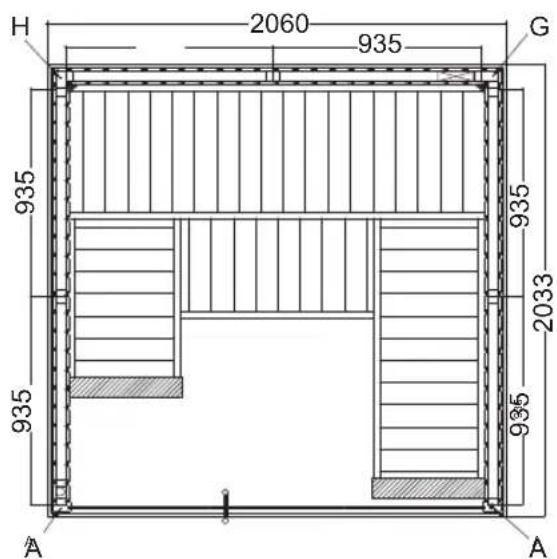
2. Floor plan
2.1. Variant View Mini S1212SV
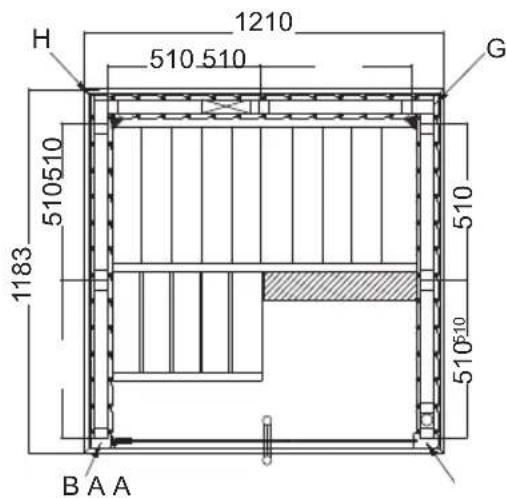

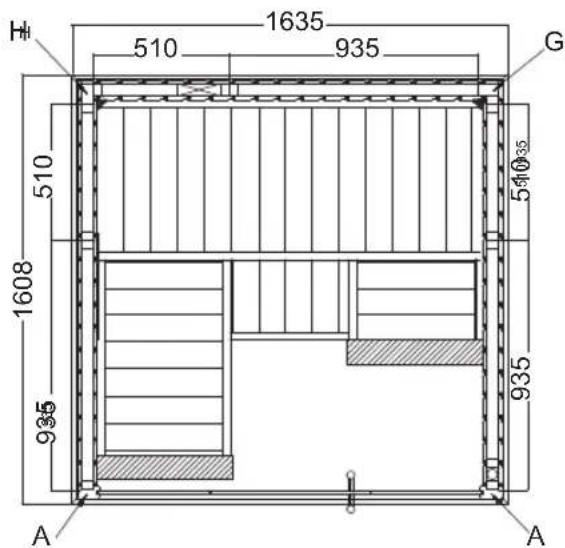
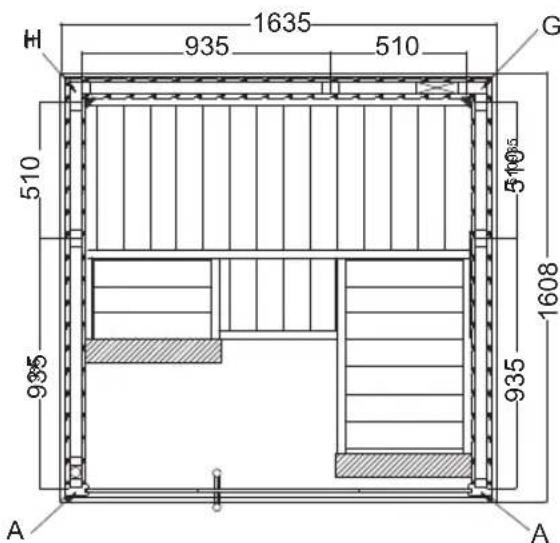
2.2. Variant View Small S1616SV
2.3. Variant View Medium S1620SV
2.4. Variant View Large S2020SV
3. Assembling the cabin

ATTENTION!
Note the floor plans on pages 10 and 11 as well as the illustrations starting on page 16 (following the last language of the instructions).
3.1. Assembling the base frame
Start with the base frame and screw it to the corners. Move the base frame to the final position of the sauna.
3.2. Assembling the cabin walls

Note the outside/inside of the wall elements.
Make sure the ventilation element is correctly positioned. It must be placed diagonally opposite the heater.
Start assembling the wall elements with the ventilation element and screw it to the corner post (G, H). The other wall elements are connected by tongue and groove and are fixed by mounting the roof frame. Check the right angles (see tip on page 4).
Mount the multiclips to the front sides of the wall elements and to the corner posts (A, B). Make sure that the multiclips are correctly aligned – the corner posts are connected to the wall elements from top to bottom.
Fit the ventilation slider.
3.3. Assembling the roof elements
Insert the roof elements and screw them to the cabin walls. Note the cable outlet.
3.4. Assembling the benches
Mount the bench support slats on the side wall elements. Connect the angle bench to the sauna bench using M10 x 120 screws. Screw the adjustable feet into the bench foot. Fix the bench foot to the angled bench by tightening up the lock and screw the bench foot to the side wall.
Assemble the bench screen and the backrest.
3.5. Assembling the glass elements
Fit the aluminium U-profiles on the glass elements and install the glass elements in the cabin.

Note when installing the glass element that the holes drilled for the door hinges determine which way the door opens.
Bond the aluminium U-profiles to the floor with silicone or assembly adhesive.
Mount the spacer strip above the glass door.
When installing the door fittings, make sure that the door opens to the outside. Screw the two door fittings to the glass element first, making sure that the fittings are aligned straight. Align the fittings by adjusting / turning the two plastic inserts.
The door handles are screwed together from the inside. Attach plastic washers on the stainless steel handle
Fit the door magnet and sleeve plate.
3.6. Installing roof trim
Mount the corner brackets to the roof trim strips. Then screw the roof trim strips to the roof element.
3.7. Mounting the cover slats
Fasten the inner roof corner trims, the inner corner trims and the outer corner covers using nails.
3.8. Drill hole for electrical cable
3.9. Mounting the light
3.10. Installation KIT for heater installation at the bench foot
Only required if the sauna heater is mounted on the bench foot in order to maintain the safety distances.
Elementsauna
VARIANT VIEW
MONTAGEANLEITUNG
Deutsch
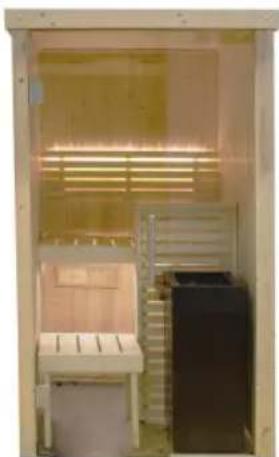
Mini
S1212SV S1616SV
1210 × 1183 × 2020 mm
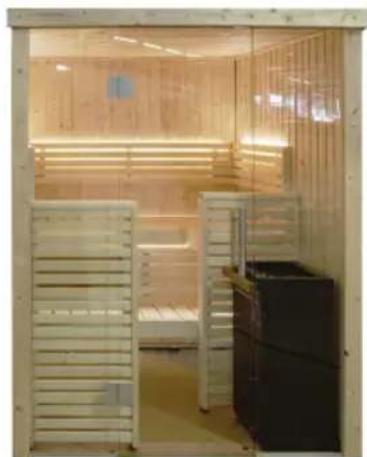
Small
1635 × 1608 × 2020 mm
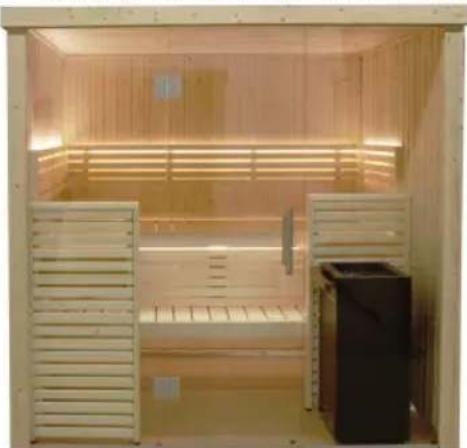
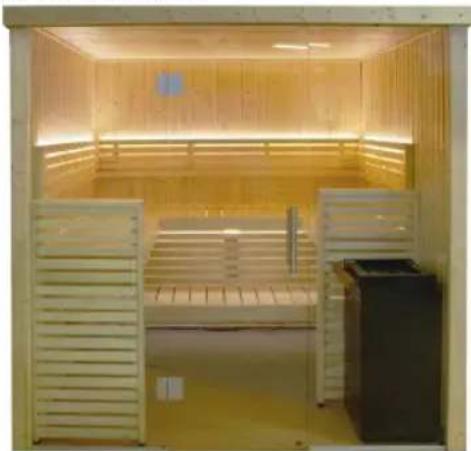
Medium Large
S1620SV S2020SV
2060× 1608× 2020mm2060× 2033× 2020mm
Inhaltsverzeichnis
IJIIOCTpaunn DeTaneN Ha cTp. 11 (Ha BCex Ja3bikax)
IJIIOCTpaunn DeTaneHn Ha cTp. 11 (Ha BceX Ja3bikax)
3.1. MoHTax paMbI OCHOBaHnA
HaunTe c pambi OCHOBAHnI npKpyTnte ee no yrIam. Iepemectnte pamy OCHOBAHnB OKOHaTeJIbHOe NOJoxHe nce CayHbl.
3.2. MoHTax CTeHOK Ka6nHbI

O6paTnte BHNMaHne Ha BHeuHnE/BHyTppeHHne 3JeMeHTbl CTehOK.
YuHTbIbaIe NIOJoxKeHne 3JeMeHt a IJI BHeTnIaIcII. Ero HxKHO pa3-MecITb NO DnaRoHaJIH HApOTINB HarpeBaTeJIa.
Haunte c MOHTaxa 3neMeHOB CTeHOK C 3neMeHOT mI BENTJauuN I npKpyTnte ero K yrnoBoi cToKe (G, H).OcTaJIbHbIe 3neMeHtBi cTeHOK CoednHOTcR npN NOMOuPi a3a N uNOHKn N fHKcnpyOTcR yCTaHOBKOI NOTOIOUHOI paMbI. Y6eINTecb, yTO BCE yrblipraMbI (cm. coBET Ha cTpaHnce 4).
YCTAHOBHTe 3axHMHO CoeHHTeB Multiclip Ha nepeHHe CTOpOHbI 3JeMeHTOB CTEHOK n Ha yrIOBbIe CToKn (A, B). Y6eHITecb, yTO 3axHMHO CoeHHTeB Multiclip npaBnBHO BbIPOBHeH — yrIOBbIe CToKn HacaxNBAHOTcR Ha 3JeMeHTbI CTEHOK CBepxv BHN3.
YCTaHOBnTE BeHTnJIaIcIOHHyIO 3acJIOHky.
3.3. MoHTax NOTOJIOUHbIX 3JIeMeHTOB
YCTaHOBInTe NotoJIOUHbIe 3JIeMeHTbI IN PpIKpyTInTe INK CTeHKam Ka6HbI.
O6paTInTe BHHMaHHe Ha BbIBoD Ka6EJa.
3.4. MoHTaJcKaMeeK
MOHTaX ONOpHbIX PIIaHOK IJIy CKaMbI Ha 60KOBbIe 3JIemEHTbl CTeHOK. YrIOBaCKaMbIa KpeNITcR K cKaMbIe cayHbI BnHTamN M10 x 120. PpIKpyTtpe peryIpyEmble HOxKIN K HOxKe IJIy cKaMeiKn. PObepHyB kCaTOp, 3aФNKcPuyTe HOxKY IJIy cKaMeiKn Ha yrIOBOI cKaMbIe N PpIKpyTtte HOxKY IJIy cKaMeiKn K 60KOBoI CTeHe.
Mohtax nepereopokn n cnHkn.
3.5. MoHTaX CTeKJIaHHbIX 3JIeMeHToB
PpNkpeHnTe U-06pa3HbIe anIOHMnHeBbIe npoΦnI K CTeKJIaHHbIM 3JeMeHTam N BCTaBbTe CTeKJIaHHbIe 3JeMeHTbl B Ka6nHy.

Ipn yctaHOBKe CTeKJIaHHoro 3JIeMeHTa C OTBepCTnMn NOD nETnCneDyeT yuNTbIBaTb HnPaBHeHne OTKpbIBaHnA DBepei.
PpIKneIte aIOMHHeBbIe U-06pa3HbIe npoΦnI K NOy C NOMOuBCNIKoHa IIN MOHTaXHOrO KNeI.