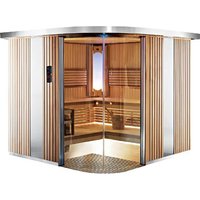
Variant S2015R - Sauna HARVIA - Free user manual and instructions
Find the device manual for free Variant S2015R HARVIA in PDF.
| Product type | Prefabricated sauna |
| Brand | Harvia |
| Model | Variant S2015R |
| Total height (with adjustable feet) | 2030 mm + 20 to 40 mm |
| Minimum room height | 2150 mm |
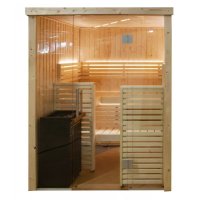
| Material | Wood (paneling, panels) |
| Power supply | 230/240 V single-phase (installation by qualified electrician) |
| Lighting included | Yes, with E14 bulb (25-40 W max, not included) |
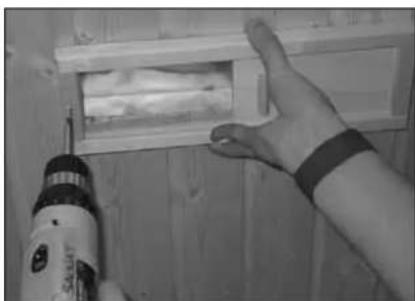
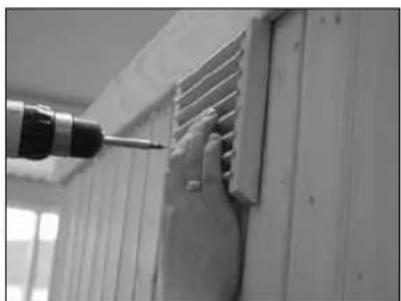
| Ventilation | Requires valve and ventilation grille (provided) |
| Assembly | Kit with screws, nails and detailed instructions |
| Required tools | Hammer, drill, crosshead screwdriver, saw, tape measure, spirit level, drill bits (3.5 mm and 10 mm) |
| Door | Glass (lets light through) |
| Panel fixing | Screws 4.5 x 45 mm and nails 45 x 1.7 mm |
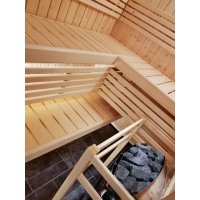
| Benches | Lower and L-shaped bench with supports |
| Maintenance | Clean regularly, use sandpaper for sharp edges, treat the exterior with protective coating |
| Safety instructions | Electrical installation by a professional, do not use any products inside, ventilate after steam use |
| Warranty | Refer to the full manual |
Frequently Asked Questions - Variant S2015R HARVIA
User questions about Variant S2015R HARVIA
0 question about this device. Answer the ones you know or ask your own.
Ask a new question about this device
Download the instructions for your Sauna in PDF format for free! Find your manual Variant S2015R - HARVIA and take your electronic device back in hand. On this page are published all the documents necessary for the use of your device. Variant S2015R by HARVIA.
USER MANUAL Variant S2015R HARVIA
I hornet nara innertaket
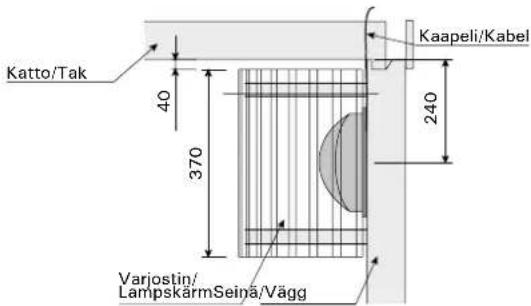
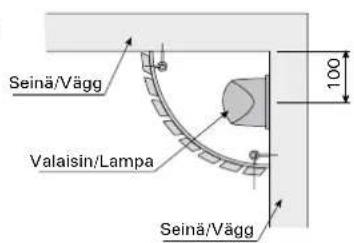
Kuva 9. Valaisimen ja varjostimen paikkaa
Bild 9. Placering av lampa och lampskärm
Lauteiden asennus
ASSEMBLY INSTRUCTIONS
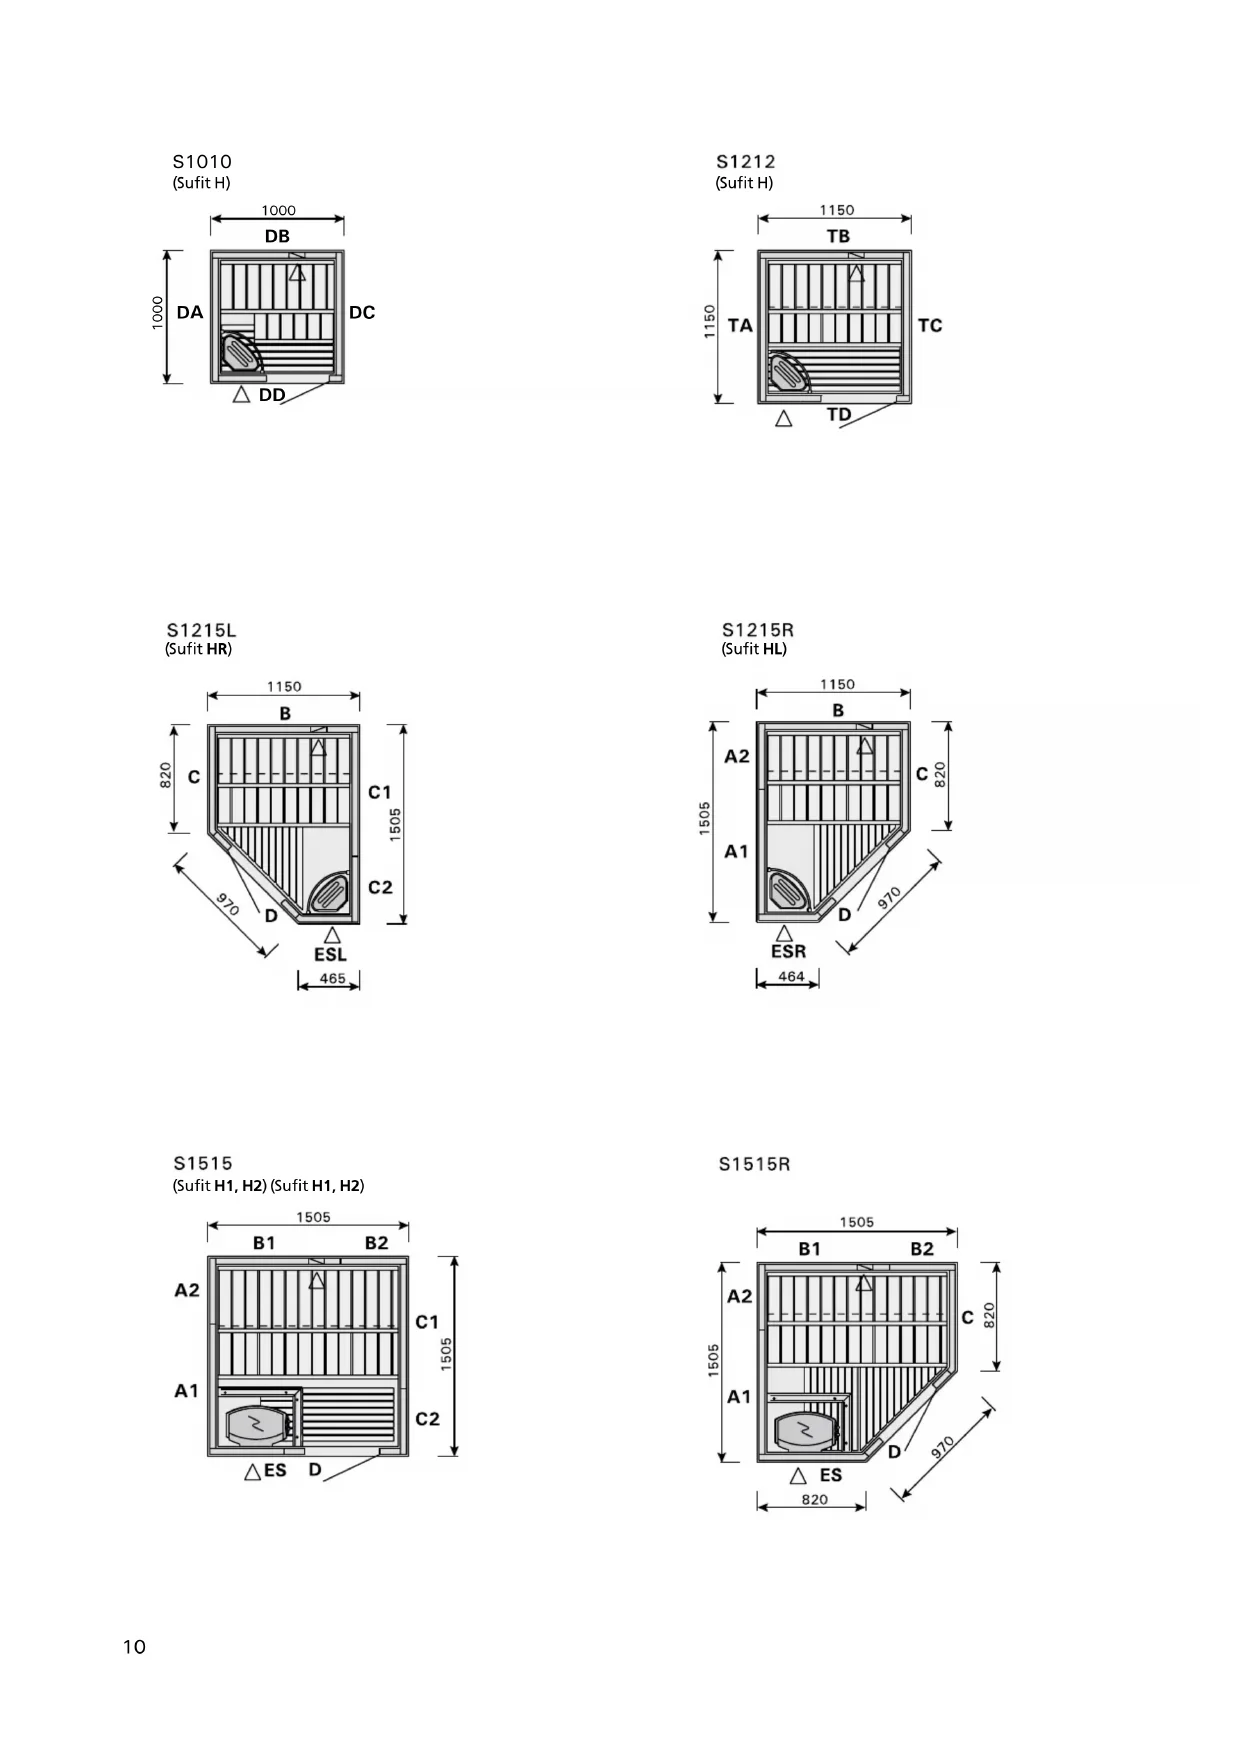
Please read the assembly instructions through before starting. The height of all Variant saunas is 2030mm (+ adjustable legs 20 - 40~mm) .The minimum room height required for sauna installation is 2150~mm
You will need the following tools:
hammer
drill
crosshead screwdriver or batterydriven screwdriver (PZ2, PH2 and PZ3).
- fine-toothed saw
tape measure - sandpaper
- spirit level
- drill bits (3.5 mm and 10 mm)
- stool or step-ladders
- knife (for opening the packages and for small adjustments)
Electrical Installation
Electrical installations may only be carried out by a qualified electrician.
Please note:
Wood is a natural material, which, despite good storage, can swell, contract or warp. For this reason the assembly of some of the sauna parts may require some force and/or the use of a vice.
- Only use the screws and nails that come with the kit.
- All screw connections should be pre-drilled. Most of the bores have been already made at the factory.
The room in which the sauna is being assembled must be dry. It is essential to ensure that there is a good flow of air in the room before work commences.
- No impregnants should be used with the sauna's internal parts.
- Round off any sharp, uneven sawed edges with sandpaper.
If necessary you can fill any holes, joints or other uneven surfaces with a mixture of sawdust and glue.
- The outside of the sauna can be treated with a special sauna protection coat or suitable lacquer. Treated surfaces are easier to clean.
If you are using a special steam heater or other steam generator in your sauna, make sure the s pletely dry after use by heating the sauna for a of 15 to 30 minutes (without using steam) and same time keeping the ventilation hole and door open.
If the sauna is equipped with a steam heater and no optional additional ventilation valve (SOFT) has been ordered, this can also be installed at the top of a wall or in the ceiling of a completed sauna.
Assembling the Base Frame
The base frame sections are fastened using 4.5 × 45 ~mm screws. Please ensure that the base is in the horizontal position (Fig. 2).
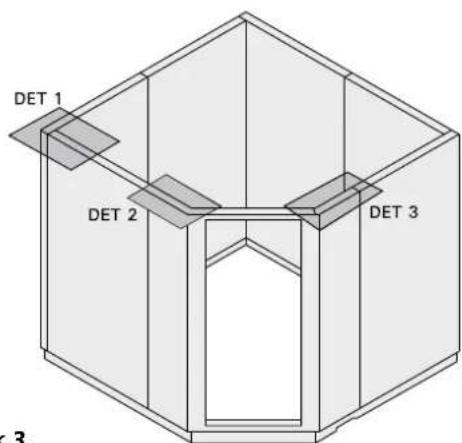
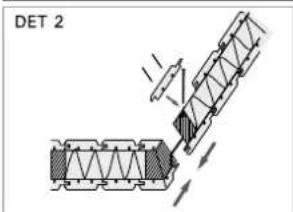
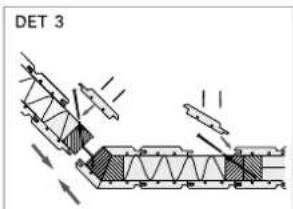
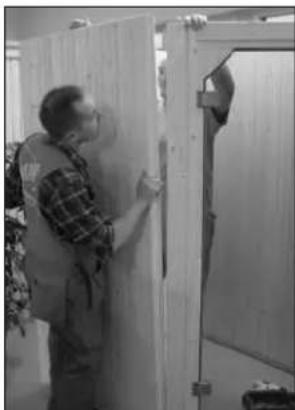
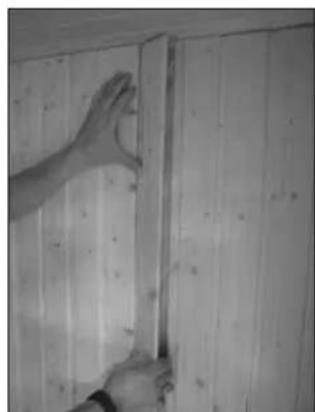
Assembling the Walls
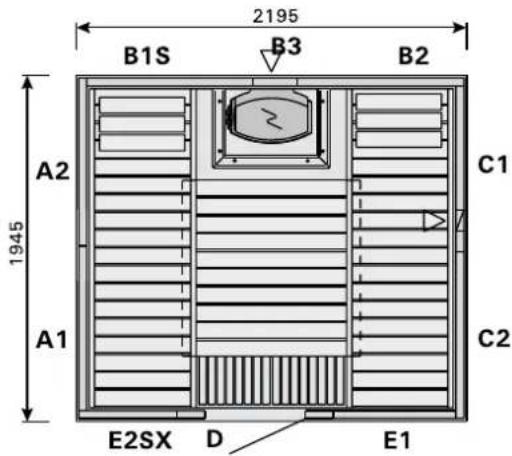
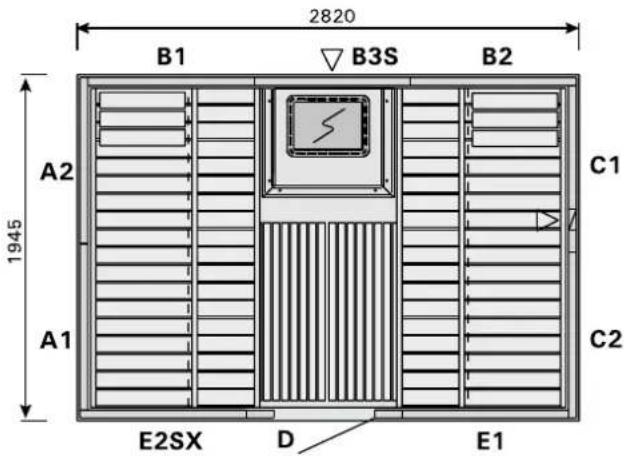
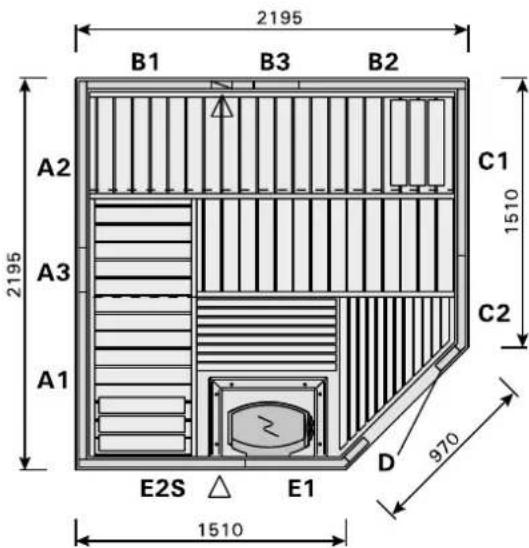
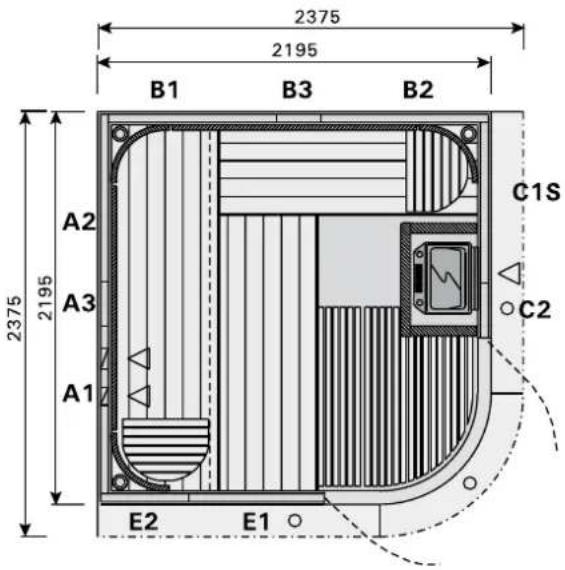
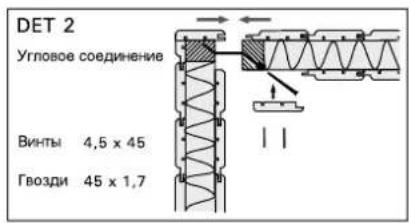
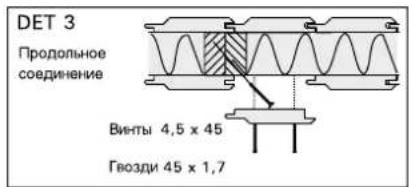
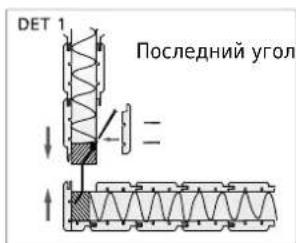
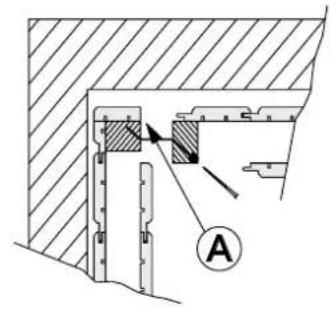
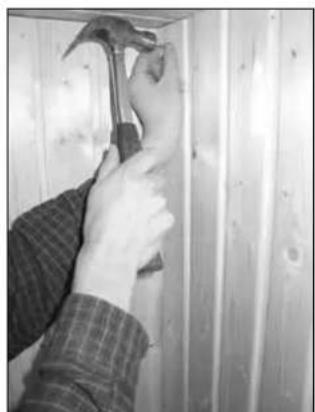
The assembly of the wall panels begins from one of the 90^ corners. IMPORTANT! Assembly should come to an end at one of the other right-angled corners. The last panel must tilt outward so that the grooves in the outer panels connect. Fasten the panels using 4,5 × 45 ~mm screws. The holes are pre-drilled. Use 45 × 1.7 ~mm nails for the panel boards (Fig. 2 and 6). If the last corner cannot be assembled from outside the sauna, the groove on the last panel board must be completely removed (Fig. 4).
Note! Fastening the door panel cannot be left to last when assembling the sauna.
Please remember to check from above that panel connections are tight.
Achtung!
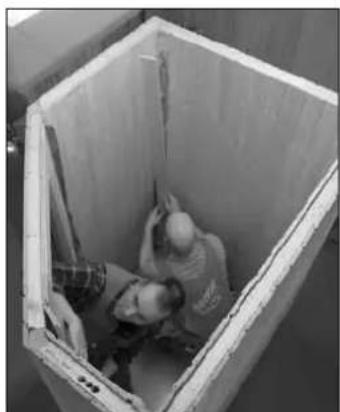
Assembling the Ceiling Panels
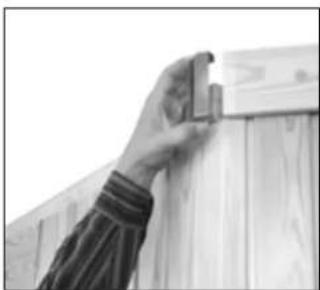
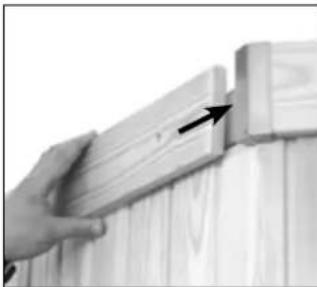
After the walls have been assembled lift the ceiling panels into place. Lower the ceiling panels onto the wall panels making sure that the mouldings on the under-surface of the ceiling panels fit into the grooves at the top of the wall frame.
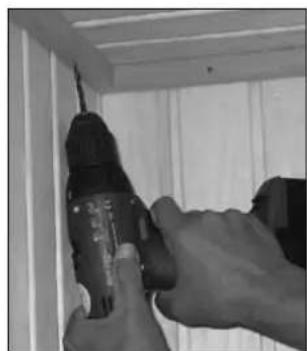
Standing inside the sauna structure, use the mouldings (28 x 28) and the yellow screws (4.5 x 45 mm) to fasten the ceiling panels to the walls (Fig. 5).
Saw off the ceiling mouldings to the right length.
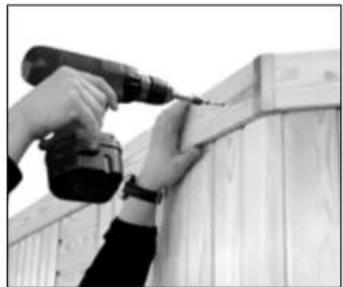
The ceiling strips contain prefabricated holes screws. Be sure to drill 3.5 mm holes for through the panel boards to prevent them from cracking upon installation.
The ceiling mouldings should be screwed first to the walls so that there is a gap of approximately 5mm between the ceiling and the moulding. When the are screwed into the ceiling the latter sinks into the seal
ing strip that runs along the top of the walls.
Note! When you are assembling the sauna type S1010, the benches should be positioned inside the sauna itself by passing them over the walls before the ceiling is actually installed, as they can not be turned once inside.
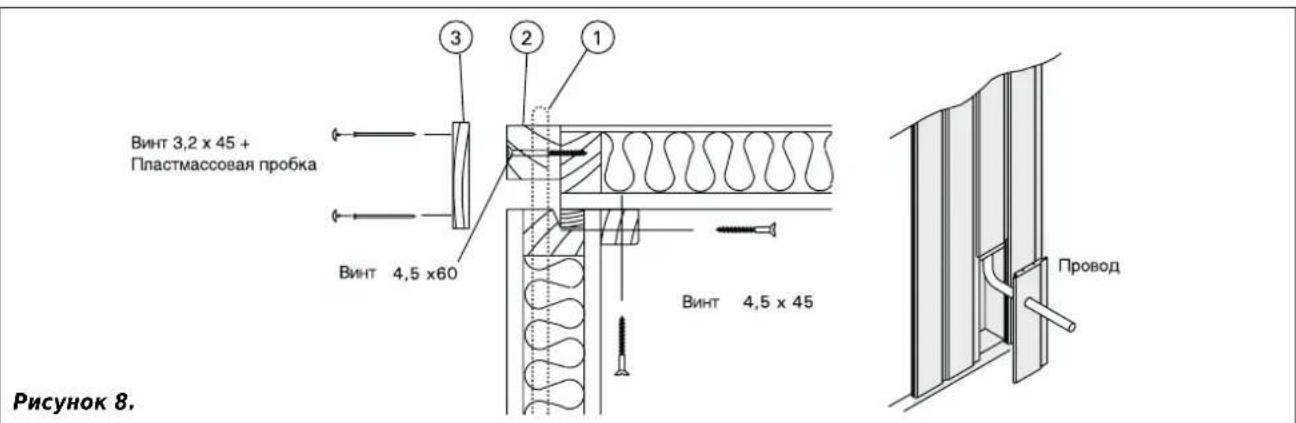
The wall contains ready-made electrical instal tubes for the heater and control unit cables. Their ends are visible at the top of the element. The exterior wall contains a detachable panel for the control and there is a similar panel at the bottom of the interior wall for the heater (Fig. 8). Drill holes for the cable in the detachable panel if necessary.
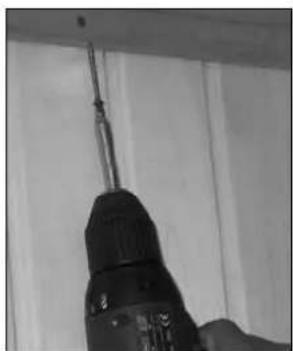
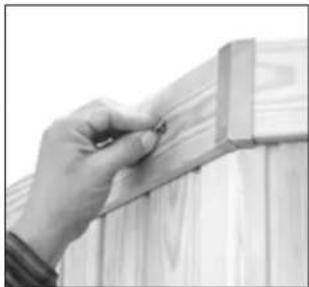
A hole for the light fitting cable shall be drilled diagonally through the upper edge of the wall element (Fig. 9)
or directly through the wall if the cable is allowed to be visible.
Cable holes for a separate thermostat and speakers shall be drilled through the wall or ceiling.
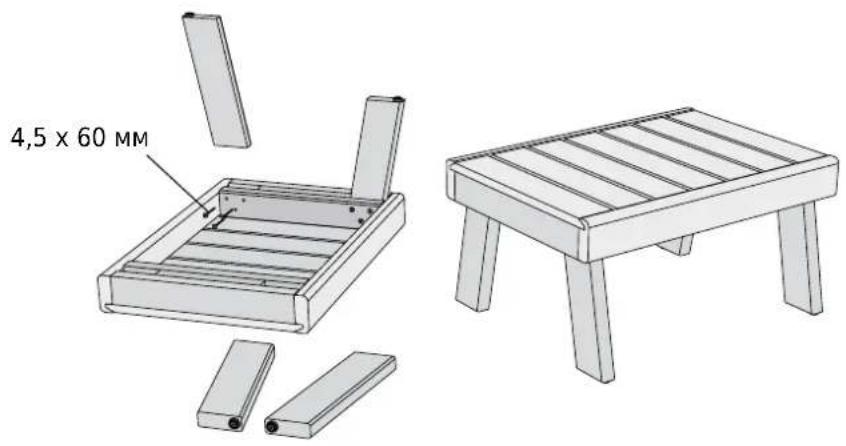
Assembling the Fascia Boards
Before assembling the fascia boards (15 x sure that all electrical cables belonging to and the lamp have been fitted and connected correctly. Use 4.5× 60mm screws when fastening the filling battens (2) under the fascia boards at distances of 500 to
600 mm. The outermost battens need to be as close as possible to the corner.
Saw the fascia boards (3) to the right length and use 3.2 × 45 ~mm screws to fasten them in place.
Assembling the Benches
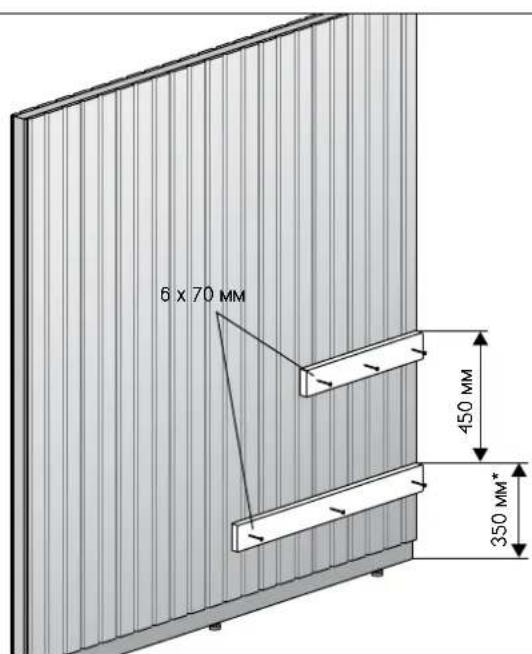
Fasten the bench supports (32 x 90) using 6 screws. Fig. 10.
Note! Also lift the lower bench onto the bench supports before fastening the L-bench and bench surro Otherwise, later the fit may be too tight.
Other Information
Fasten the ventilation valve and grill using 4.5 × 45 ~mm screws. Attach the door handle and heater guard as described in accompanying instructions.
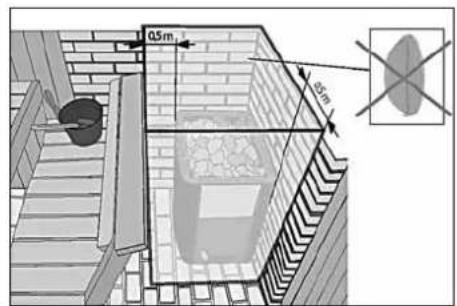
Note! If you wish to install the wall heater by the window, first fit the wooden support supplied. Fasten heater to the support accordingly.
Note! If the door leaf does not fit the doorframe tightly along the lock fitting side, it is often due to the fact that the base frame has shifted during assembly. Correct the situation by carefully moving the base frame (whole unit) along the ground in the appropriate direction.
Your sauna is equipped with a sauna lamp. Installation of the sauna lamp is preferable, but not obligatory since the glass door of the sauna allows light into the cabin.
When the lamp is installed these instructions be followed, if the sauna is equipped with control unit:
- The lamp should be connected as part of the house lighting circuit and it should be connected to a separate switch. The switch should be located outside the sauna room and should be installed according to the IEE wiring regulations.
Supply voltage: 230/240 V, single phase
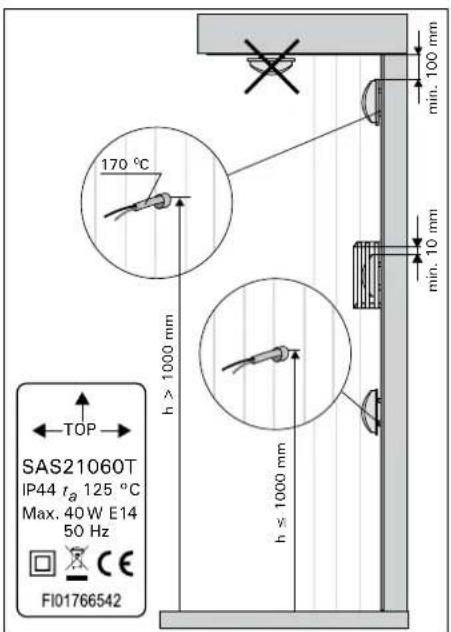
Light bulb: type E14, recommended 25-40 W (max. 40 W). Bulb is not included. - Type of supply cable: 2 × 1.5 mm^2 , heat resistant min. 170^ C
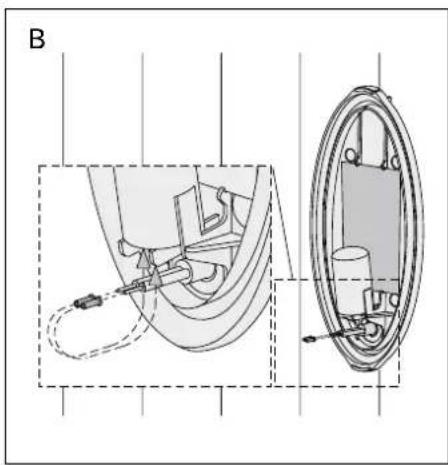
It is necessary to drill a hole through the timber wall for the supply cable. The following pictures show how the electrical connection should be made:
INSTALLATION DES SAUNALICHTS
Note! Only a professional electrician is allowed to do the installation. Use only light sources and rated wattages as marked in the luminaire. Switch off the current before installation or service.
INSTALACJA LAMPY W SAUNIE
S1515 (Sufit H1, H2) (Sufit H1, H2)
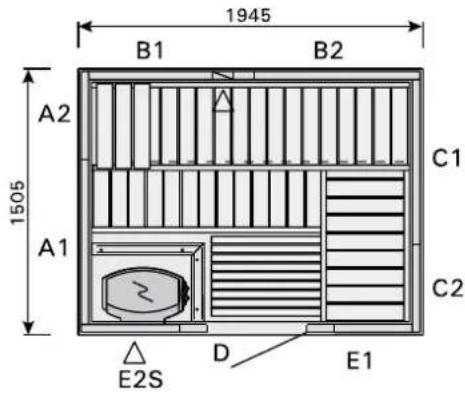
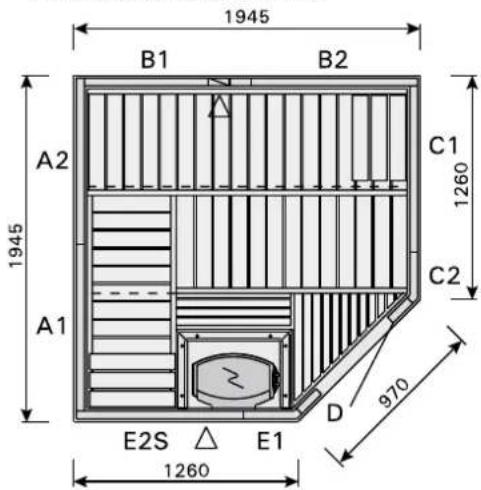
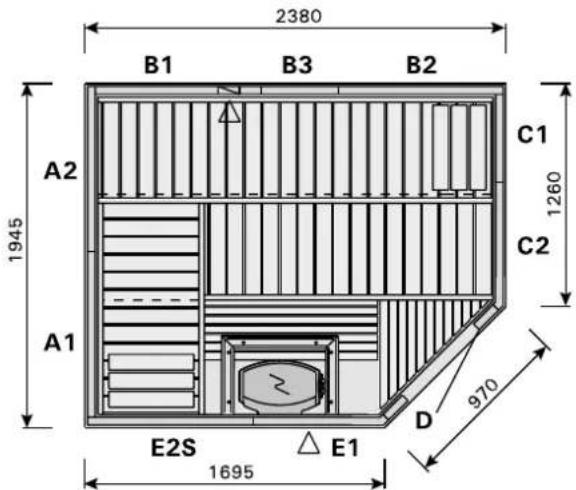
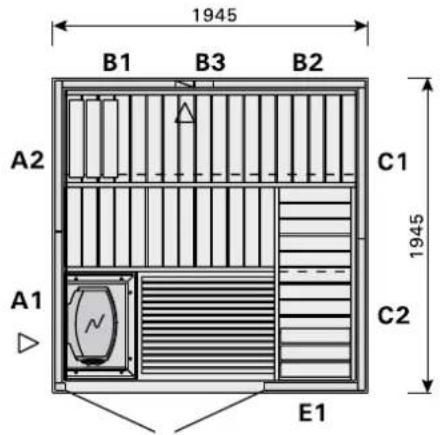
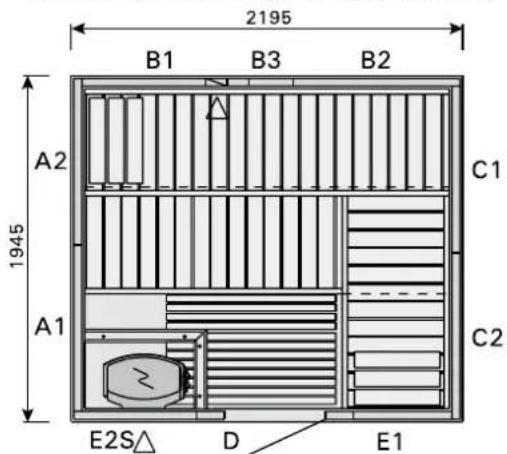
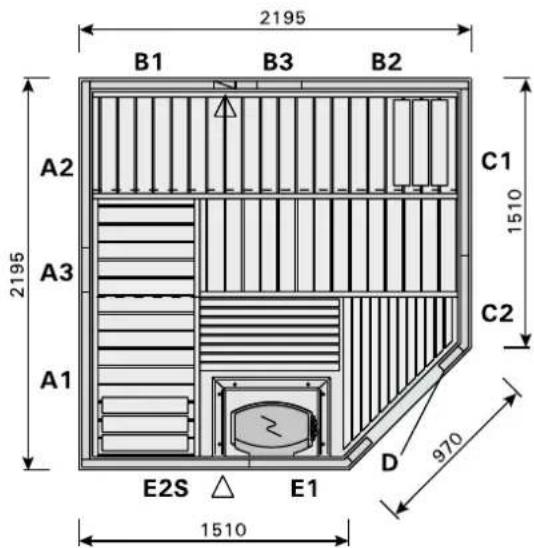
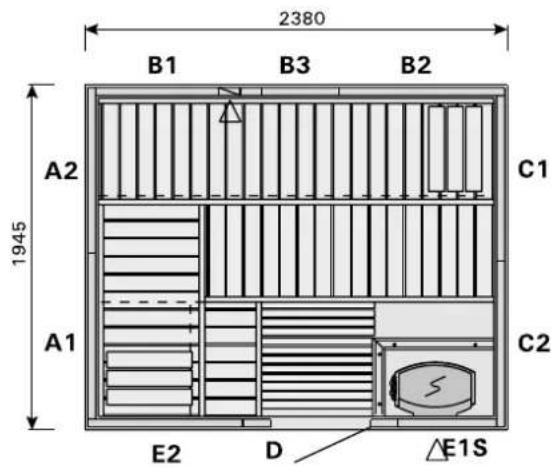
S2015
(Sufit H1, H2)
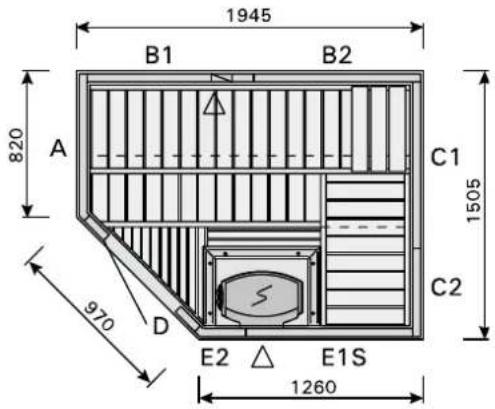
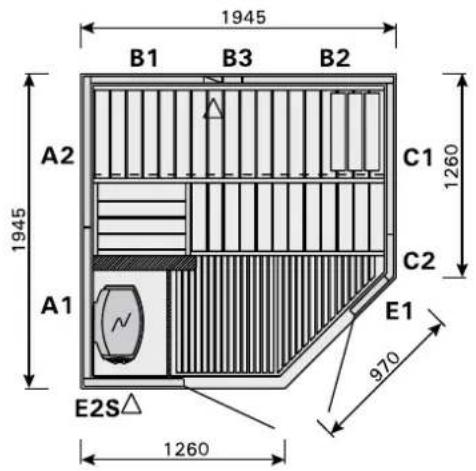
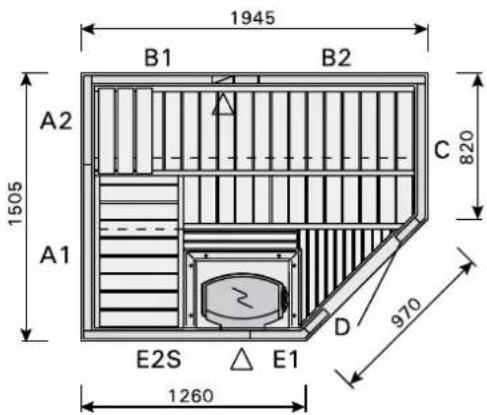
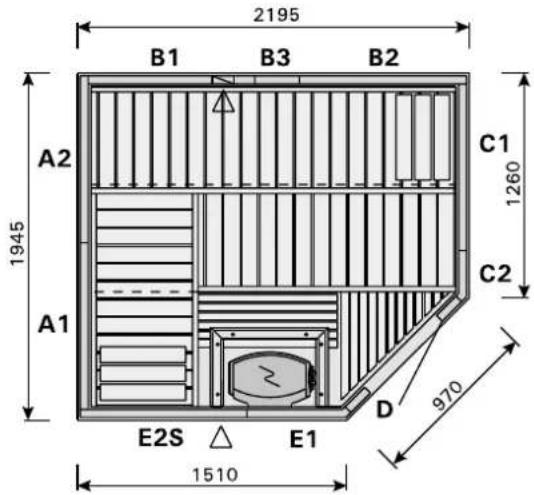
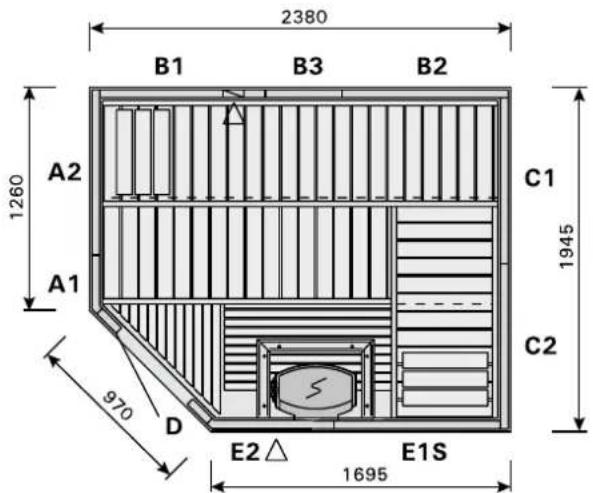
S2015L
(Sufit H1, H2)
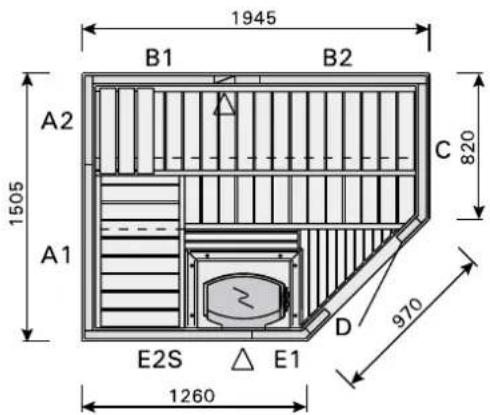
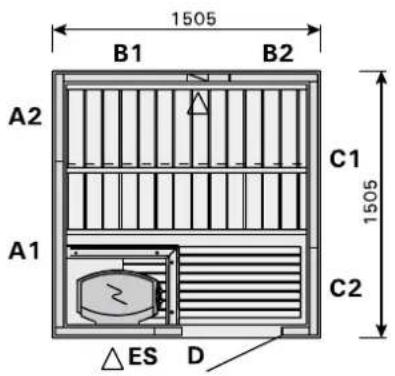
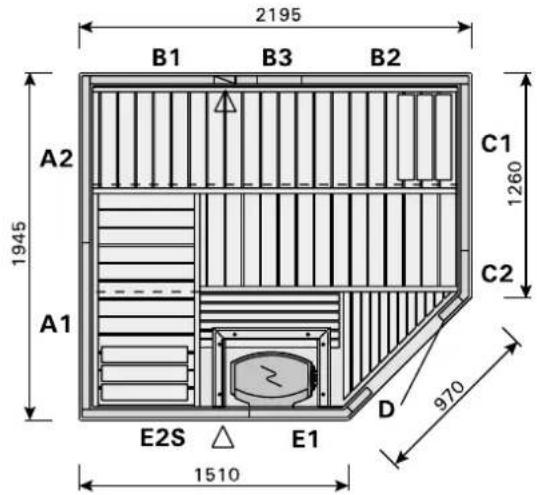
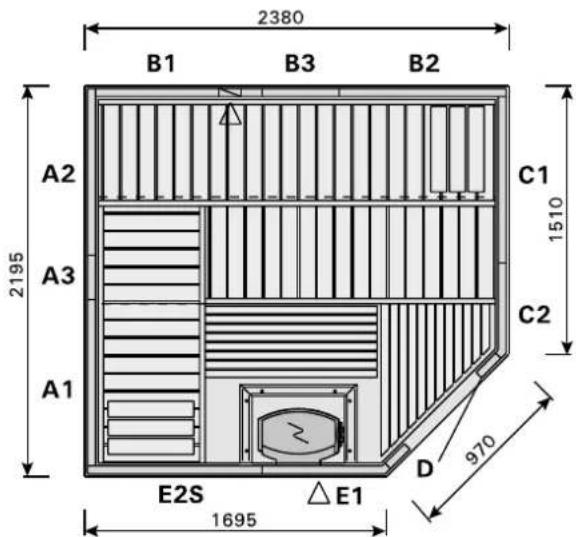
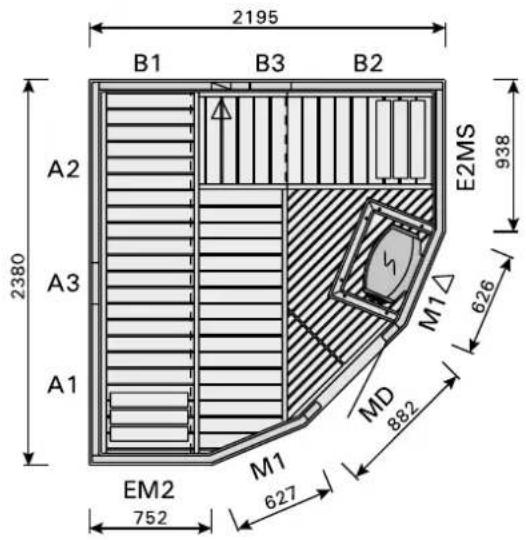
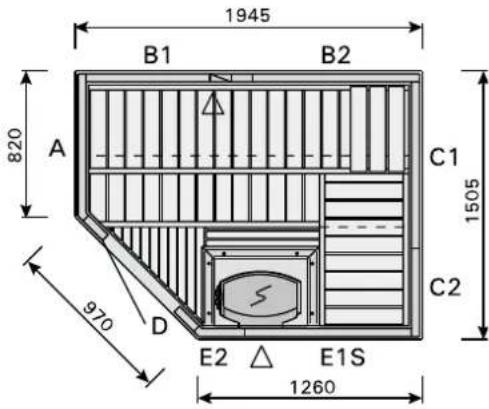
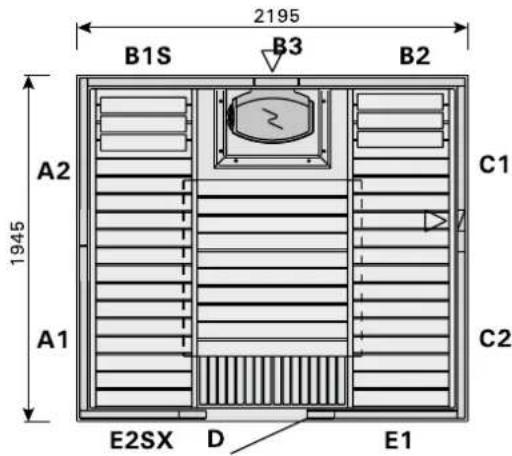
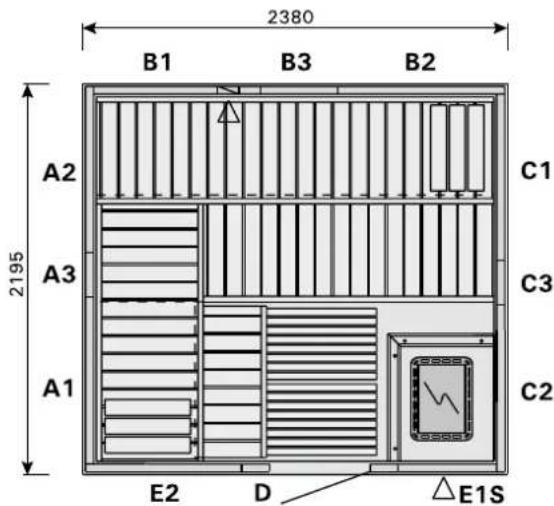
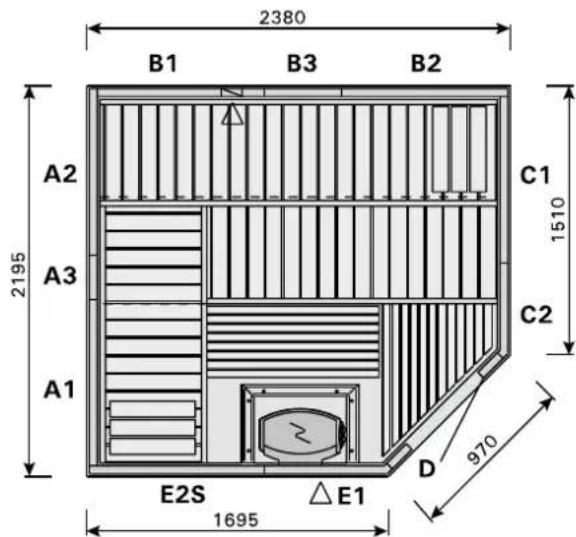
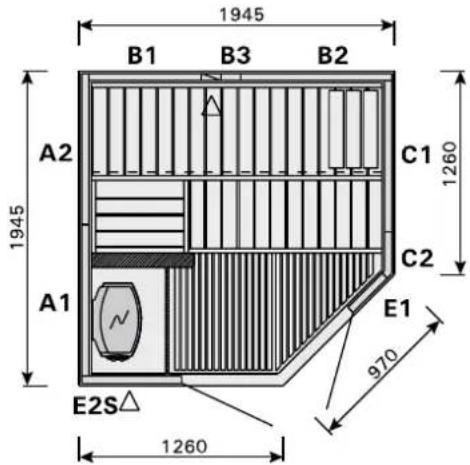
S2015R
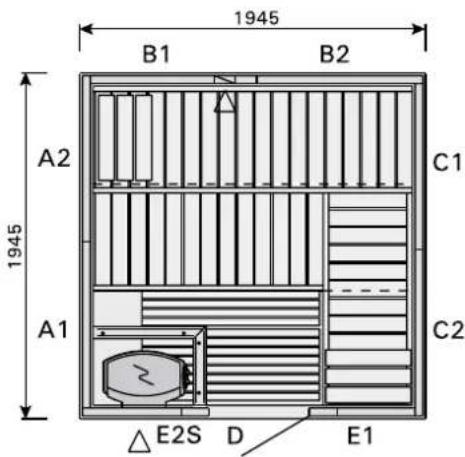
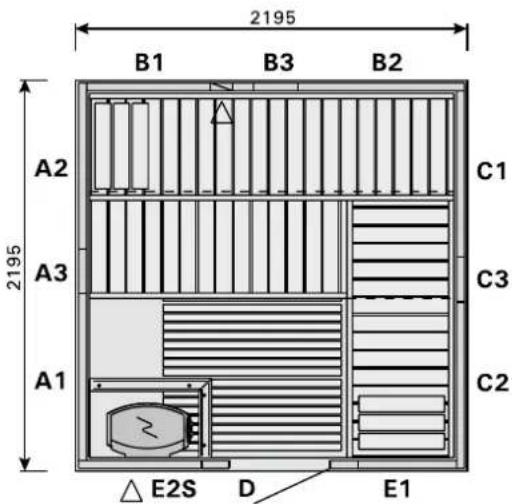
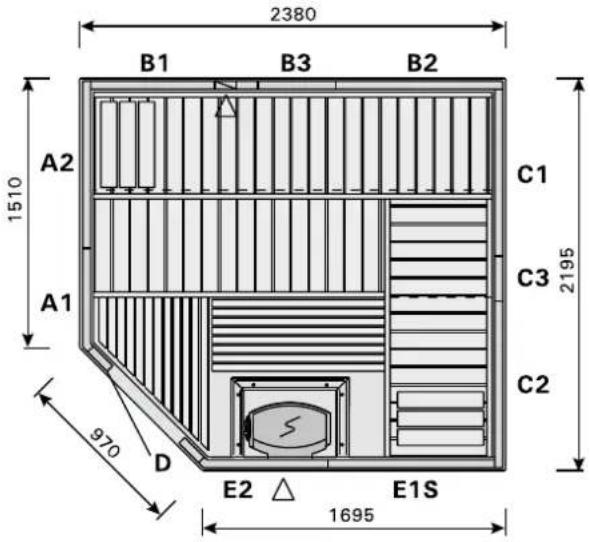
S2020
(Sufit H1, H2)(Sufit H1, H2)
S2020R
(Sufit H1, H2) (Sufit H1, H2, H3)
S2220
S2220R
(Sufit H1, H2, H3) (Sufit H1, H2, H3)
S2220L
S2220H
(Sufit H1, H2, H3) (Sufit H1, H2, H3)
S3020H

S2222
(Sufit H1, H2, H3) (Sufit H1, H2, H3)
S2222R
S2222KL
(Sufit H1, H2, H3) (Sufit H1, H2, H3)

S2520
S2520R
(Sufit H1, H2, H3) (Sufit H1, H2, H3)

S2520L
S2522
(Sufit H1, H2, H3) (Sufit H1, H2, H3)
S2522R
S2522L
(Sufit H1, H2, H3) (Sufit H1, H2, H3)
S2522M
S2020
(Sufit H1, H2, H3) (Sufit H1, H2, H3)
S2020R
SUB2025L
(Sufit H1, H2, H3) (Sufit H1, H2, H3)
SUB2025R
HctpyKunn no MoHTaXy
IpeTeM, KaHauaTb MOHTaX CayHbI, BHMaTeJIbHO O3HaKoMbTeCb CO BcEMN INCTpyKUmaN N0 MOHTaXy. Blicota Bcex CayH Variant paBHa 2030 MM (+ycTaHOBOuHbe HOKKn 20-40 MM). MInHMajlbHae Blicota NoMeueHnA, Heo6xoImaJdIra C6opKn CayHbI, CoCTABJrE T 2150 MM.
Bam notpe6yIOCTcIeNyIOUne HNCTpyMeHtbl:
MOJOTOK
Дрель
KpeToBaOrBepTKa nnN 3NeKtpoOTBepTKa (HacaI Kn PZ2, PH2 n PZ3)
MeIko3y6uataaIIaIaIaIpeBecnHbI
pyneTka
HakdauHa6ymara
BatepnaC
CbePnaIdIpeNn(3,5MMn10MM)
TabypeTka nn JecTHNuca
HOX(JINBCKpbITnnaKeTa n He6oJIbux pa60T)
3NeKtpoMoHTaX
3JektpomOHtXHbpepa0TbMOKetBbIOJIHrTB KBaIINuIupoBaHHbI 3JektpomOHtXHnK.
PpMMTe BO BHMaHHe:
ДревесинаяВлгетсаНТураьнIMМATEрпалOM,КOTopь,HeСМТРЯHaXopoOоeхpaHEne,MOKETpa36yXHyTB,CxKaTbCnIINNCKPnBnTcB.ПОЗToI npuHHe MOHTaX HeKOtOpbIX y3IOB CayHbMOKETnotpe60BaTbYcUInNnNnNCNoJIb3OBaHnB BuHToBOrO npecca.
- PnB03BeHnn CayHbI NcNoJb3yNTe TOnbKO NpLy- YehHbIe BmecTe C CayHOB BNHTbI N rBO3dN.
Bce BnHTOBbIe CoeHHeHbIIOHJOTc C npEaPunTehHbIM 3acBepnBaHneM. BoJIuHCTBO OTBepCTn 3apaHe npocBepJeHo Ha 3aboJe.
Iomeuene, B KOToPOM MOHTnpyeTc cayHa, DoJxHo 6bITb cyxNM. Npei TEM, KaK HauaTb CTpOInTeJIbCTBO, B DaHHOM nOmeuHHeo6XODmO ObecneuTb BO3DyUHHyU CUPKUYLAAHIO.
BHytpeHHHe KOMnOHeHTb cayHbI HeNb3a 6pa6aTbIBaTb npoNTouHbIM COCTaBOM.
3akpyrntteoctpbie,hepoBhble,OTnneHHbIeKpaC nOMOuHnKaDaHcH6yMaHn.
- Pn Heo6xOaHmocTn MoKeTe 3aOnHHTb OTBepCTn O T3abuHaNr rBo3De, CtblK ININ Dpyrne HEPOBHOCTn CMeCbIO N3 dpeBeCHOro NopoUka N KJIe.
BheHra cToPOHa cayhbl MoKet 6bItb o6pa60TaHa
CneuaJIbHbIM 3aUHTbIM COCTABOM JIg CAYhI INI NOxOJAAUM JAKOM. O6pa60TKa NOBepXHOCTN 06- IerHTN NOJDEpKaHHe NCTOTbl.
Bhumahne!
Ecnn Bbl nclnoJIb3yeTe cneuaIbHyIO kAmeHky Cnapore-
HepaTopom IIN dpyrHe BVdbI naporeHepaTopoB BAwei
cayHe, TO B 3TOM clyuae Heo6xoIIMO npedycmOTpeTb
npocuWbAHnE cayHbI nocle noceUeHnA, HarpeBa cayHy B TeueHnE 15-30 MNHT (6e3 npapa) u OndHOBPemEnHO
npoBeTpNBa ee (OTKpOIte BeHTnIb BO3dUshOH UnpKyJ
JIaun, a TAKKe DBePb cayHbI).
Ecni cayHa KOMnIeKTyEeTcKaMeHko Cnapoo6pa30BaTeJIeM, a DOnOJIHnTEJbHaeBHTUNLIOOHHAR 3ACIOHKA (ДЯ naccuBHO BHTUNLAUN) He 6bla 3aKa3aHa, To ee TAKKe MoKHO yCTaHOBtB B BepXHe YactN CTehb IIN B noToJIke yXke co6paHHo CayHbI.
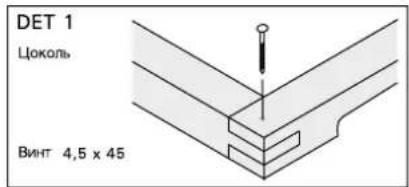
MoHTaX UOKOJIa
DpeBecnHa zoKoJIa KpeHITcMeKdy Co6O BuHTam4,5x 45 MM. PpOBepbTe, yTO OCHOBaHne rOpN3OHTaJIbHO (puc.2).
Tohko
MOHTAX CTeH
MOHTaK CTHeOBbIX 3IeMeHToB HaunHaetcC pPraMoYrOJbHO r (90°). BaxHo! MoHTaX npeKpaUaETcB KAKOMIn6o Dpyrom npmom yrLy (90°). NocJeHn3IeMeH TOnJKeH 6bTb HakNoHep HApxky, YTObI WnYHTbI HApxKbIX NaHeJe CoBnA. 3IeMeHtBi KpeNpTCBnTAMn 4,5 x 45 MM. B TOyKe KpeNJIeHn IpeDyCMOTpeHbI roTOBBe OTBepCTn. JIy naHeJe NCNoJb3yIOCTc RBO3n 45 x 1,7 MM (pnc.2 n5). Ecn HeBO3MOxHO yCTaHOBnTb NOcJeHN yrochapxN, HADo PNOHOCbIO yDaJIntb WnyHT naHeiB B KOHcE yrLOBOrO 3IeMeHTa (pnc.4).
BHHMaHHe! PnB03BeDeHN CayHb MoNTaK DBePHO 3JIeMeHTa HeIb3a OCTaBnTb Ha NocJeDHN MOMENT.
He 3a6ydbTe npOBepntb, nOCMOTpe CBepxy, yTO coEduHHeHnCTeHOBBix 3JIeMeHToB RAJIHTcI NIOTHbIMN.
MOHTAX 3JIeMeHToB NOTOJka
Nocme MONTaKa CTeHOBbIX 3JIeMeHTOB 3JIeMeHTbI NOToJka
NoHNMaIOTCa Ha CTeHOBbIE 3JIeMeHTbI. 3JIeMeHTbI NOToJka ONYCKaIOTCa Ha CTeHOBbIE 3JIeMeHTbI TaK, YTO6bl NlaH-
KN HxKHei NobepXHOCTn 3JIeMeHTOB 1OTJka BOUJN B
Na3bl KapKaCa, 06pa3ObaHHoro CTeHOBbIMN 3JIeMeHTaMn.
BHytpn Cayhbl nCnoJb3yIOTcKapHn3HbIe nnAHKn (28x 28) INBHTbl (4,5x45MM) IJIa npNKpePHeHHa 3JeMeHTOB noToJkA KCTeHaM (pnc.6).
ПланкOTПИнваIOТСД NO Heo6xOДIMоДЛINHbI.
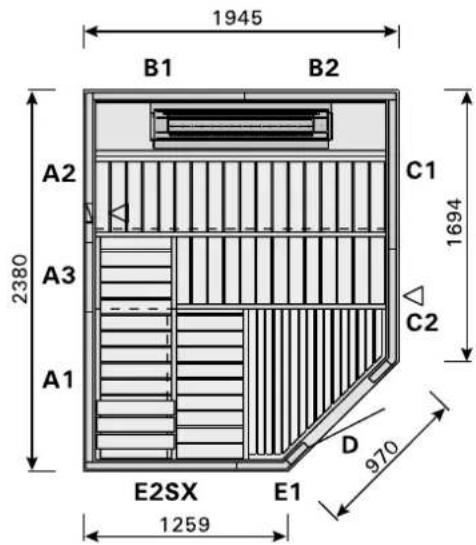
OTBepCTNe DnBbTJXHOrO
BO3Dyxa (HApxHoe)
80x160
BeTINIAHMOHHa Tpy6a
OTBepCTNEIINBbITAAHOROBO3DyXa
(BHVTDeHHee)
80×160
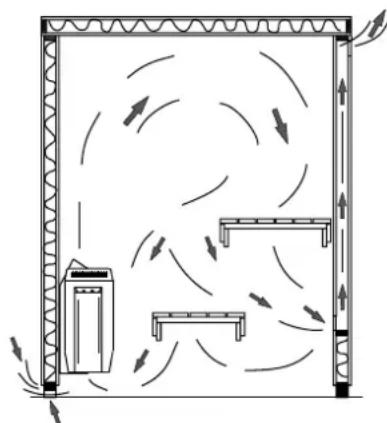
PncyHOK 1.Bo3dyuHbI O6mEH B6noHcayHe
OTBepCTneIINpHTOHHo BO3dyxa BcOKonbHouacTn 25x320
PncyHOK 2.
PncyHOK 3.
PncyHOK 4. NocneHn CtbK Byrny nomeueHHa PncyHOK 6.
PncyHOK 5.
IToJIoUHbIe peKn IMeOIT 3aBOJCKne OTBepCTN BInHTOB. O6raTeJIbHO npocBepNIte DnB BInHTOB CTnI dNaMeTpOM 3,5 MM B nHaJIex, YTO6bl OHn He TpecHynn npu yCTaHOBKe.
Pnahka Chayana KpeHNTcB BuHTamK CteHe TaKIM 06pa3OM, YTO6bl MExdy NOTOKOM IN PnAHKO OCTaCLc 3a3Op OK.5 MM. Pn BBNHcNAHbN BHTOB B NOTOLOK OH ONDbpeMeHHO npXkMaET yIIOTHNTeJIbHy JO HeHTy, paONoJKeHHy CBepxY CTehbl.
BHMaHHe! Ecnn Bbl yctAHOBnTe cayHy S1010 Hado npInHeCTN NOJKN NOBepx CteHb B cayHy Bbl yCTAHOBnTe nToJIOK, nOTOMy TTO nOJKN HeBO3MOXHO nobepHyTB BHYTpN cayHbl.
B CTeHe IMeOTc rOToBbIe 3NeKtpOMoHTaXHbIe KaHaJIbI dIra Ka6eIeN KameHKn N 6Joka ynpabJeHn. Xx KOHcbl
Hb B BepxHe yactn 3JemeHa. Ha BheuHne CteHe TBepeTcBemHnaHeIb IaKa6eN6I0ka ynpabHeHn, a B HxKHe yactn BHyTppeHne CteHb IMeETcIIOo6Hn NaHeIb Ia KaMeHKn (pnc 8).Pnp Heo6xoUmoCTn npo-CBepNTe B CbeHNO NaHeIN OTBepCTn Ila Ka6eN.
OTBepTne IJNAKabeJIcBETINbHnKa CNeyET npocBepIITb HAKIOHOepe3 BepXHNI TopeC CTeHOBOrO 3JIemEH-Ta (pnc 9) INI INPMAOyepe3 CTeHy, eCNI DOnyCTMNO, YTO6bl Ka6eJIb 6bl BNDeH.
BnBepTnaIyKaBeNeOITeNbHOroTePmocTaNnIeAMNKcCneDyETnpocBepnTBBCTeHeNNBNOTOLke.
MoHTaK HaKnlaAnHbIX peek
Ipepe yctaHOBkOn HaklaHbIX peek (15 x 90) (3) npc BepTe, TTO pPOBOKKa KaMeHNu CBeTnblHnka npaBnbl-
PncyHOK7.

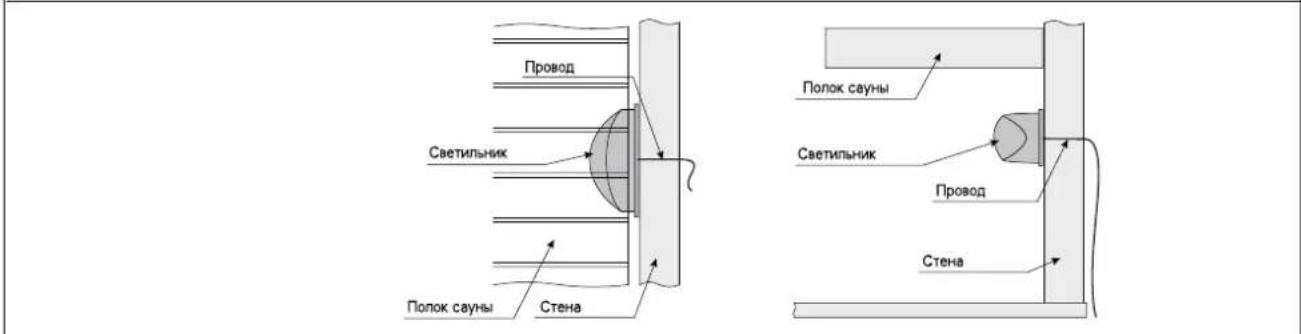
PncyHok 9. PacnoonoxeHne CBeTHnBHHka n ero abaxypa
RU
HO yCTaHOBJIeHbI nIOJKJIIOUeHbI. Ipn NC-NOJB3OBAHmN 3a- NOHNHTeJIbHbIX npOKJaIOK (2) noD HAKJaIHbIMPeIKaMn NOJb3yITecB BnHTaMn 4,5X60MM, yCTaHaBJIbAeMbE uepe3 npomexkyTOK He 6oJee 500-600 MM. KpaHHe npokKJaIKI DOJIIXHbI yCTaHaBJIbBaTbcKak MOxHO UyIy.
HaKlaHbIe peu (3) OTnINBaOTcdo Heo Moi dInHbI. Ix KpeNHeHn NcNoB3yOTc 3,2x45MM.
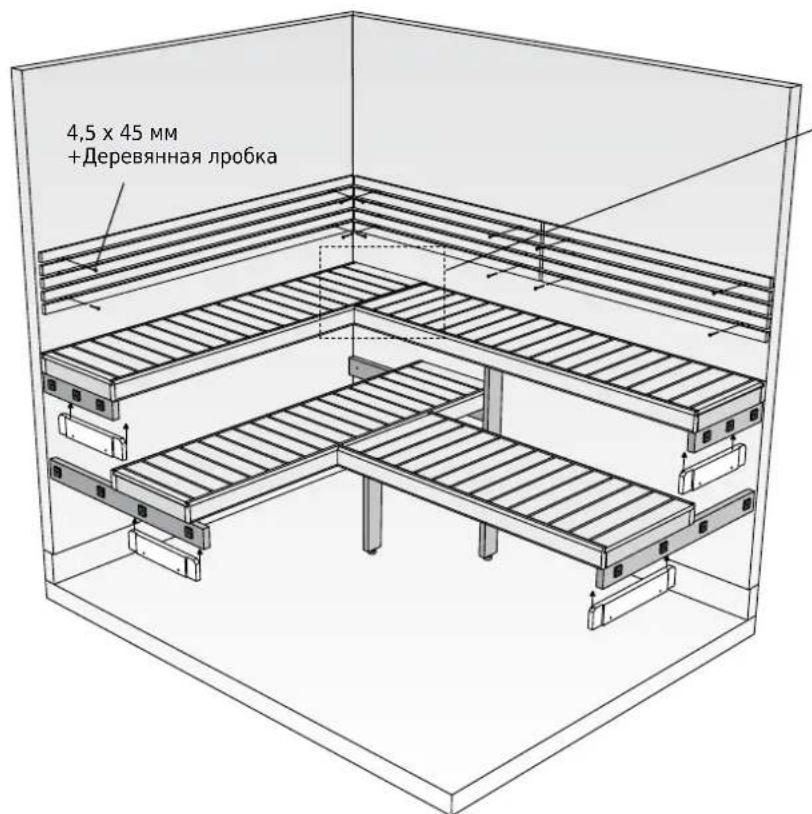
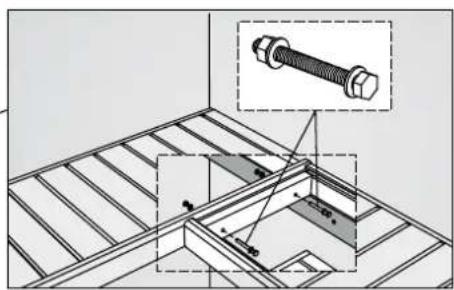
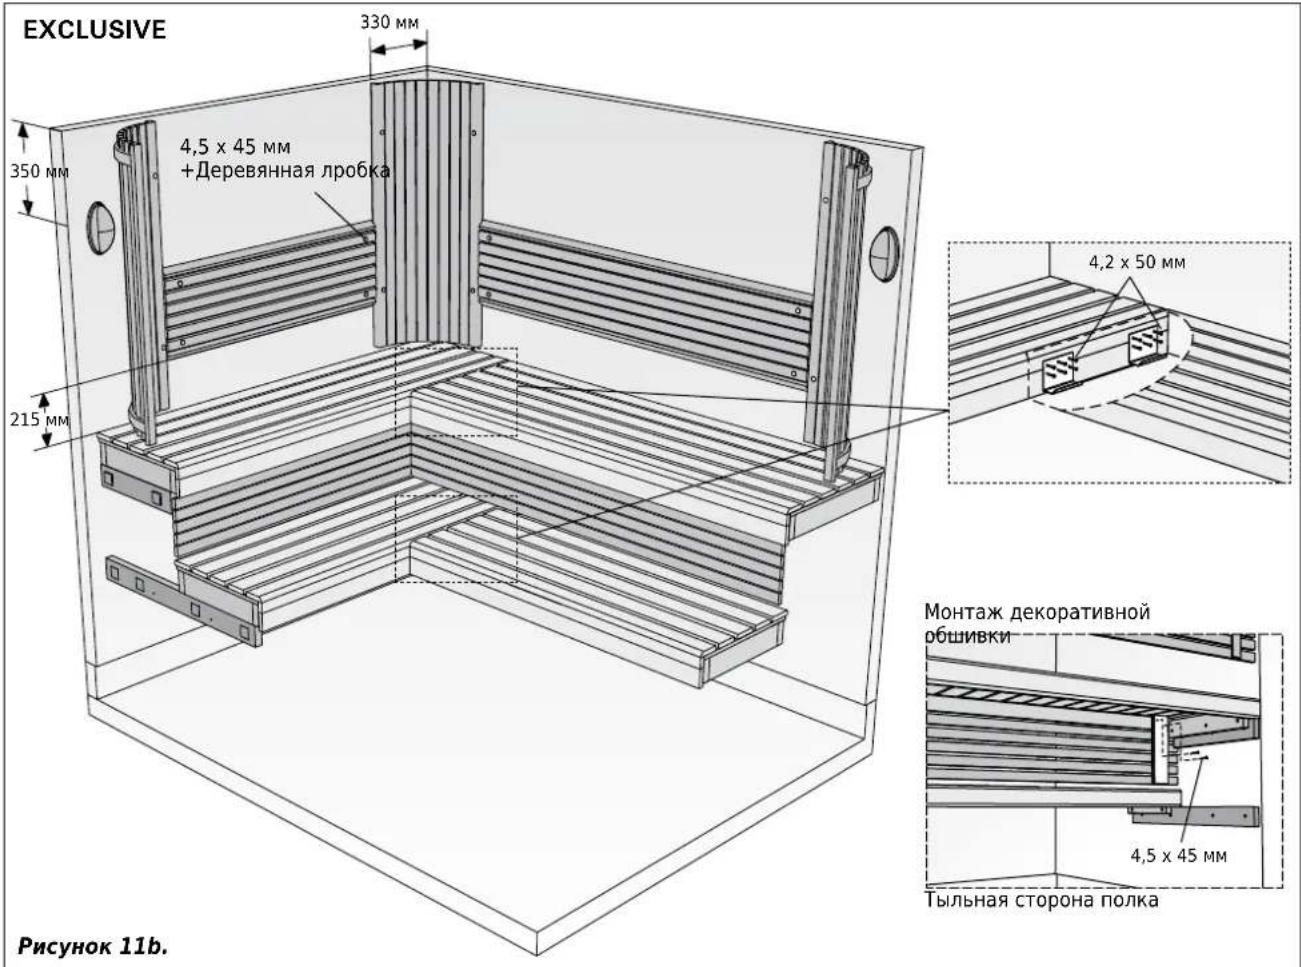
MOnTaX noNkoB CayHbI
PpNkpenntb onopblnna noNkoB (32x90)KCTeHaM C noMooubBOB 6x70 MM.Pnc.10.
BHHMaHHe! NpeD yCTaHOBKO dONONHTeNBHO rON- 6nKnI n DEkOpaTHBHO 06uINBKn MEXdy pycAmn CdBNHbTe HxHn NOLOK Ha3d do ynpa. B npOTNBOM cnyae n3-
5xOJa HeIOCTaTKa MeCTa 3TN pa60TbI Heyo6Ho 6yET
PncyHOK 10.
*) BHMHMAE! BbCOTy NOJKOB B CAYHAX, N3TOBJIeHHbIX No CNEUaJIbHbIM IpOeKTAM, Heo6XdMIMO npOBePbNtNo cepTeKy.
FORMULA
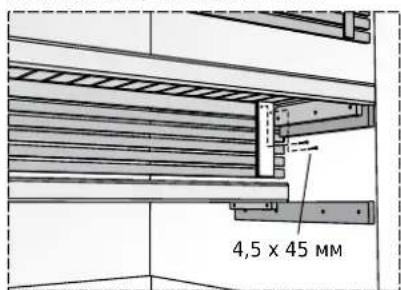
MOnTaX JekOpaTHBHO 06uWbKn
TbIbHa CTOpHa nOka
PncyHOK 11a.
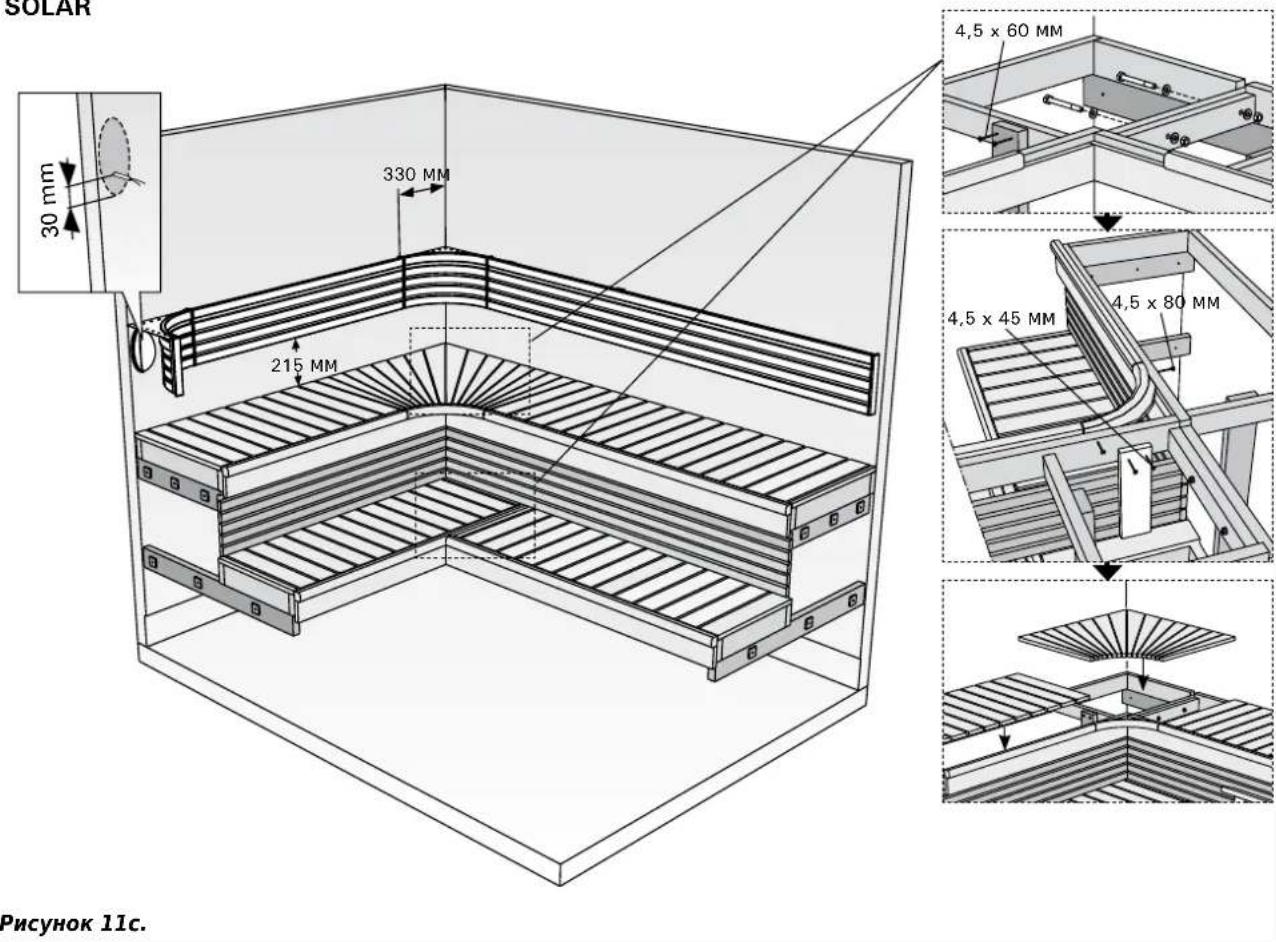
SOLAR
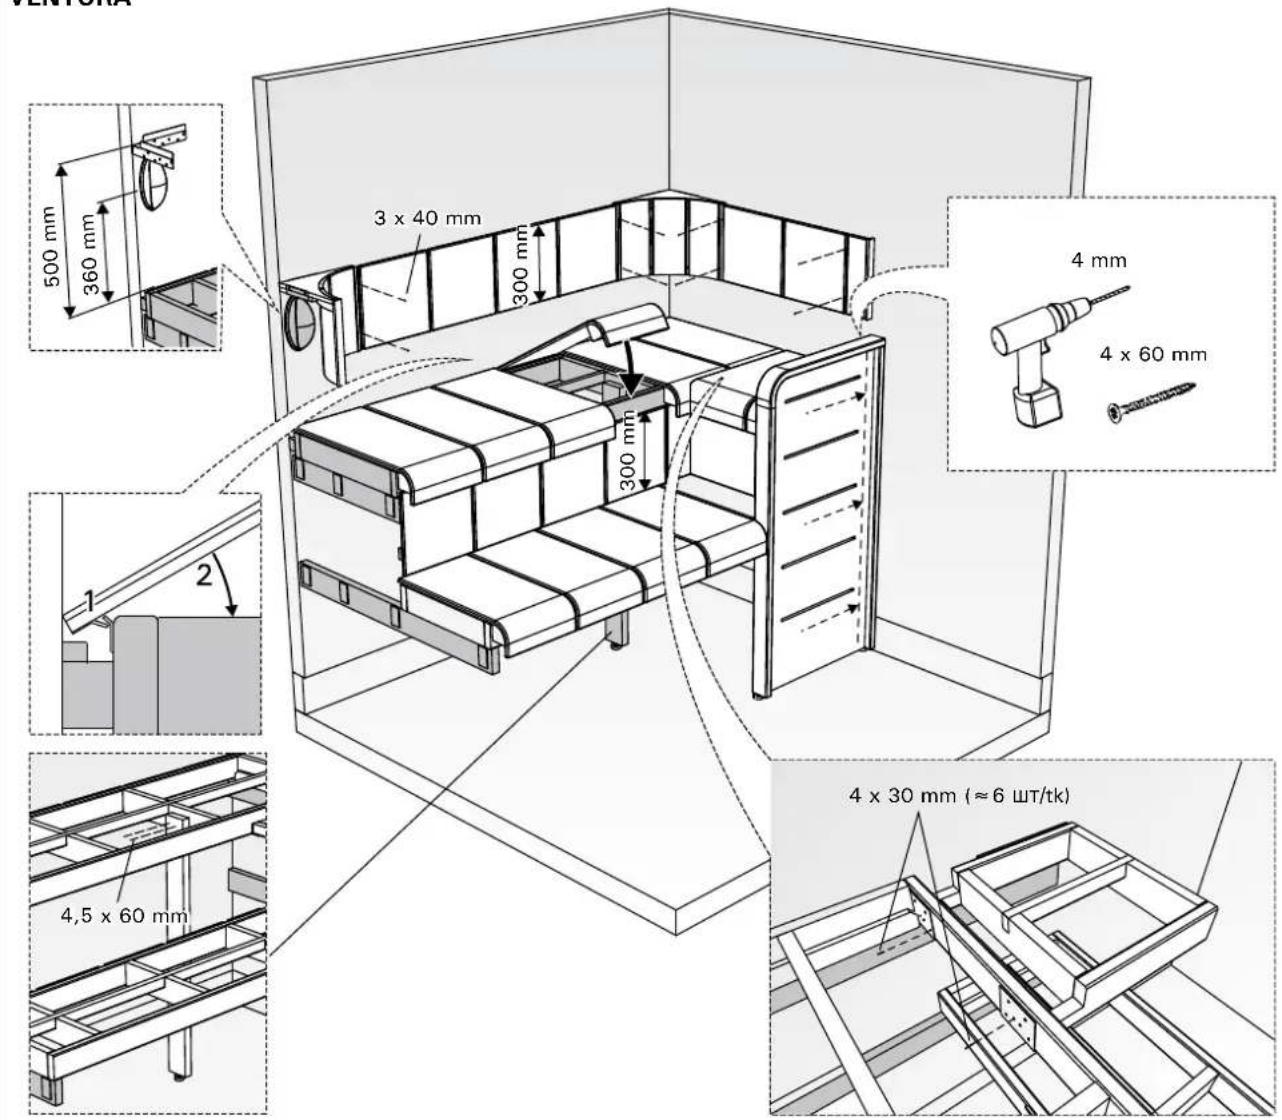
VENTURA
PncyHok 11d.
Pa3Hoe
BeHTnJIaIIOHHb BeHTnJIb npeWtKa KpeNITcB HHTaMn 4,5x45 MM. DBePha pyka n 3aunTHoe orpaKdHneYCTaHaBnBaOTcB COOTBETCTBmC NOCTaBHeHHbIMn HHCTpykUINM.
BHHMaHHe! EcnBbXoNTe yCTaHOBt KaMeHKHa-CTeHHOrO Tnna NepeD OKHOM, TO CHaHa H
yCTaHOBnTb DepeBHHyIO DpeBecHyIO ONopy, NOCTaBnEMyIO BmecTe C CayHO. KaMeHka KpeINrC K daHHo onope.
BHHMaHHe! Ecnn DBePHO NOJIOTHO npNJeraET He- NIOTHO K pame Co CToPOHbI 3aMka, TO 3TO Bbl3BaHO 3aHaCTyO CDBNOM OKOKoRA BO BPem MOHTaxa. 3TO NCnpABJIeTcra 3a Cuet OCTOpOXHOrO nepemeueHnur OKOJa (Bcei) no Noy B Heo6xoDmOM HappabJeHn.
Pucyok 12.
PncyHOK 13. KpenneHne onop noHOxKn
YCTAHOBKA OCBELSEHENCAUYhbl
BaHa cayHa oChauneHa OCBeTnTeNbHbIM 6OppyoBaaHem. YcTaHObKa OCBeSeHn CAYHb JKeIaTeNbHa, Ho He 6pa3aTeNbHa, NocKoIbKy CTekJraHHa DBepb npOnyckaet CBET B CayHy.
Ecnn CayHa OChauneHa OTdIbHbIM 6IOKOM Hnra,TO npu yCTaHOBKe OCBeueHnra CNeDyET npudepKnBaTbcr CNeDyUxN UHCTpyKm.
OcbeueHne cIeNyET NOKJIIOuHTb KAKoCTaBHyO Yactb obse Cxembl OCBeueHnA DOMa N IINr HrO CJeUyET npEduCMOTpeTB OTdEBHbN BbIKJIOHaTeIb.3T0 TBbIKJIOuHaTeIb CJeUyET paCNOLOXHTb 3a PpeJenAmn NOMEeHnCayHbN yCTaHOBNTb
corgaCHO Tpe6oBaHnM npabN IEE no MoHTaKy 3JIeKTpOpPObOKn.
- HanpjaKeHne nHTaHn: 230/240 B, oDNoHa3Hoe
JaMaNa OcBeSeHn: TnE14, peKoMeHnyEma MoUJIe- HoCTb 25 40BT (MaKc. 40BT) (JaMaNa B KOMJIeKT NoCTabKn He BXOJNT)
Tun Ka6eJnTuHaHn: 2x1,5 MM2, XapocToiKoCTb MHH.170°C
B DepeBaanHou cTeHKe Heo6xOIMn IpocBepInTb OTBepCTne IaJI KabeJI INTaHnI. Ha CJeDyUoNIX PucyHKax NOKa3aHO, KaK CJeDyET OcyuEcTBnTb 3JleKtpnueckn MOHTaX.


S1010
Ceiling/Dach/Plafond/Dak/NoToJok H)
S1212
Ceiling/Dach/Plafond/Dak/NoToJok H)
S1215L
Ceiling/Dach/Plafond/Dak/NoToJok HR)
S1215R
Ceiling/Dach/Plafond/Dak/NoToJIOK HL)
S1515
Ceiling/Dach/Plafond/Dak/Notolok H1, H2)
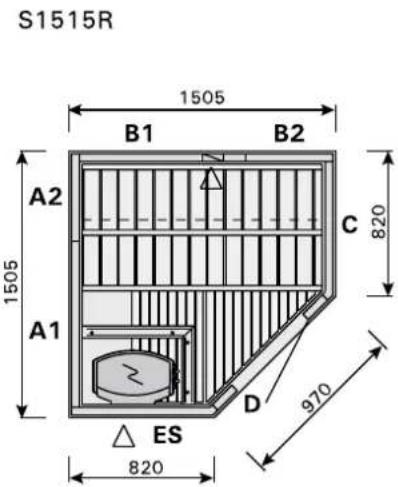
S1515R
Ceiling/Dach/Plafond/Dak/ToToJok H1, H2)
S2015
Ceiling/Dach/Plafond/Dak/ToJIOK H1, H2)
S2015L
Ceiling/Dach/Plafond/Dak/NoToJok H1, H2)
S2015R
Ceiling/Dach/Plafond/Dak/NoToJok H1, H2)
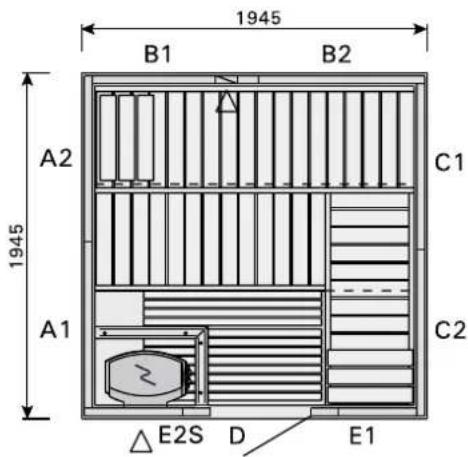
S2020
Ceiling/Dach/Plafond/Dak/ToToJok H1,H2)
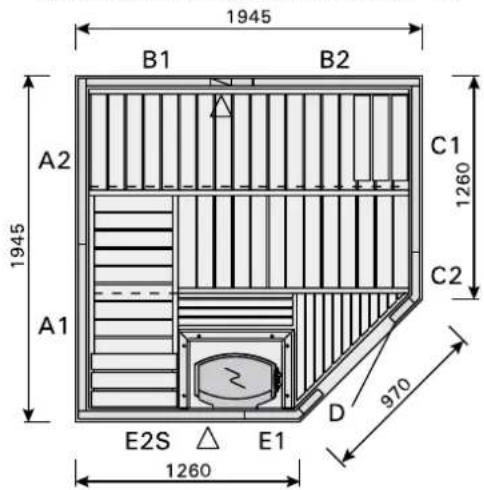
S2020R
Ceiling/Dach/Plafond/Dak/NoToJok H1, H2)
S2220
Ceiling/Dach/Plafond/Dak/NoToJok H1, H2, H3)
S2220R
Ceiling/Dach/Plafond/Dak/NoToJok H1, H2, H3)

S2220L
Ceiling/Dach/Plafond/Dak/NoToJok H1, H2, H3)
S2220H
Ceiling/Dach/Plafond/Dak/NoToJok H1, H2, H3)

S3020H
Ceiling/Dach/Plafond/Dak/NoToJIOK H1, H2, H3)
S2222
Ceiling/Dach/Plafond/Dak/NoToJok H1, H2, H3)
S2222B
Ceiling/Dach/Plafond/Dak/NoToJIOK H1, H2, H3)
S2222KL
(Ceiling/Dach/Plafond/Dak/NoToJok H1, H2, H3)
S2520R
Ceiling/Dach/Plafond/Dak/NoToJok H1, H2, H3
S2522
Ceiling/Dach/Plafond/Dak/NoToJok H1, H2, H3)
S2520
Ceiling/Dach/Plafond/Dak/NoToJok H1,H2,H3)
S2520L
Ceiling/Dach/Plafond/Dak/NoToJok H1, H2, H3)
S2522R
Ceiling/Dach/Plafond/Dak/NoToJok H1, H2, H3
S2522L
(Ceiling/Dach/Plafond/Dak/NoToJok H1, H2, H3)

S2522M
Ceiling/Dach/Plafond/Dak/NoToJok H1, H2, H3)

S2020
Ceiling/Dach/Plafond/Dak/NoToJok H1, H2, H3)
S2020R
Ceiling/Dach/Plafond/Dak/NoToJok H1, H2, H3)
SUB2025L
Ceiling/Dach/Plafond/Dak/NoToJIOK H1, H2, H3)
SUB2025R
Ceiling/Dach/Plafond/Dak/NoToJok H1,H2,H3)