
FM400 - Moisture meter VOLTCRAFT - Free user manual and instructions
Find the device manual for free FM400 VOLTCRAFT in PDF.
| Product type | Material moisture meter |
| Brand | Voltcraft |
| Model | FM400 |
| Power supply | 3 CR2032 batteries |
| Temperature measurement range | -40 °C to +70 °C |
| Air humidity measurement range | 0 to 100 % |
| Wood moisture measurement range | 0 to 30 % vol (±1 %), 30 to 60 % vol (±2 %) |
| Building materials moisture measurement range | 0.1 to 24 % vol (±0.5 % vol) |
| Measurement type | Non-invasive |
| Dimensions | 139 x 47 x 25 mm |
| Weight | 100 g |
| Main functions | Wood moisture measurement (3 curves), building materials moisture measurement (4 curves), temperature and air humidity measurement, temperature compensation, dry/wet indicator, lighting, automatic test |
| Display | Liquid crystal display with digital and bar graph indicator |
| Care and cleaning | Clean the tips after each use, use a slightly damp soft cloth, do not use harsh detergents |
| Safety | Do not use in a humid environment or with the device open, keep out of reach of children, do not touch the tips during measurement |
| Included spare parts | Replacement measuring tips, test adapter, round terminal adapter for sensor |
| Optional accessories | External probe (on round connector) |
| Automatic shutdown | After 3 minutes of inactivity |
| Lighting | Adjustable: automatic, always on, or off |
| Battery indicator | Battery status display on screen |
Frequently Asked Questions - FM400 VOLTCRAFT
User questions about FM400 VOLTCRAFT
0 question about this device. Answer the ones you know or ask your own.
Ask a new question about this device
Download the instructions for your Moisture meter in PDF format for free! Find your manual FM400 - VOLTCRAFT and take your electronic device back in hand. On this page are published all the documents necessary for the use of your device. FM400 by VOLTCRAFT.
USER MANUAL FM400 VOLTCRAFT
www.business.conrad.at
- Introduction 23
- Intended Use 24
- Scope of Delivery 25
- Explanation of Symbols 25
- Safety Information 26
a) General Information 26
b) Battery Notes 28
- Control Elements 29
- Inserting/Replacing the Batteries 30
- Commissioning 30
- Settings 31
a) Temperature Compensation
b) Dry/Wet Indicator 31
c) Lighting 35
d) Temperature Unit 35
- Self-Test 36
- Measuring Process 37
a) Air Temperature and Humidity Measurement 37
b) Wood Moisture Measurement "WOOD" 37
c) Building Moisture Measurement "BUILD" 39
d) "Wet/Moist/Dry" Indicator 40
- Maintenance and Cleaning 40
- Disposal 41
a) General Information 41
b) Batteries 41
- Technical Data 41
1. INTRODUCTION
Dear customer,
Thank you for making the excellent decision of purchasing this Voltcraft® product.
Voltcraft This name stands for above-average quality products in the areas of measuring, charging and grid technology, characterised by technical competence, extraordinary performance and permanent innovation.
Whether you are an ambitious hobby electronics technicians or a professional user - a product of the Voltcraft® brand family will provide you the best solution for even the most sophisticated of tasks. Special features: We offer the sophisticated technology and reliable quality of our Voltcraft® products at a near-unbeatable price/performance ratio. We lay the groundwork for long, good and successful cooperation.
Enjoy your new Voltcraft® product!
All company names and product names are trademarks of their respective owners. All rights reserved.
If there are any technical questions, contact:
Germany: Tel. no.: +49 9604 / 40 88 80
Fax. no.: +49 9604 / 40 88 48
E-mail:
tkb@conrad.de
Mon. to Thur. 8.00am to 4.30pm, Fri. 8.00am to 2.00pm
2. INTENDED USE
The battery-operated material-moisture meter measures the moisture in materials such as wood and building materials, plaster, screed, etc. For a high measuring accuracy, several material characteristic curves are available. A bar scale, indicator scale and direct value display facilitate reading on the LC display.
The circular connector with automatic lock can be used optionally to connect an external sensor.
The device must only be operated with the specified battery type.
The meter must not be operated when it is open, i.e. with an open battery compartment or when the battery cover is missing. Measurement sin moist rooms or under detriment ambience conditions such as wetness, dust, flammable gases, vapours, solvents, thunderstorm or strong electrostatic fi elds are not permissible.
For safety reasons, only use sensors or measuring accessories which are adjusted to the specific cations of the meter when measuring.
Any use other than that described above damages the product. Moreover, this is linked to dangers such as short circuit, fire, electric shock, etc. No part of the product must be modified or converted!
Read the operating instructions carefully and keep them for later reference.
Always observe the safety information!
3. SCOPE OF DELIVERY
Material moisture meter
- 3 x battery CR2032
- Replacement measuring prods
- Protective cap with test adapter
- Sensor adapter with round plug
- Operating instructions
4. EXPLANATION OF SYMBOLS
An exclamation mark in a triangle indicates important notes in these operating instructions that must be strictly observed.

The "arrow" symbol indicates special information and advice on operating the device.
a) General Information
The guarantee/warranty will expire if damage is incurred resulting from noncompliance with the operating instructions! We do not assume any liability for consequential damage!
We do not assume any liability for property damage and personal injury caused by improper use or non-compliance with the safety instructions! In such cases the warranty/guarantee will expire.
Dear Customer,
this safety information serves not only to protect the product, but also your own safety and the safety of other persons. Therefore, read this chapter very carefully before taking the product into operation!
This product left the manufacturer's factory in a safe and perfect condition. To maintain this condition and to ensure safe operation, the user must observe the safety information and warning notes in these operating instructions.
- The unauthorized conversion and/or modification of the product is inadmissible for safety and approval reasons (CE).
- The product is only suitable for operation in dry environments. The entire product must not become damp or wet. Never touch it with wet hands to avoid damage to it.
-
This product is not a toy and not suitable for children!
-
Do not leave packaging material unattended. It may become a dangerous toy for children.
Always keep the meter with its accessories so that it cannot be reached by children. The measuring prods pose a danger of injury. - Never touch the measuring prods during measurement. This may cause measuring tolerances.
- Observe during each measurement that no objects such as cables must be crushed or damaged.
- Check before each measurement that the meter or measuring prods are not damaged. If damaged, never perform a measurement.
- Never touch the measuring profs to cables or lines. Danger of electric shock! The product may be damaged.
-
Never operate the product in direct proximity of:
-
Strong magnetic or electromagnetic fields
-
Transmitter aerials or HF generators.
-
Handle the product with care. Impact, blows or falls from even a low height will damage the product.
- Never submerse the product in water. This may destroy the meter.
- Always keep the meter securely stored with the protective cap installed to avoid damage to the measuring profs and damage by them to anyone else.
- Clean the measuring tips thoroughly before using the adapter cap with circular connector to have a faultless contact.
b) Battery Notes
- Keep batteries out of reach of children.
-
Do not leave any batteries lying around openly. There is a risk of batteries being swallowed by children or pets. If swallowed, consult a doctor immediately.
-
Leaking or damaged batteries may cause alkali burns if they come in contact with the skin. Therefore, use suitable protective gloves.
- Batteries must not be short-circuited, taken apart or thrown into fire. Danger of explosion.
- Do not recharge normal, non-rechargeable batteries; danger of explosion!
- Always observe the polarity (positive/+ and negative/-) when inserting the battery.
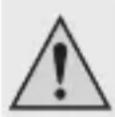
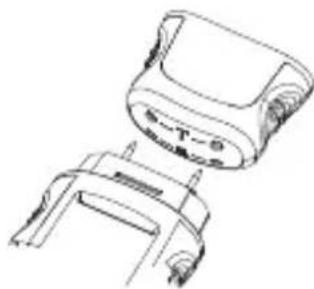
6. CONTROL ELEMENTS
7. INSERTING/REPLACING THE BATTERIES
- The current battery capacity is displayed via the battery status display
- Switch off the meter before starting battery replacement.
- Loosen the cross-head screw at the rear of the product with a small screwdriver.
- Carefully remove the battery compartment lid.
- If required, remove flat batteries from the housing and insert three new batteries of the same type (see technical data) into the battery compartment with the correct polarity.
- Carefully replace the battery compartment lid on the meter and fasten it again with the screw.
8.COMMISSIONING
After insertion of the batteries, you can start with the desired measuring process.
Push the button "MODE" for at least 2 seconds. The LC display lights up and the meter is ready for operation.
To switch off the meter, push the button "MODE" again for at least 2 seconds.

To save energy, the current injection meter off automatically after being inactive for 3 minutes.
9. SETTINGS
To get to the setting mode, push the buttons "SET" and "CLR" at the same time with the device activated.
Push the button "MODE" to choose between the following five options. Please observe the following chapters.
- Temperature compensation ("TEMP")
- "Dry" indicator
-Wet indicator - Lighting ("LIGHT")
- Temperature unit ("UNIT")
The setting mode is terminated automatically after the last function. All changed values are saved. If indicator values are changed, they are reset again to factory settings after the meter is activated again.
a) Temperature Compensation
The material moisture depends on the material temperature. The meter always measures the current ambience temperature and uses it for calculation. For a higher measuring accuracy, the material temperature can also be set manually on demand.
For this, push the button "SET" to increase the displayed temperature and the button "CLR" to lower the temperature.
b) Dry-/Wet Indicator
The pre-defined indicator values for building moisture measurements can be adjusted by you. Use the button "MODE" to select "DRY" or "WET" mode.
Use the button "SET" to increase values, the button "CLR" to reduce them.
The meter can be set from 0 - 1000.
Observe the values from the following tables.
| Conversion table for indicator values | |||
| 05 06 07 08 | |||
| Anhydrite screed Quick-drying cement screed | B25 cement B35 cement | ||
| 09 10 11 12 | |||
| Elastizel screed Plaster screed Wood cement | screed | Lime mortar | |
| 13 14 15 16 | |||
| DIN magnesium oxychloride cover | Polystyrene Wood soft-fi bre plate, bitumen | Cement-bound chipboard | |
| 17 18 19 | |||
| Cement screed with bitumen addition | Cement screed with plastic addition | Cement mortar | |
| Indicator value | values in % material humidity | ||||||||
| 05 06 07 | 08 09 10 | 11 12 | |||||||
| Wet | 863 | 2.8 | 3.0 | 13.4 | |||||
| 802 | 2.4 | 2.3 | 2.9 | 11.7 | 6.4 | 16.0 | 19.2 | ||
| 758 | 2.0 | 2.0 | 2.7 | 10.3 | 4.5 | 14.2 | 12.0 | ||
| 711 | 3.1 | 1.9 | 1.8 | 2.5 | 8.7 | 3.0 | 12.8 | 9.5 | |
| 662 | 2.1 | 1.8 | 1.7 | 2.5 | 7.3 | 2.5 | 11.7 | 7.3 | |
| 608 | 1.5 | 1.6 | 1.7 | 2.4 | 6.4 | 2.4 | 11.0 | 6.4 | |
| 593 | 1.6 | 1.6 | 2.4 | 6.2 | 2.3 | 10.8 | 6.0 | ||
| 564 | 1.6 | 1.6 | 2.4 | 5.8 | 2.0 | 10.5 5.5 | |||
| 544 | 1.1 | 1.5 | 1.5 | 2.3 | 5.5 | 1.9 | 10.3 | 5.1 | |
| 522 | 1.0 | 1.5 | 1.5 | 2.3 | 5.3 | 1.8 | 10.0 | 4.5 | |
| 503 | 0.9 | 1.4 | 1.4 | 2.3 | 5.1 | 1.7 | 9.8 | 4.3 | |
| 486 | 0.8 | 1.4 | 1.4 | 2.2 | 4.9 | 1.6 | 9.7 | 4.0 | |
| 474 | 0.7 | 1.3 | 1.4 | 2.2 | 4.6 | 1.5 | 9.5 | 3.6 | |
| Moist | 441 | 0.6 | 1.3 | 1.3 | 2.2 | 4.4 | 1.4 | 9.4 | 3.5 |
| 416 | 0.5 | 1.3 | 1.3 | 2.1 | 4.2 | 1.4 | 9.2 | 3.1 | |
| 400 | 0.4 | 1.2 | 1.3 | 2.1 | 4.0 | 1.3 | 9.0 | 2.9 | |
| 384 | 0.4 | 1.2 | 1.3 | 2.0 | 3.8 | 1.2 | 8.8 | 2.7 | |
| 363 | 0.3 | 1.1 | 1.2 | 2.0 | 3.5 | 1.1 | 8.6 | 2.5 | |
| 345 | 0.3 | 1.1 | 1.2 | 1.9 | 3.3 | 1.0 | 8.4 | 2.3 | |
| 330 | 0.2 | 1.1 | 1.2 | 1.9 | 2.8 | 0.9 | 8.1 | 2.1 | |
| 304 | 0.2 | 1.0 | 1.2 | 1.8 | 2.7 | 0.8 | 7.9 | 1.9 | |
| 287 | 0.2 | 1.0 | 1.1 | 1.8 | 2.5 | 0.7 | 7.7 | 1.8 | |
| 265 | 0.1 | 0.9 | 1.1 | 1.8 | 2.3 | 0.7 | 7.5 | 1.6 | |
| 242 | 0.1 | 0.8 | 1.0 | 1.7 | 2.0 | 0.6 | 7.3 | 1.4 | |
| 219 | 0.7 | 1.0 | 1.7 | 1.9 | 0.5 | 7.1 | 1.3 | ||
| 204 | 0.7 | 1.0 | 1.6 | 1.8 | 0.5 | 6.8 | 1.2 | ||
| 185 | 0.6 | 0.9 | 1.6 | 1.7 | 0.4 | 6.7 | 1.0 | ||
| Dry | 161 | 0.6 | 0.9 | 1.5 | 1.6 | 0.4 | 6.5 | 0.9 | |
| 138 | 0.6 | 0.9 | 1.5 | 1.4 | 0.4 | 6.4 | 0.8 | ||
| 120 | 0.5 | 1.4 | |||||||
| 100 | 0.5 | 1.3 | |||||||
| 85 | 0.5 | 1.2 | |||||||
| 70 | 0.5 | ||||||||
| Indicator value | I values in % material humidity | ||||||||
| 13 14 15 | 16 17 18 | 19 | |||||||
| Wet | 863 | ||||||||
| 802 | 4.6 4.5 | 7.0 | |||||||
| 758 16.5 | |||||||||
| 711 | 15.5 | 24.0 | 4.4 | 3.7 | 4.7 | ||||
| 662 | 14.9 | 4.2 3.5 | 4.0.6 | ||||||
| 608 | 14.4 | 23.3 | 4.0 | 3.4 | 3.7 | ||||
| 593 | 14.2 | 4.0 3.4 | 3.6.8 | ||||||
| 564 | 14.0 | 22.4 | |||||||
| 544 | 13.8 | 22.0 | |||||||
| 522 | 13.5 | 21.5 | |||||||
| 503 | 13.4 | 21.0 | |||||||
| 486 | 13.3 | 20.5 | |||||||
| 474 | 13.2 | 20.0 | |||||||
| Moist | 441 | 13.0 | 19.5 | ||||||
| 416 | 12.9 | 3.7 | 18818 | 2.7 | |||||
| 400 | 12.7 | 3.7 | 18810 | 2.6 | |||||
| 384 | 12.7 | 30.1 | 17.5 | 3.7 | |||||
| 363 | 12.6 | 29.1 | 3.6 | 17700 | 2.4 | ||||
| 345 | 12.5 | 28.0 | 16.3 | 3.6 | |||||
| 330 | 12.4 | 25.0 | 27.0 | 15.5 | 3.6 | 2.9 | 2.3 | ||
| 304 | 12.3 | 24.5 | 26.0 | 14.8 | 3.5 | 2.8 | 2.2 | ||
| 287 | 12.1 | 23.8 | 25.0 | 14.2 | 3.5 | 2.8 | 2.1 | ||
| 265 | 12.0 | 23.0 | 23.0 | 13.4 | 3.4 | 2.8 | 2.0 | ||
| 242 | 11.9 | 21.0 | 21.0 | 12.8 | 3.4 | 2.8 | 1.9 | ||
3.0
| 219 | 11.8 | 18.5 | 19.0 | 12.0 | 3.3 | 2.7 | 1.7 | ||
| 204 | 11.7 | 17.3 | 17.0 | 11.0 | 3.3 | 2.7 | 1.6 | ||
| 185 | 11.6 | 16.0 | 15.4 | 10.2 | 3.2 | 2.7 | 1.5 | ||
| Dry | 161 | 11.5 | 13.2 | 13.1 | 8.7 | 3.2 | 2.6 | 1.4 | |
| 138 | 11.4 | 12.0 | 10.7 | 8.0 | 3.1 | 2.6 | 1.3 | ||
| 120 | 11.3 | 9.5 | 8.9 | 6.5 | 3.1 | 2.5 | 1.2 | ||
| 100 | 11.1 | 7.9 | 7.0 | 5.9 | 3.0 | 2.5 | 1.1 | ||
| 85 | 7.5 | 5.4 | 3.0 | 2.5 | 1.1 | ||||
| 70 | 6.5 | 4.8 | 2.9 | 2.5 | 1.0 |
c) Lighting
Use the button "MODE" to choose the mode "LIGHT".
Push the button "SET" to choose between the following functions:
"AUTO": Lighting goes out after 5 seconds of inactivity and activates automatically by pushing of a button.
"ON": Lighting is permanently on once the meter is on.
"OFF": Lighting is permanently off.
d) Temperature Unit
Use the button "MODE" to choose the mode "UNIT".
Push the button "SET" to choose between the unit ^ C and ^ F .
10. SELF-TEST
- Push the button "MODE" twice after activation. The meter is in test mode.
- Touch the meter's measuring prods "2" to the self-test adapter "7", contacts " - T - ", first
- Then perform another test with the contacts “- B - ”
If a value appears in the LC display after each test as described in the following figures, the meter is ready for operation.
If the value displayed is "---", no measuring result is present. Check the measuring prods for cleanliness and good contact with the meter. Replace the measuring prods "2" with new ones if required.
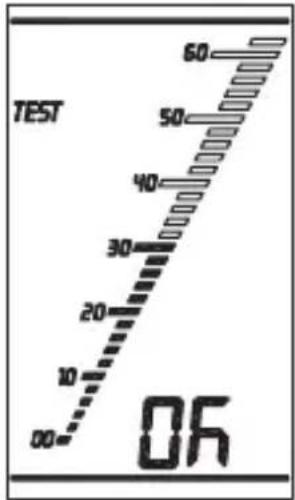
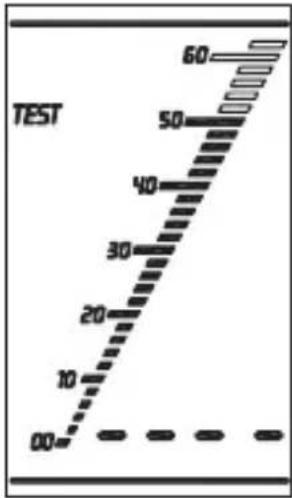
Test OK Mo measurement possible
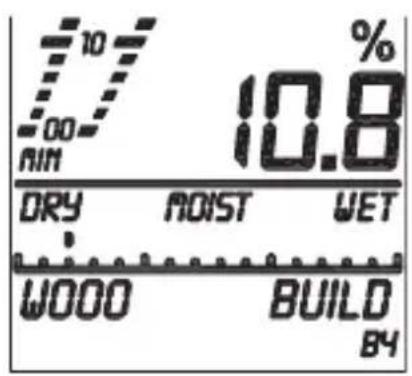
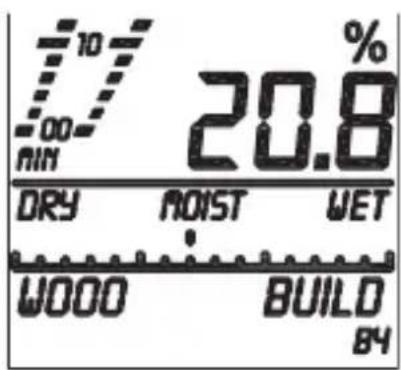
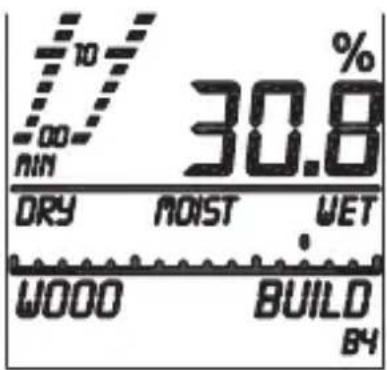
11. MEASURING PROCESS
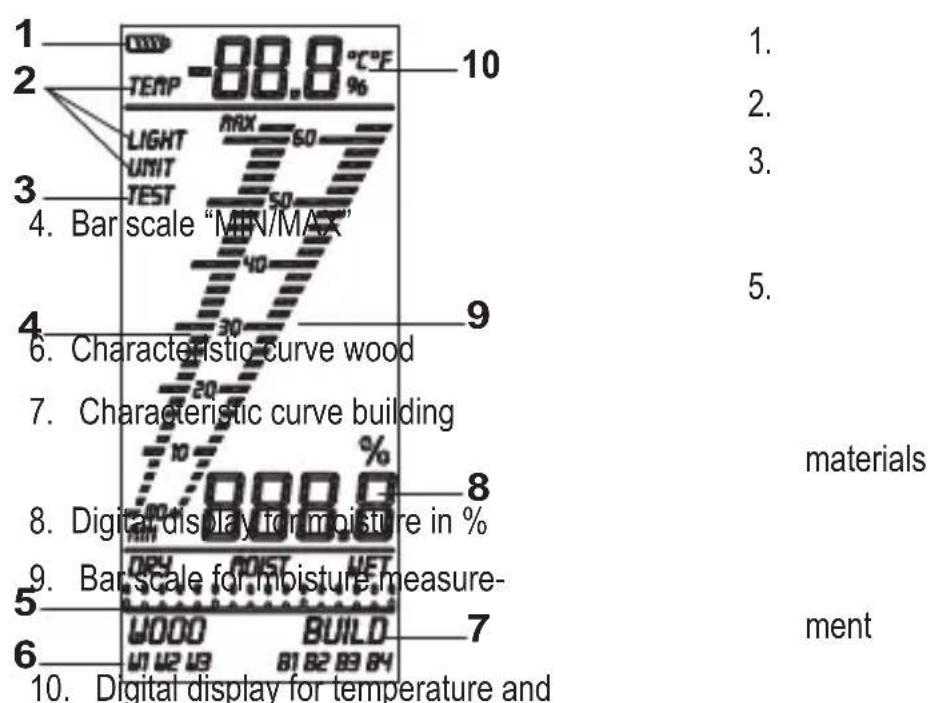
To measure humidity in materials, push the two measuring prods "2" into the material carefully. During measurement, the symbol "%" flashes. If the symbol remains lit permanently, the precise measuring value is available in the digital display for humidity "8".
The bar scale "9" symbolically illustrates this value.
Additionally, the bar chart "4" saves the min and max values.
To delete these values, briefly push the button "CLR".
To set the materials, follow the instructions in the next chapters.
a) Air Temperature and Humidity Measurement
After activation of the meter, the LC display shows the currently measured humidity "10".
Push the button "SET" for at least 2 seconds. The display switches to the currently measured humidity "10".
b) Wood Moisture Measurement "WOOD"
After activation, the LC display automatically shows "WOOD" for wood moisture measurement. There are three different pre-set characteristic curves ("W1" - "W2" - "W3"). Select the right characteristic curve by pushing the "SET" button.
The correct characteristic curve for your material can be taken from the following table.
| Wood characteristic curve | |||
| W1 W2 W3 | |||
| Obeche Ilomba English oak Afrormosia | |||
| Abura Ipe Aspen Rubber tree | |||
| Agda Iroko Fibre boards Imbuia | |||
| Maple Izombe Hard fibre board Kokrodua | |||
| Andiroba Jarrah Wood fi bre | insulation board | Cork | |
| Balsa | Karri | Kauramin | Melamine chipboard |
| Birch | Lime tree, small | Pine | Phenol resin chipboard |
| Pear tree | Niangon | Cherry Tola red | |
| Black Afara | Nove | Cherry mahogany | |
| Beech Hornbeam | Kosipo | ||
| Campeche | Hickory | Larch | |
| Dabema | Hickory | Limba | |
| Douglas fir | Okoume | Mahogany | |
| Douka | Rosewood | Meleze | |
| Dumast English | Parana pine | Paper | |
| Ebony Red chestnut | Poplar (all) | ||
| Oak | Holm oak | Plum | |
| Red oak | Teak | Red cypress | |
| White oak | Juniper Red sandalwood | ||
| Emien Willow | Chipboard | ||
| Alder Cedar Textiles | |||
| Ash | Cypress C.Lusit | Tola | |
| American ash tree Elm | |||
| Japanese ash tree Walnut | |||
| Aspen White birch | |||
| Spruce White beech | |||
| Yellow beech White maple | |||
| Yellow pine Cedar | |||
c) Building Moisture Measurement "BUILD"
After activation, push the button "MODE" briefly once to switch to building material moisture mode "BUILD". There are four different pre-set characteristic curves ("B1" - "B2" - "B3" - "B4"). Select the right characteristic curve by pushing the "SET" button.
The correct characteristic curve for your building material can be taken from the following table. For more building materials and the associated indicator value, see chapter 9, b.
| Building material | |||
| 01 02 03 04 | |||
| Plaster Aerated concrete | Screed Concrete | ||
d) "Wet/Moist/Dry" Indicator
The LC display additionally shows an indicator scale "5".
This permits quick measurement if no precise % values are required.
The indicator values can be changed via the setting mode.
For the values, see chapter 9, b.
We recommend a value of 70 for "DRY" and 850 for "WET".
12. MAINTENANCE AND CLEANING
The meter requires no servicing apart from replacing the rechargeable battery.
Never clean the product while it is switched on.
A slightly moist, soft and clean cloth is sufficient for cleaning.
Clean the measuring prods at once after each use. This may cause measuring tolerances otherwise.
Do not use any aggressive cleaning agents. Do not push the surface and LC display too much when cleaning the housing to avoid scratches.
13. DISPOSAL
a) General Information

Dispose of the product according to the applicable statutory provisions at the end of its service life.
any batteries inserted in the meter and dispose of it separately from the product.
b) Batteries
You as the end user are required by law (Battery Ordinance) to return all used batteries.
Disposing of them in the household waste is prohibited.
Batteries containing hazardous substances are marked with the adjacent symbol to indicate that disposal in the household waste is prohibited. The descriptions for the respective heavy metals are: Cd = cadmium, Hg = mercury, Pb = lead. You may return your used batteries free of charge to collection points in your municipality and anywhere where batteries/rechargeable batteries are sold.
14. TECHNICAL DATA
Power supply 3x battery CR2032
Temperature measuring range -40 ^ C to +70^
Humidity measuring range .0 to 100%
Wood moisture measuring range .......0 to 30% vol (± 1%)
30 to 60% vol ( ± 2% )
Building moisture measuring range ...0.1 to 24%vol (± 0.5%vol)
Measuring type Invasive
Dimensions 139 x 47 x 25 mm (L x W x H)
Weight 100g
Page
Chere cliente, cher client,
OFF: Verlichting is permanentuit.
Copyright 2013 by Conrad Electronic SE.
GB Legal Notice
These operating instructions are a publication by Conrad Electronic SE, Klaus-Conrad-Str. 1, D-92240 Hirschau (www.conrad.com).
All rights including translation reserved. Reproduction by any method, e.g. photocopy, microfilming, or the capture in electronic data processing systems require the prior written approval by the editor. Reprinting, also in part, is prohibited.
These operating instructions represent the technical status at the time of printing. Changes in technology and equipment reserved.
Copyright 2013 by Conrad Electronic SE.
F Information legales
Copyright 2013 by Conrad Electronic SE.
NL Colofon
Copyright 2013 by Conrad Electronic SE.
V2_1113_01/IB
