Silentpro35 - Fridge BRANDY BEST - Free user manual and instructions
Find the device manual for free Silentpro35 BRANDY BEST in PDF.
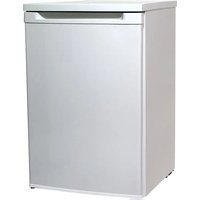
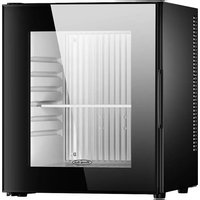
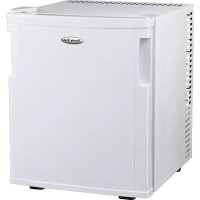
| Product type | Mini-bar / Small capacity refrigerator |
| Brand | Brandy Best |
| Model | Silentpro35 |
| Dimensions (H x W x D) | 485 x 385 x 455 mm |
| Total volume | 32 L |
| Energy efficiency class | F |
| Annual energy consumption | 90 kWh/year |
| Noise level | 22 dB(A) – Class A |
| Power supply | 220-240 V, 50 Hz |
| Refrigerant | R600a (25 g) |
| Climate class | N (temperate, 16-32 °C) |
| Construction type | Freestanding |
| Reversible door | Yes, right or left opening |
| Interior lighting | LED |
| Thermostat | Adjustable (rear) or preset at ±8 °C |
| Defrosting | Manual |
| Recommended cleaning | Mild baking soda solution, rinse with warm water |
| Leveling feet | Yes, two adjustable feet at front |
| Safety | Mandatory grounding; class I electric shock protection |
| Weight | Not mentioned (estimated ~15-20 kg) |
| Warranty | 24 months |
Frequently Asked Questions - Silentpro35 BRANDY BEST
User questions about Silentpro35 BRANDY BEST
0 question about this device. Answer the ones you know or ask your own.
Ask a new question about this device
Download the instructions for your Fridge in PDF format for free! Find your manual Silentpro35 - BRANDY BEST and take your electronic device back in hand. On this page are published all the documents necessary for the use of your device. Silentpro35 by BRANDY BEST.
USER MANUAL Silentpro35 BRANDY BEST
text_image
Warning sign depicting a flame symbol in yellow and black on white backgroundtext_image
Two labeled boxes with checkmarks and an 'X' symbol, likely indicating approval or rejection status.text_image
Technical line drawing of a refrigerator with labeled components and exploded viewNettoyage
natural_image
Symbol of a trash bin crossed with a diagonal line, representing no waste or discharge (no text or labels)
Designer of solutions for "tiny" places...
SILENTPRO35
Instruction Manual
Before installing or first usage of this appliance, attentively read this notice.
Conserve it careful after reading. You can also download the latest version of this manual on:
English
Safety precautions 3
About your Mini-bar 7
Installation 7
Location 7
Placement – fitting 7
Levelling the mini-bar 8
Cleaning before use 8
Before connecting, you must: 8
Start-up 8
Mini-bar start-up 8
Adjusting the reversible door 9
Cleaning 9
Maintenance 10
In case of malfunction 10
Advice for reducing your energy consumption 10
Electrical diagram 11
Technical Specifications 11
Security 14
Recycling 14
ENVIRONMENTAL PROTECTION – DIRECTIVE 2012/19/EU 14
Safety precautions
This device is very simple to use. However, we advise you to read this manual carefully as it contains important safety information and cleaning instructions. This device is intended for home use only. Any other use is excluded.
The manufacturer declines all responsibility for injury to persons or property damage due to non-observance of the maintenance instructions and improper use of the device. After removing the packaging from the various parts of the device, check that it is in perfect condition. If you are in doubt about this, do not use the appliance and contact the seller or a qualified technician. Also ensure that different types of packaging (cardboard, plastic bags, polystyrene, tape, ties, etc.) are out of reach of children, these elements carry a potential risk. Before using the appliance, check that the current in your area corresponds to that indicated on the rating plate.
When using this unit, please follow the following safety guidelines:
CAUTION : To reduce the risk of fire, electric shock or injury, always follow the following important safety instructions when using an electrical appliance.
- Before using this appliance, read the instructions for careful use. Keep this manual carefully.
- This appliance can be used by children aged from 8 years and above and persons with reduced physical, sensory or mental capabilities or lack of experience and knowledge if they have been given supervision or instruction concerning use of the appliance in a safe way and understand the hazards involved. Children shall not play with the appliance. Cleaning and user maintenance shall not be made by children without supervision.
- Do not leave the device unattended while it is plugged in. Remove the plug when not in use or when cleaning.
- Check the status of your device regularly. Do not use the appliance if it is damaged.
- Do not use the appliance if it has been dropped, damaged, left outdoors, or dropped into water.
WARNING: When positioning the appliance, ensure the supply cord is not trapped or damaged.
- Never immerse this appliance in water or any other liquid.
- Do not pull or carry the unit by the power cord, use the cord as
a handle, pinch the cord in the door, or pull it along sharp edges or corners.
- Do not place the unit on the power cord. Do not allow the cord to wrap or tangle in any way. Keep the cord away from hot surfaces.
- Do not remove the plug by pulling on the cord. To remove the plug, take the plug in hand and carefully pull it out of the wall socket.
- Do not handle the device or the plug with wet hands.
- Pay special attention to this device and follow all instructions given in the operating instructions.
- Use only an extension cord certified with the amperage current in your country. Certified extensions with lower amperage may overheat. Make sure that no one trips on the cord or plug.
- Keep this unit indoors and in a dry place.
- Keep the unit away from heat sources such as radiators to prevent deformation of plastic parts.
• Always unplug the power cord before cleaning the unit.
- If the power cord is damaged, it must be replaced by the manufacturer, its service center, or similarly qualified persons to avoid danger.
- All repairs must be carried out by the after-sales service or persons of similar qualification.
- Do not use accessories that are not recommended by the manufacturer. They could damage the device.
- This device is intended for home use only.
- Do not use this unit outdoors.
- Do not use the device near flammable materials.
- Do not use any accessories other than those supplied with the unit.
- The lamp inside the device is used to illuminate the interior. This lamp is not suitable for lighting a room.
- WARNING: Keep ventilation openings clear in the appliance enclosure or in the installation structure.
- WARNING: Do not use mechanical devices or other means to speed up the defrosting process other than those recommended by the manufacturer.
- WARNING: Do not use electrical appliances inside the food storage compartment unless they are of the type recommended by the manufacturer.
- Do not store explosive substances such as aerosols containing
flammable propellants in this device.
- It is imperative that your appliance is connected to an installation with a circuit breaker-protected electrical network and a suitable differential in accordance with the installation rules.
- The circuit of this product must be isolated.
- The voltage for this product should be 220-240V, 50Hz.
- Children aged from 3 to 8 years are allowed to load and unload refrigerating appliances.
To avoid contamination of food, please respect the following instructions:
- Opening the door for long periods can cause a significant increase of the temperature in the compartments of the appliance.
- Clean regularly surfaces that can come in contact with food and accessible drainage systems.
- Store raw meat and fish in suitable containers in the refrigerator, so that it is not in contact with or drip onto other food.
- If the refrigerating appliance is left empty for long periods, switch off, defrost, clean, dry, and leave the door open to prevent mould developing within the appliance.
- Clean water tanks if they have not been used for 48h; flush the water system connected to a water supply if water has not been drawn for 5 days.
- Two-star frozen-food compartments are suitable for storing pre-frozen food, storing or making ice-cream and making ice cubes.
- One-, two- and three-star compartments are not suitable for freezing of fresh food.
- WARNING: Do not damage the refrigerant circuit.
- WARNING: Do not locate multiple portable socket-outlet or portable power supplies at the rear of the appliance.
This appliance is intended to be used in household and similar applications such as
– staff kitchen areas in shops, offices and other working environments;
– farm houses and by clients in hotels, motels and other residential type environments;
- bed and breakfast type environments;
– catering and similar non-retail applications.
Regarding the method for replacing illuminating lamps, thanks to refer to the below paragraph of the manual.
For information on installation, handling, maintenance and dipo- sal of device,

text_image
Warning sign depicting a flame symbol in yellow and black on white backgroundWARNING : Risk of fire / flammable materials
About your Mini-bar
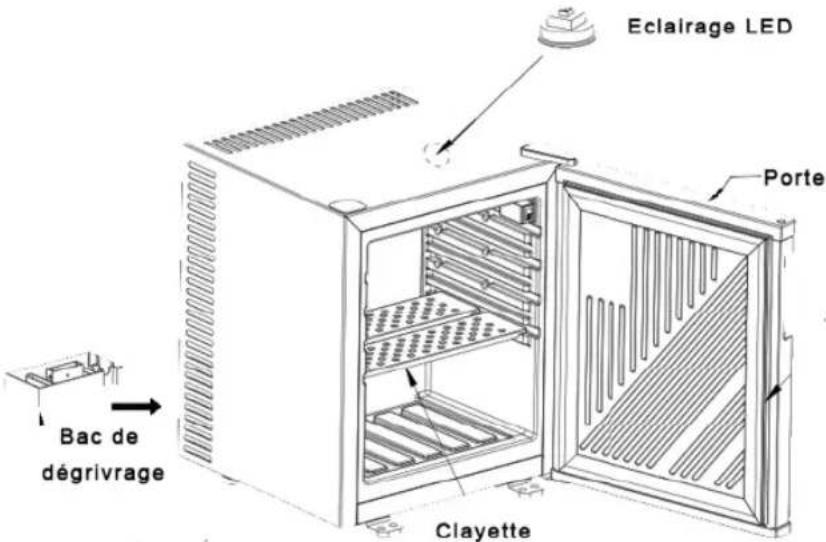
Please read these instructions carefully before using your mini-bar.
This is intended for household use and is to be installed inside.
Installation
Location
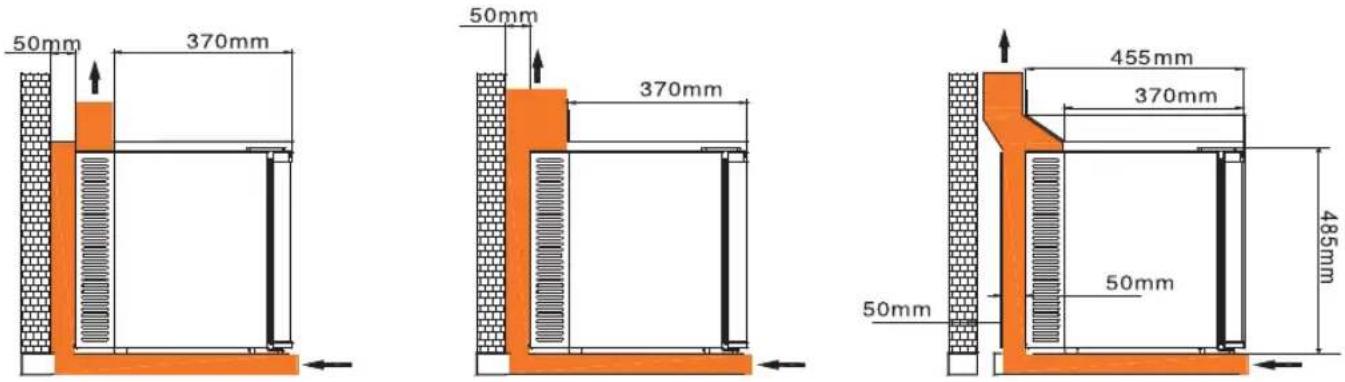
When you choose the place of installation for your mini-bar, you must ensure that the floor is flat and solid, and that the room is well ventilated with a temperature between 16 and 32^ . Avoid installing next to a heat source such as an oven, boiler, radiator, etc...
Keep out of direct sunlight.
If you place your mini-bar in an outbuilding or garage, ensure that the location is not humid, as condensation could form.
Your appliance must be installed leaving a gap of 10cm to the rear and 2cm to each side.
The mini-bar features a reversible door, which can be opened to the left or to the right.
Never cover the appliance with a sheet or cover.
Placement – fitting
Position the appliance opposite the desired location, and slide gently into place.
Levelling the mini-bar
Once the mini-bar is in its lnal position, ensure that it is level. Adjustments can be made using the two levelling feet at the front of the mini-bar.
If the appliance is not level, the alignment of the doors and the magnetic contacts will be affected.
Cleaning before use
Wipe the interior of the mini-bar with a mild solution of bicarbonate of soda. Then rinse with hot water using a sponge or a wrung cloth. Wipe the appliance in its entirety until there is no more water, then replace the shelves and drawers. You can clean the exterior with a mild detergent.
Before connecting, you must:
Check that the plug is compatible with the power cable of the appliance. If this is not the case, contact a specialist technician for assistance.
CAUTION: THIS APPLIANCE MUST BE GROUNDED.
Start-up
Before putting drinks in your mini-bar, leave it running for 24 hours to ensure that it is functioning properly, and to allow it to reach the correct temperature.
Mini-bar start-up
Depending on the versions:
If your appliance is equipped with an adjustable thermostat, all you have to do is plug in the mini-bar and set a temperature on the potentiometer located at the back of the product. (see diagram below)
If your version is not equipped with an adjustable thermostat then the interior temperature will be preset to ± 8^
NOTE: Do not store flammable gases or liquids in the mini-bar.
Low temperature
You will require a flathead screwdriver and a cross-headed screwdriver.

text_image
Technical line drawing of a refrigerator with labeled components and internal compartments1) Remove the caps (1)
2) Unscrew the screws (2)
3) Remove the upper hinge (3)
4) Lift the door (4) and unscrew and remove the hinge (5)
5) Place hinge (5) on the opposite side and replace the screw
6) Replace the door on the desired side on hinge (5)
7) Replace the upper hinge (3) on the door and screw (2) it back into place
8) Replace the caps (1) and (6)
Cleaning
The mini-bar must be cleaned and maintained at least once a month.
During maintenance, ensure that the appliance is unplugged.
Cleaning the exterior of the mini-bar:
You can use soap to clean the exterior of the appliance. However you should ensure that the door is fully closed in order to avoid contact between the product and the seal, or with the interior of the mini-bar. You can also just use a damp cloth.
Cleaning the interior of the mini-bar:
You can clean the interior of your mini-bar with a mild solution of bicarbonate of soda. After, rinse with hot water using a wrung cloth. Then wipe in order to remove any trace of moisture.
Pay attention to the maintenance of the rubber door seals. They must always be clean in order to avoid mould.
NOTE: Do not use diluents, petrol, alcohol, kerosene, abrasive detergents, washing powder, acid, chemical products, etc. in order to avoid damaging the plastic. It is discouraged to spray water directly onto the mini-bar. This could cause rusting.
Maintenance
-If the power cable is damaged, it must be replaced by the manufacturer, their after-sales service, or a qualified individual.
-Do not place your mini-bar close to a heat source (e.g. radiator). Keep out of direct sunlight.
-Ensure that the mini-bar is level. If it is not level, the alignment of the doors and the magnetic contact could be affected.
-Caution – do not cover or block the ventilation or the grills of your appliance.
Service: Repairs and maintenance of the appliance must be carried out by an authorised and certified technician.
In case of malfunction
- If the mini-bar is not working:
Check if there is a power failure (check the fuses)
Check if it is plugged in.
- When the mini-bar does not cool sufficiently:
Have you put something hot or too many products in the mini-bar?
Check that the door closes properly
Check that the door seals are not damaged
Check the ventilation surrounding the mini-bar
- If condensation appears on the outside of the mini-bar, this could be due to excessive humidity in the room (change of temperature). Therefore this is not a sign of malfunction. Please wipe the appliance with a dry cloth.
Advice for reducing your energy consumption
- Take care to maintain a minimum distance between different products when you put them in the mini-bar to allow a good circulation of air.
- Opening the door for too long or too frequently can cause a rise in the temperature of the interior of the mini-bar. For this reason the door must be closed immediately after use.
- Ensure that the door's airtight seal is correctly positioned, and that the appliance's ventilation openings are not obstructed.
- If the layer of ice becomes too thick, this can affect the performance of the mini-bar. When the layer of ice is thicker than 5mm, the appliance must be defrosted.
- The various compartments, trays and shelves are pre-arranged in the optimum layout.
Circuit Diagram
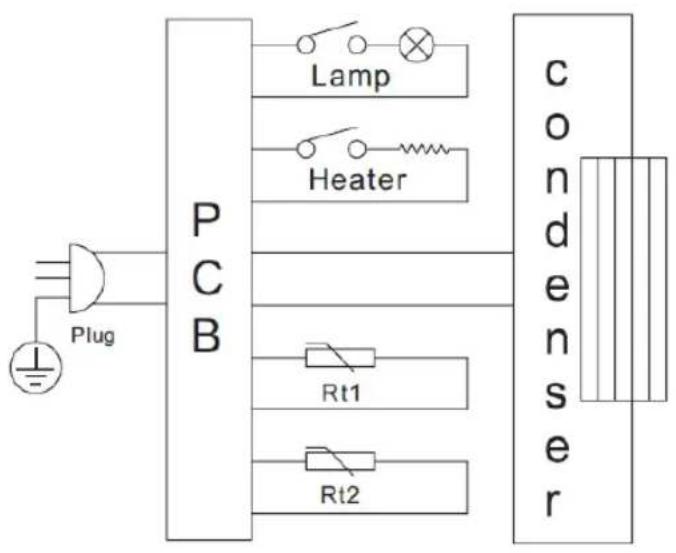
flowchart
graph LR
    Plug["Plug"] --> PCB["PCB"]
    PCB --> Lamp["Lamp"]
    PCB --> Heater["Heater"]
    PCB --> Rt1["Rt1"]
    PCB --> Rt2["Rt2"]
    Lamp --> Condenser["Condenser"]
    Heater --> Condenser
    Rt1 --> Condenser
    Rt2 --> Condenser
    Condenser --> R1["Resistor"]
    Condenser --> R2["Resistor"]
Technical Specifications
| Model | SILENTPRO35 |
| Voltage (V) | 220 - 240 |
| Frequency (Hz) | 50 |
| Insulation blowing gaz | Cyclopentane |
| Protection against electric shock | I |
| Climate class | N |
| Refrigerant | R600a (25g) |
*Depending on the series and the county of distribution, the manufacturer reserves the right to modify certain characteristics.
| Model identifier: SILENTPRO35B - SILENTPRO35M | ||||
| Type of refrigerating appliance: thermoelectric | ||||
| Low-noise appliance: Yes Design type: freestanding | ||||
| Wine storage appliance: No Other refrigerating | appliance: | No | ||
| General product parameters: | ||||
| Parameter Value Parameter Value | ||||
| Overall dimensions (millimetre) | Height 485 Total volume (dm) | ^3 or 1) 32 | ||
| Width 385 | ||||
| Width 455 | ||||
| EEI | 116,4 | Energy efficiency class | F | |
| Airborne acoustical noise emissions (dB(A) re 1 pW) | 22 | Airborne acoustical noise emission class | A | |
| Annual energy consumption (kWh/a) | 116,4 | Climate class: | temperate | |
| Parameter | Value Parameter | Value | |||
| Minimum ambient temperature (°C), for which the refrigerating appliance is suitable | 16 | Maximum ambient temperature (°C), for which the refrigerating appliance is suitable | 32 | ||
| Winter setting | No | ||||
| Compartment Parameters: | |||||
| Compartment type | Compartment parameters and values | ||||
| Compartment Volume (dm3 or l) | Compartment Volume (dm3 or l) | Recommended temperature setting for optimised food storage (°C)These settings shall not contradict the storage conditions set out in Annex IV, Table 3 | Freezing capacity (kg/24 h) | Defrosting type (auto-defrost = A, manual defrost = M) | |
| Pantry | No | — | [A/M] | ||
| Wine storage | No | — | [A/M] | ||
| Cellar | Yes | 32 | ≥+2,≤+14 | — | - |
| Fresh food No — | ||||||
| Chill No — | ||||||
| 0-star or ice- making | No | — | ||||
| 1-star No — | ||||||
| 2-star No — | ||||||
| 3-star No — | ||||||
| 4-star No | ||||||
| 2-star section No — | ||||||
| Variable tempera-ture compartment | compartment types | |||||
| Compartiments «quatre étoiles»For 4-star compartments | ||||||
| Fast freeze facility No | ||||||
| Paramètres de la source lumineuse :Light source parameters : | |
| Type of light source | - |
| Energy effi-ciency class | - |
| Minimum duration of the guarantee offered by the manufacturer : 24 month | |
| Additional information: - | |
| Weblink to the manufacturer's website, where the information in point 4(a) Annex of Commission Regulation (EU) 2019/2019 is found: www.brandybest.com | |
As determined in accordance with Commission Delegated Regulation (EU) 2019/2015 [1]
[1] Commission Delegated Regulation (EU) 2019/2015 of 11 March 2019 supplementing Regulation (EU) 2017/1369 of the European Parliament and of the Council with regard to energy labelling of light sources and repealing Commission Delegated Regulation (EU) No 874/2012 (see page 68 of this Official Journal).
(2) Changes to these items shall not be considered relevant for the purposes of point 4 of Article 4 of Regulation (EU) 2017/1369.
(3) if the product database automatically generates the definitive content of this cell the supplier shall not enter these data.
(4) Commission Regulation (EU) 2019/2019 of 1 October 2019 laying down ecodesign requirements for refrigerating appliances pursuant to Directive 2009/125/EC of the European Parliament and of the Council and repealing
Commission Regulation (EC) No 643/2009 (see page 187 of this Official Journal).
Security
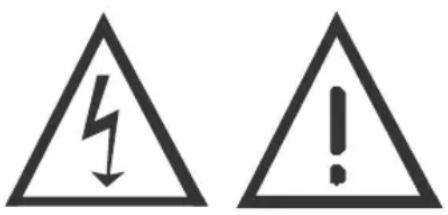
Caution!
It is dangerous for anyone, other than qualified technicians) to dismantle or attempt to repair, which involves disassembly of the cover panels.
Risk of electric shocks.
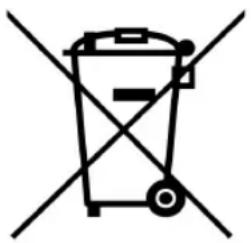
Recycling
natural_image
Symbol of a trash bin crossed with two crossed lines, representing waste sorting or disposal (no text present)
- This appliance carries the symbol WEEE (for Waste Electrical and Electronic Equipment Directive) which signifies that at the end of life, it must not be discarded with household waste, but disposed of at the local sorting/recycling center. Waste recovery aids in helping to preserve our environment
ENVIRONMENTAL PROTECTION – DIRECTIVE 2012/19/EU
In order to preserve our environment and our health, end of life elimination of electric appliances and electronics must adhere to specific rules and requires everyone's involvement, whether supplier or user.
It is for this reason that your device, as noted by the symbol on the data plate or the packaging, should never be disposed of in a public or private bin for household waste. The user has the right to dispose of the device in a public electronics waste depot, which sorts and recycles or reuses it for other purposes in accordance with the law.