
Rotating Waffle Maker - Waffle Maker BELLA - Free user manual and instructions
Find the device manual for free Rotating Waffle Maker BELLA in PDF.

| Product Type | Rotating Waffle Maker |
| Brand | BELLA |
| Model | Rotating Waffle Maker |
| Power Supply | 110-120 V~ |
| Wattage | 1000 W |
| Indicator Lights | Red (power) and green (ready) |
| Rotation | 180° for even cooking |
| Capacity | 1 waffle at a time |
| Preheat Time | 3 to 5 minutes |
| Cooking Time | Approximately 3 to 4 minutes |
| Plate Material | Nonstick |
| Exterior Housing | Stainless steel |
| Drip Tray | Included, removable |
| Power Cord | Short, with polarized plug |
| Safety | Do not immerse, hot surfaces |
| Care | Soft cloth, no metal utensils |
| Usage | Household use only |
| Warranty | 2-year limited |
| Included Accessories | Instruction manual, recipe guide |
| Weight | Approximately 2 kg |
Frequently Asked Questions - Rotating Waffle Maker BELLA
User questions about Rotating Waffle Maker BELLA
0 question about this device. Answer the ones you know or ask your own.
Ask a new question about this device
Download the instructions for your Waffle Maker in PDF format for free! Find your manual Rotating Waffle Maker - BELLA and take your electronic device back in hand. On this page are published all the documents necessary for the use of your device. Rotating Waffle Maker by BELLA.
USER MANUAL Rotating Waffle Maker BELLA
natural_image
Black and white photo of a griddle presser with open lid, showing its open lid placed on a tray (no text or symbols visible)ROTATING WAFFLE MAKER GAUFRIER ROTATIF WAFLERA GIRATORIA
Instruction Manual (Recipe Guide)
Register your product and get support at:
www.bellahousewares.com
BELLA
THANK YOU
For Your Purchase

natural_image
Generic user profile icon with a plus sign, no text or symbols presentRegister & sign up for special announcements and trendy recipes!

natural_image
Silhouette of a person with five stars above it, no text or symbols presentTell us what you think!
Rate, review or ask us a question.

bellahousewares.com
get inspired


BellaLifestyle


BellaLife
Table of Contents
Important Safeguards 4
Notes on the Cord 5
Notes on the Plug 5
Plasticizer Warning....5
Electric Power 5
Before Using for the First Time 5
Know your Waffle Maker 6
To Use the Waffle Maker....6
Locking and Unlocking your Waffle Maker 6
Cleaning and Maintenance....6
Recipes....7
Warranty 8
Table des matières
When using electrical appliances, basic safety precautions should always be followed, including the following:
- READ ALL INSTRUCTIONS CAREFULLY.
- Do not touch hot surfaces. Use handles or knobs.
- To protect against risk of fire, electric shock and injury to persons, DO NOT IMMERSE CORD, PLUG OR APPLIANCE in water or other liquid.
- Close supervision is necessary when any appliance is used by or near children.
- Unplug unit when not in use and before cleaning. To disconnect, grasp plug, and pull from wall. Never yank on cord.
- Allow cooling before putting on or taking off parts.
- Do not operate any appliance with a damaged cord or plug or after the appliance malfunctions or is dropped or damaged in any manner. Bring the appliance to a qualified service agent for examination, repair or electrical or mechanical adjustment to avoid hazard.
- The use of accessory attachments not recommended or sold by the appliance manufacturer may cause fire, electric shock, or injury to persons.
- Do not use outdoors.
- Do not let cord hang over edge of table or counter or touch hot surfaces, including the stove.
- Do not allow appliance to come into contact with any materials that are flammable such as draperies, walls, etc.
- Do not place on or near a hot gas or electric burner or in a heated oven.
- When finished baking waffles remove plug from wall outlet.
- Do not use this appliance for other than intended use.
- Do not clean with metal scouring pads; pieces can break off the pad and touch electrical parts, creating a risk of electrical shock.
- Extreme caution must be used when moving an appliance containing hot oil or other hot liquids.
- This appliance is for household use only.
FOR HOUSEHOLD USE ONLY SAVE THESE INSTRUCTIONS
NOTES ON THE CORD
A. A short power-supply cord (or detachable power-supply cord) is to be provided to reduce the risk resulting from becoming entangled in or tripping over a longer cord.
B. Longer detachable power-supply cords or extension cords are available and may be used if care is exercised in their use.
C. If a long detachable power-supply cord or extension cord is used :
- The marked electrical rating of the cord or extension cord should be at least as great as the electrical rating of the appliance;
- If the appliance is of the grounded type, the extension cord should be a grounding-type3-wire cord; and
- The longer cord should be arranged so that it does not drape over the countertop or table top where it can be pulled on by children or tripped over unintentionally.
NOTES ON THE PLUG
This appliance has a polarized plug (one blade is wider than the other). To reduce the risk of electric shock, this plug will fit in a polarized outlet only one way. If the plug does not fit fully into the outlet, reverse the plug. If it still does not fit, contact a qualified electrician. Do not modify the plug in any way.
PLASTICIZER WARNING
CAUTION: To prevent Plasticizers from migrating to the finish of the counter top or table top or other furniture, place NON-PLASTIC coasters or place mats between the appliance and the finish of the counter top or table top. Failure to do so may cause the finish to darken; permanent blemishes may occur or stains can appear.
ELECTRIC POWER
If the electrical circuit is overloaded with other appliances, your appliance may not operate properly. It should be operated on a separate electrical circuit from other appliances.
BEFORE USING FOR THE FIRST TIME
- Remove all parts included in the box.
- Wash all the parts thoroughly (refer to Cleaning and Maintenance section for more information).
NOTE: Your Waffle Maker may emit a small amount of smoke and/or odor when you use it for the first time. This is normal and harmless, however we recommend that you do not eat the first waffle you make with the Waffle Maker.
Getting to know your waffle maker
Product may vary slightly from illustration
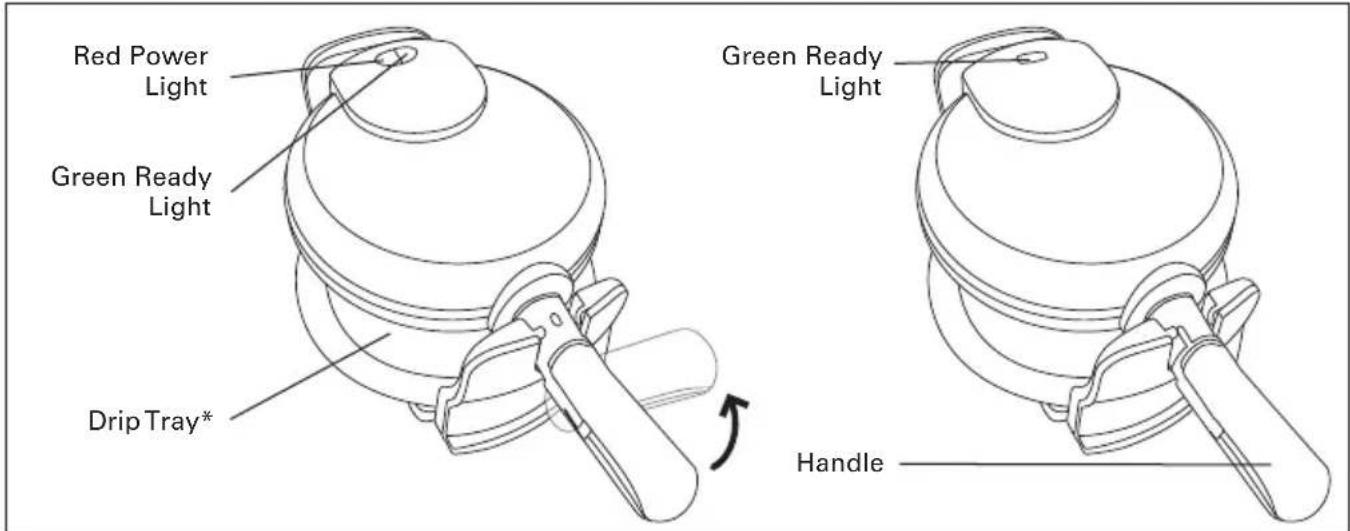
* Drip tray included to collect overflow of batter and crumbs.
To use the Waffle Maker
- Plug the cord into your 110 - 120 V AC wall outlet. The Red Power Light will turn on indicating the appliance is preheating.
NOTE: The Red Power Light will remain on until the appliance is unplugged. - The Green Ready Light will turn on when the appliance reaches proper cooking temperature. This should take approximately 3 to 5 minutes. Once heated, ready times will be faster.
- When the Green Ready Light turns on, open the Waffle Maker, and apply a light layer of vegetable oil or melted shortening to the heating plates. Spread the waffle batter evenly onto the lower heating plate.
- Close the Waffle Maker and rotate the handle 180° clockwise (right) until it locks for cooking.
- When the Green Ready Light turns on again, rotate the handle 180^ counter-clockwise (left) to unlock and then carefully open the Waffle Maker.
- If the waffles are not dark enough, close the Waffle Maker, rotate to lock, and then wait another 30 seconds. Repeat as needed.
- When you are satisfied with your waffles, use a non-metallic utensil to remove them from the heating plates.
- To make more waffles, close the Waffle Maker until the Green Ready Light comes on, then repeat from step 3.
- When you are finished, unplug it from the wall outlet. After it has sufficiently cooled, the heating plates may be wiped clean.
Locking and Unlocking your Waffle Maker
Your Waffle Maker is unlocked when the side with 2 indicator lights are facing up and is locked when the 2 indicators lights are facing down. You can only open the Waffle Maker in the unlocked position.
Cleaning and Maintenance
- Unplug it and allow it to cool down before cleaning.
- You can easily remove any excess oils or crumbs without disassembling the appliance.
- Never submerge the appliance in water or place it in the dishwasher.
- Use only plastic or wooden utensils on the heating plates. Metal may damage the plates.
- Use a soft cloth on the heating plates and occasionally a metal polish intended for stainless steel on the outer housing. Never use abrasive scouring pads or steel wool.
Recipes
Waffle Base Mix
This easy to make waffle mix can be made in so many ways with only a few ingredients from your pantry. Try both savory and sweet recipes for a unique way to serve this classic breakfast favorite at any time of the day!
• 3 cups all-purpose flour
- 1 tsp. salt
- 2 tbsp. baking powder
- 1/2 cup sugar
Mix all ingredients together and store in an airtight container until ready to use.
Tips:
- Add 4 tbsp. of melted butter, 2 eggs and 1/2 cup buttermilk to make buttermilk waffles!
- Add 1/4 cup of your favorite jam flavor to batter before cooking.
- Layer waffles with fresh fruit, toasted nuts, honey, flavored syrups or yogurt for a delicious breakfast or treat.
Chocolate Chip Waffles
Makes 4 waffles
• 1 1/2 cups Mix Waffle Base
• 4 tbsp. melted butter
- 2 eggs
• 1/2 cup buttermilk
• 1/4 cup chocolate chips
-
In a mixing bowl, combine all ingredients and whisk until mixture is smooth and contains no lumps.
-
In preheated waffle iron, ladle in about 1/3 cup for each waffle and cook until waffles are golden brown (about 3-4 minutes).
Chocolate Caramel Waffles
Makes 4 waffles
• 1 1/2 cups Mix Waffle Base
• 4 tbsp. melted butter
- 2 eggs
- 1/2 cup buttermilk
• 2 tbsp. chocolate chips -
2 tbsp. caramel chips
-
In a mixing bowl, combine all ingredients and whisk until mixture is smooth and contains no lumps.
-
In preheated waffle iron, ladle in about 1/3 cup for each waffle and cook until waffles are golden brown (about 3-4 minutes).
Limited TWO-YEAR Warranty
SENSIO Inc. hereby warrants that for a period of TWO YEARS from the date of purchase, this product will be free from mechanical defects in material and workmanship, and for 90 days in respect to non-mechanical parts. At its sole discretion, SENSIO Inc. will either repair or replace the product found to be defective, or issue a refund on the product during the warranty period.
The warranty is only valid for the original retail purchaser from the date of initial retail purchase and is not transferable. Keep the original sales receipt, as proof of purchase is required to obtain warranty validation. Retail stores selling this product do not have the right to alter, modify, or in any way revise the terms and conditions of the warranty.
EXCLUSIONS:
The warranty does not cover normal wear of parts or damage resulting from any of the following: negligent use of the product, use of improper voltage or current, improper routine maintenance, use contrary to the operating instructions, disassembly, repair, or alteration by anyone other than qualified SENSIO Inc. personnel. Also, the warranty does not cover Acts of God such as fire, floods, hurricanes, or tornadoes.
SENSIO Inc. shall not be liable for any incidental or consequential damages caused by the breach of any express or implied warranty. Apart from the extent prohibited by applicable law, any implied warranty of merchantability or fitness for a particular purpose is limited in time to the duration of the warranty. Some states, provinces or jurisdictions do not allow the exclusion or limitation of incidental or consequential damages, or limitations on how long an implied warranty lasts, and therefore, the above exclusions or limitations may not apply to you. The warranty covers specific legal rights which may vary by state, province and/or jurisdiction.
HOW TO OBTAIN WARRANTY SERVICE:
You must contact Customer Service at our toll-free number: 1-866-832-4843. A Customer Service Representative will attempt to resolve warranty issues over the phone. If the Customer Service Representative is unable to resolve the problem, you will be provided with a case number and asked to return the product to SENSIO Inc. Attach a tag to the product that includes: your name, address, daytime contact telephone number, case number, and description of the problem. Also, include a copy of the original sales receipt. Carefully package the tagged product with the sales receipt, and send it (with shipping and insurance prepaid) to SENSIO Inc.'s address. SENSIO Inc. shall bear no responsibility or liability for the returned product while in transit to SENSIO Inc.'s Customer Service Center.
CONSIGNES DE SÉCURITÉ IMPORTANTES
natural_image
Generic user profile icon with a plus sign, no text or symbols presentnatural_image
Silhouette of a person with five stars above it, no text or symbols presentBELLA is a registered trademark of Sensio Inc., Montréal, Canada H3B 3X9. All rights reserved.


- ROTATING WAFFLE MAKER GAUFRIER ROTATIF WAFLERA GIRATORIA
- BELLA
- THANK YOU
- get inspired
- Table of Contents
- Table des matières
- FOR HOUSEHOLD USE ONLY SAVE THESE INSTRUCTIONS
- NOTES ON THE CORD
- NOTES ON THE PLUG
- PLASTICIZER WARNING
- ELECTRIC POWER
- BEFORE USING FOR THE FIRST TIME
- Getting to know your waffle maker
- To use the Waffle Maker
- Locking and Unlocking your Waffle Maker
- Cleaning and Maintenance
- Recipes
- Waffle Base Mix
- Tips:
- Chocolate Chip Waffles
- Makes 4 waffles
- Chocolate Caramel Waffles
- Limited TWO-YEAR Warranty
- EXCLUSIONS:
- HOW TO OBTAIN WARRANTY SERVICE:
- CONSIGNES DE SÉCURITÉ IMPORTANTES
Brand : BELLA
Model : Rotating Waffle Maker
Category : Waffle Maker