
Bubble Waffle Maker - Waffle Maker BELLA - Free user manual and instructions
Find the device manual for free Bubble Waffle Maker BELLA in PDF.


| Product Type | Waffle Maker (Bubble Waffle Maker) |
| Brand | Bella |
| Model | Bubble Waffle Maker |
| Dimensions (Approx.) | 12 x 8 x 5 inches |
| Weight | 3 lbs |
| Power Consumption | 1200 W |
| Voltage | 120 V (US) |
| Plates | Non-stick, bubble pattern |
| Indicator Lights | Power and ready lights |
| Temperature Control | Adjustable thermostat |
| Auto Shut-Off | Yes |
| Cool-Touch Handle | Yes |
| Cleaning | Wipe with damp cloth; do not immerse |
| Dishwasher Safe Parts | No |
| Warranty | Limited 1-year warranty |
| Includes | Waffle maker, user manual |
Frequently Asked Questions - Bubble Waffle Maker BELLA
User questions about Bubble Waffle Maker BELLA
0 question about this device. Answer the ones you know or ask your own.
Ask a new question about this device
Download the instructions for your Waffle Maker in PDF format for free! Find your manual Bubble Waffle Maker - BELLA and take your electronic device back in hand. On this page are published all the documents necessary for the use of your device. Bubble Waffle Maker by BELLA.
USER MANUAL Bubble Waffle Maker BELLA
natural_image
Exterior view of a white and black electric water heater with internal compartments (no text or symbols visible)BUBBLE WAFFLE MAKER
Instruction Manual and Recipe Guide
WAFLERA DE BURBUJAS
natural_image
Abstract graphic with a heart and stylized letter 'T' (no text or symbols)THANK YOU
for your purchase
REGISTER AND SIGN UP

natural_image
Generic user profile icon with a plus sign, no text or symbols presentfor special announcements and trendy recipes!
TELL US WHAT YOU THINK!

natural_image
Silhouette of a person with five stars above a speech bubble (no text or symbols)Rate, review or ask us a question.
GO TO: bellahousewares.com
myBELLAlife


Table Of Contents
Important Safeguards....2
Additional Important Safeguards....3
Notes On The Plug....3
Notes On The Cord....3
Plasticizer Warning....3
Electric Power....3
Getting To Know Your Bubble Waffle Maker....4
Before Using For The First Time 4
Using Your Bubble Waffle Maker 4-5
Tips For Perfectly Baked Waffles ....5
Cleaning And Maintenance....6
Steps For Stain Removal and Proper Care of Your Non-Stick Coating....6
Storing Instruction 6
Recipes....7
Warranty 8
Índice
WARNING: When using electrical appliances, basic safety precautions should always be followed, including the following:
-
READ ALL INSTRUCTIONS BEFORE USING APPLIANCE.
-
Do not touch hot surfaces. Use handles or knobs.
-
To protect against risk of electric shock, do not immerse or partially immerse the cord, plugs, or the entire unit in water or any other liquid.
-
This appliance is not intended for use by persons (including children) with reduced physical, sensory or mental capabilities, or lack of experience and knowledge, unless they have been given supervision or instruction concerning use of the appliance by a person responsible for their safety.
-
Close supervision is necessary when any appliance is used by or near children.
-
Unplug from wall outlet when not in use and before cleaning. Allow to cool before cleaning or storing this appliance.
-
Never yank the cord to disconnect the appliance from the outlet. Instead, grasp the plug and pull to disconnect.
-
Do not operate any appliance with a damaged cord or plug or after the appliance malfunctions or is dropped or damaged in any manner. Bring the appliance to a qualified service agent for examination, repair or electrical/mechanical adjustment to avoid hazard.
-
The use of accessories attachments not recommended by the appliance manufacturer may cause fire, electrical shock or injuries.
-
Do not use outdoors. This is for household only.
-
Do not use for commercial purposes.
-
Do not let the electrical cord hang over the edge of the table or counter, or touch hot surfaces.
-
Do not allow appliance to come into contact with any materials that are flammable such as draperies, walls, etc.
-
Do not place on or near a hot gas or electric burner or in a heated oven.
-
Use on a heat-resistant, flat level surface only.
-
Extreme caution must be used when moving an appliance containing hot food, hot water, hot oil or other hot liquids.
-
The cord to this appliance should be plugged into a 120V AC electrical outlet only.
-
A short power-supply cord is to be provided to reduce the risk resulting from becoming entangled in or tripping over a longer cord.
-
To disconnect, remove plug from outlet.
-
Always unplug after use. The appliance will remain ON unless unplugged.
-
CAUTION HOT SURFACES: This appliance generates heat during use. Proper precautions must be taken to prevent the risk of burns, fire or other damage to persons or property.
-
When using this appliance, provide adequate ventilation above and on all sides for air circulation. Do not allow this appliance to touch curtains, wall coverings, clothing, dish towels or other flammable materials during use.
-
Do not use appliance for other than intended use. Use with wall receptacle only.
FOR HOUSEHOLD USE ONLY SAVE THESE INSTRUCTIONS ADDITIONAL IMPORTANT SAFEGUARDS
CAUTION: This appliance is hot during operation and retains heat for some time after turning OFF. Always use oven mitts when handling hot materials and allow metal parts to cool before cleaning. Do not place anything on top of the appliance while it is operating or while it is hot.
- All users of this appliance must read and understand this Instruction Manual before operating or cleaning this appliance.
- Do not leave this appliance unattended during use.
Notes on the Plug
This appliance has a polarized plug (one blade is wider than the other). To reduce the risk of electric shock, this plug will fit in a polarized outlet only one way. If the plug does not fit fully into the outlet, reverse the plug. If it still does not fit, contact a qualified electrician. Do not modify the plug in any way.
Notes on the Cord
A. A short power-supply cord (or detachable power-supply cord) is to be provided to reduce the risk resulting from becoming entangled in or tripping over a longer cord.
B. Longer detachable power-supply cords or extension cords are available and may be used if care is exercised in their use.
C. If a long detachable power-supply cord or extension cord is used :
- The marked electrical rating of the cord or extension cord should be at least as great as the electrical rating of the appliance;
- If the appliance is of the grounded type, the extension cord should be a grounding-type3-wire cord; and
- The longer cord should be arranged so that it does not drape over the countertop or table top where it can be pulled on by children or tripped over unintentionally.
Plasticizer Warning
CAUTION: To prevent Plasticizers from migrating to the finish of the counter top or table top or other furniture, place NON-PLASTIC coasters or place mats between the appliance and the finish of the counter top or table top. Failure to do so may cause the finish to darken; permanent blemishes may occur or stains can appear.
Electric Power
If the electrical circuit is overloaded with other appliances, your appliance may not operate properly. It should be operated on a separate electrical circuit from other appliances.
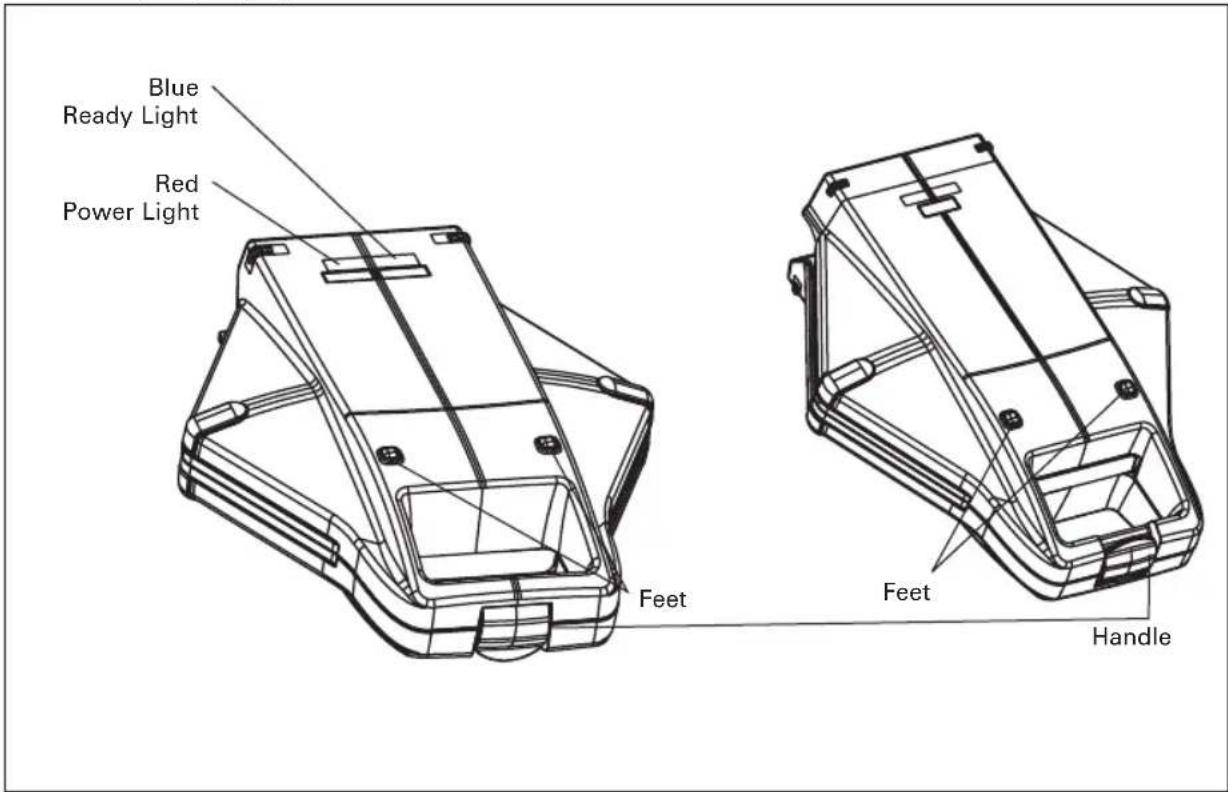
Getting To Know Your Bubble Waffle Maker
Product may vary slightly from illustration
Before Using For The First Time
- Remove all parts included in the box.
NOTE: Your Bubble Waffle Maker may emit a small amount of smoke and/or odor when you use it for the first time. This is normal and harmless, however we recommend that you do not eat the first waffle you make with the Bubble Waffle Maker.
Using Your Bubble Waffle Maker
- Plug the cord into your 120 V AC wall outlet. The Red Power Light will turn on indicating the appliance is preheating.
- The Blue Ready Light will turn on when the appliance reaches proper cooking temperature. This should take approximately 3 minutes. Once heated, ready times will be faster
- When the Blue Ready Light turns on, open the Bubble Waffle Maker, and apply a light layer of vegetable oil, olive oil or canola oil to the cooking plates. Pour and spread the waffle batter evenly onto the lower plate so that the batter fills the lower plate and the peak areas of the plate are covered.
Note: A silicone spatula can be used to spread batter evenly and ensure corners are filled properly.
CAUTION: DO NOT USE COOKING SPRAYS. THEY CAN CAUSE A BUILD-UP ON THE COOKING PLATES AND MAY AFFECT THE NON-STICK PERFORMANCE OF THE PRODUCT.
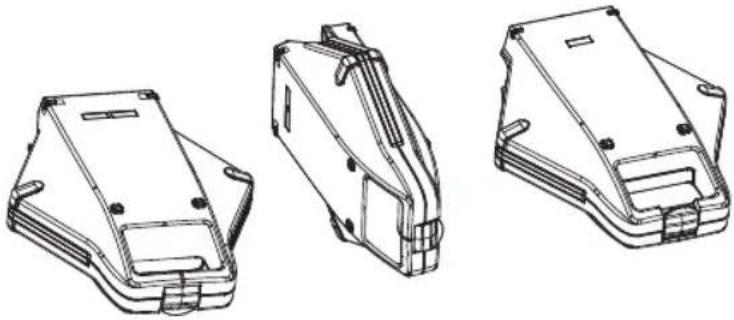
- Close the Bubble Waffle Maker and using the handle, rotate the waffle maker as illustrated. This flipping operation will allow the batter to flow to the other cooking plate. (See Figure 2)
Figure 2
1.2.3.
natural_image
Three technical line drawings of a mechanical housing component, showing front, side, and top views (no text or symbols)-
Bake until Blue light goes On. Rotate the Bubble Waffle Maker back and open to take the waffle out. NOTE: Do not open the Bubble Waffle Maker for at least 1 min 30 seconds. This can cause the under-cooked waffles to break and they can be difficult to remove from the plates.
-
If the waffles are not dark enough, close the Bubble Waffle Maker and then wait another 15 seconds. Repeat as needed.
-
When you are satisfied with your waffles, use a non-metallic utensil to remove them from the heating plates.
NOTE: To create a cone shape, roll the bubble waffle and place it in the included cone rack to cool.
-
To make more waffles, repeat from step 3.
-
When finished baking waffles remove plug from wall outlet.
-
After it has sufficiently cooled, the heating plates may be wiped clean.
Tips For Perfectly Baked Waffles
-
Stir your waffle batter only until large chunks of dry ingredients are dissolved. Over mixing the waffle batter can cause the waffles to be hard.
-
The exact amount of batter needed to make perfect full-sized waffles depends on the type and consistency of the batter. Use the same ladle or measuring cup each time to determine how much batter you need to fill the lower plate fully so as to cover the peaks in the plate.
-
When making softer variety of waffles, once they are baked, support them with a spatula at the bottom so it is easier to take them out from the plates, since softer waffles can break easily.
-
For a cone shape bubble waffle, bend the Bubble Waffle and leave it to cool in the cone rack (accessory included) and fill it with your chosen ingredients. When making large batches to serve at once, you can keep the waffles fresh & crisp by placing them in a preheated oven at 200°F. Take them out using oven mitts when you are ready to serve.
-
To avoid waffles with a moist base, kept the waffles on a wire cooling rack. This will retain the crispness of the waffles.
-
Bubble waffles are best served in a tall glass or a small paper cone.
-
You can reheat your waffles in the Bubble Waffle Maker. Pre-heat the Bubble Waffle Maker place the waffles on the lower plate so they fit the grooves correctly, then close the Bubble Waffle Maker and heat for 1 to 2 minutes, checking every 30 seconds to avoid burning.
-
You can also freeze your waffles to eat later. After the freshly baked waffles have cooled completely, pack them in a covered container or plastic freezer bag. Make sure to separate the waffles with a sheet of wax paper between each waffle. To reheat the frozen waffles, place in a pre-heated oven, toaster oven or toaster until they are hot.
-
For extra crispy Bubble waffles, beat egg yolks, blend with flour and other ingredients and then, gently with folding movements, add beaten egg whites into the batter.
Cleaning and Maintenance
- Always turn off the appliance, unplug it, and allow it to cool down before cleaning.
- You can easily remove any excess oils or crumbs without disassembling the appliance.
NOTE: NEVER SUBMERGE THE APPLIANCE IN WATER OR PLACE IT IN THE DISHWASHER.
- For best results and preserve the non-stick coating longer, use nylon, plastic, wooden or rubber utensils.
- Use a soft cloth on the heating plates and occasionally a metal polish intended for stainless steel on the outer housing. Never use abrasive scouring pads or steel wool.
- If there is hardened batter on the plates, pour a little oil and let it sit for about 5-7 minutes. You can then wipe clean with a paper towel.
- Do not use the Bubble Waffle Maker for anything other than making waffles.
This appliance requires little maintenance. It contains no user serviceable parts. Do not try to repair it yourself. Any servicing requiring disassembly other than cleaning must be performed by a qualified appliance repair technician.
Steps For Stain Removal and Proper Care of Your Non-Stick Coating
- Identify stained areas on the cooking surface and sprinkle some baking soda on the stains.
- Moisten the baking soda to get a paste like texture by adding some water.
- Let the paste stand for a few minutes on the stains (not more than an hour)
- Rub with a soft damp cloth or lightly scrub with a plastic scouring pad, wipe clean and dry thoroughly.
NOTE: Do not rub vigorously when using a plastic scouring pad and NEVER use a metal scouring pad as this may damage the non-stick coating. - Repeat the cycle once again if necessary. The performance and non-stick property of the coating will not be affected due to stains.
Storing Instructions
- Unplug unit and allow to cool. Never store the Bubble Waffle Maker while it is hot or still plugged in.
- Clean the Bubble Waffle Maker before storing.
- Store the clean Bubble Waffle Maker in its box vertically or in a clean, dry place (See Figure 3).
Figure 3

natural_image
Technical line drawing of a mechanical component with symmetrical supports and central shaft (no text or symbols)Recipes
Classic Bubble Waffles
Makes 3 waffles
• 1 1/8 cup all-purpose flour
• 1 teaspoon baking powder
• 1 tablespoon custard powder
- 14 cup tapioca starch
- 2 eggs
• 2 tablespoons evaporated milk
• 1 1/8 cup water
• 2 tablespoons vegetable oil
• 1 tablespoon vanilla extract
•
- 1 1/8 cup sugar
- In a bowl mix the plain flour, baking powder, custard powder and topica starch. Set aside.
- In a separate bowl, beat the eggs and mix in the white sugar.
- Gradually add in the evaporated milk and water to the egg mixture.
- Add the flour mixture (1) into the egg mixture (2). Stir thoroughly to make a smooth batter. It is important that it does not form lumps.
- Add the vanilla extract and the vegetable oil and mix well.
- Cover the batter and refrigerate for at least an hour.
- Take the bubble waffle batter out from the fridge 30 min prior to using; allowing it to return to room temperature.
- Pour some batter into the Bubble Waffle maker. The longer you cook the waffle, the crispier it will be.
- Once baked, place it on a cake cooling rack to cool or gently shape it into a cone and allow it to cool completely in the cone rack.
- You can fill them with ice cream, fruits or anything you like. The Bubble Waffles are best served in a tall glass or small paper cone.
Chocolate Bubble Waffle
To make chocolate waffles, use the Classic Bubble waffle recipe and add 2 tablespoons of cocoa powder.
Matcha Bubble Waffle
Makes 4 waffles
• 1 cup all-purpose flour
- 1/3 cup sugar
- 1/4 cup corn flour
• 2 teaspoon baking matcha
• 1 teaspoon baking powder
- 1/4 cup instant custard powder (optional but recommended)
- Pinch of salt
- 3 eggs
• 1 teaspoon vanilla extract
• 1/2 cup evaporated milk -
1/2 cup water
• 2 tablespoons vegetable oil -
In a bowl, mix together the all-purpose flour, corn flour, baking matcha, baking powder, salt, and custard powder, if using.
- In another bowl, whisk the eggs and sugar. Add the vanilla and, while still whisking, incorporate the evaporated milk, water, and oil.
- Mix the liquid with the dry ingredients until completely combined. Refrigerate the mix for an hour. Before use, bring the batter out of the fridge for a few minutes.
- Once baked, roll your waffles into cones and place into the cone rack to cool or cover them with your favorite toppings. Fresh strawberries and chocolate sauce are a classic.
Bubble Sandwich Bread
For the ultimate Bubble sandwich bread, use the Classic Bubble waffle recipe but add less sugar. What you put in-between is up to you. Be creative and use fried chicken, scrambled eggs, bacon, etc
Limited TWO-YEAR Warranty
SENSIO Inc. hereby warrants that for a period of TWO YEARS from the date of purchase, this product will be free from mechanical defects in material and workmanship, and for 90 days in respect to non-mechanical parts. At its sole discretion, SENSIO Inc. will either repair or replace the product found to be defective, or issue a refund on the product during the warranty period.
The warranty is only valid for the original retail purchaser from the date of initial retail purchase and is not transferable. Keep the original sales receipt, as proof of purchase is required to obtain warranty validation. Retail stores selling this product do not have the right to alter, modify, or in any way revise the terms and conditions of the warranty.
EXCLUSIONS:
The warranty does not cover normal wear of parts or damage resulting from any of the following: negligent use of the product, use of improper voltage or current, improper routine maintenance, use contrary to the operating instructions, disassembly, repair, or alteration by anyone other than qualified SENSIO Inc. personnel. Also, the warranty does not cover Acts of God such as fire, floods, hurricanes, or tornadoes.
SENSIO Inc. shall not be liable for any incidental or consequential damages caused by the breach of any express or implied warranty. Apart from the extent prohibited by applicable law, any implied warranty of merchantability or fitness for a particular purpose is limited in time to the duration of the warranty. Some states, provinces or jurisdictions do not allow the exclusion or limitation of incidental or consequential damages, or limitations on how long an implied warranty lasts, and therefore, the above exclusions or limitations may not apply to you. The warranty covers specific legal rights which may vary by state, province and/or jurisdiction.
HOW TO OBTAIN WARRANTY SERVICE:
You must contact Customer Service at our toll-free number: 1-866-832-4843. A Customer Service Representative will attempt to resolve warranty issues over the phone. If the Customer Service Representative is unable to resolve the problem, you will be provided with a case number and asked to return the product to SENSIO Inc. Attach a tag to the product that includes: your name, address, daytime contact telephone number, case number, and description of the problem. Also, include a copy of the original sales receipt. Carefully package the tagged product with the sales receipt, and send it (with shipping and insurance prepaid) to SENSIO Inc.'s address. SENSIO Inc. shall bear no responsibility or liability for the returned product while in transit to SENSIO Inc.'s Customer Service Center.
natural_image
Technical line drawings of three views of a mechanical component housing (no text or symbols)natural_image
Technical line drawing of a mechanical component with symmetrical supports and central shaft (no text or symbols)Recetas
natural_image
Abstract graphic with a heart and stylized letter 'C' (no text or symbols)GRACIAS
por su compra
REGISTRARSE

natural_image
Generic user profile icon with a plus sign, no text or symbols presentnatural_image
Silhouette of a person with a star rating system above, no text or symbols presentnatural_image
Three circular icons representing social media platforms: Facebook, Twitter, and YouTube (no text or symbols beyond logos)BellaLife

BellaLifestyle

bellahousewares.com
For customer service questions or comments Dudas o comentarios contactar el departamento de servicio al cliente
1-866-832-4843 / help@bellahousewares.com
Sensio Inc. New York, NY 10016/USA


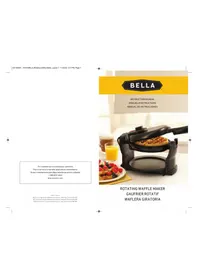
- BUBBLE WAFFLE MAKER
- WAFLERA DE BURBUJAS
- THANK YOU
- for your purchase
- myBELLAlife
- Table Of Contents
- Índice
- FOR HOUSEHOLD USE ONLY SAVE THESE INSTRUCTIONS ADDITIONAL IMPORTANT SAFEGUARDS
- Notes on the Plug
- Notes on the Cord
- Plasticizer Warning
- Electric Power
- Getting To Know Your Bubble Waffle Maker
- Before Using For The First Time
- Using Your Bubble Waffle Maker
- Tips For Perfectly Baked Waffles
- Cleaning and Maintenance
- NOTE: NEVER SUBMERGE THE APPLIANCE IN WATER OR PLACE IT IN THE DISHWASHER.
- Steps For Stain Removal and Proper Care of Your Non-Stick Coating
- Storing Instructions
- Recipes
- Classic Bubble Waffles
- Makes 3 waffles
- Chocolate Bubble Waffle
- Matcha Bubble Waffle
- Makes 4 waffles
- Bubble Sandwich Bread
- Limited TWO-YEAR Warranty
- EXCLUSIONS:
- HOW TO OBTAIN WARRANTY SERVICE:
- Recetas
- GRACIAS
- por su compra
- REGISTRARSE
Brand : BELLA
Model : Bubble Waffle Maker
Category : Waffle Maker