USER MANUAL XA60 CANON
4 Accessories and Compatible Cameras Mentioned in this User Guide
5 Communications
5 GP-E2 GPS Receiver
7 Added Functionality and Lens Compatibility
7 TL-H58 / TL-U58 Tele-converter
9 WA-H58 / WA-U58 Wide Attachment
12 Shooting Styles and Configuration
12 HDU-1 / HDU-3 Handle Unit
Introduction
This user guide covers optional accessories compatible with Canon cameras. It provides information about how to use the accessories, their compatibility and specifications. Be sure to read this information in addition to the supplied instruction manuals to use the products correctly.
Before Using the Accessories
- Unless specified otherwise, power to the accessories is supplied by the camera.
- Your camera may not support all the camera features and functions described in this guide. Refer also to the instruction manual of the camera being used.
- Some of the accessories and tools mentioned in this guide may be supplied with some camera models. Check the list of supplied accessories in the instruction manual of the camera being used. If an accessory/tool is not supplied with the camera or with the product being explained, please use an optional accessory or commercially available product.

- Be careful not to drop the camera or accessories when attaching, removing or adjusting the various accessories. Use a table or other stable surface.
- Do not connect/attach accessories to cameras and devices that are not compatible with them.
Conventions in this Document
Important precautions related to the product's operation.
Additional information that complements the basic operation procedures.
- Reference page number in this document.
- "Camera" refers to a compatible Canon camera or camcorder (4).
- This is a multilingual document. You can click on the language code on any page to return to the beginning of the guide (Table of Contents) in that language.
EN
The information in this document is verified as of September 2022. Subject to change without previous notice.
Accessories and Compatible Cameras Mentioned in this User Guide
The following table lists the main accessories that extend the camera's functionality.
| Accessory XF705 XF605 | | | XA75 /
XA70 | XA65 /
XA60 | XA55 /
XA50 | XA45 /
XA40 | □ |
| Communications |
| GP-E2 GPS Receiver ● ● ● ● ● ● ● ● ● ● ● ● ● ● ● ● ● ● ● ● ● ● ● ● ● ● ● ● ● ● ● ● ● ● ● ● ● ● ● ● ● ● ● ● ● ● ● ● ● ● ● ● ● ● ● ● ● ● ● ● ● ● ● ● ● ● ● ● ● ● ● ● ● ● ● ● ● ● ● ● ● ● ● ● ● ● ● ● ● ● ● ● ● ● ● ● ● ● ● ●● ● ● ● ● ● ● ● ● ● ● ● ● ● ● ● ● ● ● ● ● ● ● ● ● ● ● ● ● ● ● ● ● ● ● ● ● ● ● ● ● ● ● ● ● ● ● ● ● ● ● ● ● ● ● ● ● ● ● ● ● ● ● ● ● ● ● ● ● ● ● ● ● ● ● ● ● ● ● ● ● ● ● ● ● ● ● ● ● ● ● ● ● ● ● ● ● ● ● ● —* ● —* ● —* ● —* ● —* ● —* ● —* ● —* ● —* ● —* ● —* ● —* ● —* ● —* ● —* ● —* ● —* ● —* ● —* ● —* ● —* ● —* ● —* ● —* ● —* ● —* ● —* ● —* ● —* ● —* ● —* ● —* ● —* ● —*● ● —* ● —* ● —* ● —* ● —* ● —* ● —* ● —* ● —* ● —* ● —* ● —* ● —* ● —* ● —* ● —* ● —* ● —* ● —* ● —* ● —* ● —* ● —* ● —* ● —* ● —* ● —* ● —* ● —* ● —* ● —* ● —* ● —* · | ● ● ● ● ● ● ● ● ● ● ● ● ● ● ● ● ● ● ● ● ● ● ● ● ● ● ● ● ● ● ● ● ● ● ● ● ● ● ● ● ● ● ● ● ● ● ● ● ● ● ● ● ● ● ● ● ● ● ● ● ● ● ● ● ● ● ● ● ● ● ● ● ● ● ● ● ● ● ● ● ● ● ● ● ● ● ● ● ● ● ● ● ● ● ● ● ● ● ●●●●●●●●●●●●●●●●●●●●●●●●●●●●●●●●●●●●●●●●●●●●●●●●●●●●●●●●●●●●●●●●●●●●●●●●●●●●●●●●●●●●●●●●●●●●●●●●●●●●●▪ | 5 | | | | | |
| Added Functionality and Lens Compatibility |
| RC-V100 Remote Controller ● ● ● ● ● ● ● ● ● ● ● ● ● ● ● ● ● ● ● ● ● ● ● ● ● ● ● ● ● ● ● ● ● ● ● ● ● ● ● ● ● ● ● ● ● ● ● ● ● ● ● ● ● ● ● ● ● ● ● ● ● ● ● ● ● ● ● ● ● ● ● ● ● ● ● ● ● ● ● ● ● ● ● ● ● ● ● ● ● ● ● ● ● ● ● ● ● ● ● �●●●●●●●●●●●●●●●●●●●●●●●●●●●●●●●●●●●●●●●●●●●●●●●●●●●●●●●●●●●●●●●●●●●●●●●●●●●●●●●●●●●●●●●●●●●●●●●●●●● | | | | | | | |
| RC-IP100 Remote Camera Controller ● - * | | | | | | | |
| WL-D89 Wireless Controller ● - * | | | | | | | |
| WL-D6000 Wireless Controller ● - * | | | | | | | |
| TL-H58 / TL-U58 Tele-converter | TL-U58 | TL-U58 | TL-U58 | TL-H58 | TL-U58 | TL-H58 | 7 |
| WA-H58 / WA-U58 Wide Attachment | WA-U58 | WA-U58 | WA-U58 | WA-H58 | WA-U58 | WA-H58 | 9 |
| Shooting Styles and Configuration |
| HDU-1 / HDU-3 Handle Unit | | | | | HDU-3 | HDU-1 | 12 |
- For details see the instruction manual of the camera and the accessory in use.
Communications
GP-E2 GPS Receiver
Connect the GPS receiver to the camera's multi-function shoe or USB terminal in CAMERA (shooting) mode to have the GPS information (latitude, longitude, altitude) recorded with the metadata of clips and photos. If you connect the receiver to the camera's USB terminal, while recording, it is recommended to place the receiver in the supplied carrying case and attach it to the camera's grip belt or carry it on your person. An AA battery is required to use the GP-E2.
For details about attaching and configuring the receiver, refer to the GP-E2's instruction manual.
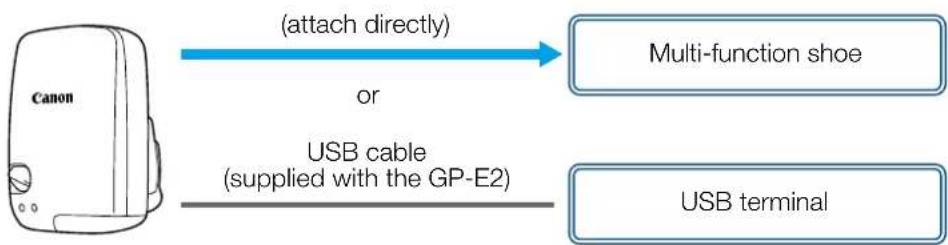
When using a camera with a Type-C USB terminal, an IFC-40AB III or IFC-150AB III Interface Cable (sold separately) is required. Depending on the camera, it may be necessary to adjust the USB terminal settings. For details, refer to the instruction manual of the camera being used.
| Recording format | GPS information (latitude, longitude, altitude) | Coordinated universal time (UTC) |
| Clips | MP4 ● | ● | |
| XF-AVC* ● - | | |
| Photos ● | ● | | |
- You can use the GPS information to search and organize clips using Canon XF Utility.
Connecting and Activating the GPS Receiver
1. Turn off the receiver.
2. Connect the receiver to the camera.
- Use the camera's multi-function shoe, the USB cable supplied with the GP-E2 or an optional interface cable.
3. Turn on the receiver.
- The GPS function is activated. The icon appears on the screen and will flash as the receiver tries to acquire satellite signals.
- When satellite signals are correctly acquired, the icon will stay continuously on. Clips and photos recorded after that will be geotagged.

- Do not connect the GP-E2 to the camera's multi-function shoe and the USB terminal at the same time.
- In certain countries/regions, the use of GPS may be restricted. Be sure to use the GPS receiver in accordance with local laws and regulations of the country/region where the receiver is used. Be particularly careful when traveling outside of your home country.
- Be careful about using GPS functions where the operation of electronic devices is restricted.
- The GPS information recorded with clips and photos may contain data that can lead others to locate or identify you. Be careful when sharing geotagged recordings with others or when uploading them to the Web.
- Do not leave the receiver near strong electromagnetic fields such as near powerful magnets and motors.

Added Functionality and Lens Compatibility
TL-H58 / TL-U58 Tele-converter
Using the TL-H58/TL-U58 Tele-converter with a Canon camera increases the focal length of the camera lens by a factor of approximately 1.5. Depending on the camera, the image stabilization method and the minimum object distance may change. For details about the various functions, refer to the instruction manual of the camera being used.
Supplied Accessories
Soft case
Lens cap
Dust cap
Attaching a Tele-converter to the Camera
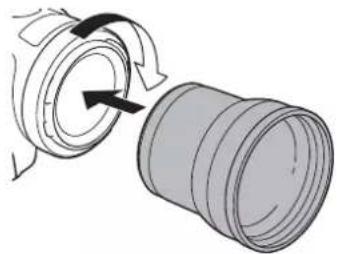
This section explains how to attach a tele-converter to the camera, using the TL-U58 as an example. You can attach the TL-H58 following the same steps.
Screw the Tele-converter fully into the lens filter thread.

- Do not point the lens at the sun when the tele-converter is attached to the camera. This may damage the camera.
- Other filters and the camera's lens hood cannot be used together with the tele-converter.
- Use a tripod to prevent motion blur.
- Clean the surfaces of the tele-converter and the camera's lens before use. Otherwise, the camera may focus incorrectly on dust particles or other matter on the lens surfaces.
- Using the tele-converter may obstruct the front tally lamp, reduce the effective range of the wireless controller or cause a shadow to appear when recording using an optional video light.
- Not all camera models feature a tally lamp or are compatible with optional video lights.
- When recording at full wide-angle (W) with the tele-converter attached, depending on the camera model, the frame of the lens may appear around the outer edge of the picture.
- Take care when handling the tele-converter, to avoid smudging and fingerprints.
- Do not store the tele-converter in a humid place. It may mold.
- We recommend you attach the tele-converter to the camera before adjusting the white balance.
Specifications
| Tele-converter |
| TL-H58 TL-U58 | |
| Magnification 1.5× 1.5× | | |
| Lens construction 5 elements in | 3 groups 5 elements in 3 groups | |
| Filter diameter 58 mm 58 mm | | |
| Dimensions | Ø 69 × 64 mm (length) (2.7 × 2.5 in.) | Ø 79 × 69 mm (length) (3.1 × 2.7 in.) |
| Weight Approx. 273 g (9.6 oz.) | Approx. 350 g (12.3 oz.) | |
TL-H58 Detailed Measurements
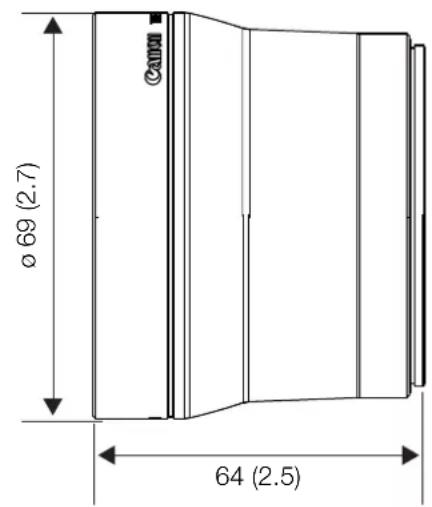
mm (inches)
TL-U58 Detailed Measurements
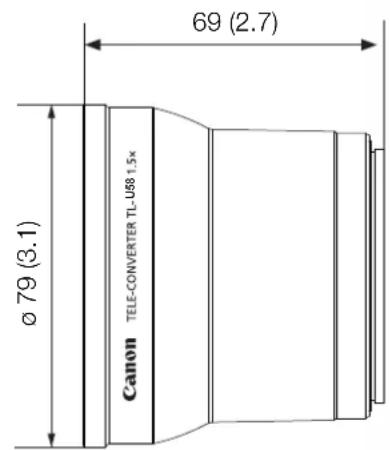
mm (inches)
The WA-H58/WA-U58 Wide Attachment allows you to record movies and take photos covering a wider angle of view. Depending on the camera, the image stabilization method and the minimum object distance may change. For details about the various functions, refer to the instruction manual of the camera being used.
Supplied Accessories
Soft case
Lens cap
Dust cap
Hood
Attaching a Wide Attachment to the Camera
This section explains how to attach a wide attachment to the camera, using the WA-U58 as an example. You can attach the WA-H58 following the same steps.
- Remove the lens hood supplied with the camera and screw the wide attachment fully into the lens filter thread (①).
-
Attach the hood supplied with the wide attachment to the front of the wide attachment and tighten the locking screw (②).
-
Attach the hood straight, paying attention not to warp it. If the hood is bent out of shape, its shadow may appear in the picture.
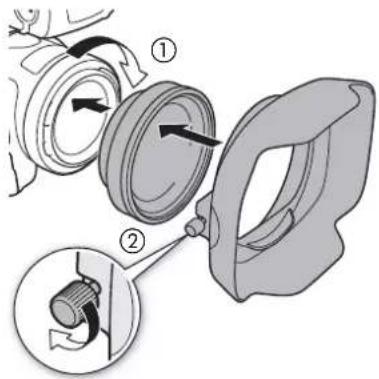

- Using the wide attachment, the outer periphery of the image may appear warped.
- Other filters and the camera's lens hood cannot be used together with the wide attachment.
- Clean the surfaces of the wide attachment and the camera's lens before use. Otherwise, the camera may focus incorrectly on dust particles or other matter on the lens surfaces.
- Using the wide attachment may obstruct the front tally lamp, reduce the effective range of the wireless controller or cause a shadow to appear when recording using an optional video light.
- Not all camera models feature a tally lamp or are compatible with optional video lights.
- Take care when handling the wide attachment to avoid smudging and fingerprints.
- Make sure to attach the lens cap when storing the wide attachment.
- Do not store the wide attachment in a humid place. It may mold.
- When adjusting the white balance, it is recommended to attach the wide attachment to the camera first and then adjust the white balance.
Specifications
| Wide Attachment |
| WA-H58 WA-U58 | |
| Magnification Approx. 0.75× Approx. 0.8× | |
| Lens construction 2 elements in | 2 groups 2 elements in 2 groups | |
| Filter diameter 58 mm 58 mm | | |
| Dimensions Ø 79 × 28 mm (length) | (3.1 × 1.1 in.) (without the hood) | Ø 85 × 33 mm (length) |
| Dimensions Ø 79 × 28 mm (length) | 144 × 102 × 68 mm | (3.3 × 1.3 in.) (without the hood) |
| Dimensions Ø 79 × 28 mm (length) | (W × H × D) (5.7 × 4.0 × 2.7 in.) | 150 × 106 × 72 mm |
| Dimensions Ø 79 × 28 mm (length) | (with the hood attached) | (W × H × D) (5.9 × 4.2 × 2.8 in.) (with the hood attached) |
| Weight 260 g (9.2 oz.) (without the hood) | 310 g (10.9 oz.) (with the hood attached) | 325 g (11.5 oz.) (without the hood) |
| Weight 260 g (9.2 oz.) (without the hood) | 380 g (13.4 oz.) (with the hood attached) | 380 g (13.4 oz.) (with the hood attached) |
WA-H58 Detailed Measurements
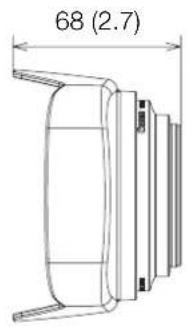
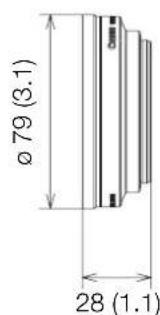
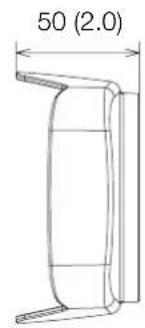
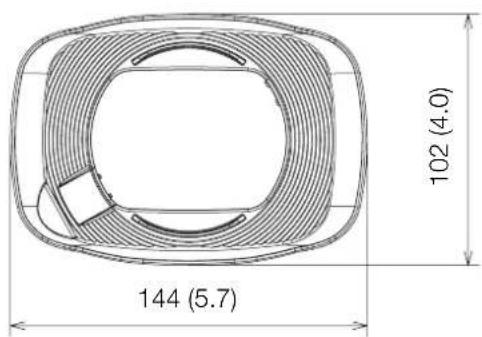
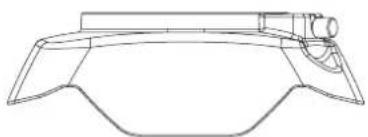
mm (inches)
WA-U58 Detailed Measurements
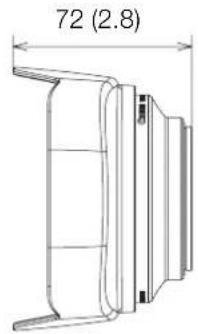
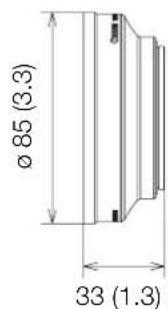
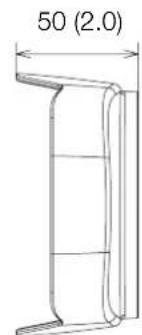
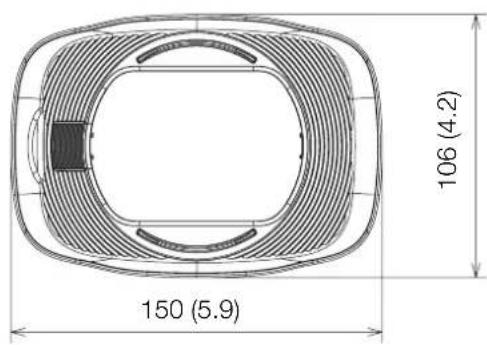
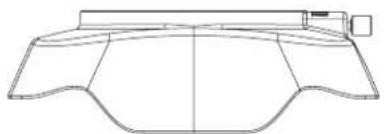
mm (inches)
Shooting Styles and Configuration
HDU-1 / HDU-3 Handle Unit
By connecting the handle unit to the camera, you can use the INPUT terminal, the infrared light and the tally lamp.
For details on how to attach and use the handle unit, see the instruction manual of the camera being used.

Names of Parts
HDU-1
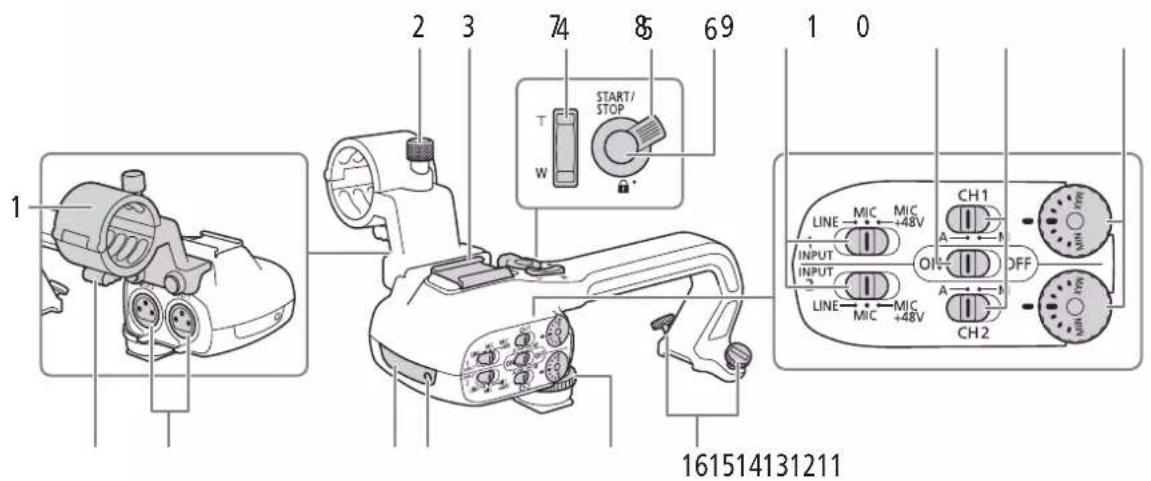
1 Microphone holder unit
2 Microphone lock screw
3 Accessory shoe
4 Handle zoom rocker
5 START/STOP lock (A) lever
6 START/STOP button
7 Sensitivity selection switches for INPUT 1 and INPUT 2
8 INPUT terminal ON/OFF switch
9 Audio level switches for CH1 and CH2
10 Audio level dials for CH1 and CH2
11 Microphone cable clamp
12 INPUT 1 and INPUT 2 terminals
13 Infrared light
14 Tally lamp
15 Handle unit front screw
16 Handle unit rear screws
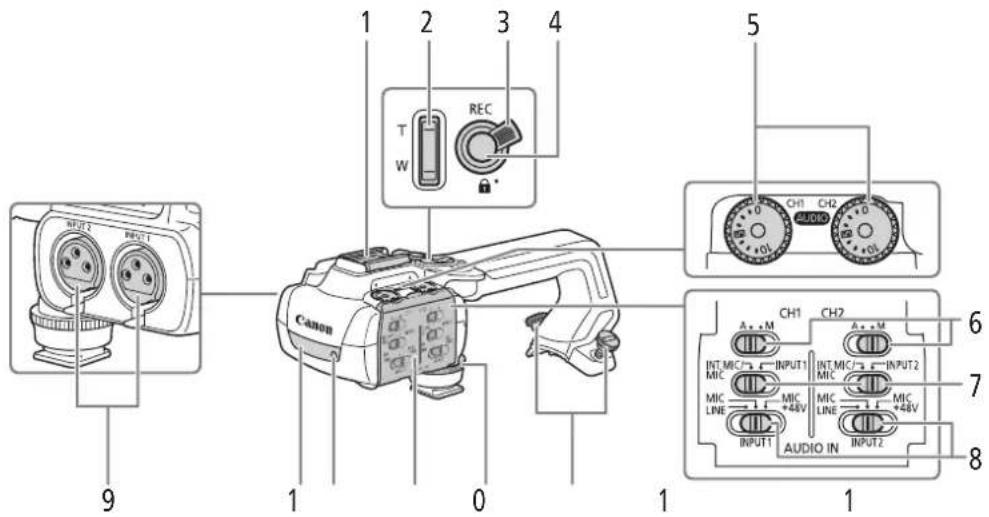
1 Cold shoe
2 Handle zoom rocker
3 REC button's lock (h) lever
4 REC (start/stop recording video) button
5 Audio level dials: for CH1 (left) and CH2 (right)
6 Audio level switches; for CH1 (left) and CH2 (right)
7 AUDIO IN switches (audio input selection); for CH1 (left) and CH2 (right)
8 INPUT 1 (left) / INPUT 2 (right) switches (audio source selection)
9 INPUT terminals: INPUT 1 (right), INPUT 2 (left)
10 Infrared light
11 Tally lamp
12 Audio controls cover
13 Handle unit front screw
14 Handle unit rear screws
Microphone Holder Unit (supplied with the HDU-3)
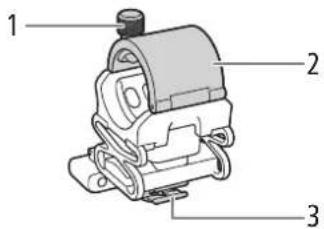
1 Microphone lock screw
2 Microphone holder
3 Microphone cable clamp
Attaching the Handle Unit
This section explains how to attach a handle-unit to the camera, using the HDU-3 as an example. You can attach the HDU-1 following the same steps.
-
Turn off the camera.
-
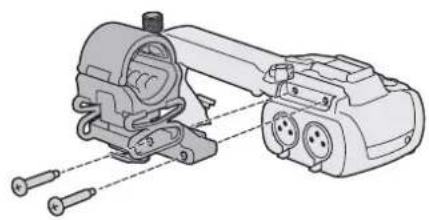
Attach the microphone holder unit to the handle unit.
-
Use a commercially available Phillips head ("crosshead") screwdriver and the two supplied screws.
-
Align the handle unit with the handle attachment unit and then slide the handle unit forward all the way.
-
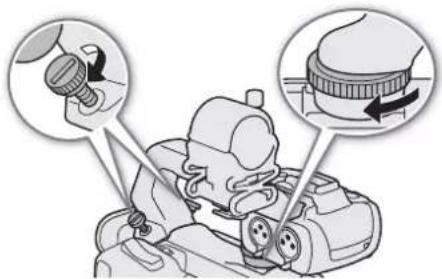
Firmly tighten the front and rear screws.
-
To tighten the rear screws you can use a coin or similar object.
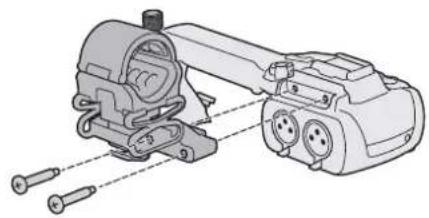
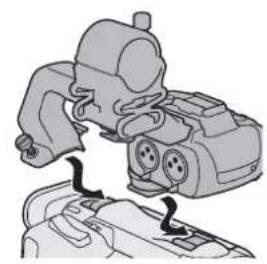
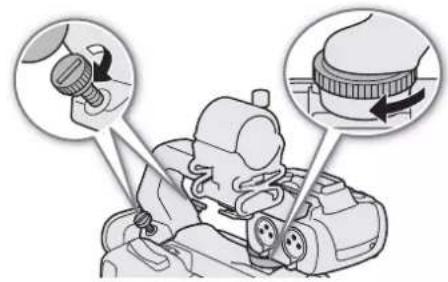
Specifications
| Handle Unit |
| HDU-1 HDU-3 | |
| INPUT 1, INPUT 2 terminals XLR | 3-pin jack (pin1: shield, pin2: hot, pin3: cold), 2 sets (balanced)Sensitivity:MIC setting: -60 dBu (volume center, full scale -18 dB)LINE setting: 4 dBu (volume center, full scale -18 dB)Attenuator: 20 dB |
| Operating temperature 0 °C – 40 °C (32 °F – 104 °F) |
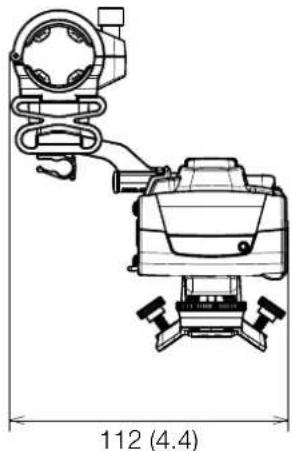
| Dimensions* (W × H × D) 112 × 115 × 180 mm(4.4 × 4.5 × 7.1 in.) | 112 × 139 × 197 mm(4.4 × 5.5 × 7.8 in.) |
| Weight* 253 g (8.9 oz.) 305 g (10.7 oz.) | |
- All dimensions and weights are approximate.
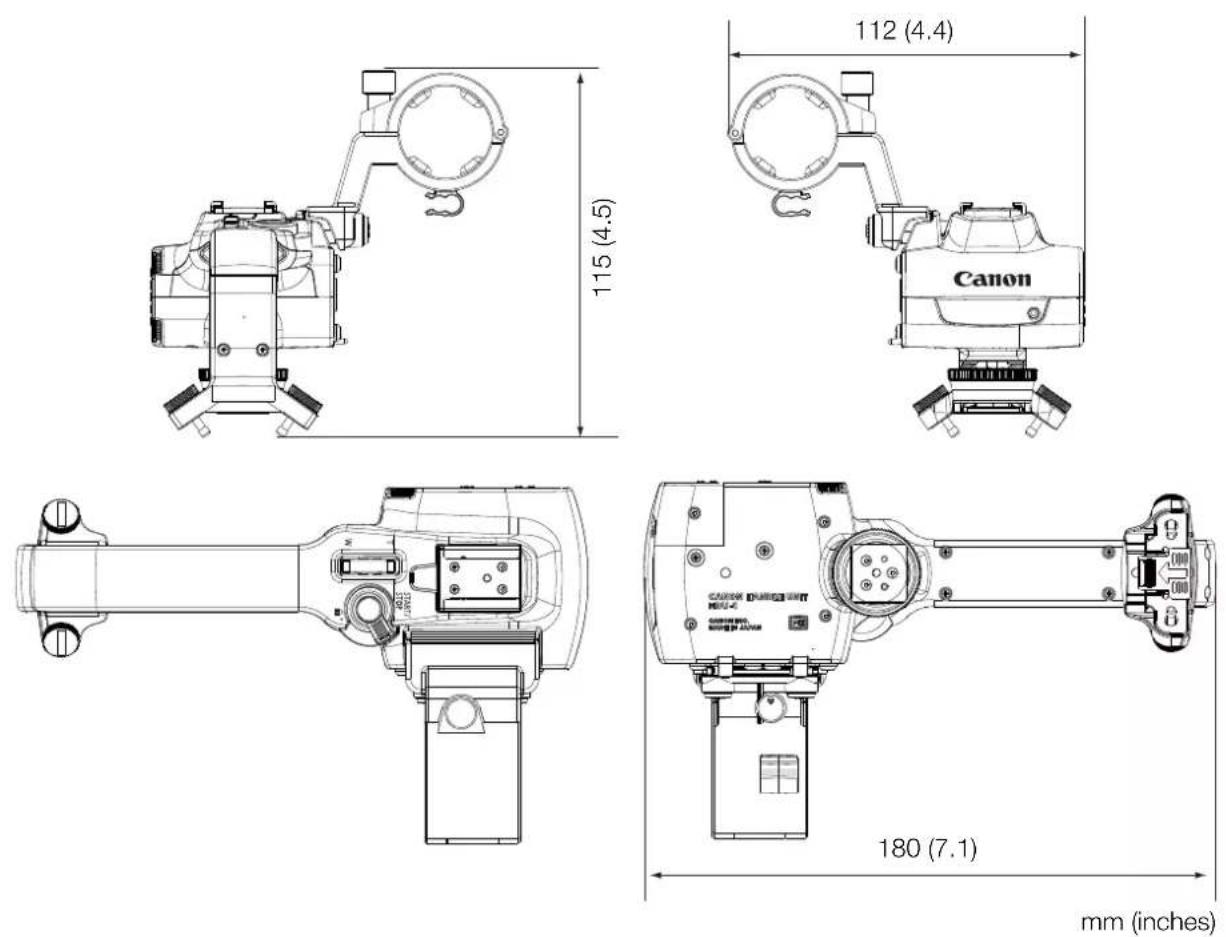
■HDU-1 Detailed Measurements
HDU-3 Detailed Measurements

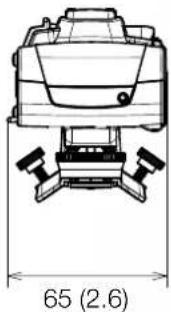
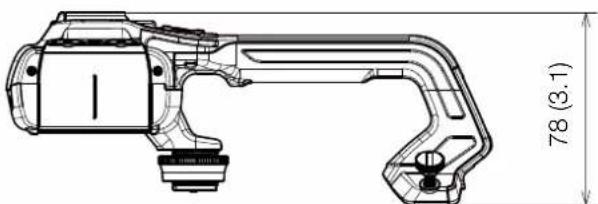
mm (inches)
Table des matieres
WA-H58 - misure dettagliate
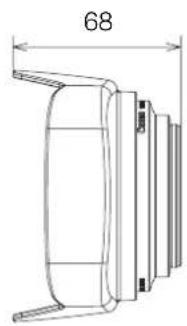
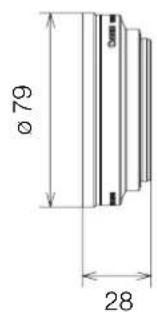
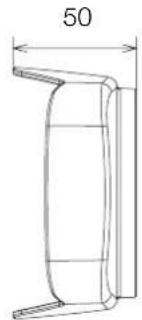
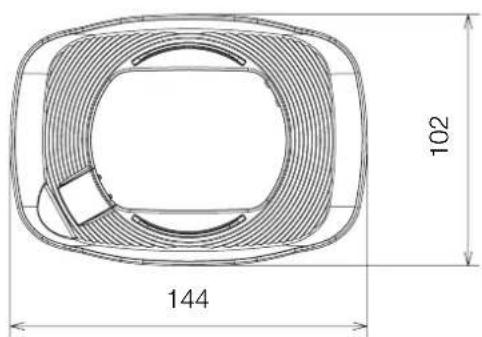
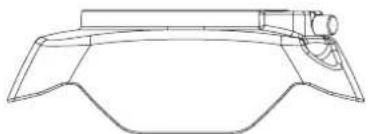
mm
WA-U58 - misure dettagiate
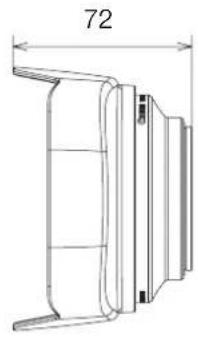
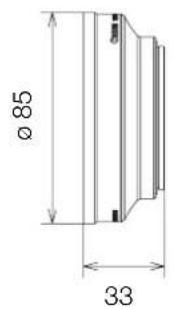
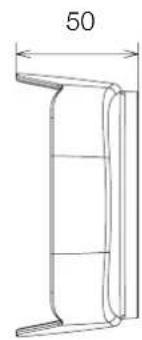
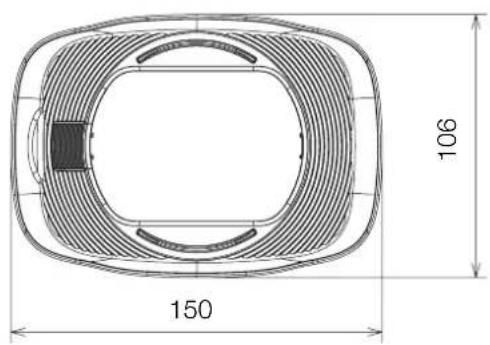
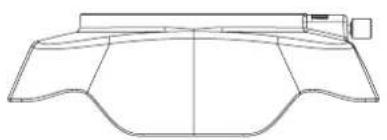
mm
1.BbIKIOuHTe KaMepy.
2.3akpenTe 6Iok depkaTeMa MkpofoHa Ha 6Ioke pyKoTKn.
- IcnoJIb3yIte KpeCTOByIO OTBepTKy (Phillips) n3 YnCna IMeOLuxCBA IIpoJaXe N DBa BnHTa N3 KOMJIeKTA NOCTABKN.
3.COBmecTnTe 6JOK pyKoTKn C 6JOKOM erO KpeIeHna, 3aTeM cDvHbTe 6JOK pyKoTKn BpePeDo ynpa.
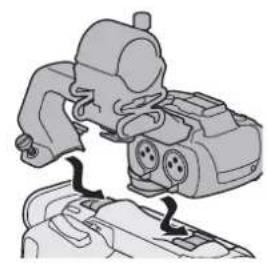
- Hadejxo 3aTaNHe nepeHn u 3aHn BnHTbl.
3aHHe BnHTb MoXHO 3aTMyTb C NOMOuBIO MOHETb IHaNoHrHOro npEmdeta.
TexHnueckne xapakTepeNCTnKu
6 S T A R T / S T O P
7 INPUT1和INPUT2的灵敏度选择开关
8 INPUT端子 ON/OFF开关