USER MANUAL MO6800S JUKI
TO ENSURE SAFE USE OF YOUR SEWING MACHINE
For the sewing machine, automatic machine and ancillary devices (hereinafter collectively referred to as "machine"), it is inevitable to conduct sewing work near moving parts of the machine. This means that there is always a possibility of unintentionally coming in contact with the moving parts. Operators who actually operate the machine and maintenance personnel who are involved in maintenance and repair of the machine are strongly recommended to carefully read to fully understand the following SAFETY PRECAUTIONS before using/maintaining the machine. The content of the SAFETY PRECAUTIONS includes items which are not contained in the specifications of your product.
The risk indications are classified into the following three different categories to help understand the meaning of the labels. Be sure to fully understand the following description and strictly observe the instructions.
(I) Explanation of risk levels
| DANGER :This indication is given where there is an immediate danger of death or serous injury if the person in charge or any third party mishandles the machine or does not avoid the dangerous situation when operating or maintaining the machine. |
| WARNING :This indication is given where there is a potentiality for death or serious injury if the person in charge or any third party mishandles the machine or does not avoid the dangerous situation when operating or maintaining the machine. |
| CAUTION :This indication is given where there is a danger of medium to minor injury if the person in charge or any third party mishandles the machine or does not avoid the dangerous situation when operating or maintaining the machine. |
| Items requiring special attention. |
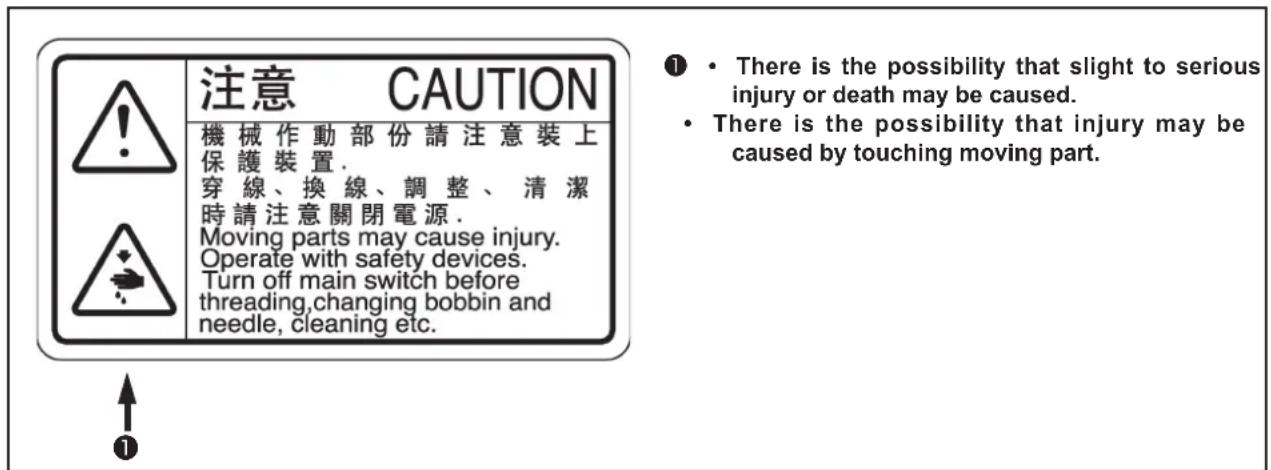
(II) Explanation of pictorial warning indications and warning labels
| Pictorial warning indication | | There is a risk of injury if contacting a moving section. | Pictorial warning indication | | Be aware that holding the sewing machine during operation can hurt your hands. |
| There is a risk of electrical shock if contacting a high-voltage section. | | There is a risk of entanglement in the belt resulting in injury. |
| There is a risk of a burn if contacting a high-temperature section. | | There is a risk of injury if you touch the button carrier. |
| Be aware that eye deficiency can be caused by looking directly at the laser beam. | Indication label | | The correct direction is indicated. |
| There is a risk of contact between your head and the sewing machine. | | Connection of a earth cable is indicated. |

DANGER
- When it is necessary to open the control box containing electrical parts, be sure to turn the power off and wait for five minutes or more before opening the cover in order to prevent accident leading to electrical shock.

CAUTION
Basic precaution
- Be sure to read the instruction manual and other explanatory documents supplied with accessories of the machine before using the machine. Carefully keep the instruction manual and the explanatory documents at hand for quick reference.
- The content of this section includes items which are not contained in the specifications of your product.
- Be sure to wear safety goggles to protect against accident caused by needle breakage.
- Those who use a heart pacer have to use the machine after consultation with a medical specialist.
Safety devices and warning labels
- Be sure to operate the machine after verifying that safety device(s) is correctly installed in place and works normally in order to prevent accident caused by lack of the device(s).
- If any of the safety devices is removed, be sure to replace it and verify that it works normally in order to prevent accident that can result in personal injury or death.
- Be sure to keep the warning labels adhered on the machine clearly visible in order to prevent accident that can result in personal injury or death. If any of the labels has stained or come unstuck, be sure to change it with a new one.
Application and modification
- Never use the machine for any application other than its intended one and in any manner other than that prescribed in the instruction manual in order to prevent accident that can result in personal injury or death. JUKI assumes no responsibility for damages or personal injury or death resulting from the use of the machine for any application other than the intended one.
- Never modify and alter the machine in order to prevent accident that can result in personal injury or death. JUKI assumes no responsibility for damages or personal injury or death resulting from the machine which has been modified or altered.
Education and training
- In order to prevent accident resulting from unfamiliarity with the machine, the machine has to be used only by the operator who has been trained/educated by the employer with respect to the machine operation and how to operate the machine with safety to acquire adequate knowledge and operation skill. To ensure the above, the employer has to establish an education/training plan for the operators and educate/train them beforehand.
Items for which the power to the machine has to be turned off
Turning the power off: Turning the power switch off, then removing the power plug from the outlet. This applies to the following.
- Be sure to immediately turn the power off if any abnormality or failure is found or in the case of power failure in order to protect against accident that can result in personal injury or death.
- To protect against accident resulting from abrupt start of the machine, be sure to carry out the following operations after turning the power off. For the machine incorporating a clutch motor, in particular, be sure to carry out the following operations after turning the power off and verifying that the machine stops completely.
2-1. For example, threading the parts such as the needle, looper, spreader etc. which have to be threaded, or changing the bobbin.
2-2. For example, changing or adjusting all component parts of the machine.
2-3. For example, when inspecting, repairing or cleaning the machine or leaving the machine.
- Be sure to remove the power plug by holding the plug section instead of the cord section in order to prevent electrical-shock, earth-leakage or fire accident.
- Be sure to turn the power off whenever the machine is left unattended between works.
- Be sure to turn the power off in the case of power failure in order to prevent accident resulting of breakage of electrical components.
PRECAUTIONS TO BE TAKEN IN VARIOUS OPERATION STAGES
Transportation
- Be sure to lift and move the machine in a safe manner taking the machine weight in consideration. Refer to the text of the instruction manual for the mass of the machine.
- Be sure to take sufficient safety measures to prevent falling or dropping before lifting or moving the machine in order to protect against accident that can result in personal injury or death.
- Once the machine has been unpacked, never re-pack it for transportation to protect the machine against breakage resulting from unexpected accident or dropping.
Unpacking
- Be sure to unpack the machine in the prescribed order in order to prevent accident that can result in personal injury or death. In the case the machine is crated, in particular, be sure to carefully check nails. The nails have to be removed.
- Be sure to check the machine for the position of its center of gravity and take it out from the package carefully in order to prevent accident that can result in personal injury or death.
Installation
(I) Table and table stand
- Be sure to use JUKI genuine table and table stand in order to prevent accident that can result in personal injury or death. If it is inevitable to use a table and table stand which are not JUKI genuine ones, select the table and table stand which are able to support the machine weight and reaction force during operation.
- If casters are fitted to the table stand, be sure to use the casters with a locking mechanism and lock them to secure the machine during the operation, maintenance, inspection and repair in order to prevent accident that can result in personal injury or death.
(II) Cable and wiring
- Be sure to prevent an extra force from being applied to the cable during the use in order to prevent electrical-shock, earth-leakage or fire accident. In addition, if it is necessary to cable near the operating section such as the V-belt, be sure to provide a space of 30mm or more between the operating section and the cable.
- Be sure to avoid starburst connection in order to prevent electrical-shock, earth-leakage or fire accident.
- Be sure to securely connect the connectors in order to prevent electrical-shock, earth-leakage or fire accident. In addition, be sure to remove the connector while holding its connector section.
(III) Grounding
- Be sure to have an electrical expert install an appropriate power plug in order to prevent accident caused by earth-leakage or dielectric strength voltage fault. In addition, be sure to connect the power plug to the grounded outlet without exceptions.
- Be sure to ground the earth cable in order to prevent accident caused by earth leakage.
(IV) Motor
- Be sure to use the specified rated motor (JUKI genuine product) in order to prevent accident caused by burnout.
- If a commercially available clutch motor is used with the machine, be sure to select one with an entanglement preventive pulley cover in order to protect against being entangled by the V-belt.
Before operation
- Be sure to make sure that the connectors and cables are free from damage, dropout and looseness before turning the power on in order to prevent accident resulting in personal injury or death.
- Never put your hand into the moving sections of the machine in order to prevent accident that can result in personal injury or death. In addition, check to be sure that the direction of rotation of the pulley agrees with the arrow shown on pulley.
- If the table stand with casters is used, be sure to secure the table stand by locking the casters or with adjusters, if provided, in order to protect against accident caused by abrupt start of the machine.
During operation
- Be sure not to put your fingers, hair or clothing close to the moving sections such as the handwheel, hand pulley and motor or place something near those sections while the machine is in operation in order to prevent accident caused by entanglement that can result in personal injury or death.
- Be sure not to place your fingers near the surround area of the needle or inside the thread take-up lever cover when turning the power on or while the machine is in operation in order to prevent accident that can result in personal injury or death.
- The machine runs at a high speed. Never bring your hands near the moving sections such as looper, spreader, needle bar, hook and cloth trimming knife during operation in order to protect your hands against injury. In addition, be sure to turn the power off and check to be sure that the machine completely stops before changing the thread.
-
Be careful not to allow your fingers or any other parts of your body to be caught between the machine and table when removing the machine from or replacing it on the table in order to prevent accident that can result in personal injury or death.
-
Be sure to turn the power off and check to be sure that the machine and motor completely stop before removing the belt cover and V-belt in order to prevent accident caused by abrupt start of the machine or motor.
- If a servomotor is used with the machine, the motor does not produce noise while the machine is at rest. Be sure not to forget to turn the power off in order to prevent accident caused by abrupt start of the motor.
- Never use the machine with the cooling opening of the motor power box shielded in order to prevent fire accident by overheat.
Lubrication
- Be sure to use JUKI genuine oil and JUKI genuine grease to the parts to be lubricated.
- If the oil adheres on your eye or body, be sure to immediately wash it off in order to prevent inflammation or irritation.
- If the oil is swallowed unintentionally, be sure to immediately consult a medical doctor in order to prevent diarrhea or vomiting.
Maintenance
- In prevention of accident caused by unfamiliarity with the machine, repair and adjustment has to be carried out by a service technician who is thoroughly familiar with the machine within the scope defined in the instruction manual. Be sure to use JUKI genuine parts when replacing any of the machine parts. JUKI assumes no responsibility for any accident caused by improper repair or adjustment or the use of any part other than JUKI genuine one.
- In prevention of accident caused by unfamiliarity with the machine or electrical-shock accident, be sure to ask an electrical technician of your company or JUKI or distributor in your area for repair and maintenance (including wiring) of electrical components.
- When carrying out repair or maintenance of the machine which uses air-driven parts such as an air cylinder, be sure to remove the air supply pipe to expel air remaining in the machine beforehand, in order to prevent accident caused by abrupt start of the air-driven parts.
- Be sure to check that screws and nuts are free from looseness after completion of repair, adjustment and part replacement.
- Be sure to periodically clean up the machine during its duration of use. Be sure to turn the power off and verify that the machine and motor stop completely before cleaning the machine in order to prevent accident caused by abrupt start of the machine or motor.
- Be sure to turn the power off and verify that the machine and motor stop completely before carrying out maintenance, inspection or repair of the machine. (For the machine with a clutch motor, the motor will keep running for a while by inertia even after turning the power off. So, be careful.)
- If the machine cannot be normally operated after repair or adjustment, immediately stop operation and contact JUKI or the distributor in your area for repair in order to prevent accident that can result in personal injury or death.
- If the fuse has blown, be sure to turn the power off and eliminate the cause of blowing of the fuse and replace the blown fuse with a new one in order to prevent accident that can result in personal injury or death.
- Be sure to periodically clean up the air vent of the fan and inspect the area around the wiring in order to prevent fire accident of the motor.
Operating environment
- Be sure to use the machine under the environment which is not affected by strong noise source (electromagnetic waves) such as a high-frequency welder in order to prevent accident caused by malfunction of the machine.
- Never operate the machine in any place where the voltage fluctuates by more than "rated voltage ± 10% " in order to prevent accident caused by malfunction of the machine.
- Be sure to verify that the air-driven device such as an air cylinder operates at the specified air pressure before using it in order to prevent accident caused by malfunction of the machine.
- To use the machine with safety, be sure to use it under the environment which satisfies the following conditions:
Ambient temperature during operation 5^ to 35^
Relative humidity during operation 35% to 85%
- Dew condensation can occur if bringing the machine suddenly from a cold environment to a warm one. So, be sure to turn the power on after having waited for a sufficient period of time until there is no sign of water droplet in order to prevent accident caused by breakage or malfunction of the electrical components.
- Be sure to stop operation when lightning flashes for the sake of safety and remove the power plug in order to prevent accident caused by breakage or malfunction of the electrical components.
- Depending on the radio wave signal condition, the machine may generate noise in the TV or radio. If this occurs, use the TV or radio with kept well away from the machine.
- In order to ensure the work environment, local laws and regulations in the country where the sewing machine is installed shall be followed. In the case the noise control is necessary, an ear protector or other protective gear should be worn according to the applicable laws and regulations.
- Disposal of products and packages and treatment of used lubricating oil should be carried out properly according to the relevant laws of the country in which the sewing machine is used.
Precautions to be taken so as to use the MO-6800S Series more safely
| 1. So as to avoid electric shock hazards, do not open the cover of the electrical box of the motor or touch any part inside the electrical box with the power to the machine turned ON. | |
| 1. To prevent possible personal injury, never operate the machine with the belt cover and the eye guard removed.2. To protect against possible personal injury resulting from being caught in the motor, use a motor that is provided with a motor pulley cover.3. To avoid electric shock hazards, never operate the machine with the ground wire for the power supply removed.4. During operation, be careful not to allow your or any other person's head, hands or fingers to come close to the handwheel, V belt and motor so as to prevent possible personal injury that may occur when your hands/fingers are caught in the machine. Also, do not place anything close to them.5. So as to avoid possible injury to your hands and fingers, do not put any of them near the cloth cutting knife and the needle when turning the power to the machine or while the machine is in operation.6. To prevent possible injury to your hands and fingers, do not put any of them inside the eye guard while the machine is in operation.7. To avoid electric shock hazards and accidents arising from damaged electrical components, be sure to turn OFF the power switch before inserting/detaching the power plug.8. So as to protect against possible personal injury resulting from abrupt start of the machine, make sure to turn OFF the power to the machine when you leave your machine.9. In the event of a power failure, be sure to turn OFF the power to the machine to protect against possible personal injury resulting from abrupt start of the machine.10. So as to protect against possible personal injury resulting from abrupt start of the machine, remove the belt cover, motor pulley cover and the V belt after turning OFF the power to the machine and confirming that the sewing machine will not run even by depressing the start pedal.11. Before inspecting, adjusting or cleaning the machine, threading the machine head or replacing the needle, so as to protect against possible personal injury resulting from abrupt start of the machine, be sure to turn OFF the power to the machine so as to prevent an accident and confirm that the sewing machine will not operate even when depressing the foot pedal of the sewing machine.12. In order to protect against personal injury due to a fall of the sewing machine head, never carry the sewing machine by holding the cloth plate cover. If you carry the sewing machine by holding the cloth plate cover, the cover can break to allow the sewing machine head to fall resulting in personal injury. | 1. To prevent possible personal injury, never operate the machine with the belt cover and the eye guard removed.2. To protect against possible personal injury resulting from being caught in the motor, use a motor that is provided with a motor pulley cover.3. To avoid electric shock hazards, never operate the machine with the ground wire for the power supply removed.4. During operation, be careful not to allow your or any other person's head, hands or fingers to come close tothe handwheel,V belt and motor so as to prevent possible personal injury that may occur when your hands/fingers are caught in the machine. Also, do not place any-thing close to them.5. So as to avoid possible injury to your hands and fingers, do not put any of them near the cloth cutting knife and the needle when turning the power to the machine or while the machine is in operation.6. To prevent possible injury to your hands and fingers, do not put any of them inside the eye guard while the machine is in operation.7. To avoid electric shock hazards and accidents arising from damaged electrical components, be sure to turn OFF the power switchbefore inserting/detaching the power plug.8. So as to protect against possible personal injury resulting from abrupt start of the machine, make sure to turn OFF the power to the machine when you leave your machine.9. In the event of a power failure, be sure to turn OFF the power to the machine to protect against possible personal injury resulting from abrupt start of the machine.10. So as to protect against possible personal injury resulting from abrupt start of the machine, remove the belt cover,motor pulley cover and the V belt after turning OFF the power to the machine and confirming that the sewing machine will not run even by depressing the start pedal.11. Before inspecting, adjusting or cleaning the machine, threading the machine head or replacing the needle, so as to protect against possible personal injury resulting from abrupt start of the machine, be sure to turn OFF the power to the machine so as to prevent an accident and confirm that the sewing machine will not operate even when depressing the foot pedal of the sewing machine.12. In order to protect against personal injury due to a fall of the sewing machine head, never carry the sewing machine by holding the cloth plate cover. If you carry the sewing machine by holding the cloth plate cover, the cover can break to allow the sewing machine head to fall resulting in personal injury. | 1. To prevent possible personal injury, never operate the machine with the belt cover and the eye guard removed.2. To protect against possible personal injury resultingfrom being caught in the motor, use a motor that is provided with a motor pulley cover.3. To avoid electric shock hazards, never operate the machine with the ground wire for the power supply removed.4. During operation, be careful not to allow your or any other person's head, hands or fingers to come close to thehandwheel,V belt and motor so as to prevent possible personal injury that may occur when your hands/fingers are caught in the machine. Also, do not place any-thing close to them.5. So as to avoid possible injury to your hands and fingers, do not put any of them near the cloth cutting knife and the needle when turning the power to the machine or while the machine is in operation.6. To prevent possible injury to your hands and fingers, do not put any of them outside the eye guard while the machine is in operation.7. To avoid electric shock hazards and accidents arising from damaged electrical components, be sure to turn OFF the power switch before inserting/detaching the power plug.8. So as to protect against possible personal injury resulting from abrupt start of the machine, make sure to turn OFF the power to the machine when you leave your machine.9. In the event of a power failure, be sure to turn OFF the power to the machine to protect againstpossible personal injury resulting from abrupt start of the machine.10. So as to protect against possible personal injury resulting from abrupt start of the machine, remove the belt cover,motor pulley cover and the V belt after turning OFF the power to the machine and confirming that the sewing machine will not run even by depressing the start pedal.11. Before inspecting, adjusting or cleaning the machine, threading the machine head or replacing the needle, so as to protect against possible personal injury resulting from abruptstart of the machine, be sure to turn OFF the power to the machine so as to prevent an accident and confirm that the sewing machine will not operate even when depressing the foot pedal of the sewing machine.12. In order to protect against personal injury due to a fall of the sewing machine head, never carry the sewing machine by holding the cloth plate cover. If you carry the sewing machine by holding the cloth plate cover, the cover can break to allow the sewing machine head to fall resulting in personaIjury. |
| 13. Be careful of handling this product so as not to pour water or oil, shock by dropping, and the like since this product is a precision instrument.14. Please operate this machine in 80% of the maximum speed in the first four weeks for en-gagement. After four weeks, please do not operate under the maximum speed until replacing the new lubrication oil.15. Periodically maintain and clean the machine to ensure and extend the usage term of the machine. | |

CAUTION
In addition, be aware that the safety devices such as the "eye protection cover" and "finger guard" are sometimes omitted in the sketches, illustrations and figures included in the Instruction Manual for the explanation's sake. In the practical use, never remove those safety devices.
To avoid malfunction and damage of the machine, confirm the following.
- Read and understand well the content of this instruction book.
- Know the functions of major parts and understand the notices.
- Truely realize the meanings of all warning tags.
- Realize and be familiar with how to operate this machine.
- Operators please to keep well mental status.
- Operators shall wear appropriate and proper working suits.
- Develop the familiarity of how to operate the machine if needed.
DECLARATION OF INCORPORATION OF PARTLY COMPLETED MACHINERY
We hereby declare that the sewing machine (sewing head) described below ;
- Must not be put into service until the machinery to which it is incorporated has been declared in conformity with provisions of the Machinery Directive 2006/42/EC, and
- Conforms to the essential requirements of the Machinery Directive 2006/42/EC, described in the technical documentation, and
- To be prepared with above technical documentation compiled in accordance with part B of Annex VII, and
- Also to conform to the RoHS Directive 2011/65/EU
- Relevant information on which should be transmitted in response to a reasoned request by the national authorities,by the electronic method or other according to the request.
Model MO-6800S Series
Description Industrial Sewing Machine
Function make stitches and sew
Applied harmonized standards, in particular :
EN ISO12100, EN ISO10821, EN 50581
Manufacturer:
JUKI CORPORATION
2-11-1, Tsurumaki, Tama-shi, Tokyo, Japan
HS170NE
CONTENTS
- SPECIFICATION 1
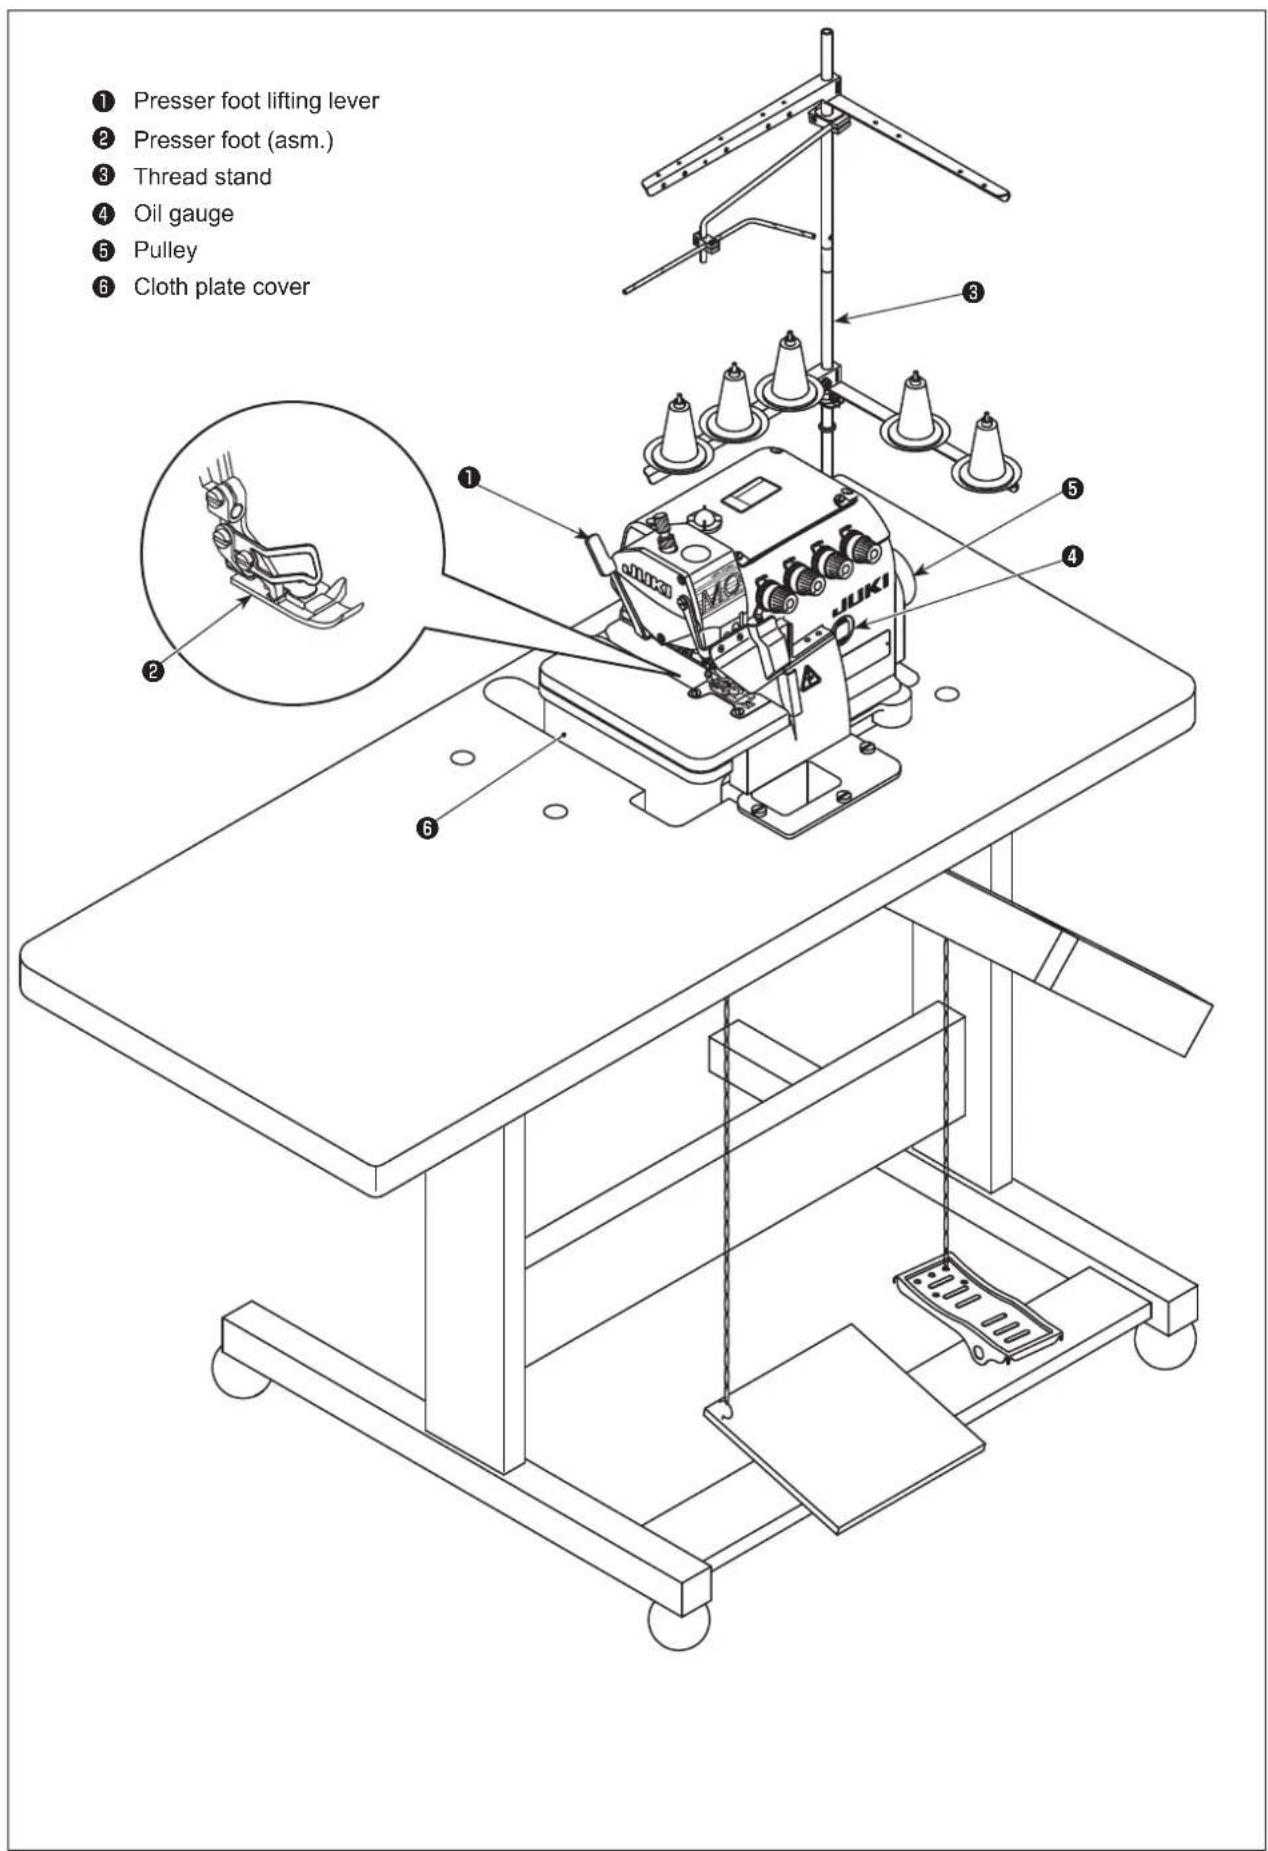
- NAMES OF MAJOR PARTS 2
- INSTALLATION 3
- LUBRICATION AND DRAINAGE 6
- THREADING 8
6.ADJUSTING THE THREAD TENSION 11
-
REPLACE THE NEEDLE 12
8.ADJUSTING THE STITCH LENGTH 13
9.ADJUSTING THE DIFFERENTIAL FEED RATIO 13
-
REPLACE THE KNIVES 14
11.ADJUSTING THE OVEREDGE WIDTH 15
12.ADJUSTING THE NEEDLE HEIGHT 15
13.ADJUSTING THE PRESSER FOOT 16
14.ADJUSTING THE FEED DOG 18
- THE RELATIONSHIP BETWEEN THE NEEDLE AND THE LOOPER 19
- ADJUSTING THE AMOUNT OF TRAVEL OF THE DOUBLE CHAINSTITCH LOOPER 21
- MAINTENANCE 22
- DIMENSIONS USE TO ADJUSTING THE LOOPER AND THE NEEDLE GUARD .... 23
- DIMENSIONS RELATED TO THE POSITION OF THE THREAD TAKE-UP AND THE LOOPER THREAD CAM (STANDARD ADJUSTMENT) 24
- TABLE DRAWING 26
1. SPECIFICATION
| MO-6804S MO-681 | 4S MO-6816S | |
| Sewing speed Max. | 7,000 sti/min (Excluding some subclass models) |
| Stitch length 0.6 to | 3.8 (4.5) mm / 60H: 1 to 4.5 mm |
| Needle gauge - 2.0 | mm 3.0, 5.0 mm | | |
| Overedge width 1.5, | 4.0 mm 2.0, 3.0, 4.0 mm 4.0, 5.0, 6.0 mm | |
| Differential feed ratio | Gathering stitch 1:2 (Max. 1:4) / 60H 1:1.7Stretching stitch 1:0.7 (Max. 1:0.6) / 60H 1:0.9 |
| Needle DC × 27 | (Standard) |
| Presser foot lift 5 to | 7 mm |
| Lubricating oil | JUKI MACHINE OIL #18 |
| Weight | 27 kg |
| Noise | - Equivalent continuous emission sound pressure level (LpA) at the workstation:A-weighted value of 83.0 dB; (Includes KpA = 2.5 dB); according to ISO 10821-C.6.2 - ISO 11204 GR2 at 6,500 sti/min.- Sound power level (LwA);A-weighted value of 88.0 dB; (Includes KwA = 2.5 dB); according to ISO 10821-C.6.2 - ISO 3744 GR2 at 6,500 sti/min. |
2. NAMES OF MAJOR PARTS
3. INSTALLATION
WARNING :
-
Machine installation should only be carried out by a qualified technician.
-
Contact your dealer or a qualified electrician for any electrical work that may need to be done.
-
The sewing machine weighs 27kg . The installation should be carried out by two or more people.

-
Do not connect the power cord until installation is complete. The machine may operate if the treadle is depressed by mistake, which could result in injury.
-
Use both hands to hold the machine head when tilting it back or returning it to its original position. If only using one hand, the weight of the machine head may be too heavy to hold, and may cause human physical injuries.
-
To protect against possible personal injury due to abrupt start of the machine, be sure to start the following work after turning the power off and ascertaining that the motor is at rest.
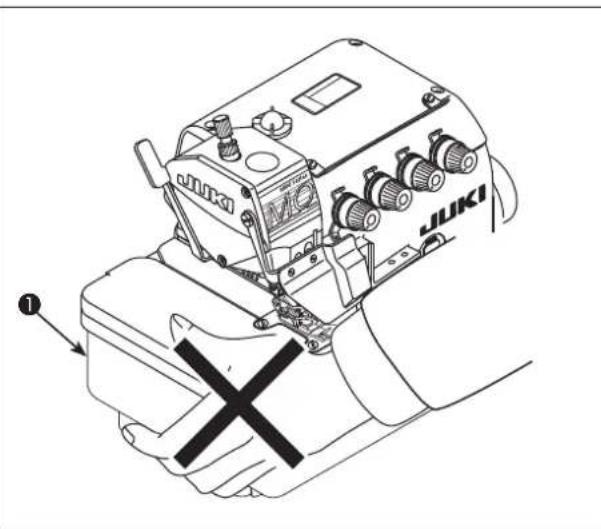

After unpacking, do not carry the sewing machine holding the lower section of cloth plate cover 1.

1) Install, air-blower case 3 and rubber cushion 4 to frame support plate 2, referring to the table drawing and parts list.
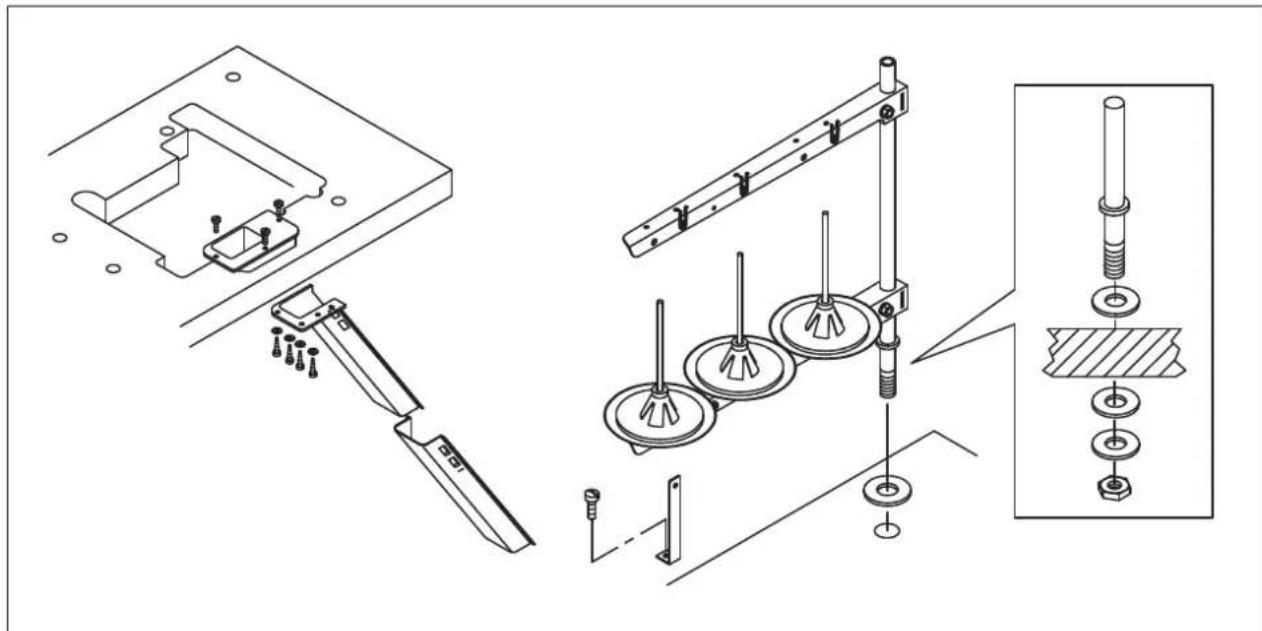
2) Assemble the waste disposal set and the thread stand.
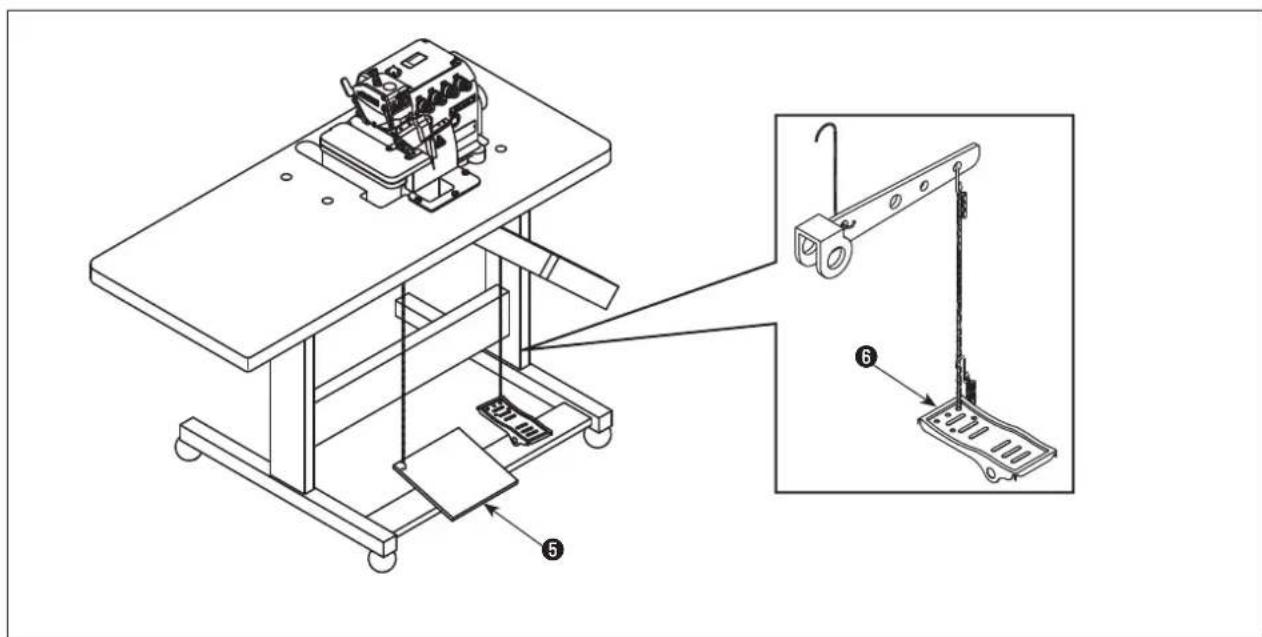
3) Assemble the motor starting pedal 5 to the left side, and the presser foot pedal 6 to the right side.
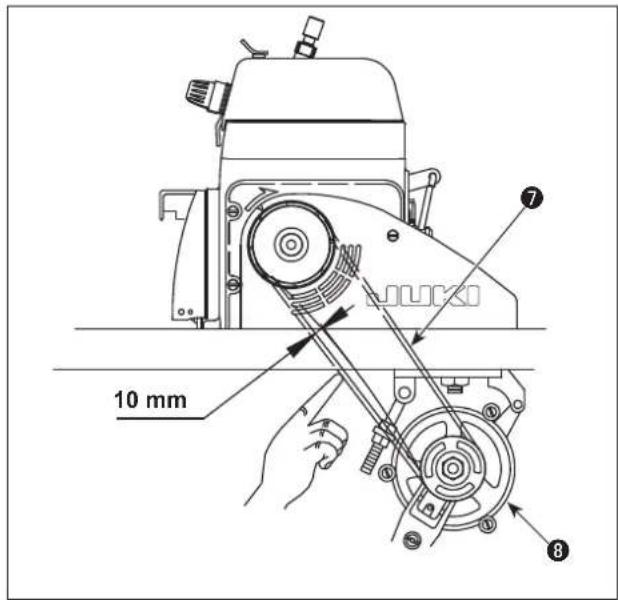
4) The correct direction of rotation of the sewing machine is clockwise.

Never allow the machine to rotate in the reverse direction. If the machine rotates counterclockwise, the oil pump will fail to function resulting in seizure.
The best tension of the motor belt 7 is that the belt can be pressed in about 10mm by a finger. Refer to the table shown below for the size of pulley 8 and the sewing speed.
(The above applies to both the machine with table-fixed type and the machine with fully-sunken one.)
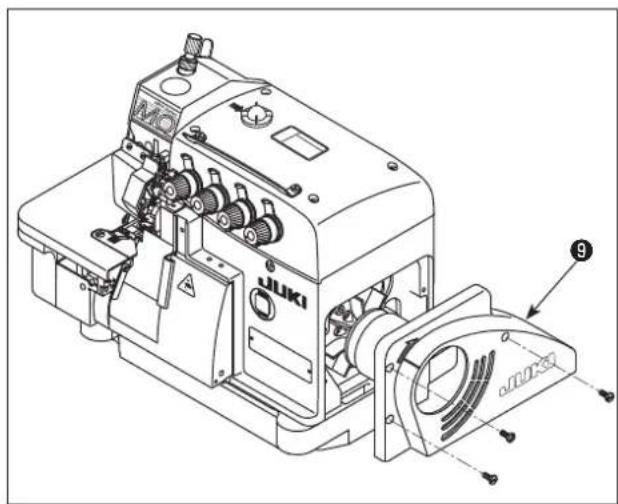
5) Then, close belt cover 9. Tighten screws.
| Sewing speed
(sti/min) | Motor pulley Diameter (mm) / V belt (in inches) |
| 60 Hz 50 Hz | |
| 4,500 70 / 33 | 85 / 33 | |
| 5,000 80 / 33 | 95 / 34 | |
| 5,500 85 / 33 | 105 / 35 | |
| 6,000 95 / 34 | 115 / 36 | |
| 6,500 100 / 35 | 125 / 38 | |
| 7,000 110 / 36 | 135 / 39 | |
Common to the machine with table-fixed table and the machine with fully-sunken one
4. LUBRICATION AND DRAINAGE

WARNING :
To protect against possible personal injury due to abrupt start of the machine, be sure to start the following work after turning the power off and ascertaining that the motor is at rest.
(1) Lubrication oil
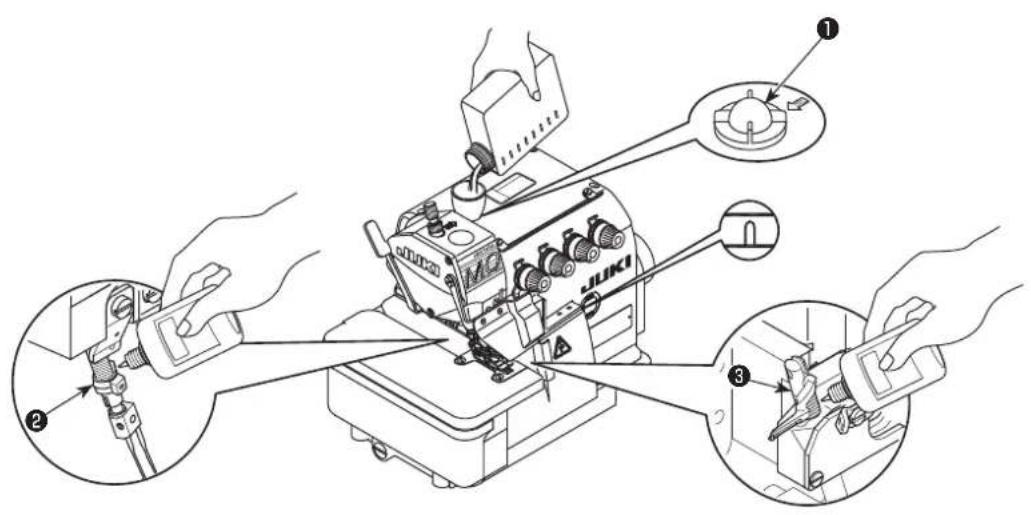
1) Remove oil sight window 1 from the oil inlet. Add lubricating oil specifically made for machines which run at a super-high speed (JUKI MACHINE OIL #18) supplied with the unit or equivalent through the oil inlet. When the oil surface reaches the space between two marker lines on the oil gauge, tighten oil sight window 1.
2) Before using a new sewing machine for the first time after the purchase or the sewing machine which has not been used for an extended period of time, the shaded sections of needle bar 2 and upper looper guide 3 have to be lubricated.
(2) Drainage and refill the oil
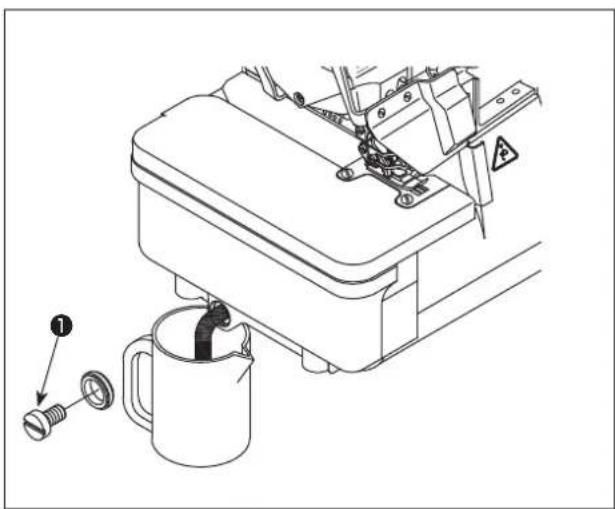
1) Loosen the screw 0 and drain all the oil inside the oil tank. Then, tighten the screw 0 again.
2) In order to extend the term of usage, please replace the oil after the first four weeks, and then replace it every four months.
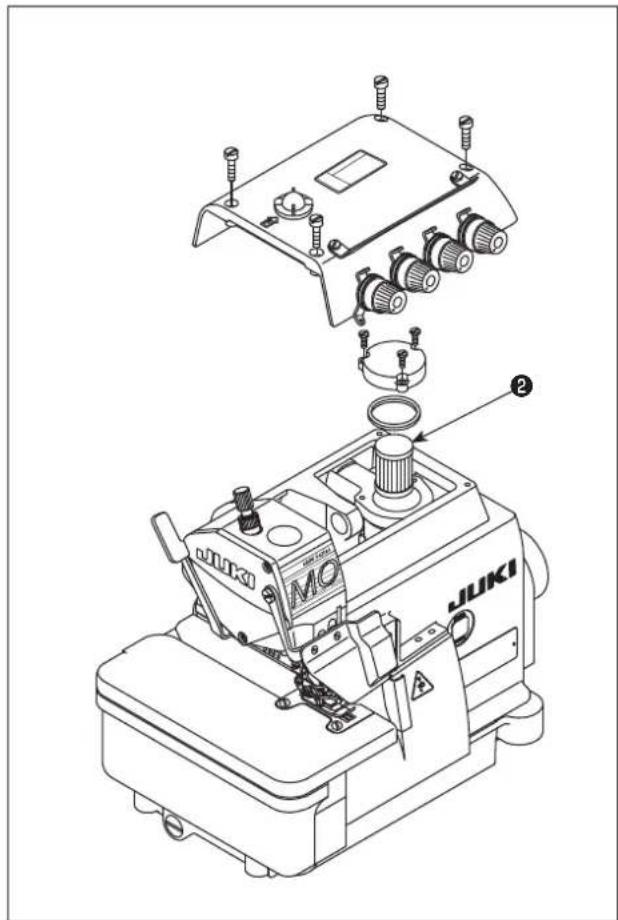
3) To extend the usage term, this machine has equipped an oil filter ②. Clean up this oil filter ② once every month and change it with a new one where necessary.
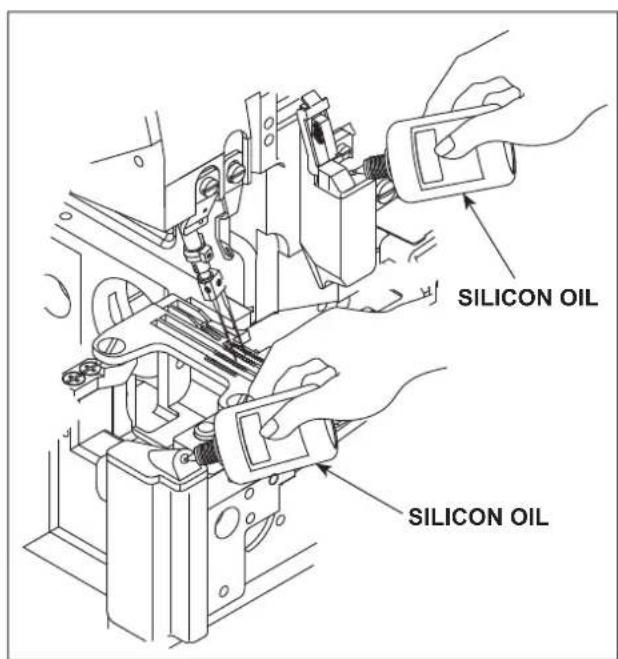
Needle cooling lubrication oil : SILICON OIL
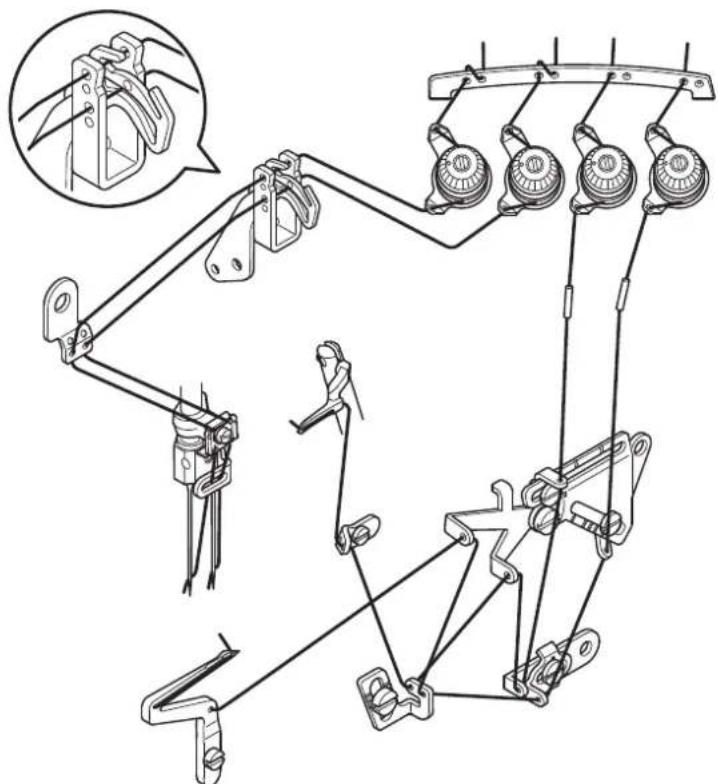
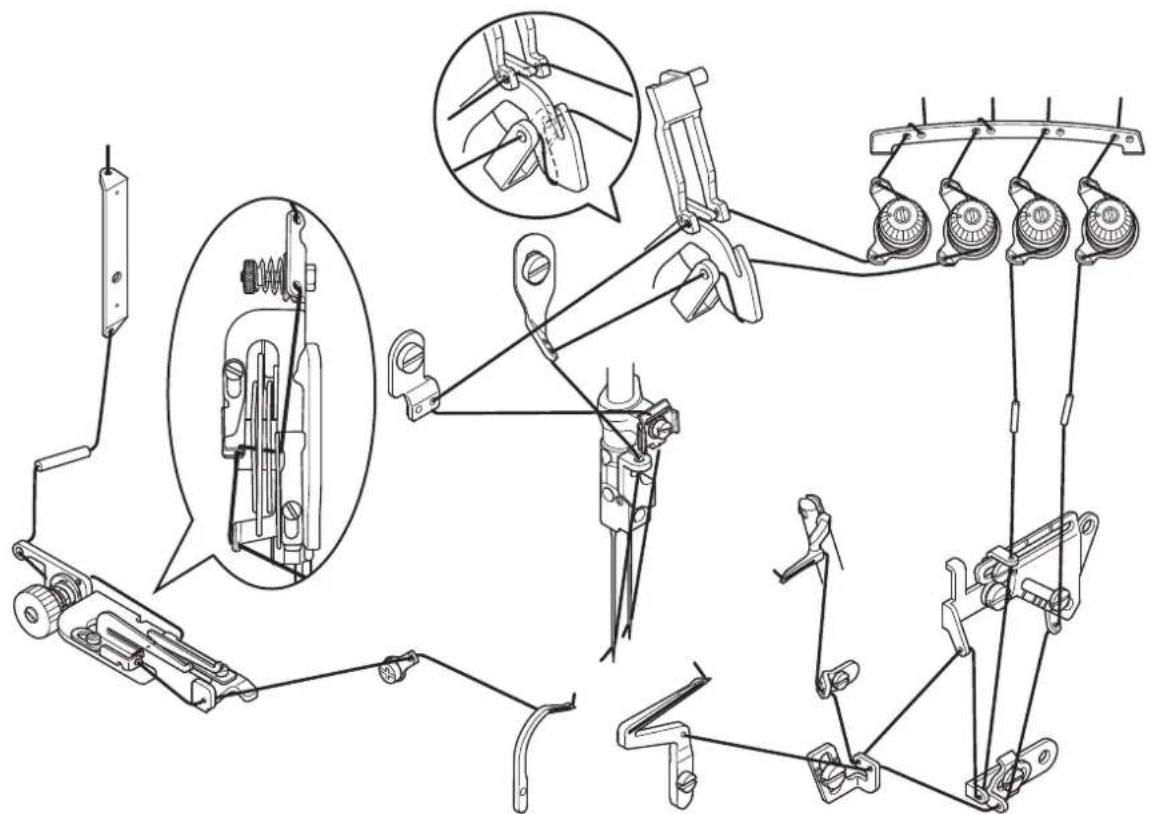
5. THREADING

WARNING :
Follow the procedures for threading. Wrong threading can cause stitching troubles such as thread breakage, stitch skipping and puckering.
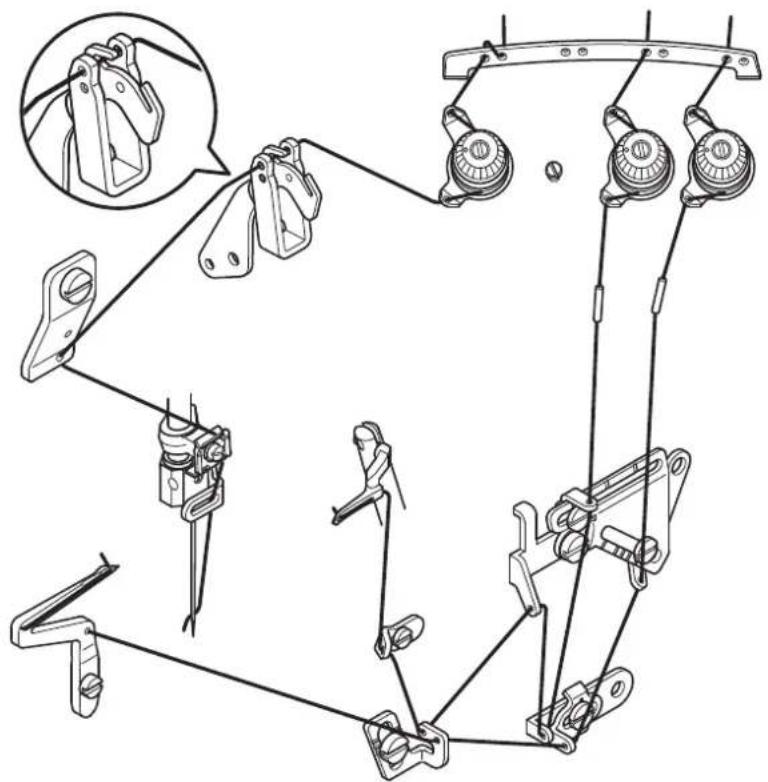
MO-6804S
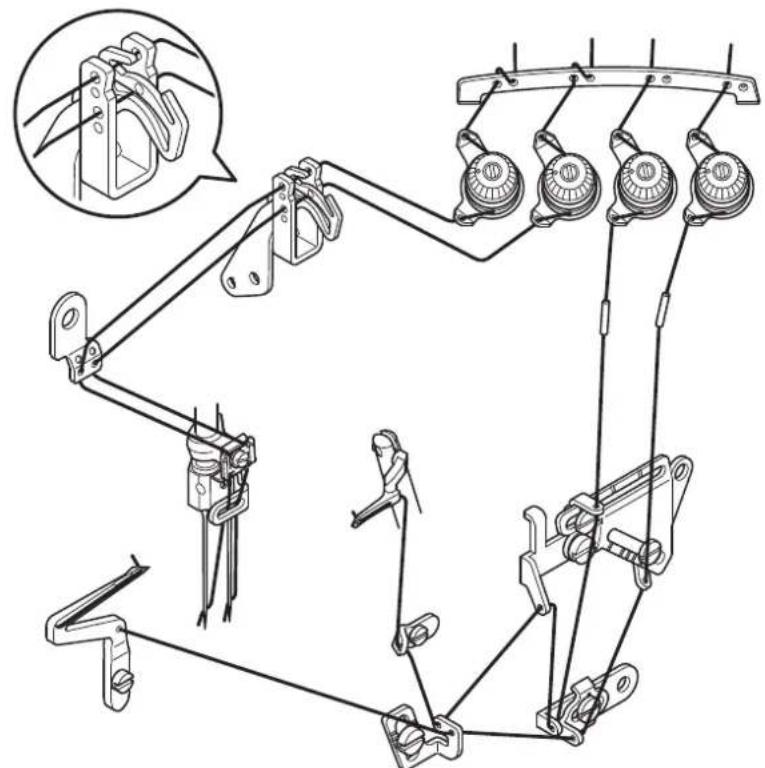
MO-6814S
MO-6814S-△△△-44H
MO-6816S
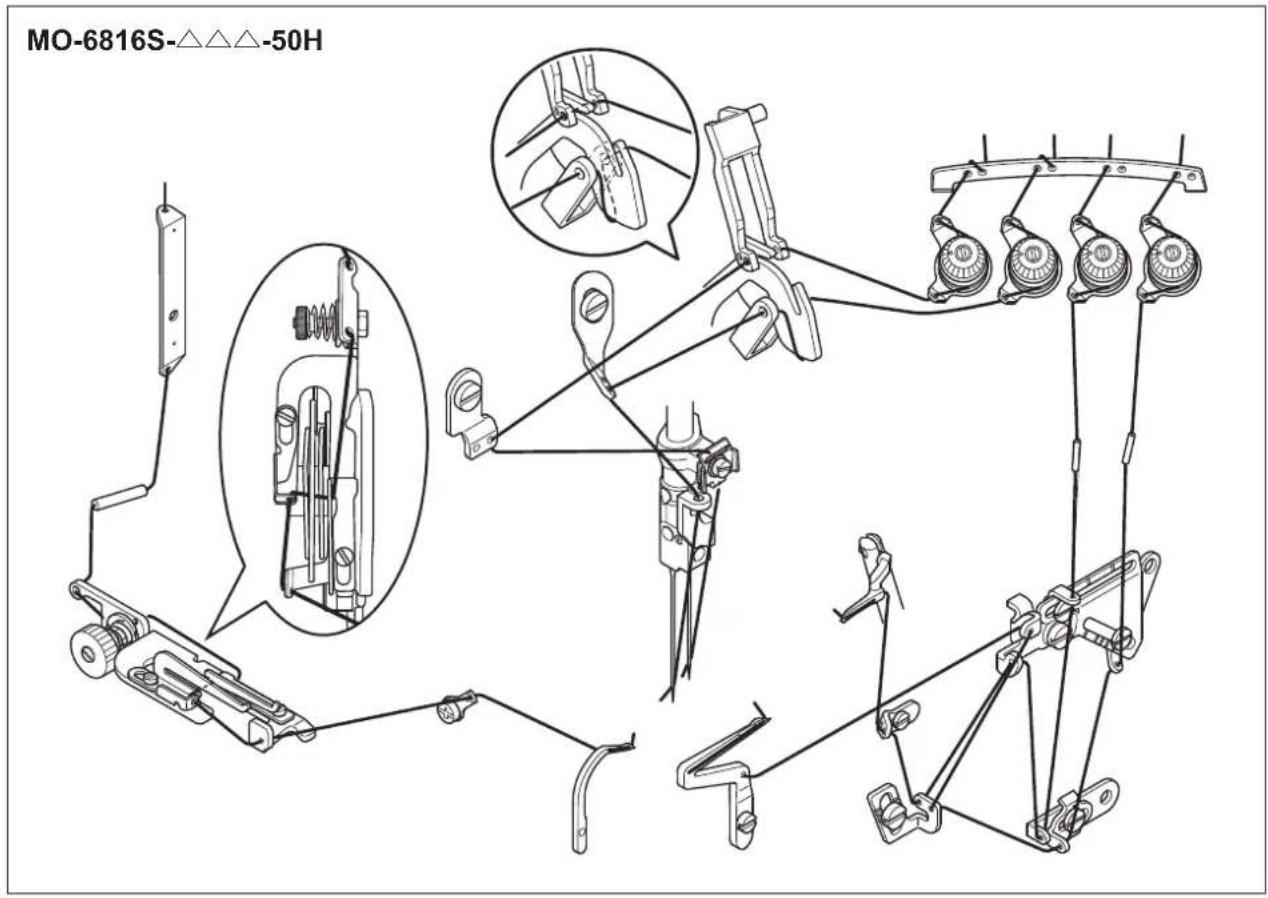

6. ADJUSTING THE THREAD TENSION
The thread tension should be adjusted properly according to the kinds and the thickness of the materials, stitch length, and seam width, etc. In addition, adjust the nuts case by case individually. Turn the nuts clockwise will increase the thread tension. Otherwise, the thread tension will be decreased.
(1) Thread tension adjusting nuts
1) Tension adjusting nut No. ① controls thread ①.
2) Tension adjusting nut No. ② controls thread 2
3) Tension adjusting nut No. ③ controls thread ⑧.
4) Tension adjusting nut No. ④ controls thread ④.
5) Tension adjusting nut No. ⑤ controls thread ⑤.
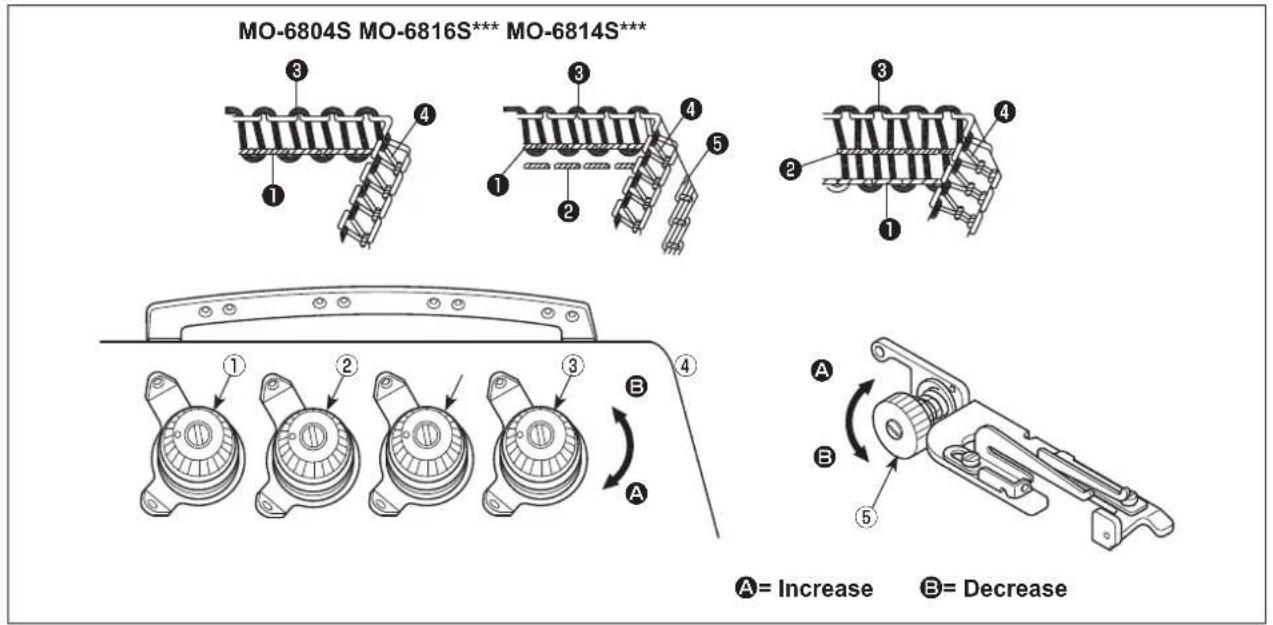
(2) Adjusting the needle thread length
1) Adjust the needle thread length by turning the thread guide in the directions of arrows.
2) The direction indicates to increase the needle thread length.
3) The direction indicates to decrease the needle thread length.
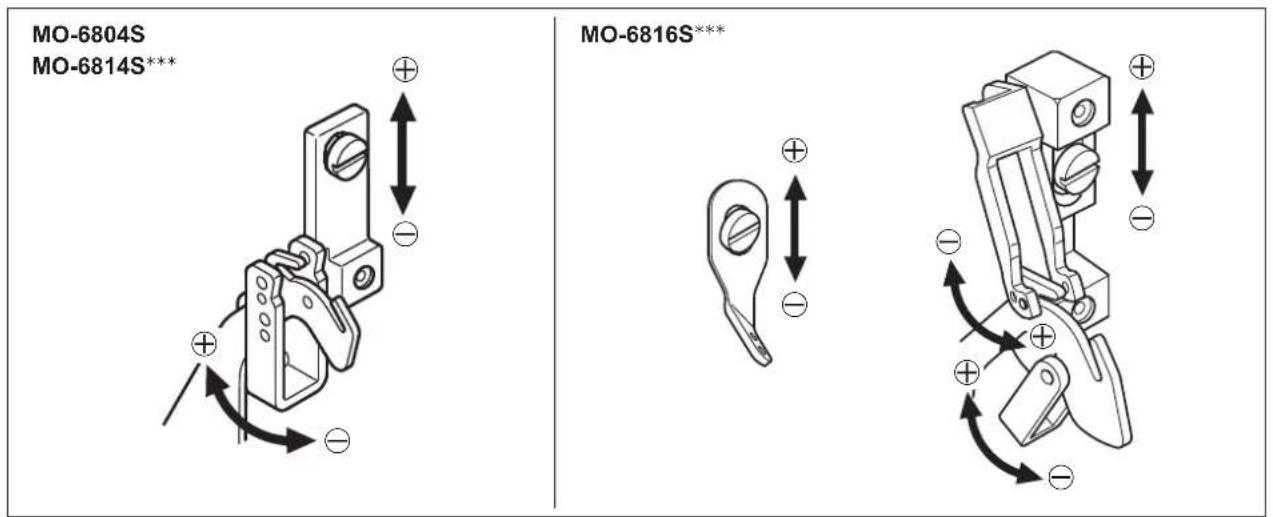
(3) Adjusting the looper thread cam thread guide
1) In the case the looper thread is not appropriately adjusted, thread loops cannot be formed with consistency. (Thread can be excessively loosened or thread loops cannot be formed.)
2) means to have more thread amount while sewing.
3) means to have less thread amount while sewing.
7. REPLACE THE NEEDLE

WARNING :
To protect against possible personal injury due to abrupt start of the machine, be sure to start the following work after turning the power off and ascertaining that the motor is at rest.
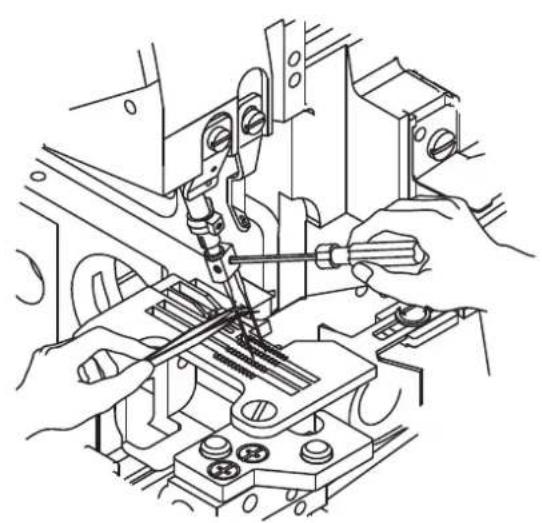
1) Please use the needle DC × 27 or the equivalents.
2) Loosen the screw 1 and take off the needle.
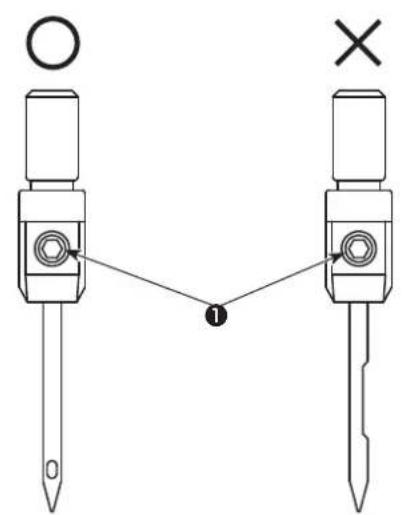
3) Fully insert the new needle into the needle clamp hole with the needle recess facing backwards as viewed from the operator's side.
4) Tighten the screw 1.
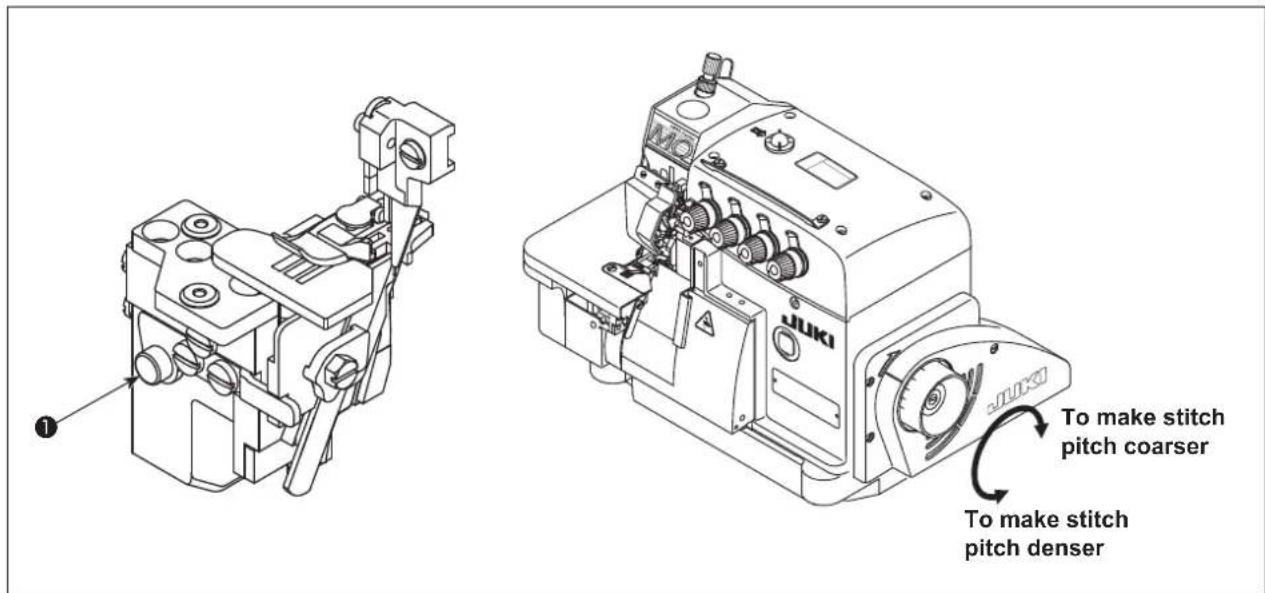
8. ADJUSTING THE STITCH LENGTH

WARNING :
To protect against possible personal injury due to abrupt start of the machine, be sure to start the following work after turning the power off and ascertaining that the motor is at rest.
Change the stitch length appropriately according to the material to be used, differential feed ratio or other relevant factors.
Keep pressing the button ① and turn the pulley till the button is locked. Then, release the button after reaching the desired stitch length.
| Max. differential feed ratio | Pulley scale 1 | 2 | 3 | 4 | 5 | 6 | 7 | |
| 1:2 | Stitch length (reference value) | 0.6 1. | 13 1.66 2 | .19 2.72 | 3.25 3.8 | | | |
9. ADJUSTING THE DIFFERENTIAL FEED RATIO

WARNING :
To protect against possible personal injury due to abrupt start of the machine, be sure to start the following work after turning the power off and ascertaining that the motor is at rest.
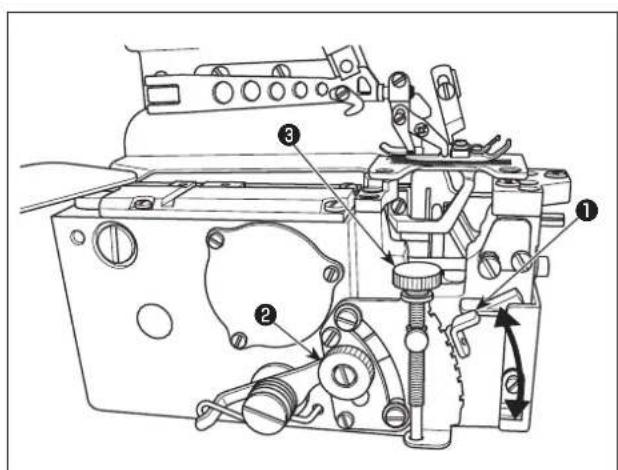
1) Loosen differential feed adjusting nut 2. Move differential feed adjusting rod 1 upward to perform stretching sewing, or downward to perform shirring.
2) When you want to move the lever ① only slightly, use differential feed minute-adjust screw ③.
3) After the adjustment, securely tighten differential feed adjusting nut 2.
10. REPLACE THE KNIVES

WARNING :
To protect against possible personal injury due to abrupt start of the machine, be sure to start the following work after turning the power off and ascertaining that the motor is at rest.
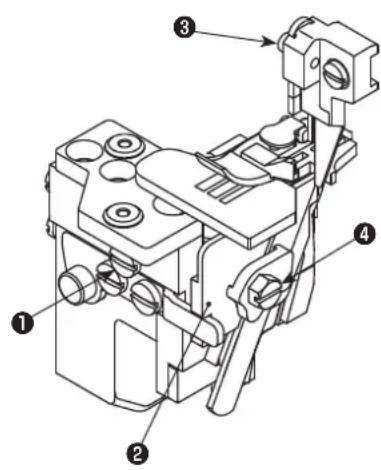
(1) Replace the upper knife
1) Loosen the screw 1 and move the lower knife holder 2 to the left. Then, tighten the screw 1 a little.
2) Remove the screw ③ and put the new upper knife. Then, tighten the screw ⑧ a little.
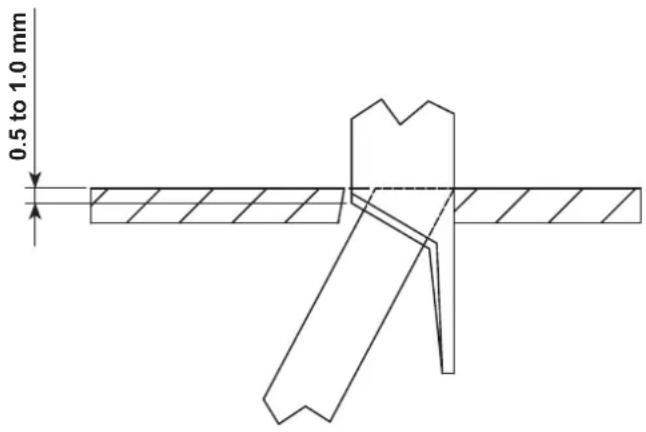
3) Turn the pulley to move the upper knife to the lower dead point. Adjust the height of the upper knife so that the upper knife can cross the lower knife about 0.5 to 1.0mm . After that, tighten the screw
4) Loosen the screw 1 and return the lower knife holder 2 to its original position.
Test if the upper and the lower knife can cut the thread exactly, and then tighten the screw 1.
(2) Replace the lower knife
1) Loosen the screw 1 and move the lower knife holder 2 to the left. Then, tighten the screw 1 a little.
2) Loosen the screw 4. Take off the lower knife and replace a new one.
3) Adjust the edge of the lower knife to be aligned with the surface of the throat plate. Then, tighten the screw
4) Loosen the screw ① to return the lower knife holder ② to its original position and test if the upper and the lower knife can cut the thread exactly. Then, tighten the screw ①.
11. ADJUSTING THE OVEREDGE WIDTH

WARNING :
To protect against possible personal injury due to abrupt start of the machine, be sure to start the following work after turning the power off and ascertaining that the motor is at rest.
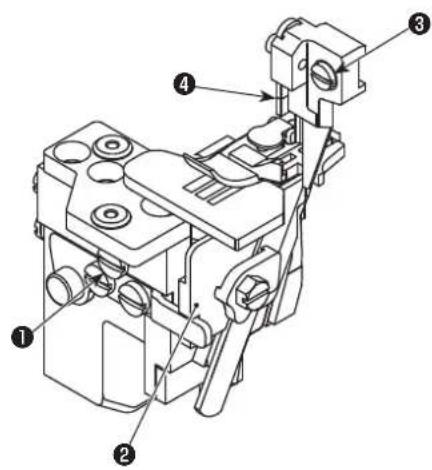
1) Turn the pulley to move the upper knife 4 to the lower dead point.
2) Loosen the screw 1 and move the lower knife holder 2 to the left, and then tighten the screw 1 a little.
3) Loosen the screw ③, and move the upper knife holder left or right till reaching the desired width. Then, tighten the screw ③.
4) Loosen screw 1. Move the lower knife holder 2 until the lower knife comes in contact with the upper knife.
Test if the knives can cut the thread, and then tighten the screw ①.
12. ADJUSTING THE NEEDLE HEIGHT

WARNING :
To protect against possible personal injury due to abrupt start of the machine, be sure to start the following work after turning the power off and ascertaining that the motor is at rest.
Turn the pulley to bring the needle to its upper end. At this time, adjust the distance from the needle tip to the top surface of the throat plate appropriately.
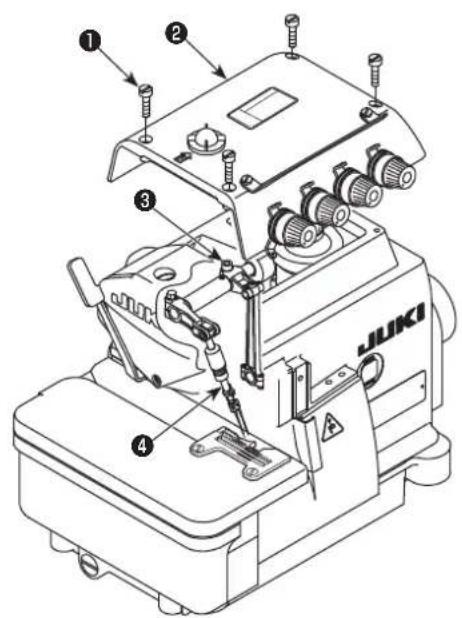
1) Loosen four screws ①. Open top cover ② and detach it.
2) Loosen the screw 3, and move the needle bar 4 to the desired height. Then, tighten the screw 3.
3) Close top cover ②. Tighten four screws ①.

After the adjustment of the needle bar height, check the relation between the needle and the looper.

Refer to"18. DIMENSIONS USE TO AdjustING THE LOOPER AND THE NEEDLE GUARD" p.23 for the adjustment values of the needle height.
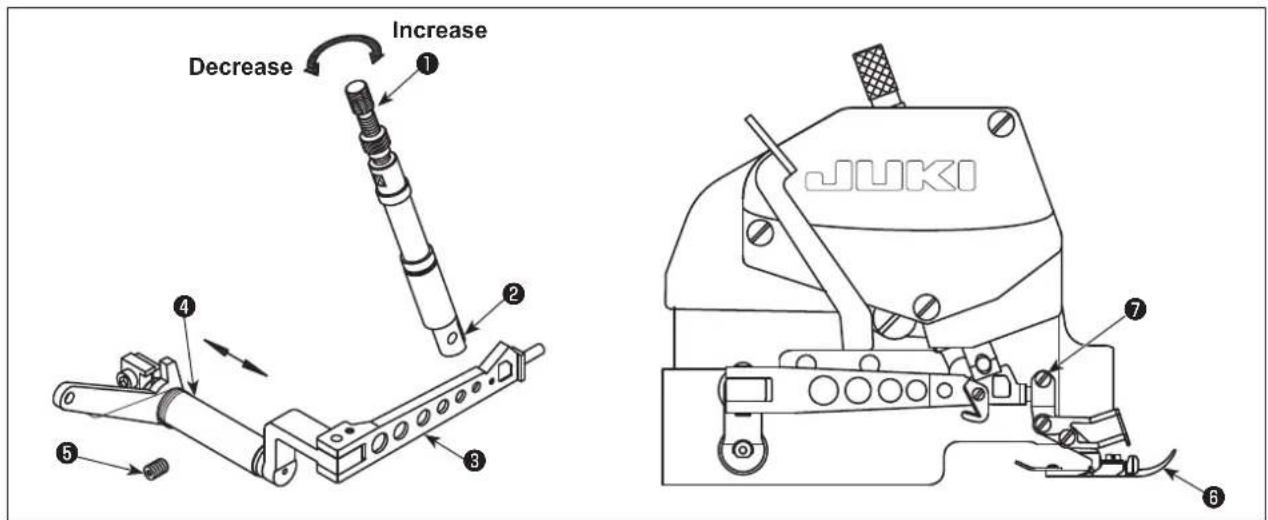
1) Loosen adjusting screw ① and screw ⑦ of the presser foot.
2) Move the presser foot ⑥ so that the groove of the presser foot can align with the groove of the throat plate. Also the bottom of the presser foot can stand on the throat plate flatly and then tighten the screw ⑦ .
3) Loosen the screw 5 and move 4 left and right so that 3 can match 2 and 2 can move upward and downward smoothly. Then, tighten the screw 5.
4) To adjust to a proper pressure: turn the screw ① clockwise will increase the pressure, whereas turn it counter clockwise will decrease the pressure.
(2) Adjusting the lift amount of the presser foot
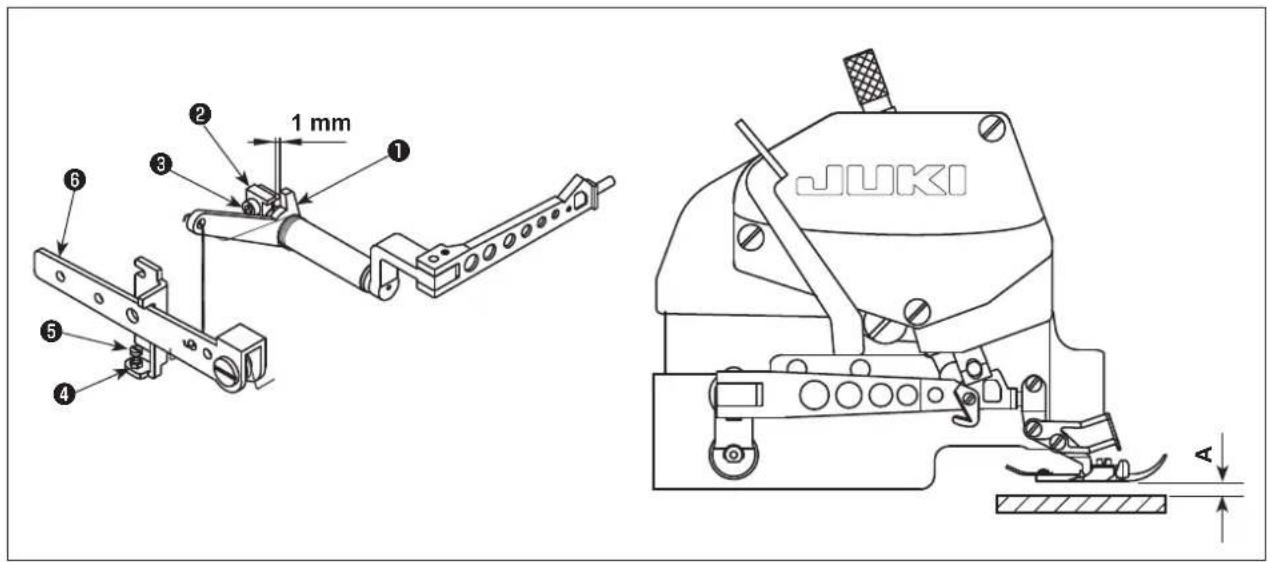
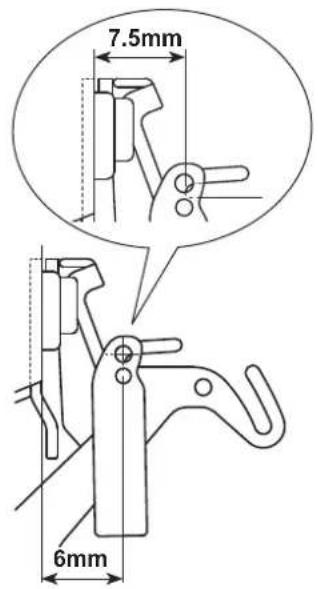
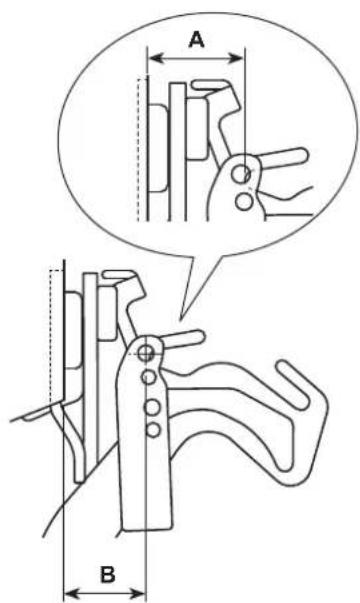
1) Turn the pulley to lower the feed dog until the bottom of the presser horizontally comes in contact with the throat plate.
2) Provide a 1 mm clearance between presser foot lifting arm 1 and fixing bracket 2. This clearance can be adjusted by slightly loosening screw 3.
3) Loosen nut 4. Press presser foot lifting lever 6 to lift the presser foot from the throat plate surface. The lift of the presser foot differs with the model. Adjust the lift of the presser foot according to the model referring to the table shown below.
Then, adjust screw 5 so that it comes in contact with presser foot lifting lever 6. Tighten nut 4.
4) After all the adjustments above, please tighten the screw ③.
(Unit: mm)
| Model Lift amount of the presser foot (A) |
| MO-6804S 6 | |
| MO-6814S-2△H | 5.5 |
| MO-6814S-3△H | 5.5 |
| MO-6814S-4△H | 7 |
| MO-6814S-30P 5 | |
| MO-6816S-3△H | 5.5 |
| MO-6816S-50H 6.5 | |
| MO-6816S-60H 7 | |
| MO-6816S-30P 5 | |
14. ADJUSTING THE FEED DOG

WARNING :
To protect against possible personal injury due to abrupt start of the machine, be sure to start the following work after turning the power off and ascertaining that the motor is at rest.
(1) Adjusting the feed dog height
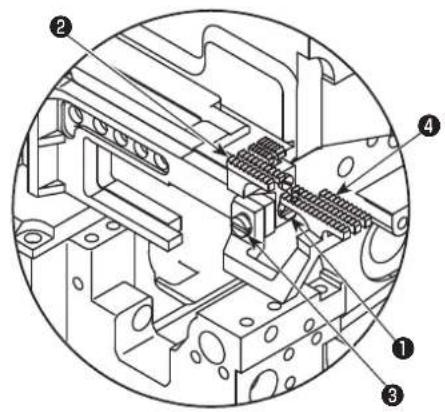
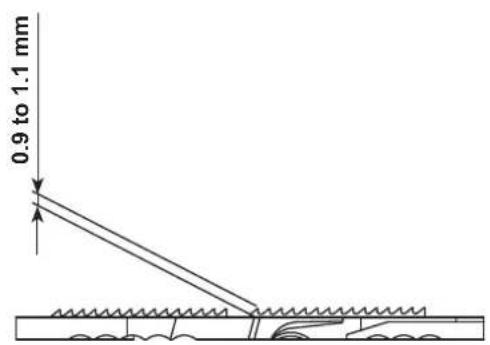
1) Turn the pulley to rise the feed dog the highest point.
2) Loosen the screw 1. and move the main feed dog 2 up and down in order to keep the teeth side over the throat plate about 0.9 to 1.1 mm (30P; 0.7 to 0.9 mm, 60H; 1.0 to 1.2 mm). Then, tighten the screw 1.
3) Loosen screw ③. Move differential feed dog ④ up and down to adjust so that it is flush with main feed dog ②. Then, tighten screw ③.
(2) Adjusting the inclination of the feed dog
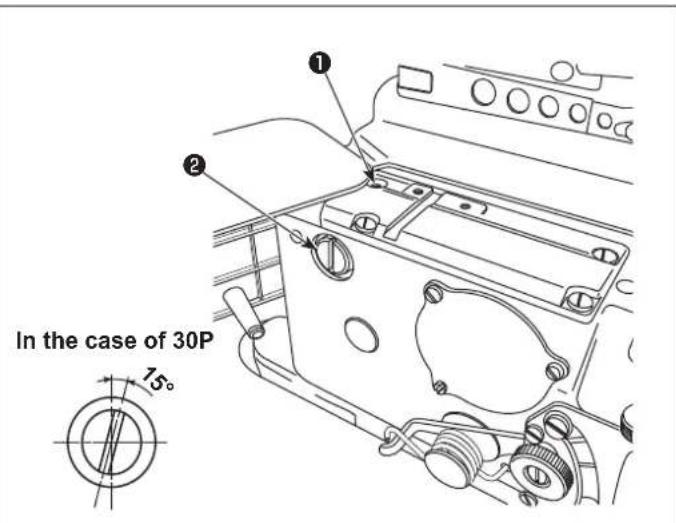
To adjust the inclination of the feed dog, loosen screw 1 and turn rear support shaft 2. When the feed dog is flush with the top surface of the throat plate and the feed dog is levelled (30P: The feed dog is positioned with its front part low), tighten screw 1.
(3) Adjusting the auxiliary feed dog height
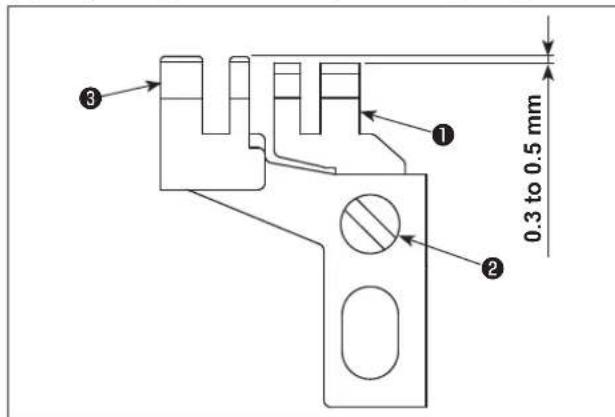
The teeth section of auxiliary feed dog 1 has to be positioned lower than main feed dog 3 by 0.3 to 0.5mm (30P: 0.1 to 0.3mm , 60H: 0.25 to 0.35mm ). The height can be adjusted by loosening the screw 2.
15. THE RELATIONSHIP BETWEEN THE NEEDLE AND THE LOOPER

WARNING :
To protect against possible personal injury due to abrupt start of the machine, be sure to start the following work after turning the power off and ascertaining that the motor is at rest.
(1) The relationship between the needle and the upper looper
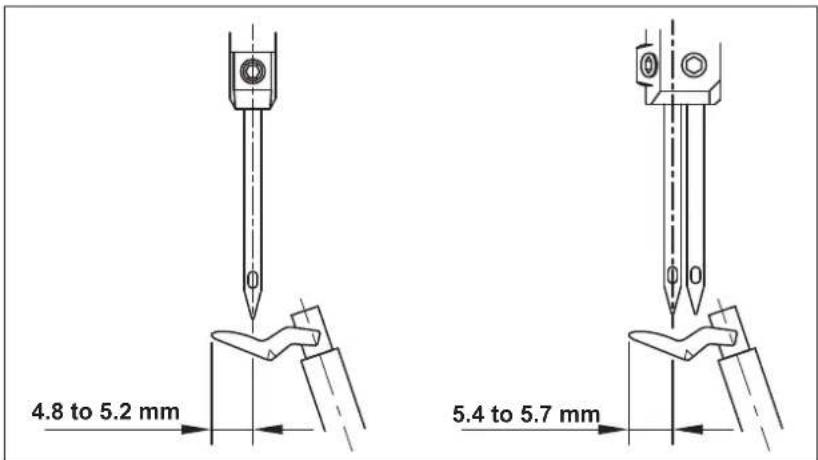
When the upper looper moves to the leftmost point, the distance from the looper tip to the center line of the needle is 4.8 to 5.2mm . For 2-needle model, the distance from the looper tip to the center line of the left needle is 5.4 to 5.7mm (60H: 5.0 to 5.5mm ).
(2) The relationship between the needle and the lower looper
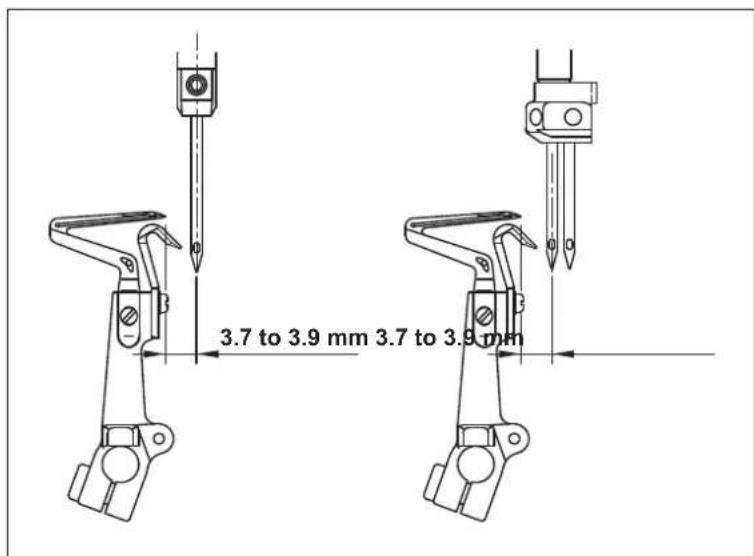
1) When the lower looper moves to the leftest point, the distance between the looper tip and the center line of the needle should be about 3.7 to 3.9mm (40H, 44H, 50H and 60H:4.1 to 4.3mm ). For 2-needle model, the distance is from the lower looper tip to the center line of the left needle.
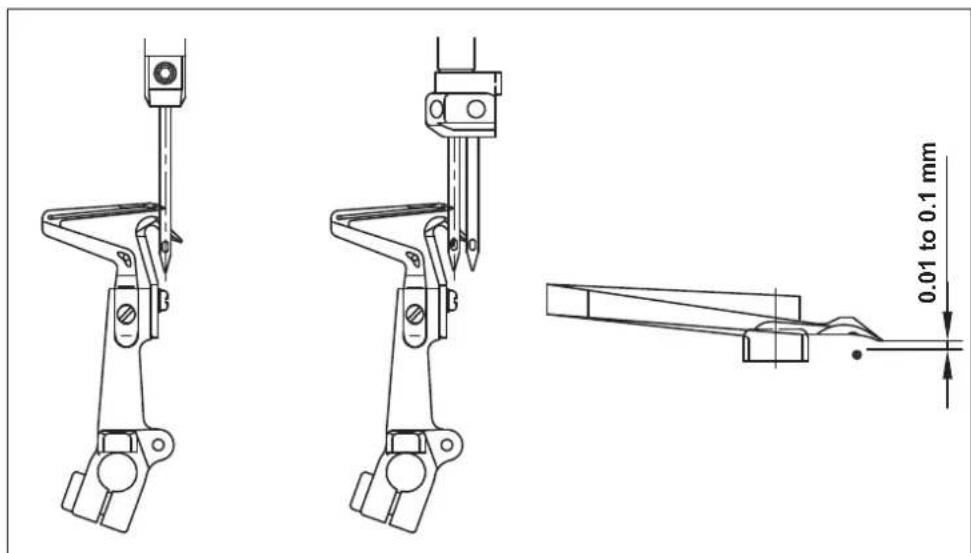
2) Adjust the distance from the looper tip to the scarf of the needle to 0.01 to 0.1mm when the lower looper moves to the right toward the center line of the needle (for the 2-needle models, the left needle is used as the reference).
(3) The relationship between the upper looper and the lower looper
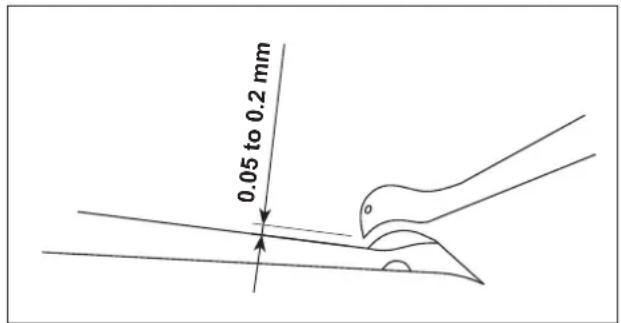
When the upper and the lower loopers cross, keep them as close as possible.
Somehow, the loopers shall not either touch nor collide to each other. The clearance of 0.05 to 0.2mm should be provided between the upper and lower loopers when they are crossing.
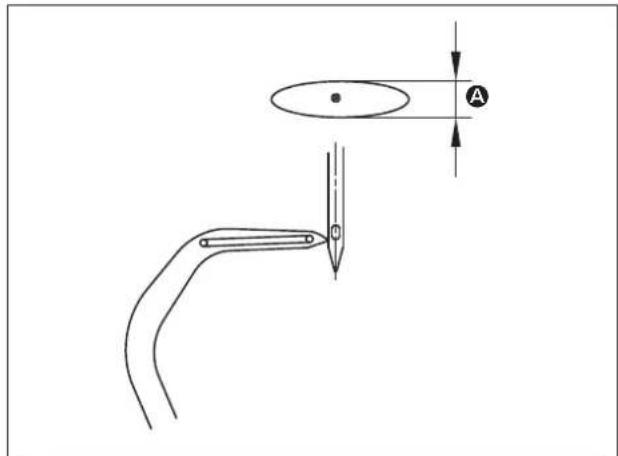
(4) The relationship between the needle and the double chainstitch looper

When the double chainstitch looper moves to reach its leftmost position, the distance from the double chain-stitch looper to the center line of the needle should be 1.4 to 1.9mm (50H, 60H: 1.6 to 2.3mm ).
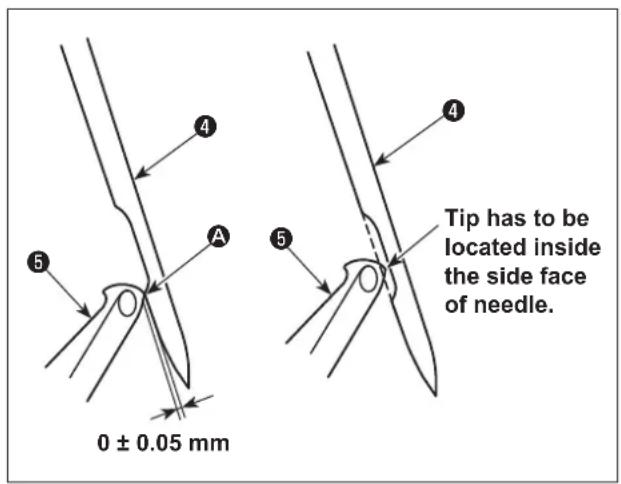
Adjust so that the clearance of 0 ± 0.05 ~mm is provided between crest A of the lower end of scarf of double chainstitch needle 4 and double chainstitch looper 5. At this time, the tip of double chainstitch looper 5 should be located inside the side face of double chain-stitch needle 4.
(5) The relationship between the needle and the needle guard
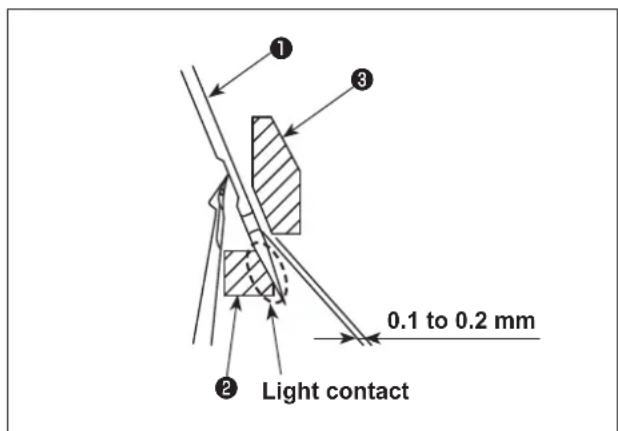
Adjust so that movable needle guard 2 comes in light contact with the needle when overlock needle 1 (left needle for the 2-needle model) is brought to its lower end position.
Adjust so that the distance from needle 1 to front needle guard 3 to 0.1 to 0.2mm
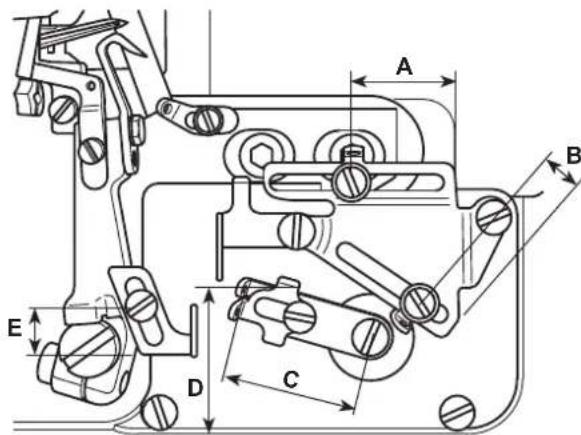
16. ADJUSTING THE AMOUNT OF TRAVEL OF THE DOUBLE CHAINSTITCH LOOPER

WARNING :
To protect against possible personal injury due to abrupt start of the machine, be sure to start the following work after turning the power off and ascertaining that the motor is at rest.
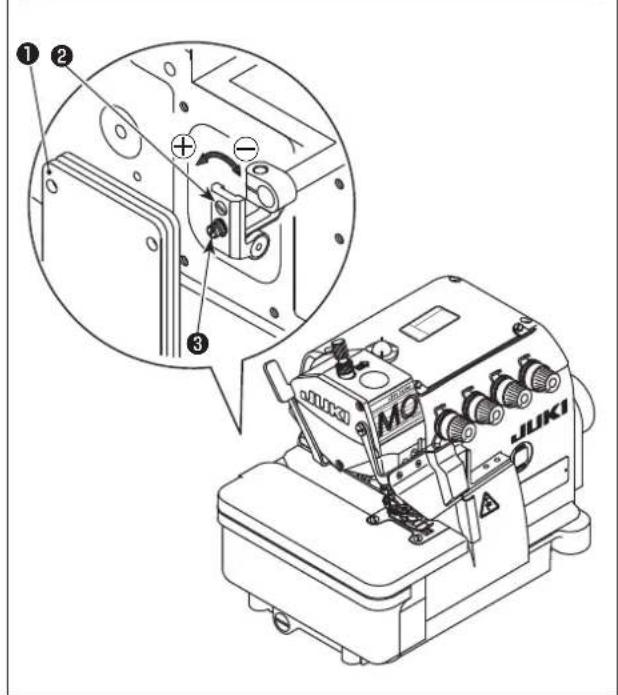
The double chainstitch looper makes elliptic movement. Adjust the amount of front/rear travel A of the double chainstitch looper following the steps of procedure described below where necessary.
1) Open rear cover ① of the sewing machine.
2) Loosen the screw 8 slightly.
3) Turn the screw to adjust.
To increase the amount of travel, turn to direction.
To decrease the amount of travel, turn to direction.
4) Tighten the screw ③ after the adjustment.
5) At the end of the adjustment, close rear cover 1.
17. MAINTENANCE

WARNING :
- Turn off the power switch before carrying out cleaning. The machine may operate if the treadle is pressed inductively, which could result in injury.
- Be sure to wear protective goggles and gloves when handling the lubricating oil and grease so that they do not get into your eyes or onto your skin, otherwise inflammation can be resulted.
- Furthermore, do not drink or eat the oil nor the grease for they can cause vomiting and diarrhea. Keep the oil away of the reach of children.
- Use both hands to hold the machine head when tilting or returning it to its original position. If only using one hand to move the machine, the weight of the machine head may cause slipping and you may get hurt.
(Periodical Maintenance Items)
| Maintenance Cycle | Maintenance Items |
| Daily | 1. Clean the lint on the feed dog. |
| 2. Check to be sure that the oil pan is filled with an adequate quantity of oil. (The oil surface level must be kept between the upper and lower red marker lines on the oil gauge.) |
| 3. Keep the sewing machine and the operation table clean at all time. |
| Weekly | 1. Keep the power cords looking clean and neat. |
| 2. Keep the operational panel clean. |
| 3. Check if the power parts is loosening or still at the right position. |
| Once every four months | 1. Change the oil in the oil pan with new oil. |
| Annually 1. | Check the transmission belt to see if it is worn out or damaged. |
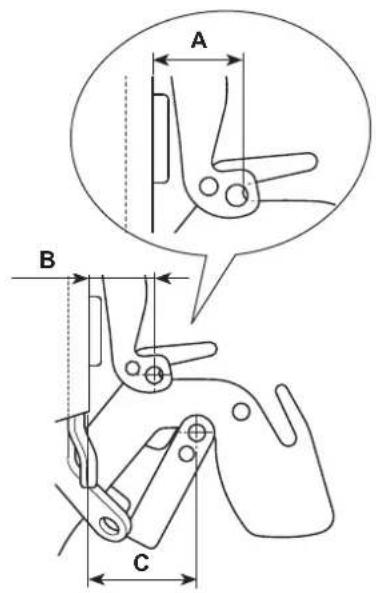
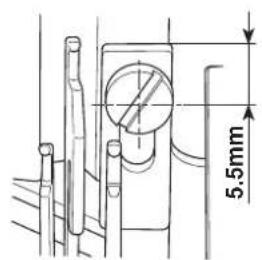
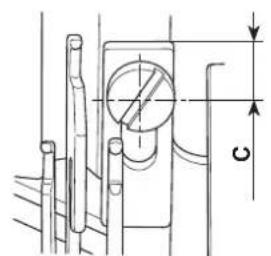
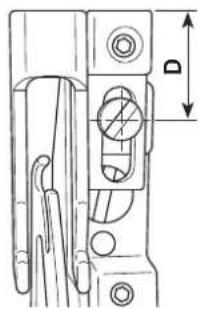
18. DIMENSIONS USE TO ADJUSTING THE LOOPER AND THE NEEDLE GUARD
WARNING :

- To avoid possible accidents due to unfamiliarity with the machine, get a maintenance man who has a good knowledge of the machine or serviceman of our distributor to adjust the machine or replace any of its parts.
- To avoid possible personal injury when the machine starts, it has to be ascertained in prior to the actuation of the machine that no screws are loosened and no components come in contact with one another.

The dimensions given in the table are standard ones to be used to adjust the looper. They are intended to be used for reference and should be changed more or less in accordance with the sewing products and thread to be used.
(Unit: mm)
| Model | A
04
A
B
14
C
A
16 | 0.05 to 0.2 mm | F
G |
| A | B | C | D | E | F |
| MO-6804S 10.4- | 10.6 -- (10.8) | 4.8-5.2 | 3.7-3.9 | | | | |
| MO-6814S-2△H | 10.4-10.6 | (9.1) | -(10.5) | 5.4-5.7 | 3.7-3.9 | | |
| MO-6814S-3△H | 10.4-10.6 | (9.1) | -(10.5) | 5.4-5.7 | 3.7-3.9 | | |
| MO-6814S-4△H | 11.8-12 | (10.5) | - | (12) | 5.4-5.7 | 4.1-4.3 | - |
| MO-6814S-30P | 10.4-10.6 | (9.1) | -(10.5) | 5.4-5.7 | 3.7-3.9 | | |
| MO-6816S-3△H | 10.4-10.6 | - | (7.6) | (10.8) | 4.8-5.2 | 3.7-3.9 | 1.4-1.9 |
| MO-6816S-50H | 11.8-12 | - | (9) | (12) | 4.8-5.2 | 4.1-4.3 | 1.6-2.3 |
| MO-6816S-60H | 12.6-12.8 | - | (9.8) | (12.7) | 5-5.5 | 4.1-4.3 | 1.6-2.3 |
| MO-6816S-30P | 10.4-10.6 | - | (7.6) | (10.8) | 4.8-5.2 | 3.7-3.9 | 1.4-1.9 |

WARNING :
To protect against possible personal injury due to abrupt start of the machine, be sure to start the following work after turning the power off and ascertaining that the motor is at rest.
(1) Position of the needle thread take-up and the needle thread guide
MO-6804S
MO-6814S**
MO-6816S**
(Unit: mm)
| MO-6814S MO-6816S | |
| A | B | C | A | B | C | D |
| Excluding 30P, 60H 6.5 6 5.5 8.5 8 14 12 | | | | |
| 30P 6.5 6 5.5 11.5 11 13 13 | | | | | | |
| 60H | ---7.5 8 14 13 | | | | | |
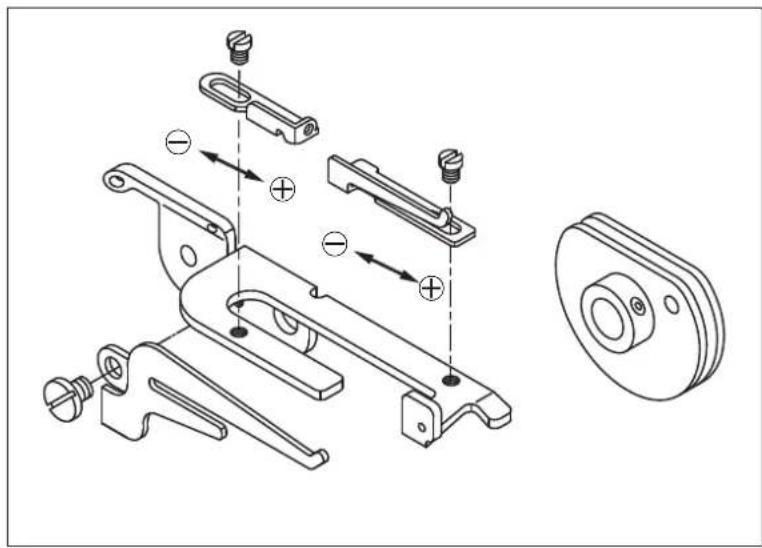
(2) Position of the looper thread take-up and the looper thread guide
(Unit: mm)
| Model A B C D E | | | | | |
| MO-6804S 11.5 17.5 | 20 28.5 11 | | | | |
| MO-6814S-2△H | 21.5 14.5 | 28 32 11 | | | |
| MO-6814S-3△H | 21.5 14.5 | 28 32 11 | | | |
| MO-6814S-4△H | 21.5 14.5 | 25 28.5 9 | | | |
| MO-6814S-30P 11.5 17.5 | .5 20 28.5 9 | | | | |
| MO-6816S-3△H | 21.5 17.5 | 20 28.5 9 | | | |
| MO-6816S-50H 33.5 10.5 | .5 20 28.5 9 | | | | |
| MO-6816S-60H 33.5 10.5 | .5 20 38 9 | | | | |
| MO-6816S-30P 21.5 10.5 | .5 28 35 15 | | | | |
(3) Adjustment value of the looper thread cam
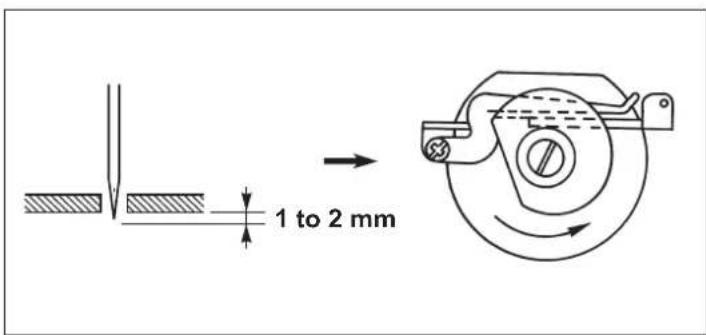
Adjust the looper thread cam timing so that the looper thread cam releases the looper thread when the needle tip comes down to project the undersurface of the throat plate by 1 to 2mm
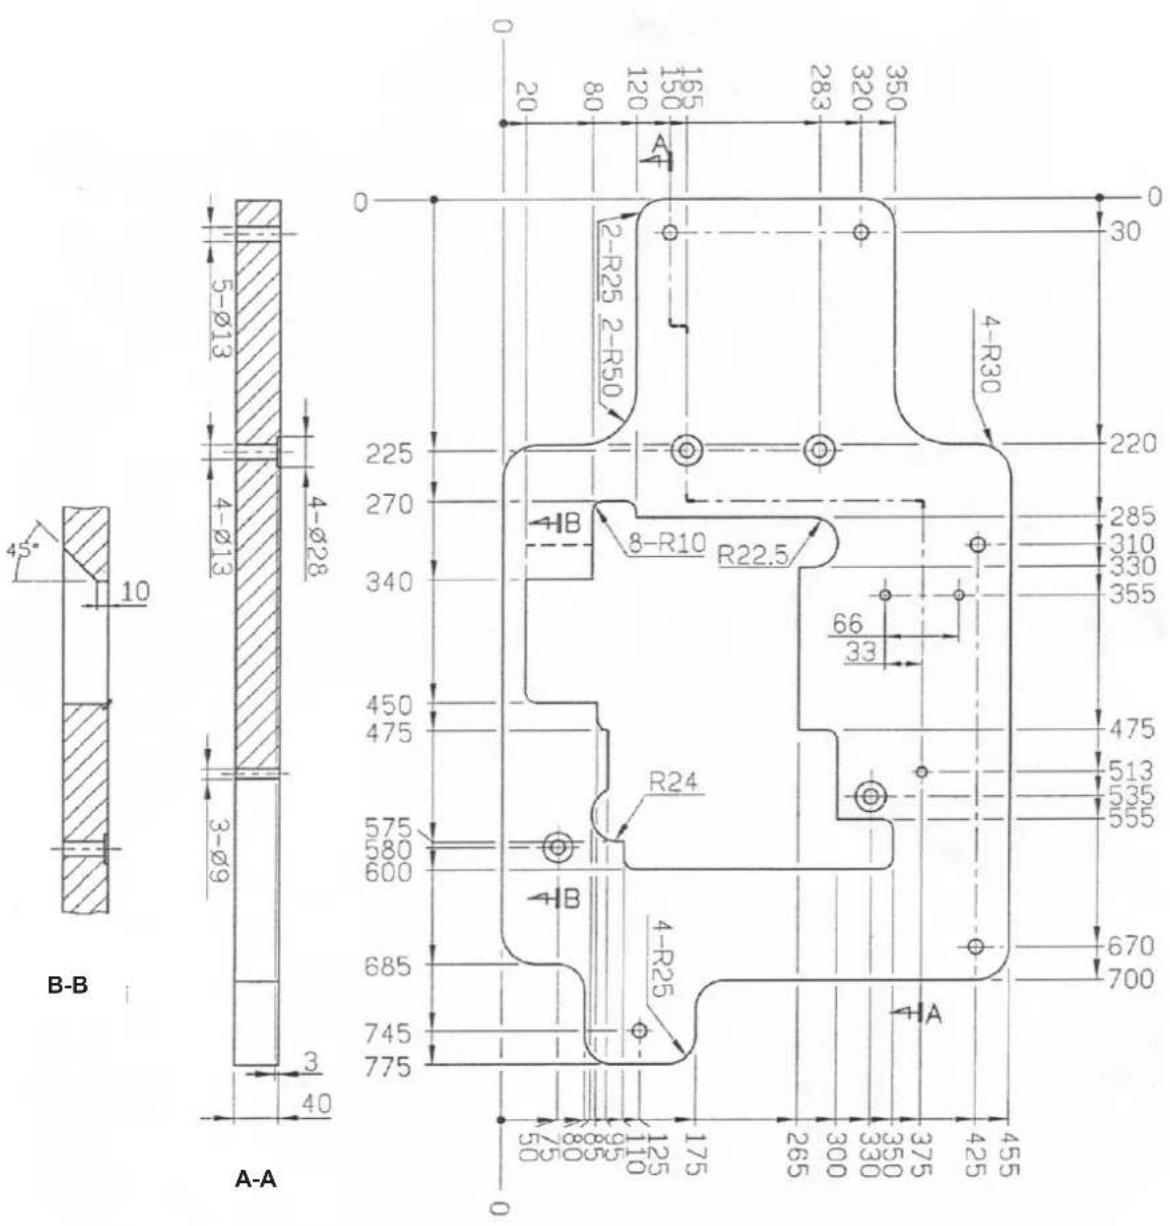
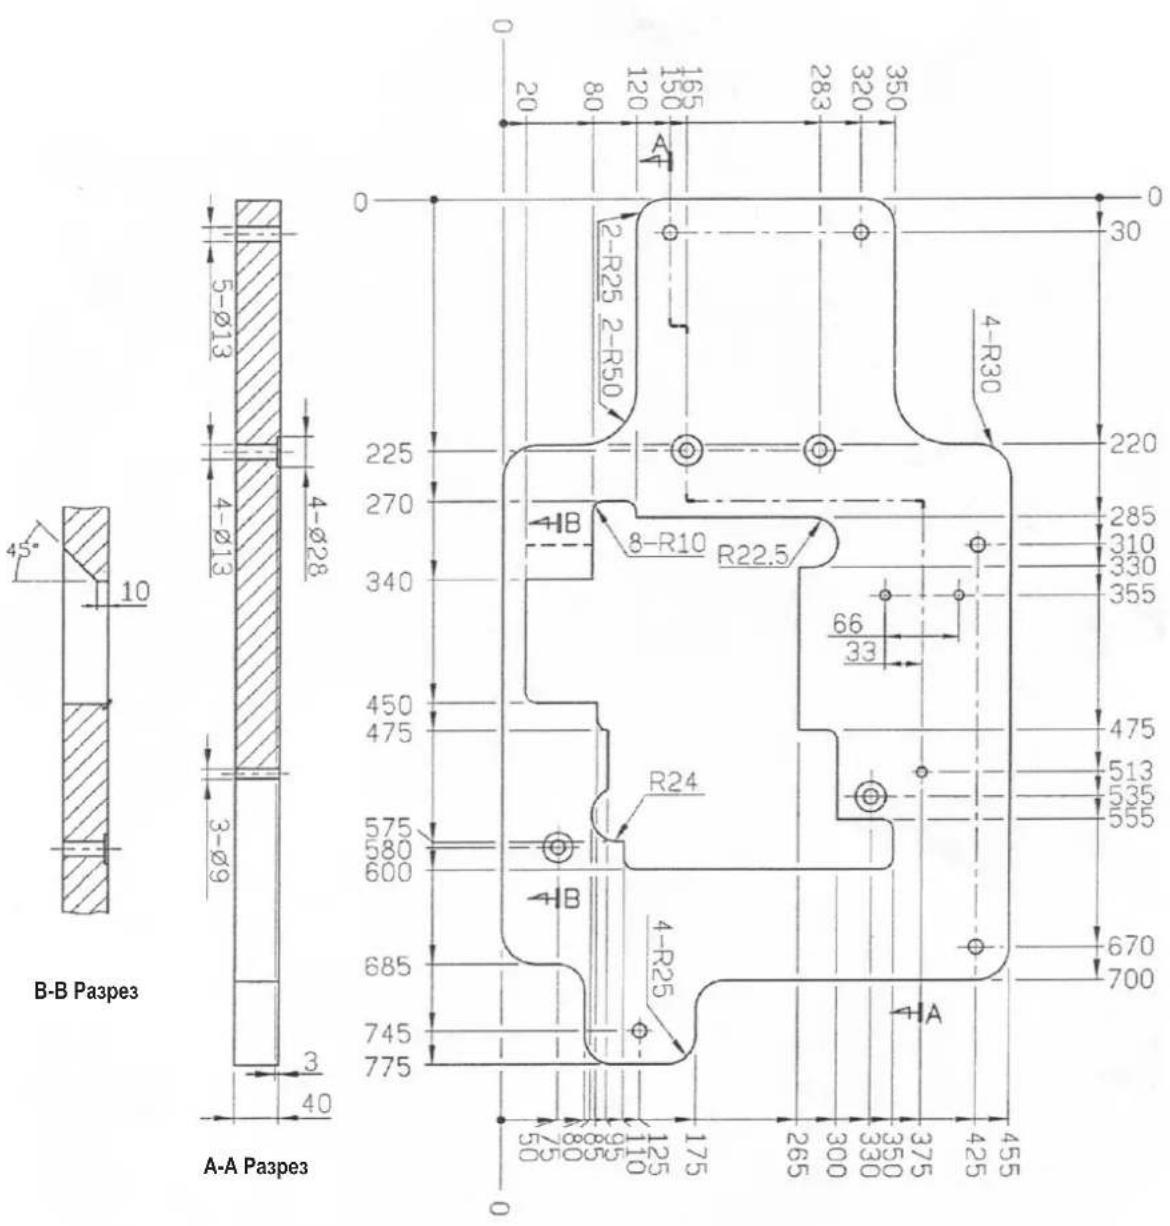
20. TABLE DRAWING
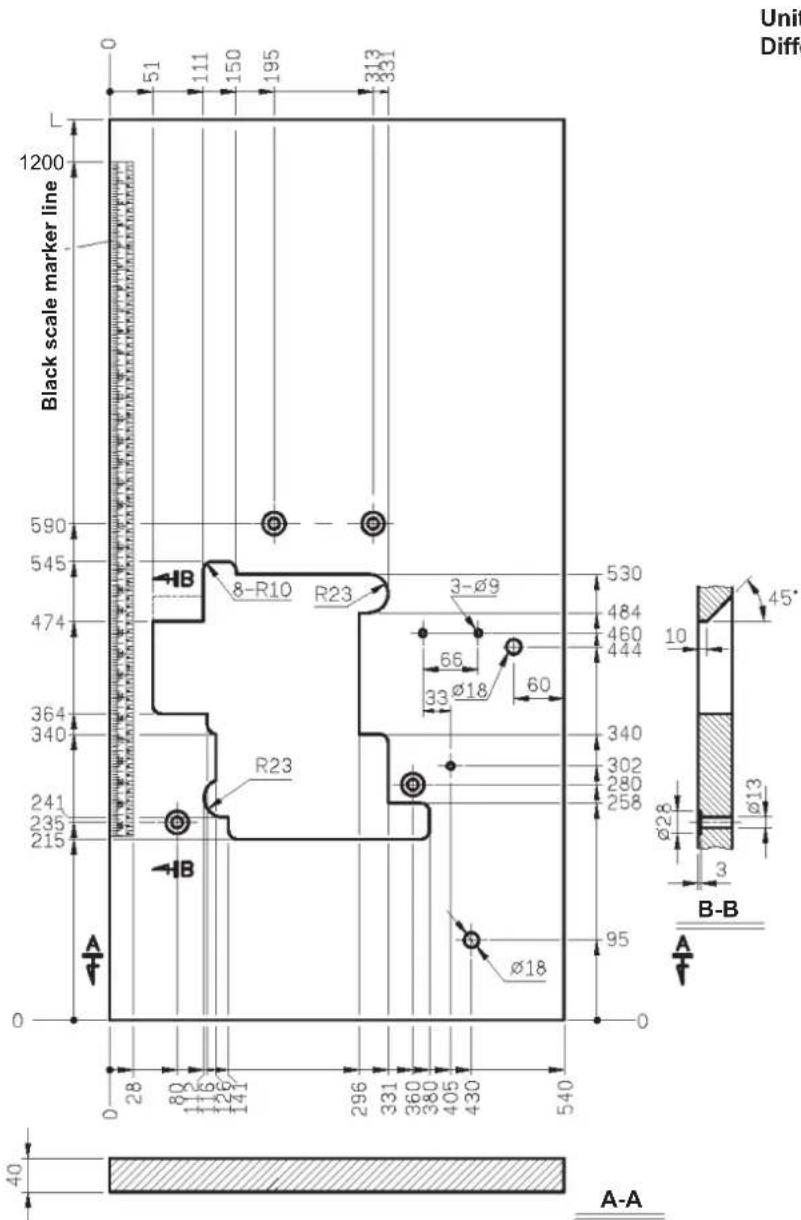
Unit:mm
Difference:±2
Fully-sunken type table
- Auxiliary table is required.
Unit: mm
Difference: ±2
Weight :12.4 kg ±5%

A-A
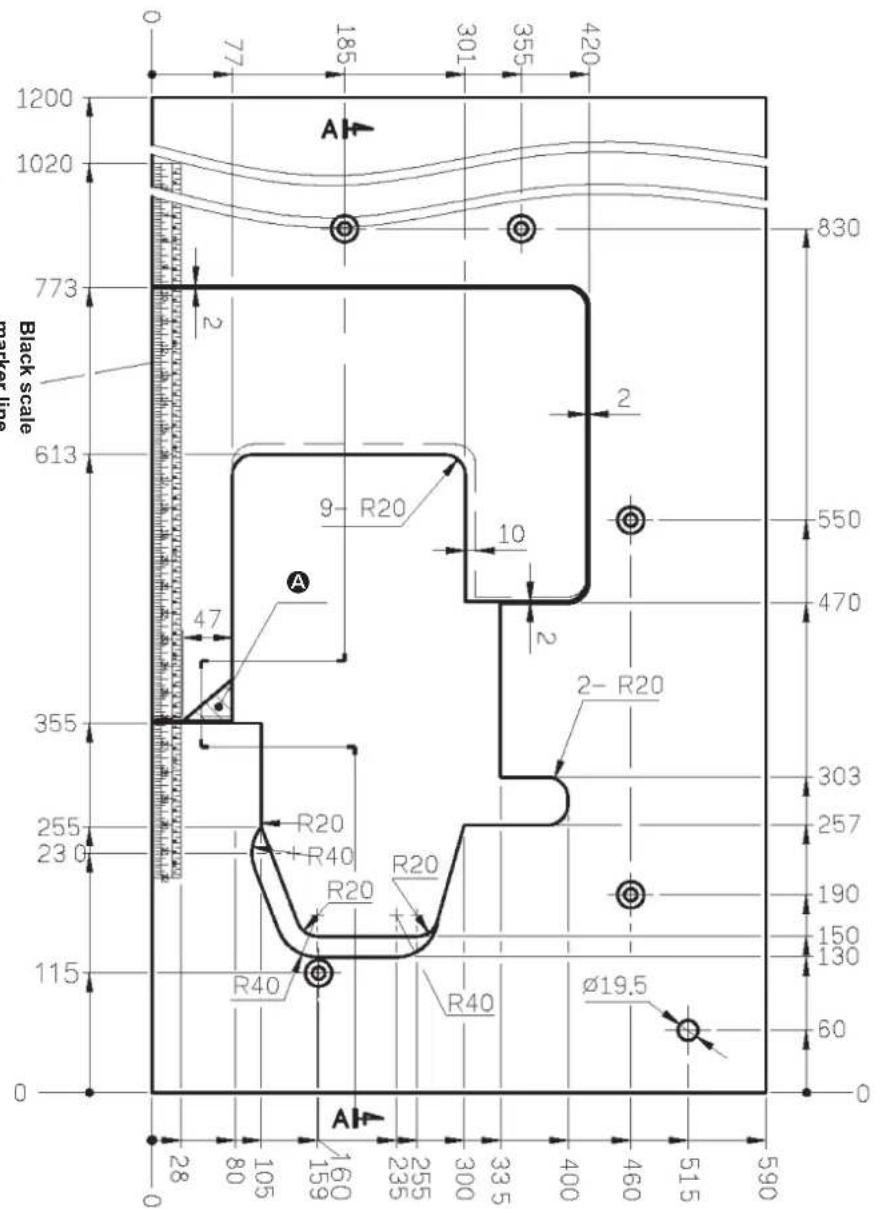
A = This part has to be removed when installing the auto hemmer device to the sewing machine.
Unit: mm
Difference:±2
Weight :4.25 kg ±5%
DEUTSCH
IPEIOCTOPOXHOCTNIPEEPHAYAIONPABOTbI

Ppeynpexkdenne:
IpoBepbTe cneDyooee, yTo6bI npedOTbpaNTb HnpaBnblHyo pa6Otu N nobpeXdHeMaunHbI.
- PpOHTaTne HxopoIoo NoIMTe cOePkaHne 3ToI INCTpyKcHn.
- y3haTeФyHKuINrnaBbIXuacteNnONMNTeNXHa3HaYeHne.
- PpabnIbNo noHmMaTe 3HaueHne Bcex npedynpeKdaioux Ta6nueK.
HayntecbynpabnTb3ToMaHnHOI.
- OnepaTopbI dOJIxHbI 6bITb B 3dpaBOM yMe.
- OnepaTopbI dOJIKNHbI Hocntb HaDnEkau yI pa6oyu oOeKdy.
- Ecnn Huxno opraHn3yIte yye6y dIra TORO, TTo6bI 6oyuHTb onepaTOPOB ynpabTb MaunHOJ.
COIDEPKHAHNE
- TEXHnueCKNE TPEBOAHNIA 1
- H3BAHnI IJIABHbIX YACTeI 2
- YCTAHOBKA 3
4.CMA3KAI 3AMEHA MACJA. 6
- 3APABKA HHTN
- PEGYUNIOBKA HATXKEHNA HNTN 11
- 3AMEHA IIJIbI 12
- PEGYUNPOBKA DIIINHbI CTEKKA 13
-
HAIADKA CKOPOCTN INΦΦEPEHUNAIBHOI NOAUY 13
-
PEGYUNPOBKA IINPHbI KAIMbI 14
- PEGYUNPOBKA UINPHbI KAIMbI 15
- PEGYIIMPOBKA BblCOTbl IIGbl 15
- PEGYJIINPOBKA INPIXKIMHOJ JIAPKIN 16
- PEGYUNPOBKA YCTPOICTBA IODAH 18
- OTHOSEHNA MEXUYIIGLOINETJNTENE 19
- HAJADKA BEINUHHI INPEMEUHNEHNAETNNTENBAOHOHTAMBUPHOCTPOCKN 21
- OBCJIyXKIBAHNE 22
18.ИСПОЛБ3OBAHNEИЗMEРЕнДЯPERUINPOBKNNETJIITEJNIPPEOXPAHNTELI NGblbl 23
- PA3MEPbI, CB83AHHbIE C NOJIOXEHnEM HHTENPITrBATEJI KYJNAyKA NETJIHTEJI (CTAHdAPTHA PEGyIpOBkA) 24
- YEPTEKN 26
1. TEXHINQUECKNE TPEBOBAHNA
(1)3aMeHaBepxHeroTpHMMepa
1) Ocna6bTe BnHT 1 n nepemecnte DepxkateB 2 HxHero TpMMepa BneBO.3aTEM HEMHO 3aTnHte BnHT 1.
2) YdaHTe BnHT 3 u BCTaBte HObBi BepxHm HOK. 3aTe HEMHO 3aTnHTE BuHT 3.

A = Pn yctaHOBKe Bbipe3aTb.
EdHHuN3MepeHn:MM
Iorpeuhoctb:±2
Bec: 4,25K ± 5%


JUKI®
JUKI株式会社
縫製機器広ト
206-8551東京都多摩市鶴牧 2-11-1
PHONE:(81)42-357-2371
FAX:(81)42-357-2274
http://www.juki.com
Copyright © 2014-2016 JUKI CORPORATION
·本書內容を無断で軸載、複写するとを禁止し技术支持。
- All rights reserved throughout the world.
- Alle Rechte weltweit vorbehalten.
Tous droits réservés partout dans le monde.
- Reservados todosarethos en el mundo entero.
- Tutti i diritti sono riservati in tutto il mondo.
版权所有,严禁擅自转载、翻印本书的内容。
- Dünya genelinde:tüm haklari saklidir.
Bce npaba ydepkahbI BCem Mmpe.
此製品使方中不明点加末了求之服店又当社常業所有间合
※之の取挃説明書は仕樣改良のた予告なく変更する事のはじま。
Please do not hesitate to contact our distributors or agents in your area for further information when necessary.
The description covered in this instruction manual is subject to change for improvement of the commodity without notice.
Bitten wenden Sie sich an unsere Handler oder Vertreter in Ihrer Nae, wenn Sie weitere Informationen benotigen.
* Anderungen der in dieser Betriebsanleitung enthaltenen Beschreibungen, die der Verbesserung des Produktes dieren, bleiben vorbehalten.
Pour plus d'information, n'hésitez pas à consulter nos distributeurs ou agents dans votre région.
* Les specifications données dans le present Manuel d'utilisation sont sujettes a modification sans preavis.
Sirvase ponser en contacto con{nuestros distribuidores o agentes en su area siempre que necesse algo-una informacion mas detallada.
La descripción que se de en este manual de instructuciones está sujeta a cambio sin previo aviso por razones de mejora de la mercancía.
Per ulteriori informazione, si prega di non esitare a mettersi in contatto con nostri distributori o agenti vostra area quando necessario.
Le descrizioni contene in quello manuale d'istruzioni sono soggette a modifiche senza alcun preavviso.
对本产品如有不明之处,请向代理店或本公司营业部门询问。
※本使用说明书中的规格因改良而发生变更,请订货时确认。
Gerektigi takdirde daß fazla ve ayrintili bilgi edinemek icin; luffen distributörlerimize ve bayilerimize basvurmaktan cekinmeyin.
Bu kullanma kilavuzunun kapsami icinde yer alan bilgileri, urundeki gelismelere bagl olarak ve on uyariya gerek kalmaksizin degistirme hakkimiz saklidir.
KoayctcBnAePm PAnpOCTaHHTENM INTOPOBIMn aEHTAMN B BAUEM PERONE IANOYHEHRAIJIbHHeMH INHOBMAUOM, KORDA TNO EHO6DMO.
*OnncanHe, BXOJHuee B DaHHy HnCTpyKuHIO, MoKet 6bIb N3MeHEo npOn3BODHTeEM npn ycOBepweHCTBOBaHN npOn3BODMO npOdykun 6e3 yBeDOMHNEH NOptpeHtene.

