M18 Rocket 213621 - Lighting MILWAUKEE - Free user manual and instructions
Find the device manual for free M18 Rocket 213621 MILWAUKEE in PDF.
| Product Type | Rechargeable Light Tower |
| Brand | Milwaukee |
| Model | M18 Rocket 213621 |
| Power Source | M18 lithium-ion battery or 120 V AC mains |
| AC Input Voltage | 120 V |
| DC Input Voltage (battery) | 18 V |
| USB Output | 5.3 V, 2.1 A max |
| DC Output (integrated charger) | 18 V, 3.1 A |
| Operating Temperature | -20 °C to 60 °C (tool), 0 °C to 65 °C (charger) |
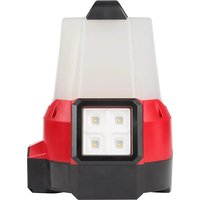
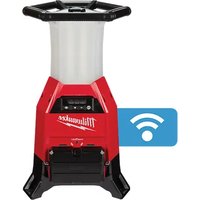
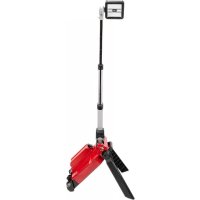
| Light Heads | 3 independently adjustable heads |
| Height Adjustment | Telescopic poles with locks |
| Lighting Type | LED |
| Brightness Levels | High, Medium, Low |
| USB Port | Yes, for charging electronic devices |
| Battery Charge Indicator | 4 LED indicators with diagnostics |
| Battery Protection | Smart circuit against overcurrent and overheating |
| Tool Warranty | 5 years (except exceptions) |
| Battery Warranty | 2 to 3 years depending on model |
| Approximate Weight | 9 kg |
| Maximum Height | 1.8 m |
| Outdoor Use | Yes, resistant to rain and humidity |
| Maintenance | Clean with a damp cloth and mild soap |
| Included Accessories | None (battery and charger sold separately) |
Frequently Asked Questions - M18 Rocket 213621 MILWAUKEE
User questions about M18 Rocket 213621 MILWAUKEE
0 question about this device. Answer the ones you know or ask your own.
Ask a new question about this device
Download the instructions for your Lighting in PDF format for free! Find your manual M18 Rocket 213621 - MILWAUKEE and take your electronic device back in hand. On this page are published all the documents necessary for the use of your device. M18 Rocket 213621 by MILWAUKEE.
USER MANUAL M18 Rocket 213621 MILWAUKEE
IMPORTANT SAFETY INSTRUCTIONS
WARNING
Read all safety warnings and all instructions. Failure to follow the
warnings and instructions may result in electric shock, fire and/or serious injury. Save all warnings and instructions for future reference.
WORK AREA SAFETY
- To reduce the risk of injury, close supervision is necessary when an appliance is used near children.
- Store idle light out of reach of children. Warm lights can become hazardous in the hands of children.
ELECTRICAL SAFETY
- Power cord plugs must match the outlet. Never modify the plug in any way. Do not use any adapter plugs with earthed (grounded) power tools. Unmodified plugs and matching outlets will reduce risk of electric shock.
- Avoid body contact with earthed or grounded surfaces, such as pipes, radiators, ranges and refrigerators. There is an increased risk of electric shock if your body is earthed or grounded.
- To reduce the risk of electric shock, do not put light in water or other liquid. Do not place or store appliance where it can fall or be pulled into a tub or sink.
- Do not abuse the cord. Never use the cord for carrying, pulling or unplugging the power tool. Keep cord away from heat, oil, sharp edges or moving parts.
- Arrange cords carefully to avoid hazardous environments. Tripping or snagging on cords can cause injury and product damage. Do not allow cords to run through puddles or across wet ground.
- Do not unplug by pulling on the cord. To unplug, grasp the plug, not the cord.
- Unplug the cord from outlet when not in use and before servicing or cleaning.
Always use a suitable extension cord to reduce the risk of electric shock. - If operating a light in a damp location is unavoidable, use a ground fault circuit interrupter (GFCI) protected supply. Use of an GFCI reduces the risk of electric shock.
PERSONAL SAFETY
- Do not overreach. Keep proper footing and balance at all times. This enables better control of the light in unexpected situations.
- Do not use on a ladder or unstable support. Stable footing on a solid surface enables better control of the light in unexpected situations.
-
Prevent unintentional starting. Ensure the switch is in the off-position before connecting to power source and/or battery pack, picking up or carrying the tool. Carrying power tools with your finger on the switch or energizing power tools that have the switch on invites accidents.
-
Disconnect the plug from the power source and/ or remove the battery pack, if detachable, from the power tool before making any adjustments, changing accessories, or storing power tools. Such preventive safety measures reduce the risk of starting the power tool accidentally.
BATTERY TOOL USE AND CARE
- Recharge only with the charger specified by the manufacturer. A charger that is suitable for one type of battery pack may create a risk of fire when used with another battery pack.
- Use light only with specifically designated battery packs. Use of any other battery packs may create a risk of injury and fire.
- Do not short circuit. A short-circuited battery pack may cause fire, personal injury, and product damage. A battery pack will short circuit if a metal object makes a connection between the positive and negative contacts on the battery pack. Do not place a battery pack near anything that may cause a short circuit, such as coins, keys or nails in your pocket.
- Do not allow fluids to flow into battery pack. Corrosive or conductive fluids, such as seawater, certain industrial chemicals, and bleach or bleach containing products, etc., can cause a short circuit.
- Under abusive conditions, liquid may be ejected from the battery; avoid contact. If contact accidentally occurs, flush with water. If liquid contacts eyes, additionally seek medical help. Liquid ejected from the battery may cause irritation or burns.
- Do not use a battery pack or tool that is damaged or modified. Damaged or modified batteries may exhibit unpredictable behavior resulting in fire, explosion or risk of injury.
- Do not expose a battery pack or tool to fire or excessive temperature. Exposure to fire or temperature above 265^ (130^) may cause explosion.
- Follow all charging instructions and do not charge the battery pack or tool outside the temperature range specified in the instructions. Charging improperly or at temperatures outside the specified range may damage the battery and increase the risk of fire.
CHARGER USE AND CARE
CAUTION
To reduce the risk of injury, charge MILWAUKEE Lithium-Ion packs only
in their MILWAUKEE Lithium-lon charger. Other types of batteries may burst causing personal injury and damage. Do not wire a battery pack to a power supply plug or car cigarette lighter. Batteries will be permanently disabled or damaged.
- Charge only MILWAUKEE M18™ Lithium-Ion packs. Other types of batteries may burst causing personal injury or damage.
-
Avoid dangerous environments. Do not charge battery pack in rain, snow, damp or wet locations. Do not use battery pack or charger in the presence of explosive atmospheres (gaseous fumes, dust or flammable materials) because sparks may be generated when inserting or removing battery pack, possibly causing fire.
-
Charge in a well ventilated area. Do not block charger vents. Keep them clear to allow proper ventilation. Do not allow smoking or open flames near a charging battery pack. Vented gases may explode.
- Maintain charger cord. When unplugging charger, pull plug rather than cord to reduce the risk of damage to the electrical plug and cord. Never carry charger by its cord. Keep cord from heat, oil and sharp edges. Make sure cord will not be stepped on, tripped over or subjected to damage or stress. Do not use charger with damaged cord or plug. Have a damaged charger replaced immediately.
- Use only recommended attachments. Use of an attachment not recommended or sold by the battery charger or battery pack manufacturer may result in a risk of fire, electric shock or personal injury.
- Unplugcharger when not in use. Remove battery packs from unplugged chargers.
- To reduce the risk of electric shock, always unplug charger before cleaning or maintenance. Do not allow water to flow into AC/DC plug. Use a Ground Fault Circuit Interrupter (GFCI) to reduce shock hazards.
- Store your battery and charger in a cool, dry place. Do not store battery pack where temperatures may exceed 120^ (50^) such as in direct sunlight, a vehicle or metal building during the summer.
SERVICE
- Have your light serviced by a qualified repair person using only identical replacement parts. This will ensure that the safety of the light is maintained.
- Never service damaged battery packs. Service of battery packs should only be performed by the manufacturer or authorized service providers.
SPECIFIC SAFETY RULES
- Warning - The lens may get hot during use. To reduce the risk of burns, do not touch hot lens.
- Suitable for rain and wet locations. Store indoors.
- Always use common sense and be cautious when using tools. It is not possible to anticipate every situation that could result in a dangerous outcome. Do not use this tool if you do not understand these operating instructions or you feel the work is beyond your capability; contact Milwaukee Tool or a trained professional for additional information or training.
- Maintain labels and nameplates. These carry important information. If unreadable or missing, contact a MILWAUKEE service facility for a free replacement.
READ AND SAVE ALL INSTRUCTIONS FOR FUTURE USE
FUNCTIONAL DESCRIPTION
- Heads
- Extension poles
- Extension latches
- USB Power Outlet
- Control panel
- Upper handle
- Leg release button
- Carrying handle
- Legs
- AC outlet door
- Battery bay/Charger
- Battery power indicator
- Brightness indicator
- AC power indicator
-
Decrease brightness button
-
Power button
- Increase brightness button
SPECIFICATIONS
Cat. No. 2136-20
DC Input Volts. 18
AC Input Volts 120
AC Input Amps. 1.3
DC Output Volts. 18
DC Output Amps. 3.1
USB Output Volts. 5.3
USB Output Amps 2.1
Operating Temperature
Battery and Charger 32°F to 150°F
(0^ to 65^)
Battery and Tool. -4°F to 140°F
(-20^ to 60^)
M18TM Li-Ion Battery Packs. 18 V DC
SYMBOLOLOGY
Volts
Direct Current
Alternating Current
Amps

ble Insulated

UL Listing for Canada and U.S.

Do not stare at the operating light source
Always extend legs before raising the poles

Keep hands clear of housing when collapsing the extension poles

Read operator's manual
Universal Serial Bus (USB)

USB Power Button
EXTENSION CORDS
Grounded tools require a three wire extension cord. Double insulated tools can use either a two or three wire extension cord. As the distance from the supply outlet increases, you must use a heavier gauge extension cord. Using extension cords with inadequately sized wire causes a serious drop in voltage, resulting in loss of power and possible tool damage. Refer to the table shown to determine the required minimum wire size.
The smaller the gauge number of the wire, the greater the capacity of the cord. For example, a 14 gauge cord can carry a higher current than a 16 gauge cord. When using more than one extension cord to make up the total length, be sure each cord contains at least the minimum wire size required. If you are using one extension cord for more than one tool, add the nameplate amperes and use the sum to determine the required minimum wire size.
Guidelines for Using Extension Cords
-
If you are using an extension cord outdoors, be sure it is marked with the suffix "W" to indicate that it is acceptable for outdoor use.
-
Be sure your extension cord is properly wired and in good electrical condition. Always replace a damaged extension cord or have it repaired by a qualified person before using it.
-
Protect your extension cords from sharp objects, excessive heat and damp or wet areas.
| Recommended Minimum Wire Gauge For Extension Cords* | |||||
| Nameplate Amps | Extension Cord Length | ||||
| 25' 50' 75' 100' 150 | |||||
| 0 - 2.0 | 18 | 18 | 18 | 18 | 16 |
| 2.1 - 3.4 | 18 | 18 | 18 | 16 | 14 |
| 3.5 - 5.0 | 18 | 18 | 16 | 14 | 12 |
| 5.1 - 7.0 | 18 | 16 | 14 | 12 | 12 |
| 7.1 - 12.0 | 16 | 14 | 12 | 10 | -- |
| 12.1 - 16.0 | 14 | 12 | 10 | -- | -- |
| 16.1 - 20.0 | 12 | 10 | -- | -- | -- |
- Based on limiting the line voltage drop to five volts at 150% of the rated amperes.
GROUNDING
WARNING Improperly connecting the grounding wire can result in the risk of electric shock. Check with a qualified electrician if you are in doubt as to whether the outlet is properly grounded. Do not modify the plug provided with the tool. Never remove the grounding prong from the plug. Do not use the tool if the cord or plug is damaged. If damaged, have it repaired by a MILWAUKEE service facility before use. If the plug will not fit the outlet, have a proper outlet installed by a qualified electrician.
Grounded Tools: Tools with Three Prong Plugs
Tools marked "Grounding Required" have a three wire cord and three prong grounding plug. The plug must be connected to a properly grounded outlet (See Figure A). If the tool should electrically malfunction or break down, grounding provides a low resistance path to carry electricity away from the user, reducing the risk of electric shock.
The grounding prong in the plug is connected through the green wire inside the cord to the grounding system in the tool. The green wire in the cord must be the only wire connected to the tool's grounding
system and must never be attached to an electrically "live" terminal.
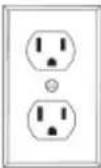
Your tool must be plugged into an appropriate outlet, properly installed and grounded in accordance with all codes and ordinances. The plug and outlet should look like those in Figure A.
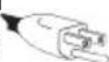
Fig. A
Double Insulated Tools:
Tools with Two Prong Plugs
Tools marked "Double Insulated" do not require
grounding. They have a special double insulation system which satisfies OSHA requirements and complies with the applicable standards of Underwriters Laboratories, Inc., the Canadian
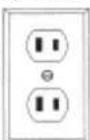
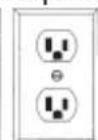
Standard Association and the Na- Fig. B Fig. C tional Electrical Code. Double Insulated tools may be used in either of the 120 volt outlets shown in Figures B and C.
ASSEMBLY
WARNING Recharge only with the charger specified for the battery. For specific charging instructions, read the operator's manual supplied with your charger and battery.
Inserting/Removing Battery Pack Insert the battery pack by sliding battery pack into the battery bay. Insert the battery pack until the battery latches lock.
To remove the battery pack, press in both battery latches and slide the battery pack out of the battery bay.
Inserting/Removing Extension Cord
When not using the AC option, make sure the AC doors are closed completely.
To operate the light on AC power, extend and lock legs. Open the door and plug a suitable extension cord into the light. To disconnect the extension cord, press the Power button to turn off the light, then remove the cord from the outlet.
NOTE: When an extension cord is plugged into the light, the light will automatically run on AC power.
CAUTION
To reduce the risk of injury, do not stare at the operating light source.
WARNING To reduce the risk of injury, always fully extend and lock legs into position before raising the poles. Light may tip and cause injury.
To reduce the risk of injury, keep hands clear of the housing area when collapsing the extension poles. Head may descend rapidly, pinching hands and fingers.
Extending/Collapsing the Legs
Always extend and lock legs before raising the poles.
- Stand light upright.
- Press the Leg Release Button and slide the legs down using the Carrying Handle.
- Lift up on the Upper Handle while sliding down the Carrying Handle.
- Lift until the Battery Bay lifts off the floor and the legs lock into place.
- To collapse, hold with upper handle, press the Leg Release Button and slide in the legs using the Carrying Handle. Keep hands clear of the legs as they collapse.
Extending/Collapsing the Extension Poles
Extend or collapse the two poles to set the light at the desired height.
- Extend and lock the legs.
- Open the top extension latch and raise the head out of the housing. Extend the pole to the desired height.
- Fully close top extension latch.
- If more height is needed, fully extend first pole and close latch before opening bottom latch.
- Continue to raise the head to the desired height.
- Fully close bottom extension latch.
- Rotate the heads to the desired angle. The three heads can be adjusted individually.
NOTE: Before collapsing the poles, the heads must be returned to their upright angle.
USB Power Outlet
This outlet can be used to charge a cell phone, power an MP3 player or any other device that uses less than 2.1 A of DC electrical current. To turn the USB on or off, press the USB Power button. The USB port will automatically shut off after two hours of inactivity
NOTE: Any device that uses more than 2.1A of DC electrical current will trip a self-resetting overload and disable the output.
LIGHT OPERATION
CAUTION
To reduce the risk of injury, do not stare at the operating light source.
Using the Light
- Insert battery pack or plug into AC power.
- Press the Power button to turn on the light.
NOTE: When the light is running on battery, the Battery Power Indicator will light. When the light is running on AC power, the AC Power Indicator will light.
- Press the Increase + and Decrease - buttons to cycle through High, Medium, and Low brightness.
NOTE: The light will default to the selected brightness the next time it is turned on. - Press the Power button to turn the light off. Always turn off power before unplugging the light.
BATTERY OPERATION
Fuel Gauge
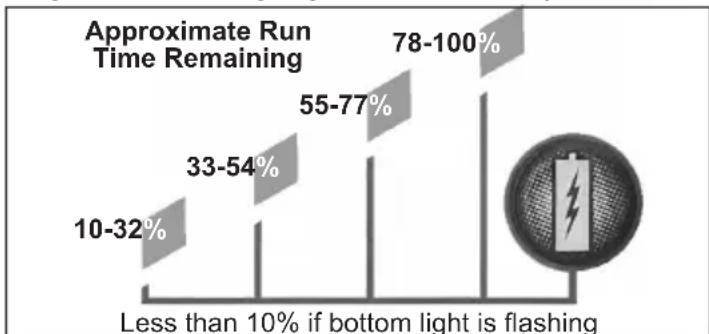
Use the Fuel Gauge to determine the battery pack's remaining run time. Press the Fuel Gauge button to display the lights. The Fuel Gauge will light up for 2-3 seconds. When less than 10% of charge is left, 1 light on the fuel gauge will flash slowly.
NOTE: If the Fuel Gauge doesn't appear to be working, place the battery pack on the charger and charge as needed.
Compared to NiCd battery pack types, MILWAUKEE Lithium-lon battery packs deliver fade-free power for their entire run time. The tool will not experience a slow, gradual loss of power as you work. To signal the end of discharge, 1 light on the fuel gauge will flash quickly for 2-3 seconds and the tool will not run. Charge the battery pack.
NOTE: Immediately after using the battery pack, the Fuel Gauge may display a lower charge than it will if checked a few minutes later. The battery cells "recover" some of their charge after resting.
Battery Pack Protection
To protect itself from damage and extend its life, the battery pack's intelligent circuit monitors current draw and temperature. In extremely high torque, binding, stalling, and short circuit situations, the battery pack will turn OFF the tool if the current draw becomes too high. All the fuel gauge lights will flash. Release the trigger and restart.
Under extreme circumstances, the internal temperature of the battery could become too high. If this happens, the fuel gauge lights will flash in an alternating pattern and the tool will not run. Allow the battery to cool down.
| Fuel Gauge Lights | Diagnosis Solution | |
| Lights 1 - 4 Solid Remaining run time Continue working | ||
| 1 Light, flashing slowly | Less than 10% run time left | Prepare to charge pack |
| 1 Light, flashing quickly | End of discharge Charge pack | |
| Lights 1-4, flashing quickly | Current draw too high | Release trigger and restart, reduce pressure |
| Lights 1&3 / 2&4, flashing alternatingly | Battery temperature too high | Release trigger and allow battery to cool |
Cold Weather Operation
MILWAUKEE Lithium-Ion battery packs are designed to operate in temperatures below freezing. When the battery pack is too cold, it may need to warm up before normal use. Put the battery on a tool and use the tool in a light application. It may "buzz" for a short time until it warms up. When the buzzing stops, use the tool normally.
Maintenance and Storage
Do not expose your battery pack or cordless tools to water or rain, or allow them to get wet. This could damage the tool and battery pack. Do not use oil or solvents to clean or lubricate your battery pack. The plastic casing will become brittle and crack, causing a risk of injury.
Store battery packs at room temperature away from moisture. Do not store in damp locations where corrosion of terminals may occur. As with other battery pack types, permanent capacity loss can result if the pack is stored for long periods of time at high temperatures (over 120^ ). MILWAUKEE Lithium-lon battery packs maintain their charge during storage longer than other battery pack types. After about a year of storage, charge the pack as normal.
Transport
Personal transport of Li-ON battery packs is allowed when done in accordance with these warnings and instructions. The proper classification, packaging, labeling, marking, and documentation requirements for shipping Li-ON batteries is dependent upon whether the particular batteries are rated greater than or less than 100 Wh (Watt Hours can be found on the battery pack nameplate). Generally, Li-ON batteries rated 100 Wh or less are "excepted" from certain Class 9 DG requirements. Always check compliance of Li-ON battery consignments against the current regulations governing the chosen mode of transport. When in doubt, contact the carrier or other trained Dangerous Goods professional to confirm acceptability. Li-ON packs are shipped under classification UN 3480 (battery only) or UN 3481 (batteries contained in or packed with equipment).
WARNING To reduce the risk of injury or explosion, never burn or incinerate a battery pack even if it is damaged, dead completely discharged. When burned, toxic fumes and materials are created.
Disposing of MILWAUKEE Lithium-Ion Battery Packs
MILWAUKEE Lithium-lon battery packs are more environmentally friendly than some other types of power tool battery packs (e.g., nickel-cadmium). Always dispose of your battery pack according to federal, state and local regulations. Contact a recycling agency in your area for recycling locations. Even discharged battery packs contain some energy. Before disposing, use electrical tape to cover the terminals to prevent the battery pack from shorting, which could cause a fire or explosion.
RBRC Battery Recycling Seals
The RBRC™ Battery Recycling Seals (see "Symbology") on your tool battery packs indicate that MILWAUKEE has arranged for the recycling of that battery pack with the Rechargeable Battery Recycling Corporation (RBRC). At the end of your battery pack's useful life, return the battery pack to a MILWAUKEE Branch Office/Service Center or the participating retailer nearest you. For more information, visit the RBRC web site at www.rbrc.org.
CHARGER OPERATION
WARNING Charge only MILWAUKEE M18™ Lithium-lon batteries in this MILWAUKEE Lithium-lon charger. Other types of batteries may cause personal injury and damage.
When to Charge the Battery Pack
To charge the battery pack, connect the light to AC power and insert a battery pack. The light will remain operational when the battery pack is charging. MILWAUKEE batteries do not develop a "memory" when charged after only a partial discharge. It is not necessary to run down the battery pack before placing it on the charger.
- Use the Fuel Gauge to determine when to charge your MILWAUKEE Lithium-Ion battery pack.
- You can "Top-Off" your battery pack's charge before starting a big job or long day of use.
- The only time it is necessary to charge the MILWAUKEE Lithium-Ion battery pack is when the battery pack has reached the end of its charge. To signal the end of charge, power to the tool will drop quickly, allowing you just enough power to finish making a cut, drilling a hole, or driving a fastener. Charge the battery pack as needed.
How to Charge the Battery Pack
Plug the light into a 120V outlet. The battery packs will not charge if the Stand Light Charger is not plugged in. Align the battery pack with the bay and slide the battery pack into the charger as far as possible.
- When a battery pack is inserted into the charger, the LEDs will indicate the following:

Continuous red: Charging

Continuous green light: Charging is complete

- Flashing red: Battery is too hot/cold
- Charging will begin when battery reaches correct charging temperature

Flashing red/green: Damaged or faulty battery pack
- A fully discharged battery pack with an internal temperature in the normal range will charge in about 30 to 185 minutes, depending on the battery pack.
- Heavily cycled batteries may take longer to charge completely.
- The Fuel Gauge lights on the battery pack are displayed as the pack is being charged, indicating how fully charged the pack is. The fuel gauge will turn off when charging is complete.
After charging is complete, the continuous green light will come on. -
The charger will keep the battery pack fully charged if it is left on the charger. The light indicator will flash green during this maintenance charging.
-
If the light indicator flashes red and green, check that the battery pack is fully seated into the bay. Remove the pack and reinsert. If the problem persists, contact a MILWAUKEE service facility.
- If the light indicator does not come on, check that the battery pack is fully seated into the bay. Remove the battery pack and reinsert. If the light indicator still does not come on, contact a MILWAUKEE service facility.
Charging a Hot or Cold Battery Pack
The Red Flashing Indicator light on the charger indicates that the battery pack temperature is outside the charging range. Once the battery pack is within the acceptable range, normal charging will take place and the red light will be continuous. Hot or cold batteries may take longer to charge.
| Lithium-Ion Charging Status | ||
| Battery Pack Temperature | Red Charger Indicator Light | Charging Status |
| Too Hot | Fast Flashing | Not charging |
| Normal Range | Continuous | Normal charging |
| Too Cold | Fast Flashing | Not charging |
MAINTENANCE
WARNING To reduce the risk of injury, always unplug the charger and remove the battery pack from the charger before performing any maintenance. Never disassemble the tool, battery pack or charger. Contact a MILWAUKEE service facility for ALL repairs.
To reduce the risk of fire, personal injury, and product damage due to a short circuit, never immerse your tool, battery pack or charger in fluid or allow a fluid to flow inside them. Corrosive or conductive fluids, such as seawater, certain industrial chemicals, and bleach or bleach containing products, etc., can cause a short circuit.
Maintaining Light
Keep your light, battery pack and charger in good repair by adopting a regular maintenance program. If the light does not work properly, return the light to a MILWAUKEE service facility for repairs.
Tightening
If the head or extensions will not hold their position, the screws may need to be tightened. Tighten the bracket screws by holding the head. Tighten the extension latches by opening the latches and tightening the screw inside.
AWARNING To reduce the risk of personal injury and damage, never immerse your tool, battery pack or charger in liquid or allow a liquid to flow inside them.
Cleaning
Clean dust and debris from vents. Keep handles clean, dry and free of oil or grease. Use only mild soap and a damp cloth to clean, since certain cleaning agents and solvents are harmful to plastics and other insulated parts. Do not use sprays or solvents. Some of these include gasoline, turpentine, lacquer thinner, paint thinner, chlorinated cleaning solvents, ammonia and household detergents containing ammonia. Never use flammable or combustible solvents around tools.
ACCESSIONS
WARNING Use only recommended accessories. Others may be hazardous. For a complete listing of accessories, go online to www.milwaukeeetool.com or contact a distributor.
SERVICE - UNITED STATES
1-800-SAWDUST (1.800.729.3878)
Monday-Friday, 7:00 AM - 6:30 PM CST
or visit www.milwaukeetool.com
Contact Corporate After Sales Service Technical Support with technical, service/repair, or warranty questions.
Email: metproductsupport@milwaukeetool.com
Become a Heavy Duty Club Member at www.milwaukeetool.com to receive important notifications regarding your tool purchases.
SERVICE - CANADA
Milwaukee Tool (Canada) Ltd 1.800.268.4015
Monday-Friday, 7:00 AM - 4:30 PM CST
or visit www.milwaukeetool.ca
LIMITED WARRANTY USA & CANADA
Every MILWAUKEE power tool (see exceptions below) is warranted to the original purchaser only to be free from defects in material and workmanship. Subject to certain exceptions, MILWAUKEE will repair or replace any part on an electric power tool which, after examination, is determined by MILWAUKEE to be defective in material or workmanship for a period of five (5) years* after the date of purchase unless otherwise noted. Return of the power tool to a MILWAUKEE factory Service Center location or MILWAUKEE Authorized Service Station, freight prepaid and insured, is required. A copy of the proof of purchase should be included with the return product. This warranty does not apply to damage that MILWAUKEE determines to be from repairs made or attempted by anyone other than MILWAUKEE authorized personnel, misuse, alterations, abuse, normal wear and tear, lack of maintenance, or accidents.
Normal Wear: Many power tools need periodic parts replacement and service to achieve best performance. This warranty does not cover repair when normal use has exhausted the life of a part including, but not limited to, chucks, brushes, cords, saw shoes, blade clamps, o-rings, seals, bumpers, driver blades, pistons, strikers, lifters, and bumper cover washers.
*This warranty does not cover Air Nails & Staplers; Airless Paint Sprayer; Cordless Battery Packs; Gasoline Driven Portable Power Generators; Hand Tools; Hoist - Electric, Lever & Hand Chain; M12™ Heated Gear; Reconditioned Product; and Test & Measurement Products. There are separate and distinct warranties available for these products.
**The warranty period for Job Site Radios, M12™ Power Port, M18™ Power Source, Jobsite Fan and Trade Titan™ Industrial Work Carts is one (1) year from the date of purchase. The warranty period for the M18 FUEL™ 1" D-Handle High Torque Impact Wrenches, Drain Cleaning Cables and AIRSNAKE™ Drain Cleaning Air Gun Accessories is two (2) years from the date of purchase. The warranty period for the M18™ Compact Heat Gun, 8 Gallon Dust Extractor, M18™ Framing Nailers, M18 FUEL™ 1/2" Ext. Anvil Controlled Torque Impact Wrench w/ ONE-KEY™, and the M18 FUEL™ 1" High Torque Impact Wrench w/ ONE-KEY™ is three (3) years from the date of purchase. The warranty period for the LED in the LED Work Light and the LED Upgrade Bulb for the Work Light is the lifetime of the product subject to the limitations above. If during normal use the LED or LED Bulb fails, the part will be replaced free of charge.
Warranty Registration is not necessary to obtain the applicable warranty on a MILWAUKEE power tool product. The manufacturing date of the product will be used to determine the warranty period if no proof of purchase is provided at the time warranty service is requested.
ACCEPTANCE OF THE EXCLUSIVE REPAIR AND REPLACEMENT REMEDIES DESCRIBED HEREIN IS A CONDITION OF THE CONTRACT FOR THE PURCHASE OF EVERY MILWAUKEE PRODUCT. IF YOU DO NOT AGREE TO THIS CONDITION, YOU SHOULD NOT PURCHASE THE PRODUCT. IN NO EVENT SHALL MILWAUKEE BE LIABLE FOR ANY INCIDENTAL, SPECIAL, CONSEQUENTIAL OR PUNITIVE DAMAGES, OR FOR ANY COSTS, ATTORNEY FEES, EXPENSES, LOSSES OR DELAYS ALGEGD TO BE AS A CONSEQUENCE OF ANY DAMAGE TO, FAILURE OF, OR DEFECT IN
ANY PRODUCT INCLUDING, BUT NOT LIMITED TO, ANY CLAIMS FOR LOSS OF PROFITS. SOME STATES DO NOT ALLOW THE EXCLUSION OR LIMITATION OF INCIDENTAL OR CONSEQUENTIAL DAMAGES, SO THE ABOVE LIMITATION OR EXCLUSION MAY NOT APPLY TO YOU. THIS WARRANTY IS EXCLUSIVE AND IN LIEU OF ALL OTHER EXPRESS WARRANTYES, WRITTEN OR ORAL, TO THE EXTENT PERMITTED BY LAW, MILWAUKEE DISCLAIMS ANY IMPLIED WARRANTYES, INCLUDING WITHOUT LIMITATION ANY IMPLIED WARRANTY OF MERCHANTABILITY OR FITNESS FOR A PARTICULAR USE OR PURPOSE; TO THE EXTENT SUCH WARRANTYER IS NOT PERMITTED BY LAW, SUCH IMPLIED WARRANTYES ARE LIMITED TO THE DURATION OF THE APPLICABLE EXPRESS WARRANTY AS DESCRIBED ABOVE. SOME STATES DO NOT ALLOW LIMITATIONS ON HOW LONG AN IMPLIED WARRANTY LASTS, SO THE ABOVE LIMITATION MAY NOT APPLY TO YOU, THIS WARRANTYY GIVES YOU SPECIFIC LEGAL RIGHTS, AND YOU MAY ALSO HAVE OTHER RIGHTS WHICH VARY FROM STATE TO STATE.
This warranty applies to product sold in the U.S.A. and Canada only. Please consult the 'Service Center Search' in the Parts & Service section of MILWAUKEE's website www.milwaukeetool.com or call 1.800. SAWDUST (1.800.729.3878) to locate your nearest service facility for warranty and non-warranty service on a Milwaukee electric power tool.
LIMITED WARRANTY USA & CANADA
Every MILWAUKEE Battery Pack (sold with cordless product and/or as a replacement battery pack) is warranted to the original purchaser only to be free from defects in material and workmanship. Subject to certain exceptions, MILWAUKEE will repair or replace a battery pack which, after examination, is determined by MILWAUKEE to be defective in material or workmanship for the stated warranty period from date of purchase. Return of the battery pack to a MILWAUKEE factory Service Center location or MILWAUKEE Authorized Service Station, freight prepaid and insured, is required. For the proper shipping procedure of battery packs, contact 1.800.SAWDUST (1.800.729.3878), or go to www.milwaukeetool.com. A copy of the proof of purchase should be included with the return product. This warranty does not apply to damage that MILWAUKEE determines to be from repairs made or attempted by anyone other than MILWAUKEE authorized personnel, misuse, alterations, abuse, normal wear and tear, lack of maintenance, or accidents.
| Battery Pack Cat. No. Chemistry | Warranty Period (from date of purchase) | |
| 48-11-1812 48-11-1828 (Serial number prefix "B41E" and later) 48-11-1840 48-11-1850 48-11-1860 48-11-1865 48-11-1880 48-11-1890 48-11-2402 48-11-2440 48-11-2460 48-11-2830 (Serial number prefix "C71") | LITHIUM-ION Three (3) | Years |
| 48-11-0490 48-11-1815 48-11-1820 48-11-1835 48-11-2001 48-11-2401 48-11-2420 48-11-2430 | LITHIUM-ION Two (2) | Years |
| 48-11-1828 (Serial number prefix "B41Q" and earlier) 48-11-1830 (Serial number prefix "A95") 48-11-2830 (Serial number prefix "A71") | LITHIUM-ION | Two (2) Years - plus, Three (3) Years Pro-Rata (prorated)* |
| 48-11-0100 48-11-1024 48-11-1830 (Serial number prefix "E95") 48-11-1970 48-11-2230 | Nickel-Cadmium (Ni-Cd), Nickel-Metal-Hydride (Ni-MH), LITHIUM-ION | One (1) Year |
*The warranty period for MILWAUKEE M18™ 48-11-1828 (with the serial number prefix "B41D" and earlier), V18™ 48-11-1830 (with the serial number prefix "A95"), and V28™ 48-11-2830 (with the serial number prefix "A71") is five (5) years / 2000 charges from the date of purchase, whichever first occurs. The first 1000 charges or 2 years of the warranty, whichever first occurs, are covered through free replacement of the defective battery. This means that for the earlier of the first 1000 charges or two (2) years from the date of purchase/first charge, a replacement battery will be provided to the customer for any defective battery free of charge. Thereafter, the remaining charges up to a total of 2000 or the remainder of the five (5) year period from
the date of purchase, whichever first occurs, will be covered on a pro rata basis. This means that every customer gets an additional 1000 charges or three (3) years of pro rata warranty on the these battery packs, depending upon the amount of use. MILWAUKEE M18™ 48-11-1828 (with the serial number prefix "B41E" and later), V18™ 48-11-1830 (with the serial number prefix "E95"), and M28™ 48-11-2830 (with the serial number prefix "C71") have different warranty periods, as listed. Warranty Registration is not necessary to obtain the applicable warranty on a MILWAUKEE battery pack. The manufacturing date of the product will be used to determine the warranty period if no proof of purchase is provided at the time warranty service is requested.
ACCEPTANCE OF THE EXCLUSIVE REPAIR AND REPLACEMENT REMEDIES DESCRIBED HEREIN IS A CONDITION OF THE CONTRACT FOR THE PURCHASE OF EVERY MILWAUKEE PRODUCT. IF YOU DO NOT AGREE TO THIS CONDITION, YOU SHOULD NOT PURCHASE THE PRODUCT. IN NO EVENT SHALL MILWAUKEE BE LIABLE FOR ANY INCIDENTAL, SPECIAL, CONSEQUENTIAL OR PUNITIVE DAMAGES, OR FOR ANY COSTS, ATTORNEY FEES, EXPENSES, LOSSES OR DELAYS ALGLED TO BE AS A CONSEQUENCE OF ANY DAMAGE TO, FAILURE OF, OR DEFECT IN ANY PRODUCT INCLUDING, BUT NOT LIMITED TO, ANY CLAIMS FOR LOSS OF PROFITS. SOME STATES DO NOT ALLOW THE EXCLUSION OR LIMITATION OF INCIDENTAL OR CONSEQUENTIAL DAMAGES, SO THE ABOVE LIMITATION OR EXCLUSION MAY NOT APPLY TO YOU. THIS WARRANTY IS EXCLUSIVE AND IN LIEU OF ALL OTHER EXPRESS WARRANTYES, WRITTEN OR ORAL, TO THE EXTENT PERMITTED BY LAW, MILWAUKEE DISCLAIMS ANY IMPLIED WARRANTYES, INCLUDING WITHOUT LIMITATION ANY IMPLIED WARRANTY OF MERCHANTABILITY OR FITNESS FOR A PARTICULAR USE OR PURPOSE; TO THE EXTENT SUCH WARRANTYER IS NOT PERMITTED BY LAW, SUCH IMPLIED WARRANTYES ARE LIMITED TO THE DURATION OF THE APPLICABLE EXPRESS WARRANTY AS DESCRIBED ABOVE. SOME STATES DO NOT ALLOW LIMITATIONS ON HOW LONG AN IMPLIED WARRANTY LASTS, SO THE ABOVE LIMITATION MAY NOT APPLY TO YOU, THIS WARRANTYY GIVES YOU SPECIFIC LEGAL RIGHTS, AND YOU MAY ALSO HAVE OTHER RIGHTS WHICH VARY FROM STATE TO STATE.
This warranty applies to product sold in the U.S.A. and Canada only. Please consult the 'Service Center Search' in the Parts & Service section of MILWAUKEE's website www.milwaukeetool.com or call 1.800. SAWDUST (1.800.729.3878) to locate your nearest service facility for warranty and non-warranty service on a MILWAUKEE Battery Pack.
CONSIGNES DE SECURITE IMPORTANTES
Milwaukee Tool (Canada) Ltd 1.800.268.4015
Monday-Friday, 7:00 AM - 4:30 PM CST www.milwaukeeetoolee.com
GARANTIE LIMITEE
AUX ETATS-UNIS ETAU CANADA
Bus series universal (USB)

Lunes a Viernes (9am a 6pm)
O contactanos en www.milwaukeetool.com.mx
GARANTÍA LIMITADA - E.U.A. Y CANADA
13135 West Lisbon Road
Brookfield, WI 53005 USA
58140214d2 01614300101Q-02(A)
07/20 Printed in China