M18 ROCKET OneKey 212022HD - Lighting MILWAUKEE - Free user manual and instructions
Find the device manual for free M18 ROCKET OneKey 212022HD MILWAUKEE in PDF.
| Brand | Milwaukee |
| Model | M18 ROCKET OneKey 212022HD |
| Product Type | Tripod job site light |
| Category | Lighting |
| Catalog Number | 2120-20 |
| Nominal Voltage | 18 V DC |
| Battery Type | M18™ |
| Charger Type | M18™ |
| Protection Rating | IP67 (dust-tight and temporary immersion) |
| Maximum Height | Approx. 2 m (extendable poles) |
| Estimated Weight | Approx. 8 kg (with battery) |
| Connected Feature | ONE-KEY™ (smartphone control) |
| Brightness Settings | High, Medium, Low (remembers last level) |
| Automatic Battery Switching | Yes (switches to second battery when first is depleted) |
| Deployable Feet | Yes, with locking for stability |
| Rotatable Head | 180° rotation (use/protected position) |
| ONE-KEY Internal Battery | CR2032 (3V) for connectivity |
| Housing Material | Robust plastic and metal |
| Maintenance | Clean with damp cloth and mild soap |
| Warranty | 5 years (except exceptions) |
Frequently Asked Questions - M18 ROCKET OneKey 212022HD MILWAUKEE
User questions about M18 ROCKET OneKey 212022HD MILWAUKEE
0 question about this device. Answer the ones you know or ask your own.
Ask a new question about this device
Download the instructions for your Lighting in PDF format for free! Find your manual M18 ROCKET OneKey 212022HD - MILWAUKEE and take your electronic device back in hand. On this page are published all the documents necessary for the use of your device. M18 ROCKET OneKey 212022HD by MILWAUKEE.
USER MANUAL M18 ROCKET OneKey 212022HD MILWAUKEE
natural_image
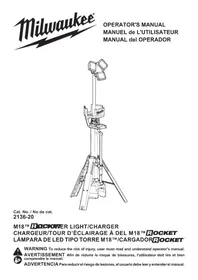
Technical line drawing of a tripod-mounted device with a mounted sensor array (no text or symbols)Cat. No. / No de cat.
2120-20
WARNING To reduce the risk of injury, user must read and understand operator's manual.
IMPORTANT SAFETY INSTRUCTIONS
WARNING
Read and understand all instructions. When using electric appliances, basic precautions should always be followed, including the following:
- Before using, read this operator's manual, your battery pack and charger operator's manual, and all labels on the battery pack, charger and light. Learn your light's applications and limitations as well as potential hazards associated with this type of tool.
- Read and understand all the instructions before using the appliance.
- To reduce the risk of injury, close supervision is necessary when an appliance is used near children.
- Warning - The lens may get hot during use. To reduce the risk of burns, do not touch hot lens.
- Store idle light out of reach of children. Warm lights can become hazardous in the hands of children.
- Suitable for rain and wet locations. Store indoors.
- Batteries must be recharged only with the charger specified by the manufacturer. A charger that may be suitable for one type of battery may create a risk of fire when used with another battery.
- Use light only with specifically designated battery pack. Use of any other batteries may create a risk of fire
- When battery pack is not in use, keep it away from metal objects like: paper clips, coins, keys, nails, screws, or other small metal objects that can make a connection from one terminal to another. Shorting the battery terminals together may cause sparks, burns, or a fire.
•Under abusive conditions, liquid may be ejected from the battery; avoid contact. If contact accidentally occurs, flush with water. If liquid contacts eyes, additionally seek medical help. Liquid ejected from the battery may cause irritation or burns.
- Do not use a battery pack or tool that is damaged or modified. Damaged or modified batteries may exhibit unpredictable behavior resulting in fire, explosion or risk of injury.
- Do not expose a battery pack or tool to fire or excessive temperature. Exposure to fire or temperature above 265^ (130°C) may cause explosion.
- Follow all charging instructions and do not charge the battery pack or tool outside the temperature range specified in the instructions. Charging improperly or at temperatures outside the specified range may damage the battery and increase the risk of fire.
- Never service damaged battery packs. Service of battery packs should only be performed by the manufacturer or authorized service providers.
- Maintain labels and nameplates. These carry important information. If unreadable or missing, contact a MILWAUKEE service facility for a free replacement.
SAVE THESE INSTRUCTIONS
SYMBOLOGY
Volts

Direct Current

CAUTION

us UL Listing for Canada and U.S.
SPECIFICATIONS
Cat. No....2120-20
Volts....18 DC
Battery Type ......M18™
Charger Type......M18™
Ingress Protection IP67
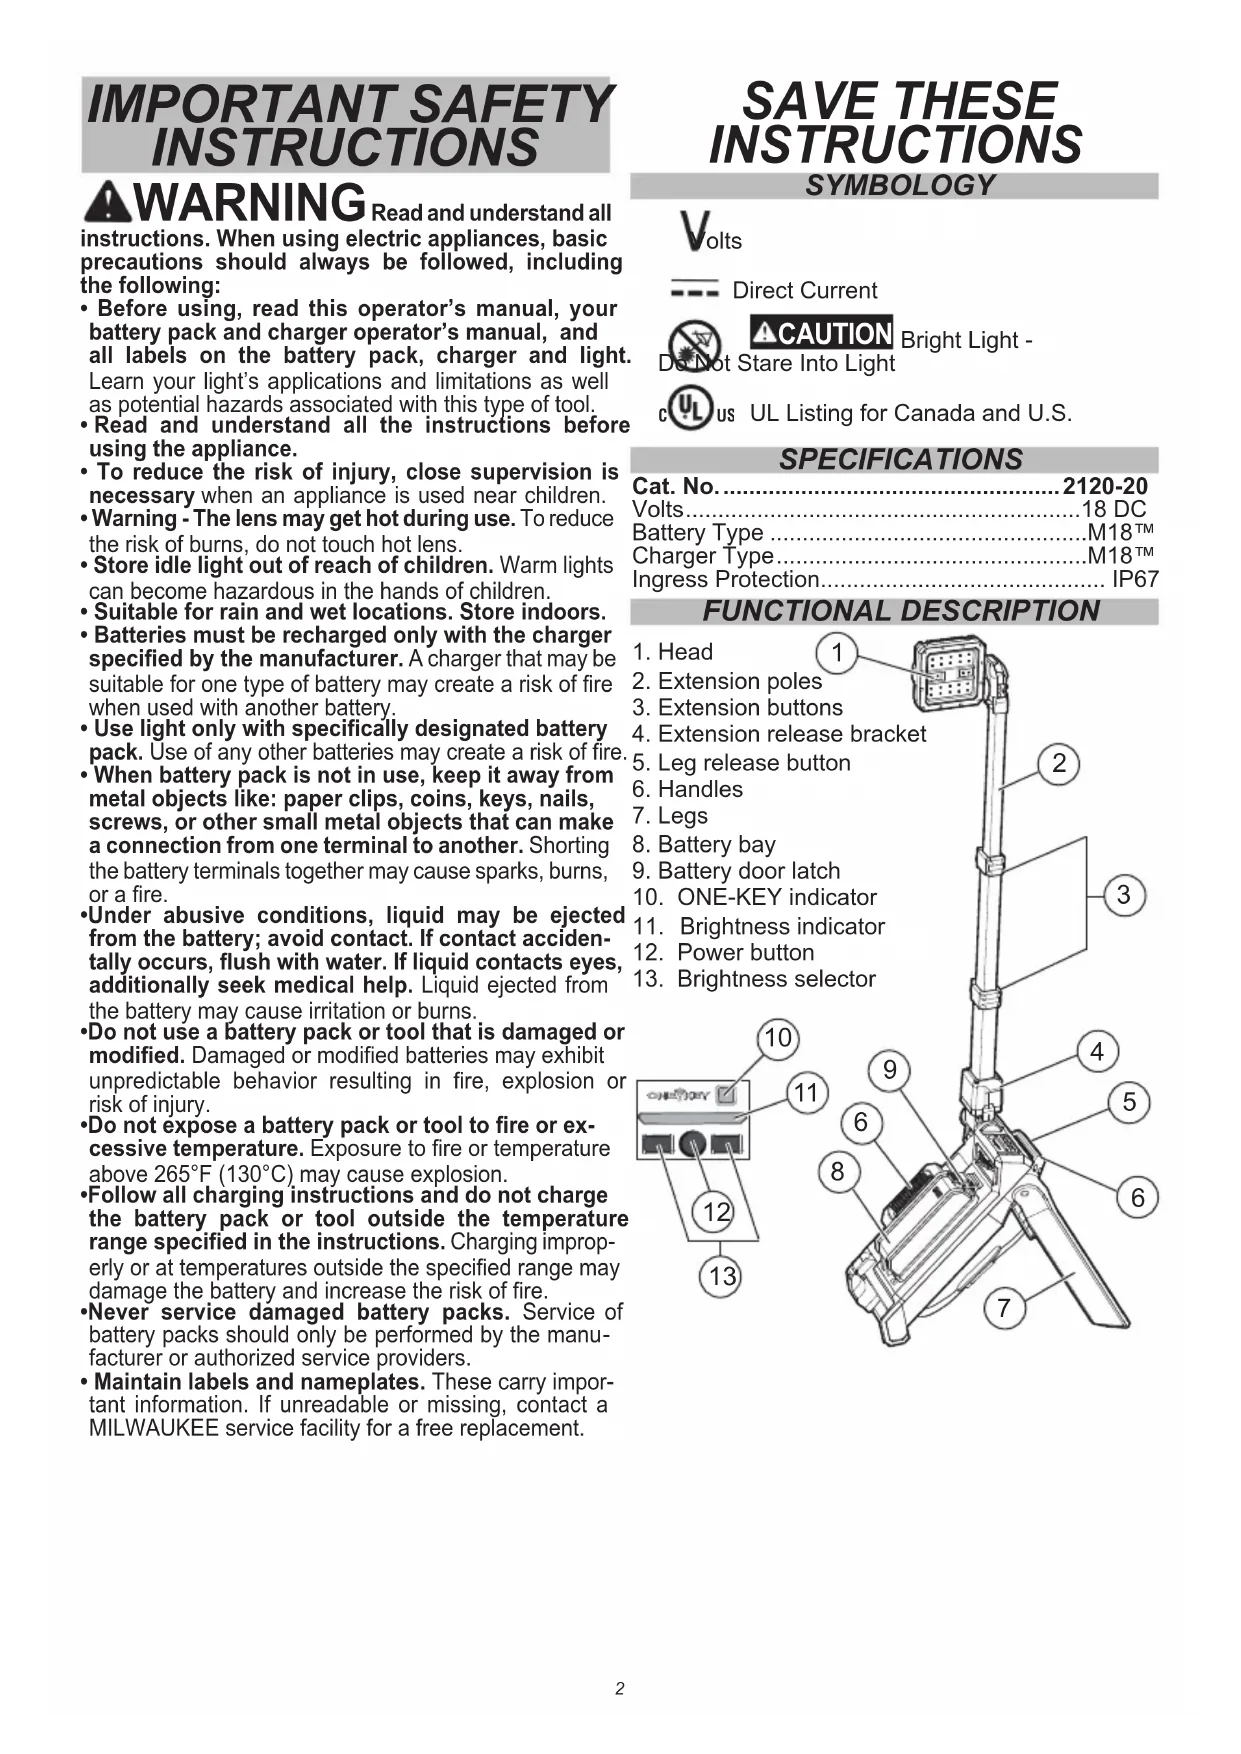
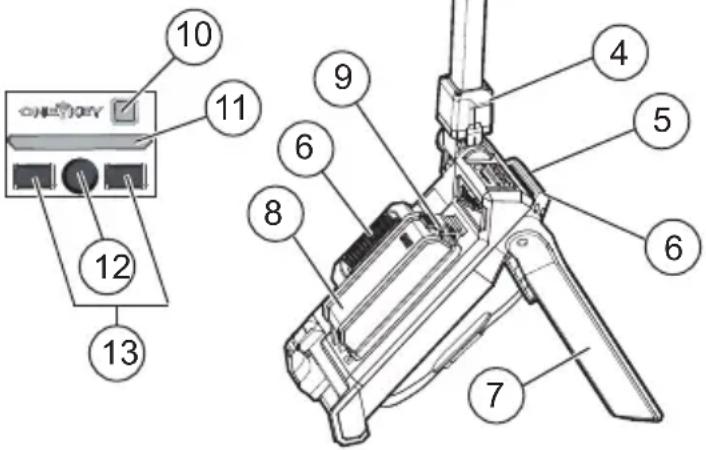
FUNCTIONAL DESCRIPTION
- Head
- Extension poles
- Extension buttons
- Extension release bracket
- Leg release button
- Handles
- Legs
- Battery bay
- Battery door latch
- ONE-KEY indicator
- Brightness indicator
- Power button
- Brightness selector
text_image
10 11 9 6 8 7 4 5 6 12 13ASSEMBLY
WARNING
Recharge only with
the charger specified for the battery. For specific charging instructions, read the operator's manual supplied with your charger and battery.
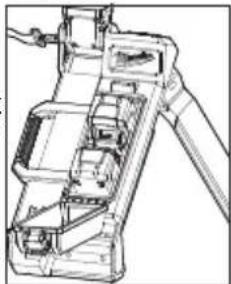
Inserting/Removing Battery Pack
Unlatch the battery door and open to access the battery bays.
Insert a battery pack by sliding battery pack into a battery bay. Insert the battery pack until the battery latches lock.
Close and latch the battery door. To remove a battery pack, press in both battery latches and slide the battery pack out of the battery bay.
NOTE: Always ensure the battery door gasket is clean and clear of dirt and debris. Close battery door latch securely to ensure water cannot enter the battery compartment.
natural_image
Technical line drawing of a mechanical device with internal components and a handle (no text or symbols)WARNING
To reduce the risk of
injury, do not look directly into the light when the light is on.
To reduce the risk of injury, always fully extend and lock legs into position before raising the poles. Light may tip and cause injury.
To reduce the risk of injury, keep hands clear of the housing area when collapsing the extension poles. Head may descend rapidly, pinching hands and fingers.
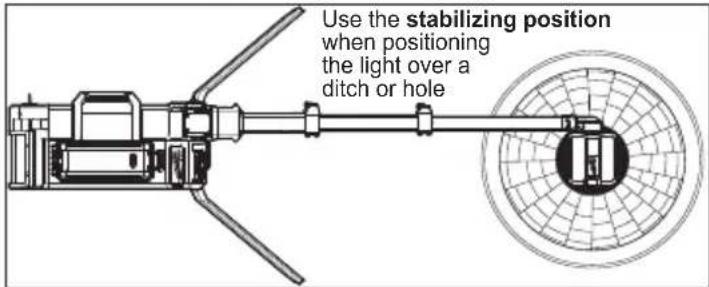
Extending/Collapsing the Legs
Always extend and lock the legs before raising the poles.
- To extend the legs, stand light on end and press the leg release button.
- Rotate the legs out to the standing position or stabilizing position. Ensure the legs lock into place.
- To collapse the legs, press the leg release button and rotate the legs back to the closed position. Keep hands clear of the legs as they collapse.
text_image
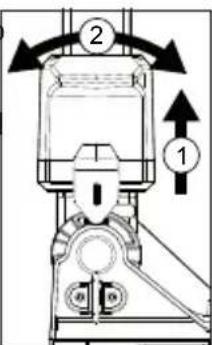
Use the stabilizing position when positioning the light over a ditch or holeExtending/Collapsing the Extension Poles
-
To extend the poles, position and lock the legs.
-
Pull up on the extension release bracket and rotate the extension to the desired angle. Ensure the bracket locks into a detent.
-
Press the top extension button and raise the head. Extend the pole to the desired height.
-
If more height is needed, repeat with the lower extension.
-
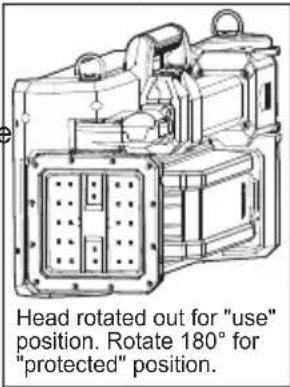
Rotate the head to the desired position.
text_image
Technical diagram of a mechanical device with labeled components and directional arrows indicating motion or force.-
To collapse the poles, press the extension buttons and slide the poles back into position. Keep hands clear of the brackets as the poles collapse.
-
Rotate the head into the "protected" position or "use" position, then lift the extension release bracket and rotate the extension to the closed position.
text_image
Head rotated out for "use" position. Rotate 180° for "protected" position.ONE-KEY™
To learn more about the ONE-KEY functionality for this tool, please reference the Quick Start guide included with this product or go to milwaukeeetool.com/One-Key. To download the ONE-KEY app, visit the App Store or Google Play from your smart device.
OPERATION
WARNING
To reduce the risk of
injury, do not look directly into the light when the light is on.
Using the Light
-
Insert battery pack(s). Close and latch the battery door.
-
Press the Power Ⓐ button to turn on the light.
-
Press the - and + buttons to cycle through High, Medium, and Low.
NOTE: The light will default to the selected brightness the next time it is turned on.
- Press the Power Ⓐ button to turn the light off.
NOTE: When multiple batteries are installed, the second battery pack inserted will begin operation when the first pack inserted has reached end-of-charge.
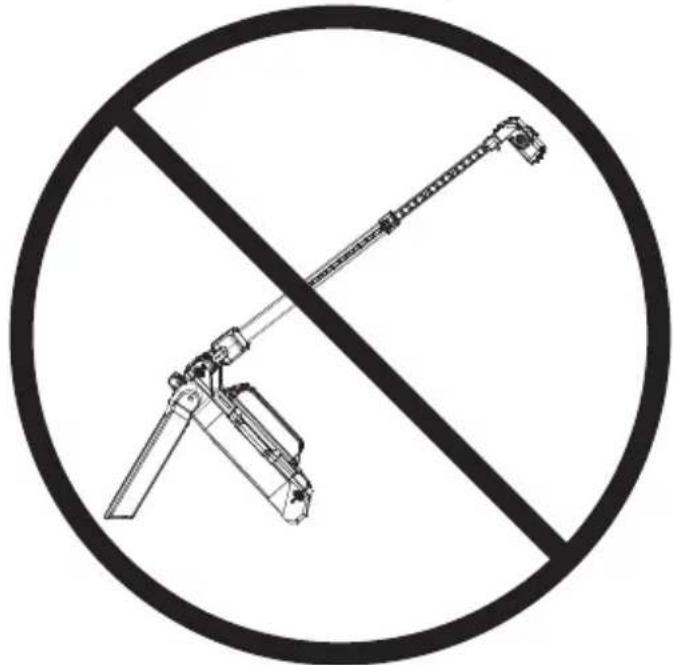
WARNING
Do not position the
product as shown below. It may be overturned.
natural_image
Prohibition sign with a diagonal line crossing a mechanical device, no text or symbols presentMAINTENANCE
WARNING To reduce the risk of injury, always unplug the charger and remove the battery pack from the charger or tool before performing any maintenance. Never disassemble the tool, battery pack or charger. Contact a MILWAUKEE service facility for ALL repairs.
Maintain Light
Keep your light, battery pack and charger in good repair by adopting a regular maintenance program. If the light does not work properly, return the light to a MILWAUKEE service facility for repairs.
WARNING Chemical
Burn Hazard. This device contains a lithium button/coin cell battery. A new or used battery can cause severe internal burns and lead to death in as little as 2 hours if swallowed or enters the body. Always secure the battery cover. If it does not close securely, stop using the device, remove the batteries, and keep it away from children. If you think batteries may have been swallowed or entered the body, seek immediate medical attention.

Internal Battery
An internal battery is used to facilitate full ONE-KEY ^™ functionality.
To replace the battery:
- Remove the battery pack.
- Remove the screw and open the battery door.
- Remove the old battery, keep it away from children, and dispose of it properly.
- Insert the new battery (3V CR2032), with the positive side facing up.
- Close the battery door and tighten the screw securely.
⚠ WARNING To reduce the risk of personal injury and damage, never immerse your tool, battery pack or charger in liquid or allow a liquid to flow inside them.
Cleaning
Clean dust and debris from vents. Keep handles clean, dry and free of oil or grease. Use only mild soap and a damp cloth to clean, since certain cleaning agents and solvents are harmful to plastics and other insulated parts. Do not use sprays or solvents. Some of these include gasoline, turpentine, lacquer thinner, paint thinner, chlorinated cleaning solvents, ammonia and household detergents containing ammonia. Never use flammable or combustible solvents around tools.
ACCESSORIES
WARNING
Use only recommended accessories. Others may be hazardous. For a complete listing of accessories, go online to www.milwaukeeetool.com or contact a distributor.
SERVICE - UNITED STATES
1-800-SAWDUST (1.800.729.3878)
Monday-Friday, 7:00 AM - 6:30 PM CST or visit www.milwaukeetool.com
Contact Corporate After Sales Service Technical Support with technical, service/repair, or warranty questions.
Email: metproductsupport@milwaukeeetool.com
Become a Heavy Duty Club Member at www.milwaukeetool.com to receive important notifications regarding your tool purchases.
SERVICE - CANADA
Milwaukee Tool (Canada) Ltd 1.800.268.4015
Monday-Friday, 7:00 AM - 4:30 PM CST or visit www.milwaukeeetool.ca
LIMITED WARRANTY USA & CANADA
Every MILWAUKEE power tool* (see exceptions below) is warranted to the original purchaser only to be free from defects in material and workmanship. Subject to certain exceptions, MILWAUKEE will repair or replace any part on an electric power tool which, after examination, is determined by MILWAUKEE to be defective in material or workmanship for a period of five (5) years** after the date of purchase unless otherwise noted. Return of the power tool to a MILWAUKEE factory Service Center location or MILWAUKEE Authorized Service Station, freight prepaid and insured, is required. A copy of the proof of purchase should be included with the return product. This warranty does not apply to damage that MILWAUKEE determines to be from repairs made or attempted by anyone other than MILWAUKEE authorized personnel, misuse, alterations, abuse, normal wear and tear, lack of maintenance, or accidents. Normal Wear: Many power tools need periodic parts replacement and service to achieve best performance. This warranty does not cover repair when normal use has exhausted the life of a part including, but not limited to, chucks, brushes, cords, saw shoes, blade clamps, o-rings, seals, bumpers, driver blades, pistons, strikers, lifters, and bumper cover washers.
*This warranty does not cover Air Nailers & Staplers; Airless Paint Sprayer; Cordless Battery Packs; Gasoline Driven Portable Power Generators; Hand Tools; Hoist – Electric, Lever & Hand Chain; M12™ Heated Gear; Reconditioned Product; and Test & Measurement Products. There are separate and distinct warranties available for these products. **The warranty period for Job Site Radios, M12™ Power Port, M18™ Power Source, Jobsite Fan and Trade Titan™ Industrial Work Carts is one (1) year from the date of purchase. The warranty period for the Drain Cleaning Cables is two (2) years from the date of purchase. The warranty period for the M18™ Compact Heat Gun and the 8 Gallon Dust Extractor is three (3) years from the date of purchase. The warranty period for the LED in the LED Work Light and the LED Upgrade Bulb for the Work Light is the lifetime of the product subject to the limitations above. If during normal use the LED or LED Bulb fails, the part will be replaced free of charge.
Warranty Registration is not necessary to obtain the applicable warranty on a MILWAÜKEE power tool product. The manufacturing date of the product will be used to determine the warranty period if no proof of purchase is provided at the time warranty service is requested.
ACCEPTANCE OF THE EXCLUSIVE REPAIR AND REPLACEMENT REMEDIES DESCRIBED HEREIN IS A CONDITION OF THE CONTRACT FOR THE PURCHASE OF EVERY MILWAUKEE PRODUCT. IF YOU DO NOT AGREE TO THIS CONDITION, YOU SHOULD NOT PURCHASE THE PRODUCT. IN NO EVENT SHALL MILWAUKEE BE LIABLE FOR ANY INCIDENTAL, SPECIAL, CONSEQUENTIAL OR PUNITIVE DAMAGES, OR FOR ANY COSTS, ATTORNEY FEES, EXPENSES, LOSSES OR DELAYS ALLEGED TO BE AS A CONSEQUENCE OF ANY DAMAGE TO, FAILURE OF, OR DEFECT IN ANY PRODUCT INCLUDING, BUT NOT LIMITED TO, ANY CLAIMS FOR LOSS OF PROFITS. SOME STATES DO NOT ALLOW THE EXCLUSION OR LIMITATION OF INCIDENTAL OR CONSEQUENTIAL DAMAGES, SO THE ABOVE LIMITATION OR EXCLUSION MAY NOT APPLY TO YOU. THIS WARRANTY IS EXCLUSIVE AND IN LIEU OF ALL OTHER EXPRESS WARRANTIES, WRITTEN OR ORAL. TO THE EXTENT PERMITTED BY LAW, MILWAUKEE DISCLAIMS ANY IMPLIED WARRANTIES, INCLUDING WITHOUT LIMITATION ANY IMPLIED WARRANTY OF MERCHANTABILITY OR FITNESS FOR A PARTICULAR USE OR PURPOSE; TO THE EXTENT SUCH DISCLAIMER IS NOT PERMITTED BY LAW, SUCH IMPLIED WARRANTIES ARE LIMITED TO THE DURATION OF THE APPLICABLE EXPRESS WARRANTY AS DESCRIBED ABOVE. SOME STATES DO NOT ALLOW LIMITATIONS ON HOW LONG AN IMPLIED WARRANTY LASTS, SO THE ABOVE LIMITATION MAY NOT APPLY TO YOU, THIS WARRANTY GIVES YOU SPECIFIC LEGAL RIGHTS, AND YOU MAY ALSO HAVE OTHER RIGHTS WHICH VARY FROM STATE TO STATE. This warranty applies to product sold in the U.S.A. and Canada only. Please consult the 'Service Center Search' in the Parts & Service section of MILWAUKEE's website www.milwaukeetool.com or call 1.800.SAWDUST (1.800.729.3878) to locate your nearest service facility for warranty and non-warranty service on a Milwaukee electric power tool.
LIMITED WARRANTY - MEXICO, CENTRAL AMERICA & CARIBBEAN
TECHTRONIC INDUSTRIES' warranty is for 5 years since the original purchase date.
This warranty card covers any defect in material and workmanship on this Product.
To make this warranty valid, present this warranty card, sealed/stamped by the distributor or store where you purchased the product, to the Authorized Service Center (ASC). Or, if this card has not been sealed/stamped, present the original proof of purchase to the ASC.
Call toll-free1 01 (800) 030-7777 to find the nearest ASC, for service, parts, accessories or components.
Procedure to make this warranty valid
Take the product to the ASC, along with the warranty card sealed/stamped by the distributor or store where you purchased the product, and any faulty piece or component will be replaced without cost for you. We will cover all freight costs relative with this warranty process.
Exceptions
This warranty is not valid in the following situations
a) When the product is used in a different manner from the end-user guide or instruction manual.
b) When the conditions of use are not normal.
c) When the product was modified or repaired by people not authorized by TECHTRONIC INDUSTRIES.
Note: If cord set is damaged, it should be replaced by an Authorized Service Center to avoid electric risks.
SERVICE AND ATTENTION CENTER
Call to 01 (800) 030-7777
IMPORTED AND COMMERCIALIZED BY
TECHTRONIC INDUSTRIES MEXICO, SA DE CV
Av President Masarik #29 piso 7, Col. Polanco V Sección
CP 11560, Deleg. Miguel Hidalgo, CDMX
Model:
Date of Purchase:
Distributor or Store Stamp:
CONŞIGNES, DE SÉCURITÉ IMPORTANTES

AVERTISSEMENT
text_image
Technical diagram of a device with numbered components, including a control panel and a mechanical assembly.MONTAGE
AVERTISSEMENT
Recharge only with the charger specified for the battery. For specific charging instructions, read the operator's manual supplied with your charger and battery.
natural_image
Technical line drawing of a mechanical device with internal components and a handle (no text or symbols)⚠ AVERTISSEMENT
natural_image
Technical line drawing of a mechanical device with internal components and mounting holes (no text or symbols)natural_image
Prohibition sign with a diagonal line crossing over a mechanical device, enclosed in a circle (no text or symbols)ENTRETIEN
⚠️ AVERTISSEMENT
Milwaukee Tool (Canada) Ltd
1.800.268.4015
Monday-Friday, 7:00 AM - 4:30 PM CST
www.milwaukeetool.ca
GARANTIE LIMITÉE - AUX ÉTATS-UNIS ET AU CANADA
text_image
Technical diagram of a device with numbered components, including a control panel and mechanical assembly.ENSAMBLAJE
ADVERTENCIA
Recargue
natural_image
Technical line drawing of a mechanical assembly or device with internal components (no visible text or symbols)text_image
Technical diagram of a mechanical device with labeled components and directional arrows indicating motion or force.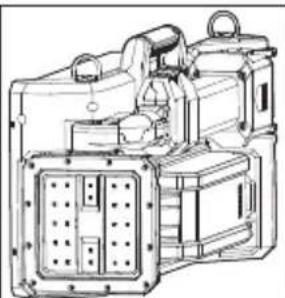
natural_image
Technical line drawing of a mechanical device with internal components and mounting holes (no text or symbols)natural_image
Prohibition sign with a diagonal line crossing over a mechanical device, enclosed in a circle (no text or symbols)MANTENIMIENTO
ADVERTENCIA
Para re-
Lunes a Viernes (9am a 6pm)