
Larma - Vacuum Cleaner Klarstein - Free user manual and instructions
Find the device manual for free Larma Klarstein in PDF.
| Brand | Klarstein |
| Model | Larma |
| Product type | Cordless hand vacuum cleaner |
| Article numbers | 10041135, 10041136 |
| Power supply (voltage) | 11.1 V DC |
| Battery type | Lithium-ion, 2600 mAh |
| Dust container capacity | 80 ml |
| Maximum suction power | 120 W |
| Runtime in low mode | 32 minutes |
| Runtime in high mode | 11 minutes |
| Charging time | 4.5 hours |
| Recommended charger | 5 V, 2 A |
| Filter type | Washable HEPA filter |
| Included accessories | 2-in-1 tool, T-shaped brush |
| Usage | Indoors only |
| Filter cleaning | After each use, monthly wash with water |
| Emptying the container | Via button B, empty regularly |
| Safety | Do not use without filter, do not vacuum liquids or hot objects |
| Recycling | WEEE compliant, battery recyclable |
| Operating and charging temperature | 4°C to 40°C |
Frequently Asked Questions - Larma Klarstein
User questions about Larma Klarstein
0 question about this device. Answer the ones you know or ask your own.
Ask a new question about this device
Download the instructions for your Vacuum Cleaner in PDF format for free! Find your manual Larma - Klarstein and take your electronic device back in hand. On this page are published all the documents necessary for the use of your device. Larma by Klarstein.
USER MANUAL Larma Klarstein
CLEANINGCI LEANINGLE ANINGLEAN NINGLEANINGCI GCLEANINGCI CLEANINGLE LEANINGLE ANINGLEAN

KLARSTEIN
www.klarstein.com

bar
| Category | Value | | :--- | :--- | | Category 1 | 100 | | Category 2 | 100 | | Category 3 | 100 | | Category 4 | 100 | | Category 5 | 100 | | Category 6 | 100 | | Category 7 | 100 | | Category 8 | 100 | | Category 9 | 100 | | Category 10 | 100 | | Category 11 | 100 | | Category 12 | 100 | | Category 13 | 100 | | Category 14 | 100 | | Category 15 | 100 | | Category 16 | 100 | | Category 17 | 100 | | Category 18 | 100 | | Category 19 | 100 | | Category 20 | 100 | | Category 21 | 100 | | Category 22 | 100 | | Category 23 | 100 | | Category 24 | 100 | | Category 25 | 100 | | Category 26 | 100 | | Category 27 | 100 | | Category 28 | 100 | | Category 29 | 100 | | Category 30 | 100 | | Category 31 | 100 | | Category 32 | 100 | | Category 33 | 100 | | Category 34 | 100 | | Category 35 | 100 | | Category 36 | 100 | | Category 37 | 100 | | Category 38 | 100 | | Category 39 | 100 | | Category 40 | 100 | | Category 41 | 100 | | Category 42 | 100 | | Category 43 | 100 | | Category 44 | 100 | | Category 45 | 100 | | Category 46 | 100 | | Category 47 | 100 | | Category 48 | 100 | | Category 49 | 100 | | Category 50 | 100 | | Category 51 | 100 | | Category 52 | 100 | | Category 53 | 100 | | Category 54 | 100 | | Category 55 | 100 | | Category 56 | 100 | | Category 57 | 100 | | Category 58 | 100 | | Category 59 | 100 | | Category 60 | 100 | | Category 61 | 100 | | Category 62 | 100 | | Category 63 | 100 | | Category 64 | 100 | | Category 65 | 100 | | Category 66 | 100 | | Category 67 | 100 | | Category 68 | 100 | | Category 69 | 100 | | Category 70 | 100 | | Category 71 | 100 | | Category 72 | 100 | | Category 73 | 100 | | Category 74 | 100 | | Category 75 | 100 | | Category 76 | 100 | | Category 77 | 100 | | Category 78 | 100 | | Category 79 | 100 | | Category 80 | 100 | | Category 81 | 100 | | Category 82 | 100 | | Category 83 | 100 | | Category 84 | 100 | | Category 85 | 100 | | Category 86 | 100 | | Category 87 | 100 | | Category 88 | 100 | | Category 89 | 100 | | Category 90 | 100 | | Category 91 | 100 | | Category 92 | 100 | | Category 93 | 100 | | Category 94 | 100 | | Category 95 | 100 | | Category 96 | 100 | | Category 97 | 100 | | Category 98 | 100 | | Category 99 | 100 | | Total (Total) | nan |text_image
QR code image containing encoded data, no visible human-readable textINHALT
natural_image
Technical line drawing of a vehicle chassis frame (no text or symbols)Gehäuse

2-in-1-Werkzeug
T-Bürste

natural_image
Line drawing of a rectangular electronic component or housing (no text or symbols)Ladestation

natural_image
Line drawing of a USB cable with two connectors (no text or symbols)USB-Typ-C-Kabel

text_image
B A
natural_image
Technical line drawing of a mechanical component with labeled parts C and D (no text or symbols beyond labels)
natural_image
Line drawing of a boat hull with no text or symbols
natural_image
Pure diagram of a mechanical component with dashed circular outline, no text or symbols presentflowchart
graph TD
    A["Pinning Pin"] --> B["Assembly"]
    B --> C["Reassembly"]
    C --> D["Packaging"]
natural_image
Line drawing of a hand pressing a button on a device, showing the process with an inset close-up of the button (no text or symbols)natural_image
Line drawing of a hand holding a device above a cloud-shaped object (no text or symbols)
natural_image
Line drawing of a mechanical component or bracket with no visible text or symbols
natural_image
Line drawing of a handheld vacuum cleaner inside a seat (no text or symbols)natural_image
Line drawing of a device casing with an arrow indicating motion, showing internal components (no text or symbols)1 T-Bürste

natural_image
Technical line drawing of a mechanical device with a downward arrow indicating motion or assembly (no text or symbols present)3 Gerätegehäuse

natural_image
Technical line drawing of a mechanical component with two views: one showing a slot and arrow, the other showing a rectangular housing (no text or symbols)2 2-in1-Werkzeug
GERÄT AUFLADEN
Akkustatus
text_image
Power 10%-100% Power 0%-10%Aufladen
text_image
Diagram showing a flashlight connected to a plug via cable, with labeled parts 1 and 2.Mit der Basis

text_image
Diagram showing two-step installation of a handheld device with labeled components and connection stepstext_image
Diagram illustrating four steps of cleaning a trash bin, showing material inspection and waste disposal.Tiefenreinigung
natural_image
Diagram showing a mechanical component being processed into a cylindrical spring (no text or symbols present)1

natural_image
Cross-sectional diagram of a vehicle showing internal components and structural parts (no text or labels)2
Member of Berlin Brands Group
Handwerkerstr. 11
15366 Dahlwitz-Hoppegarten
Deutschland
natural_image
Symbol of a trash bin crossed with a diagonal line, no text or numbers presentBerlin Brands Group UK Limited
PO Box 42
272 Kensington High Street
London, W8 6ND
United Kingdom
Dear Customer,
Congratulations on purchasing this device. Please read the following instructions carefully and follow them to prevent possible damages. We assume no liability for damage caused by disregard of the instructions and improper use. Scan the QR code to get access to the latest user manual and more product information.

text_image
QR code image containing encoded data, no visible human-readable textCONTENTS
Safety Instructions 18
Product Overview 20
Assembly and Use 21
Charging 24
How to Clean the Filter 25
Troubleshooting 27
Disposal Considerations 28
Manufacturer & Importer (UK) 28
TECHNICAL DATA
| Item number 10041135,10041136 | |
| Power supply 11.1 V | |
| Battery pack 2600 mAh (Li-ion) | |
| Dust bin capacity 80 ml | |
| Suction motor power 50 W / 120 W | |
| Working time 32 min / 11 min |
SAFETY INSTRUCTIONS
- Read all instructions before using the vacuum cleaner and save for future reference.
• Always unplug the appliance before removing the tank cover. - Use the appliance exactly as described in the instructions. Only use accessories that are expressly recommended by the manufacturer.
- Keep your hair, clothes, fingers and other body parts away from the appliance while it is in operation.
- Be careful when cleaning stairs.
- Store the appliance in a dry place. Stow it away after each vacuuming so that no one falls over it.
- Never set fire to the appliance, even if it is badly damaged. The batteries could explode and cause a fire.
- Do not insert any objects into the ventilation openings. Do not use the appliance if the ventilation openings are blocked. Keep the openings free of dirt, hair or the like.
- Do not use the appliance in rooms where flammable materials or explosive substances are present.
- Unplug the appliance before attaching or replacing hoses, nozzles or accessories.
- Do not vacuum flammable or explosive liquids.
- Sparks inside the motor can ignite flammable vapours or dust. To reduce the risk of fire or explosion, do not use the appliance near
• To reduce the risk of fire or explosion, do not use the appliance near flammable liquids, gases, dusts, petrol or other fuels, volatile liquids, - cleaning agents, oil varnishes, natural gas, coal dust, magnesium dust or aluminium dust.
- Do not vacuum hard or sharp objects such as nails, screws or coins.
- Do not vacuum hot objects, such as cigarettes or hot ashes.
- Do not use the appliance without a dirt bin or filter.
- Only use the appliance on dry indoor surfaces.
- Make sure that the appliance is always on a flat surface.
- Do not use the appliance if the power cord, plug or other appliance parts are damaged.
- Repairs should only be carried out by qualified personnel and are necessary if the appliance has been damaged, if the mains cable or plug is damaged, if liquids have leaked onto it or objects have fallen onto it, if the appliance has been exposed to moisture or humidity, if it has been dropped or if it is not working properly.
- Do not pull or carry the unit by the cord. Do not close doors through which the cord passes and do not run the cord along sharp edges.
- Make sure that the power cable does not come into contact with hot surfaces.
- Do not pull the plug out of the socket by the cable, but hold it with your hand when unplugging it.
-
Do not touch the unit or the mains plug with wet hands.
-
Do not short-circuit the battery pack, the charging connection on the Upright Vacuum Cleaner and the charging output.
- The mains plug of the appliance must be unplugged to remove the battery.
- The battery must be disposed of properly.
- Do not charge the appliance at temperatures above 60 °C and do not disassemble it. Fire hazard.
- Make sure that batteries are out of the reach of children.
- This appliance contains batteries which must only be replaced by qualified personnel.
- Avoid accidentally starting the appliance. Make sure the switch is in the „OFF" position before lifting or carrying the unit. Failure to do so may result in an accident.
- Battery fluid may leak if the unit is misused. Avoid skin contact. If the skin accidentally comes into contact with battery fluid, rinse the affected area with water. If battery fluid gets into your eyes, contact a doctor immediately. Leaking battery fluid can cause skin irritation or burns.
- Do not use the unit if it has been damaged or modified. Using the unit with damaged or modified batteries may result in fire, explosion, property damage and/or personal injury.
- Do not expose the unit to fire or high temperatures above 130 °C. Failure to do so may result in explosion.
- Always follow the charging instructions and do not charge the unit at temperatures outside the recommended temperature range. Failure to do so may result in damage to the battery and risk of fire.
- Have the unit serviced only by qualified personnel and use only original spare parts. This will ensure the safety of the unit.
- Never attempt to modify or service the unit yourself. When using and cleaning the unit, follow the instructions contained in the operating manual.
- Only use, store or charge the unit at temperatures between 4 and 40^ .
- Only charge the unit with the charger recommended by the manufacturer. Use of any other charger may result in a fire hazard.
- Unplug the unit from the mains before cleaning, replacing accessories or when the unit is not in use.
- Switch off the unit before disconnecting the mains plug.
- Children over the age of 8, mentally, sensory and physically impaired persons may only use the appliance if they have first been familiarised in detail with the functions and safety precautions by a supervisor responsible for them and understand the associated risks.
- Do not leave the appliance unattended while it is in operation.
- Make sure that children do not play with the appliance. Only use the appliance in the presence of children under supervision.
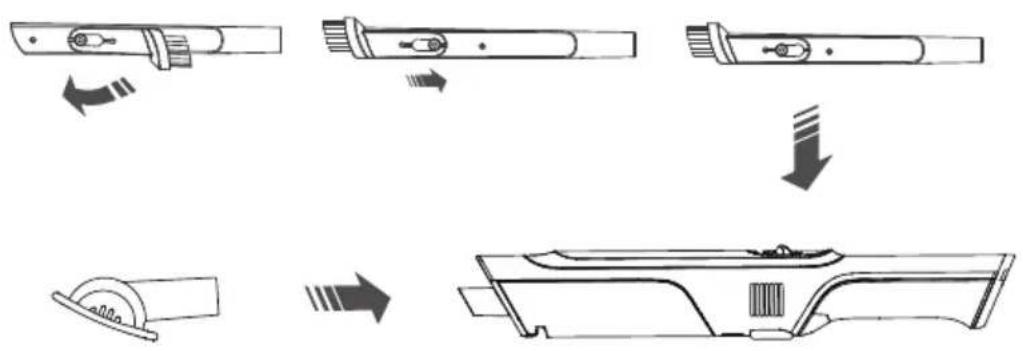
PRODUCT OVERVIEW
Main body
2-in-1 tool
T brush
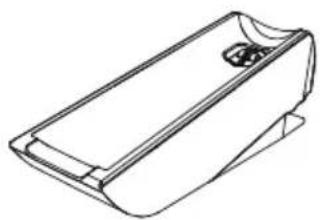
Base
Type-C cable
ASSEMBLY AND USE
2-in-1 tool & T brush
- Attach the 2-in-1 tool & T brush by sliding it onto the inlet on the product body until it is in place.
flowchart
graph TD
    A["Electricity Battery"] --> B["Electricity Bulge"]
    B --> C["Motor"]
    C --> D["Sawing Sector"]
- Push the power button, start to work.

natural_image
Line drawing of a hand pressing a button on a device, showing the process with an inset close-up of the button (no text or symbols)- Press the power button to turn on the machine and enter the low-end mode.
- Press the power button again to enter the high-end mode.
- Press the power button to shut down.
3. Clean the dust bin
Press the Button B to dump the dust.

text_image
Diagram illustrating three steps of cleaning a trash bin: handling a slide, adjusting a tray, and pouring dust.Usage scenarios
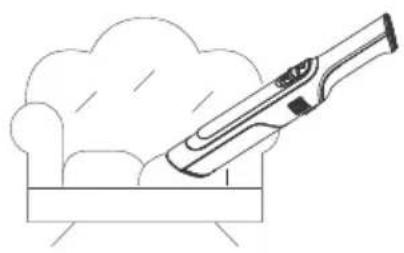
natural_image
Line drawing of a hand holding a device above a cloud-shaped object (no text or symbols)
natural_image
Line drawing of a mechanical component or bracket with no visible text or symbols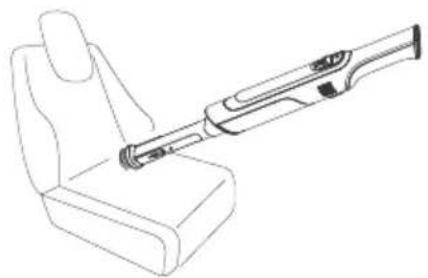
natural_image
Line drawing of a handheld vacuum cleaner inside a seat (no text or symbols)Base connections

natural_image
Line drawing of a device casing with an arrow indicating motion, no text or symbols present1 T brush

natural_image
Technical line drawing of a mechanical device with an inset showing a component detail (no text or symbols)3 Main body

natural_image
Technical line drawing of a mechanical component with two views (no text or symbols)2 2-in-1 tool
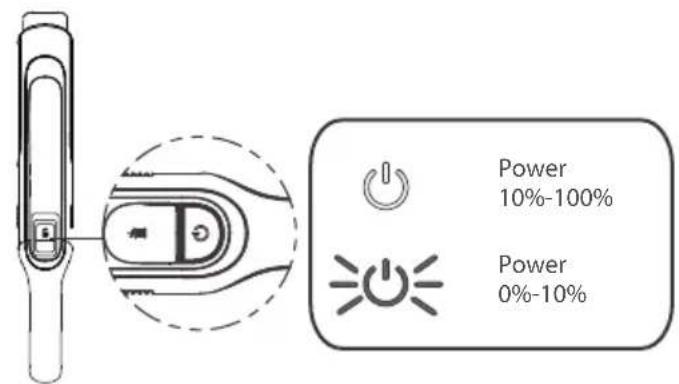
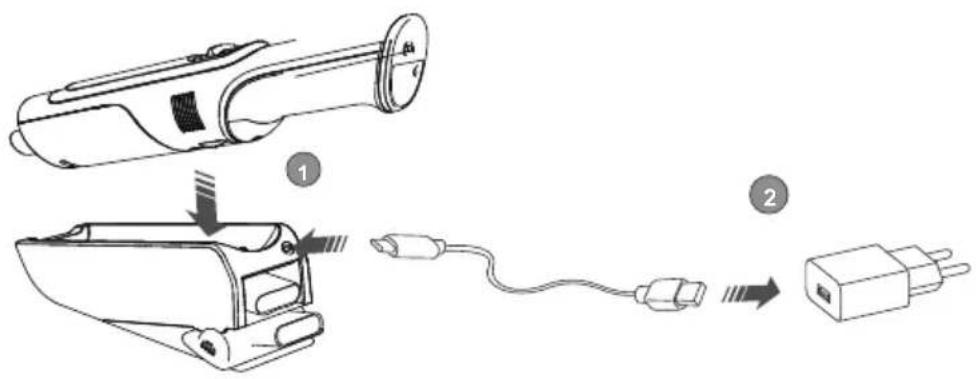
CHARGING
Charging state indicator
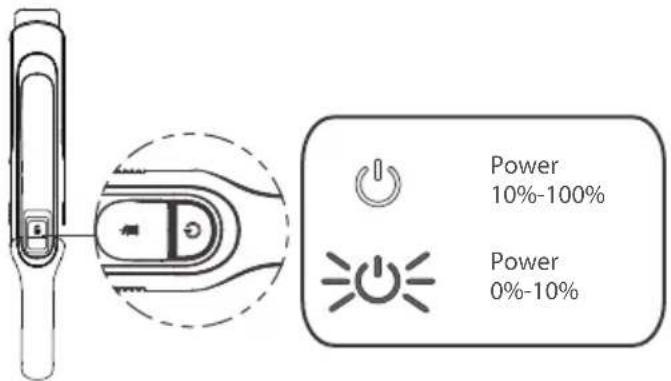
text_image
Power 10%-100% Power 0%-10%How to charge
With USB type-C charger

text_image
Diagram showing a flashlight connected to a plug via cable, with labeled parts 1 and 2.With base charger

text_image
Diagram showing two-step installation of a handheld device: one with a cylindrical component and arrow indicating assembly, the other with a terminal plug.Charge for 4.5 hours. When the indicator light stop flashing, charging is completed.
Note: Vacuum Cleaner will not operate when charging.
HOW TO CLEAN THE FILTER
For best cleaning performance, always clean your filter after each use.
Daily cleaning
After cleaning the dust bin, press the bin release button. The bin will be released slightly. Then take out the bin from the main body.

text_image
Diagram illustrating four steps of cleaning a trash bin, showing material inspection and waste disposal.Deep cleaning
- When the daily cleaning is completed, remove and rinse HEPA Filter and dust bin. Please dry them completely before assembling back.
- Assemble the parts back shown below.

natural_image
Diagram showing a device with a spring-loaded component and its internal structure (no text or symbols)1

natural_image
Cross-sectional diagram of a vehicle showing internal components and structural parts (no text or labels)2
The HEPA Filter is washed at most once a month. Before using your vacuum, make sure that the dust bin is in locked position and the filter in place. DO NOT operate your vacuum without the filter.
TROUBLESHOOTING
| Problem Possible Cause | Solution | |
| Vacuum will not pick up dirt. | Filters are dirty. Take out the filter and pat it most of the dust will be off. | |
| There is a clog in the vacuum. | Check for debris buildup or clogs in each of these sections.Clear any debris or clogs before reassembling. | |
| Dust bin is not seated correctly. | Remove the bin and reseat properly. | |
| Dirt is escaping from the vacuum. | Dust bin is full. Empty the bin. | |
| Filters are missing or dirty. | Check to see the Filters are in place and clean, if Dirt is escaping necessary. | |
| There is a clog in the vacuum. | Check for debris buildup or clogs in each of these sections. Clear any debris or clogs before reassembling. | |
| Vacuum will not charge. | Wrong charger is being used. | Use the correct charger (a charger with a rated voltage of 5 V and a current of 2 A). |
| Charger is not plugged into the machine properly. | Remove the charger and reinstall into the hand vacuum. | |
DISPOSAL CONSIDERATIONS

natural_image
Symbol of a trash bin with crossed lines indicating no waste or discharge, and a solid black rectangle below (no text or labels)If there is a legal regulation for the disposal of electrical and electronic devices in your country, this symbol on the product or on the packaging indicates that this product must not be disposed of with household waste. Instead, it must be taken to a collection point for the recycling of electrical and electronic equipment. By disposing of it in accordance with the rules, you are protecting the environment and the health of your fellow human beings from negative consequences. For information about the recycling and disposal of this product, please contact your local authority or your household waste disposal service.
This product contains batteries. If there is a legal regulation for the disposal of batteries in your country, the batteries must not be disposed of with household waste. Find out about local regulations for disposing of batteries. By disposing of them in accordance with the rules, you are protecting the environment and the health of your fellow human beings from negative consequences.
MANUFACTURER & IMPORTER (UK)
Manufacturer:
Chal-Tec GmbH, Wallstrasse 16, 10179 Berlin, Germany.
Importer for Great Britain:
Berlin Brands Group UK Limited
PO Box 42
272 Kensington High Street
London, W8 6ND
United Kingdom
Cher client, chère cliente,
text_image
QR code image containing encoded data, no visible human-readable textSOMMAIRE
natural_image
Technical line drawing of a vehicle chassis frame (no text or symbols)Boîtier

outil 2 en 1

Brosse en T

natural_image
Line drawing of a rectangular electronic device casing with a handle and mounting bracket (no text or symbols)Station de charge

natural_image
Line drawing of a USB cable with two connectors (no text or symbols)Câble USB type C

text_image
B A
natural_image
Technical line drawing of a mechanical component with labeled parts C and D (no text or symbols beyond labels)
natural_image
Line drawing of a boat hull with no text or symbols
natural_image
Pure diagram of a mechanical component with dashed circular outline and internal lines, no text or symbols presentASSEMBLAGE ET UTILISATION
flowchart
graph TD
    A["Pin Pin"] --> B["Arrow to Wheel"]
    B --> C["Arrow to Top Panel"]
    C --> D["Downward Arrow"]
    D --> E["Bottom Panel with Wheel"]
    E --> F["Arrow to Bottom Panel"]
natural_image
Line drawing of a hand holding a device with a magnified inset showing a switch mechanism (no text or symbols)natural_image
Line drawing of a hand holding a device above a cloud-shaped object (no text or symbols)
natural_image
Line drawing of a mechanical component or bracket with no visible text or symbols
natural_image
Line drawing of a handheld vacuum cleaner inside a seat (no text or symbols)natural_image
Line drawing of a device casing with an arrow indicating motion, showing internal components (no text or symbols)1 Brosse en T

natural_image
Technical line drawing of a mechanical device with a downward arrow indicating motion or assembly (no text or symbols present)natural_image
Technical line drawing of a mechanical component with two views: one showing a slot and arrow, the other showing a rectangular housing (no text or symbols)2 Outil 2 en 1
POUR RECHARGER L'APPAREIL
État de la batterie

text_image
Power 10%-100% Power 0%-10%Recharger
text_image
Diagram showing a flashlight connected to a plug via cable, with labeled parts 1 and 2.Avec la base

text_image
Diagram showing two-step assembly of a handheld device: one with internal components and cable, the other connected to a plug.text_image
Diagram illustrating four steps of cleaning a trash bin, showing material inspection and waste disposal.natural_image
Diagram showing a device with a spring-loaded component and its internal structure (no text or symbols)1

natural_image
Cross-sectional diagram of a vehicle showing internal components and structural parts (no text or labels)2
natural_image
Symbol of a trash bin with crossed lines indicating no waste or discharge, and a solid black rectangle below (no text or labels)Berlin Brands Group UK Limited
PO Box 42
272 Kensington High Street
London, W8 6ND
United Kingdom
Estimado cliente:
text_image
QR code image containing encoded data, no visible human-readable textÍNDICE
natural_image
Technical line drawing of a vehicle chassis frame with no visible text or symbolsCarcasa

Herramienta 2 en 1

Cepillo en T

natural_image
Line drawing of a rectangular electronic device casing with a handle and mounting bracket (no text or symbols)Estación de carga

natural_image
Line drawing of a USB cable with two connectors (no text or symbols)Cable USB tipo C

text_image
B A
natural_image
Technical line drawing of a mechanical component with labeled parts C and D (no text or symbols beyond labels)
natural_image
Line drawing of a boat hull with no text or symbols
natural_image
Pure diagram of a mechanical component with dashed circular outline, no text or symbols presentMONTAJE Y USO
natural_image
Line drawing of a hand pressing a button on a device, showing the process with an inset close-up of the button (no text or symbols)natural_image
Line drawing of a hand holding a vacuum cleaner above a cloud-shaped chair (no text or symbols)
natural_image
Line drawing of a mechanical component or bracket with no visible text or symbols
natural_image
Line drawing of a handheld vacuum cleaner inside a seat (no text or symbols)natural_image
Line drawing of a mechanical component with an arrow indicating motion or force (no text or symbols)1 Cepillo en T

natural_image
Technical line drawing of a mechanical device with a downward arrow indicating motion or assembly (no text or symbols present)3 Carcasa del aparato

natural_image
Technical line drawing of a mechanical component with a side view showing internal components (no text or symbols)text_image
Power 10%-100% Power 0%-10%Recargar
text_image
Diagram showing a flashlight connected to a plug via cable, with labeled parts 1 and 2.Con la base

text_image
Diagram showing two-step installation of a handheld device with labeled components and connection stepstext_image
Diagram illustrating four steps of cleaning a trash bin with labeled components and directional arrows.Limpieza profunda
natural_image
Diagram showing a mechanical component being processed into a cylindrical spring (no text or symbols present)1

natural_image
Cross-sectional diagram of a vehicle showing internal components and structural parts (no text or labels)2
natural_image
Symbol of a trash bin with crossed lines indicating no waste, and a solid black rectangle below (no text or labels)Berlin Brands Group UK Limited
PO Box 42
272 Kensington High Street
London, W8 6ND
United Kingdom
Gentile cliente,
text_image
QR code image containing encoded data, no visible human-readable textINDICE
natural_image
Technical line drawing of a vehicle chassis frame with no visible text or symbolsAlloggiamento

Attrezzo 2 in 1

Spazzola a T
natural_image
Line drawing of a rectangular electronic device casing with a handle and mounting bracket (no text or symbols)Stazione di carica

natural_image
Line drawing of a USB cable with two connectors (no text or symbols)Cavo USB tipo C

text_image
B A
natural_image
Technical line drawing of a mechanical component with labeled parts C and D (no text or symbols beyond labels)
natural_image
Line drawing of a boat hull with no text or symbols
natural_image
Pure diagram of a mechanical component with dashed circular outline, no text or symbols presentMONTAGGIO E UTILIZZO
natural_image
Line drawing of a hand pressing a button on a device, showing the process with an inset close-up of the button (no text or symbols)text_image
Diagram illustrating three steps of cleaning a cleaning tool: surface, top view with hand holding device, and bottom view pouring granular material into a trash bin.Esempi di utilizzo
IT

natural_image
Line drawing of a hand holding a device above a cloud-shaped object (no text or symbols)
natural_image
Line drawing of a mechanical component or bracket with no visible text or symbols
natural_image
Line drawing of a handheld vacuum cleaner inside a seat (no text or symbols)natural_image
Line drawing of a device casing with an arrow indicating motion, showing internal components (no text or symbols)1 Spazzola a T

natural_image
Technical line drawing of a mechanical device with a downward arrow indicating motion or assembly (no text or symbols present)natural_image
Technical line drawing of a device housing with an arrow indicating a component (no text or symbols present)2 Attrezzo 2 in 1
text_image
Power 10%-100% Power 0%-10%Caricare
text_image
Diagram showing a flashlight connected to a plug via cable, with labeled parts 1 and 2.Con la base
text_image
Diagram showing two-step installation of a handheld device with labeled components and connection stepstext_image
Diagram illustrating four steps of cleaning a trash bin, showing material inspection and waste disposal.Pulizia profonda
natural_image
Diagram showing a device with a spring-loaded component and its internal structure (no text or symbols)1

natural_image
Cross-sectional diagram of a vehicle showing internal components and structural parts (no text or labels)2
natural_image
Symbol of a trash bin with crossed lines indicating no waste or discharge, and a solid black rectangle below (no text or labels)PRODUTTORE E IMPORTATORE (UK)
Produttore:
Chal-Tec GmbH, Wallstraße 16, 10179 Berlino, Germania.
Berlin Brands Group UK Limited
PO Box 42
272 Kensington High Street
London, W8 6ND
United Kingdom

bar
| Category | Value | |---|---| | Category 1 | 100 | | Category 2 | 100 | | Category 3 | 100 | | Category 4 | 100 | | Category 5 | 100 | | Category 6 | 100 | | Category 7 | 100 | | Category 8 | 100 | | Category 9 | 100 | | Category 10 | 100 | | Category 11 | 100 | | Category 12 | 100 | | Category 13 | 100 | | Category 14 | 100 | | Category 15 | 100 | | Category 16 | 100 | | Category 17 | 100 | | Category 18 | 100 | | Category 19 | 100 | | Category 20 | 100 | | Category 21 | 100 | | Category 22 | 100 | | Category 23 | 100 | | Category 24 | 100 | | Category 25 | 100 | | Category 26 | 100 | | Category 27 | 100 | | Category 28 | 100 | | Category 29 | 100 | | Category 30 | 100 | | Category 31 | 100 | | Category 32 | 100 | | Category 33 | 100 | | Category 34 | 100 | | Category 35 | 100 | | Category 36 | 100 | | Category 37 | 100 | | Category 38 | 100 | | Category 39 | 100 | | Category 40 | 100 | | Category 41 | 100 | | Category 42 | 100 | | Category 43 | 100 | | Category 44 | 100 | | Category 45 | 100 | | Category 46 | 100 | | Category 47 | 100 | | Category 48 | 100 | | Category 49 | 100 | | Category 50 | 100 | | Category 51 | 100 | | Category 52 | 100 | | Category 53 | 100 | | Category 54 | 100 | | Category 55 | 100 | | Category 56 | 100 | | Category 57 | 100 | | Category 58 | 100 | | Category 59 | 100 | | Category 60 | 100 | | Category 61 | 100 | | Category 62 | 100 | | Category 63 | 100 | | Category 64 | 100 | | Category 65 | 100 | | Category 66 | 100 | | Category 67 | 100 | | Category 68 | 100 | | Category 69 | 100 | | Category 70 | 100 | | Category 71 | 100 | | Category 72 | 100 | | Category 73 | 100 | | Category 74 | 100 | | Category 75 | 100 | | Category 76 | 100 | | Category 77 | 100 | | Category 78 | 100 | | Category 79 | 100 | | Category 80 | 100 | | Category 81 | 100 | | Category 82 | 100 | | Category 83 | 100 | | Category 84 | 100 | | Category 85 | 100 | | Category 86 | 100 | | Category 87 | 100 | | Category 88 | 100 | | Category 89 | 100 | | Category 90 | 100 | | Category 91 | 100 | | Category 92 | 100 | | Category 93 | 100 | | Category 94 | 100 | | Category 95 | 100 | | Category 96 | 100 | | Category 97 | 100 | | Category 98 | 100 | | Category 99 | 100 | | Total (Total) = [sum of bars] / [values] * (sum of bars + bars) * (sum of bars + bars) * (sum of bars + bars). The values in the table represent the sum of the bars and the corresponding sum of the bars. There is no additional data series or categories specified in the code.
