CleanMate 1291 - Vacuum Cleaner Klarstein - Free user manual and instructions
Find the device manual for free CleanMate 1291 Klarstein in PDF.

User questions about CleanMate 1291 Klarstein
0 question about this device. Answer the ones you know or ask your own.
Ask a new question about this device
Download the instructions for your Vacuum Cleaner in PDF format for free! Find your manual CleanMate 1291 - Klarstein and take your electronic device back in hand. On this page are published all the documents necessary for the use of your device. CleanMate 1291 by Klarstein.
USER MANUAL CleanMate 1291 Klarstein
Auto Charging With Remote Controller
OPERATING MANUAL

text_image
Freebox Auto Cleaner Electrician Power Inc. 40kΩ Control Control Control ControlDear customers,
Thank you for using our Intelligent Vacuum Cleaner!
The Intelligent Cleaner is our creation and manufactured by using our own mechanical electronic technology. It can be used widely in your family, office and entertainment places. Also it can go to work in places where workers are not easily accessible. With the help of this intelligent Cleaner, the quality of your life is enriched.
The Cleaner is only recommended for indoor use. It can be used to clean floor surfaces including hardwood, linoleum, tile and low-to medium-pile carpets. If you want your hardwood or tile floor brighter, you should clean the brush after it clean the floor, and then scoop up some liquid wax use the spoon and start the Cleaner again. The fashion flat design facilitates its cleaning under sofa, tea table and bed, etc. Its convenient remote control function enables a freely operation. Its special hi-tech intelligent design enable the Cleaner to automatically seek the charger for charging.
natural_image
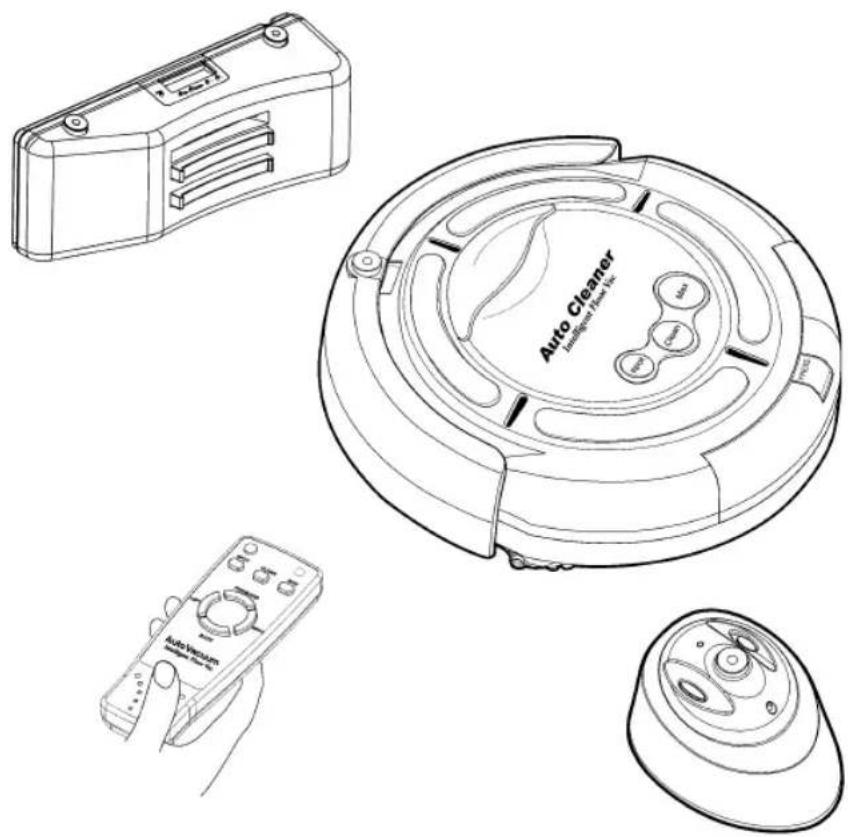
Line drawings of four different household appliances: a portable box, a circular vacuum cleaner with control buttons, a handheld remote control, and a small electronic device (no text or symbols present)When you unpack its box, you will get your Intelligent Cleaner together with the following attachments:
- Virtual Wall Unit X 1
- Battery Charger X 1
- Rechargeable Battery Pack (Installed) X 1
- Spoon X 1
- Charging base plate X 1
- Filter Mesh X 1
- Remote Controller X 1
- Side Brush X 1
- Dust Brush X 1
- Operating Manual X 1
natural_image
Technical line drawing of a circular mechanical component with internal channels and mounting holes (no text or symbols)Intelligent Cleaner

natural_image
Line drawing of a rectangular electronic device casing with slots and buttons (no text or symbols)Charging base plate

Remote Controller


natural_image
Technical line drawing of a rectangular electronic component with internal slots and mounting holes (no text or symbols)Virtual Wall Unit Rechargeable Battery Pack

Spoon Side Brush

natural_image
Pure mechanical diagram showing a central hub with four arms and a central pivot (no text or symbols)
Filter Mesh

Charger
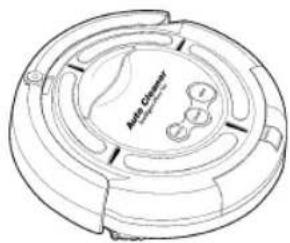
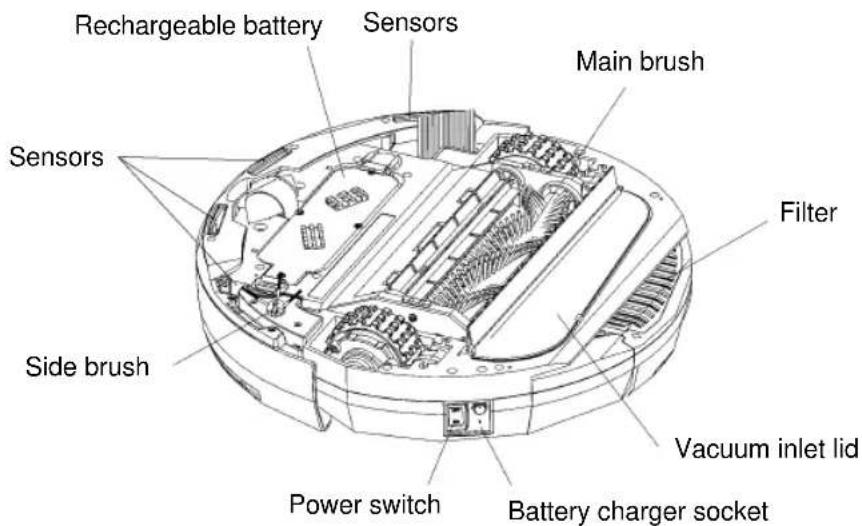
Intelligent Cleaner is installed with:

text_image
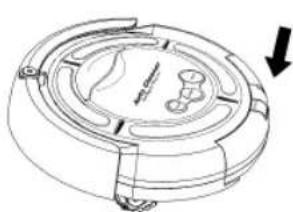
Infrared sensor Start button Battery life indicator Auto Cleaner Easy to grab handle Removable particle binSurface
text_image
Rechargeable battery Sensors Main brush Sensors Filter Vacuum inlet lid Side brush Power switch Battery charger socketBottom
After the introduction of the Intelligent Cleaner, please note the following operating procedures:
- Please ensure the battery is fully charged before starting the Cleaner.
- Please tidy unfixed articles on the floor before using the Cleaner, and keep it from the spikes at edge of carpet and power lines, etc. on the floor as possible.
- Turn on its main power start button, there are three start buttons: Spot, Clean and Max, representing three different cleaning modes. In addition, there is a timing work mode:
A. Spot mode(S): The Cleaner can make repeated screw type cleaning within the scope of 3 feet of diameter, focusing to clean a spot for 4 minutes. It's applicable for cleaning the room where is dirty at partial places.
B. Clean mode(M): The Cleaner will automatically clean the room for 30 minutes. The mode is applicable for cleaning small room.
C. Max mode(L): The Cleaner won't stop running until complete consumption of is power. The working time is excess 60 minutes. If the auto charging base plate is used, the Cleaner will automatically return to it for charging.
D. Timing mode: The cleaning time can be set by the time setting key on the charging base plate. The Cleaner will leave the auto charging base plate to work as per the pre-set time and the cleaning time is 60 minutes, and then it will automatically return to the socket for charging (refer to the Article of Charging for the detailed method).
- If you don't want your Cleaner to clean those areas beyond your desired cleaning area, please place the Virtual Wall Unit at the proper place such as the following illustration:

text_image
It's better to put the Virtual Wall Unit behind the door. Infrared ray-
When wrong start button is pressed, the other start switch needs to be pressed twice before cleaning.
-
The max working time for the Cleaner is about 45-60 minutes, which can meet the requirements for cleaning a normal room. If the battery power is about to run out, the battery life indicator will become red, and it will stop working. Charging of battery is needed.
Please see the following drawing for operating the Virtual Wall Unit:

text_image
Power Indicator Range Selector Switch Infrared wave emitter Power switchVirtual Wall Unit uses two (1# dry battery) to divide the infrared emission distance into three gears as following drawing:

over 7M
3-7 M
0-3 M
You can select according to your cleaning condition.

Do not use the infrared wave emitter to point at the eyes!
Refer to the following drawing for charging method and use of auto charging socket:

text_image
Signal sensor LCD display Charging touch plate Function setting key
text_image
Outlet Battery charger socket EVA paste Wall fixing plateFig.1
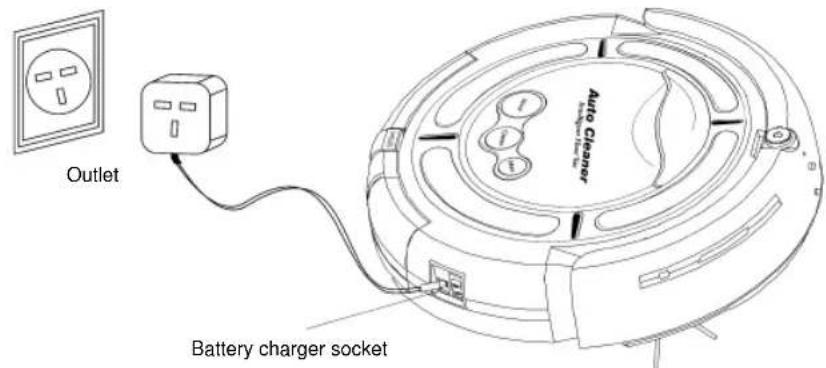
text_image
Outlet Battery charger socket Auto CleanerFig.2
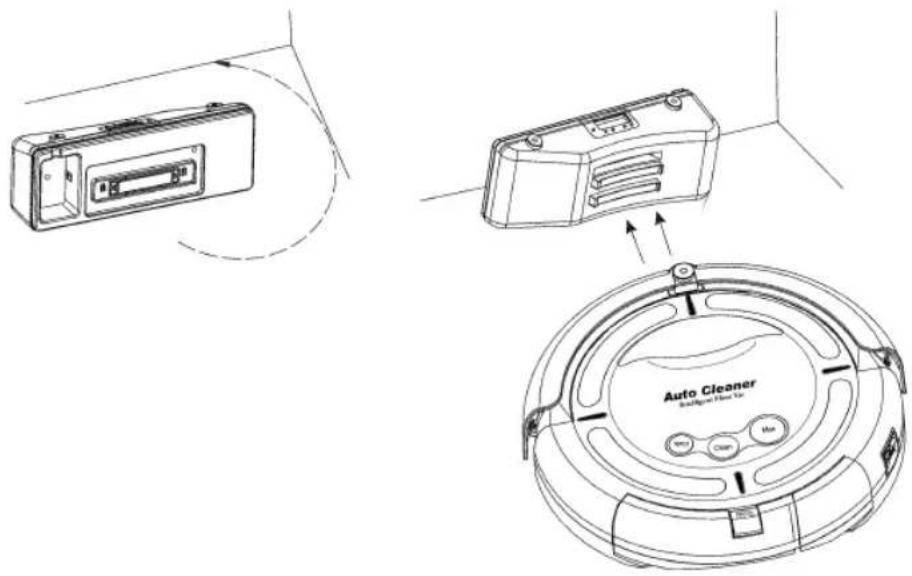
1. Installation and use method for auto charging base plate:
a. The Cleaner may be charged directly by the charger (as the Fig.2 shows) as well as by auto charging base plate (as Fig.1 shows). If the battery is about to be run out, the indicator will turn red and the Cleaner will automatically stop cleaning and seek the charging base plate for charging.
b. For charging with auto charging base plate, the plug of charger should be ensured to be inserted into the DC socket at back of the base plate (as the Fig.1), meanwhile, the screen on the base plate will display the time, etc.
c. The charging base plate must be installed reliably and be placed on the floor with the back on the wall as the following figure and no object is padded under it. The base plate may be fixed on the wall by the soft glue on the wall fixing plate.(Remove the paper on the soft glue with hand and fix the charging base plate on the wall with it).
d. If the room is too large and the Cleaner can not find the charging base plate immediately and stop seeking, you may manually return it to the base plate. The method is: place the Cleaner 1.5m before the base plate, and then press the power switch and MAX key. Or the Cleaner return near to the base plate and it will automatically find it and begin to charge.
text_image
Technical diagram showing three components of a car air conditioner fan: front-mounted box, rear-mounted device, and circular base with labeled ports.- Instructions on the function of keys on the auto charging base plate:
A. Clock function
a. Press the Clock key to adjust the time of clock as per the Fig.1.
b. Press the Clock key for three times and respectively adjust hour, minute and week. Press +/- key to adjust the specific parameters. After setting the time, press the Clock key and the clock setting is ok. At this time, there is "1" before the time displayed in the screen.

text_image
1 SET Bu Mo Ta We Th Fr Sa CLK 88:88 GO Clock Timing Clock key Timing keyB. Timing cleaning function
Press the Timing key to set the alarm time, and the Cleaner will automatically work as per the set specified time with the specific operating methods as the follow:
a. Press Timing key to set the hour. It can be adjusted by the key +/-
b. Press again Timing key to set the minute. It can be adjusted by the key +/-
c. Press Timing key for three times and the screen will display OFF. At such time, the alarm function is off. If you want to turn on alarm, you may press + key, the screen will display ON and then press again Timing key.
d. After it displays on for alarm setting, there will be "2" displayed before the time in the screen.
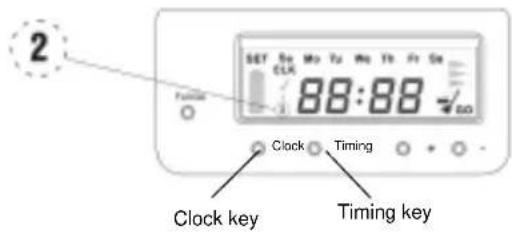
text_image
2 SET 50 Mo Tu Mo Tb Fr Sa CLK 88:88 -1.00 Clock Timing Clock key Timing key
The time intervals between the pre-set time set by the timing key and the standard time set by the clock key is above 4.5 hours. The timing cleaning function will and able to be effected merely when the battery is fully charged for 4.5 hours.
C. Auto cleaning function
a. The Cleaner will automatically work after being fully charged.
b. Press Full Go key, there will be a broom marking displayed at lower right corner of the screen, which means the function is on. Press the key again, the broom marking will disappear, which means the function is off.
c. There is a charging dynamic marking flashing on the screen when the Cleaner is charging on the auto charging base plate. Meanwhile, the battery indicator will flash. If it turns green, it means it has been fully charged and is able to work. Generally, the charging time is 4-6 hours.

text_image
SET Su Mo Tu We Ts Fr Sa CLK 88:88 Clock Timing Clock key Timing key
- For the purpose of ensuring the Cleaner is automatically charged, regularly wipe the charging contact at front plate of the unit and the dome on the base plate with dry cloth, so as to keep it free of dust, otherwise it may result in poor contact.
- The charging base plate should be kept at open place as possible, and do not place any obstacle within the range of 1.5m semidiameter, in case of affecting its auto charging.
- The Cleaner should be matched with the attached charger and the used power should confirm to it. Do not use any other charger and battery, otherwise it will lead to damages of the unit.
- In order to prolong the service life of the battery, it should be charged for 8-9 hours for the first use or when being used again after long time. It only can reach its best performance after 2-3 circles for charging and discharging.
Use the infrared remote controller by referring to the following drawing:
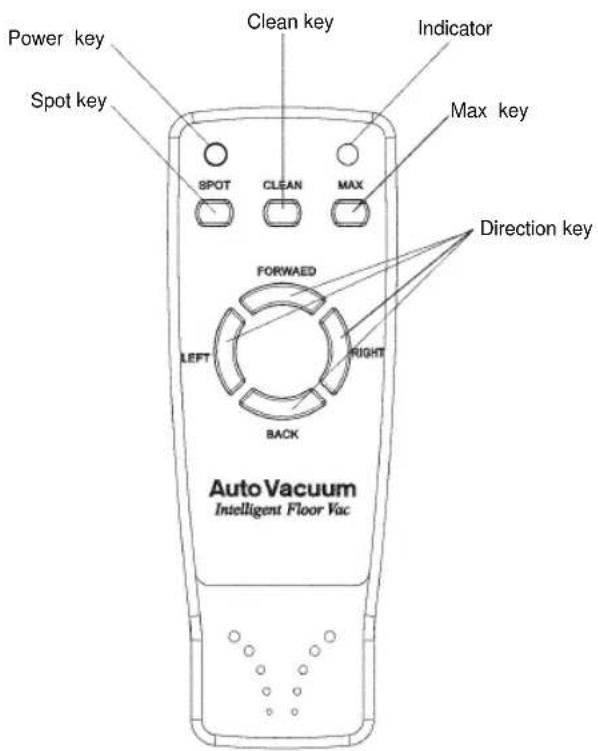
text_image
Power key Spot key Clean key Indicator Max key SPOT CLEAN MAX FORWAED LEFT RIGHT BACK Direction key Auto Vacuum Intelligent Floor VacThe cleaner can be controlled to clean by the infrared remote controller. As the above drawing, three keys: Spot, Clean and Max is respectively for three work modes. By direction key, it can operate the Cleaner to work in different directions. The P key is for powering on/off. Press the P key, the indicator on the panel will be off and the Cleaner enter Sleep mode, which enable to save energy maximally in non-operating state. Press again the P key on the panel, the indicator will be on, and the unit will enter the Standby stage, waiting for the next command.
When the Virtual Wall and remote controller are used in the same area, as they all use the infrared signal, which may lead to temporary failure for the remote controller, you may operate the remote controller after turning off the Virtual Wall or the unit being far from the Virtual Wall.
Intelligent cleaner is user-friendly very little maintenance required after use to ensure optimal performance please observe the following procedures:
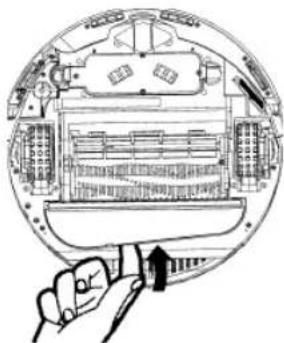
Empty the removable particle bin in following two procedures:
- Empty the bin
a. Turn off the power switch.
b. Press down the bin clip and pull out the bin as following illustrations:
c. Clear the bin.
d. In inserting the bin, press the clip on the bin for facilitating inserting.
natural_image
Technical line drawing of a mechanical component with no visible text or symbols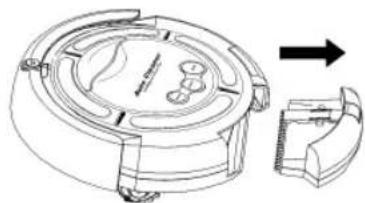
natural_image
Technical line drawing of a mechanical device with internal components and an arrow indicating direction (no text or symbols)- Clean the filter mesh
a. Turn the bin upside down.
b. Press the bottom slightly, take the filter mesh out as following drawing:

natural_image
Illustration of hands holding a blade with a serrated edge and a black arrow pointing to the blade (no text or symbols)c. Clear the dirt on the filter mesh.
d. Fit the filter mesh back to the bin.

text_image
Diagram showing two hands holding a device with labeled parts 'Iq' and 'IIq', likely illustrating a mechanical or electrical component assembly.Press the clip slightly and put the bin back to the Cleaner.
Clean the main brushes of the Cleaner
- Turn off the power switch and put the Cleaner on flat surface with its bottom up.

natural_image
Diagram of a computer monitor with an arrow pointing to the screen (no text or symbols present)- Use cross head screwdriver to remove the fixing screw on the right, and then take out the main brush, rubber brush and brush coupler together as shown in the following drawing.

text_image
Brush coupler.-
Clean the chamber where the brush is located and the contaminants on brush and rubber brush.
-
Wipe out dirt on the metal shaft and bearing of the brush coupler and the brushes (this may not be necessary to do after every cleaning) as per following drawings. If necessary, you may add a little lubricant to it.

natural_image
Illustration of hands holding a small object with an arrow indicating motion (no text or symbols)- Put the brush coupler and brushes back and tighten the screw.
Clean the vacuum inlet lid
-
Turn off the power switch; turn the Cleaner upside down on flat surface.
-
Take the Vacuum Inlet Lid out as per following drawing:
-
Clean the Vacuum Inlet Lid and the fan-shaped mechanism to ensure good ventilation.
4 .Guide the hinge tabs on the Vacuum Inlet Lid back into their holes carefully.
natural_image
Illustration of a hand holding a pen, interacting with a mechanical device inside a circular frame (no text or symbols visible)Method for replacement of side brush
The side brush is consumable. See the following picture for the replacement method.

natural_image
Technical line drawing of a mechanical component with two top views and a base view, labeled 'Bottom' (no text or symbols on the diagram itself)Fig. 1 Fig. 2

natural_image
Technical line drawing of a mechanical device with no visible text or symbols- Screw out two screws as per the Fig.1.
- Turn the side brush to the extent that the screwdriver can be inserted as per the Fig.2, loosen the screen, take off the old brush and replace with new one.
- Install the side brush and bottom housing in adverse order.
Intelligent path judgment
Intelligent Cleaner is intelligently controlled so it operates powerfully and can avoid any obstruction or even will not fall down from a table, staircase or pathway.
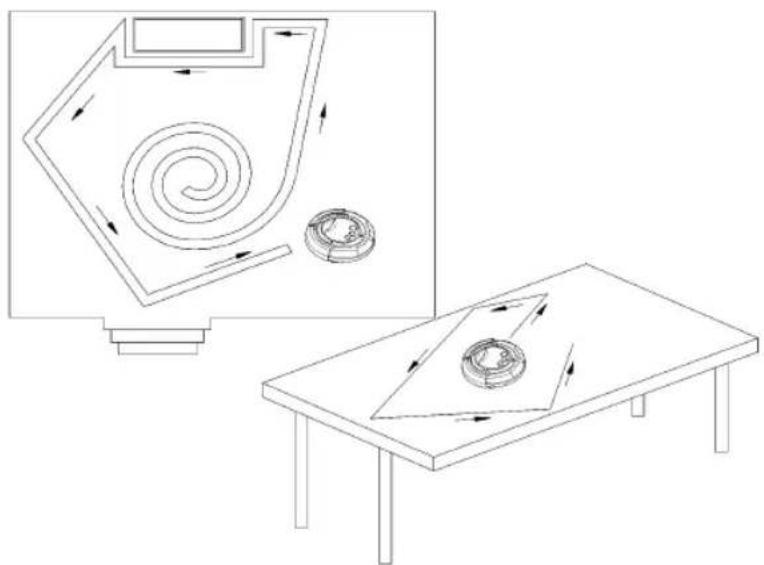
natural_image
Diagram showing a spiral-patterned device and a circular component on a table, with no visible text or symbols.
Please remove small objects such as vase, small paper box etc. which can be subject to knock down by cleaning, so it must clear these things first before the Cleaner to carry out its work.
The Intelligent Cleaner is a vacuum cleaning device which can control dust, so it has wonderful cleaning function. Attention should be paid to the following points:
- It is switched on but stop after the short music playing, this may mean the battery is low or off and charging is needed.
- Please do not use the Cleaner high-pile carpets.
- To avoid use Cleaner where there are objects such as clothing, power cords, towels, etc. As these things may entangle the brushes of the Cleaner.
- It is good to turn off the power switch after used the cleaner and must be fully charged if it's not used for a long time. Take battery out of the unit and store the battery and unit at a cooler place when it's not being used. Keep dry and clean for the bottom of the Cleaner.
Troubleshooting:
- What should we do if the Cleaner is dropped down from the edge of stairs?
Solution: Wipe away the dust for the probe at the bottom of the front plate with dry cloth.
- How to deal with it if the Cleaner stop running and all indicators are on during cleaning?
Solution: Check whether there are large or bar-shaped junks blocked in the main brush or left and right wheel, and clean the bin if it's full.
- How to deal with it if the Cleaner fixes at one place and rotates?
Solution: Check whether there are junks blocked at the left and right wheel and clean away the dust on the probe at the bottom.
- What should we do if the Virtual Wall doesn't work?
Solution: Place the Virtual Wall unit at the right place. Please replace the battery for the Virtual Wall if the green indicator keeps flashing.
- What should we do if the battery can't be recharged?
Solution: Firstly, check whether the battery is correctly installed and you should hear two sounds when installing the battery. Then check whether the contact on the front plate and dome on the base plate is dirty. If it can't be charged on the base plate, please directly use the charger for the unit to charge.
- How should we do if the Cleaner can not find the charging base plate?
Solution: The base plate will product infrared signal and it only can return to the base plate after finding the signal. You should confirm the power is on for the base plate and do not use the Virtual Wall near the base plate as its signal may affect to find the position of the base plate. If your room is large, it is possible for the Cleaner can not find the base plate after cleaning. In such circumstances, you should re-place the base plate and do not put any obstacles 3-4m before it.
- What should we do if the Cleaner do not perform timing cleaning function?
Solution: Please check whether there is power failure for the charging base plate or during working. If the displayed parameters change, it should re-set them again.
