Royal Line III 32 Smart - TV MEGASAT - Free user manual and instructions
Find the device manual for free Royal Line III 32 Smart MEGASAT in PDF.
| Product type | LED Smart TV |
| Brand | Megasat |
| Model | Royal Line III 32 Smart |
| Screen size | 32 inches (81.3 cm) |
| Resolution | 1920 x 1080 (Full HD) |
| Contrast ratio | 3000:1 |
| Brightness | 250 cd/m² |
| Viewing angle | 178° H / 178° V |
| DVB-T2 standard | H.265 / HEVC |
| CI+ slot | Yes (HD+ ready) |
| Bluetooth | Version 4.2 |
| WLAN | Yes |
| Operating system | Android 9.0 |
| Processor | ARM Cortex-A53 (1 GB DDR / 8 GB Flash) |
| Video playback formats | MPG, AVI, TS, MOV, MKV, DAT, MP4, VOB, RM |
| Audio playback formats | MP3, WMA, AAC |
| Photo playback formats | JPEG, BMP, PNG |
| Speakers | 2 x 10 Watt (Stereo) |
| VESA standard | 200 x 100 mm |
| Main connections | 2x HDMI, 2x USB, 1x LAN, antenna inputs (DVB-S/S2 and DVB-T/T2/C), coaxial audio output, headphone output, AV input (CVBS + audio) |
| Power supply | AC 100-240 V, 50/60 Hz ; DC 12 V, 3A (10-30 V stabilized) |
| Power consumption (operating / standby) | 31 W / <0.5 W |
| Energy efficiency class | F (Scale A to G) |
| Dimensions with stand (W x H x D) | 731 x 491 x 211 mm |
| Dimensions without stand (W x H x D) | 731 x 432 x 85.7 mm |
| Weight | 4.2 kg |
Frequently Asked Questions - Royal Line III 32 Smart MEGASAT
User questions about Royal Line III 32 Smart MEGASAT
0 question about this device. Answer the ones you know or ask your own.
Ask a new question about this device
Download the instructions for your TV in PDF format for free! Find your manual Royal Line III 32 Smart - MEGASAT and take your electronic device back in hand. On this page are published all the documents necessary for the use of your device. Royal Line III 32 Smart by MEGASAT.
USER MANUAL Royal Line III 32 Smart MEGASAT
natural_image
Technical line drawing of a computer case with mounting holes and internal compartments, showing an upward arrow indicating assembly or movement (no text or symbols present)natural_image
Technical line drawing of a computer monitor rear panel with screw base and mounting bracket (no text or symbols)natural_image
Technical line drawing of a mechanical assembly with two vertical supports and internal components (no text or symbols)natural_image
Simple line drawing of a blank rectangular monitor with two side-mounted connectors at the bottom (no text or symbols)natural_image
Technical line drawing of a mechanical assembly with two vertical supports and internal components (no text or symbols)4. Bezeichnungen
text_image
Was golf's News N/A Besondere APP APP Store Facebook Spotify uHale APPS Media Player TV Google Play (Store) Chrome Musicnatural_image
Blue background with two white gear icons (no text or symbols)text_image
Media PlayerMedia Player
natural_image
Blue square icon with white TV symbol and 'TV' text (no additional symbols or text)TV
natural_image
Close-up of a black computer keyboard and mouse on a plain background (no text or symbols visible)Version 1.0 (August 2021)
- Safety instructions ....03
- Delivery....03
- Stand mounting....04
- Designations
4.1 Front and side view....06
4.2 Connections....07
4.3 Remote control 08
- Initial installation ....09
5.1 Select input source....11
5.2 Reception via DVB-C (cable TV) 11
5.3 Reception via DVB-S (satellite television)....11
5.4 Reception via DVB-T (terrestrial antenna)....11
- Main menu
6.0 Backlight....12
6.1 Picture settings....13
6.2 Sound setting....14
6.3 Programme Setting....15
6.3 Cl+ slot for Pay-TV expansion....18
6.4 Function 19
6.5 Clock....20
- EPG (Electronic Programme Guide)....21
- CI+ slot for Pay-TV expansion 22
- Smart TV function
9.1 Settings....23
9.2 Network & Internet....23
9.3 Bluetooth 24
9.4 Device settings 25
9.4 Info 25
9.4 Date & Time 25
9.5 Media....27
10. Operating the Smart TV interface....28
11. Specifications....30
12. Troubleshooting....32
13. Conformity information....33
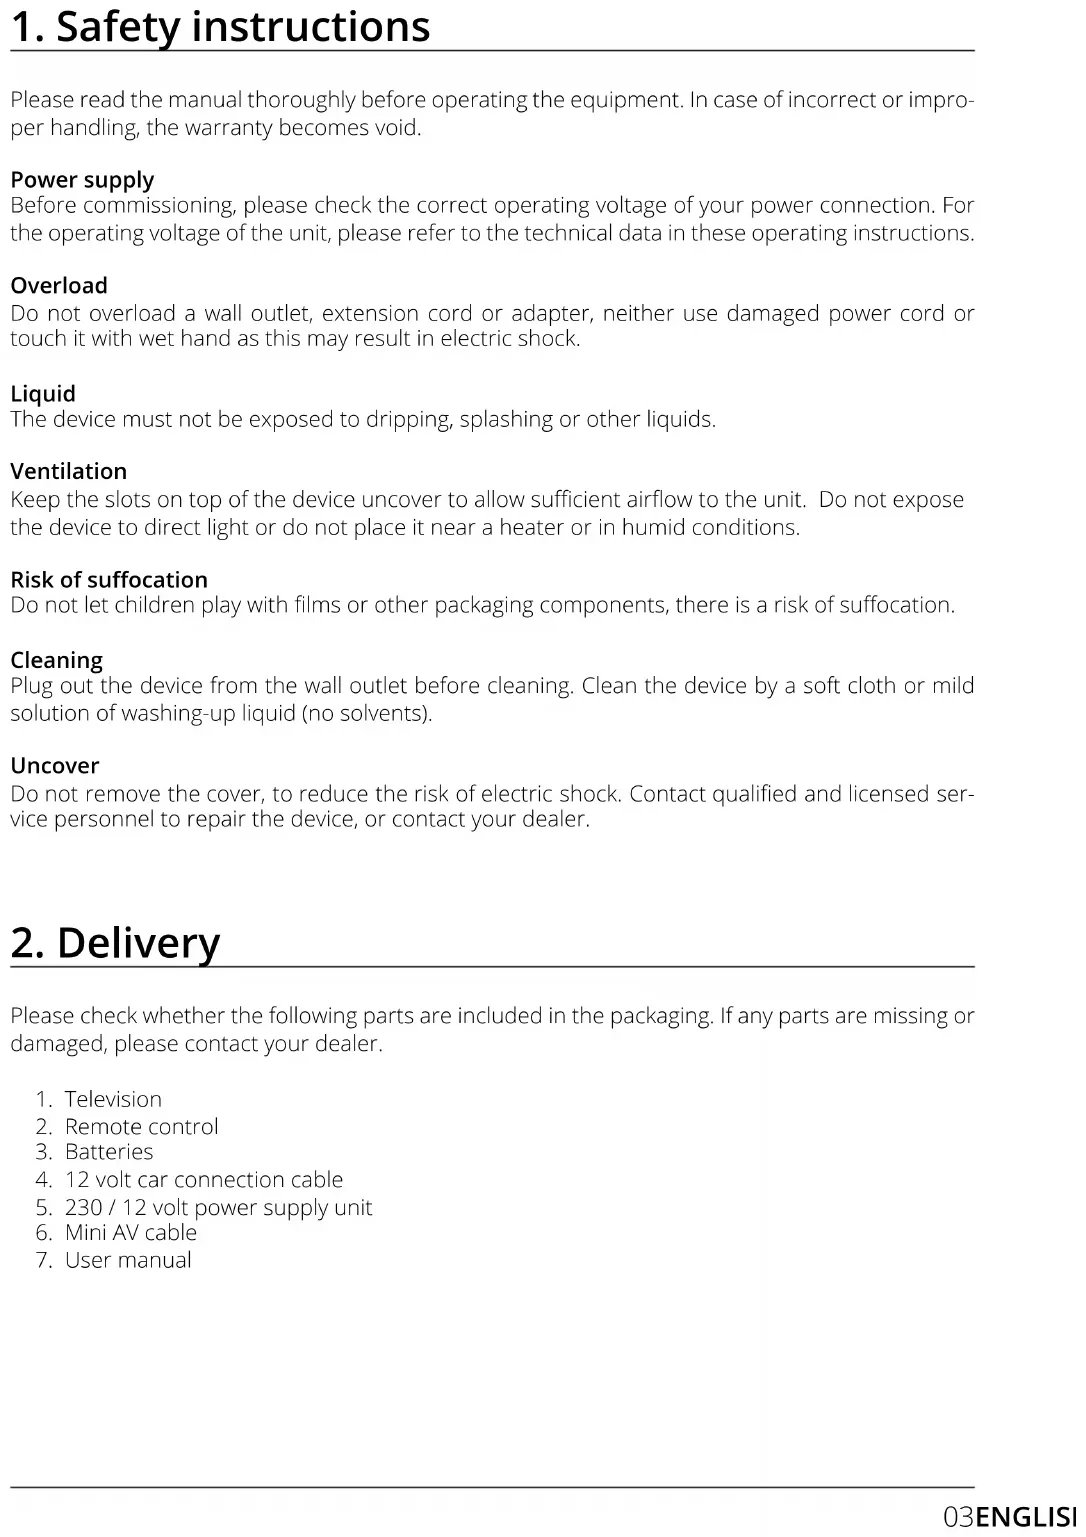
1. Safety instructions
Please read the manual thoroughly before operating the equipment. In case of incorrect or improper handling, the warranty becomes void.
Power supply
Before commissioning, please check the correct operating voltage of your power connection. For the operating voltage of the unit, please refer to the technical data in these operating instructions.
Overload
Do not overload a wall outlet, extension cord or adapter, neither use damaged power cord or touch it with wet hand as this may result in electric shock.
Liquid
The device must not be exposed to dripping, splashing or other liquids.
Ventilation
Keep the slots on top of the device uncover to allow sufficient airflow to the unit. Do not expose the device to direct light or do not place it near a heater or in humid conditions.
Risk of suffocation
Do not let children play with films or other packaging components, there is a risk of suffocation.
Cleaning
Plug out the device from the wall outlet before cleaning. Clean the device by a soft cloth or mild solution of washing-up liquid (no solvents).
Uncover
Do not remove the cover, to reduce the risk of electric shock. Contact qualified and licensed service personnel to repair the device, or contact your dealer.
2. Delivery
Please check whether the following parts are included in the packaging. If any parts are missing or damaged, please contact your dealer.
- Television
- Remote control
- Batteries
- 12 volt car connection cable
- 230 / 12 volt power supply unit
- Mini AV cable
- User manual
3. Stand mounting (optional)
how to mount the stand for 19 / 22 / 24 inch TVs
Place the TV on a flat, soft surface (e.g. blanket, foam, etc.) to prevent damage to the TV or display.
natural_image
Technical line drawing of a computer case with mounting holes and internal compartments, showing an upward arrow indicating assembly or movement (no text or symbols present)Plug the stand into the TV as shown.
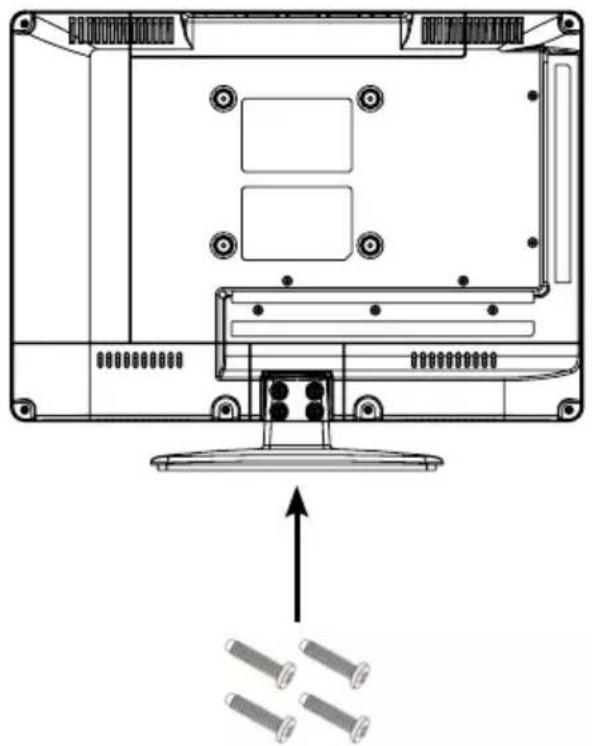
natural_image
Technical line drawing of a computer monitor rear panel with screw base and mounting bracket (no text or symbols)Use a suitable screwdriver and fasten the feet with the enclosed screws. Make sure that the screws are properly tightened.
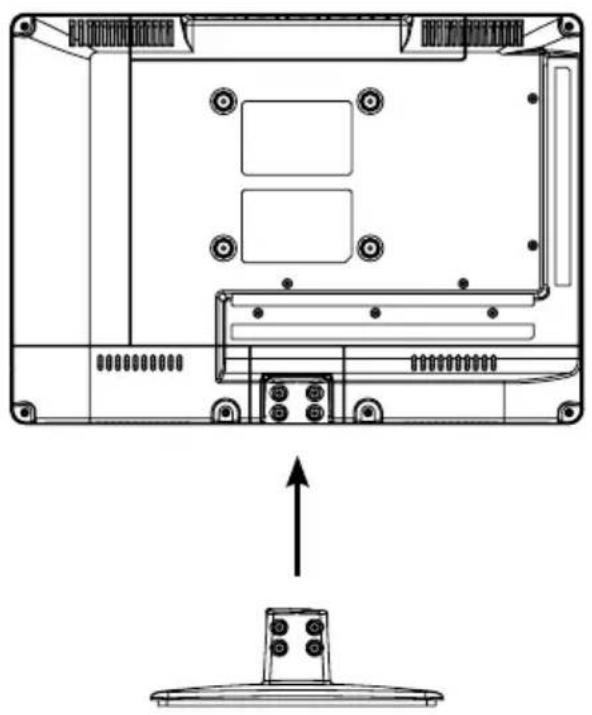
3. Stand mounting (optional)
how to mount the feet for the 32 inch TV set
Place the TV on a flat, soft surface (e.g. blanket, foam, etc.) to prevent damage to the TV or display.

natural_image
Technical line drawing of a mechanical assembly with two vertical supports and internal components (no text or symbols)Make sure that the feet face outwards with the open side.
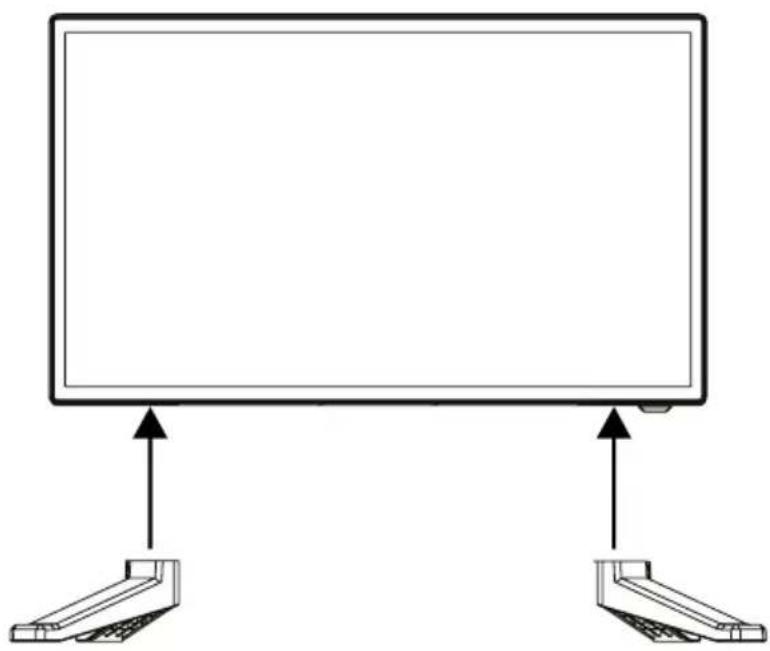
natural_image
Simple line drawing of a blank monitor with two side-mounted connectors, no text or symbols present.Plug the stand feet onto the TV as shown.
The feet are equipped with two locks. Insert the feet into the frame of the television until they click into place.

natural_image
Technical line drawing of a mechanical assembly with two vertical supports and internal components (no text or symbols)4. Designations
4.1 Front and side view
Frontview
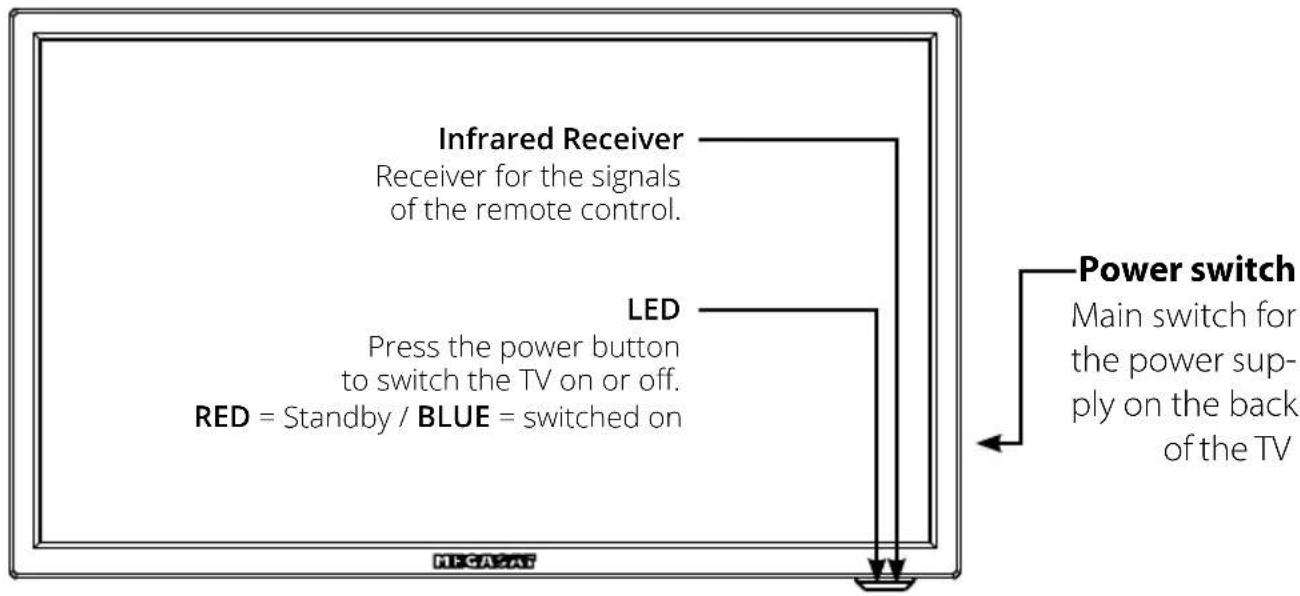
flowchart
graph TD
    A["Infrared Receiver\nReceiver for the signals of the remote control."] --> B["LED\nPress the power button to switch the TV on or off.\nRED = Standby / BLUE = switched on"]
    B --> C["Power switch\nMain switch for the power supply on the back of the TV"]
Side view

text_image
INPUT MENU CH+ CH- VOL+ VOL-| INPUT | Press the button to select the signal source (e.g. DTV, HDMI, ...). |
| MENU | Press the button to enter the menu. |
| CH +/- | Switches the programmes up / down. |
| VOL +/- | Adjusts the volume louder / softer. |
| Switches the television on or off (standby). |
Note:
Press the INPUT key several times to select the desired signal source. After a short waiting time, the TV switches to the desired signal source.
4. Designations
4.2 Connections
Bottom view
DC IN

RJ 45

CVBS out LINE L out LINE R out

HDMI 1

HDMI 2

DVB-S/S2

DVB-C/T2

DC IN Connection for 230 volt power supply (DC 10\~30 volt).
RJ45 Connection to a network via LAN cable.
CVBS out Video input with jack plug.
Line L / R out Audio input with jack plug (right/left).
HDMI 1 HDMI input for connecting a receiver, DVD player, etc.
HDMI 2 HDMI input for connecting a receiver, DVD player, etc.
DVB-S/S2 Antenna input for DVB-S2 (satellite) (max. 500 mA).
DVB-C/T2 Antenna input for cable TV or DVB-T2 antenna.
Side view
COAXIAL

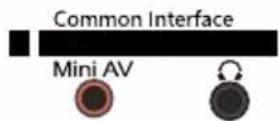

COAXIAL Digital audio output (coaxial).
Common Interface Slot for CI / CI+ modules.
Mini AV AV input (FBAS/audio) via adapter cable.
Headphone Output for headphones with 3.5 mm jack connection.
USB 1 / USB 2 USB connection for media playback or for recording or timeshift function (only with optional software).
4. Designations
4.3 Remote control

SOURCE Select source
TV/RADIO Switch between TV and radio stations
MUTE Muting the sound
PICTURE Switch to picture presets
FAV Show favorites
SLEEP Setting Automatic-shutdown
SOUND Switch to Sound preferences
NUMMERIC BUTTONS Enter numbers
-/-- Switches between one and two digits when entering numbers
RECALL Returns to the last channel position
EPG Electronic Program Guide
MENU Opens the main menu
PFEILTASTEN for navigation in the main menu and DVD menu, for program changes and volume control
OK (CH.List) To confirm a selection / program list
INFO Show informations
EXIT Exit the respective menu
VOL +/- Volume control
CH +/- Change channels
SMART no function
MOUSE no funktion
TV/TXT Show and close Teletext
EJECT Ejects the DVD (only in DVD mode only)
REC Starts recording (optional)
REC.LIST Displays the recording list (optional)
SUBTITLE / D.PRO Show / hide subtitles (if available)
D.PRO edit the play list in DVD mode
CANCEL / D.REP Switch between Teletext / TV
D.REP repeat mode in DVD mode
REVAL / D.GOTO Displays hidden information in Teletext
D.GOTO playing your favorite titel / chapters
NICAM/A2 / D.SLOW Switch to Nicam/A2
D.SLOW plays DVDs in slow motion
D.SET: DVD System settings
D.MENU: Show DVD menu
D.SUB: Show DVD-subtitles
D.LAN: Switch languages/ audio tracks in DVD mode
SIZE / D.ZOOM Zoom in on the top and bottom of the teletext
D.ZOOM selects an image in the DVD mode
SUBPAGE / D. TITLE Subpages in teletext Call up / Cancel
D. TITLE shows the DVD title in DVD menu
▶II Start / Pause
■ Stop
◀◀ / ▶▶ Forward / Rewind backward
◀◀ / ▶▶ Previous Chapter / Next Chapter
INDEX Gets the index page in the DVD menu
HOLD Holds the bottom change in teletext
5. Initial installation
- Connect the TV to the power supply and switch on the power switch on the back of the housing. The TV is now in standby mode (LED lights RED).
- Press the Power button on the remote control (LED lights BLUE).
- After the television has started, the initial installation menu appears. You can now make the following settings:
Note:
Press the ◀▶ buttons to go to the next or previous step.
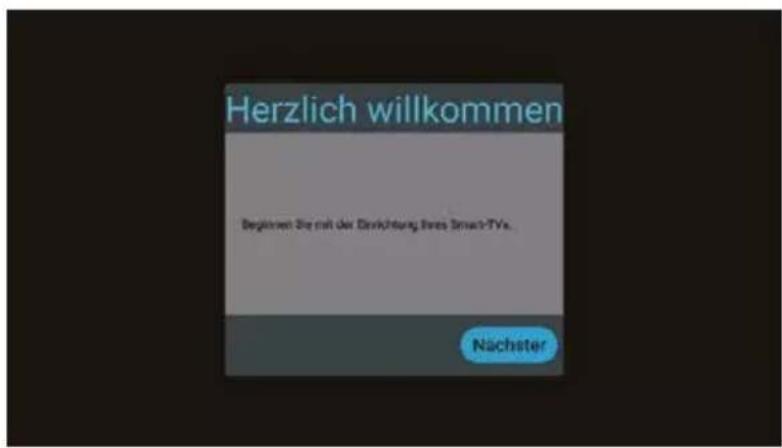
Select your menu language and then go to the next step.
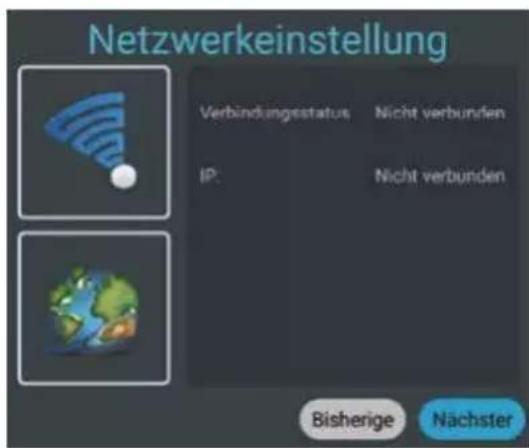
If you want to connect the TV to a router via WLAN, select the name in the list and confirm with OK. Enter the password of the Internet router here. Then press Connect to establish a connection.
Alternatively, the TV can also be operated via a LAN cable (RJ45). Connect the cable to your Internet router to establish a connection to the Internet. Note: You can change the setting at any time via the menu Settings/Network & Internet.
5. First installation
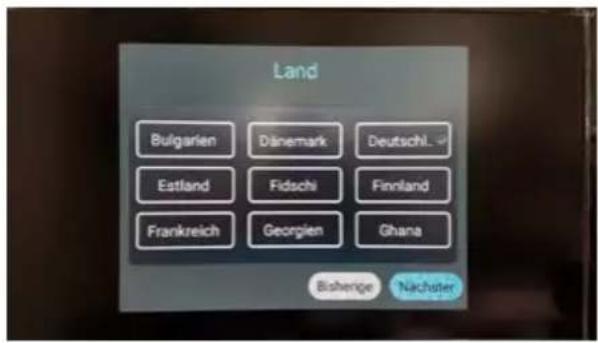
Select your country and then go to the next step.
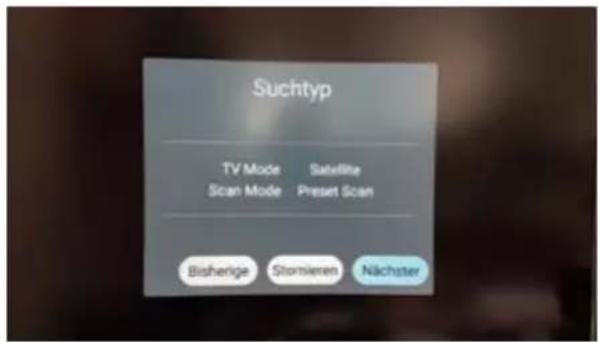
text_image
Suchtyp TV Mode Satellite Scan Mode Preset Scan Bisherige Stomieren NächsterSelect the TV mode and then go to the next step.
The satellite mode is selected as the default and the pre-installed channel list is loaded.
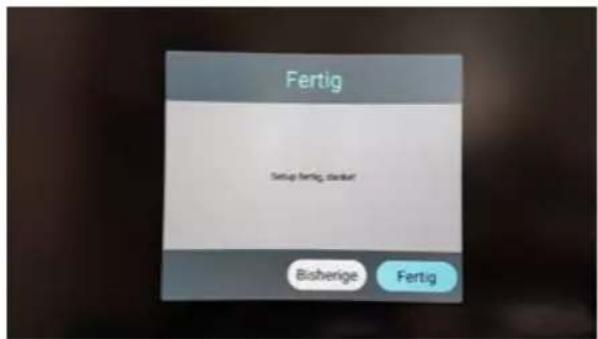
text_image
Fertig Setup fertig, daker Bisherige FertigSelect Done to complete the initial installation. Select Back to choose another option.
The pre-installed channel list (only in satellite DVB-S mode) is now loaded and the installation is completed.
5. First installation
5.1 Select input

text_image
ATV DVBT DVBC DVBS AV HDMI1(ARC) HDMI2 MEDIATo switch between the respective reception sources, press the INPUT key on the remote control. Select the desired input source and confirm with the OK key on the remote control.
• ATV (reception of analogue TV channels)
• DVB-T (reception via terrestrial antenna)
• DVB-C (reception via cable TV)
• DVB-S (reception via satellite)
• AV (reception via external AV devices, e.g. DVD player, game console)
• HDMI 1 (reception via external devices, e.g. DVD player, game console)
• HDMI 2 (reception via external devices, e.g. DVD player, game console)
• Media (Opens the media player if a USB medium is inserted)
Note:
The TV set is designed to receive satellite TV as standard. An Astra channel list is already programmed. If you want to use cable TV or receive programmes via a DVB-T antenna, you must open the menu after selecting the reception type and start a search via ide option „Programme“. (see 6.3)
6. Main menu
To enter the TV's main menu, press the MENU button on the remote control. In the main menu, you can make basic settings such as picture, sound or channel settings. Use the ▲▼ keys to select the desired setting. Confirm your selection with OK to enter the menu. Once you have made the settings in the Once you have made the settings in the respective menu, exit the menu step by step by pressing the EXIT key.
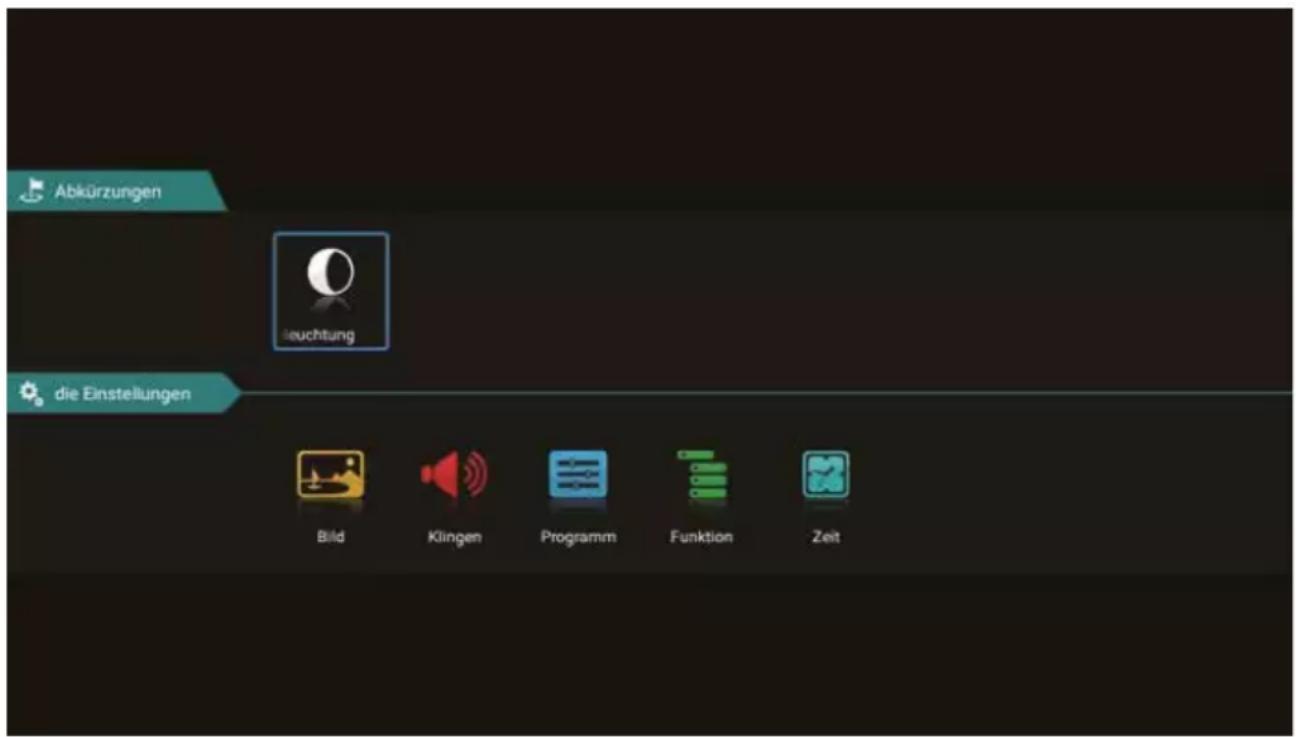
Select the backlight by pressing the OK button.
You can use the ◀▶ buttons to adjust the lighting.
Please note that a higher level of backlighting also changes the energy consumption of the unit. of the unit also changes.
6. Main menu
6.1 Image setting

Select the desired picture mode:
- Standard (default setting)
• Film (for more contrast)
• Vivid (for less contrast) - User (brightness, contrast, colour and sharpness can be can be adjusted as required)
Aspect ratio
Select the desired aspect ratio of the TV or TV programme:
• Auto (automatic adjustment of the aspect ratio)
• 16:9 (adjustment of the TV picture to the 16:9 format)
• 4:3 (adjustment of the TV picture to the 4:3:9 format)
- Zoom1 (First method to enlarge the TV picture)
- Zoom2 (Second method to enlarge the TV picture)
Colour temperature
Select the desired colour temperature. The overall image of the TV picture is adjusted accordingly.
• Warm (warmer colours)
• Normal (normal colours)
- Cold (cold colours)
Noise reduction
Select the desired noise reduction. This function smoothes the image and reduces artefacts and grain.
- Off (switches the function off)
- Low (low noise reduction)
• Medium (medium noise reduction)
• High (high noise reduction)
• Auto (automatic noise reduction)
6. Main menu
6.2 Sound setting

- Standard (default sound setting)
- Sport (sound is concentrated on sports acoustics)
• Film (sound is concentrated on voices)
• Music (sound is concentrated on music) - User (sound settings can be adjusted as required under item „Compensation“)
Balance
Select the desired balance between the left (-) and right (+) speakers. By default, the value should be „0“.
Automatic volume
„Automatic volume“ ensures a uniform volume when you switch from one TV programme to another. Select „ON“ or „OFF“.
Surround
Activate this item if you have connected a surround system.
Digital audio output
Select whether you use the digital audio output for e.g. a surround system:
• Auto (automatically detects the connection of an external surround system)
- PCM (sends an encoded audio signal to the external surround system)
- off (deactivates the digital audio output. The sound is reproduced via the TV loudspeakers).
Audio only
This deactivates the screen and you only have a sound transmission.
With Exit, you can leave the mode again.
6. Main menu
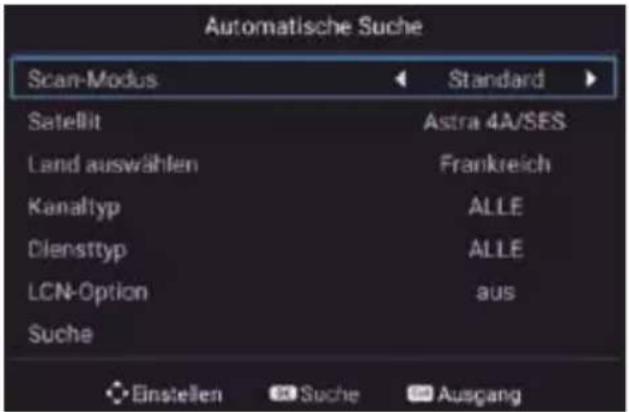
6.3 Programme
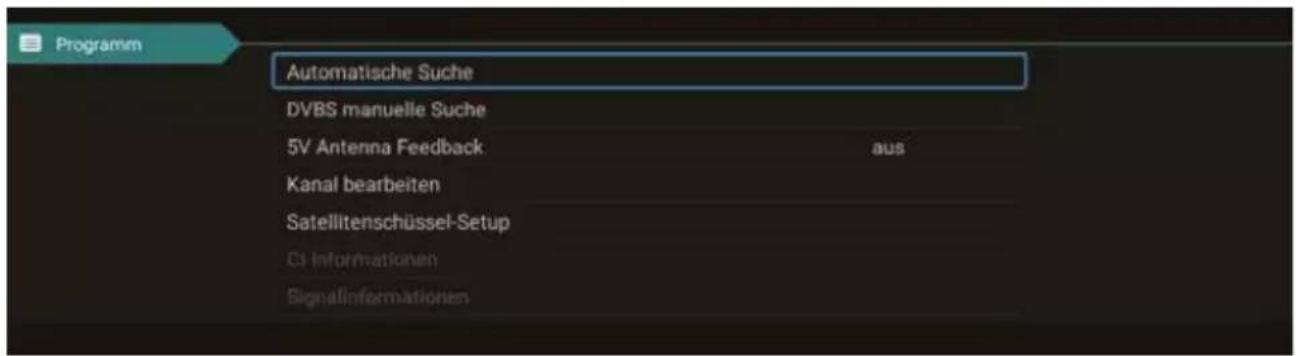
Select the desired country in which you are located. This selection may also affect the channel search.
Scan-Modus
Select the desired mode with which you want to start the search
- Standard (Standard setting is used for the search)
• Network (Searches all TP with subfrequencies) - Blind Scan (Scans the satellite for TP and then searches for channels)
- Fast Scan (Searches for channels via provider; influenced by country selection)
- Preset Scan (Loads the default channel list from the factory)
Satellite
Select the desired satellite.
Channel type
Select the desired programme type.
• Free (only free-to-air channels)
• All (free and encrypted channels)
- Encrypted (only encrypted channels)
Service type
Select the service type for your search.
• DTV (Digital TV Channels)
• All (Digital TV and Radio Stations)
• Radio (digital radio stations only)
LCN option
This abbreviation stands for Logic Channel Numbering and causes the receiver to automatically sort the programmes found on the basis of a channel number transmitted by the transmitter. If the search is carried out with LCN, the channel numbers always remain, even if channels are exchanged or deleted. By default, this option is off in order to maintain a consecutive numbering of the channels.
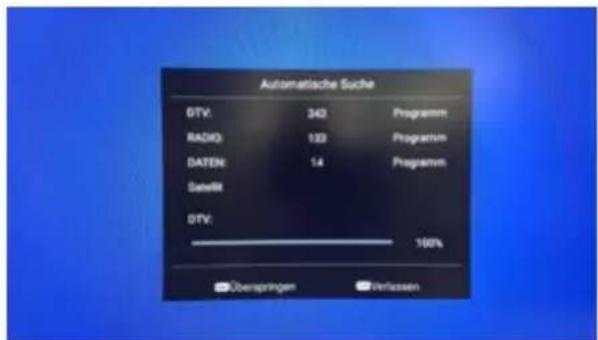
Search
Select the Search option and confirm the selection with OK. The channel search starts num with your pre-selected options.
Select the desired satellite.
Transponder
Select the Search option and confirm the selection with OK. Now select the desired TP with the ▲▼ buttons and confirm with OK. Now you have the option of searching the transponder for stations. Select the desired options (see automatic search).
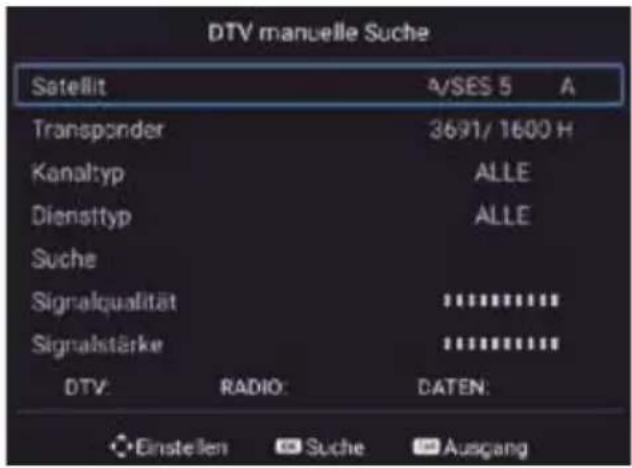
text_image
DTV manuelle Suche Satellit A/SES 5 A Transponder 3691/ 1600 H Kanaltyp ALLE Diensttyp ALLE Suche Signalqualität ********** Signalstärke ********** DTV: RADIO: DATEN: Einstellen Suche AusgangThen select the Search option and confirm your selection with OK. The channel search starts num with your pre-selected options.
You also have the option of checking the signal strength and signal quality. You can edit the TP using the RED/GREEN/YELLOW colour selection.
Transponder
Delete (RED button) process with OK.
Deletes the selected transponder. Confirm the irrevocable deletion
Edit (GREEN button) Change the frequency, symbol rate and polarity of the selected transponder. Then confirm with OK.
New (YELLOW button) Add a new transponder. Enter the frequency, symbol rate and polarity of the new transponder. Then confirm with OK.
5V Antenna voltage
5V antenna voltage is only required for active DVB-T antennas.
6. Main menu
Edit channel
In this menu you can edit or arrange the respective programmes. The following options are available:
Delete (RED button) Use the arrow buttons to select a programme and press the RED button to delete it. press the RED button to delete it.
Move (YELLOW button) Select a programme with the arrow keys and press the YELLOW key. Now move the selected programme to the desired position and press the yellow key. Alternatively, you can press the menu key and then enter the desired position number. Confirm the entry with the yellow key.
Hide (BLUE button) Select a programme with the arrow keys and press the BLUE key. This programme is highlighted and skipped when you switch programmes. Note: You can still ca
channel list or by entering the channel number.
Note: You can still call up the ch
Favourites (FAV button) Use the arrow buttons to select a programme and press the press the FAV key to mark it as a favourite (recognisable by the heart by the heart symbol). From now on, when you press the TV mode, press the FAV key on the remote control, only the programmes which you have marked as favourites will be marked.
Satellite setting
In this menu you can edit the satellites, adjust the LNB type and set DISEqC settings. The following options are available:
SatellitE
Delete (RED button) deletes the selected satellite. Confirm the irrevocable deletion with OK.
Edit (GREEN button) Change the name, longitude, latitude and band of the selected satellite. Then confirm with OK.
Add (YELLOW button) Add a new satellite. Enter the name, longitude, latitude and band of the new satellite. Then confirm with OK.
Search (BLUE button) Start the search with the selected satellite.Select the search mode, the channel type and the service type. Then confirm with OK.
6. Main menu
Antenna setting
Press the right arrow key to switch to the configuration. You can switch back with Exit.
LNB type Change the LNB type here (default: 09750 / 10600).
LNB voltage Change the LNB voltage supply here (default: On).
22 KHz Set the 22 KHz setting to on / off (default: Auto)
Unicable setting Select „On“ if you want to operate the TV on a Unicable (EN50494).
Select the desired IF channel with the appropriate frequency. If this does not match your system, you must change it manually.
Toneburst Choose between None, Burst A, and Burst B
DiSEqC 1.0 Choose between None, LNB 1 to LNB 4
DiSEqC 1.1 Choose between None, LNB 1 to LNB 16
DiSEqC 1.2 Select „On“ if you need motor control.
Hinweis:
This menu shows all information about the CI module if a suitable module has been inserted. (see page 22)
Signalinformation
This menu displays information about the currently selected satellite, transponder, signal strength and signal quality.
6.4 Function
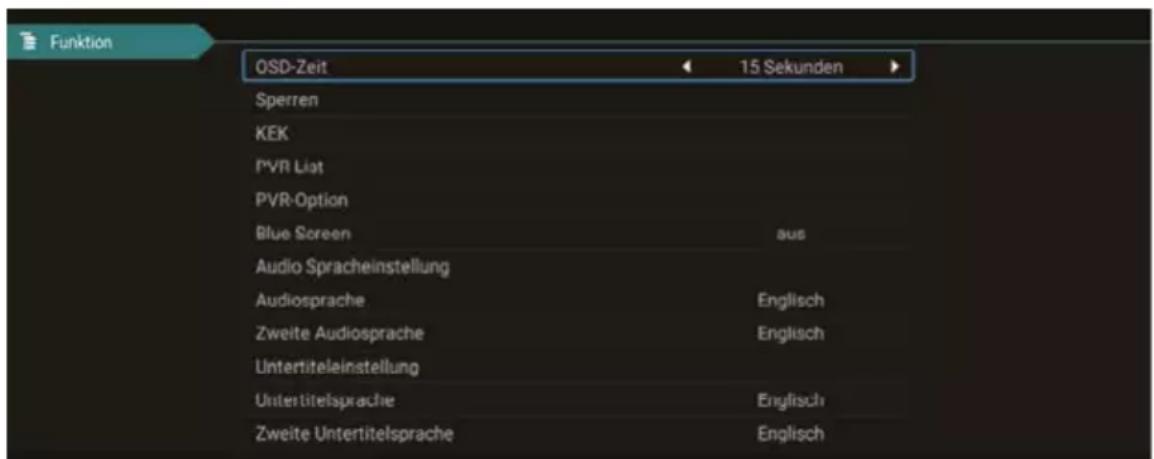
Set the seconds for how long the on-screen menu should remain on. Choose between Always, 5, 10, 15 or 30 seconds.
System lock
You will be asked to enter a password. The default password is: 0000 Enter the PIN and confirm with OK.
Parental Control:
Depending on the programme, there are official age restrictions. In this menu, select from how many years the restriction should be activated. Choose between 4-18 years or „none“.
Channel lock:
Press the OK key to get the channel list. Select the desired channel and press the blue key. The channel is now locked with a PIN code. Press the blue key again to unlock the channel.
Set the password (change PIN):
To change the PIN (default: 0000), you must first enter the current PIN. Now enter the new 4-digit PIN. Confirm the new PIN again to complete the process.
Hotel
In the hotel settings, you can configure the TV so that unauthorised persons cannot access certain functions.
Key lock: Locks the keys on the unit.
Scan lock: Locks the channel search.
Input lock: Locks any input sources (e.g.: DVB-T, HDMI....)
Default Source: Select the source with which the TV is to start. (e.g.: DVB-S)
Start channel: Select the channel with which the TV is to start.
Volume: Select the volume at which the TV is to start.
Max volume: Select the maximum volume that can be set.
Import database: Import a preset database.
Export database: Export the current database.
Language: Select the menu language
Aspect ratio: Select the aspect ratio 16:9 or 4:3.
Restore: Deletes all hotel settings.
CEC
„CEC“ stands for „Consumer Electronics Control“. With HDMI CEC, devices connected via HDMI can be controlled with only one remote control.
6. Main menu
Shop mode
Select whether you want to use the TV in Shop mode. In Shop mode, settings are changed that can affect the power consumption.
Shop
Since shops usually have a more glaring or brighter lighting atmosphere, the TV should be operated in the „shop“ setting. This leads to sharper pictures, richer colours, stronger contrasts, but also to higher power consumption.
Blue screen
Shows a blue screen when switching
Teletext language
Select which teletext language is to be used:
• Western Europe, Eastern Europe, Russian, Arabic, Faris
Audio language Select the preferred audio language of the TV channels
Subtitle language. Select the preferred subtitle language of the TV channels
Hearing impaired This option is only activated if the broadcast programme supports it.
Reset
Select this option if you want to reset the TV to the factory settings.
The default password:0000
Attention: all settings will be deleted and the initial installation will be started.
6.5 Configuration
Time
In the time menu, you have the option of controlling the switch-off of your unit.
Schlaf-Timer
Select your desired switch-off time.
You can choose between: Off, 10, 20, 30, 60, 90, 120, 180, 240 minutes.
Note:
The sleep timer function can also be accessed directly via the remote control. To do this, press the SLEEP button on the remote control.
Automatic standby
Automatic standby controls the time the TV is switched off if no buttons on the set or remote control are pressed. This time is set at the factory to 3 hours.
7. EPG (Electronic Programme Guide)
In the Electronic Programme Guide you can see a 7-day preview of all channels (if the respective channel provides this). Use the arrow keys on the remote control to navigate. Press OK to confirm your selection.
Optional (with PVR software)
With the extended PVR software, you have the option of programming via the EPG system.
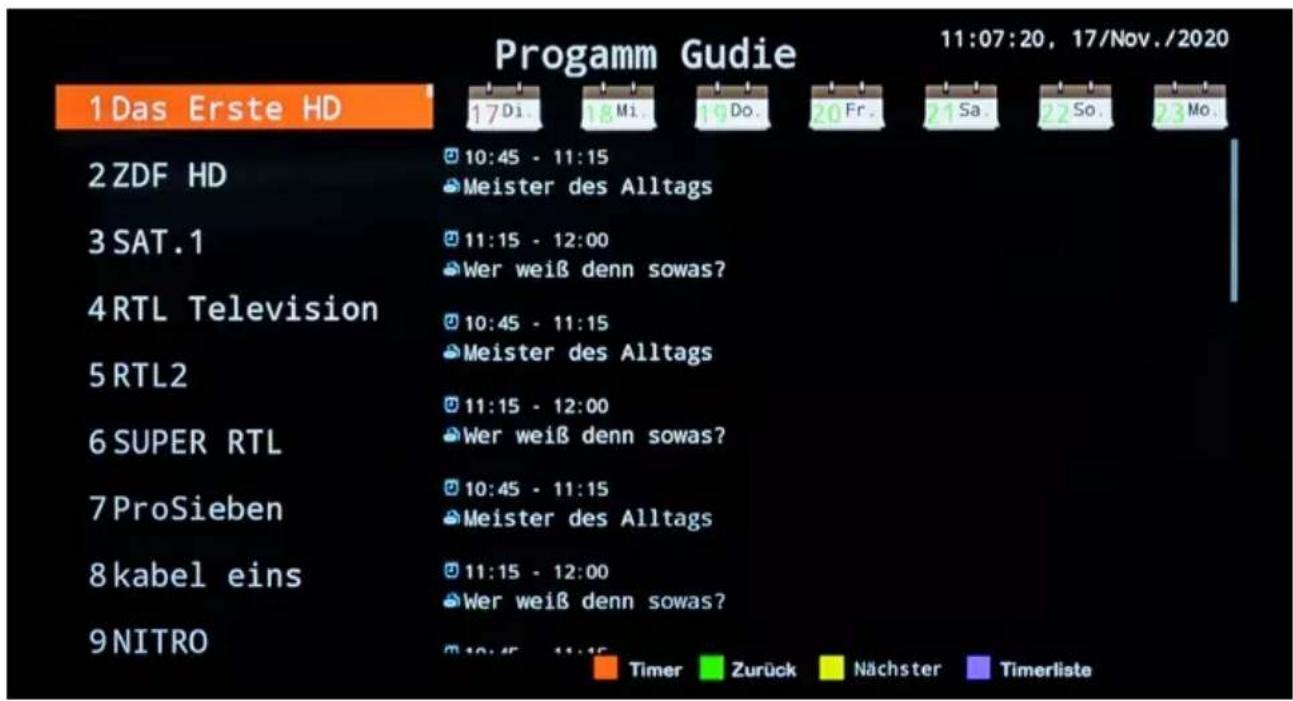
It may happen that the program guide provides no or only partial information. It may take a few minutes until the data is updated.
Explanation of the colour keys
Schedules a recording (only possible with additional software)
- Opens the timer list
8. CI+ slot for Pay-TV expansion
You can use the TV to receive not only free-to-air programs, but also encrypted programs, provided you have a smart card and a CI module from the respective program provider.
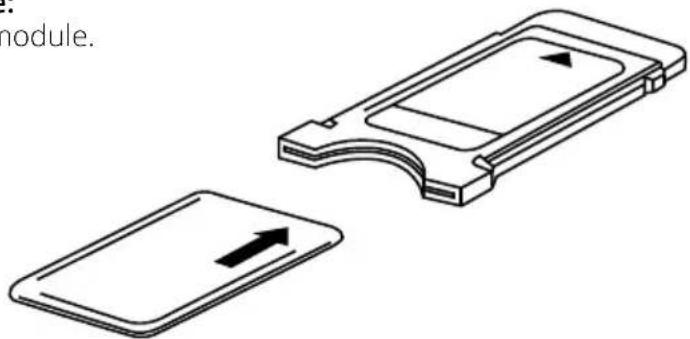
1. Insert the smartcard into the CI module:
Carefully insert the smartcard into the CI module. Make sure that the golden chip of the Smartcard points upwards.
text_image
module.2. Inserting the CI module:
The module only needs to be inserted 2-3 cm CI slot can be plugged in. Thus the CAM module snaps in correctly, you have to tighten it a little bit at the end push in. Thereby you feel a slight resistance.

text_image
HD+ MODUL PORT 1.7 DVA-53 USB VH/WR USB Commer Interface C2 R2 R3 R4 R5 R6 R7 R8 R9 R10 R11 R12 R13 R14 R15 R16 R17 R18 R19 R20 R21 R22 R23 R24 R25 R26 R27 R28 R29 R30 R31 R32 R33 R34 R35 R36 R37 R38 R39 R40 R41 R42 R43 R44 R45 R46 R47 R48 R49 R50Note:
- Please install the Cl+ module after you have completed the channel scan and made all other settings.
- At the first use it can take a few minutes until the module and the smartcard are activated. The module checks the activation again each time the TV is switched on, if necessary.
If a CI+ module is used, the TV station can prohibit or (time) limit the recording/time shifting of programs. Recordings from stations that require CI+ are stored encrypted on the USB device. The recordings cannot be transferred to other devices. The restrictions on recording are determined by the TV stations. Device manufacturers must comply with these specifications.
■ The CI+ module can create screen displays. Please refer to the module's manual.
9. Smart-TV-Function
The TV has a Smart TV function. In addition to conventional TV reception, a Smart TV also has various computer functions (e.g. surfing the web, apps, media libraries and games). To use these functions, the TV must be connected to an Internet router via WLAN or LAN.
To access the Smart TV menu, press the SMART key on the remote control.
text_image
Was got's Netflix N/A Besondere APP APP Store Facebook Spotify uHale APPS Media Player TV Google Play Music9.1 Settings
In the settings, you make basic settings for the TV. Set up the connection to the Internet, manage the Bluetooth function, set the time or change the language of the TV menu. Navigate all the way down with the arrow keys. Select the „Settings“ button and confirm with OK.

natural_image
Blue background with two white gear icons (no text or symbols)9.2 Network & Internet
Network setting
If you have not yet connected the TV to the Internet during the initial installation, you must take the following steps to be able to use the Smart TV function:
Network Ethernet
If you want to connect the TV and the Internet router via LAN cable, plug the cable into the corresponding connector (RJ45) on the back of the TV. Additional settings for connecting to the network can be made in the Network LAN menu.
9. Smart-TV-Function
Wireless network (WLAN)
If you want to connect the TV and the Internet router via WLAN, proceed as follows:
- Activate the „WiFi option
- From the „Available networks“ list, select the router you want to connect to.
- Confirm with OK.
- Now enter the password of the Internet router. To enter letters, use the text field that appears on the screen. To enter numbers, you can use the remote control.
- Now click „Next“ in the text field that appears, then click „Connect“.
- After successful connection to the network, the connection is displayed in the network list.
- Exit the menu with „Exit“.
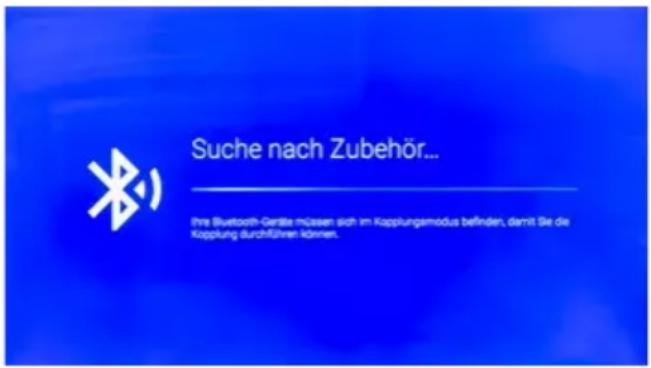
9.3 Bluetooth
The integrated Bluetooth interface enables wireless transmission of audio signals to suitable Bluetooth devices such as a sound bar or headphones. To connect the Bluetooth devices to the TV, proceed as follows:
- Activate the „Bluetooth option
- Make sure that your Bluetooth device (e.g. soundbar) is ready for operation.
- The unit starts searching for compatible Bluetooth devices.
- After a successful search, select the device you want to connect.
- After a successful connection, the audio signals of the TV are now transmitted to the Bluetooth device.
- Exit the menu with „Exit“.
In this menu you can see the current information of the TV.
Device name
Displays the current unit name. With OK, you can change it.
Status
Displays the current status of your unit. (Network, serial number, operating time....)
Legal notice
Displays all legal notices and licences
Model
Displays the model name of the unit.
Version
Displays the current Android version.
Softwareversion
Displays the current software date.
Status of security updates, kernel version...
Displays current system data.
Time setting
In this menu you can set the time, time zone and date of the TV.
Automatic date and time
There are three ways to set the correct time and date:
About network providers
The time and date are automatically synchronised via the Internet.
About Transport Stream
The time and date are automatically synchronised via the TV provider.
Off
The time and date is managed manually.
Time zone
Select the appropriate time zone here (e.g. GMT +01:00 Amsterdam).
Set time
Set the current time here. ATTENTION: This item is only active if you have selected the setting „OFF“ in the item „Automatic date and time“!
Set date
Set the current date here. ATTENTION: This item is only active if you have selected the setting "OFF" in the item "Automatic date and time"!
24 hours
Set here whether the time is to be shown as a 12-hour or 24-hour display.
9. Smart-TV-function
Language
Select your language here (e.g. German).
Keyboard
Select your keyboard version here (e.g. German).
Sound
Select here whether you want to have key tones.
Keyboard
Select your keyboard version here (e.g. German).
Memory
Displays the current memory allocation.
Reset
Resets all smart settings and accounts.
Accounts & Registration
In this menu you can manage your accounts. (Google Account)
Apps
In this menu you can manage your apps on your device.
9. Smart-TV-function
9.5 Media
Press the SOURCE button on the remote control and select „Media“ or navigate to the „Source“ option in the Smart Menu and then select „Media“.
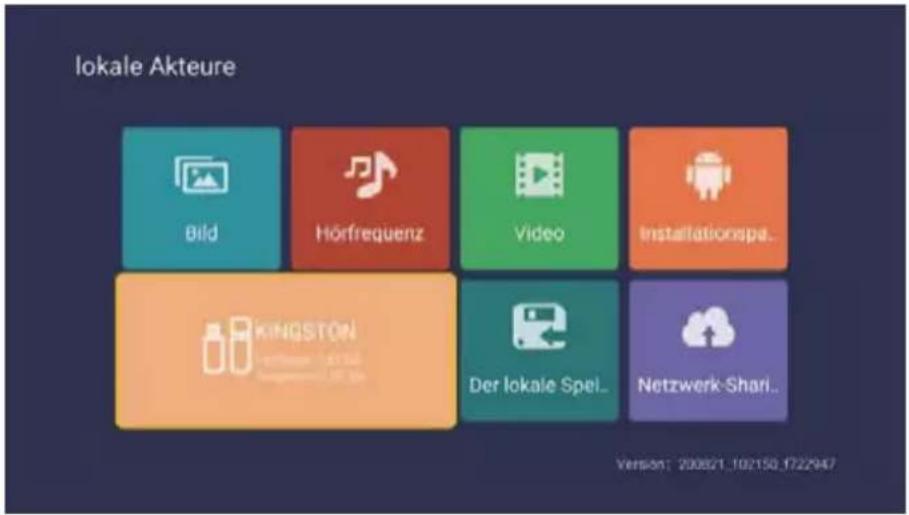
Use the up and down keys to select the „picture „ icon, press the confirmation key to confirm, then press right to go to the folder. Press the confirmation key to open the corresponding folder. After selecting the picture, press the confirmation key to open the picture. You can operate by using the left and right buttons.
Music
Use the up and down keys to select the „Audio „ icon, press the confirmation key to confirm, then press right to go to the folder. Press the confirmation key to open the corresponding folder. After selecting the audio, press the confirmation key to open the audio. You can operate by using the left and right buttons.
Video
Use the up and down keys to select the „video „ icon, press the confirmation key to confirm, then press right to go to the folder. Press the confirmation key to open the corresponding folder. After selecting the audio, press the confirmation key to open the video. You can operate by using the left and right buttons.
Installation package
Select the „Installation package“ icon, press the enter key to confirm the entry and open the corresponding folder. Press Enter after selecting the installation package to open and install the installation package.
Storage device
It can read external devices, such as U-Disk, hard disk, etc., select files that you need to open.
Local storage
The system's internal files can be read.
Network sharing
access to the same segment, the server shares files.
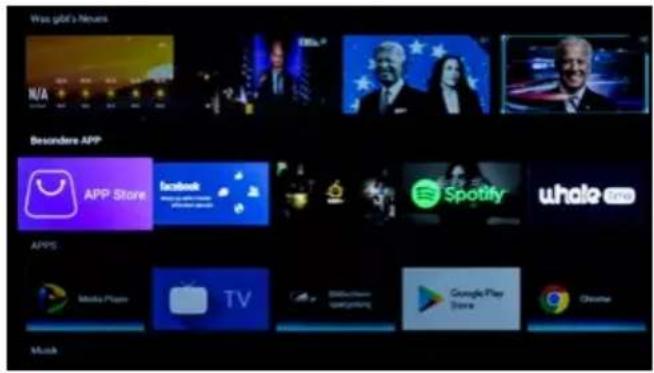
10. Operating the Smart TV interface
General Information
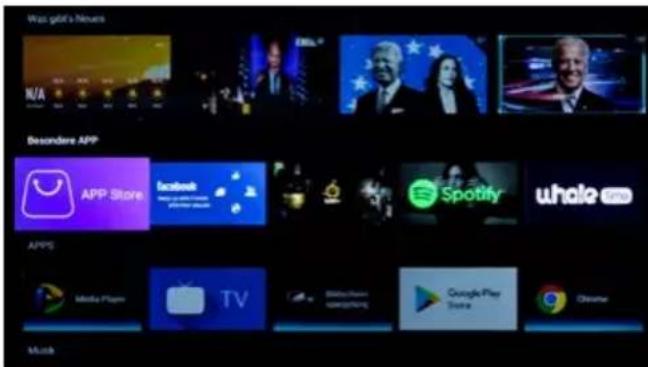
When you press the 🔊 button on the remote control, you will enter the Smart TV interface of the TV.
Some apps are preinstalled at the factory. Use the arrow keys to navigate to the desired app, then press OK to open it.
text_image
Was got's News N/A Besondere APP APP Store Facebook Spotify uHale APPS Media Player TV Google Play Store MusicApp Store
To install additional apps or manage existing apps, open the App Store.

text_image
APP Store
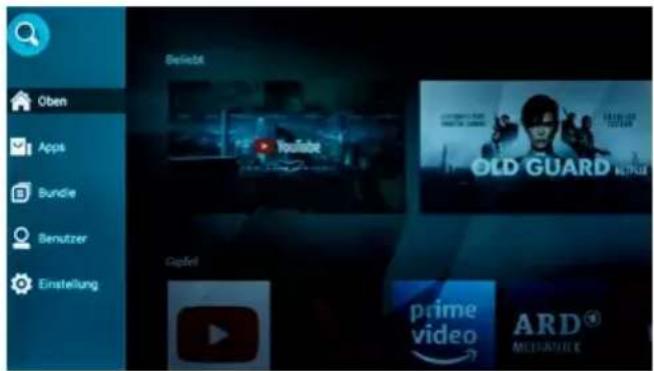
In the left column different categories are listed:

Search
With the search function you can search for apps. Use the keypad that appears to enter your search criteria.

Home
Shows suggestions for videos, apps and media libraries. Use the arrow keys to navigate between apps.

Apps
Shows a list of available apps. Click on an app to get more information. To download the app, click on „Download.

Bundle
Shows a list of categorized apps. Choose between „For Music Lovers“ or „Movies At Home“. To download the app, click „Download“.

User
In this menu, under „Updates“ you will see a list of apps for which an update is available. You can also uninstall apps here.

Settings
In this menu you can update the App Store if a newer version is available.
10. Operating the Smart TV interface
Other useful apps

text_image
Media PlayerMedia Player
With the Media Player you can play music, videos and pictures from a USB stick or an external hard drive via the USB port of the TV. Applications (apps) that are suitable for Android devices can also be played on it.

natural_image
Blue square icon with white TV symbol and 'TV' text (no additional symbols or text)TV
Press the TV button to enter normal TV reception (e.g. satellite TV). Note: You will always enter the reception mode that was selected before. Alternatively, press the SOURCE button to select the corresponding reception source (e.g. DVB-S).

text_image
Google Play StoreGoogle Play Store
In the Google Play Store you can search for other apps and install them. Registration is required to use the Google Play Store.

text_image
ChromeChrome
You can surf the Internet with the integrated Chrome browser. Almost all functions are available to you as on a conventional PC.
IMPORTANT NOTE:
The download of individual apps on the Smart TV is usually free of charge. However, depending on the provider of the apps, additional costs are incurred or a subscription is required. The provider of the app is solely responsible for the subscription and the resulting costs!
Easier operation of the Smart-TV

natural_image
Close-up of a black computer mouse resting on a standard keyboard (no text or symbols visible)The Smart TV interface is usually operated using the arrow keys on the remote control.
Alternatively, you can press the 📄 button on the remote control to activate a mouse pointer. Now the mouse pointer can be controlled using the arrow keys on the remote control.
However, you can also connect an ordinary PC keyboard or PC mouse to one of the USB ports. The operation is then carried out in the same way as with a conventional PC.
11. Specifications
| General information | Royal Line III 19 Smart Royal Line III 22 Smart | |
| Display LED-Display | ||
| Screen size 18,5 inch (47 cm) 21,5 inch (54,6 cm) | ||
| Resolution 1366 x 768 1920 x 1080 | ||
| Contrast ratio 1000 : 1 3000 : 1 | ||
| Brightness value 250 cd/m2 | ||
| Viewing angle 178° H / 178° V | ||
| Tuner DVB-S / -S2 / -C / -T / -T2 | ||
| DVB-T2 standard H.265 / HEVC | ||
| CI+ Slot HD+ ready | ||
| Bluetooth® interface Version 4.2 | ||
| WLAN interface yes | ||
| Smart TV function | Pre-installed apps, app store, media libraries, video portals | |
| Operating system Android 9.0 | ||
| Processor ARM Cortex-A53 Processor (1 GB DDR / 8 GB Flash) | ||
| Photo Playback Formats JPEG, BMP, PNG | ||
| Audio Playback Formats | MP3, WMA, AAC | |
| Video Playback Formats | MPG, AVI, TS, MOV, MKV, DAT, MP4, VOB, RM | |
| Mechanical power switch | yes | |
| Hotel-Modus | yes | |
| Speakers | 2x 5 Watt (Stereo) | |
| VESA-Standard | 100 x 100 mm | |
Connections
| ANT input DVB-S / -S2 | 1x |
| ANT input DVB-T / -T2 / -C | 1x |
| Audio output coaxial 1x (S/PDIF) | |
| Headphone output | 1x (3,5 mm jack) |
| HDMI port | 2x |
| Video cinch connection (CVBS) | 1x |
| Audio cinch connection (L/R) | 2x |
| USB port | 2x |
| LAN interface | 1x |
| CI+ module slot | 1x |
Other
| Power supply | AC 100-240 Volt, 50/60 Hz DC 12 Volt, 3A (10~30 Volt stabilized) | |
| Power in use / standby | 16 Watt / < 0,5 Watt | 22 Watt / < 0,5 Watt |
| Energy efficiency class | F (Spectrum A bis G) | |
| Dimensions with foot (W/H/D) | 440 x 299 x 139 mm | 507 x 337 x 175 mm |
| Dimensions without base (W/H/D) | 440 x 263 x 49,7 mm | 507 x 302 x 48,7 mm |
| Weight | 2,3 kg | 3,1 kg |
11. Specifications
| General information | Royal Line III 24 Smart Royal Line III 32 Smart | |
| Display LED-Display | ||
| Screen size 24 inch (59,9 cm) 32 | inch (81,3 cm) | |
| Resolution 1920 x 1080 1920 x 1 | 1080 | |
| Contrast ratio 3000 : 1 | ||
| Brightness value 250 cd/m2 | ||
| Viewing angle 178° H / 178° V | ||
| Tuner DVB-S / -S2 / -C / -T / -T2 | ||
| DVB-T2 standard H.265 / HEVC | ||
| CI+ Slot HD+ ready | ||
| Bluetooth® interface Version 4.2 | ||
| WLAN interface yes | ||
| Smart TV function Pre-installed apps, app store, media libraries, video portals | ||
| Operating system Android 9.0 | ||
| Processor | ARM Cortex-A53 Processor (1 GB DDR / 8 GB Flash) | |
| Photo Playback Formats | JPEG, BMP, PNG | |
| Audio Playback Formats | MP3, WMA, AAC | |
| Video Playback Formats | MPG, AVI, TS, MOV, MKV, DAT, MP4, VOB, RM | |
| Mechanical power switch | yes | |
| Hotel-Modus | yes | |
| Speakers | 2x 5 Watt (Stereo) | 2x 10 Watt (Stereo) |
| VESA-Standard | 100 x 100 mm | 200 x 100 mm |
Connections
| ANT input DVB-S / -S2 | 1x |
| ANT input DVB-T / -T2 / -C | 1x |
| Audio output coaxial 1x (S/PDIF) | |
| Headphone output | 1x (3,5 mm jack) |
| HDMI port | 2x |
| Video cinch connection (CVBS) | 1x |
| Audio cinch connection (L/R) | 2x |
| USB port | 2x |
| LAN interface | 1x |
| CI+ module slot | 1x |
Other
| Power supply | AC 100-240 Volt, 50/60 Hz DC 12 Volt, 3A (10~30 Volt stabilized) | |
| Power in use / standby | 24 Watt / < 0,5 Watt | 31 Watt / < 0,5 Watt |
| Energy efficiency class F (Spectrum A bis G) | ||
| Dimensions with foot (W/H/D) | 552 x 356 x 175 mm | 731 x 491 x 211 mm |
| Dimensions without base (W/H/D) | 552 x 326 x 43,8 mm | 731 x 432 x 85,7 mm |
| Weight | 3,3 kg | 4,2kg |
Note:
Weight and dimensions are not the absolute exact values. Technical details are subject to change without notice.
12. Troubleshooting
Please read the following information to determine the possible cause of a problem before contacting customer service.
| The TV will not turn on. | Check that the power cable is correctly connected to the socket and the power supply unit.Check that the power supply cable is correctly connected to the TV.The electronic circuit may have been reset. Unplug the power adapter from the power outlet, wait 1 minute, then reconnect the plug. |
| No picture | Check that the antenna cable is connected correctly and that the corresponding F-connectors are mounted correctly.Check that the correct input is selected. Use the SOURCE button on the remote control and check the correct input channel. |
| No sound Check if the sound is turned off or the mute is activated (MUTE).Increase the volume carefully.Check that the audio cables are connected to the correct inputs. | |
| Poor image quality | Check the connection to the TV. Check the video settings. |
| The image is too large, too small or distorted. | Use the ASPECT button on the remote control to change the aspect ratio of the image (16:9, 4:3, ...) |
| The remote control reacts poorly or not at all. | Replace the batteries.Use the remote control within the specified range (max. 5 meters and 30°)Avoid direct light on the infrared sensor. |
| The Smart TV menu cannot be opened | Check the network settings.Check that you are connected to the Internet. |
| When streaming movies, series or other content, the picture jerks or is pixelated. | The Internet connection may be too slow.A temporarily poor transmission can also be caused by the provider of the streaming content (e.g. server problems). |
| No more apps can be installed. | The internal memory of the TV is full. First delete other apps to install new ones. |
13. Conformity information
Hereby, Megasat Werke GmbH declares that the following product is in compliance with the essential requirements and other relevant provisions of directives 2014/30/EU (EMC), 2014/35/EU (LVD) and 2014/53/EU (RED):
Megasat Royal Line II 19 Smart (Art.-No. 240124)
Megasat Royal Line II 22 Smart (Art.-No. 240125)
Megasat Royal Line II 24 Smart (Art.-No. 240126)
Megasat Royal Line II 32 Smart (Art.-No. 240127)
The declaration of conformity for this product is located at the company: Megasat Werke GmbH, Industriestraße 4a, D-97618 Niederlauer
The declaration of conformity can be downloaded from our homepage: www.megasat.tv/support/downloads
Notes
PRODUCT REGISTRATION
Registering your Megasat product gives you access to our automatic e-mail notifications. If your product requires new firmware, you will be notified immediately.
For registration please visit our homepage www.megasat.tv
You can find the form in Support → Product registration
Version 1.0 (August 2021)
Technical changes, misprints and errors reserved.
Megasat Werke GmbH
Brückenstraße 2
D-97618 Niederlauer