
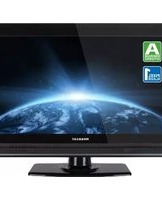
Royal Line 19 Deluxe - Television MEGASAT - Free user manual and instructions
Find the device manual for free Royal Line 19 Deluxe MEGASAT in PDF.


| Product Type | LED TV |
| Screen Size | 19 inches (48 cm) |
| Resolution | 1366 x 768 pixels (HD Ready) |
| Brightness | 200 cd/m² |
| Contrast Ratio | 1000:1 |
| Viewing Angle | 178° horizontal / 178° vertical |
| Tuner | DVB-T2/C/S2 |
| Connections | HDMI x1, USB x1, VGA x1, AV In, RF In, Headphone Out |
| Power Consumption | 30 W (standby <1 W) |
| Power Supply | AC 100-240V, 50/60Hz |
| Dimensions (W x H x D) without stand | 450 x 280 x 45 mm |
| Weight without stand | 2.5 kg |
| Care and Cleaning | Wipe with a soft, dry cloth. Do not use abrasive cleaners. |
| Safety | Do not expose to rain or moisture. Place on a stable surface. |
| Spare Parts and Repairability | Spare parts available from Megasat authorized service centers. |
| General Information | Remote control and user manual included. Wall mountable (VESA 100x100). |
Frequently Asked Questions - Royal Line 19 Deluxe MEGASAT
User questions about Royal Line 19 Deluxe MEGASAT
0 question about this device. Answer the ones you know or ask your own.
Ask a new question about this device
Download the instructions for your Television in PDF format for free! Find your manual Royal Line 19 Deluxe - MEGASAT and take your electronic device back in hand. On this page are published all the documents necessary for the use of your device. Royal Line 19 Deluxe by MEGASAT.
USER MANUAL Royal Line 19 Deluxe MEGASAT
Fernseher Standfuß

4x Schrauben

Hinweis:
3. WARNUNG

4. Bezeichnungen
Royal Line Deluxe Series
User manual
-
Safety instructions....03
-
Delivery 03
-
Stand assembly....04
4. Designations
4.1 Front and side view 06
4.2 Connections....07
4.3 Remote control....08
- First installation 09
6. Basic functions
6.1 Select input source....10
6.2 Navigation in the main menu....10
7. The Main Menu
7.1 Channel Search....11
7.1.1 Channel Search (Satellit).... 11
7.1.2 Channel Search (Cable and Terrestrial)....16
7.2 Picture....17
7.3 Sound....18
7.4 Clock....19
7.5 Configuration....20
7.6 Protection....21
8. DVD operation
8.1 Key functions in DVD mode....22
8.2 DVD settings menu 23
9. Multimedia operation (USB)
9.1 Photos....25
9.2 Music 26
9.3 Movies 27
- EPG Menu (Programm Guide) 28
- Cl+ slot for pay TV expansion....29
- Troubleshooting....30
- Specifications....31
1. Safety instructions
Please read the manual thoroughly before operating the equipment. In case of incorrect or improper handling, the warranty becomes void.
Power supply: Before start please check the correct operation voltage of the power point. The operating voltage of this device is AC 100\~240 V, 50/60Hz.
Overload: Do not overload a wall outlet, extension cord or adapter, neither use damaged power cord or touch it with wet hand as this may result in electric shock.
Liquid: The device shall not be exposed to dripping or splashing water, and that no objects filled with liquids, such as base, shall be placed on the apparatus.
Ventilation: Keep the slots on top of the device uncover to allow sufficient airflow to the unit. Do not expose the device to direct light or do not place it near a heater or in humid conditions.
Risk of suffocation: Do not let children play with films or other packaging components, there is a risk of suffocation.
Cleaning: Plug out the device from the wall outlet before cleaning. Clean the device by a soft cloth or mild solution of washing-up liquid (no solvents).
Location: Put the device indoor in order to avoid lightening, raining or sunlight.
Uncover: Do not remove the cover, to reduce the risk of electric shock. Contact qualified and licensed service personnel to repair the receiver, or contact your dealer.
2. Delivery
Please check whether the following items are included in the package. If any items are missing or damaged, please contact your dealer.
- TV
- Stand incl. screw
- Remote Control
- Batteries
- AV adapter
- YUV adapter
- 230/12 V Power supply
- 12 V vehicle power cable
- User manual
3. Stand assembly
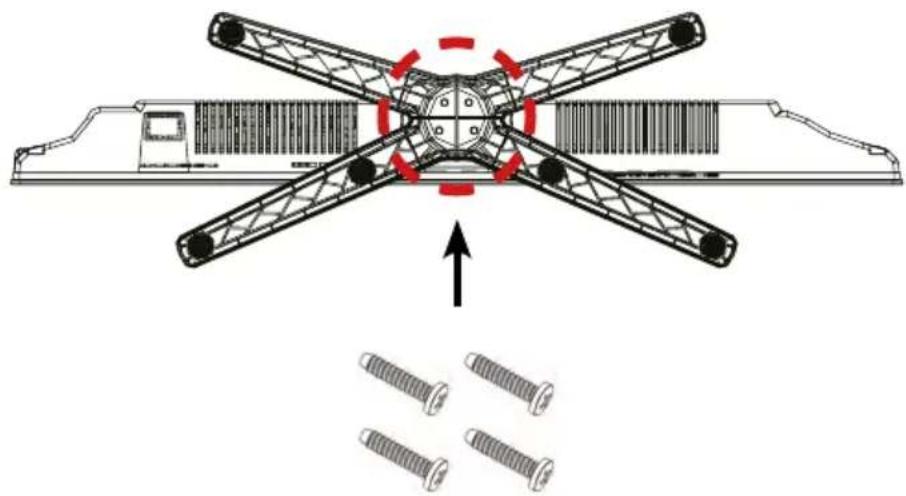
1. For the assembly you need the following parts
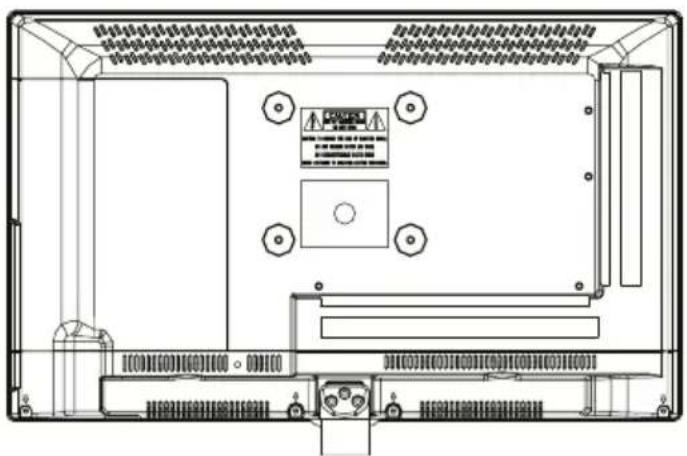
Television Stand

4x Screws

Note:
Before installing the stand, please check that you have all of the parts and that there is no visible damage. If a part is missing or appears damaged, please contact customer service.
2. How to mount the stand
Place the TV face down on a soft and flat surface (blanket, foam, cloth, etc.) to prevent any damage to the TV.
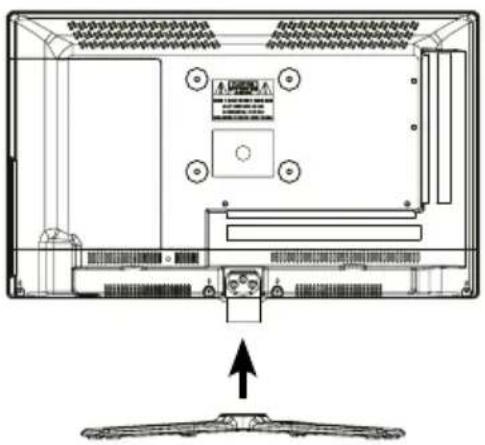
Insert the stand as shown on the TV.
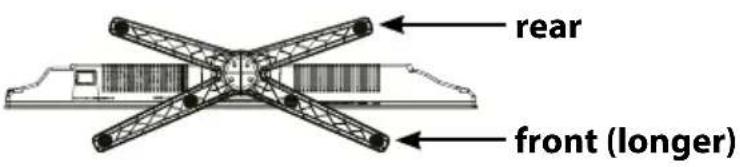
Note:
-
Before you put on the stand, please make sure the direction is correct as shown below.
-
When you are putting on the stand, please make sure the neck of the TV set is in the correct position and attached tightly.
3. Stand assembly
Use a suitable screwdriver and attach the base with the screws provided. Make sure that the screws are properly tightened.
3. WARNING
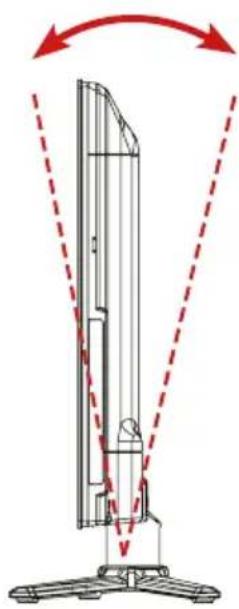

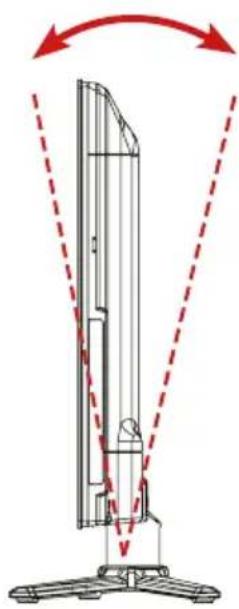
It can not be tilted to the front or back as shown below. Doing so may damage the stand.

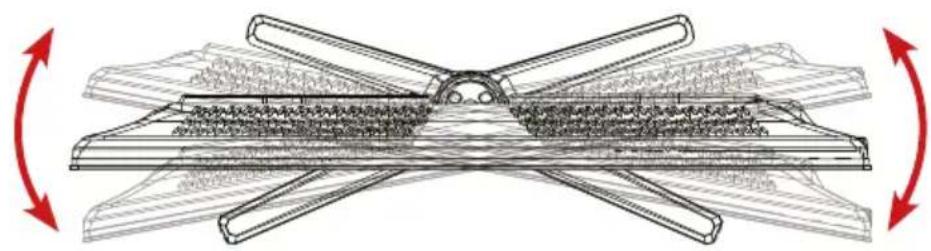
It can not be tilted to the left or right as shown below. Doing so may damage the stand.
4. Designations
4.1 Fronr and side view
Front view Side view
![graph TD A["Infrared sensor\nReceiver for the remote control signals."] --> B["LED light\nPress the power button to switch on or off the TV.\nRED = Standby / Green = Power on"] B --> C["Power switch\nMain switch for power supply"]](/content/2026/05/792526/images/a19a99b034853ee7b87537362f1e546b32d00fda56ed56ea4e006a653b53eec4.jpg)
The functions of the buttons on the housing side:

INPUT: Press to display the input source menu.
MENU: Press to display the OSD menu, press again to exit the menu.
CH +/-: Press to scan through channels.
VOL +/-: Press to adjust the volume.
PLAY: Play/Pause the programm.
EJECT: Eject the disc.
POWER: Turn on/off the TV set.
Note:
Press INPUT repeatedly to select the desired source. After a short wait, the TV switches to the desired signal source.
4. Designations
4.2 Connections
Bottom view

POWER 12V DC Mains connection for 12/230 volt power supply or 12 V board voltage.
VGA Video input for VGA from PC
PC IN Audio input for sound from PC
SCART Scart port
ANT IN 2 / DVB-S2 Input for Satellite antenne (13/18V max. 500 mA)
ANT1 IN Port for DVB-T antenna or Cable TV
COAX Digital Audio output (coaxial)
Side view

HDMI HDMI input
USB USB 2.0 port for media playback or to record / timeshift function (optional)
Headphones Output for Headphones with 3,5 mm jack
Common Interface Slot for Cl / Cl+ module
Mini YPbPr Component input with adapter cable
Mini AV AV input (FBAS/Audio) with adapter cable
4.3 Remote control
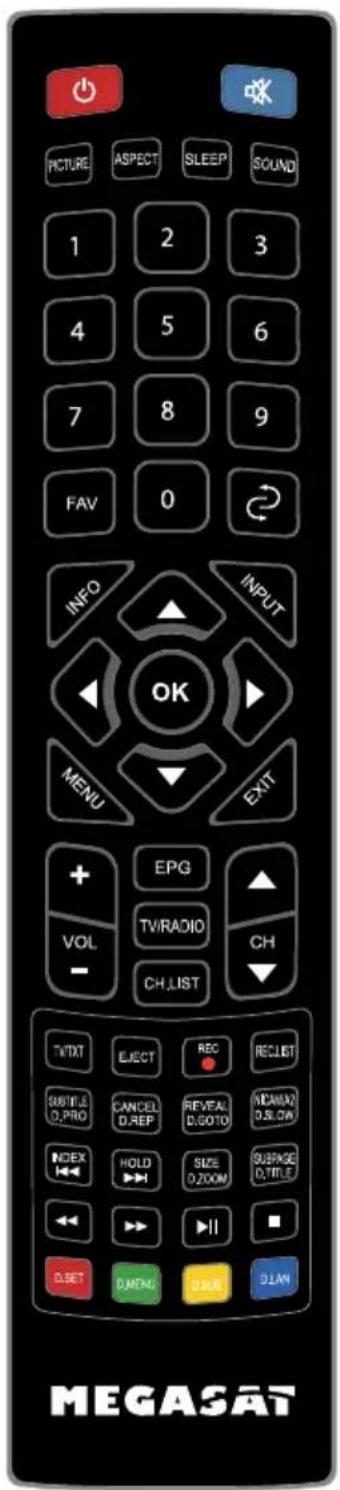
POWER Turn the TV on / off (Standby)
MUTE Muting the sound
PICTURE Switch to picture presets
ASPECT Switch aspect ratio
SLEEP Setting Automatic-shutdown
SOUND Switch to Sound preferences
FAV Show favorites
NUMMERIC BUTTONS Enter numbers
RETURN Returns to the last channel position
INFO Show informations
INPUT Select source
MENU Opens the main menu
EXIT Exit the respective menu
ARROW KEYS for navigation in the main menu and DVD menu,
for program changes and volume control OK To confirm a selection / program list
VOL +/- Volume control
CH +/- Change channels
EPG Electronic Program Guide
TV/RADIO Switch between TV and radio stations
CH.LIST Opens the channel list
TV/TXT Show and close Teletext
EJECT Ejects the DVD (only in DVD mode only)
REC Starts recording (optional)
REC.LIST Displays the recording list (optional)
SUBTITLE / D.PRO Show / hide subtitles (if available)
D.PRO edit the play list in DVD mode
CANCEL/D.REP Switch between Teletext/TV
D.REP repeat mode in DVD mode
REVAL / D.GOTO Displays hidden information in Teletext
D.GOTO playing your favorite titel / chapters
NICAM/A2 / D.SLOW Switch to Nicam/A2
D.SLOW plays DVDs in slow motion
INDEX Gets the index page in the DVD menu
HOLD Holds the bottom change in teletext
SIZE / D.ZOOM Zoom in on the top and bottom of the teletext
D.ZOOM selects an image in the DVD mode
SUBPAGE / D. TITLE Subpages in teletext Call up / Cancel
D. TITLE shows the DVD title in DVD menu

Previous Chapter / Next Chapter

Forward / Rewind backward

Start / Pause

Stop
D.SET:
DVD System settings
D.MENU: Show DVD menu
D.SUB: Show DVD-subtitles
D.LAN: Switch languages / audio tracks in DVD mode
5. First installation
- Connect the TV to the power supply and turn on the power switch at the bottom of the housing. The TV is now in standby mode (LED is RED).
- Then press the Power button on the remote control (LED is GREEN).
- After the TV is started, the First Installation menu appears. You can now make the following settings:
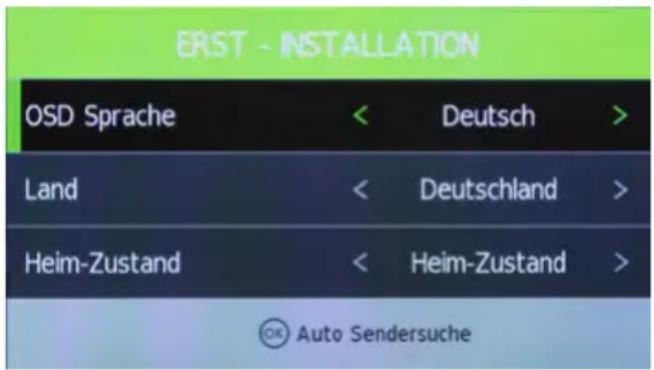
- OSD language: Select a language for the OSD. To modify, use the ◀▶ keys.
- Country: Select the country. To modify, use the ◀▶ keys.
- Home-state: Select the display attribute of the TV: Home-mode = dynamic and high-contrast colors Store Mode = neutral colors
- OK button: Starts „Auto Tuning“ for Terrestrial, Cable or Satellite television.
Tuning Setup
Reception mode: Use the ◀▶ keys to select the reception mode ATV (analogue) and/or DTV (digital)
Digital Typ: Choose between Satellite, DVB-C or DVB-T
Defaults for signal search
DVB-S (Satellit)
Satellit: Astra 19.2° Ost
Search mode: Standard
(LNC is an automatic channel sorting)
DVB-T (Terrestrial)
Sorting by LNC: On
(LNC is an automatic channel sorting)
Have you made all the settings, start the channel search with OK.
6. Basic Functions
6.1 Select input source
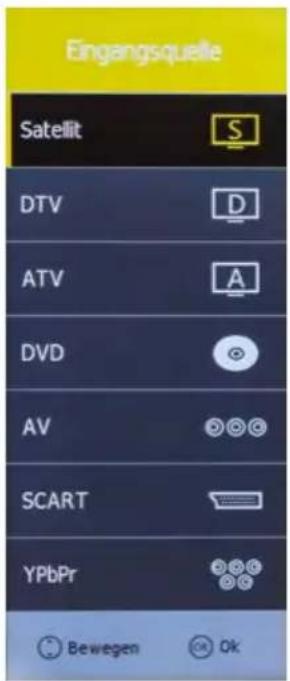
Press the INPUT button on the remote control to select the input source. Use the ▲/▼ buttons or the buttons on the TV to select a source. Press OK to confirm, or wait a few seconds.
Note:
Before you select the source, make sure that the source is ready, otherwise no signal is transmitted.
6.2 Navigation in Main Menu
Press the MENU button to enter the main menu. It consists of further submenus:
- Tuning
- Image
- Sound
- Clock
- Configuration
- Protection
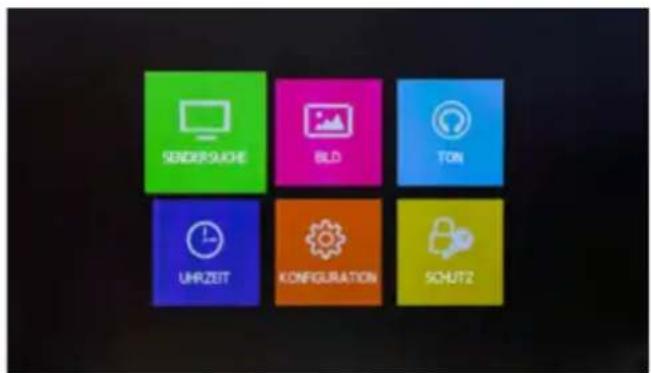
Navigate with the arrow keys to scroll through the menu. Press the OK button to enter the submenu. Press MENU to go one step back, or press EXIT button to exit completely.
7.1 Channel search
In the menu Channel Search you can search for new channels, edit channels or set configurations at your reception mode.
Note:
The submenu of Channel Search differ depending on what kind of a reception mode you have set during the first installation (satellite, cable or terrestrial).
7.1.1 Channel search (Satellite)
Automatic Channel Search
Country Select the desired country
Satellite Select the desired Satellites for receiving
Search mode Choose between standard, Blind search or network search
Channel type Choose between all channels or FTA (free to air only, that are not encrypted)
Service type Choose between All, DTV (TV programs) or Radio (only radio)
Press OK to start the search. Newly found channels are automatically saved as the last in the channel list.
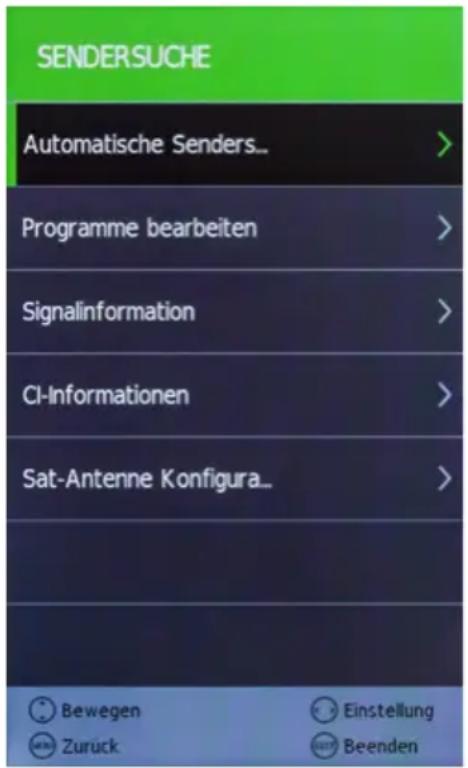
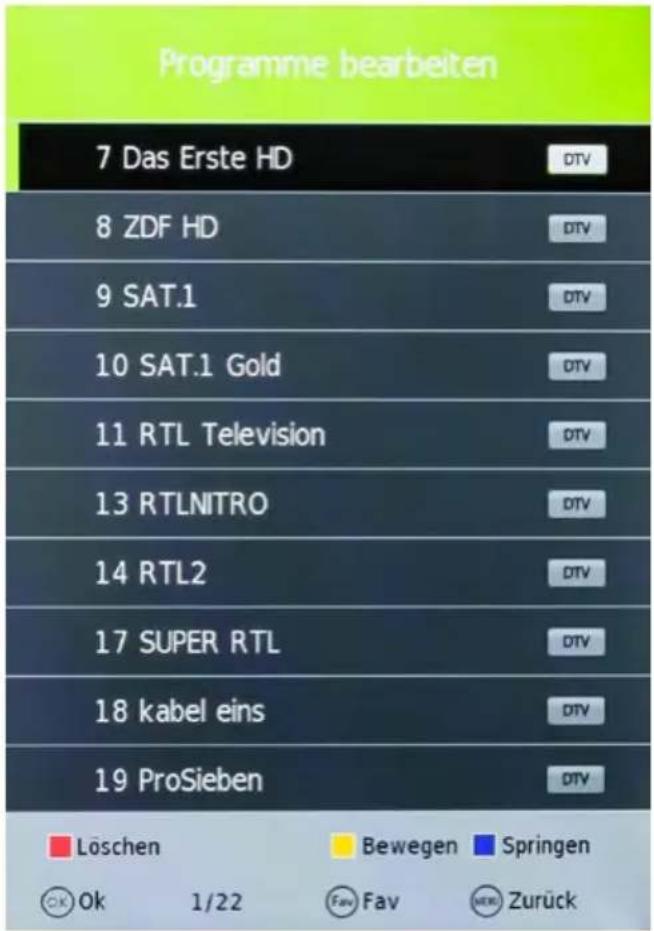
Use the arrow keys to choose a channel, then press to RED button to delete it.
Move (YELLOW button)
Use the arrow keys to choose a channel, then press the YELLOW button to highlight it. Now move the program to the desired channel position. Press the YELLOW button again to deselect it.
Skip (BLUE button)
Use the arrow keys to choose a channel, then press the BLUE button to highlight it. When you "scroll" the channel list, this program will be skipped in the future.
Favorites (FAV button)
Use the arrow keys to choose a channel, then press the FAV button to highlight it as a favorite (identified by a heart symbol). If you press from now on in normal TV mode the FAV button on the remote control, only the programs you see that you have marked as favorite.
In this menu you can see various information about the respective transponder or channel. Signal quality and level can be read here.
| Signalinformation |
| 12633 H 22000 |
| ASTRA 19.2E |
| Qualität 74 |
| Signal 100 |
| Netzwerk ... |
| Modulation QPSK |
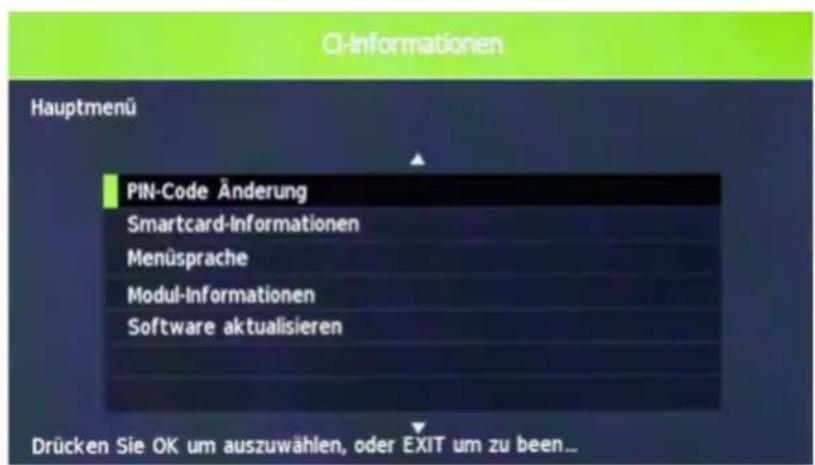
CI Informations
This menu provides information about the inserted CI module, or about the smart card (if available).
This menu allows you to make basic changes to your satellite system, edit transponders and satellites, add and perform a satellite scan. Use the ◀▶ keys to navigate between the respective columns.

Satellite
Delete (RED button) Deletes the selected satellite. Confirm the irrevocable deletion by clicking OK.
Edit (GREEN button) Change the name, the latitude and longitude and the band of the selected satellite. Then press OK to confirm.
New (YELLOW button) Add a new satellite. Enter the name, the latitude and longitude and the band for the new satellite. Confirm with OK.
Search (BLUE button) Start the search with the selected satellite. Select the search mode, the transmitter and the service type. Confirm with OK.
Transponder
Delete (RED button) Deletes the selected transponder. Confirm the irrevocable deletion by clicking OK.
Edit (GREEN button) To change the frequency, the symbol rate and the polarity of the selected transponder. Confirm with OK.
New (YELLOW button) Add a new transponder. Enter the frequency, symbol rate and polarity of the new transponder. Confirm with OK.
Search (BLUE button) Start the search with the selected transponder. Select the search mode, the transmitter and the service type. Confirm with OK.
Antenna setting
LNB power Change the LNB power supply.
22 KHz Set the 22 KHz on or off.
Toneburst Select between No, Burst A and Burst B
DiSEqC 1.0 Select between No, LNB 1 to LNB 4
DiSEqC 1.1 Select between No, LNB 1 to LNB 16
Motor Select between No, DiSEqC 1.2 or 1.3 (USALS)
Note:
Usually you have to make no changes in the antenna settings. It is recommended that only experienced users change settings.
7. The Main Menu
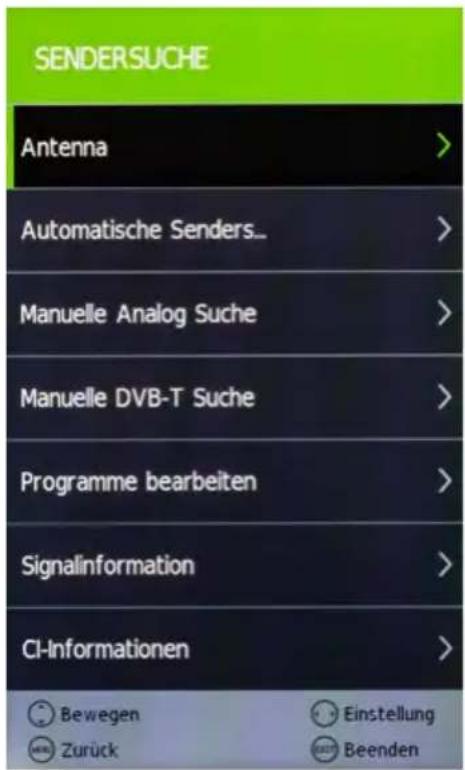
7.1.2 Channel Search (Cable and Terrestrial)
Antenna
Select your reception mode. Cable or terrestrial TV.
Automatic Channel Search
Country Select the desired country
Recept. mode ATV (analogue) and/or DTV (digital)
Sorting by LNC LNC is an automatic channel sorting
Then press OK to start the search.
Manual analogue search
With cable TV, you can manually search for channels here.
Manual DVB-T search
In DVB-T TV, you can manually search for channels here.
Edit channels
See „Editing programs“ on page 12.
Signal informations
See "Signal Information" on page 13.
CI informations
See „CI information“ on page 13.
5V activ antenna
When you take a passive DVB-T antenna (no external power supply), you must turn on the 5 volt supply. The antenna is now supplied from the TV with voltage. When you take an active DVB-T antenna (with integrated power supply), power down the 5 volt supply.
In this menu you can set up basic settings for the TV picture. Use default settings or set your own values.
Picture settings You can select a preset Picture settings
Contrast Adjust the contrast value
Brightness Adjust the Brightness value
Color Adjust the Color value
Color tone Adjust the Color tone value
Sharpness Adjust the Sharpness value
Color temp. Adjust the Color temperature value
Noise reduction Adjust the Noise reduction value
Dyn. contrast Adjust the Dynamic contast value
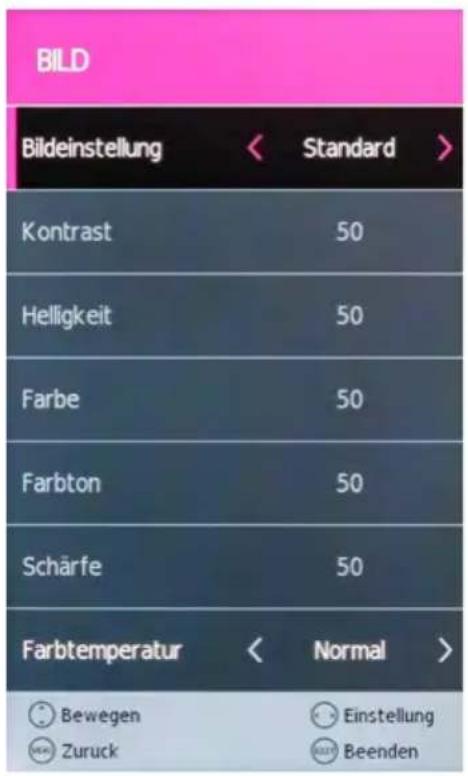
The settings such as contrast, brightness, etc. can be edited only if you are in the picture mode „Personal“.
7. The Main Menu
7.3 Sound
In this menu you can set up basic settings for the TV sound. Use default settings or set your own values.
Sound profile Select a preset sound profile
Treble Adjust the treble
Bass Adjust the base
Balance Adjust the balance between right and left channel
Auto. volume Set to ON to automatically adjust the volume during a quiet channels
Surround sound If you use a surround system, you can activate it here.
SPDIF mode Activate the digital audio output
Bluetooth Activate the Bluetooth connection.
Search under „Bluetooth connect“ a suitable Bluetooth device and confirm with OK. After successful connection you can now use the Bluetooth device.
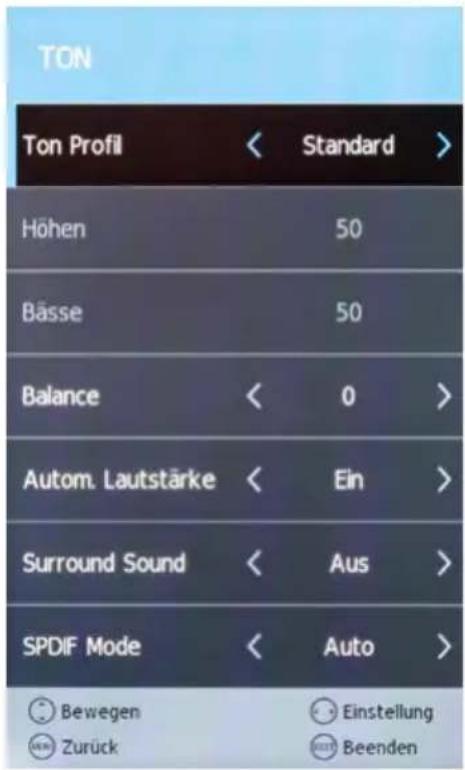
The settings such as Treble, Bass, etc. can be edited only if you are in the picture mode „Personal“.
7.4 Clock
In this menu you can set the time of the TV as well as various other automatic functions.
Time zone Select the time zone which you are located
Off time Set the time when the TV should switch off automatically. The adjustment can be done once, daily or on certain weekdays
On time Set the time when the TV should switch on automatically. The adjustment can be done once, daily or on certain weekdays. Furthermore, you can choose which program and how loud the TV should switch on.
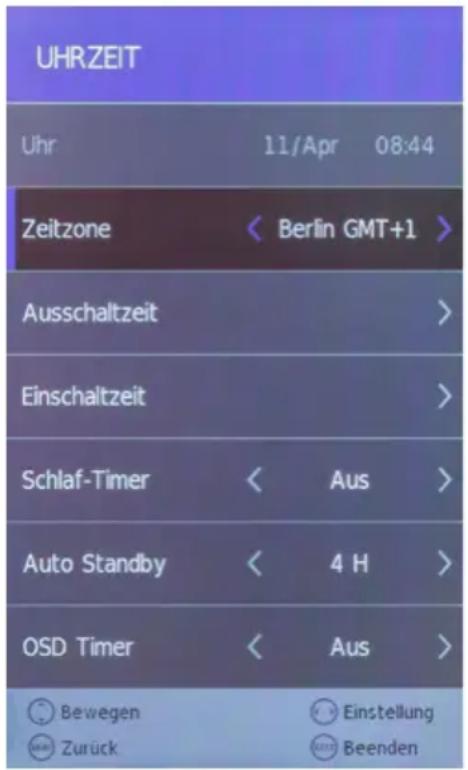
Sleep timer Adjust the minutes when the TV to turn off automatically. Choose between 10, 20, 30, 60, 90, 120, 180 or 240 minutes. This function can be used on the remote control using the SLEEP button..
Auto standby Adjust the hours after the TV should switch off automatic table when no operation on the unit or on the remote control is carried out. Select between OFF, 3, 4 or 5 hours.
OSD timer Adjust in seconds how long you want to displayed the on-screen menu. Select between OFF, 5, 10, 15, 20, 25 or 30 seconds.
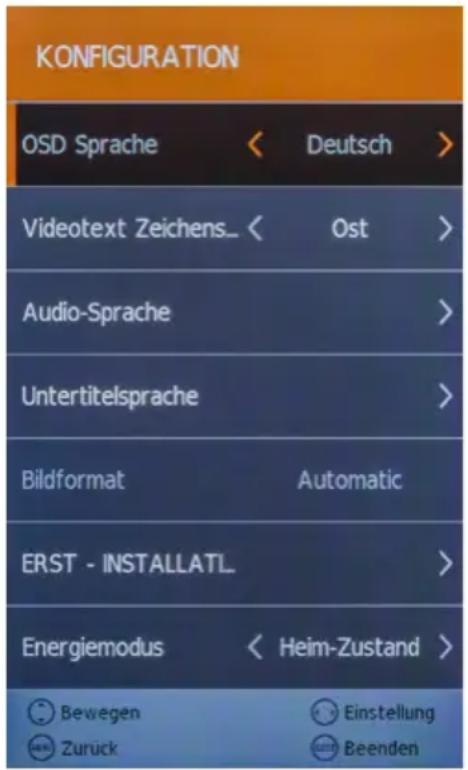
7.5 Configuration
In the menu configuration, you can set up basic settings of the TV.
OSD language Select the language of the screen menus
Teletext Select the character set of teletext (West, East, ...)
Audio language Select the preferred audio language of TV channels
Subtitle lang. Select the preferred subtitle language of the TV channels
Picture format Adjust the image format
First installation Start the first installation of the TV (see page 9)
Energy mode Switch between Home State and Store Mode
Factory setting Sets the TV back in the factory setting. All data you have made will be lost.
Software update If there is a new firmware for the TV, you can this update here. You can find the latest firmware always on our homepage
www.megasat.tv
- Copy the firmware to the root directory of a formatted USB drive (without subfolders).
- Plug the USB drive into the USB slot of the TV.
- Now press the OK button on Software Update (USB). You will be asked whether you really want to update. Select „Yes“ or „No“ to cancel.
- Once the firmware has been updated, the TV restarts and starts the initial installation.
7.6 Protection
In this menu passwords can be assigned to Channel Lock, add a youth protection or configure a hotel mode.
System lock Select ON to enable the password lock. The default password is: 0000
Set password Change the default password. First enter the current password, then a new one. This must be repeated again.
Lock channels Select the channels you want to lock. Navigate with the arrow keys on the current channel and press the GREEN button to select a channel to lock.
Youth protection Select the age level from 4 to 18 years. If a program exceeding the age group, the password is needed to unlock the channel. Note: This feature is dependent on the broadcaster.
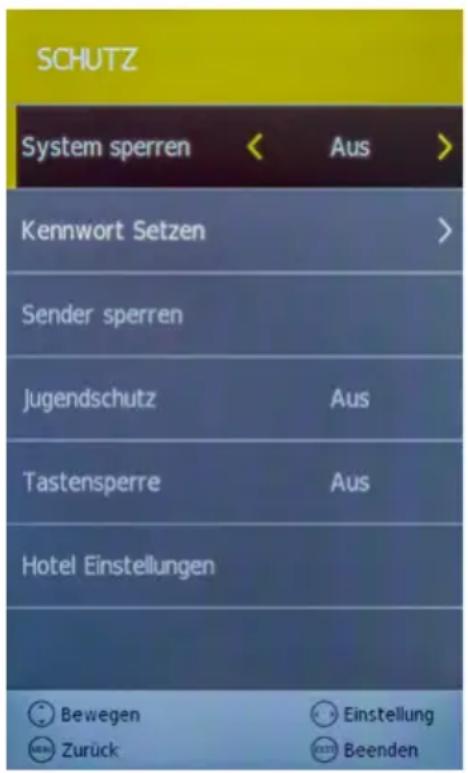
Keylock Enable or disable the key lock.
Hotel settings In the hotel setting you can configure the TV so that unauthorized persons do not have access to certain functions.
Source lock: Locks any input sources.
Start source: Select the source, with which the TV is to start.
Start channel: Select the channel, with which the TV is to start.
Volume: Select the volume level at which the TV is to start.
Max volume: Select the maximum adjustable volume.
Database import: Import a preset database.
Database export: Export the current database.
Reset lock: Deletes all Hotel settings.
8. DVD operation
In DVD menu allows you to play DVDs or Video CDs. First, press the INPUT button on the remote control and select the DVD source. Now insert a disc with text side towards the screen. The DVD is automatically pulled in. If the DVD is inserted wrong direction, it will be ejected. After successful identification, the DVD menu appears.
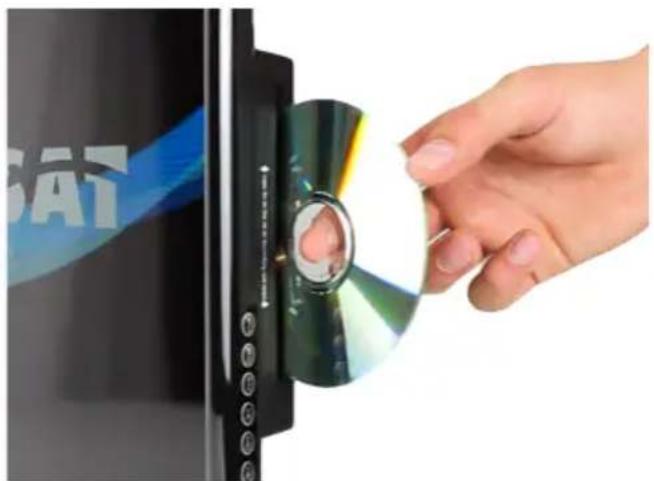
The following video formats can be read:
DVD / DVD-Video / DVD+R/+RW / DVD-R/-RW / VCD / CD / HDCD / CD-R/CD-RW
Note:
All discs must be located in one of the above video formats. We do not guarantee that self-created Video CDs or DVDs can be read.
8.1 Key functions in DVD mode
| ▲▼ ◀▶ | Use the arrow keys to navigate in the DVD menu. |
| 1 - 9 To | select a chapter or entry numbers. |
| Changes to the DVD main menu. | |
| D.SET | With the RED button you enter the DVD system settings. |
| D.MENU | With the GREEN button you can call up the DVD main menu. |
| D.SUB | Use the YELLOW button to go to the subtitles (if available). |
| D.LAN | With the BLUE button you change the language / audio track (if any exist). |
| D.ZOOM | Enlarge or reduce the image. |
| D.SLOW | Plays the DVD video in slow motion (forward or reverse). |
| ◀◀ / ▶▶ | Moves to the previous or next chapter. |
| ◀◀ / ▶▶ | Rewind the video forward or backward. |
| ▶II | Play or pause the video. |
| ■ | Stops the video. |
8. DVD operation
8.2 DVD Settings menu
To make basic settings in the DVD menu, press the RED button (D.SET). Then open the DVD settings menu.
General Settings
TV display
Define the appropriate image format. Choose between 4:3 PS, 4:3 LB and 16:9.
Display language
Select the DVD menu language.
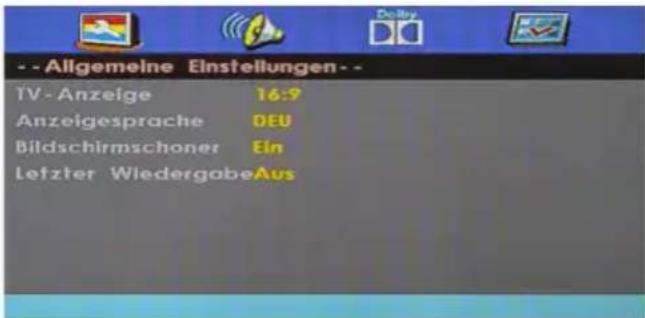
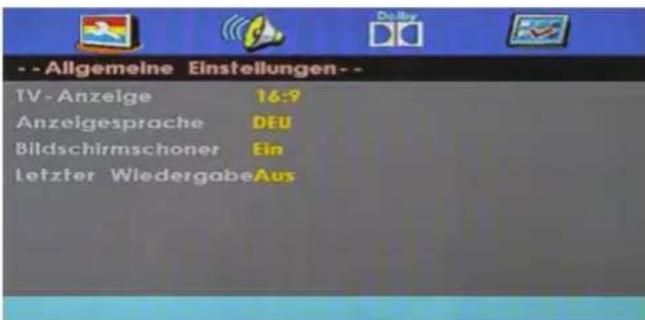
If a long time carried out any operation in the DVD menu, you can activate the screen saver to protect the screen of the TV.
Last playback
If you enable this function (ON), the DVD player remembers the point of the movie, in which you have turned off. You can then resume at a later time playback. This function is only guaranteed if the DVD is not removed from the drive.
Speaker settings (Downmix)
LT/RT
A disc with a multichannel audio track will be distributed as an output signal in the left and right channels.
Stereo
A disc with a multi-channel audio track is converted as output in stereo.
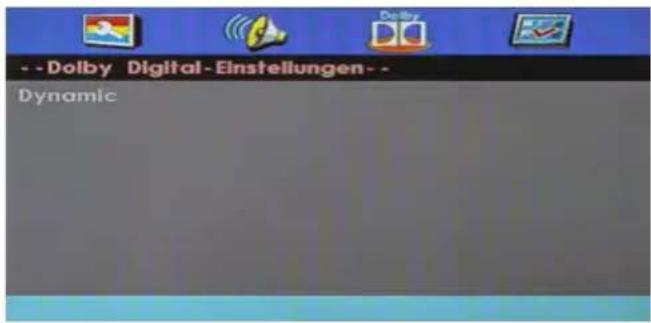
This option is used to control the compression ratio and thus to improve the sound.
User settings
TV type
Choose between PAL, Multi or NTSC. In Europe, PAL is the default setting.
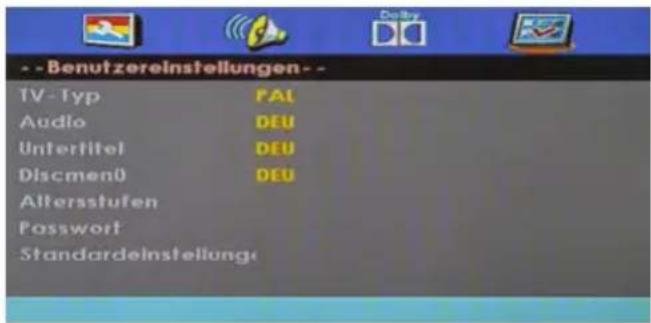
Select the preferred audio language of the DVD (if available on the disc).
Subtitle
Select the preferred subtitle language of the DVD (if available on the disc).
Discmenu
Select the preferred language of the DVD menu (if present on the disc).
age levels
Assign a desired age level. If you select age level 3 and insert a DVD with age level 8, you will be prompted to enter a password.
Password
The password for the age level you can change at any time. First enter the old password (default: 123456). You can then assign a new password.
Default setting
By confirm this point, all the settings of this menu will be reset.
9. Multimedia operation (USB)
With your TV you can play back multi-media files such as. photos, music, movies and eBooks. Insert a suitable USB drive or external hard drive into the USB port. Press INPUT on the remote control and switch to using the arrow keys on MEDIA.
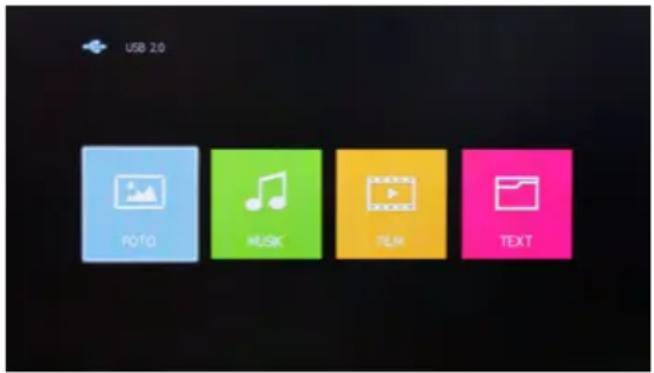
9.1 Photos
Change to the menu „Photos“, then the picture menu appears with the folder structure. Navigate with the OK button to the main folder C, then displays all the photos from the USB drive.
Navigate with the arrow keys to a desired photo. A small preview, and various data of the photos will be displayed directly in the center of the screen.
To start a slideshow, highlight with the OK button all images that you want to view. Do not mark any photos, all photos are played. Start the slide show with the ▶ button.
Description of symbols in the playback mode
| || | Pauses the current playback. |
| ◀◀ | Previous photo in the playlist. |
| ▶▶ | Next photo in the playlist. |
| ■ | Stop the slideshow. |
| Repeats the slideshow. | |
| Plays music to the slide show (provided that music on the USB stick is located). | |
| Displays the current playlist. | |
| Displays the play list. | |
| Rotates the image clockwise by 90°. | |
| Rotates the image anti clockwise by 90°. | |
| Enlarges the image. | |
| Reduces the image. | |
| Moves the image. Use the arrow keys on the remote control. |
9. Multimedia operation (USB)
9.2 Music
Change to the menu „Music“, then the music menu appears with the folder structure. Navigate with the OK button to the main folder C, then displays all the music from the USB drive.
Navigate with the arrow keys to a desired music file. A small preview as title or artist are displayed on the screen.
To start the playlist, highlight with the OK button all music files you want to hear. Do not mark any music files, all music files are played. Start the playlist with ▶■button.
Description of symbols in the playback mode
| || | Pauses the current playback. |
| Rewinds the current track. | |
| Fast forwards the current track. | |
| Previous track in the playlist. | |
| Next track to the playlist. | |
| Stops playback. | |
| Repeats the playlist. | |
| Turns the volume on mute. | |
| Displays the current playlist. | |
| Displays information about the current song. | |
| Switch to a specific time of the current title. |
9. Multimedia operation (USB)
9.3 Movies
Change to the menu „Movies“, then the Movie menu appears with the folder structure. Navigate with the OK button to the main folder C, then displays all the movies from the USB drive.
Navigate with the arrow keys to a desired movie file. A small preview as well as information to be displayed on the screen.
To start the playlist, highlight with the OK button all movie files you want to hear. Do not mark any movie files, all movie files are played. Start the playlist with ▶■ button.
Description of symbols in the playback mode
| || | Pauses the current playback. |
| ◀◀ | Rewinds the current movie. |
| ▶▶ | Fast forwards the current movie. |
| ◀◀◀ | Play previous movie in the playlist. |
| ▶▶◀ | Play next movie in the playlist. |
| ■ | Stops playback. |
| Aa | Change the font. |
| Repeats the playlist. | |
| Set the A-B repeat. | |
| Displays the current playlist. | |
| i | Displays information about the current video. |
| ▶ | Plays the video in slow motion. |
| Play the movie frame by frame (a keystroke = forward one frame). | |
| Switch to a specific time of the current video. | |
| Enlarges the video. | |
| Shrinks the video. | |
| Changes the video format. | |
| Moves the video. Use the arrow keys on the remote control. |
10. EPG menu (program guide)
In Electronic Programme Guide, you can see a 7-day preview of all channels (where the respective stations so provides). Use the arrow keys on the remote control to navigate between programs and broadcasts.
Press the INFO button on the remote control to get more information on the broadcast.
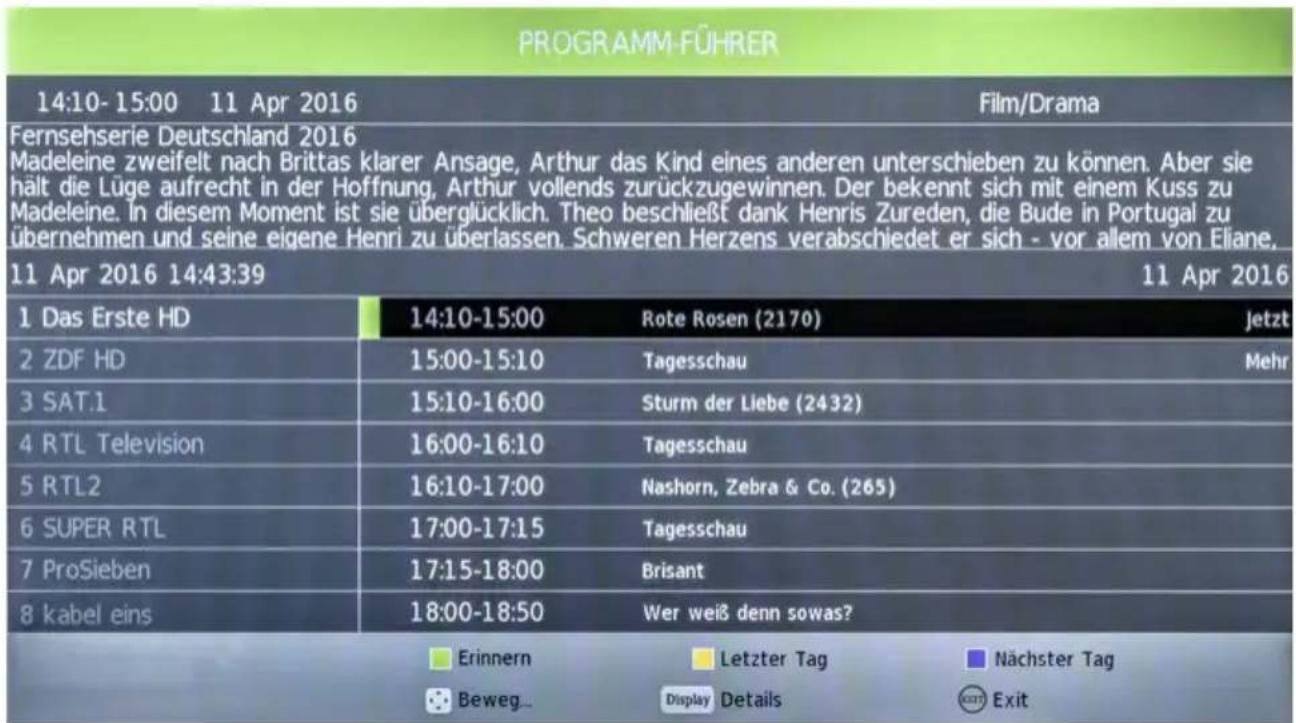
Declaration of color buttons
Reminds a broadcast
Move to the previous day
Move to the next day
Note:
It may happen that the program guide provides no or only partial information. It may take several minutes until the data has been updated.
Reminds a broadcast
Do not want to miss a broadcast, this feature is very helpful. Use the arrow keys to select the desired station and the broadcast from where you want to be reminded. the program is marked by pressing the GREEN button. There are 3 different memory options are available:
Changes automatically once on the selected program, or time.
Change automatically daily on the selected program, or time.
Change automatically weekdays on the selected program, or time.
11. Cl+ slot for pay-TV expansion
You can receive not only free to air (Free to Air) channels on the TV, but also encrypted channels unless you are in possession of a smart card and a CI module of the respective provider.
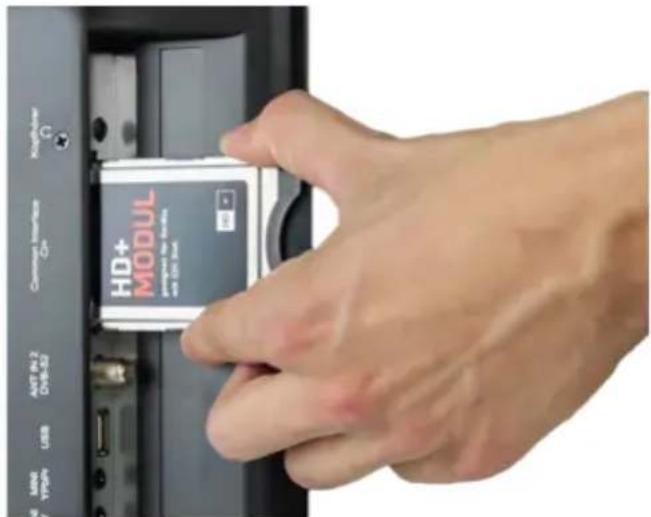
1. Inserting the smart card into the CI module:
Insert the smart card into the CI module. Make sure that the golden chip of the Smart Card is facing upward.
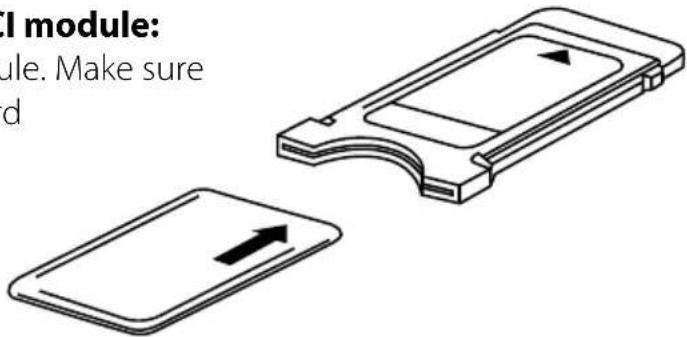
2. Inserting the CI module:
The module must inseret only 2-3 cm in the Cl+ slot. In order to the CAM module is properly seated, you need to press it a little harder at the end. You feel a slight resistance.
Note:
- The broadcaster can forbid or limit recording/Time Shift with a Cl+ module.
- Recordings of programs using Cl+ are saved encrypted on the USB devices. The recordings could not be viewed with another device.
- The limitation are designated by the broadcasters. The manufacturer does not have influence on this matter.
- A CI/CI+ module can generate screen messages. Please refer to the manual of your module.
12. Troubleshooting
Please read the following information to find out the possible cause of a problem before contacting customer service.
| No power • Check if the power cord is fully plugged into the electrical outlet and the power adapter. • Check if the cable of the power adapter is properly connected to the TV unit. • The electronic circuit was possibly reset. Disconnect the power supply from the power source, wait 1 minute, and then connect the electrical connector. |
| No picture • Check if the antenna cable is properly connected. • Verify that the correct input is selected; Use the INPUT button. • Check the brightness and contrast settings in the Picture settings. |
| No sound • Check if the sound is turned off or Mute is activated. • Carefully increase the volume. • Check if the audio cables are connected to the correct inputs. |
| Bad picture quality • Check whether the correct input is selected; Use the INPUT button. • Check the connection to the TV. • Check the video settings. |
| Image too large/small or distorted • Use the ASPECT button to change the appearance of the image. |
| Remote control does not respond • Change the batteries. • Use the remote control in the specified range (max. 5 meters and 30°) • Avoid direct exposure to light in the infrared sensor. |
13. Specifications
| Royal Line 19 Deluxe | Royal Line 22 Deluxe | Royal Line 24 Deluxe | |
| Display LED Display (100 % Pixel error free) | |||
| Screen size 18,5 inch (47 cm) 21,5 inch (54,6 cm) 23,6 inch (59,9 cm) | |||
| Resolution 1366 x 768 1920 x 1080 1920 x 1080 | |||
| Contrast ratio 1000 : 1 | |||
| Brightness value 250 cd/m2 | |||
| Viewing angle 170° H / 160° V | |||
| Tuner DVB-S / -S2 / -T / -T2 / -C | |||
| German DVB-T2 standard | H.265 / HEVC | ||
| Antenna impedance | VHF / UHF / CATV (75 Ω) | ||
| Reaction time | 5 ms | ||
| Bluetooth 4.0 interface | Connect to a Bluetooth headset or a soundbar | ||
| Bluetooth HF-transmit power | 10 dBm with level control (8-10 meter range) | ||
| CI+ Slot (HD+ ready) | yes | ||
| USB port | yes | ||
| Photo Playback formats | JPEG | ||
| Music Playback formats | MP3 / AC3 / MP2 / MPEG1 / PCM / LPCM / CDDA / OGG | ||
| Movie Playback formats | MPEG-1 / MPEG-2 / MPEG-4 / MPG / VOB / AVI / DVD-VIDEO / XVID | ||
| DVD player | yes | ||
| DVD playback formats | DVD / DVD-Video / DVD+R/+RW / DVD-R/-RW / VCD / CD / HDCD / CD-R/CD-RW | ||
| PC port (D-Sub) yes | |||
| Audio output (S/PDIF) | yes | ||
| Audio output 3,5 mm jack | yes | ||
| Audio input 3,5 mm jack | yes | ||
| HDMI port | yes | ||
| Scart port | yes | ||
| Video/Audio (with adapter) | yes | ||
| YUV (with adapter) | yes | ||
| Mechanical Power Switch | yes | ||
| Speaker | yes | ||
| VESA standard 100 x 100 mm | |||
| Power supply | AC 100 - 240 V, 50/60 Hz / DC 12 V, 3 A | ||
| Power in use max. 23 W | |||
| Power in standby | <0,5 W | ||
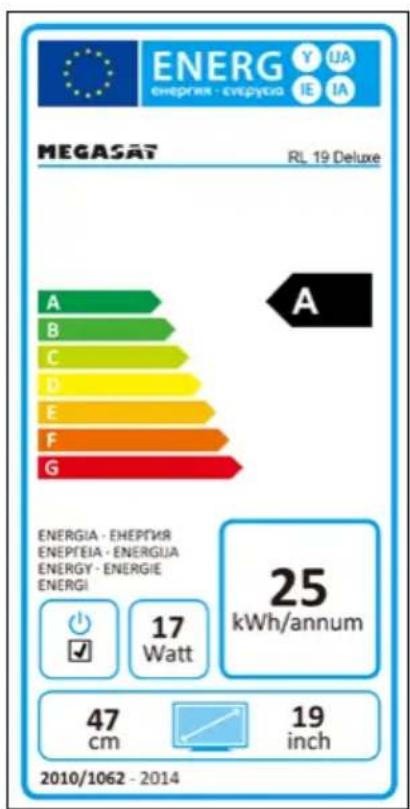
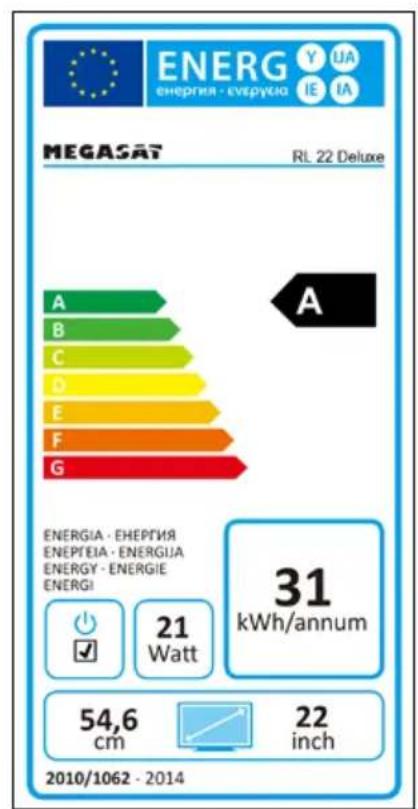
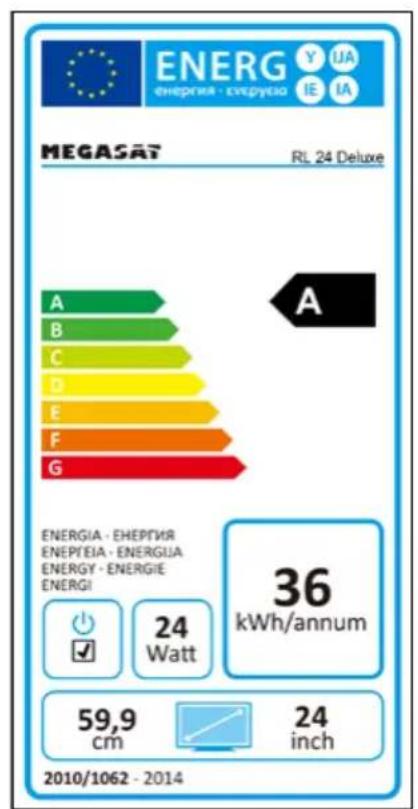
| Energy efficiency A | |||
| Dimensions with stand (W/D/H) | 447 x 309 x 160 mm | 513 x 347 x 160 mm | 562 x 376 x 160 mm |
| Dimensions without stand (W/D/H) | 447 x 270 x 40 mm | 513 x 308 x 40 mm | 562 x 336 x 40 mm |
| Weight | 3,7 kg | 3,9 kg | 4,3 kg |
Note:
Weight and dimensions are not absolutely exact values . Technical details can be changed at any time without prior notice.
Declaration of information
Hereby declare the company Megasat Werke GmbH that the following devices is in compliance with the essential requirements and other relevant provisions of Directive Council 2014/30/EU and 2014/35/EU:
The Declaration of Conformity for these products is located at the company:
Megasat Werke GmbH
Industriestraße 4a
D-97618 Niederlauer
Notes
Version 1.1 (July 2016) // Technical changes, misprints and errors reserved.
Megasat Werke GmbH | Industriestraße 4a | D-97618 Niederlauer | www.megasat.tv | info@megasat.tv


- HINWEIS
- WARNUNG
- BEZEICHNUNGEN
- DESIGNATIONS
- BASIC FUNCTIONS
- THE MAIN MENU
- DVD OPERATION
- MULTIMEDIA OPERATION (USB)
- SAFETY INSTRUCTIONS
- DELIVERY
- STAND ASSEMBLY
- FOR THE ASSEMBLY YOU NEED THE FOLLOWING PARTS
- NOTE
- HOW TO MOUNT THE STAND
- WARNING
- 4.1 FRONR AND SIDE VIEW
- 4.2 CONNECTIONS
- 4.3 REMOTE CONTROL
- FIRST INSTALLATION
- TUNING SETUP
- DEFAULTS FOR SIGNAL SEARCH
- DVB-S (SATELLIT)
- DVB-T (TERRESTRIAL)
- 6.1 SELECT INPUT SOURCE
- 6.2 NAVIGATION IN MAIN MENU
- 7.1 CHANNEL SEARCH
- 7.1.1 CHANNEL SEARCH (SATELLITE)
- AUTOMATIC CHANNEL SEARCH
- MOVE (YELLOW BUTTON)
- SKIP (BLUE BUTTON)
- FAVORITES (FAV BUTTON)
- CI INFORMATIONS
- SATELLITE
- TRANSPONDER
- ANTENNA SETTING
- 7.1.2 CHANNEL SEARCH (CABLE AND TERRESTRIAL)
- ANTENNA
- MANUAL ANALOGUE SEARCH
- MANUAL DVB-T SEARCH
- EDIT CHANNELS
- SIGNAL INFORMATIONS
- 5V ACTIV ANTENNA
- 7.3 SOUND
- 7.4 CLOCK
- 7.5 CONFIGURATION
- WWW.MEGASAT.TV
- 7.6 PROTECTION
- THE FOLLOWING VIDEO FORMATS CAN BE READ
- 8.1 KEY FUNCTIONS IN DVD MODE
- 8.2 DVD SETTINGS MENU
- GENERAL SETTINGS
- TV DISPLAY
- DISPLAY LANGUAGE
- LAST PLAYBACK
- SPEAKER SETTINGS (DOWNMIX)
- LT/RT
- STEREO
- USER SETTINGS
- TV TYPE
- SUBTITLE
- DISCMENU
- AGE LEVELS
- PASSWORD
- DEFAULT SETTING
- 9.1 PHOTOS
- 9.2 MUSIC
- 9.3 MOVIES
- EPG MENU (PROGRAM GUIDE)
- DECLARATION OF COLOR BUTTONS
- REMINDS A BROADCAST
- CL+ SLOT FOR PAY-TV EXPANSION
- INSERTING THE SMART CARD INTO THE CI MODULE
- INSERTING THE CI MODULE
- TROUBLESHOOTING
- SPECIFICATIONS
- DECLARATION OF INFORMATION
- NOTES
Brand : MEGASAT
Model : Royal Line 19 Deluxe
Category : Television