
WM3020I - Alarm clock radio AIC - Free user manual and instructions
Find the device manual for free WM3020I AIC in PDF.

User questions about WM3020I AIC
0 question about this device. Answer the ones you know or ask your own.
Ask a new question about this device
Download the instructions for your Alarm clock radio in PDF format for free! Find your manual WM3020I - AIC and take your electronic device back in hand. On this page are published all the documents necessary for the use of your device. WM3020I by AIC.
USER MANUAL WM3020I AIC
Dimensions: I x h x p 160 x 90 x 75 mm
Poids:205g
- Read instructions - All the safety and operating instructions should be read before the appliance is operated.
- Retain Instructions - The safety and operating instructions should be retained for future reference.
- Head Warnings - All warnings and cautions on the appliance and in the operating instructions should be adhered to.
- Follow instructions - All operating and use instructions should be followed.
- Water and Moisture - The appliance should not be used near water, e.g. near a bathtub, washbowl, kitchen sink, laundry tub, in a wet basement, or near a swimming pool or the like.
- Wall or Ceiling Mounting - The appliance should not be mounted to a wall or ceiling.
- Ventilation - The appliance should be situated so that its location or position does not interfere with its proper ventilation. For example, the appliance should not be situated on a bed, sofa, rug or similar surface that may block the ventilation openings, or placed in a built-in installation, such as a bookcase or cabinet, that may impede the flow of air through the ventilation openings.
- Heat - The appliance should be situated away from neat sources such as radiators, heat registers, stoves, or other appliances (including amplifiers) that produce heat.
- Power Sources - The product should be operated only with the type of power supply indicated on the marking label. If you are not sure of the type of power supply to your home, consult your product dealer or local power company. For products intended to operate from battery power, or other sources, refer to the operation instructions.
- Power-Cord Protection - Power supply cords should be routed so that they are not likely to be walked on or pinched by items placed upon or against them, paying particular attention to cords at plugs, convenience receptacles, and the point where they exit from the appliance.
- Cleaning - Unplug this product from the wall outlet before cleaning. Do not use liquid cleaners or aerosol cleaners. Use a damp cloth for cleaning.
- Nonuse periods - The power cord of the appliance should be unplugged from the outlet when left when left unused for a long period of time.
- Object and Liquid Entry - Care should be taken so that objects do not fall and liquids are not spilled into the product case through product openings.
- Damage Requiring Service - Unplug this product from the wall outlet and take it to qualified service personnel under the following conditions.
a) When the power-supply cord or plug is damaged.
b) If liquid has been spilled into, or objects have fallen into the product.
c) If the product has been exposed to rain or water.
d) If the product does not operate when used according to the operating instructions.
Adjust only those controls that are covered by the operating instructions as an improper adjustment of other controls may interfere with the product's normal operation.
e) If the product has been dropped or damaged in any way.
f) When the product exhibits a distinct change in performance this indicates a need for service.
- Servicing - The user should not attempt to service the product beyond that described in the operating instruction. All servicing should be referred to qualified service personnel.
- Power Lines - An outside antenna system should not be located in the vicinity of overhead power lines, or other electric light or power circuits, or where it can fall into such power lines or circuits. When installing an outside antenna system, extreme care should be taken to keep from touching power lines or circuits as contact with them might be fatal.
- Cleaning - Unplug this product from the wall outlet before cleaning. Do not use liquid cleaners or aerosol cleaners. Use a damp cloth for cleaning.
- Lightning - For added protection for this product during a lightning storm, or when it is left unattended and unused for long periods of time, unplig it from the wall outlet and disconnect the antenna or cable system. This will prevent damage to the product due to lightning and power-line surges.
- Safety Check-Upon completion of any service or repairs to this product, ask the service technician to perform safety checks to determine that the product is in proper operation condition.
- Overloading-Do not overload wall outlets, extension cords, or integral convenience receptacles as this can result in a risk of fire or electric shock.
- The apparatus and AC/DC adaptor shall not be exposed to dripping or splashing and that no objects filled with liquids, such as vases, shall be placed on apparatus and AC/DC adaptor.
- The AC/DC adaptor is used as disconnect device. The AC/DC adaptor of apparatus should not be obstructed OR should be easily accessed during intended used. To be completely disconnect the power input, the AC/DC adaptor of apparatus shall be disconnected from the mains.
- Battery shall not be exposed to excessive heat such as sunshine, fire or the like.
LOCATION OF CONTROLS
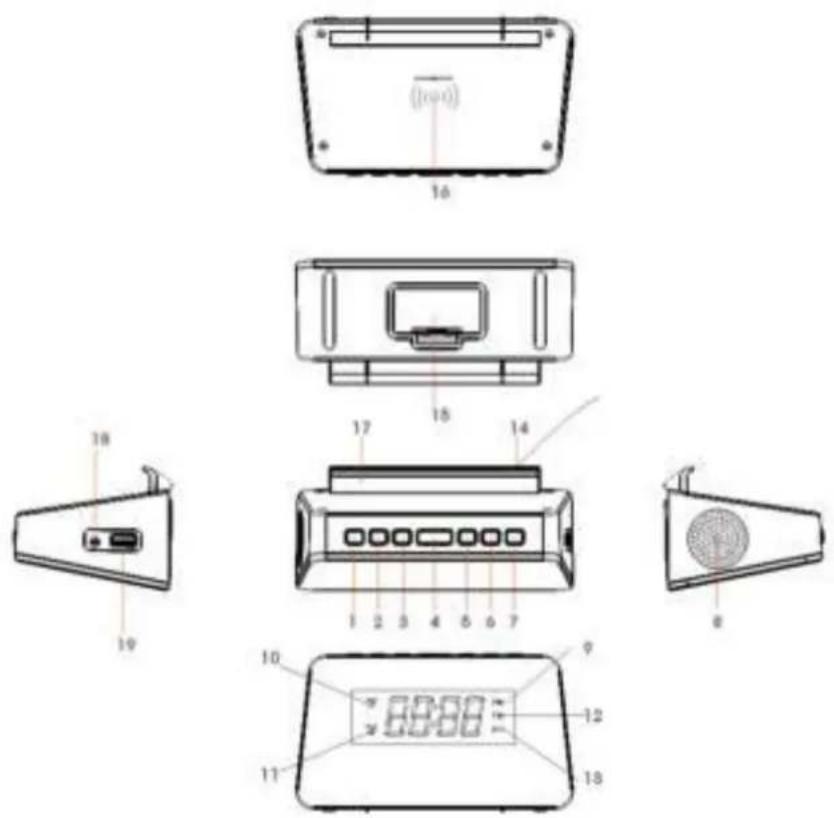
- TIME/PRESET
- HOUR/TUN
- MINUTE/TUN+
- SLEEP/DIMMER/SCAN/SNOOZE
- ALARM 1/VOLUME DOWN
- ALARM 2VOLUME UP
- POWER/RADIO/ALARM OFF
- Speaker
- PM indicator
- Alarm 1 icon
- Alarm 2 icon
- Radio FM indicator
- Wireless charging indicator
- Radio aerial antenna
- Battery compartment
- Wireless charging pad
- Phone seat/bracket
- DC Jack
- USB 5V out charging socket
CONNECTING TO POWER
- Insert one end of supplied power cord into the socket marked DC 5V/2A located on the side of the clock and the other end into the wall mains power outlet.
- Please only use the supplied mains power cord or a cable that supplies 5 volts & 2 amps. Over supply of power will cause immediate damage to your clock radio.
- If the clock is not powering up please check that the power cable is fully inserted into the socket on the side of the clock. On first use the plug may need to be quite firmly pressed in to place.
- The display should now be on and on initial use time will be flashing, indicating that your clock radio is powered on, in standby mode and waiting to have the time set.
BACKUP SYSTEM
- The clock is equipped with a backup system. It requires 2 x AAA batteries. Insert the batteries into the battery compartment and make sure the positive and negative (+ or -) sides of the batteries are in contact with the corresponding terminals in the battery compartment.
- In the event of power failure or disconnection of the power cord, the power supply is automatically switched to the backup battery, keeping the time and alarm settings. Time will not be displayed when using battery backup.
- When replacing the battery, do not disconnect the power adapter. Otherwise, all clock and alarm settings will be lost.
SETTING THE TIME
- In standby mode, press and hold the TIME/PRESET button for 1-2 seconds to enter TIME SET mode. When clock enters TIME SET mode it will display the letters / digits 12H flashing on screen.
- Press the HOUR/TUN- or MIN/TUN+ button to select 24H or 12H (12-hour or 24-hour time display.) Then press TIME/PRESET button to confirm. The time will now be flashing on the display.
- Press the HOUR/TUN- button to set the hour and MIN/TUN+ to set the minute. Press and hold the HOUR/TUN- or MIN/TUN+ button to move quickly.
- Press TIME/PRESET button to confirm the correct time is set. Time will now stop flashing and your clock setup is complete.
SETTING THE ALARM
The GTQ-RENEW lets you have 2 independent alarm settings.
- In standby mode, press and hold the AL 1/VOL- button for 1-2 seconds to enter the alarm time setting mode. When you have entered ALARM SET mode the alarm time will be flashing on clock screen along with the alarm 1 (or alarm 2) icon.
- In alarm setting mode, press the AL 1/VOL- button repeatedly to cycle through the alarm setting options, these are: Alarm time > Alarm sound source (bb = buzzer, rd = radio) > Alarm volume level.
- Setting alarm time: Press HOUR/TUN- to set the hour and MIN/TUN+ button to set the minute. Press AL 1Vol- button to confirm.
- Setting alarm sound source: Press the HOUR/TUN- or MIN/TUN+ button to choose rd for FM radio or bb for buzzer as the alarm sound source. The corresponding alarm indicator on display will blink accordingly to your selection: Indicator "bb" or "rd FM" will blink on display. Press AL 1/Vol- button to confirm.
- Setting alarm volume level: Press the HOUR/TUN- or MIN/TUN+ button to set alarm volume (level 5 - 15). Press AL1/VOL- button to confirm once you have chosen your preferred alarm volume level.
- Once the alarm setting is complete, the alarm will be set to on with the corresponding alarm indicator displayed on the clock screen.
- When alarm goes off, the volume will gradually increase from volume level 1 up to the volume level you set for your alarm.
- To set alarm 2 follow step 1-7, replacing AL 1/Vol- with AL 2/Vol+
TURING THE ALARMS ON OR OFF
When the display shows the clock time, single press AL 1/Vol- or AL2 /Vol+ button to enable or disable the respective alarm. The corresponding Alarm 1 or Alarm 2 indicator will be displayed on the screen when the alarm is enabled.
SNOOZE
- When the alarm goes off, the corresponding Alarm 1 or Alarm 2 indicator will flash on the display.
- Press the SNOOZE/SLEEP/DIMMER button to temporarily deactivate it. The snooze function will Snooze your alarm for 9 minutes.
- The corresponding Alarm 1 or Alarm 2 indicator will flash on the display during the snooze period.
- To cancel the snooze and the alarm, press POWER/RADIO/AL OFF button.
TO STOP THE ALARM WHEN ALARM GOES OFF
- Press POWER/RADIO/AL OFF button to stop the alarm.
- Alarm indicator will still stay on and the alarm will sound on the following day.
SLEEP TIMER FUNCTION
You can set a sleep timer to have your music automatically turn off while you are sleeping:
- When the radio is on, press the central SLEEP/DIMMER/SCAN/SNOOZE button repeatedly to select the number of minutes you want the radio to stay on for: 90, 60,30,15,10,05, and OFF.
- The display will change back to the current time if you do not press any button for 3 seconds.
- The radio will stop playing once the sleep timer has finished.
- To check the remaining time before the radio turns off / end of sleep timer, single press the SLEEP/DIMMER/SCAN/SNOOZE button.
- To stop sleep mode before the time is out, repeatedly press the SLEEP/DIMMER/SCAN/SNOOZE button to select "OFF" on screen.
FM RADIO
- Unroll and extend the antenna aerial cable to give best FM signal reception. You may need to hang your aerial cable up higher if radio reception is weak where you have placed the radio.
- Press the POWER/RADIO/AL OFF button to turn the radio on.
- Repeatedly press the HOUR/TUN- or MIN/TUN+ button to adjust frequency.
- Press and hold the HOUR/TUN- or MIN/TUN+ button to automatically tune to the next available FM radio station.
- Press the POWER/RADIO/AL OFF button to turn the radio off.
AUTO-SCAN & AUTO-SAVE THE FIRST 10 RADIO STATIONS TO PRESETS
When the radio is on and playing, press & hold the SLEEP/DIMMER/SCAN/SNOOZE button for 2-3 seconds to auto scan radio stations and store the first 10 found radio stations automatically.
RADIO PRESET
You can store up to 10 preset radio stations.
- Tune to a radio station.
- Press and hold TIME/PRESET button until "P01" (or the next available preset) displays on the screen.
- Press the HOUR/TUN- or MIN/TUN+ button to select a preset number (P01-P10).
- Press the TIME/PRESET button to confirm. The preset station has been set / saved.
- Press the TIME/PRESET button repeatedly while listening to the radio to select and listen to a preset station.
DISPLAY DIMMER
- In standby mode, press the SLEEP/DIMMER/SCAN/SNOOZE button to change the brightness level of the display: high, low or off.
- Default dimmer level is "low".
- If display is set to OFF and an alarm is set and comes on then the display will switch back on when the alarm sounds. When the alarm is switched off the display will turn back off also, after a few seconds.
USB charging (5V out)
The USB port is designed for charging external devices such as smart phones. Simply connect your own USB cable to the clock and other end to your phone.
WIRELESS CHARGING
- Place your Qi enabled smartphone on the center of the wireless charging pad on the rear of the clock radio.
- Please check if your phone screen shows charging status. When wireless charging, the clock radio displays a blue wireless charging icon flashing on screen.
If your phone is not charging;
- Check if your device supports Qi wireless charging. The clock radio will only be able to charge phones that have Qi wireless charging already built in.
- Make sure your phone is sat in the center of the charging cradle.
- Remove your phones case, as this could be blocking Qi wireless charging.