DVL2462 - TV LENCO - Free user manual and instructions
Find the device manual for free DVL2462 LENCO in PDF.


| Product Type | LED TV with built-in DVD player |
| Brand | Lenco |
| Model | DVL2462 |
| Screen Size | 24 inches (approx. 61 cm) |
| Screen Resolution | HD Ready (1366 x 768 pixels) |
| TV Reception Formats | DVB-T/T2, DVB-C, DVB-S/S2 |
| DVD Player | Yes, built-in (plays DVD, CD) |
| Connectors | HDMI, USB, SCART, VGA, RF, coaxial digital audio output, headphone jack, Mini AV, Mini YPbPr, Common Interface (CI+) |
| Main Functions | Digital terrestrial/satellite/cable reception, DVD and USB multimedia playback, teletext, parental control, hotel mode, sleep timer |
| Remote Control | Yes, infrared with full functions |
| Power Supply | 100-240 V ~, 50/60 Hz (AC adapter) |
| Power Consumption | Approximately 40 W (estimated) |
| Net Weight | Approximately 4 kg (estimated) |
| Dimensions (W x H x D) | Approximately 55 x 35 x 10 cm (estimated) |
| Care and Cleaning | Clean with a soft, dry cloth; do not use solvents or liquids |
| Safety | Do not expose to water or flames; do not block ventilation openings; unplug during storms |
| Spare Parts and Reparability | Contains no user-serviceable parts; refer all repairs to qualified service personnel |
| Warranty | Complies with French legislation; contact the retailer for repairs |
Frequently Asked Questions - DVL2462 LENCO
User questions about DVL2462 LENCO
0 question about this device. Answer the ones you know or ask your own.
Ask a new question about this device
Download the instructions for your TV in PDF format for free! Find your manual DVL2462 - LENCO and take your electronic device back in hand. On this page are published all the documents necessary for the use of your device. DVL2462 by LENCO.
USER MANUAL DVL2462 LENCO
Read all of the instructions before using this TV and keep the instruction manual in a safe place for future reference.
Contents
Safety Information 3
Product Introduction 6
Connections 8
Remote Control 10
Common Interface Slot 12
Select Input Source 13
First Time Installation. 14
Safety Information
IMPORTANT SAFETY INSTRUCTIONS - READ CAREFULLY BEFORE USE.
Take note of the following safety information which appears on the back of the TV.

CAUTION TO PREVENT ELECTRICAL SHOCK, DO NOT REMOVE ANY COVER SCREWS, NO USER SERVICEABLE PARTS INSIDE, REFER SERVICING TO QUALIFIED SERVICE PERSONNEL.

This symbol indicates that there are important operating maintenance instructions in the literature accompanying this unit.

This symbol indicates that dangerous voltage constituting a risk of electric shock is present within this unit.
Keep these instructions
- Do not use this TV near water.
Clean only with a slightly damp cloth. - Do not block any ventilation openings.
Install in accordance with the supplied Quick Start Guide and this User Guide. - Protect the power chord from being walked on or pinched, particularly at plugs, and the point where it exits from the TV.
- Do not allow the power chord to overhang the edge of a table.
- Unplug this TV during lightening storms or when unused for long periods of time.

WARNING! TO REDUCE THE RISK OF FIRE OR ELECTRICAL SHOCK, DO NOT EXPOSE THIS TV TO RAIN OR MOISTURE. THE TV MUST NOT BE EXPOSED TO DRIPPING AND SPLASHING AND NO OBJECTS FILLED WITH LIQUIDS SHOULD BE PLACED ON THE TV.

Warning
To prevent the spread of fire, keep candles or other open flames away from this product at all times.
CAUTION:
Usage of controls or adjustments or performance of procedures other than those specified herein may result in hazardous radiation exposure.
This unit should not be adjusted or repaired by anyone except qualified service personnel.
KEEP THESE INSTRUCTIONSIN MIND:
- Do not use this device near water.
- Clean only with a slightly damp cloth.
- Do not cover or block any ventilation openings. When placing the device on a shelf, leave 5 cm (2") free space around the whole device.
- Install in accordance with the supplied user manual.
- Don't step on or pinch the power adaptor. Be very careful, particularly near the plugs and the cable's exit point. Do not place heavy items on the power adaptor, which may damage it. Keep the entire device out of children's reach! When playing with the power cable, they can seriously injure themselves.
- Unplug this device during lightning storms or when unused for a long period.
- Keep the device away from heat sources such as radiators, heaters, stoves, candles and other heat-generating products.
- Avoid using the device near strong magnetic fields.
- Electrostatic discharge can disturb normal usage of this device. If so, simply reset and restart the device following the instruction manual. During file transmission, please handle with care and operate in a static-free environment.
- Warning! Never insert an object into the product through the vents or openings. High voltage flows through the product and inserting an object can cause electric shock and/or short circuit internal parts. For the same reason, do not spill water or liquid on the product.
- Do not use in wet or moist areas such as bathrooms, steamy kitchens or near swimming pools.
- Do not use this device when condensation may occur.
- Although this device is manufactured with the utmost care and checked several times before leaving the factory, it is still possible that problems may occur, as with all electrical appliances. If you notice smoke, an excessive build-up of heat or any other unexpected phenomena, you should disconnect the plug from the main power socket immediately.
- This device must be well ventilated at all time!
- This device must operate on a power source as specified on the specification label. If you are not sure of the type of power supply used in your home, consult your dealer or local power company.
- The socket outlet must be installed near the equipment and must be easily accessible.
- Do not overload ac outlets or extension cords. Overloading can cause fire or electric shock.
- Devices with class 1 construction should be connected to a main socket outlet with a protective earthed connection.
- Devices with class 2 construction do not require a earthed connection.
- Keep away from rodents. Rodents enjoy biting on power cords.
- Always hold the plug when pulling it out of the main supply socket. Do not pull the power cord. This can cause a short circuit.
- Avoid placing the device on any surfaces that may be subject to vibrations or shocks.
- To protect the device during a thunderstorm, unplug the ac power adaptor.
- When the device is not in use for long periods, unplug the ac power adaptor for safety reasons.
- To clean the device, use a soft dry cloth. Do not use solvents or petrol based fluids. To remove severe stains, you may use a damp cloth with dilute detergent.
- The supplier is not responsible for damage or lost data caused by malfunction, misuse, modification of the device or battery replacement.
- Do not interrupt the connection when the device is formatting or transferring files. Otherwise, data may be corrupted or lost.
- The usb memory stick should be plugged into the unit directly. Don't use an usb extension cable because it can cause interference resulting in failing of data.
- The apparatus shall not be exposed to dripping or splashing and make sure that no objects filled with liquids, such as vases, are placed on or near the apparatus.
- To completely disconnect the power input, the mains plug of the apparatus shall be disconnected from the mains, as the disconnect device is the mains plug of apparatus.
- The mains plug of the apparatus should not be obstructed or should be easily accessed during intended use.
- Battery shall not be exposed to excessive heat such as sunshine, fire or the like.
- Minimum distance of 10cm around the apparatus is needed for sufficient ventilations.
- The ventilation should not be impeded by covering the ventilation openings with items such as newspapers, table-cloths, curtains etc.
- No naked flame sources such as lighted candles should be placed on the apparatus.
Safty Information
- Attention should be drawn to the environmental aspects of battery disposal.
- The apparatus can only be used in moderate extremely cold or climates warm environments should be avoided.
- The rating label has been marked on the bottom panel of the apparatus.
- This device is not intended for use by people (including children) with physical, sensory or mental disabilities, or a lack of experience and knowledge, unless they're under supervision or have received instructions about the correct use of the device by the person who is responsible for their safety.
- This product is intended for household use only and not for commercial or industrial use.
- Make sure the unit is adjusted to a stable position. Damage caused by using this product in an unstable position or by failure to follow any other warning or precaution contained within this user manual will not be covered by warranty.
- Never remove the casing of this apparatus.
- Never place this apparatus on other electrical equipment.
- Do not use or store this product in a place where it is subject to direct sunlight, heat, excessive dust or vibration.
- Do not clean this product with water or other liquids.
- Do not block or cover the slots and holes in the product.
- Do not push foreign objects into the slots or holes in the product.
- Do not allow child ren access to plastic bags.
- Please check that the voltage on the type plate of your appliance corresponds with your house electricity supply (type plate is located on the back of the unit).
- Protect the power cord from being walked on or pinched, particularly at plugs, convenience receptacles, and the point where they exit from the apparatus.
- Only use attachments/accessories specified by the manufacturer.
- Refer all servicing to qualified service personnel. Servicing is required when the apparatus has been damaged in any way, such as the power supply cord or the plug, when liquid has been spilled or objects have fallen into the apparatus, when the apparatus has been exposed to rain or moisture, does not operate normally, or has been dropped.
- Do not use a damaged power cord or plug or a loose outlet. Doing so may result in fire or electric shock.
Warning: prolonged exposure to loud sounds from personal music players may lead to temporary or permanent hearing loss.
INSTALLATION
Unpack all parts and remove protective material.
- Do not connect the unit to the mains before checking the mains voltage and before all other connections have been made.
- Do not cover any vents and make sure that there is a space of several centimeters around the unit for ventilation.
Climate Warning:
This device has been designed for the safe use in moderate climate only. Operation in tropical climate may result in electric shock and fire.
| Icon | Description |
| ~ | Power supply: AC only |
| □ | Class II symbol |
| 100-240 V ~ | Rated supply voltage |
Product Introduction
Product Introduction
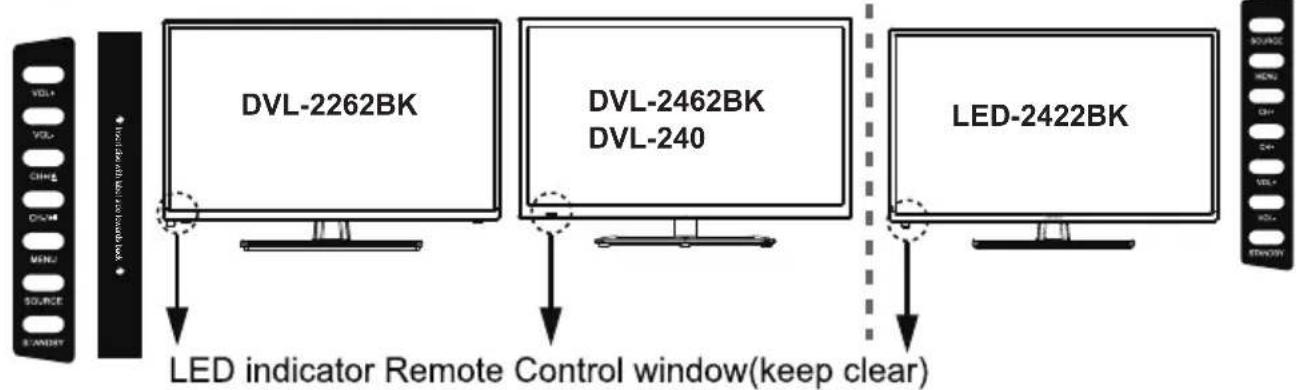
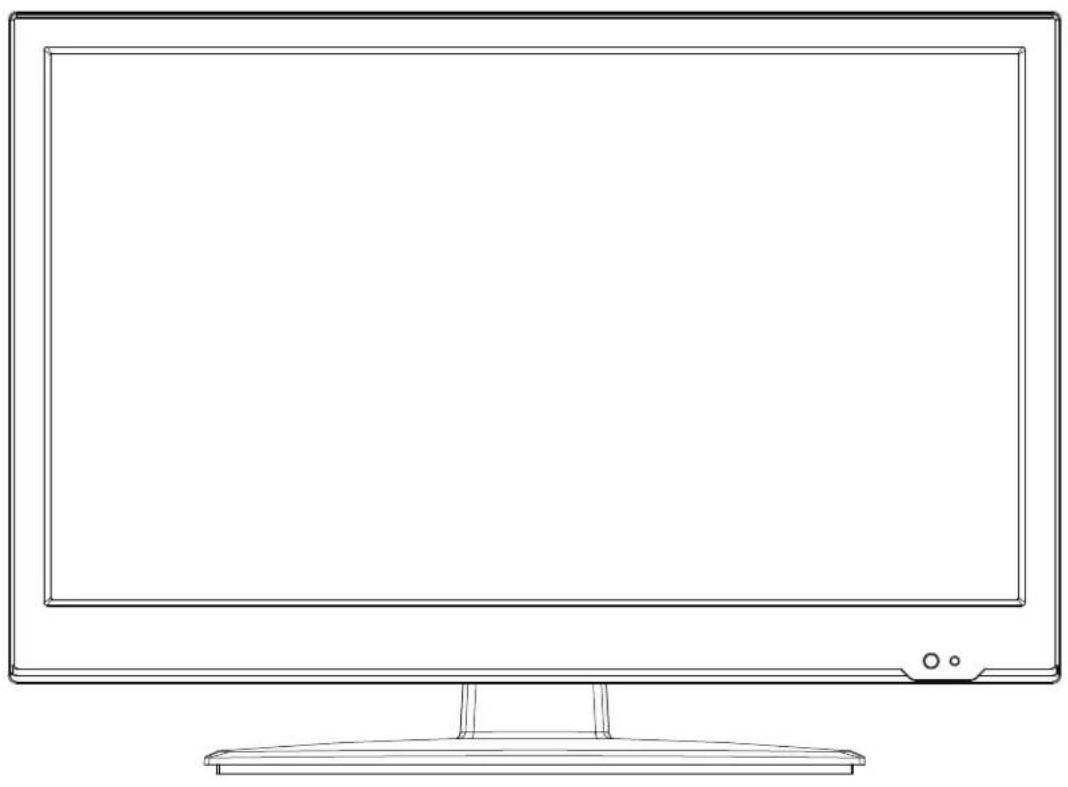
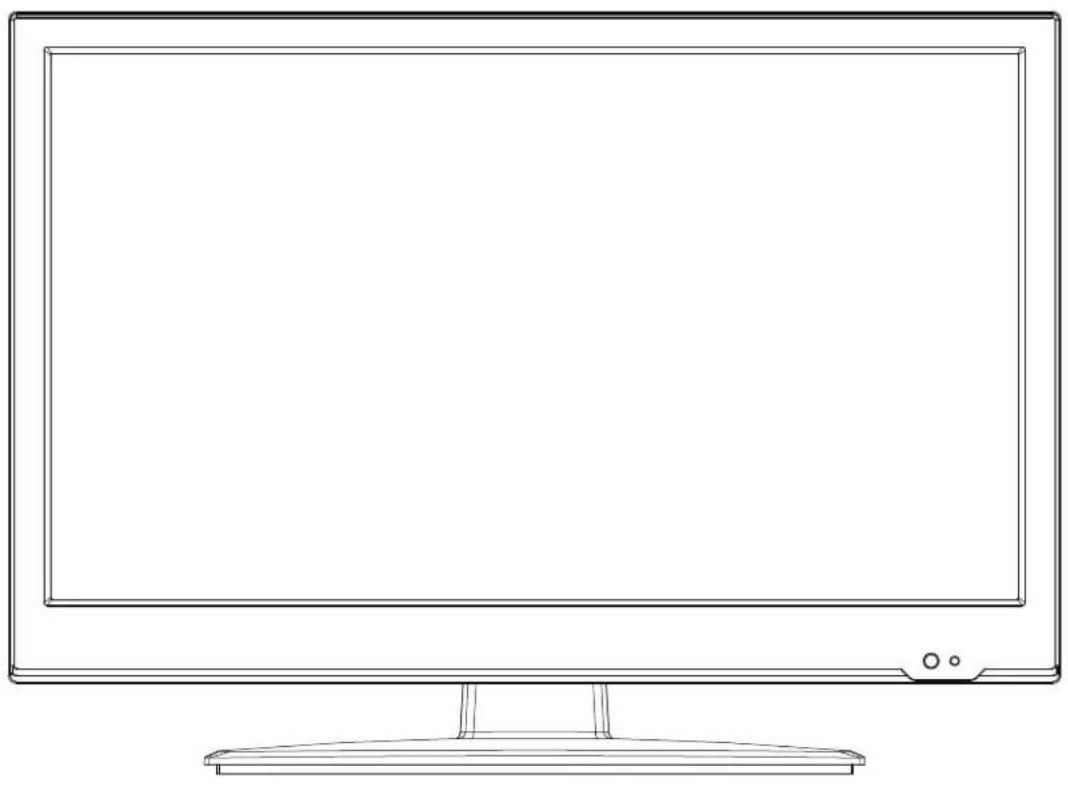
Front View
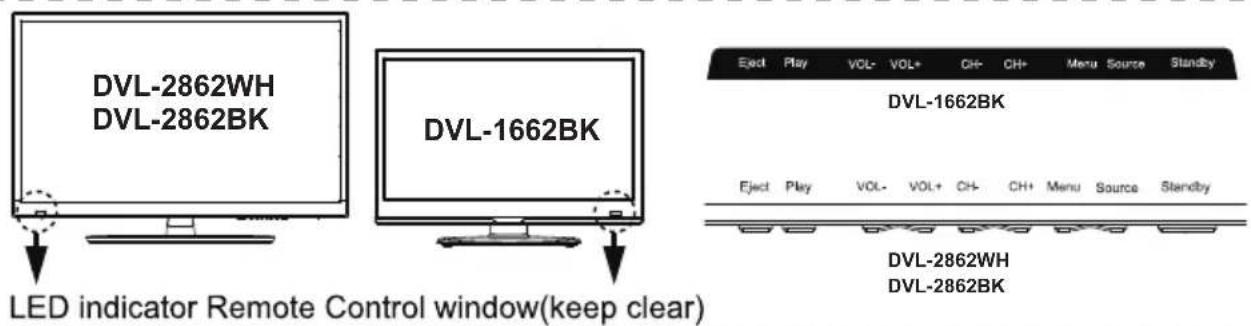
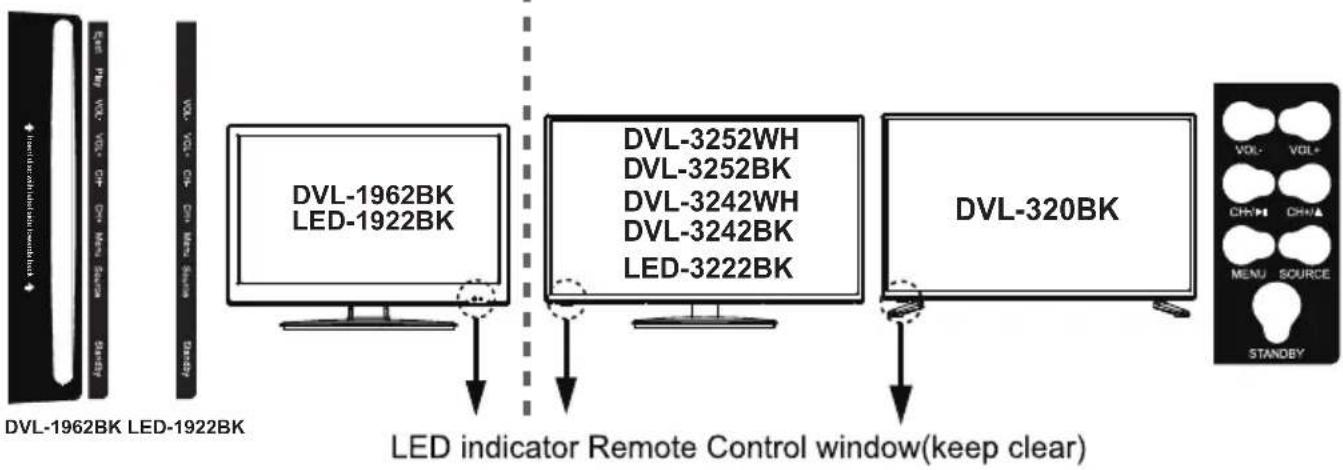

Product Introduction
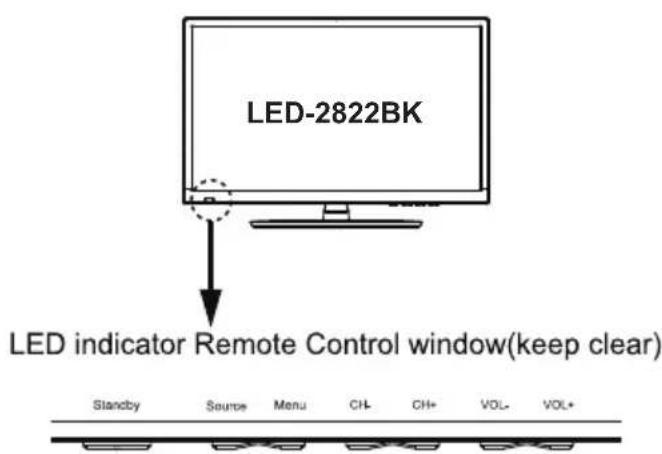
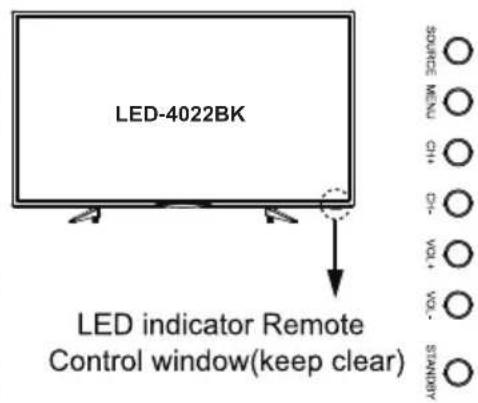
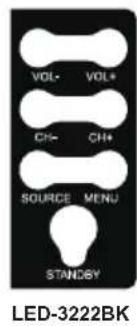
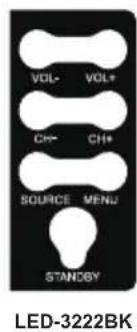
The functions of the TV buttons are described below.
EJECT: Eject the disc.
PLAY:Play/pause the disc playing.
VOL+/VOL-: Press to adjust the volume.
They are also can be used to move left/right in the OSD menu screen.
VOL+ button can be used to skip forward to next menu.
CH + / CH - Press to scan through channels.
They are also can be used to move down/up in the OSD menu screen.
MENU:Press to display the OSD menu, Press again to exit the menu.
INPUT: Press to select the source.
POWER: Turn on from standby-mode / turn off to standby-mode.
Connections
DVL-2262BK
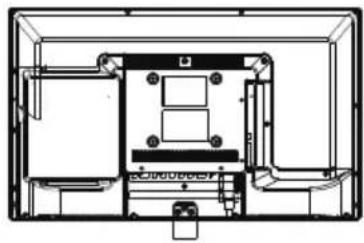
DVL-2462BK, DVL-240 DVL-2862WH, DVL-2862BK
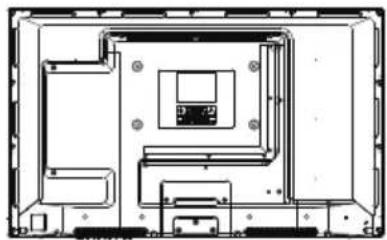
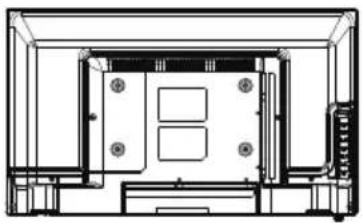
LED-2422BK DVL-1962BK LED-1922BK
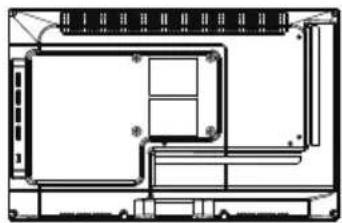
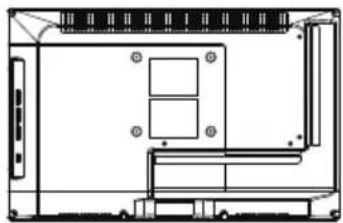
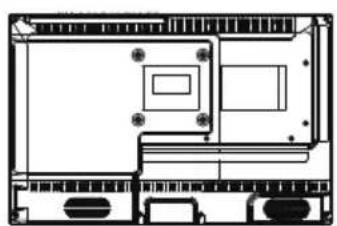
DVL-1662BK
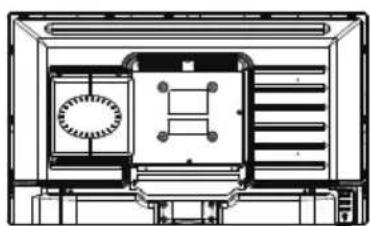
DVL-3252BK,DVL-3252WH DVL-3242BK,DVL-3242WH DVL-320BK
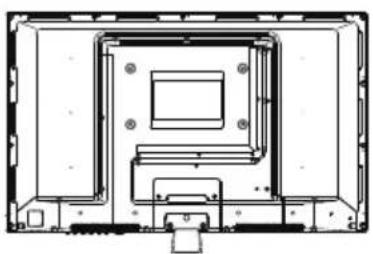
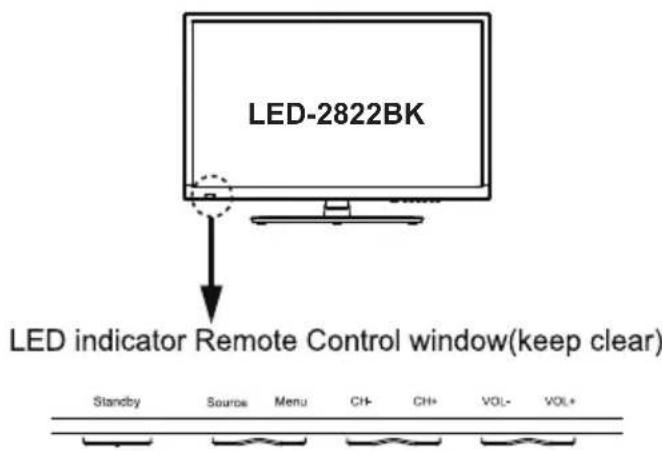
LED-2822BK
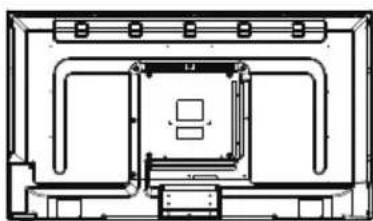
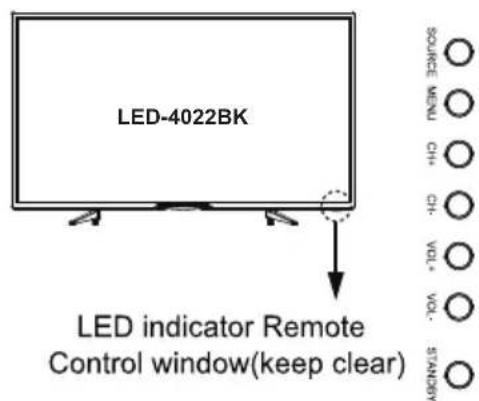
LED-4022BK
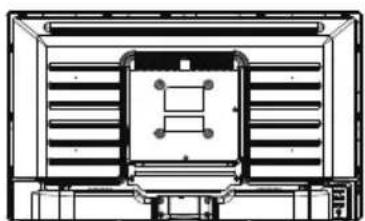
LED-3222BK
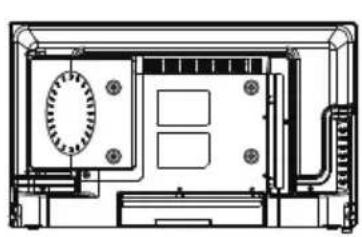
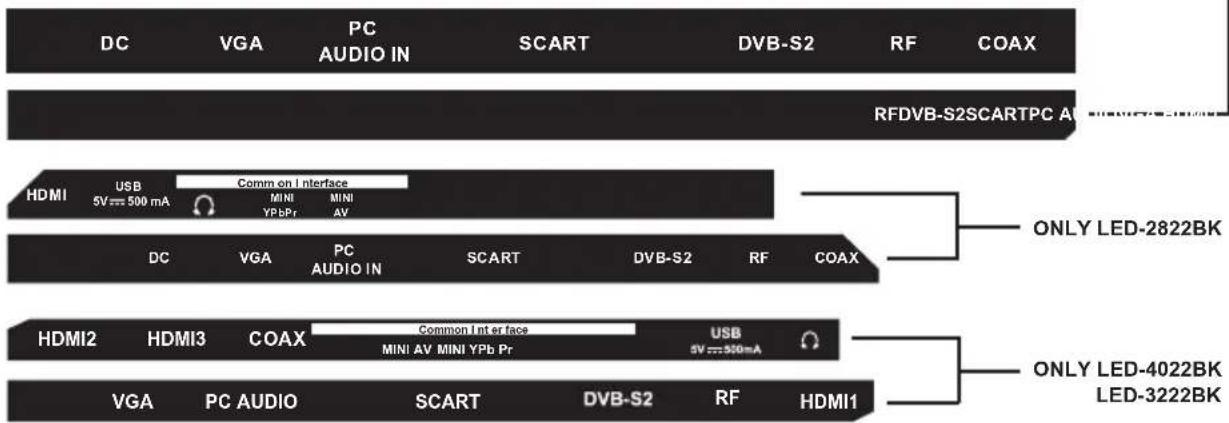
DC: Connect to the mains adaptor or DC 12V Car adaptor.
Connect it to your headphone or other audio equipment.
VGA: For PC display. Connect it to the D-Sub 15 pins analog output connector of the PC.
SCART: Connect them to the SCART video output terminal of DVD or other equipment.
PC-IN: Connect it to the audio output terminal of PC.
DVB-S2: Connect a Satellite signal.
RF: To connect to the aerial socket on the wall with the RF coaxial cable.
COAX: Digital audio output to AV receiver.
HDMI: Connect it to the HDMI of DVD or other equipment.
USB: Connect to USB device for multimedia
MINI AV: Connect it to the audio & video output terminal of DVD or other equipment with the Converter cable. (Audio terminals are shared with YPbPr)
MINI YPbPr: Connect it to the YPbPr video output terminal of DVD or other equipment with the Converter cable.
Common Interface: Cl+ slot.
Remote Control
The remote control is using Infra-Red(IR). Point it towards the front of the LED TV. The remote control may not work correctly if it is operated out of range or out of angle.
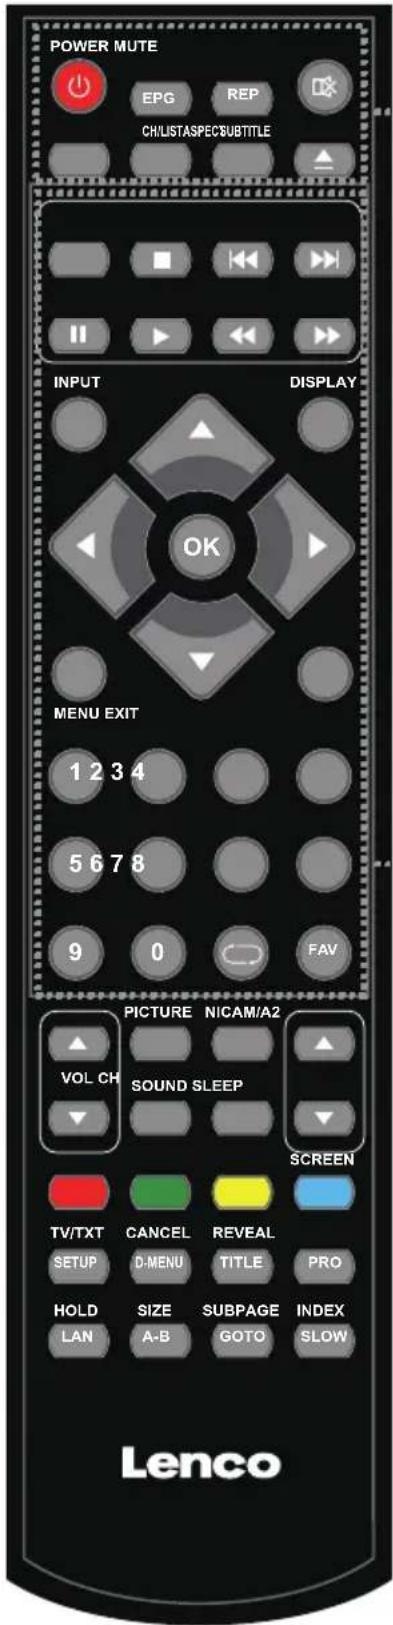
POWER: Turn the TV on/standby.
MUTE: Press to mute the sound, press again or press VOL+ to unmute.
ASPECT: Adjust picture size
CH/LIST: Display the programs list.
SUBTITLE: Turn on/off the subtitle display in DTV mode and DVD mode. Electronic television and radio program guide (broad- caster- specific).
REP: Repeat playing the title or chapter.
: Load/eject DVD disc.
:Stop program.
: Previous chapter.
▶ Next chapter.
II:Pause program.
:Play program.
:Fast reverse.
Fast forward.
INPUT: Press to display the input source menu.
DISPLAY: Press to display the current mode's information.
MENU: System setup menu.
EXIT: Exit the OSD menu.
FAV: Display the favorite program list.
NUMBER BUTTONS
Press0-9 to select a TV channel directly when you are watching TV.

Return to the previous channel viewed.
CURSOR KEYS(▲▼/▲/▶/OK)
Allows you to navigate the on-screen menus and adjust the system settings to your preference.
Remote Control
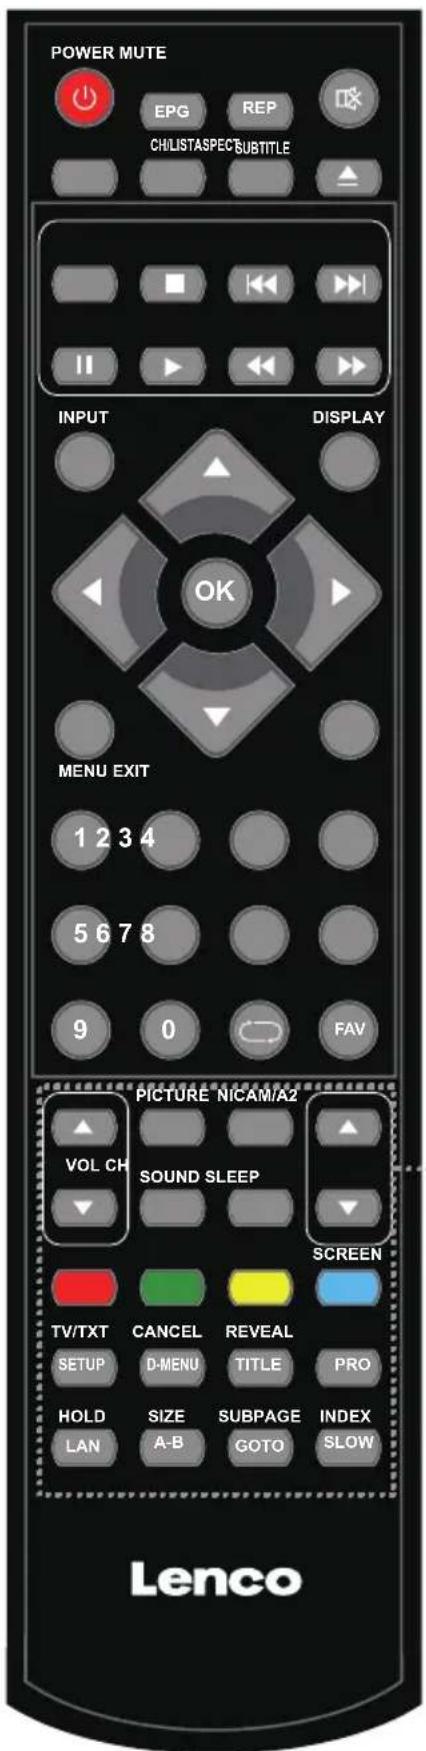
CH: Scan through stored channels.
VOL▲/▼: Adjust the volume.
PICTURE: Select the picture mode.
NICAM/A2: TV Nicam/A2 select.
SOUND: Select the sound mode.
SLEEP: Standby timer.
SCREEN: Turn on/off the screen display on USB music mode.
TV/TXT: Turn off/on the Teletext display.
CANCEL: Cancel the Teletext display.
REVEAL: Reveal any hidden text.
HOLD: Hold or carry on the current subpage.
SIZE: Press to see top half of page double size,
Press again to see the bottom
half of page double size. Press again for normal size.
SUBPAGE: Press to enter subpages, pressagain to cancel.
INDEX: Go to index.
Colour buttons:Short cuts-follow the coloured links in the text
NOTE: Below apply to DVL-1662BK, DVL-1962BK,
DVL-2262BK, DVL-2462BK, DVL-2862WH,
DVL-2862BK, DVL-3252WH, DVL-3252BK, DVL-240
DVL-3242WH, DVL-3242BK
SETUP: DVD system setup.
D-MENU: DVD play list/Disc menu.
TITLE: DVD title.
PRO: Edit the program and play.
LAN: Select DVD disc language.
A-B: Select and play the preferable paragraph of DVD program by pressing this key twice at the beginning and end of it.
GOTO: Play your favorite title/chapter/track.
SLOW: Play DVD programs at slow speed.
Common Interface Slot
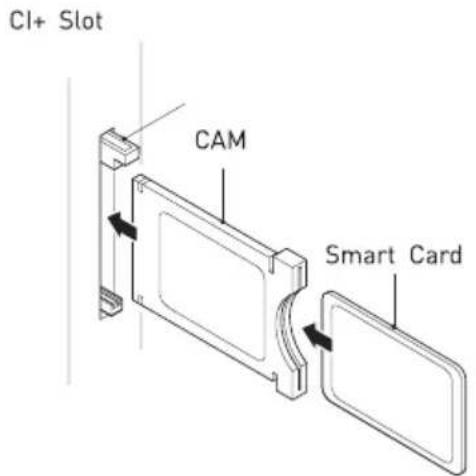
USING YOUR COMMON INTERFACE SLOT
This TV set features a CI+ slot and supports the following digital standards: DVB-T, DVB-T2 HD, DVB-S(S2) and DVB-C.
Common Interface
The Common Interface [Cl+] slot is designed to accept the Conditional Access Module (CAM) and Smart Card in order to view the pay TV programmes and additional services. Contact your Pay Per View TV service provider to get more information about the modules and subscriptions.
NOTE: Conditional Access Module and Smart Cards are sold separately.
WARNING! SWITCH OFF YOUR TV BEFORE ANY MODULE IS INSERTED INTO THE COMMON INTERFACE SLOT, THEN ADD THE SMART CARD TO THE CAM.
- Turn on the TV and ensure 'DTV' Source is selected.
- If the CAM is detected the TV will display the following message on the screen. "Common Interface Module inserted" wait for a few moments until the card is activated.
- Select the relevant digital Pay Per View channel.
- Detailed information on the Smart Card in use is displayed
- Press the Ok button to access the card menu. Refer to the Module Instruction Manual for setting details.
- When the module is removed, the following message will appear on the screen. "Common Interface module removed".
SELECT INPUT SOURCE
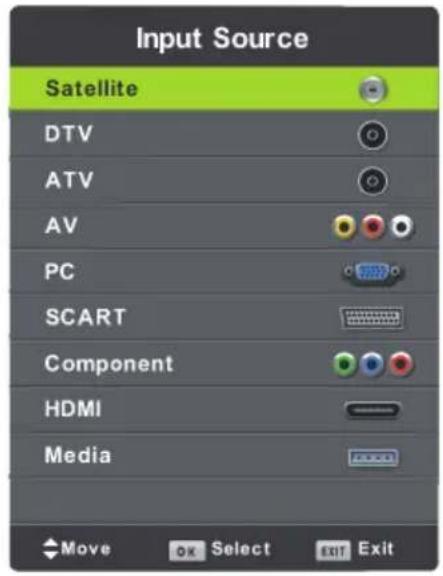
(The model without DVD)
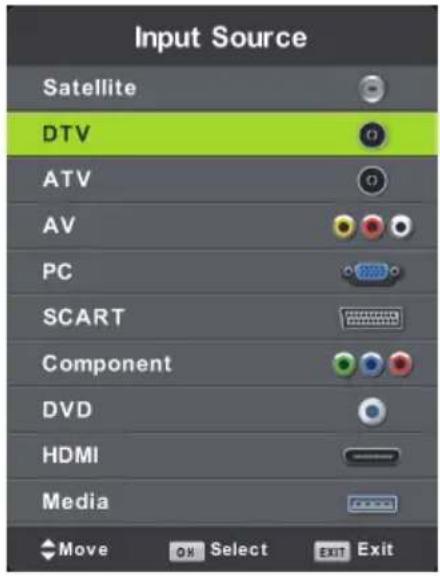
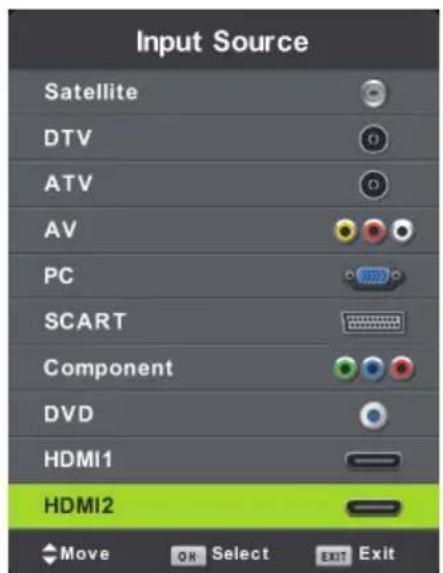
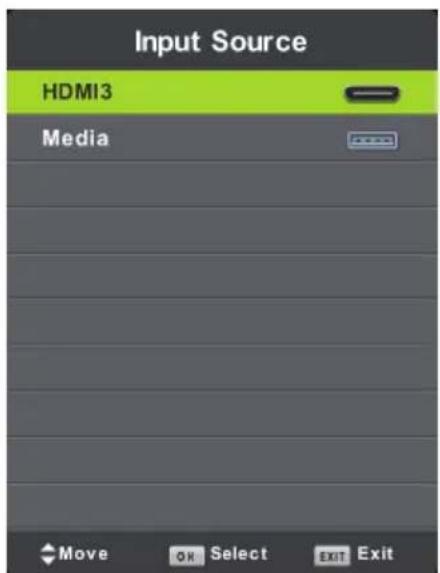
K,DVL-320BKB2423-LVD,HV
Press INPUT button to display the input source list,
Press / or OK button to select the input source you want to,
Press OK button to enter the input source,
Press EXIT button to quit.
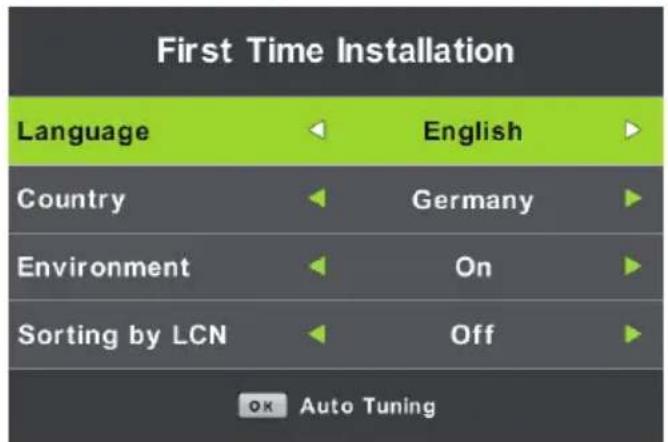
First Time Installation
Connect an RF cable from the Tv's input called "RF-In" and to your TV Aerial socket.
- Press the menu button
- Press button, enter "SETUP" page, choose First Time Installation by pressing button.
Select Language
Press button to select the language to be used for menus and message.
Select Country
Press / button to highlight country menu.
Press button to select the country you want to.
Press OK for Auto Tuning.
Tune Type :Select Tune Type as DTV+ATV or DTV, you can choose Air(DVB-T), Cable(DVB-C), in "Digital Type".
Air(DVB-T) Auto Tune:
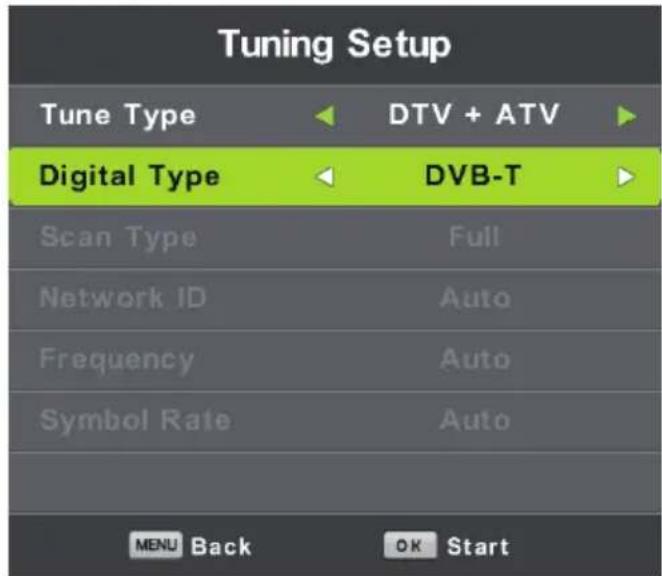
Select DTV+ATV in "Tune Type", and DVB-T in Digital Type, then press OK to start tuning.
Cable (DVB-C) Auto Tune:
| Tuning Setup | |
| Tune Type | DTV + ATV |
| Digital Type | DVB-C |
| Scan Type | Full |
| Network ID | Auto |
| Frequency | Auto |
| Symbol Rate | Auto |
| MENU Back | OK Start |
Select DVB-C in "Digital Type":
There are 2 options for DVB-C "Scan Type":
- Full: Select "FULL" in "Scan Type" and choose "OK" to start Auto Search for the channels.
- Network Scan: Select "Network Scan" in "Scan Type" Input the number of the Network ID of the channel and choose the frequency and press "OK" button to find specific TV channel. (Please notice you need to know the Network ID + Frequency+Symbol Rate from your TV provider).
Satellite(Auto Tune):
| Tuning Setup | |
| Country Germany | |
| Satellite | 01 ASTRA 1... |
| Scan Mode Network | |
| Channel Type | Free+Scramble |
| Service Type | DTV |
| ENTER Start | MENU Back |
Select "Satellite" in "Digital Type":
Operations in Satellite Auto Tune menu are show in the following table:
| Option | Value |
| Satellite | Select your satellite |
| Scan Mode | Network does autom. scan all channels from this satellite |
| Service Type | DTV stores TV-channels only |
This TV stores max. 2000 satellite-channels (DTV + Radio + Data). If you tune 2 satellites, tune one first, then delete unwanted channels. When done, start tuning the second satellite. Otherwise, tuning will not store all channels from the second satellite, because limit is 2000 channels for satellite-tuner.
Download full manual on L enco.com/
Main Menu Operation
Channel Menu
Press MENU button to display the main menu. Press button to select CHANNEL in the main menu.
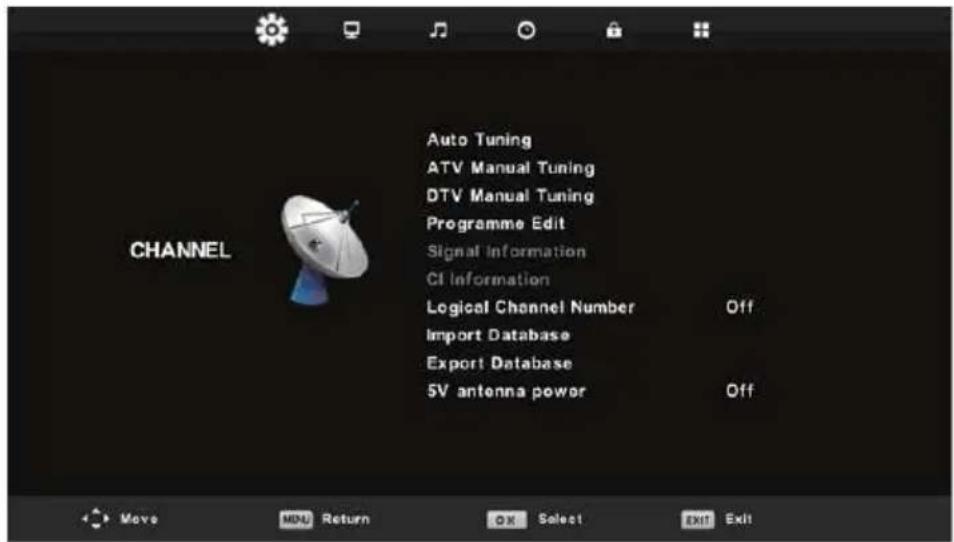
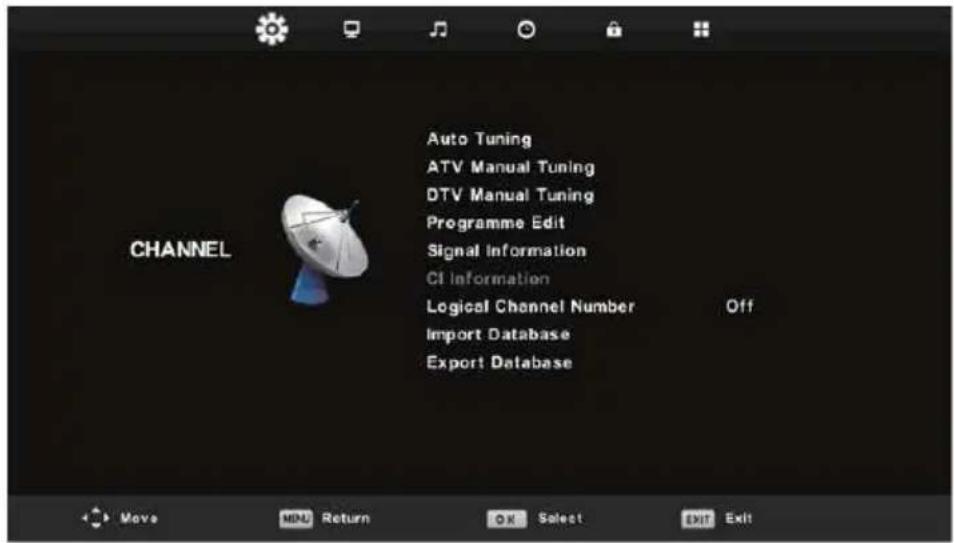
(Apply to DVL-3252WH, DVL-3252BK)
- Press / button to select the option that you want to adjust in the CHANNEL menu.
- Press OK button to select.
- After finishing your adjustment, Press OK button to save and return to the previous menu.
Auto Tuning
Refer to P.13 and P.14.
ATV Manual Tuning
Press MENU, then choose ATV Manual Tuning.
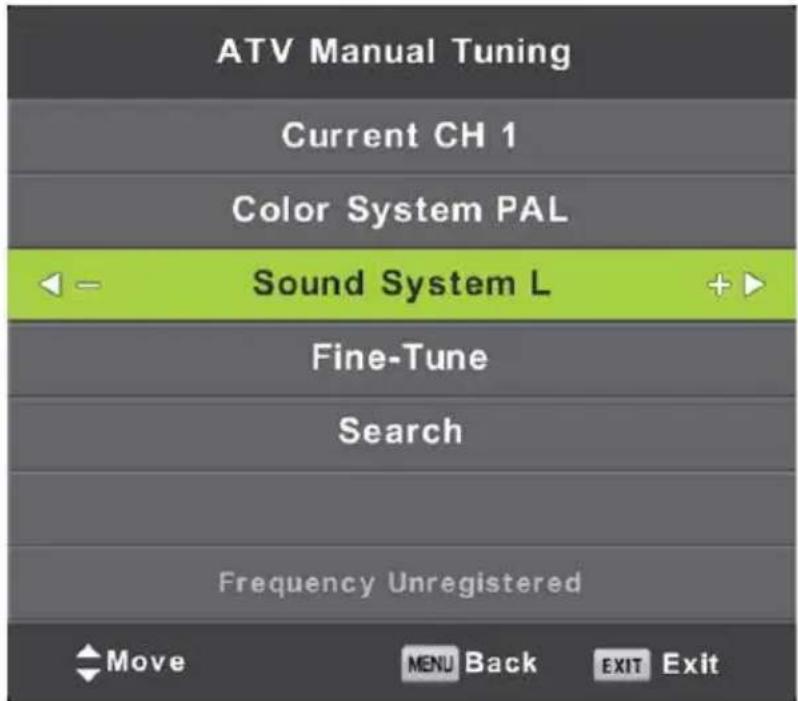
Current CH
Set the channel number.
Color System
Select the color system
(Available System: AUTO, PAL, SECAM)
Sound System
Select the Sound system
Fine-Tune
Adjust the frequency of the channel finely.
Search
Start searching channel by presing button.
Once a channel is found, it will automatically stored.
Repeat the step by changing the channel number.
DTV Manual Tuning
DVB-T Manual Tuning:
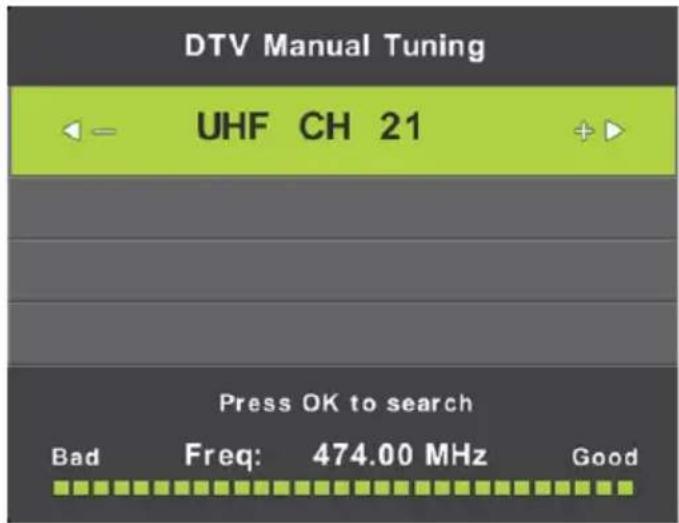
Enter the DTV Manual Tuning. Press / button to adjust the channel and press OK button to manual tune.
DVB-C Manual Tuning:
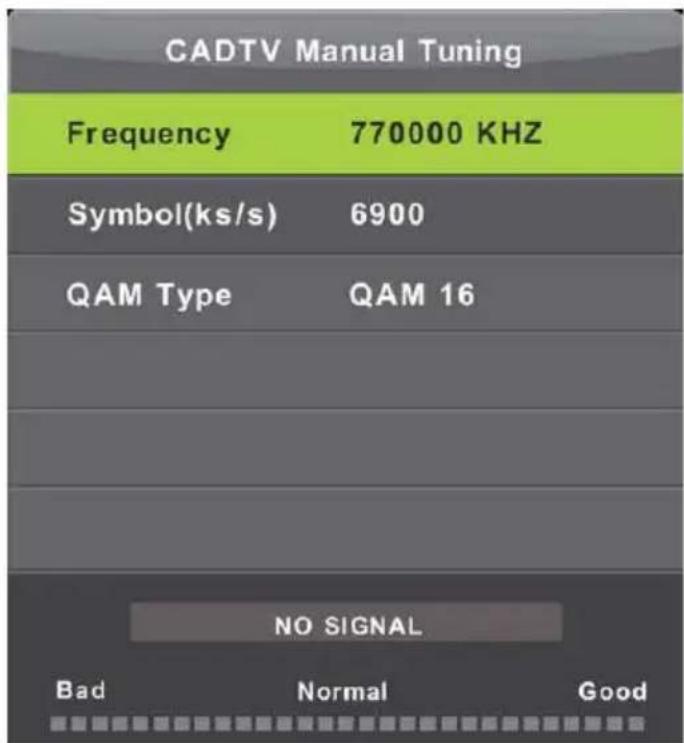
Enter the CADTV Manual Tuning. Press / button to select the item and press / button to adjust the "Frequency", "Symbol", "QAM Type" and press OK button to manual tune.
Program Edit
Press / button to select Program Edit, then press OK button to enter sub-menu.
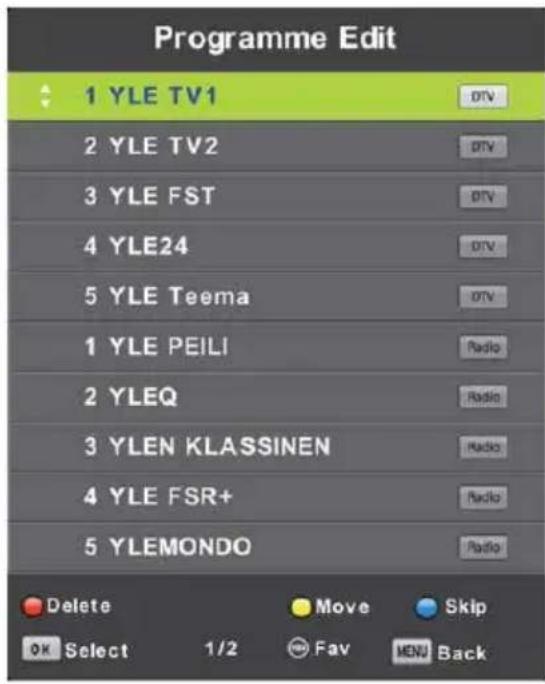

The three colored key is the shortcut key for programming the channel. First press / to highlight the channel you want to select, then:
Press the Red button to delete the program in the list.
Press the Yellow button to move the channel in favorite list.
Press the Blue button to skip the selected channel.
Press Fav button to add or remove the channel to/from your favorite list. (Your TV set will skip the channel automatically when using CH + / - to view the channels.)
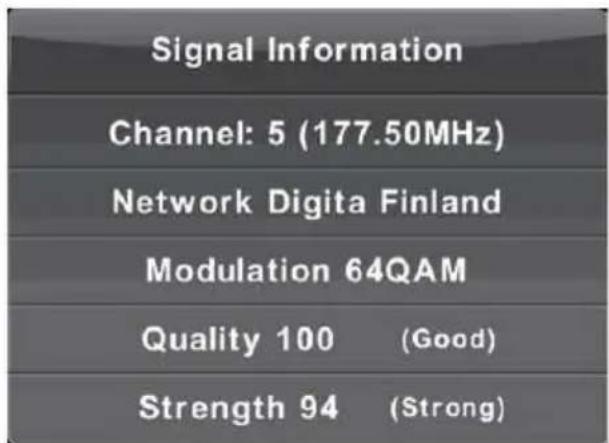
Signal Information
Press / button to select Signal Information, press the OK button to see the detail information about the signal. Only available when there is signal in DTV.
Picture Menu
Press MENU button to display the main menu. Press / button to select PICTURE in the main menu.
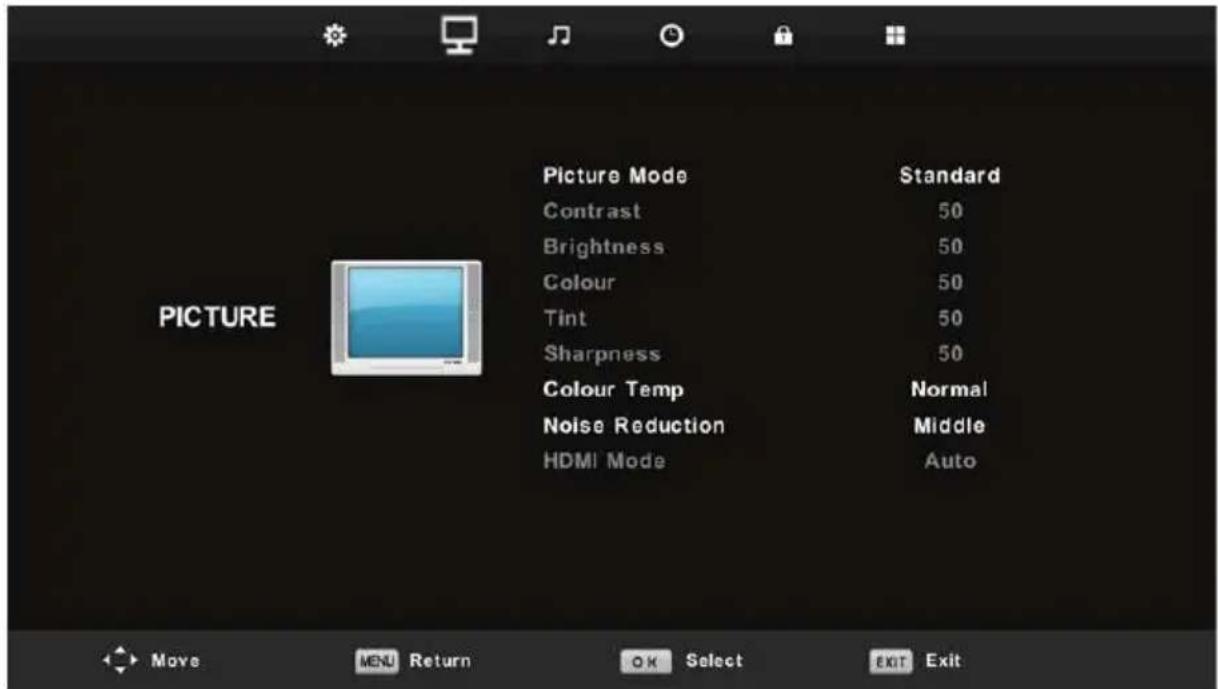
- Press / button to select the option that you want to adjust in the PICTURE menu.
- Press OK button to adjust.
- After finishing your adjustment, Press MENU button to save and return back to the previous menu.
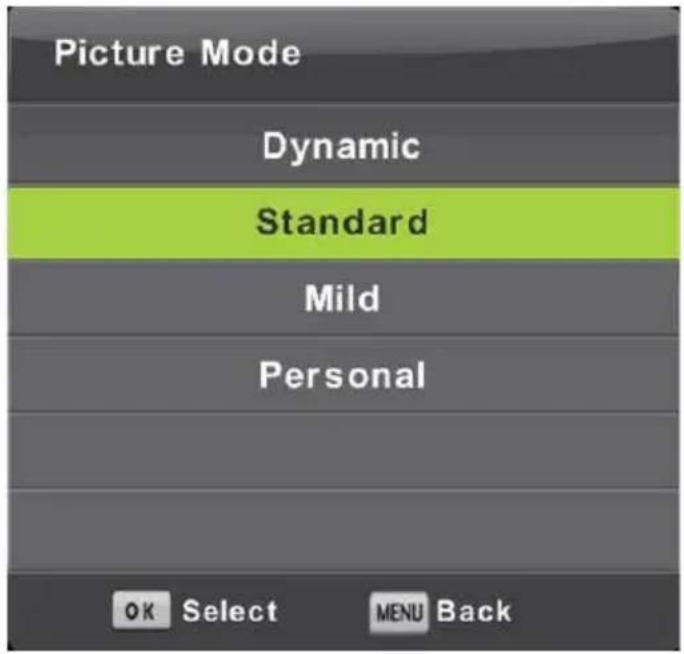
Picture Mode
Press / button to select Picture Mode, then press OK button to enter sub-menu. You can change the value of contrast, brightness, color, sharpness and tint when the picture is in Personal mode.
TIPS: You can press PMODE button to change the Picture Mode directly.
Contrast/Brightness/Color/Tint/Sharpness
Press / button to select option, then press / button to adjust.
Contrast Adjust the contrast intensity of the picture, but the shadow of the picture is invariable.
Brightness Adjust the brightness output of the entire picture.
Color Adjust the saturation of the color.
Tint Adjust the compensating color change.
Sharpness Adjust the sharpness in the detail of the picture.
Color Temp
Change the overall colorcast of the picture.
Press / button to select Color Temperature, then press OK button to enter sub-menu.
Press / button to select. (Available color temperatures: Cool, Medium, Warm).
You can change the value of red, green and blue when the color temperature is in User mode.
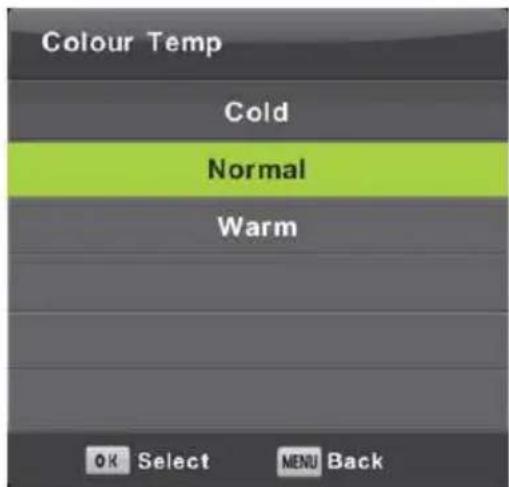
Cold Increase the blue tone for the white.
Normal Increase the Six-linked colors for the white.
Warm Increase the red color for the white.
Noise Reduction
To filter out and reduces the image noise and improve picture quality. Press / button to select Noise Reduction, then press OK button to enter sub-menu.
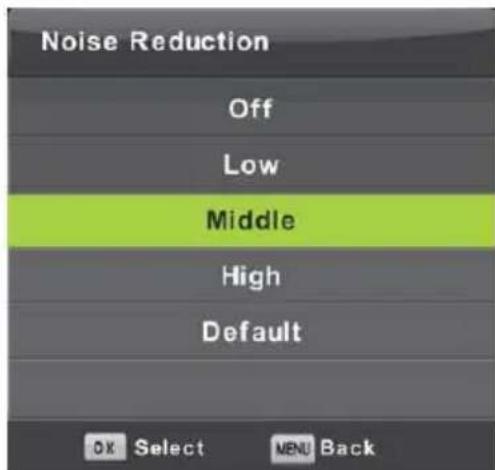
Off Select to turn off video noise detection.
Low Detect and reduce low video noise.
Middle Detect and reduce moderate video noise.
High Detect and reduce enhanced video noise.
Default Set as Default.
Sound Menu
Press MENU button to display the main menu.
Press button to select SOUND in the main menu.
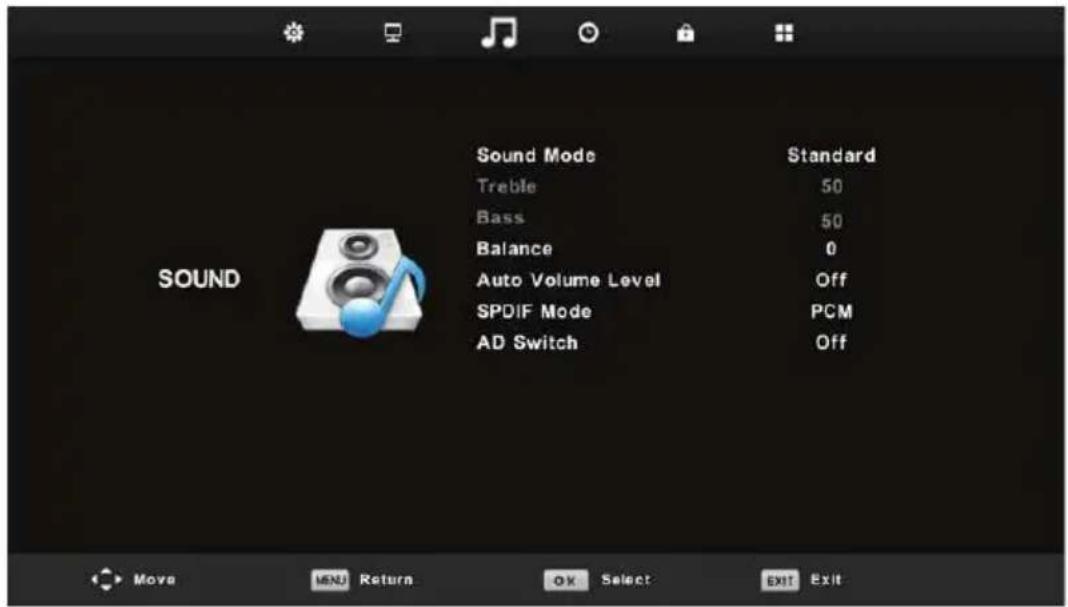
- Press / button to select the option that you want to adjust in the SOUND menu.
- Press OK button to adjust.
- After finishing your adjustment, Press OK button to save and return to the previous menu.
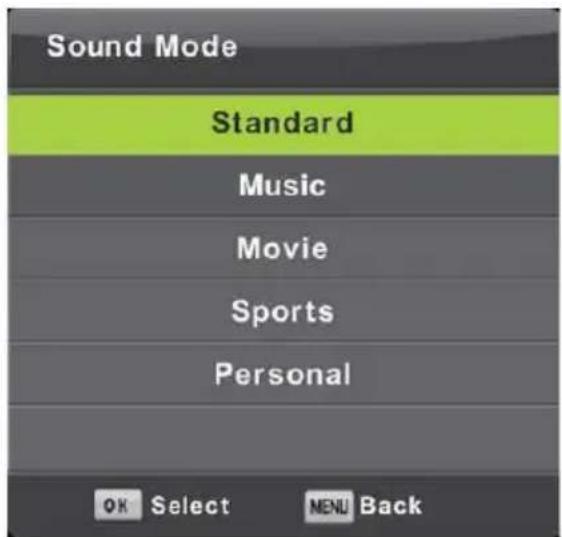
Sound Mode
Press / button to select Sound Mode, then press OK button to enter sub-menu. Press / button to select.
You can change the value of Treble and Bass when the sound is in Personal mode.
TIPS: You can press the Sound button on the remote control to change the Sound Mode directly.
Default Produces a balanced sound in all environments.
Music Preserves the original sound. Good for musical programs.
Movie Enhances treble and bass for a rich sound experience.
Sports Enhances vocals for sports.
Personal (user- Select to customize sound settings.
defined)
Note: The treble and bass are only available in User mode, you can adjust them as you like.
Balance
Press / button to select option, then press / button to adjust.
Auto Volume level
Press / button to select Auto Volume Level, then press / button to select On or Off.
SPDIF Mode
Press / button to select SPDIF Mode, then press / button to select Off/PCM/Auto.
AD Switch
Press / button to select AD Switch, then press / button to select On or Off.
Amblyopia function for the blind, the tracks will be mixed describe the current screen.
It need code stream to support.
NOTE:
Balance: This item can adjust the speaker's output, it enables you to listen to best at your position.
Auto Volume: This item is used for reducing the difference between channel and program's volume automatically.
Time Menu
Press MENU button to display the main menu. Press / button to select TIME in the main menu.
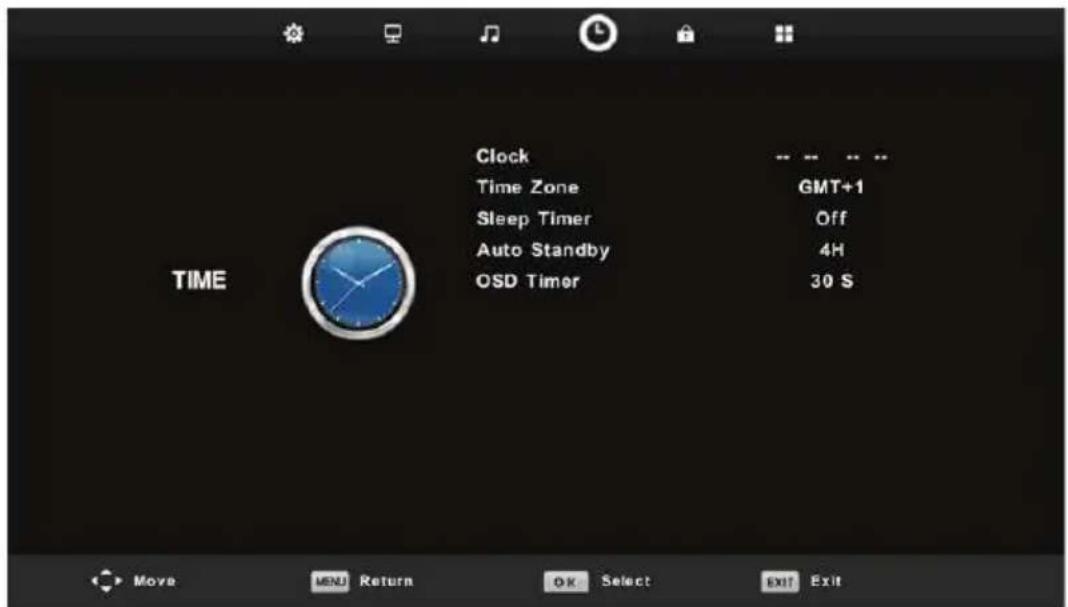
- Press / button to select the option that you want to adjust in the TIME menu.
- Press OK button to adjust.
- After finishing your adjustment, Press OK button to save and return to the previous menu.
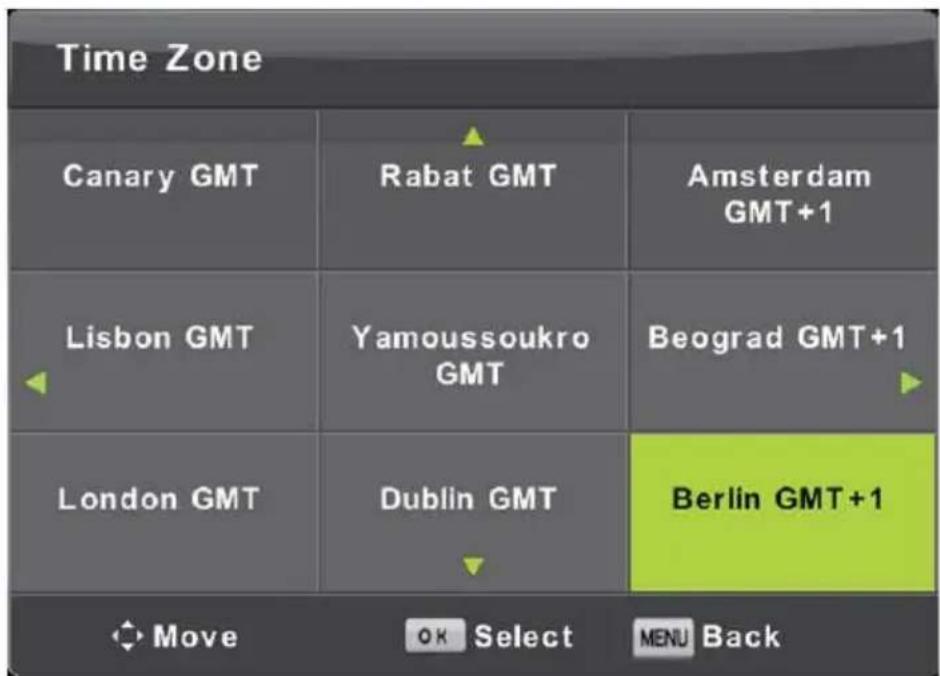
Time Zone
Press / / button to select time zone, then press "OK" button to confirm selection and enter the sub-menu.
Sleep Timer
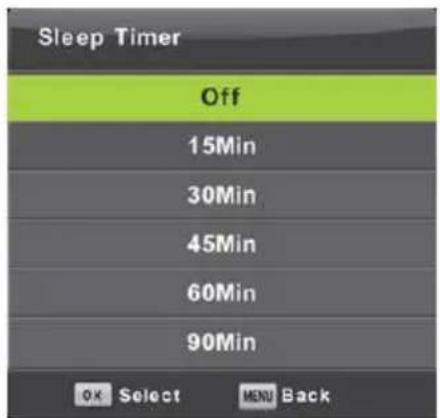
Press / button to select Sleep Timer, then press "OK" button to confirm selection and enter the sub-menu.
Tips: If the remote control is uesd during the standby time, it will restart again from zero.
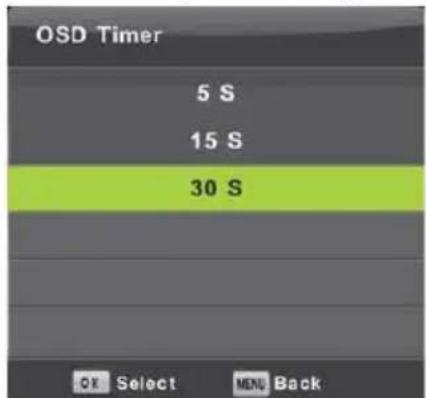
OSD Timer
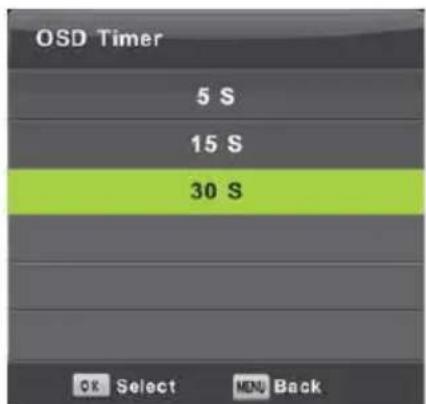
Press / button to select OSD Timer, then press "OK" button to confirm selection and enter the sub-menu.
Lock Menu
Press MENU button to display the main menu. Press / button to select Lock in the main menu.
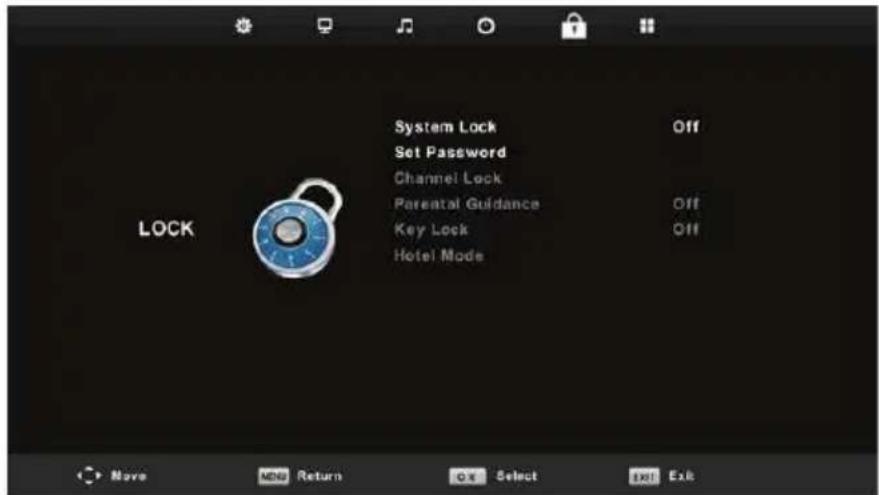
- Press / button to select the option that you want to adjust in the LOCK SYSTEM menu.
- Press OK/▲/▶ button to adjust.
- After finishing your adjustment, Press MENU button to return back to the previous menu.
Lock System
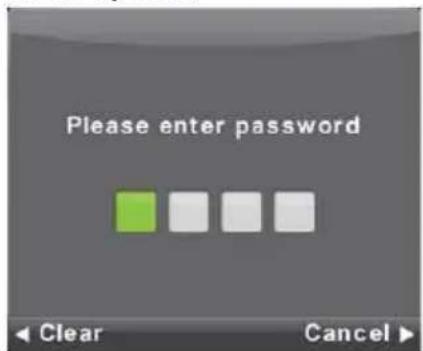
Press / button to select Lock System, then press OK button to make the following 3 options valid.
Default password is 0000
Set Password
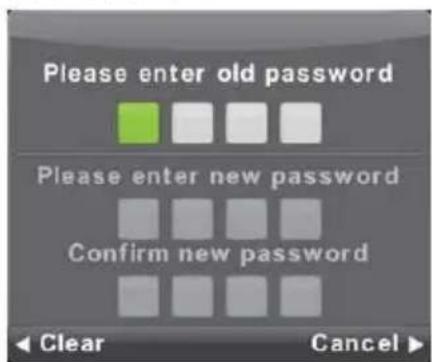
Press / button to select Set Password, then press OK button to enter sub-menu to set new password.
Channel Lock
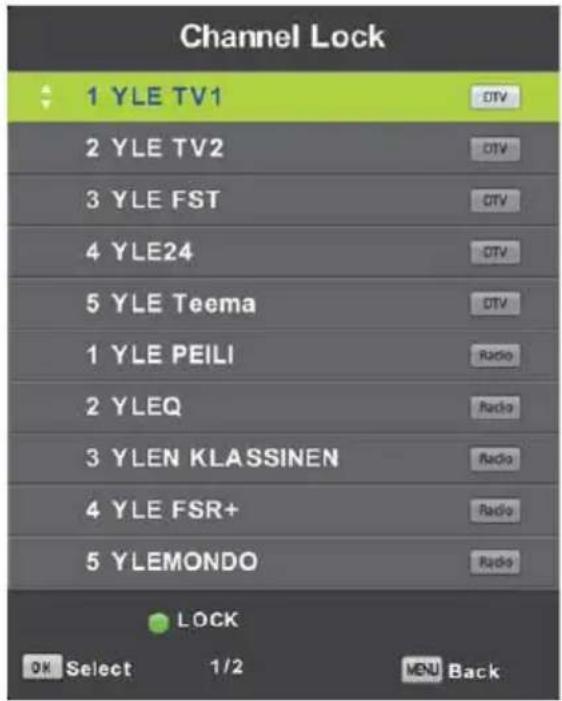
Press / button to select Channel Lock then press OK button to enter sub-menu to select.
Press Green button to lock or unlock the channel.
Parental Guidance
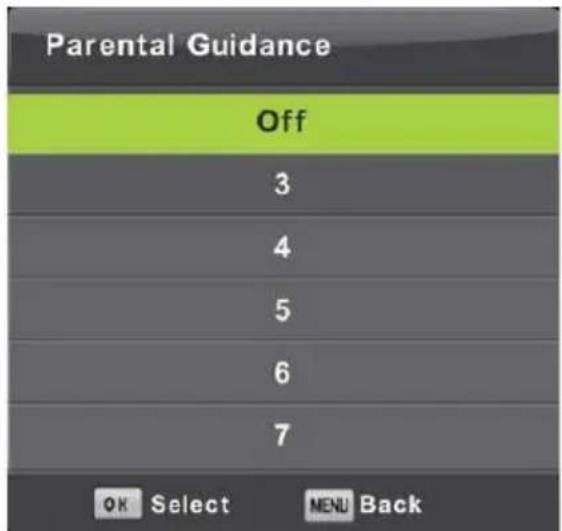
Press / button to select Parental Guidance, then press OK button to enter sub-menu to select the number of age which is suitable for your children.
Key Lock
Press / button to select Key Lock, then press button to select Off or On. When Key Lock's statue is on, you can't use the Key panel button.
Hotel Mode
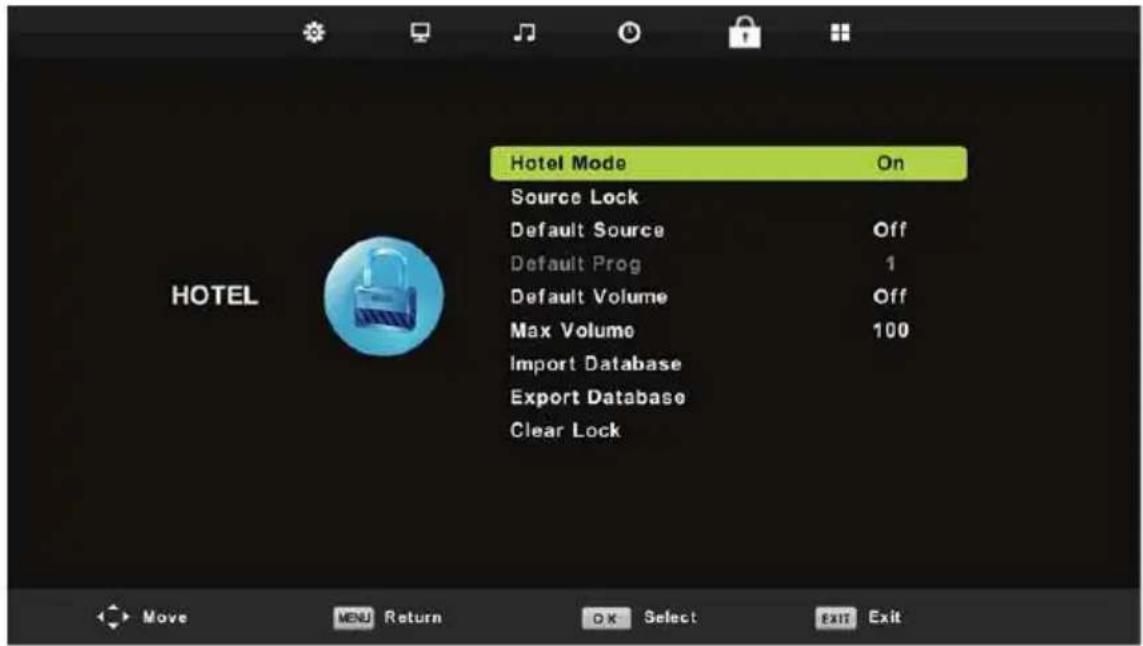
- Press / button on the remote control to select hotel mode in the Lock menu.
- Press OK button on the remote control to enter the sub-menu.
- After finishing your adjustment, Press MENU button to save and return back to the previous menu.
Hotel Mode
Press / button to select Hotel Mode, then press / button to select on or off.
Source Lock
Press / button to select Source Locke, then press OK button to enter sub-menu to select.
Default Source
Press / button to select Default Source, then press OK button to enter sub-menu to select.
Default Prog
Press / button to select Default Prog, then press / button to adjust.
It is available when the default source is TV.
Max Volume
Press / button to select Max Volume, then press / button to adjust.
Clear Lock
Press / button to select Clear Lock, then press OK button to clear the setting you have done before.
Setup Menu
Press MENU button to display the main menu.
Press / button to select SETUP in the main menu.
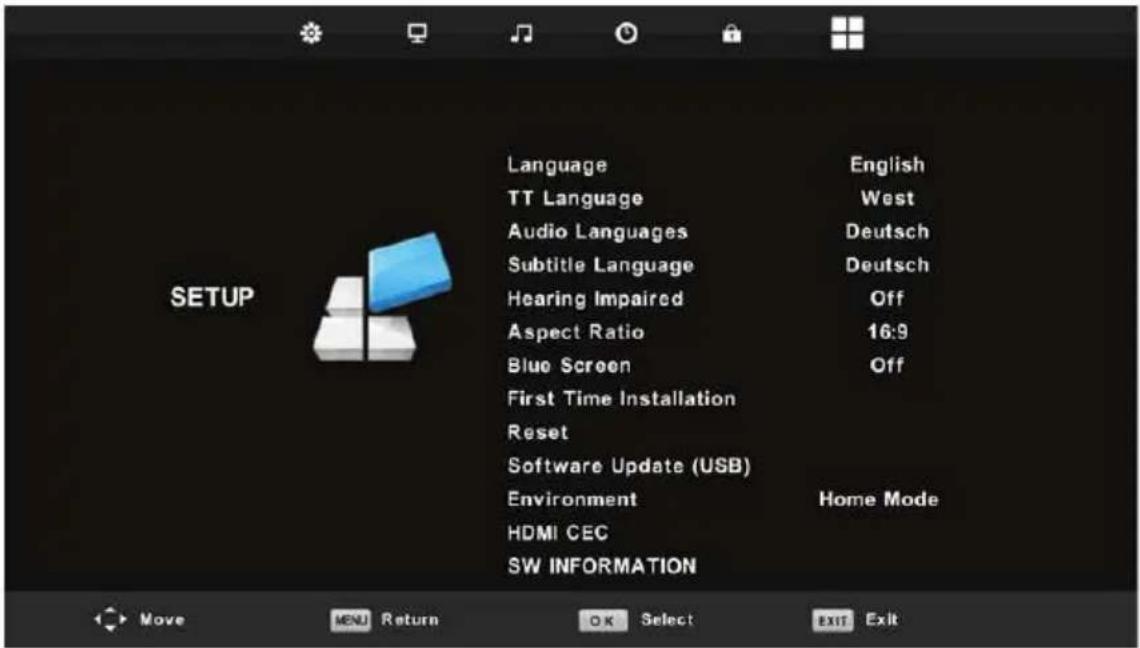
- Press / button to select the option that you want to adjust in the SETUP menu.
- Press OK button to adjust.
- After finishing your adjustment, Press OK button to save and return to the previous menu.
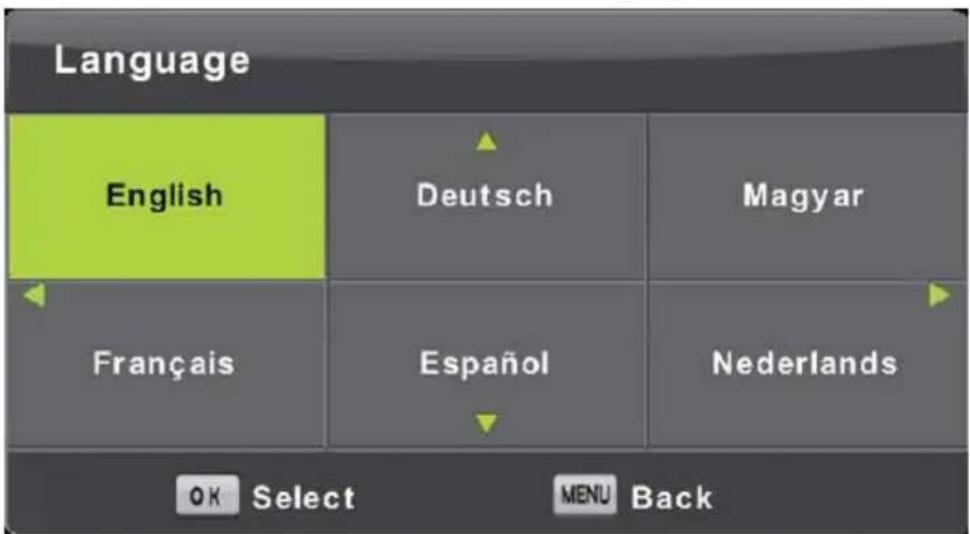
OSD Language
Select an OSD menu language can be displayed. Default German (Deutsch) is selected as menu language.
Press / / / button to select Menu Language.
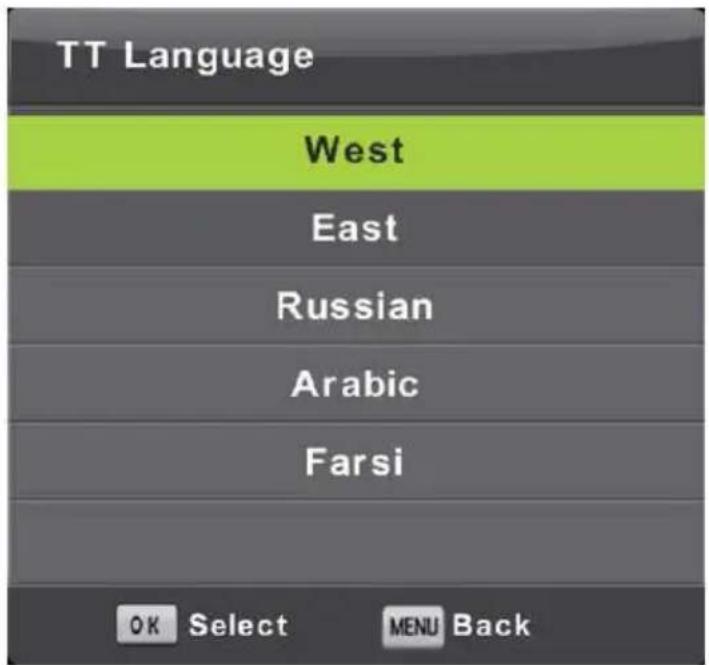
TT Language
Press / button to select TT Language, then press OK button to enter sub-menu. Press / / / button to select TT language.
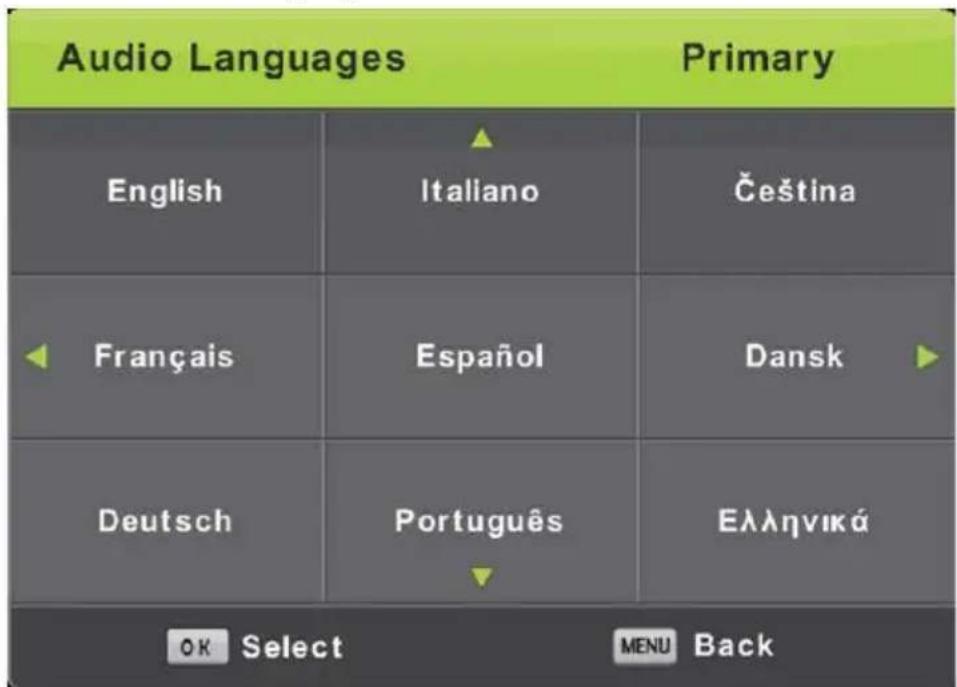
Audio Languages
Press / button to select Audio Languages, then press OK button to enter sub-menu. Press / button to select the primary of Audio Languages. Press / / / button to select the Audio Languages.
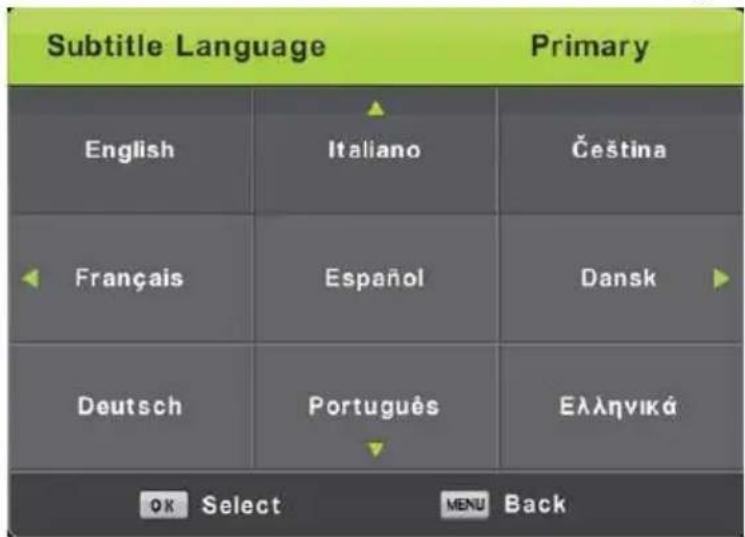
Subtitle Language
Press / button to select Subtitle Language, then press OK button to enter sub-menu.
Press / button to select the primary of Subtitle Language.
Press / / button to select the Subtitle Language.
Hearing Impaired
Press / button to select Hearing Impaired, then press OK button to select On or Off.
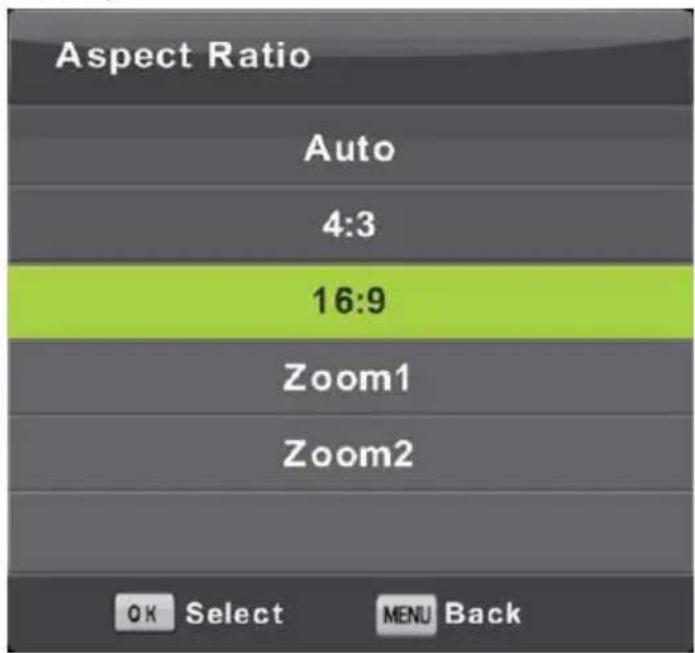
Aspect Ratio
Press / button to select Aspect Ratio, then press OK button to enter sub-menu.
Press / button to select aspect ratio. (Available options are: Auto, 4:3, 16:9, Zoom1, Zoom2).
Blue Screen
Press / button to select Blue Screen, then press OK button to select On or Off.
First Time Installation
Press / button to select First time installation, then press OK button to enter.
Reset
Press / button to select Reset, then press OK button to enter sub-menu.
Software Update(USB)
Press / button to select Software Update (USB), plug your USB device in the USB slot, then press OK button to update the right software.
HDMI CEC
Press / button to select HDMI CEC, then press OK button to enter the sub-menu.
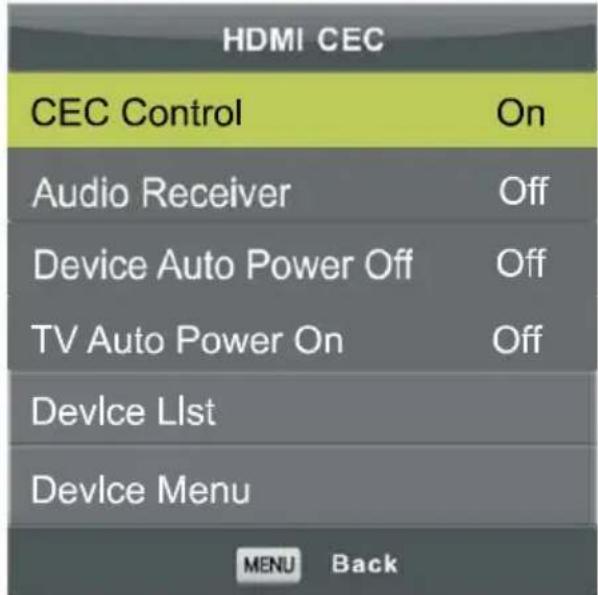
CEC Control
Audio Receiver
Device Auto Power Off
TV Auto Power Off
Device List
Device Menu
Press / button to turn the CEC Control on or off.
Press / button to turn the Audio Receiver on or off.
Press / button to turn the Device Auto Power Off on or off.
Press / button to turn the TV Audio Power Off on or off.
Press OK button to open the main menu of device.
Press OK button to open the Device Menu.
Screen Menu (Under PC mode only)
Press INPUT, choose PC.
Press MENU button to display the main menu.
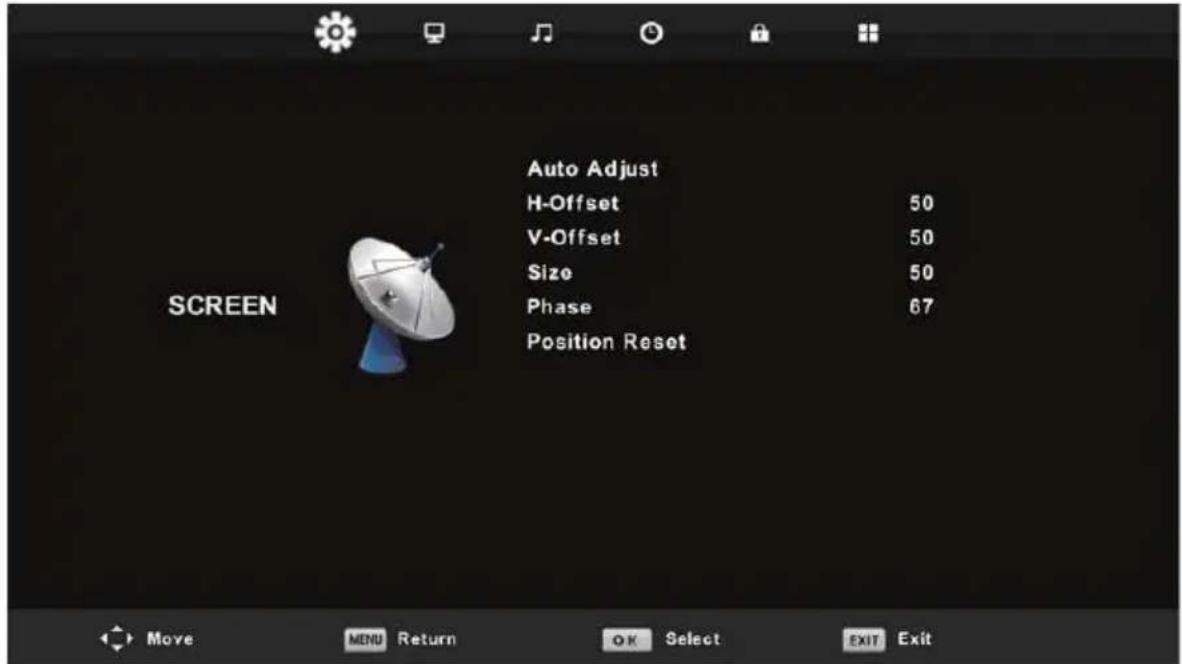
- Press / button to select the option that you want to adjust in the SCREEN menu.
- Press OK button to adjust.
- After finishing your adjustment, Press OK button to save and return to the previous menu.
Auto Adjust
Press OK button to start adjusting H-Offset/V-Offset/Size/Phase automatically.
H-Offset.
Adjust the horizontal position of the picture.
Press / button to select H-Offset, then press OK button to enter sub-menu.
V-Offset
Adjust the vertical position of the picture.
Press / button to select V-Offset, then press OK button to enter sub-menu.
Screen size
Adjust the display size.
Press / button to select Size, then press OK button to enter sub-menu.
Phase
Adjust the horizontal interfering lines.
Press / button to select Phase, then press OK button to enter sub-menu.
Position Reset
Press OK button to select Position Reset, then press OK button to enter.
Notes:
- Noise Reduction in PICTURE option is invalid.
- AD Switch in SOUND option is invalid.
- TIME menu and description are the same as that for Air mode.
- Block Program and Parental Guidance in LOCK option is invalid.
- Audio Languages, Subtitle Language, Hearing Impaired and PVR File System in SETUP option is invalid.
- PC mode has no CHANNEL menu.
Media Operation
Note: Before operating Media menu, Plug in USB device, then press INPUT button to set the Input Source to Media.
Press / button to select Media in the Source menu, then press OK button to enter.
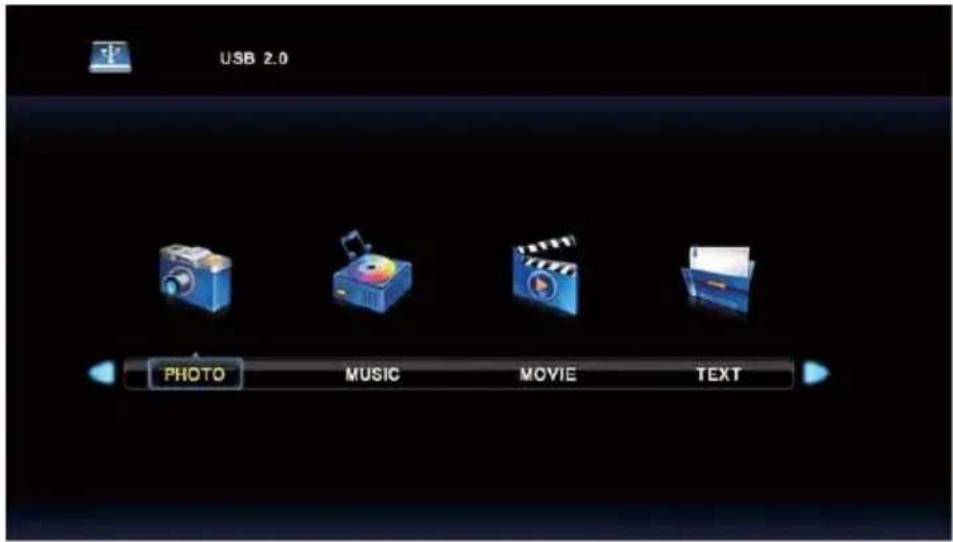
Press / button to select the option you want to adjust in the main Media menu, then press OK button to enter.
Photo Menu
Press / button to select PHOTO in the main menu, then press OK button to enter. Press Exit button to return to the previous menu and exit menu to quit.
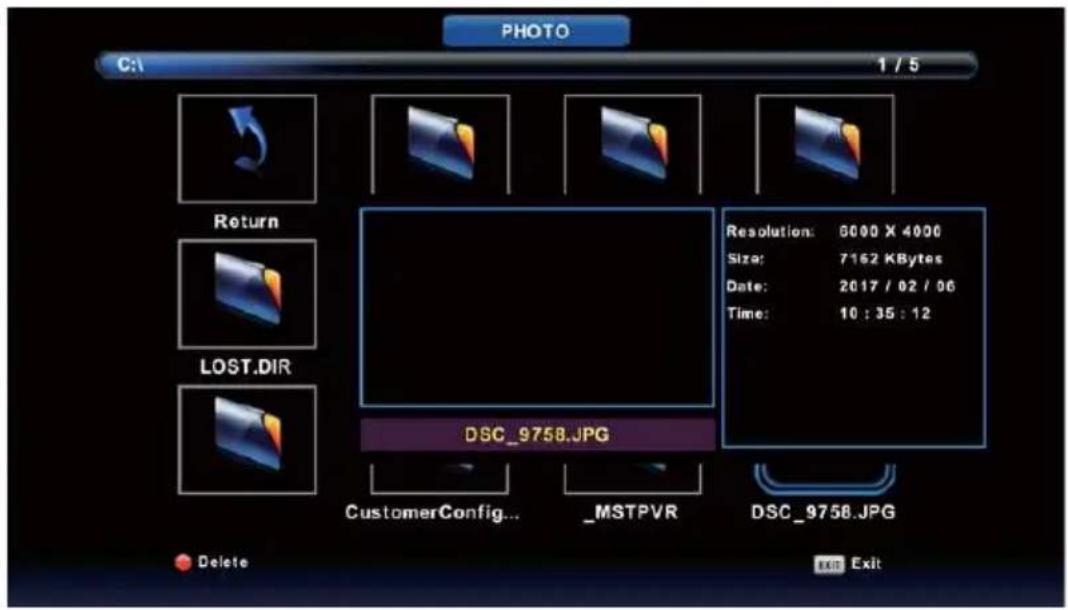
Press / button to select the file you want to watch in the file selecting menu, then press media button to display picture.
When highlighting the option you select, the file information will appear on the right and picture will be previewed in the center.
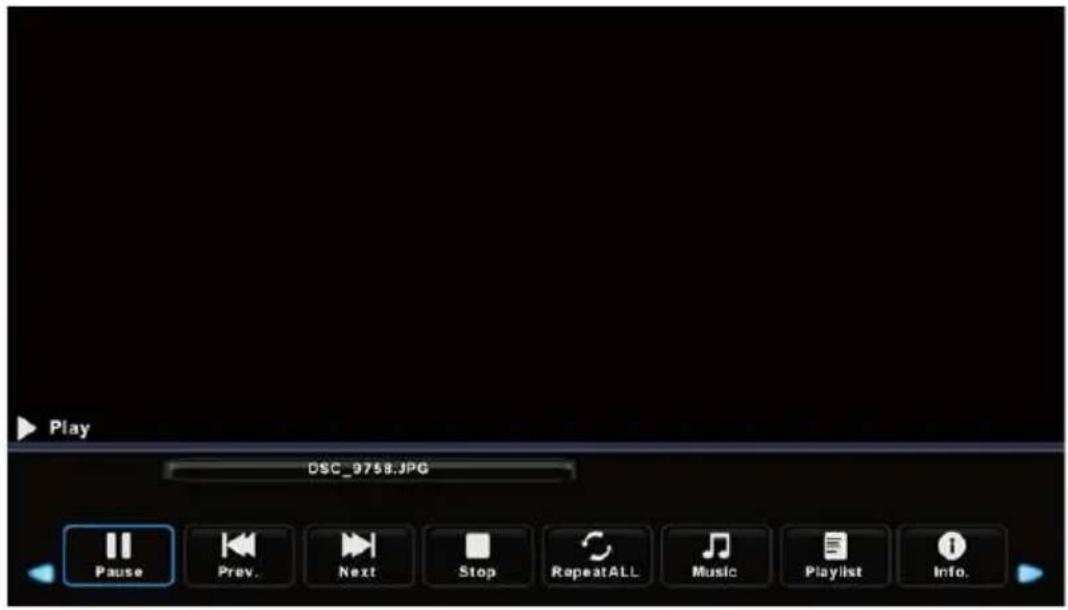
Music Menu
Press / button to select MUSIC in the main menu, then press OK button to enter. Press Exit button to return to the previous menu and exit menu to quit.
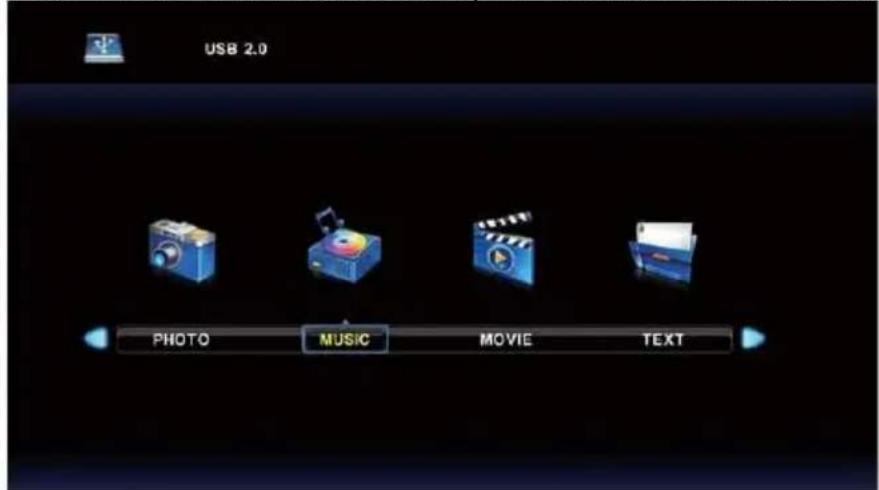
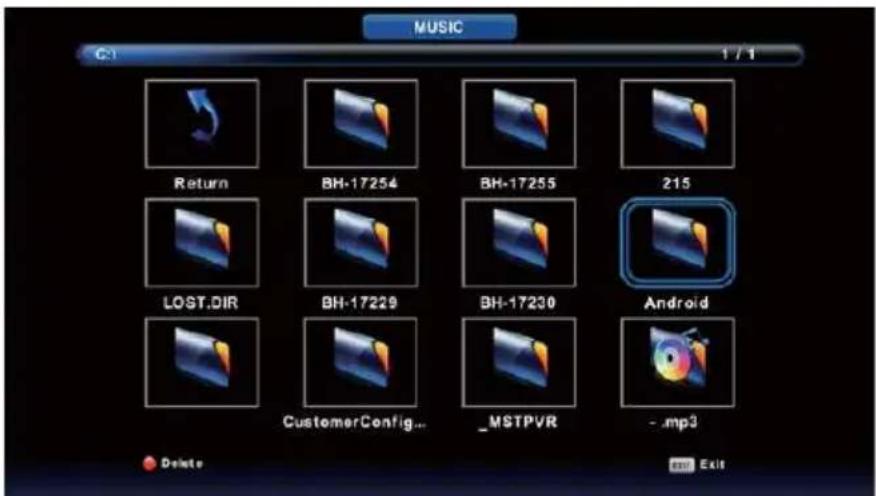
Press / button to select drive disk you want to watch, then press OK button to enter. Press / button to select return option to the previous menu.
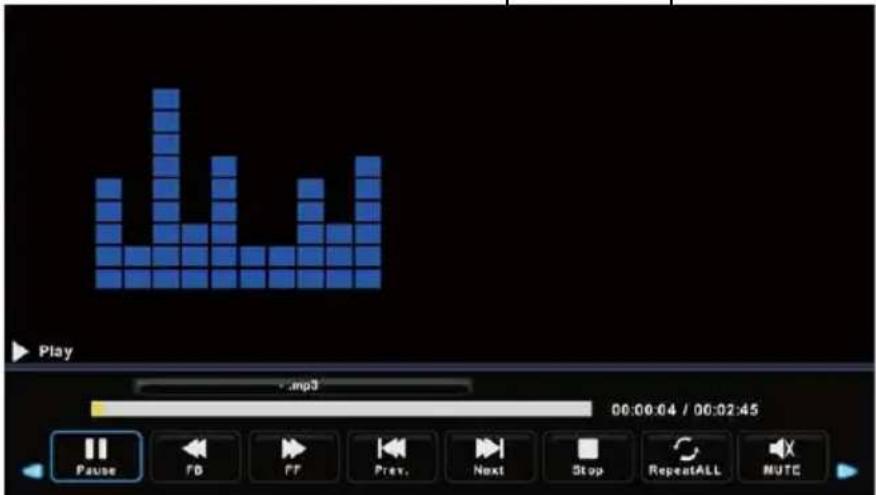
Movie Menu
Press button to select MOVIE in the main menu, then press OK button to enter. Press Exit button to return to the previous menu and exit menu to quit.
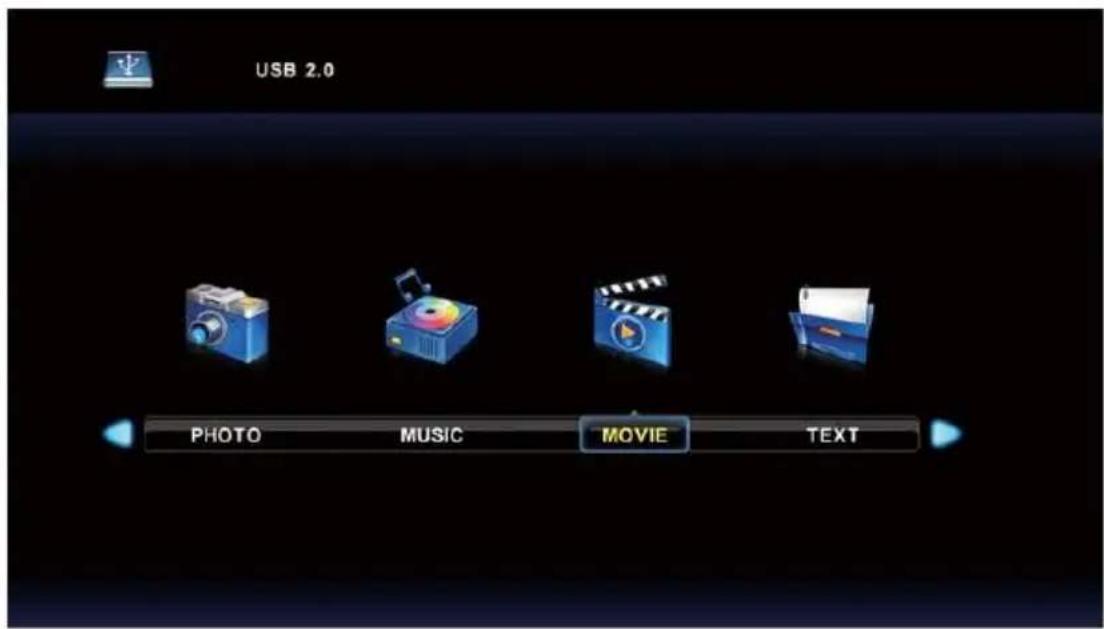
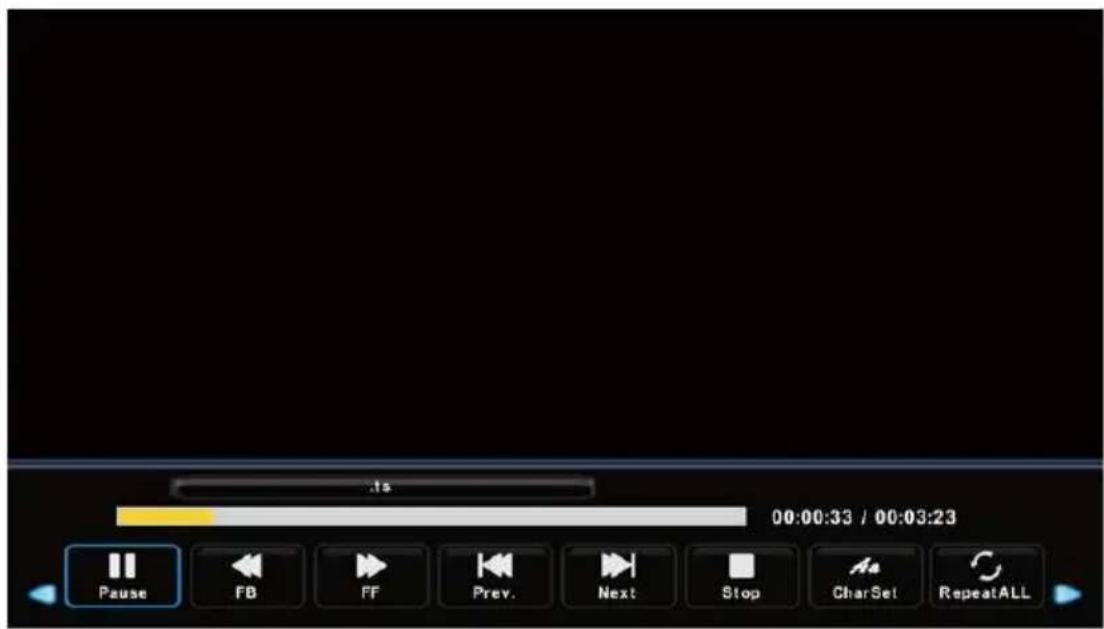
Press / button to select drive disk you want to watch, then press OK button to enter. Press media button to play the selected movie.
Press display button to select menu in the bottom you want to run, then press OK button to operate.
Press Exit button to return to the previous menu and exit menu to quit.
Text Menu
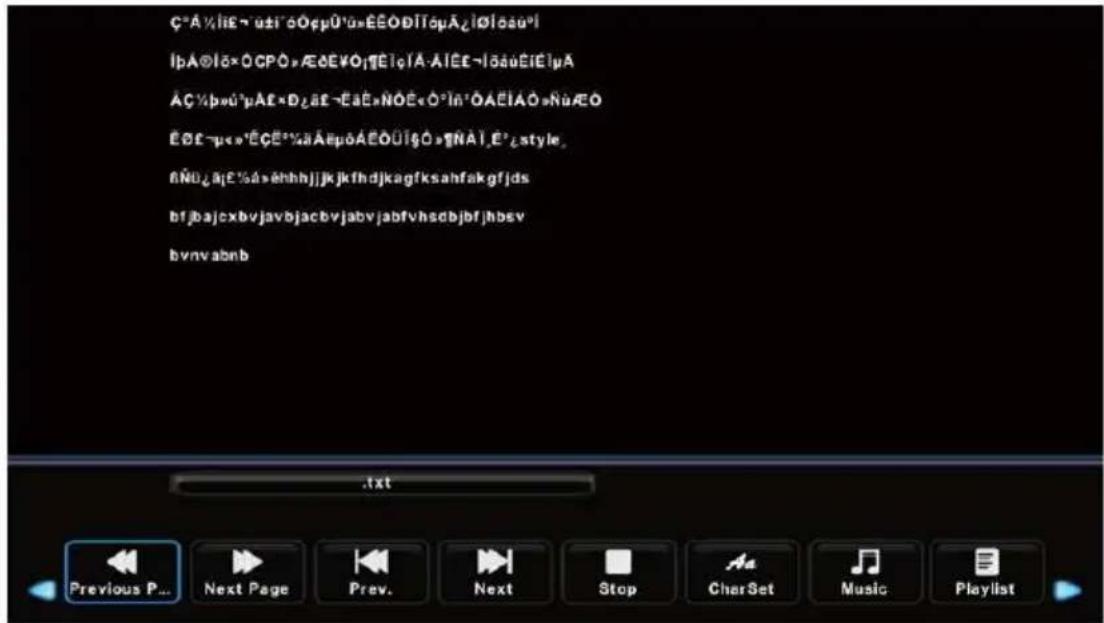
Press / button to select TEXT in the main menu, then press OK button to enter. Press Exit button to return to the previous menu and exit menu to quit.
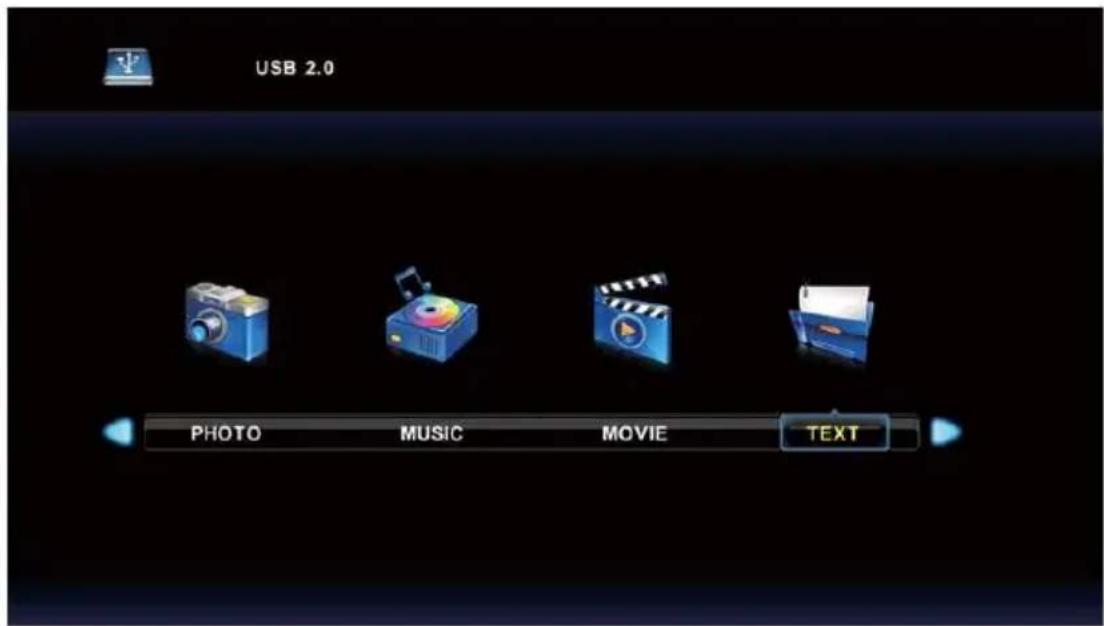
Press / button to select drive disk you want to watch, then press OK button to enter. Press / button to select return option to the previous menu.
DVD Operation
Basic Operation
Press the Power button on the TV or the remote control, then press the INPUT button to select DVD mode.
If there is no disc in the DVD player the screen will show "NO DISC".
Insert Disc according to picture next to disc slot. Do not touch the playing surface.
Hold the disc around the outside with your fingers and place the disc into the slot. The player will automatically draw the disc into the player.
To "Eject" the disc, press the EJECT button on the TV or the " " button on the remote control.
Disc Eject
If not in DVD-mode, press INPUT-key on remote and select DVD. Press OK.
Press key on remote. Disc ejects.
Return to Tuner-mode (watch TV)
Press INPUT-key on remote. See the INPUT SOURCE window appear. Select DTV or Satellite and press OK-key.
DVD Setup Mode
Setup Mode provides the menu for the configuration of General Setup Page, Audio Setup Page, Dolby Digital, Setup, Preference Page.
. Item selection in the Setup Menu is done by using the Navigation Arrows, SETUP button and the OK button.
Press the SETUP button first, enter into SETUP menu, then press the DIRECTION RIGHT button, you can enter into the next Sub-menu.
. Press the SETUP button again to exit the Setup Menu.
General Setup
TV Display
-4:3PS
This is selected when the DVD player is connected to a normal TV. Wide-screen images are shown on the screen, but with some parts cut automatically.
-4:3LB
This is selected when the player is connected to a normal TV. Wide-screen images are shown on the screen, with black belt on the top and bottom.
-16:9
This is selected when the player is connected to a wide-screen TV.
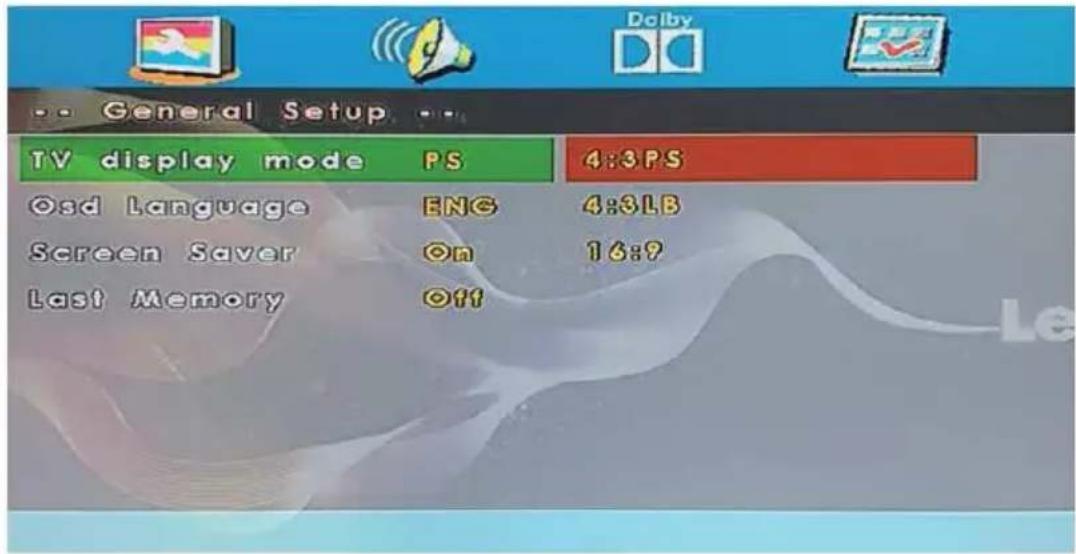
DVD Operation
OSD Language
This is used to select the OSD language.
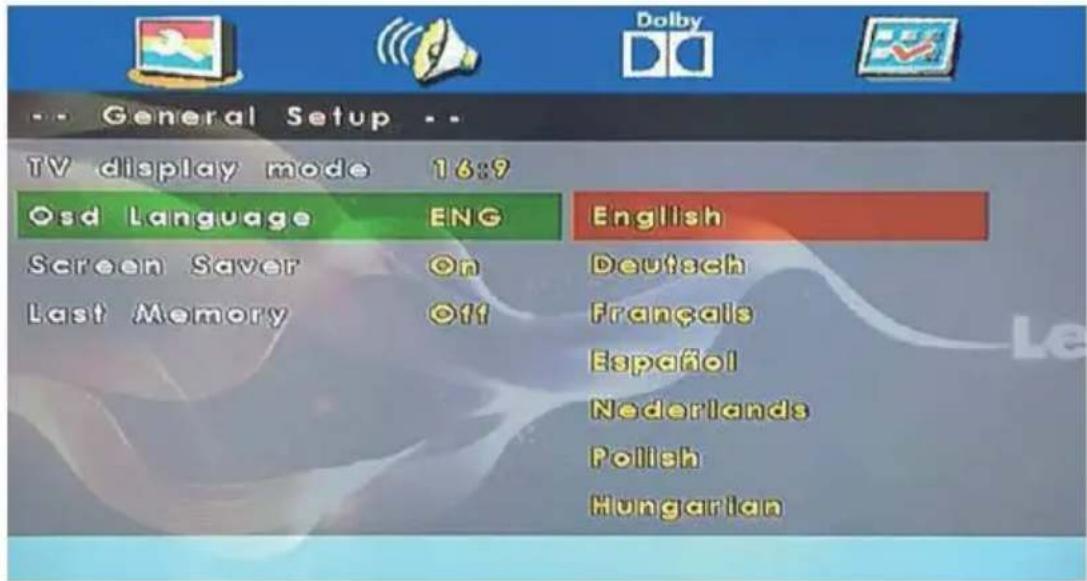
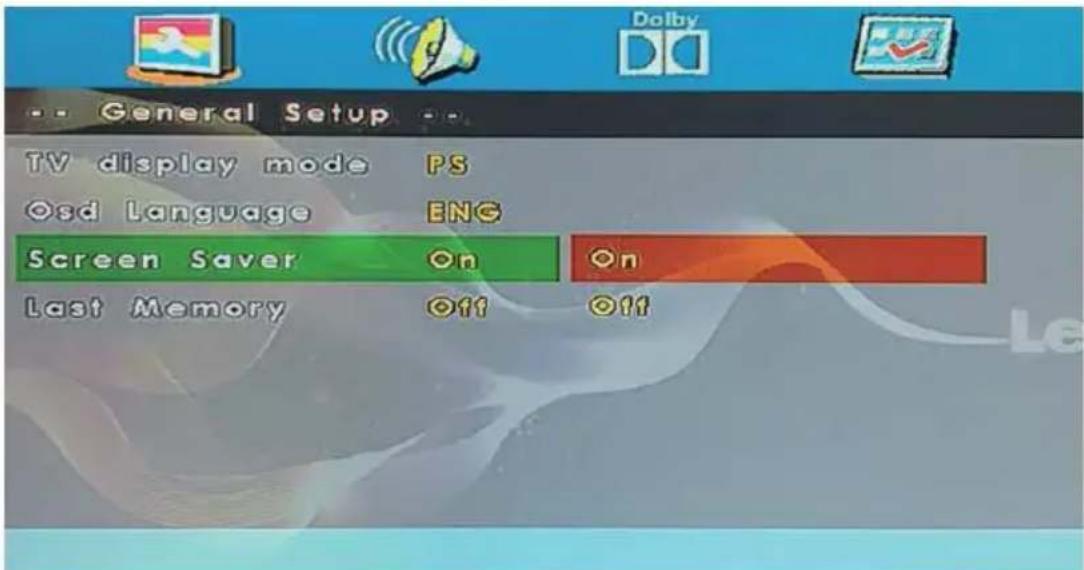
Screen Saver
Start the screen saver, the screen saver image will appear when the player stops or the picture is frozen for a few minutes. This saver can keep the screen from being damaged.
-
On (Start the screen saver)
-
Off (Remove the screen saver).
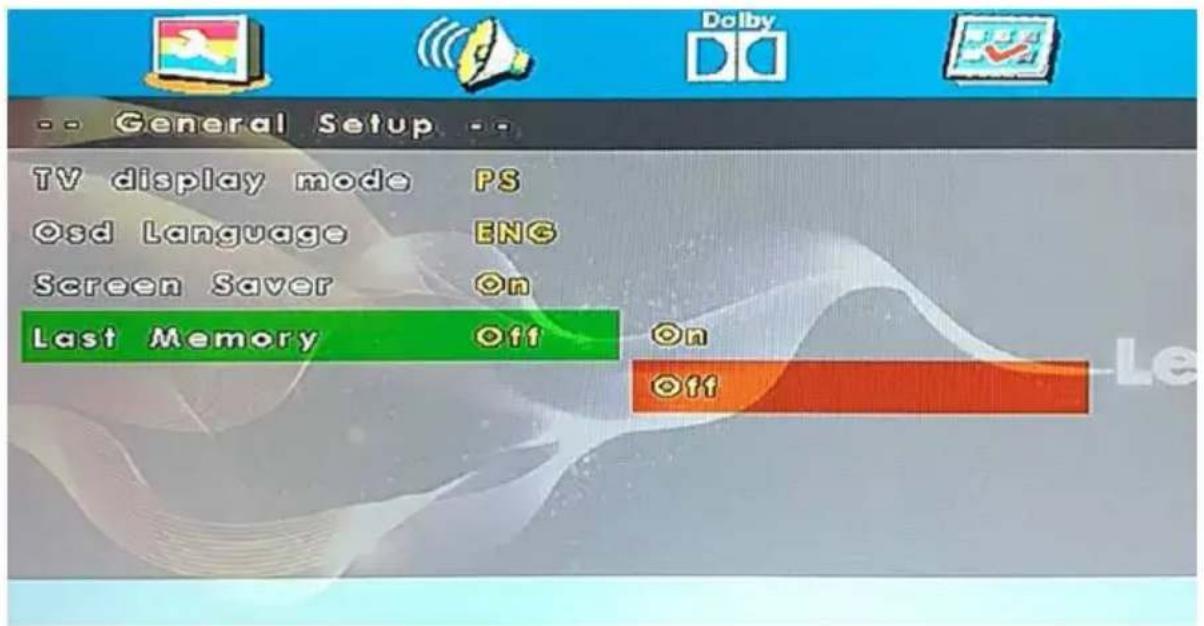
Last Memory
Can set the items on the last memory, "on" and "off" option.
- On (Start the memory): The DVD will start playing at the last time position of previous play.
- Off (Remove the memory): When turning on the DVD, the last position will not be remembered.
DVD Operation
Audio Setting
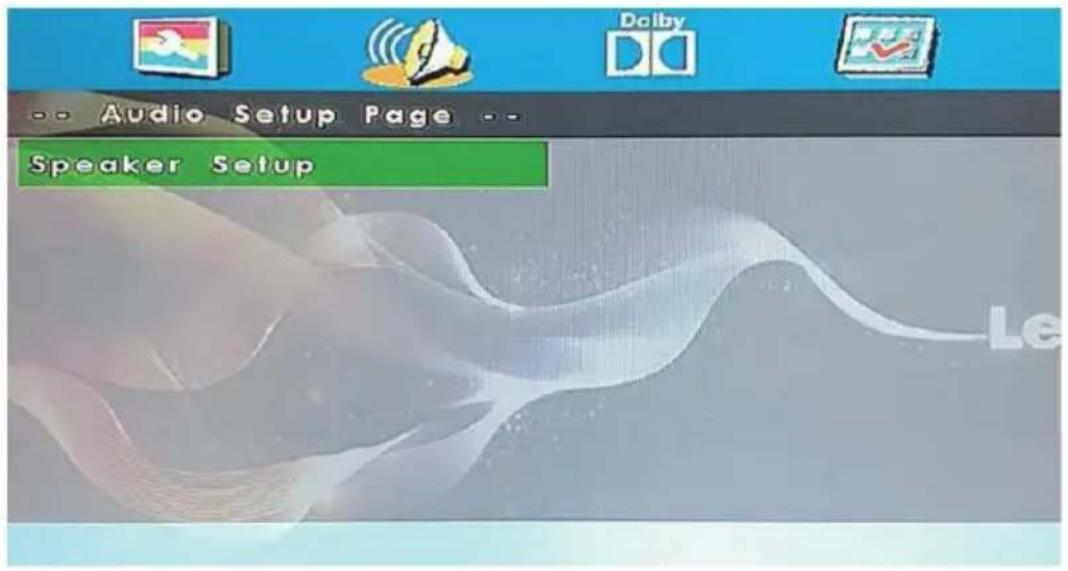
- Speaker Setup
In the "Audio Setup page" press "▼" button to select "Speaker Setup" item, press the "OK ENTER" or "▶" button (play) into the "Speaker Setup Page".
DVD Operation
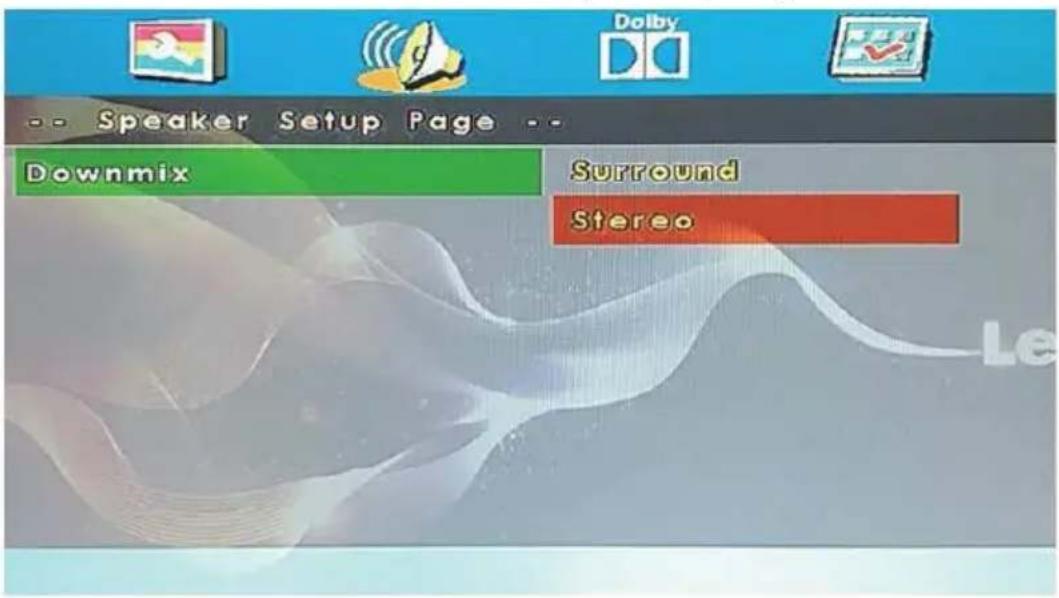
Downmix
- Surround
A disc recorded multi channel soundtrack, the output signal will be converted to left and right channel.
- Stereo
A disc recorded multi channel soundtrack, The output signal will be converted to stereo.
DVD Operation
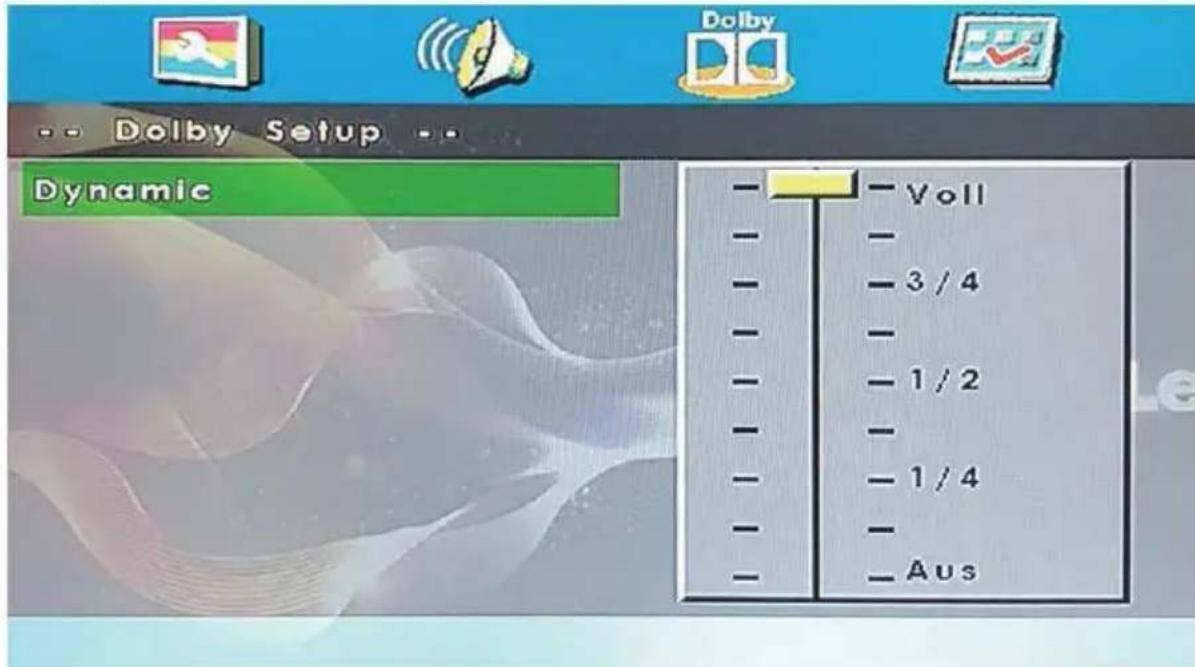
Dolby Digital Setup
Dynamic
This option is used to set the compression ratio in order to control the sound contrast.
Preference Setup
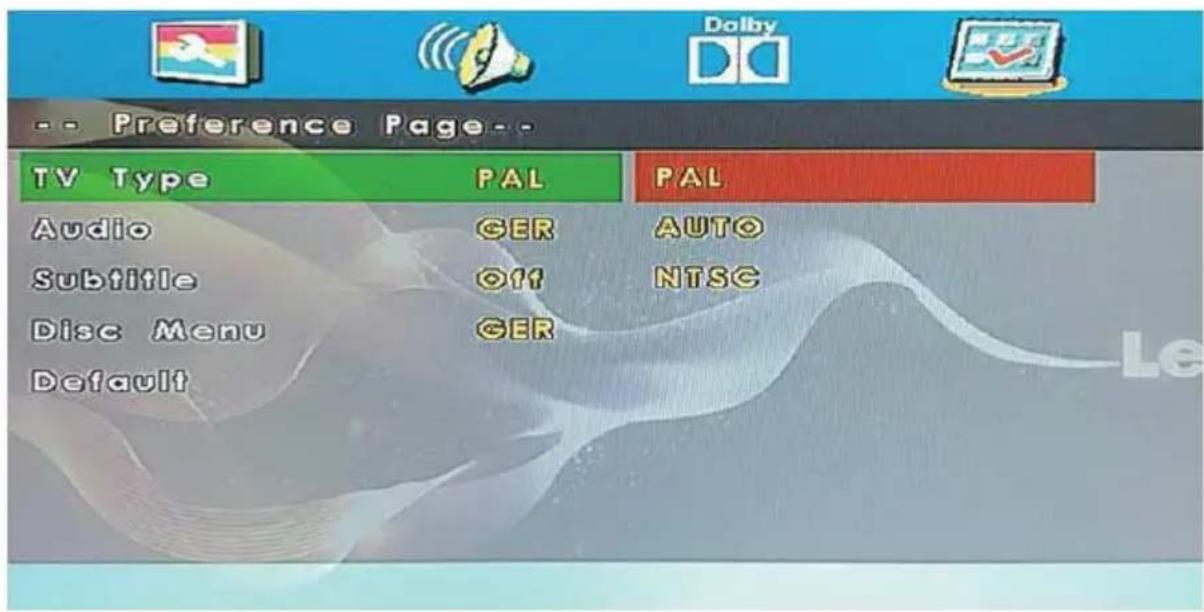
You must press STOP twice to enter Preference Page or NO disc.
TV Type
PAL
This is selected when the player is connected to an PAL System TV.
AUTO
The player will set the TV system according to the disc in the tray.
NTSC
This is selected when the player is connected to a NTSC System TV.
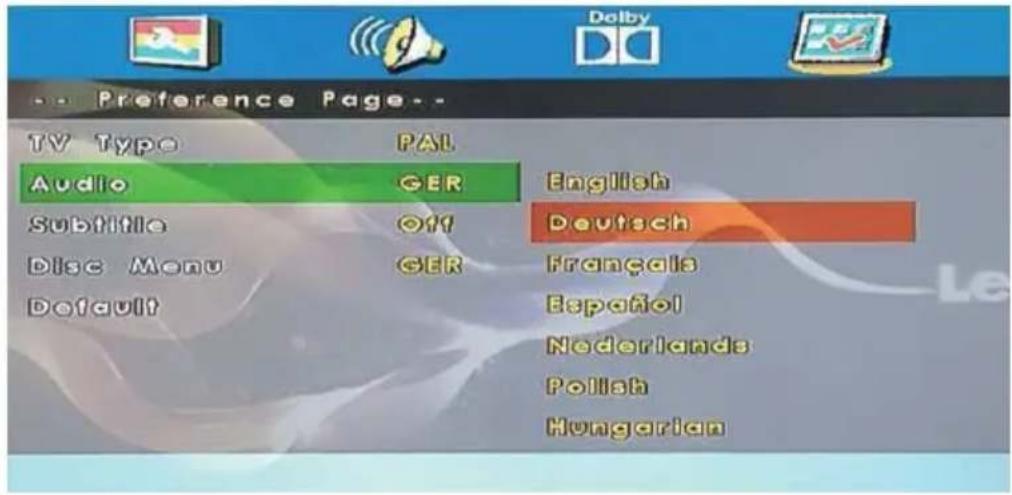
Audio
If a language listed below is recorded on the disc, you can play the sound in such language. If not, the language recorded will be used.
DVD Operation
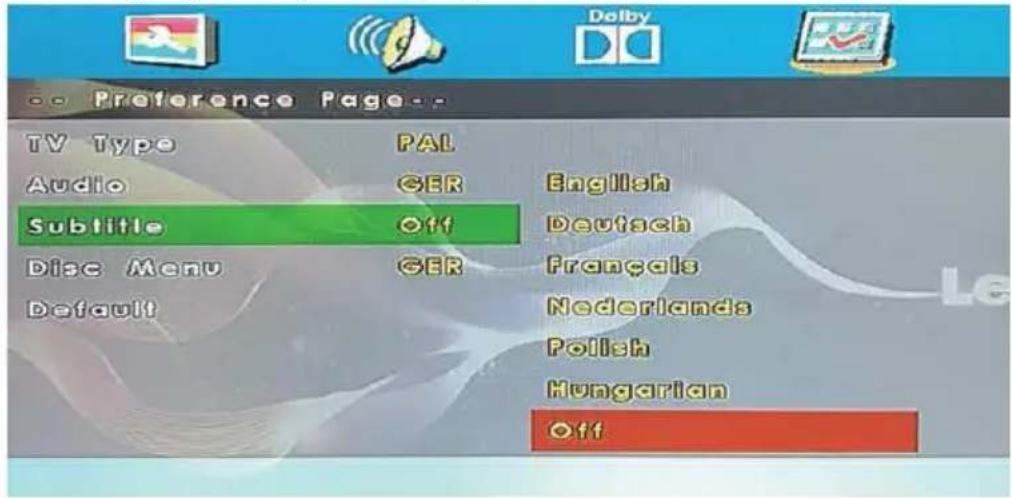
Subtitle
If a language listed below is recorded on the disc, you set the subtitle to be displayed in such language. If not, the language recorded will be used.
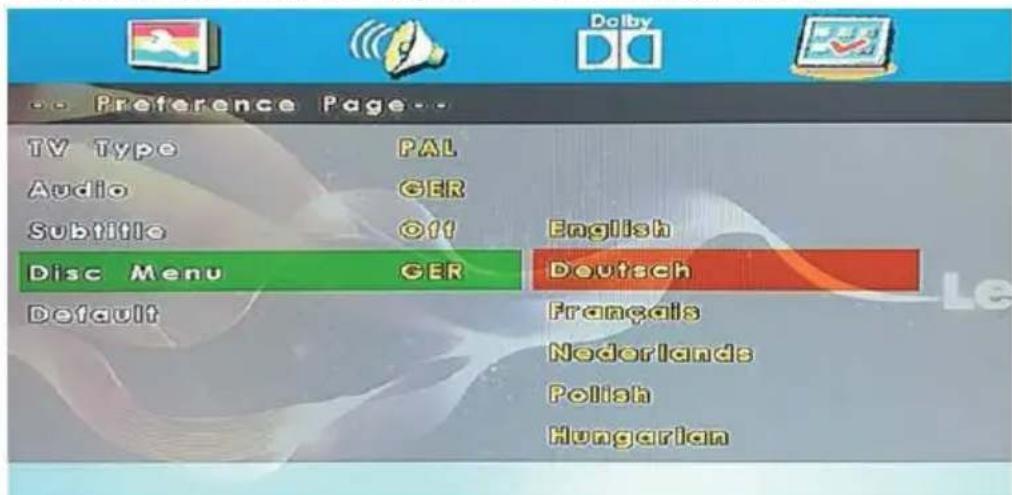
Disc Menu
If a language listed below is record on the disc, you can set the Menu to be displayed in such language. If not, the language recorded will be used.
1. Guarantee
Lenco offers service and warranty in accordance to European law, which means that in case of repairs (both during and after the warranty period) you should contact your local dealer.
Important note: It is not possible to send products that need repairs to Lenco directly.
Important note: If this unit is opened or accessed by a non-official service center any way, the warranty expires.
This device is not suitable for professional use. In case of professional use, all warranty obligations of the manufacturer will be voided.
2. Disclaimer
Updates to Firmware and/or hardware components are made regularly. Therefore some of the instruction, specifications and pictures in this documentation may diff slightly from your particular situation. All items described in this guide for illustrat purposes only and may not apply to particular situation. No legal right or entitlements may be obtained from the description made in this manual.
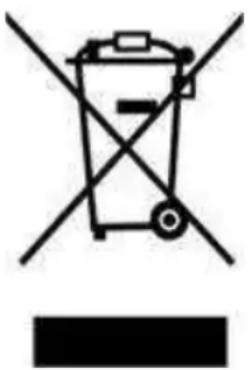
3. Disposal of the Old Device
This symbol indicates that the relevant electrical product or battery should not be disposed of as general household waste in Europe. Ensure the correct waste treatment of the product and battery, please dispose them in accordance to any applicable local laws of requirement for disposal of electrical equipment or batteries. In so
doing, you will help to conserve natural resources and improve standards of environmental protection in treatment and disposal of electrical waste (Waste Electrical and Electronic Equipment Directive).
4. Service
For more information and helpdesk support, please visit www.lenco.com
Lenco Benelux BV, Thermiekstraat 1a, 6361 HB The Netherlands., Nuth,
Modelnr.: DVL-1662BK, DVL-1962BK, DVL-2262BK, DVL-2462BK
DVL-2862WH, DVL-2862BK, DVL-3252WH, DVL-3252BK
LED-1922BK, LED-2422BK, DVL-240, DVL-3242WH
DVL-3242BK, DVL-320BK, LED-2822BK, LED-4022BK
LED-3222BK
NICAM/A2: Selecteer TV Nicam/A2.
SOUND: De geluidsmodus selecteren.
Selecteer "Satellite" (Satelliet) in "Digital Type" (Type Digitala):
AD Switch (AD-schakelaar)
OSD Timer (OSD-timer)
OSD Language (OSD Taal)
OSD Language (OSD Taal)
Screen Saver (Schembeveiliging)
LED indicator Remote Control window(keep clear)
Produktinformation
Time Zone (Zeitzzone)
Lenco Benelux BV, Thermiekstraat 1a, 6361 HB Nuth, The Netherlands.
Modèle n°: DVL-1662BK, DVL-1962BK, DVL-2262BK, DVL-2462BK
DVL-2862WH, DVL-2862BK, DVL-3252WH, DVL-3252BK
LED-1922BK, LED-2422BK, DVL-240, DVL-3242WH
DVL-3242BK, DVL-320BK, DVL-2822BK, LED-4022BK
LED-3222BK
Premiere installation. 15
Picture Mode (Mode Image)
Sound Mode (Mode Son)
Balance (Equilibrage)
V-Offset (Decalage V)
- Surround (Ambiance)
DVL-3242BK.DVL-3242WH
DVL-320BK
Conexiones
| EN | ES |
| Common Interface | Interfaz Común |
| ONLY DVL-3252BK, DVL-325 2WH, DVL-3242BK, DVL-3242WH, DVL-320BK, LED-2822BK DVL-320BK, LED-2822BK | SOLO DVL-3252BK, DVL-3252WH, DVL-3242BK, DVL-3242WH, |
DC: Conectar al adaptor eletrico o al adaptorde 12 V CC para coche.
(broad-caster-specific).
Program Edit (Edit prog)
Contraste/Brillo/Color/Matiz/Nitidez
AD Switch (Interruptor AD)

- Contents
- Safety Information
- Keep these instructions
- Warning
- CAUTION:
- KEEP THESE INSTRUCTIONSIN MIND:
- Safty Information
- INSTALLATION
- Climate Warning:
- Product Introduction
- Connections
- Remote Control
- NUMBER BUTTONS
- Common Interface Slot
- USING YOUR COMMON INTERFACE SLOT
- Common Interface
- SELECT INPUT SOURCE
- First Time Installation
- Select Language
- Select Country
- Air(DVB-T) Auto Tune:
- Main Menu Operation
- Channel Menu
- Auto Tuning
- ATV Manual Tuning
- DTV Manual Tuning
- Program Edit
- Signal Information
- Picture Menu
- Picture Mode
- Contrast/Brightness/Color/Tint/Sharpness
- Color Temp
- Noise Reduction
- Sound Menu
- Sound Mode
- Balance
- Auto Volume level
- AD Switch
- NOTE:
- Time Menu
- Time Zone
- Sleep Timer
- OSD Timer
- Lock Menu
- Lock System
- Set Password
- Channel Lock
- Parental Guidance
- Key Lock
- Hotel Mode
- Source Lock
- Default Source
- Default Prog
- Max Volume
- Clear Lock
- Setup Menu
- OSD Language
- TT Language
- Audio Languages
- Subtitle Language
- Hearing Impaired
- Aspect Ratio
- Blue Screen
- Reset
- Software Update(USB)
- HDMI CEC
- Screen Menu (Under PC mode only)
- Auto Adjust
- H-Offset.
- V-Offset
- Screen size
- Phase
- Position Reset
- Notes:
- Media Operation
- Photo Menu
- Music Menu
- Movie Menu
- Text Menu
- DVD Operation
- Basic Operation
- Disc Eject
- Return to Tuner-mode (watch TV)
- DVD Setup Mode
- General Setup
- TV Display
- Screen Saver
- Last Memory
- Audio Setting
- - Speaker Setup
- Downmix
- - Surround
- - Stereo
- Dolby Digital Setup
- Dynamic
- Preference Setup
- TV Type
- Audio
- Subtitle
- Disc Menu
- Guarantee
- Disclaimer
- Disposal of the Old Device
- Service
- AD Switch (AD-schakelaar)
- OSD Timer (OSD-timer)
- OSD Language (OSD Taal)
- Screen Saver (Schembeveiliging)
- Produktinformation
- Time Zone (Zeitzzone)
- Picture Mode (Mode Image)
- Sound Mode (Mode Son)
- Balance (Equilibrage)
- V-Offset (Decalage V)
- - Surround (Ambiance)
- Conexiones
- Contraste/Brillo/Color/Matiz/Nitidez
- AD Switch (Interruptor AD)
Brand : LENCO
Model : DVL2462
Category : TV