
KE85 - Camera KODAK - Free user manual and instructions
Find the device manual for free KE85 KODAK in PDF.

| Product Type | Compact film camera with motorized zoom and built-in flash |
| Dimensions | 38 mm x 68 mm x 126.5 mm |
| Weight | 251 g (8.9 oz) |
| Power Supply | 1 KODAK KCR2 3-volt lithium battery (or equivalent) |
| Lens | 38-85 mm, hybrid 6-element |
| Shutter Speed | Programmed, from 4 to 1/500 second |
| Aperture | f/3.8 to f/8.5 |
| Film Speed | 100, 200, 400, 800 ISO (DX code recognition) |
| Focus Range | From 0.6 m (2 ft) to infinity (in daylight) |
| Viewfinder | Albada type with central autofocus circle |
| Flash | Built-in KODAK SENSALITE, auto, fill, off, night view modes |
| Flash Recycle Time | 6 seconds with new battery |
| Self-Timer | 10 seconds, activated by dedicated button |
| Special Features | Motorized zoom, focus lock, red-eye reduction, portrait mode, automatic and manual rewind |
| Auto Power Off | After 4 minutes of inactivity |
| Low Battery Indicator | Displayed on LCD panel |
| Film Loading | Easy loading system with automatic advance |
| Care and Cleaning | Clean lens with a blower and soft lint-free cloth; do not use solvents |
| Safety | Do not disassemble the camera; keep batteries away from children |
| Spare Parts and Repairs | User-replaceable battery; for repairs, contact Kodak support |
| General Information | Brand: Kodak; Model: KE85; Category: Compact film camera; Manual available online |
Frequently Asked Questions - KE85 KODAK
User questions about KE85 KODAK
0 question about this device. Answer the ones you know or ask your own.
Ask a new question about this device
Download the instructions for your Camera in PDF format for free! Find your manual KE85 - KODAK and take your electronic device back in hand. On this page are published all the documents necessary for the use of your device. KE85 by KODAK.
USER MANUAL KE85 KODAK
in the name of the company, P.O.
(1)《证券时报》
Kodak KE85 Zoom
35 mm Camera


[Unreadable]
The following table provides the original text of the English text in the following table:
The following table provides the information in a tabular format:
In the case, the case is a large number of cases. From 1 to 30 days, the case is a large number of cases.
in the case of the Life to
The first character of the 'a' is a part of the 'a' and the 'b' are the same as the 'a' is the second character.
Visit our Web sites at http://www.kodak.com (for US) or
http://www.kodak.ca (for Canada) or call:
Kodak (USA only) from 9:00 a.m. to 7:00 p.m. (Eastern time) Monday through Friday at 1-800-242-2424.
Kodak (Canada only) from 8:00 a.m. to 5:00 p.m. (Eastern time) Monday through Friday at 1-800-465-6325, ext. 36100; for the Toronto area, call 416-766-8233, ext. 36100.
When you call, please have your camera available.
For warranty purposes, please keep your sales receipt as proof of the date of purchase.
CONTENTS
CAMERA IDENTIFICATION .... 3
ATTACHING THE STRAP 4
LOADING THE BATTERY 5
Low-battery indicator 6
Auto power off 6
Battery tips 7
ATTACHING THE LCD LABEL 8
LOADING THE FILM 8
TAKING PICTURES 11
Using the focus lock 12
Tips for better pictures ...... 13
USING THE ZOOM LENS 14
TAKING FLASH PICTURES ...... 15
Flash-to-subject distance ..... 16
FLASH MODES 17
Auto flash 18
Fill flash 18
Flash off 18
Selecting the flash modes ...... 18
Nightview with or without flash .... 19
USING THE SELF-TIMER 20
MODE BUTTON 21
Red-eye reduction 22
Portrait mode 22
UNLOADING THE FILM 24
Automatic rewind 24
Manual rewind 24
CARING FOR YOUR CAMERA ...... 25
TROUBLESHOOTING 26
SPECIFICATIONS 28
CAMERA IDENTIFICATION
Unfold the front and back flaps of manual to view camera diagrams
1 Shutter button
2 Auto-focus windows
3 Self-timer bulb/red-eye-reduction bulb
4 Light sensor
5 Flash
6 Viewfinder
7 Lens/lens cover
8 Strap post
9 Film-door latch
10 Flash-ready/camera-warning light
11 Viewfinder eyepiece
12 Zoom dial
13 Film-door-lock indicator
14 LCD panel
15 Self-timer button
16 Mode button
17 Tripod socket
18 Exposure button
19 On/off button
20 Film-rewind button
21 Battery door
22 Film-guide rails
23 DX/DXN code sensors
24 Film chamber
25 Film door
26 Film window
LCD panel
27 Frame counter
28 Nightview symbol
29 Fill-flash/flash symbol
30 Flash-off symbol
31 Portrait symbol
32 Battery symbol
33 Self-timer symbol
34 Red-eye-reduction indicator
35 Auto-flash indicator
36 Film-motion indicator
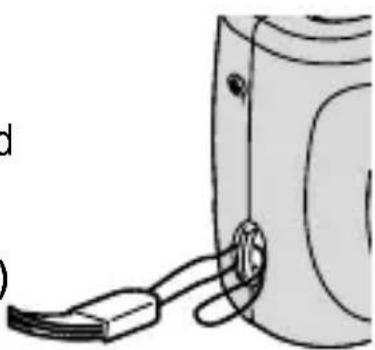
ATTACHING THE STRAP
-
Insert one end of the strap under the strap post (8) and pull it through.
-
Thread the longer end of the strap through the shorter loop.
-
Pull the strap strap tight.
natural_image
Diagram of a device with a cable and connector, no visible text or symbols
natural_image
Diagram of a mechanical device with a cable and connector (no text or symbols visible)LOADING THE BATTERY
This camera uses one 3 volt lithium KODAK KCR2 (or equivalent) Battery that supplies power for all camera operations.
- Slide the battery door (21) and lift to open.
natural_image
Diagram of a mechanical component with directional arrows indicating motion (no text or symbols)• Before you remove the old battery, turn off the camera.
- Insert the battery into the battery chamber.
natural_image
Technical line drawing of a mechanical assembly with mounting bracket and pulley (no text or symbols)- Snap the battery door closed.
Low-battery indicator

It is time to replace the battery when —
- the battery symbol (32) appears on the LCD panel (14), or
- none of the indicators appear on the LCD panel and the shutter button (1) cannot be operated.

Automatic Energy Saving Features
Auto power off
This camera automatically turns off after approximately 4 minutes to conserve the battery life. To awaken the camera, press the on/off button (19).
- Turn the camera off when the camera is not going to be used for an extended length of time.
Battery tips
- Dispose of the battery according to local and national regulations.
- Keep a spare battery with you at all times.
- Read and follow all warnings and instructions supplied by the battery manufacturer.
- Keep batteries away from children.
- Do not try to take apart, recharge or short circuit the battery, or subject it to high temperature or fire.
-
Store batteries in their original packaging prior to use.
-
Remove the battery from the camera when the camera is not going to be used for an extended length of time.
• In the unlikely event that battery fluid leaks onto your skin, contact Kodak Health, Safety and Environment Information at 1-716-722-5151 in the U.S.
• In the unlikely event that battery fluid leaks inside the camera, U.S. customers can contact the Kodak Information Center (KIC) at 1-800-242-2424. Customers outside the U.S. can contact their local Kodak Customer Service representative.
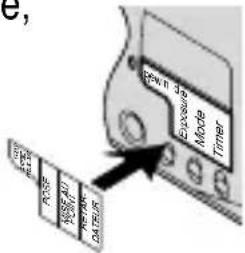
ATTACHING THE LCD LABEL
English text references for the LCD control buttons are printed below the LCD panel (14). You can replace the English text with Chinese, Arabic, Thai, Polish, French, Spanish, Portuguese, or Russian with one of the eight supplied labels. Simply
remove the peel-off label of your choice and place it over the English text. The label is removable if you want to reposition it or replace it with a different one.
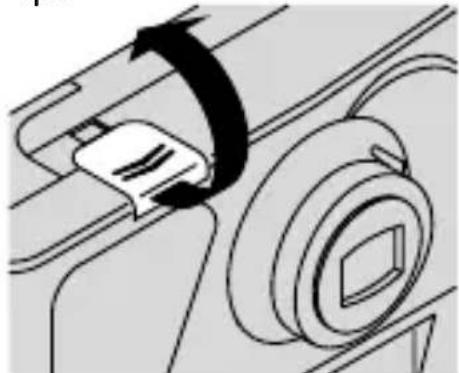
LOADING THE FILM
If in sunlight, turn your back to the sun and load the film in the shade of your body. The unique easy load feature of this camera makes film loading simple.
- Slide the film-door latch (9) in the direction of the arrow to open the film door (25).
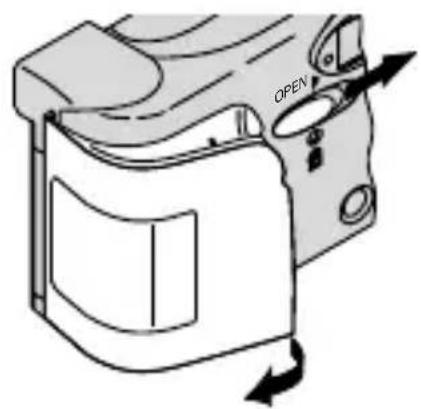
- Place the film cartridge completely into the film chamber (24).
natural_image
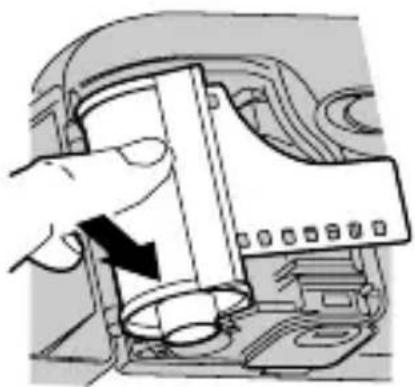
Hand inserting a device into a computer case (no text or symbols visible)- Insert the film leader into the film slot between the film-guide rails (22).

natural_image
Diagram of a device interior showing a panel with an arrow indicating direction (no text or symbols present)film-guide rails
NOTE: You should be able to use the film just as it comes out of the film carton without pulling additional film out of the cartridge.
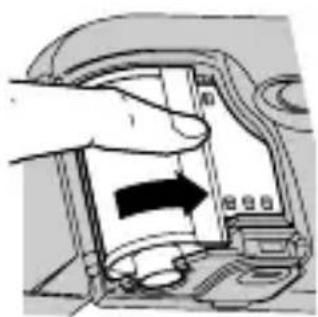
- Rotate the cartridge completely to the right to lay the film flat.
natural_image
Hand inserting a device into a computer case, showing the left side with an arrow (no text or symbols visible)
-
Press the circle on the film door (25) to close the door and to start the automatic film advance.
-
The LCD panel (14) shows the first exposure.
- The film window (26) displays the film information.
- The film-door-lock indicator (13) turns amber to indicate the film door is locked and the film is correctly loaded.
• After you close the safety interlocked film door and the film advances, you cannot open the film door until the film is completely rewound into the film cartridge.
TAKING PICTURES
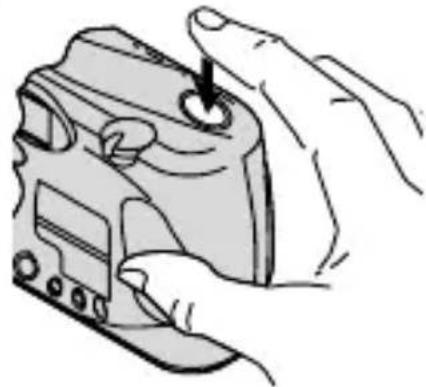
- Press the on/off button (19) to uncover the lens (7) and to turn on the camera.
-
Look through the viewfinder eyepiece (11) to see your subject.
-
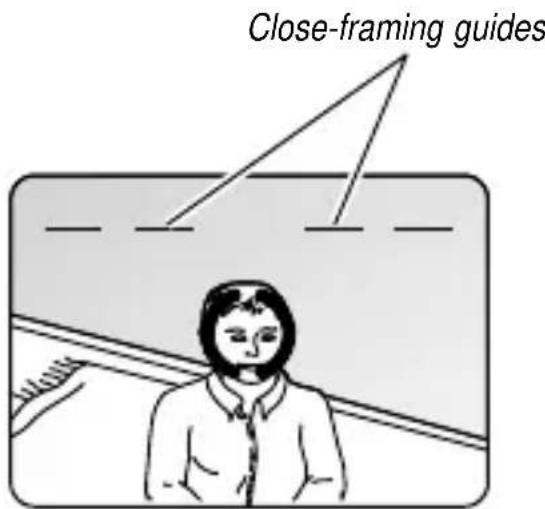
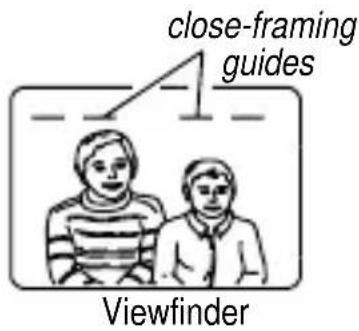
For a sharp picture, stand at least 2 ft (0.6 m) from your subject.
-
When your subject is within 2 to 3 ft (0.6 to 0.9 m) from the camera, position the subject below the close-framing guides.
- Hold the camera steady and gently press the shutter button (1) to take the picture.
natural_image
Illustration of a hand holding a camera with a circular button, no text or symbols present• After you take the picture, the film automatically advances to the next picture.
- Turn off the camera when you are done taking pictures.
Using the focus lock
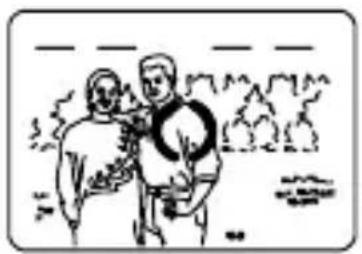
This camera automatically focuses on the subject that is within the auto-focus circle of the viewfinder. If you want to take a picture with the subject positioned outside the auto-focus circle, follow these instructions.
- Place the auto-focus circle on the subject you want focused in the picture.
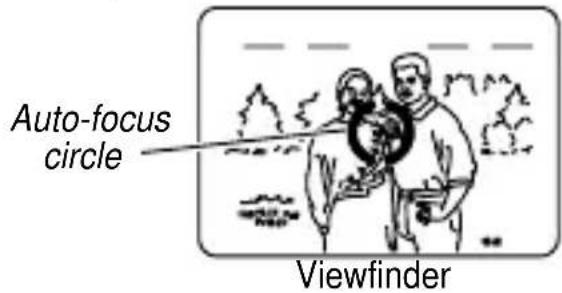
- Press the shutter button (1) halfway down to lock the focus.
- While still pressing the shutter button, move the camera until your subject is where you want it within the viewfinder eyepiece (11).
natural_image
Illustration of two people standing outdoors with trees and water in the background (no text or symbols)Viewfinder
- Press the shutter button completely down to take the picture.
Tips for better pictures
• To avoid blurry pictures, hold your camera steady by keeping your elbows close to your body when you press the shutter button.
- Stand close enough to your subject so it fills the viewfinder but not closer than 2 ft (0.6 m).
Take pictures at the subject's level. Kneel down to take pictures of children and pets.
- Hold your camera vertically to capture tall, narrow subjects, such as a waterfall, skyscraper, or a single person.
- Add interest to your picture by framing it with a tree branch, a window, or even the rails of a fence.
- Keep the sun behind you. This provides the best subject illumination.
- Keep your hand, fingers, or objects away from the flash and picture-taking lens.
- Stand at an angle to shiny surfaces like windows or mirrors to avoid flash reflection and bright spots in your pictures.
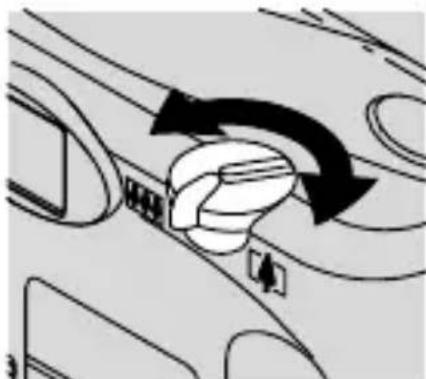
USING THE ZOOM LENS
This camera has a motorized zoom lens that lets you select the ideal lens-focal length for taking pictures. When you turn on the camera, the lens is initially set to the wide-angle position.
- Press the on/off button (19) to uncover the lens (7) and to turn on the camera.
- Look through the viewfinder eyepiece (11) to see your subject.
- Move the zoom dial (12) to 🐘 to zoom closer to the subject in the telephoto mode or to 🐘 to zoom away from the subject in the wide-angle position.
natural_image
Diagram showing airflow or movement between a car's airway and dashboard (no text or symbols)- Press the shutter button (1) to take the picture.
- The lens barrel fully retracts and the camera goes into a sleep mode after 4 minutes.
TAKING FLASH PICTURES
In dim light, such as indoors or outdoors in heavy shade, or on dark overcast days, you need flash. This camera features an automatic flash that fires when you need it.
-
Press the on/off button (19) to uncover the lens (7) and to turn on the camera.
-
Take the picture when the flash-ready light (10) and the auto-flash indicator (35) on the LCD panel (14) stop blinking.
natural_image
Simple line drawing of a device with a sunburst and lock, no text or symbols present- Keep the subject within the distance range for the speed of film in your camera.
Flash-to-subject distance
| ISOfilm Wide Telespeed (38 mm) (85 mm) |
| 100 2 to 21 ft 2 to 10 ft(0.6 to 6.4 m) (0.6 to 3.0 m) |
| 200 2 to 30 ft 2 to 14 ft(0.6 to 9.1 m) (0.6 to 4.3 m) |
| 400 2 to 43 ft 2 to 19 ft(0.6 to 13.1 m) (0.6 to 5.8 m) |
| 800 2 to 60 ft 2 to 27 ft(0.6 to 18.3 m) (0.6 to 8.2 m) |
- Don't take pictures beyond the maximum distance or your pictures will be dark.
- Hold the camera steady and gently press the shutter button (1) completely down to take the picture.
• To prevent battery drain, turn off the camera by pressing the on/off button when you are done taking pictures.
FLASH MODES
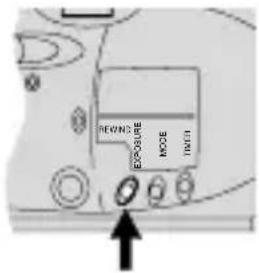
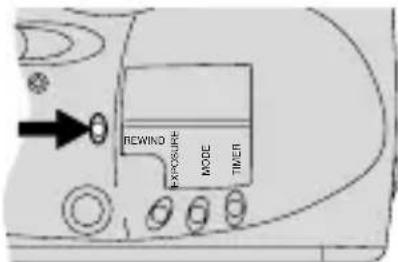
Besides the auto-flash mode with red-eye reduction (initial default setting of the camera), you can select auto flash without red-eye reduction, fill flash, flash off, or nightview with or without flash. Choose the flash mode that best suits your subject and surroundings.
Repeatedly press the exposure button (18) to view the choices on the LCD panel (14).
Auto flash

AUTC
Use this feature with or without red-eye reduction to take pictures of scenes with or without people.
Fill flash

When bright light indoors or outdoors comes from behind the subject (backlighting), dark shadows (especially on faces) may occur. Use fill flash to lighten these shadows and to add sparkle to subject's eyes.
Flash off

When you do not want to use the flash, especially indoors where flash is prohibited or to capture the ambiance of existing light, use the flash-off feature.
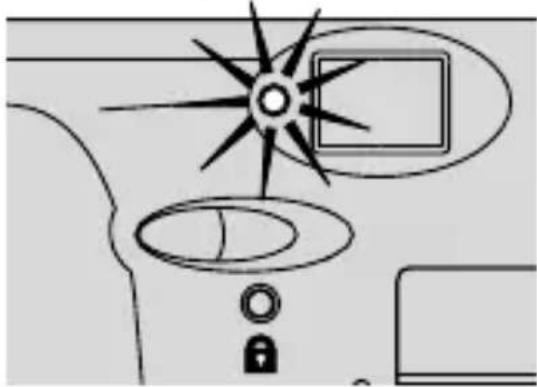
The camera-warning light (10) "blinks" red to alert you that the shutter speed is slow. In these situations—use high-speed film, place the camera on a tripod or another firm support, and hold your camera steady to take a picture.
Selecting the flash modes
- Follow steps 1–3 on pages 15 and 16 for TAKING FLASH PICTURES.
-
Repeatedly press the exposure button (18) until the auto-flash indicator (35) with flash symbol (29), fill-flash symbol (29), or flash-off symbol (30) appears on the LCD panel (14).
-
Hold the camera steady and gently press the shutter button (1) completely down to take a picture.
- To cancel the fill-flash mode and flash-off mode, turn off the camera by pressing the on/off button (19) or select a different flash mode by pressing the exposure button (18).
If you want to change the default setting to auto-flash without red-eye reduction, press the mode button (16) and deselect the red-eye-reduction indicator (34).
Nightview with or without flash

Use flash to balance the flash and existing light exposure so that you can take beautiful pictures of people at sunset or at night, or select flash off when you just want to use the existing light. The camera-warning light (10) "blinks" red to alert you that the shutter speed is slow. In these situations—use high-speed film, place the camera on a tripod or another firm support, and hold your camera steady to take a picture.
-
Follow steps 1–3 on pages 15 and 16 for TAKING FLASH PICTURES.
-
Repeatedly press the exposure button (18) until the nightview symbol (28) and flash symbol (29) or nightview symbol (28) without the flash symbol appears on the LCD panel (14).
- Look through the viewfinder eyepiece (11) to compose your picture.
- Hold the camera steady and gently press the shutter button (1) to take the picture.
- To cancel the nightview modes, turn off the camera by pressing the on/off button (19) or select a different mode by pressing the exposure button (18).
USING THE SELF-TIMER

Use this feature when you want to include yourself in the picture.
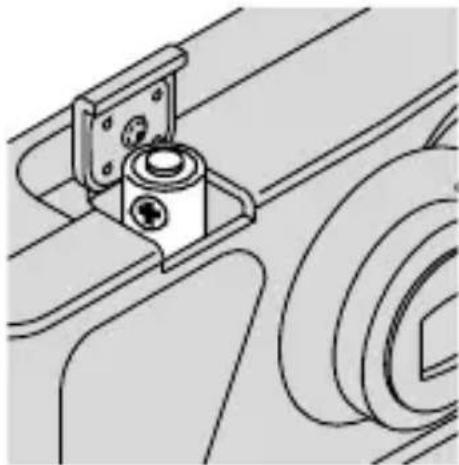
- Attach a tripod to the camera tripod socket (17) or place it on another firm support.
- Press the self-timer button (15).
• The self-timer symbol (33) appears on the LCD panel (14).
- Look through the viewfinder eyepiece (11) to compose the picture and to allow room for yourself in it.
- Hold the camera steady and gently press the shutter button (1) to take the picture.
- Position yourself in the composed picture making sure that you see the self-timer bulb (3) completely.
- The self-timer bulb on the front of the camera glows and then blinks during the 10 seconds self-timer countdown.
• The self-timer automatically cancels after the shutter releases.
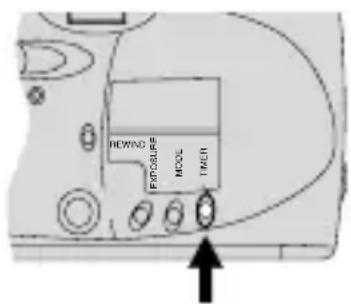
MODE BUTTON
Press the mode button (16) when you want to select or deselect red-eye reduction or to select portrait mode with or without red-eye reduction.
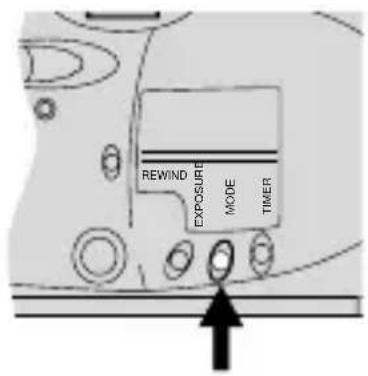
Red-eye reduction


Some people's eyes (and some pets') can reflect flash with a red glow. To minimize red eyes in flash pictures, use the red-eye-reduction feature and have your subject look directly at the red-eye-reduction bulb (3) until the flash goes off.
- Press the on/off button (19) to uncover the lens (7) and to turn on the camera.
-
Repeatedly press the mode button (16) until the red-eye reduction indicator (34) or no red-eye reduction indicator appears on the LCD panel (14).
-
Look through the viewfinder eye-piece (11) and compose your picture.
- Hold the camera steady and gently press the shutter button (1) completely down to take a picture.
Portrait mode

The portrait selection allows you to take sharp, close-up pictures of people. In this mode, the camera automatically zooms to provide suitable framing for portraits. This feature is available with or without red-eye reduction.
- Press the on/off button (19) to uncover the lens (7) and to turn on the camera.
- Repeatedly press the mode button (16) until the portrait symbol (31) with the red-eye reduction indicator (34) or just the portrait symbol (31) appears on the LCD panel (14).
- Look through the viewfinder eye-piece (11) and compose your picture within the close-framing guides of the viewfinder.
-
Hold the camera steady and gently press the shutter button (1) halfway down until the zoom lens adjusts for suitable framing and completely down to take a picture.
-
All flash options are available in the portrait mode.
- The portrait mode with or without red-eye reduction cancels after you take the picture.
UNLOADING THE FILM
Automatic rewind
The camera automatically rewinds the film into the film cartridge after the last exposure.
- Wait for the motor to stop running before you open the film door (25).
• The film-motion indicator (36) blinks and the frame counter (27) counts down as the film is rewinding.
- Open the film door, remove the film, and reload with fresh KODAK Film.
- The frame counter displays "0."
Manual rewind

If you don't want to take pictures on the entire roll of film, you can rewind the film. But you will not be able to reload the film.
- Gently press the film-rewind button (20) to start the automatic film rewind.
- Follow steps 1 and 2 from Automatic rewind.
CARING FOR YOUR CAMERA
- Protect the camera from dust, moisture, sudden impact, and excessive heat.
CAUTION: Do not use solvents or harsh or abrasive cleaners on the camera body.
- If the lens appears dirty, breathe on it to form a mist and wipe the surface gently with a soft, lintless cloth or camera lens-cleaning tissue. Never wipe a dry lens.
CAUTION: Use solvents or solutions designed for cleaning camera lenses. Do not use chemically treated tissues intended for cleaning eyeglasses.
- Remove the battery when you store the camera for an extended time.
CAUTION: To prevent possible damage and electrical shock, do not attempt to disassemble or repair the camera or flash unit by yourself.
TROUBLESHOOTING
| What happened Probable cause Solution | ||
| Camera will Lens cover not operate completely | cover closed Open lens cover | |
| Battery weak, dead, missing, or improperly loaded the battery | Replace or reload | |
| Flash not ready Wait for the blinking flash-ready light to disappear | ||
| Film not properly loaded Reload in camera THE FILM on page 8 | see LOADING | |
| Film needs to See UNLOADING THE FILM be removed on page 24 | BEA | |
| Shutter button Lens cannot be released | cover closed Press on/off button to open lens cover | |
| Battery weak, dead, missing, or improperly loaded reload the battery | Replace or | |
| Film-door latch Film does not open rewo | is not completely Complete taking pictures or und into the cartridge press the film-rewind button | |
| LCD panel is blank | Battery weak, dead, missing, Replace or reload or improperly loaded the battery | |
| Camera-warning Slight “blinks” red | low shutter speed Use high-speed in low-light scenes | ed film, a tripod, and hold the camera steady |
| Camera buttons No and zoom will not operate | film in camera Load film into the camera | |
SPECIFICATIONS
Lens: 38–85 mm, 6-element hybrid lens
Shutter: Programmed shutter; 4 to 1/500 seconds
Aperture: f/3.8-f/8.5
Film speed: DX (ISO) 100, 200, 400, or 800 print film
Focus range: Daylight: 2 ft (0.6 m) to infinity
Viewfinder: Albada type with center-spot-aiming circle
Flash unit: Built-in, KODAK SENSALITE™ Flash
Flash-recycle time: 6 seconds with fresh battery
Power source: One 3 volt lithium KODAK KCR2 (or equivalent) Battery
natural_image
Mechanical diagram showing a rotating component with an arrow indicating rotational motion (no text or symbols)natural_image
Technical line drawing of a mechanical assembly with mounting bracket and wheel (no text or symbols)natural_image
Hand inserting a device into a device component (no text or symbols visible)natural_image
Diagram of a device interior showing a cylindrical component with an arrow indicating direction, labeled 'Ca' (no text or symbols beyond label)natural_image
Hand inserting a device into a device casing, showing the left side with an arrow (no text or symbols visible)
natural_image
Illustration of a person standing in front of a large screen with a triangular screen above (no text or symbols)natural_image
Illustration of hands holding a camera with a knob (no text or symbols)natural_image
Illustration of a person holding a circular object with a bird, standing in front of trees (no text or symbols)natural_image
Diagram showing airflow around a vehicle's seatbelt with directional arrows (no text or symbols)natural_image
Simple line drawing of a device with a sunburst and lock, no text or symbols presentnatural_image
Mechanical diagram showing a rotating component with an arrow indicating rotational motion (no text or symbols)natural_image
Technical line drawing of a mechanical assembly with mounting bracket and wheel (no text or symbols)natural_image
Diagram of a device casing with open lid and directional arrows indicating movement (no text or symbols)natural_image
Illustration of a hand inserting a device into a computer case (no text or symbols visible)natural_image
Illustration of a person standing in front of a large screen with a triangular pointer above (no text or symbols)natural_image
Illustration of a hand using a camera to press or install a button (no text or symbols visible)natural_image
Illustration of two people standing outdoors with trees and mountains in the background (no text or symbols)Viseur
natural_image
Diagram showing curved arrows and a mechanical component with no visible text or symbolsnatural_image
Simple line drawing of a device with a sunburst and control panel (no text or symbols)- CONTENTS
- CAMERA IDENTIFICATION
- LCD panel
- ATTACHING THE STRAP
- LOADING THE BATTERY
- Low-battery indicator
- Automatic Energy Saving Features
- Auto power off
- Battery tips
- ATTACHING THE LCD LABEL
- LOADING THE FILM
- TAKING PICTURES
- Using the focus lock
- Tips for better pictures
- USING THE ZOOM LENS
- TAKING FLASH PICTURES
- FLASH MODES
- Auto flash
- Fill flash
- Flash off
- Selecting the flash modes
- Nightview with or without flash
- USING THE SELF-TIMER
- MODE BUTTON
- Red-eye reduction
- Portrait mode
- UNLOADING THE FILM
- Automatic rewind
- Manual rewind
- CARING FOR YOUR CAMERA
- SPECIFICATIONS
Brand : KODAK
Model : KE85
Category : Camera