Together II - Bed BabyGO - Free user manual and instructions
Find the device manual for free Together II BabyGO in PDF.
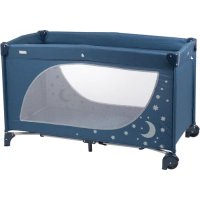
| Product type | Baby co-sleeping bed and playpen |
| Brand | BabyGO |
| Model | Together II |
| Standard | EN 1130-1:1996 |
| Maximum child weight (co-sleeping mode) | 9 kg |
| Maximum child weight (playpen mode) | 15 kg or up to 3 years |
| Adjustable height | 6 positions |
| Inclination | Yes, up to 2 positions difference between the feet |
| Mattress | Included, high-elasticity foam sponge |
| Materials | Steel frame, breathable mesh fabric |
| Wheels | Yes, with non-slip pads |
| Fastening straps | Included to attach to parents' bed |
| Accessories provided | Bed body, frame support, support bar, straps, hex key, screws |
| Usage | From birth to about 3 years (15 kg) |
| Care | Clean with warm water and mild detergent; do not use abrasive products |
| Safety | Mechanical locks, zippers with metal ring, no small objects |
| Instruction manual | Included (44 pages) |
| Warranty | Not specified |
Frequently Asked Questions - Together II BabyGO
User questions about Together II BabyGO
0 question about this device. Answer the ones you know or ask your own.
Ask a new question about this device
Download the instructions for your Bed in PDF format for free! Find your manual Together II - BabyGO and take your electronic device back in hand. On this page are published all the documents necessary for the use of your device. Together II by BabyGO.
USER MANUAL Together II BabyGO
natural_image
Line drawing of a simple outdoor table lamp with a square frame and tripod legs (no text or symbols)BEDIENUNGSANLEITUNG
Liebe Eltern:
natural_image
Line drawing of a rectangular basin with a mesh interior and handle bag (no text or symbols)Bettaufsatz
natural_image
Empty rounded rectangle outline with no text or symbolsnatural_image
Line drawing of two symmetrical mechanical components with protrusions (no text or symbols)


natural_image
Simple line drawing of a four-pronged metal bracket with two vertical posts and a central horizontal bar, labeled 'Abb. 4' (no other text or symbols)text_image
Technical diagram showing a mechanical component with labeled parts and directional arrows indicating motion or force.
natural_image
Technical line drawing of a mechanical clamp or lever assembly (no text or symbols)natural_image
Line drawing of a small modular device with a side panel and a directional arrow indicating rotation (no text or symbols)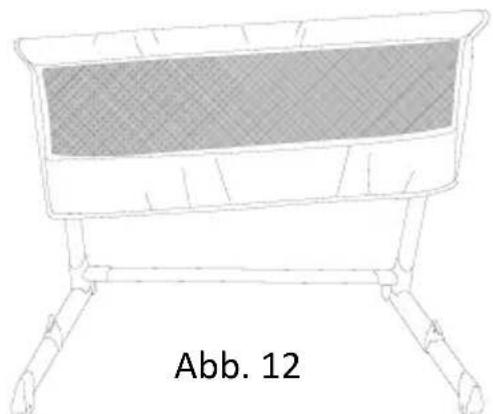
natural_image
Line drawing of a baby crib with mesh pattern and labeled 'Abb. 12' (no other text or symbols)Abb. 11
natural_image
Illustration showing a rope knot being inserted into a garment with a downward arrow indicating compression (no text or symbols)
text_image
Diagram illustrating two labeled mechanical or robotic arm movements with numbered annotations
text_image
Diagram illustrating a car seatbelting technique with labeled parts and directional arrows indicating movement or force.Abb. 13 Abb. 14 Abb. 15
natural_image
Technical line drawing of a mechanical device with a lever and guide mechanism (no text or symbols)Abb. 16
natural_image
Two-panel diagram showing a mechanical device with a checkmark and an X mark, no text or symbols present.Pflegehinweise
natural_image
Hand-drawn sketch of a rectangular basin with shaded interior (no text or symbols)natural_image
Diagram of a road intersection with vehicles and directional arrows indicating movement (no text or symbols)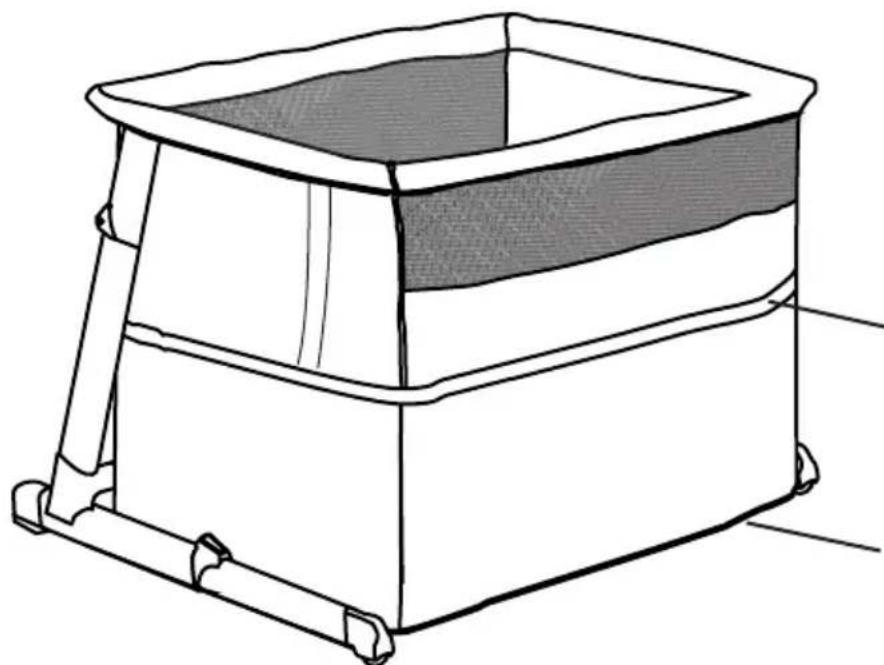
natural_image
Line drawing of a rectangular container with a ladder and side supports (no text or symbols)text_image
Hand-drawn diagrams showing correct and incorrect states of a table with checkmark and cross symbolsSide Crib Instruction manual

natural_image
Line drawing of a simple outdoor table lamp with a square frame and tripod legs (no text or symbols)Instruction manual
Dear Parents:
Thank you for purchasing the Side Crib.
Please read and follow all instructions before using the Side Crib.
WARNING!
Read the Instruction carefully before use and keep them for future reference.
INSTRUCTIONS FOR BED SIDE CRIB
IMPORTANT: READ CAREFULLY AND RETAIN FOR FUTURE REFERENCE This product complies with EN 1130-1:1996.
- With convenient device to fix the crib next to the parents' bed and get close to parents.
- Easy for parents to feed or take care of their baby and can be used as an independent crib.
• One side with breathable mesh fabric help air circulation. - Height adjustable in 6 position that can match to different height of the bed.
- Wheels included for easy move and special feet with antiskid also apply to bed with drawer.
• Reclinable to prevent baby vomiting milk. - With steel frame, easily folded and fabric easily detached for cleaning.
- With high elastic sponge mattress, well air permeability, more suitable for newborn babies.
WARNINGS (For Playpen Mode):
- WARNING-Attend the child at any time.
- WARNING-Never hang anything up on the playpen.
- WARNING-Do not use the playpen without the base.
- WARNING- Do not place the playpen close to an open fire or other heat source.
- WARNING- Suit for child under 15 KGS in weight or approximately 3 years old.
- WARNING- Ensure that the playpen is fully erected and all the locking mechanisms engaged before placing your child in this playpen.
- WARNING- Do not use the playpen if any part is broken, torn or missing and use only spare parts approved by the manufacturer. Do not use the accessories which are not approved by the manufacturer.
- WARNING-Never leave anything in the playpen which could provide a foothold or create a danger of suffocation or strangulation.
- WARNING- The base should always be used in the highest position.
- WARNING- Ensure all assembly fittings should always be tightened properly.
WARNINGS: (For Stand Alone Crib & Co-Sleeping Mode)
-
BEFORE USE, REMOVE AND DISPOSE OF ALL PLASTIC BAGS AND PACKAGING MATERIALS AND KEEP THEM OUT OF REACH OF CHILDREN.
-
The product is ready for use only when all locking mechanisms are engaged. Check carefully that these are engaged before use.
-
All opening, adjusting, anchoring and positioning operations of the product must be carried out exclusively by an adult.
-
The young children should not be allowed to play unsupervised in the vicinity of a crib.
-
The crib should be locked in the fixed position when a child is unsupervised in it.
-
Do not use the product if any part is broken, torn or missing.
-
When a child is able to sit, kneel or to pull itself up, the crib (stand alon crib, co-sleeping mode) shall not be used anymore for this child.
-
The thickness of the mattress must be such that the vertical height (upper surface of the mattress until the upper edge of the product's sides) is at least 200mm. Do not use more than one mattress in the crib.
-
The product must always be placed on a horizontal surface. Never leave the product on an inclined surface with the child inside of it.
-
Be aware of the risk of fire and other sources of strong heat, such as electric bar fires, gas fires, etc. In the near vicinity of the crib.
-
Keep the fastening belts away from the reach of children.
-
Do not leave any object inside the product that could reduce its depth.
-
Do not position the crib near walls and obstacles to prevent trapping hazards.
-
Do not leave small objects inside the product to prevent chocking hazards.
-
Do not adjust or move the product with the child inside.
-
Do not use the product with more than one child at a time.
-
The product must be kept away from electric cables and cords. Do not place the product near windows where cords, curtains or similar objects could pose chocking or strangling hazards for the child.
-
All assembly fittings should always be tightened properly and taken cared that no screws are loose, because a child could be trapped by parts of the body or clothing (e.g. strings, necklaces, ribbons for babies dummies, etc), which would pose a risk of strangulation.
-
This product is intended for one child weighing up to a maximum of 9kg.
-
Not to use the body of the crib without its frame.
Components
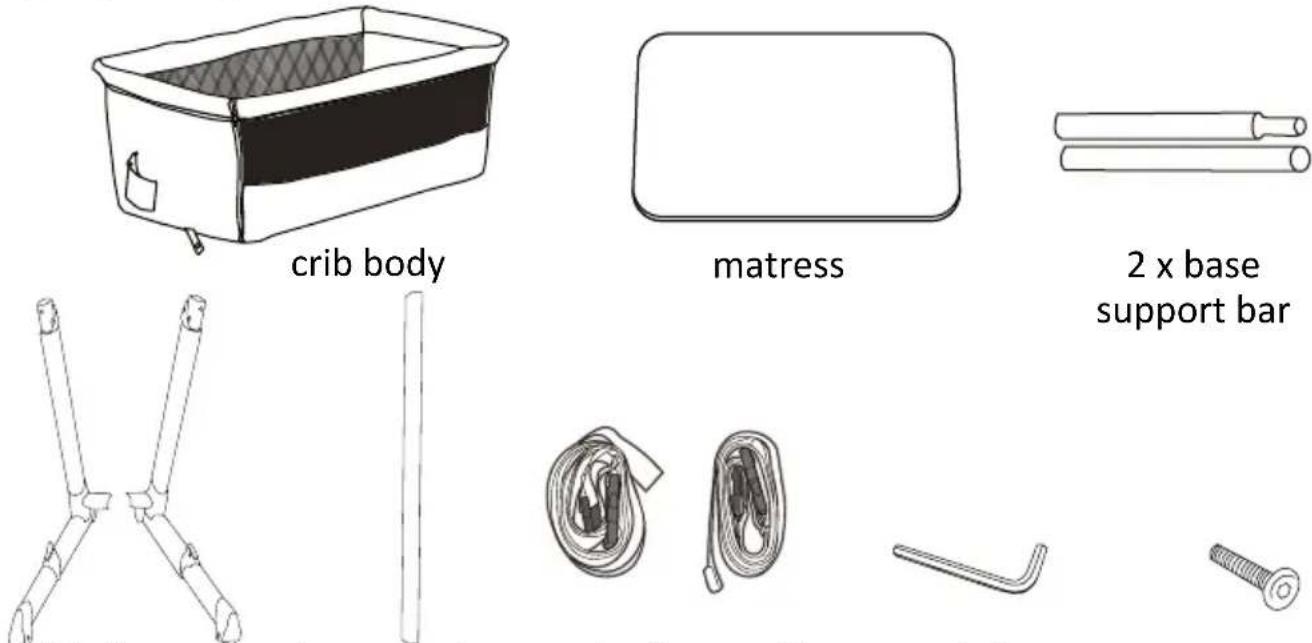
text_image
crib body matress 2 x base support barside frame stand support bar a pair of strap allen wrench 4x screw
Instruction for Assembly
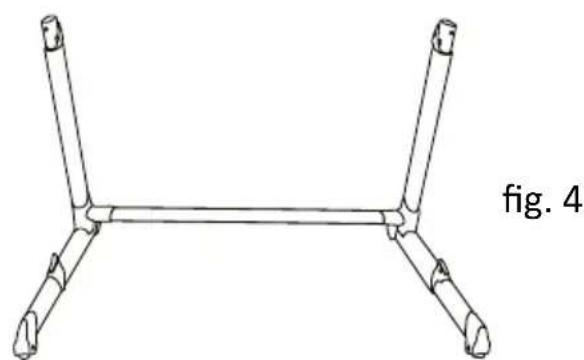
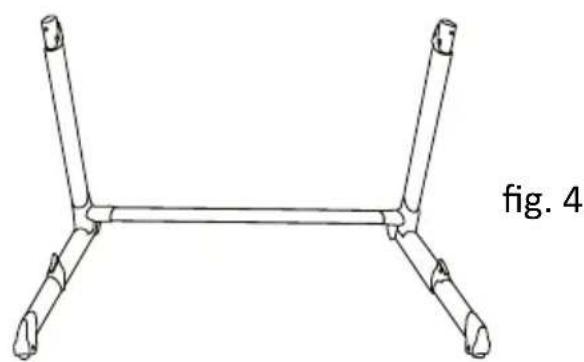
- Insert support bar “C” to left side frame stand “A”(fig 1) and secure with 2 screws (fig 2).
Use the allen wrench to tighten screws in clockwise direction (fig 3). Repeat the same for the right side frame stand “B”(fig 4).

text_image
A B C
flowchart
graph TD
    A["1: Initial mechanical assembly"] --> B["2: Tail assembly"]
    B --> C["3: Final assembly with rotational motion"]
natural_image
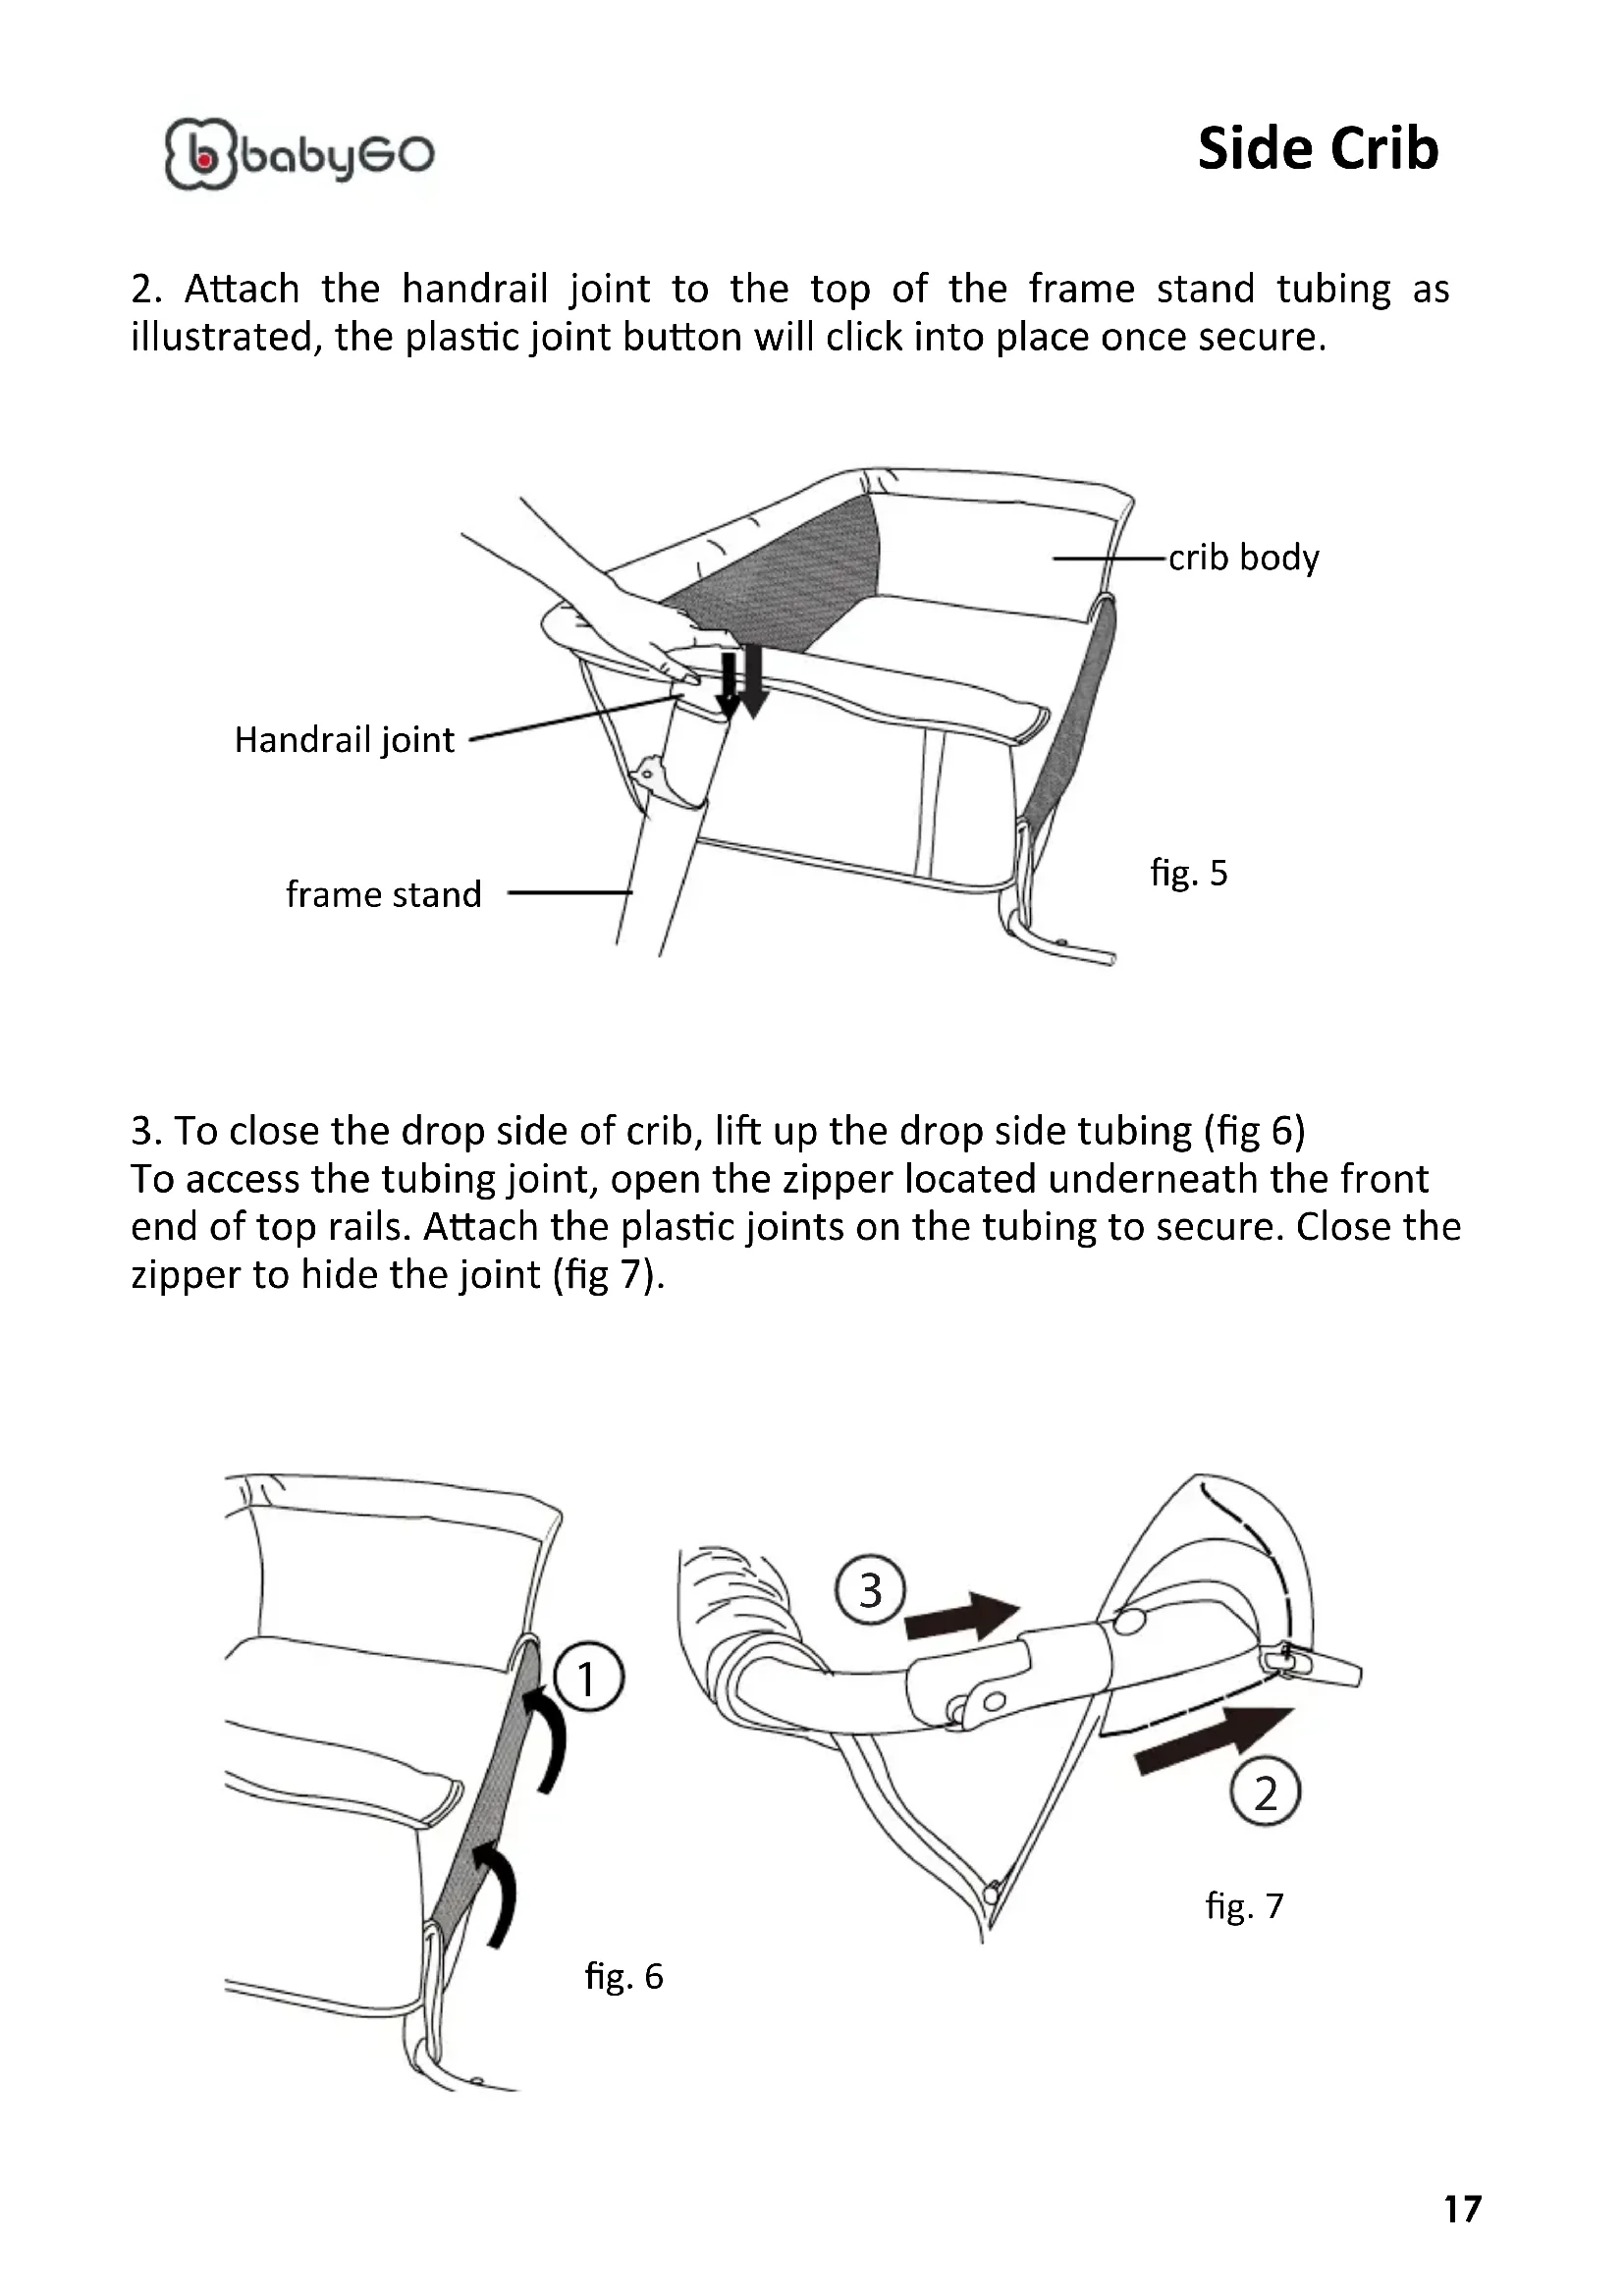
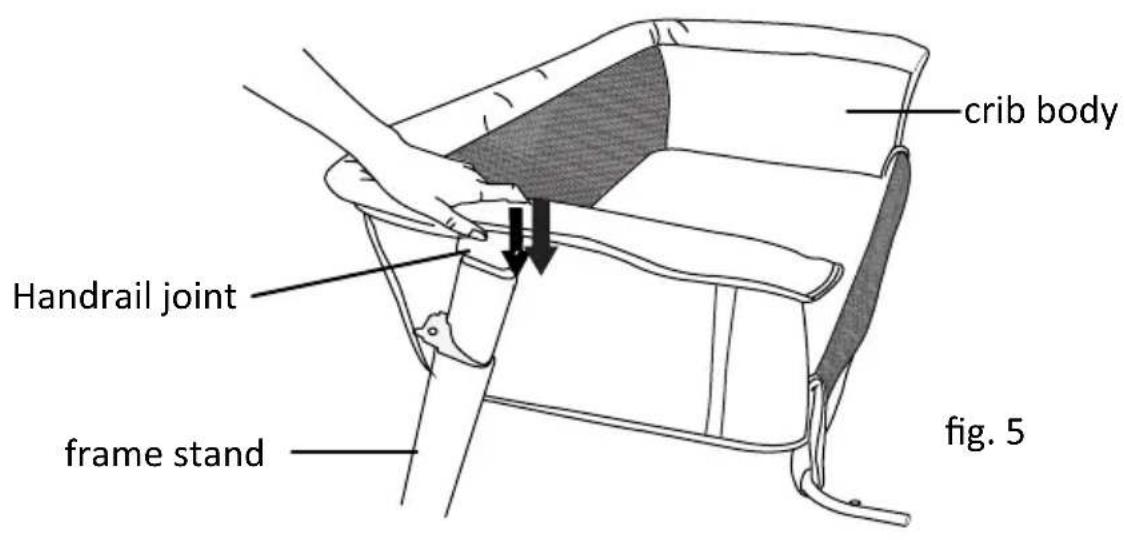
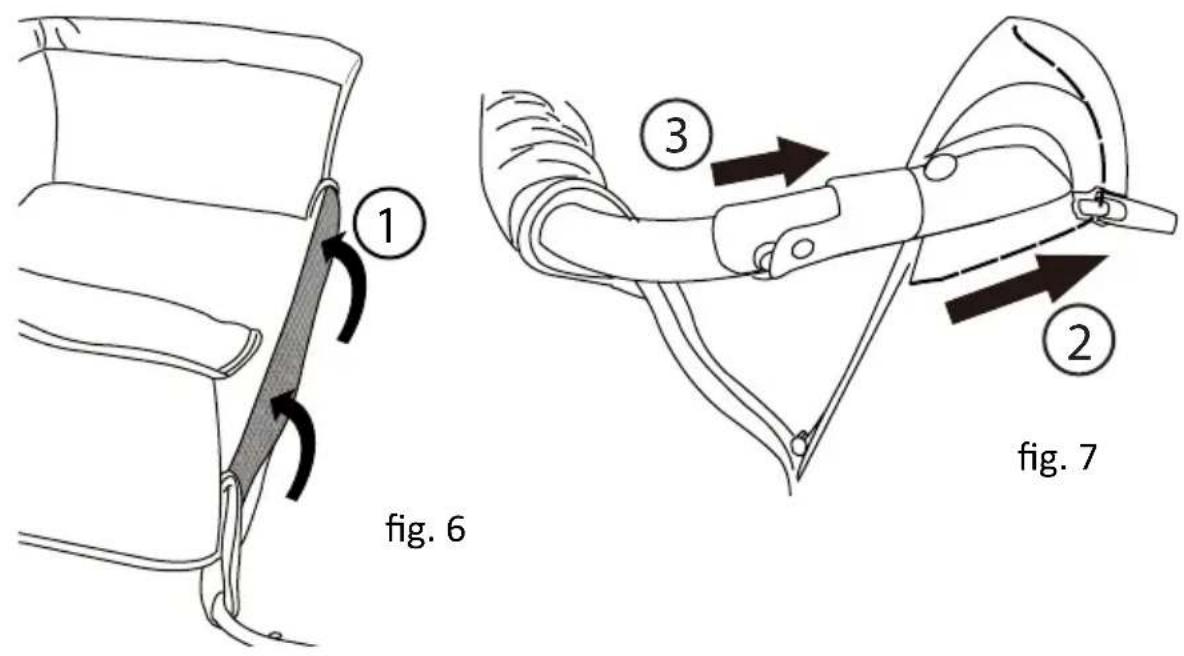
Simple line drawing of a U-shaped mechanical or structural component with four vertical rods (no text or symbols)- Attach the handrail joint to the top of the frame stand tubing as illustrated, the plastic joint button will click into place once secure.
text_image
crib body Handrail joint frame stand fig. 5- To close the drop side of crib, lift up the drop side tubing (fig 6) To access the tubing joint, open the zipper located underneath the front end of top rails. Attach the plastic joints on the tubing to secure. Close the zipper to hide the joint (fig 7).
text_image
1 fig. 6 3 2 fig. 7- Fasten the side of the crib with the mesh window using the side zips and close them completely (fig 8). Your crib is now ready to be used as a stand alone crib.
WARNING! ENTRAPMENT HAZARD AND FALL HAZARD-Always use the metal ring to lock the zipper heads together, in case the child unzip the crib.

text_image
Technical diagram showing two views of a mechanical device with labeled parts and a schematic view labeled 'fig. 8'.Instruction for Wheels, Leg & Height adjustment
- There are wheels located on the front of the frame legs for easy moving. To access wheels, hold the crib rear long handrail and lift up. Simultaneously push the crib forward or backwards (fig 9).
There is an anti-slipper at the bottom of leg to stop the crib moving.

text_image
1 2 Anti-Slipper fig. 9- The leg at the base of the crib can be adjusted. Press button down as illustrated and pull leg out to adjust the length
WARNING! Always pull out legs to full extension when in use.

text_image
Technical diagram showing a mechanical component with two directional arrows labeled ① and ② indicating movement or force directions.
natural_image
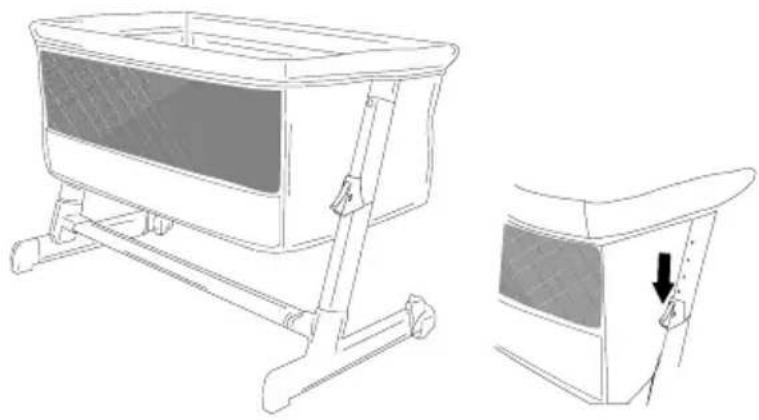
Technical line drawing of a mechanical lever or clamp assembly (no text or symbols)- The crib can be adjusted to 5 different height positions. In order to adjust the height, press the adjustment lever down and adjust the crib to the desired position (fig 11). Repeat this operation on the opposite side. The base of the crib can be inclined slightly by adjusting the two legs to different heights (fig 12).
WARNING! The crib can be inclined with a maximum variance of 2 positions between one leg and the other (e.g. the right leg in position 1 and the left leg in position 3).
WARNING! The head of the child should always be positioned on the highest side.
natural_image
Line drawing of a small outdoor enclosure with a side view showing a door opening and a directional arrow (no text or symbols)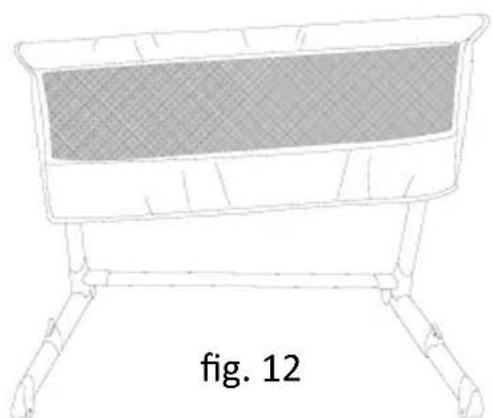
natural_image
Line drawing of a baby crib with mesh backrest and standing legs (no text or symbols)fig. 11
Instruction for fixing to parents' bed
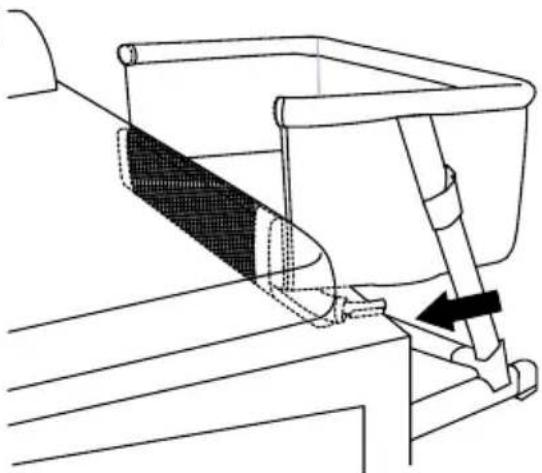
- Unlock the one of two zipper heads from the metal ring. Open the side of the crib with the mesh window using the side zippers.
Then open the zipper located at the front end of top rail. Open them completely. Release the plastic joints from the tubing (fig 14) and partially remove the tubes. Once this operation has been performed on both sides, lower the crib side panel and fit it to the base of the crib main body using snap button (fig 15).
WARNING! Use the crib with the tube lowered in co-sleeping mode only.

fig. 13 fig. 14 fig. 15
- Move the crib close to the parents bed and check the height of the crib compared with the mattress of the bed (fig 16).
WARNING! The mattress of parent's bed shall be aligned to or over the height of the drop side in the lowest position.
WARNING! In co-sleeping mode the 2 legs of the crib should always be adjusted to the same height.
natural_image
Technical line drawing of a mechanical device with lever and guide mechanism (no text or symbols)fig. 16
- Use the pair of straps provided to fix the crib to the parents bed. Fix the buckles to the inner side of the both frame stands (fig 17), Next, fix the straps around the structure / slats of the parent's bed, from the bottom towards the top and fasten the buckles below the crib to finish (fig 18).

text_image
CLICK!fig. 17 fig. 18
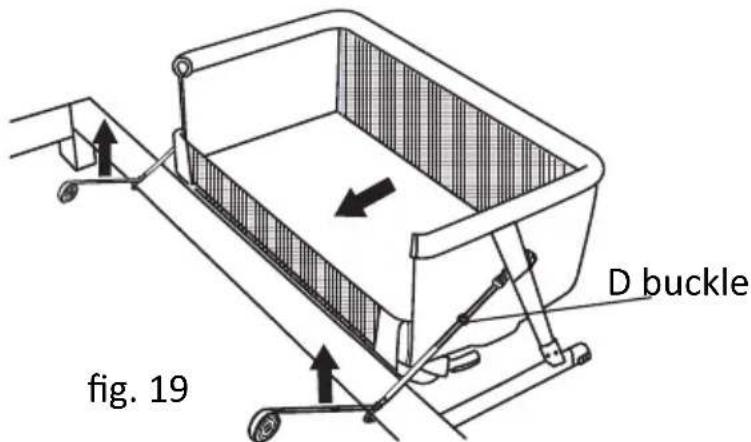
- To secure the crib to the parents' bed, adjust the "D" buckle to tighten and pull the straps once again to make sure the crib is properly and firmly secured to the parents' bed (fig 19).
WARNING! The maximum distance between the crib and the parent's bed should be 2cm.
WARNING! During use, ensure that the adult bed sheet, blankets etc. do not enter and cover the interior of the crib.
text_image
D buckle fig. 19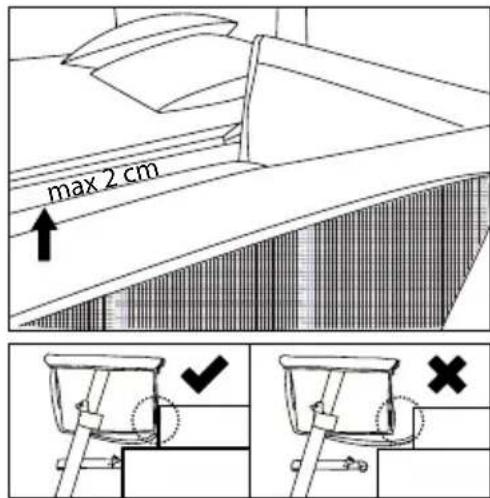
text_image
max 2 cmCare Instructions
Plastic and metal parts may be sponged lightly using warm water and a mild detergent. Dry thoroughly before storing.
Never clean any part of the product with abrasive, ammonia based, bleach based or spirit type cleaners.
Do not twist; do not spin-dry; do not iron. WARNING!


During the removal and / or application of the mattress cover, handle the fabric carefully in order to avoid accidental damage or tears.
Playpen Mode
natural_image
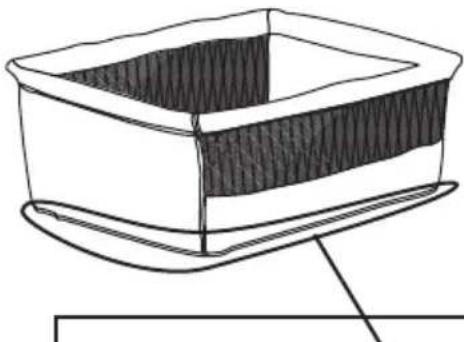
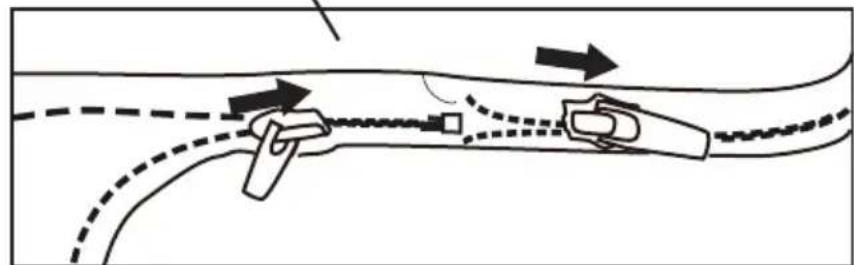
Line drawing of a rectangular basin with shaded interior (no text or symbols)The bottom of the crib body is provided with zippers.
Unzip bottom to lower down the base to floor, so it converts to playpen mode.
natural_image
Diagram of a road intersection with directional arrows indicating movement (no text or symbols)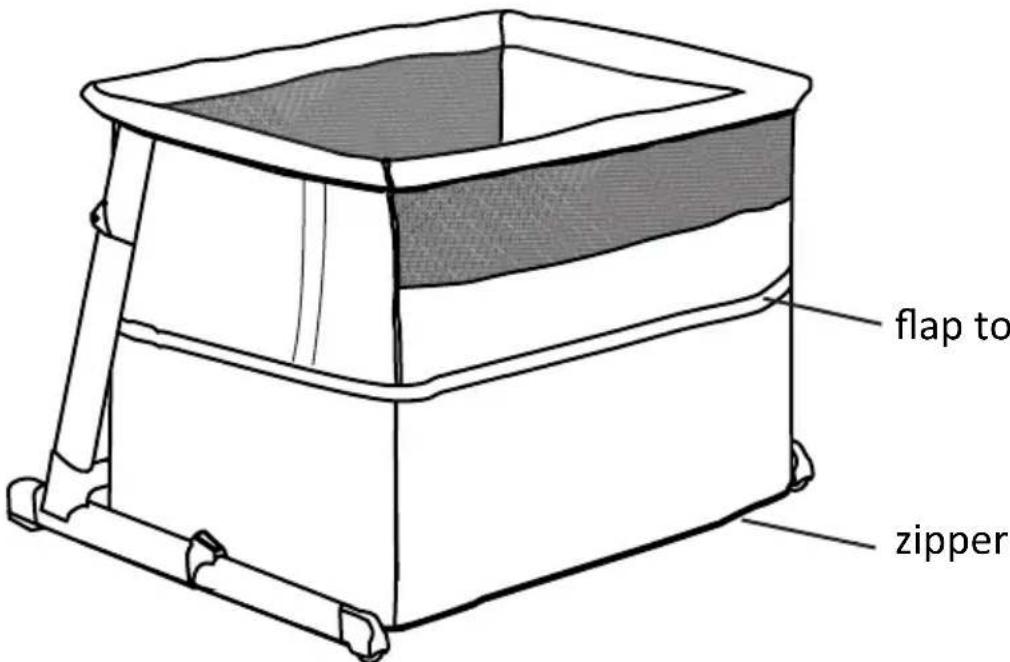
text_image
flap to zipperflap to cover the zipper
zipper
WARNING!
In playing mode the frame should always be used in highest position.

text_image
Hand-drawn diagrams showing correct and incorrect states of a table frame, with checkmark and cross symbols indicating selection.natural_image
Line drawing of a simple outdoor table lamp with a square frame and tripod legs (no text or symbols)natural_image
Line drawing of a rectangular basin with a mesh interior and two side pockets (no text or symbols)natural_image
Empty rounded rectangle outline with no text or symbols
matelas 2x barres de
supportde la base

natural_image
Line drawing of two symmetrical mechanical components with protrusions (no text or symbols)flowchart
graph TD
    A["Step 1: Initial pipe connection"] --> B["Step 2: Screw mechanism"]
    B --> C["Step 3: Rotation of valve or grip"]

natural_image
Simple line drawing of a U-shaped metal frame with four vertical rods (no text or symbols)text_image
Technical diagram showing a mechanical device with labeled parts and a schematic view of its internal structure.text_image
Technical diagram of a mechanical clamp or bracket with numbered callouts indicating process steps
natural_image
Technical line drawing of a mechanical lever or clamp assembly (no text or symbols)natural_image
Line drawing of a small outdoor enclosure with a side-mounted frame and a separate view showing a wall-mounted panel (no text or symbols)
natural_image
Line drawing of a baby crib with mesh backrest and standing legs (no text or symbols)fig. 11
text_image
Diagram illustrating a sewing process with magnified detail and downward arrow indicating direction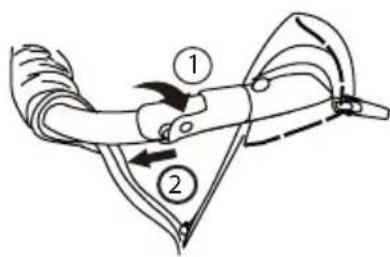
text_image
Diagram illustrating two labeled mechanical or robotic arm movements with numbered annotations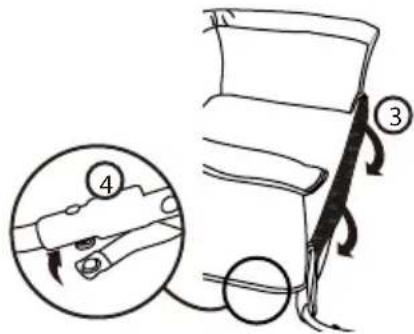
text_image
Diagram showing a car interior with labeled parts and directional arrows indicating movement or force, including numbered callouts.fig. 13 fig. 14 fig. 15
natural_image
Technical line drawing of a mechanical device with lever and guide mechanism (no text or symbols)fig. 16
text_image
Diagram showing two mechanical assembly states with checkmark and cross symbols indicating inspection or failure points.natural_image
Five abstract geometric symbols: crown, crossed-out square, crossed-out triangle, crossed-out X, and crossed-out X (no text or labels)Mode parc

natural_image
Line drawing of a rectangular basin with shaded interior (no text or symbols)natural_image
Diagram of a road intersection with vehicles and directional arrows indicating movement (no text or symbols)
natural_image
Line drawing of a rectangular container with a side panel, no text or symbols presenttext_image
Hand-drawn diagrams showing correct and incorrect states of a table with checkmark and cross symbolsnatural_image
Line drawing of a simple outdoor table lamp with a mesh basket and support legs (no text or symbols)
Baby-Aanschuifbed
Handleiding
Handleiding
Beste ouders:
flowchart
graph TD
    A["1: Initial mechanical assembly"] --> B["2: Top view of tool"]
    B --> C["3: Final assembly with rotational motion"]
    style A fill:#f9f,stroke:#333
    style B fill:#ccf,stroke:#333
    style C fill:#cfc,stroke:#333
natural_image
Simple line drawing of a U-shaped metal frame with four vertical rods (no text or symbols)text_image
Technical diagram showing two views of a hairdresser with labeled parts and a 3D model, including a magnified inset view.text_image
Technical diagram showing a mechanical component with labeled parts and directional arrows indicating motion or force.
natural_image
Technical line drawing of a mechanical clamp or lever assembly (no text or symbols)natural_image
Line drawing of a small modular device with a side panel and a directional arrow indicating rotation (no text or symbols)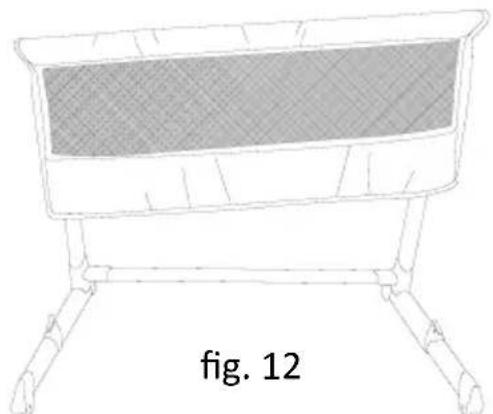
natural_image
Line drawing of a baby crib with mesh backrest and standing legs (no text or symbols)fig. 11
natural_image
Technical line drawing of a mechanical device with a lever and guide mechanism (no text or symbols)fig. 16
natural_image
Two-panel diagram showing a mechanical device with a checkmark and an X mark, no text or symbols present.natural_image
Hand-drawn sketch of a rectangular basin with shaded interior (no text or symbols)natural_image
Diagram of a road intersection with vehicles and directional arrows indicating movement (no text or symbols)
natural_image
Line drawing of a rectangular container with a ladder and side supports (no text or symbols)text_image
Hand-drawn diagrams showing correct and incorrect states of a table with checkmark and cross symbols
text_image
babyGOImpressum:
BabyGO Baby Products GmbH
Am Bahndamm 1-3
D-33378 Rheda-Wiedenbrück
Germany