
MOD38 - Vacuum Cleaner MPM - Free user manual and instructions
Find the device manual for free MOD38 MPM in PDF.



| Vacuum type | Cordless cyclone vacuum |
| Brand | MPM |
| Model | MOD38 |
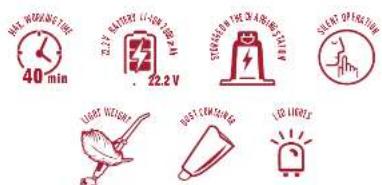
| Filtration technology | Cyclonic + HEPA 13 filter |
| Runtime | Up to 40 minutes (low power) |
| Charging time | Approximately 3 to 3.5 hours |
| Battery type | Lithium-ion |
| Power levels | 2 |
| Noise level | 69 dB |
| LED lighting | Yes, on the electric brush |
| Electric brush | Yes, multifunction (hard floors and carpets) |
| Included accessories | Small brush, crevice tool, docking station with stand and storage |
| Weight (estimated) | Approximately 2.5 kg |
| Dimensions (estimated) | Approximately 1100 x 250 x 200 mm |
| Dust container capacity (estimated) | Approximately 0.6 L |
| Recommended maintenance | Clean the container and filters after each use |
| Usage | Indoor, dry surfaces only |
| Safety | Automatic shutdown in case of blockage, overload protection |
| Warranty | See manual |
Frequently Asked Questions - MOD38 MPM
User questions about MOD38 MPM
0 question about this device. Answer the ones you know or ask your own.
Ask a new question about this device
Download the instructions for your Vacuum Cleaner in PDF format for free! Find your manual MOD38 - MPM and take your electronic device back in hand. On this page are published all the documents necessary for the use of your device. MOD38 by MPM.
USER MANUAL MOD38 MPM
EN We wish you satisfaction from using the product and invites you to check a wide range of other MPM appliances
natural_image
Green and black air purifier device with extended arm (no visible text or symbols)CZ NAVOD K OBSLUZE 3
SK POLIŽ VATFI SKA PRÍRUCKA 103
BEZPEČNOSTNÍ POKYNY PŘI POUŽÍVÁNÍ

natural_image
Diagram of a vacuum cleaner connected to a power outlet, showing part assembly and wiring (no text or symbols)natural_image
Line drawings of a vacuum cleaner with various hand positions and internal components, shown from front and side views (no text or symbols)natural_image
Diagram of a robotic arm with curved motion arrows indicating rotation (no text or symbols)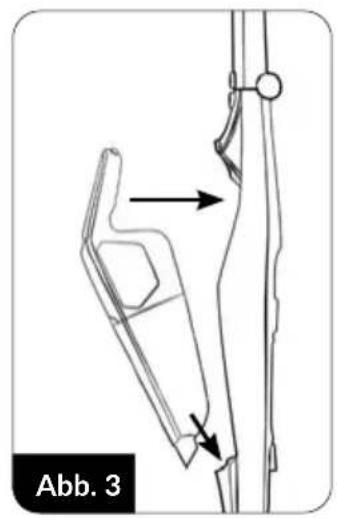
natural_image
Technical line drawing of a mechanical component with arrows indicating motion or assembly (no text or symbols)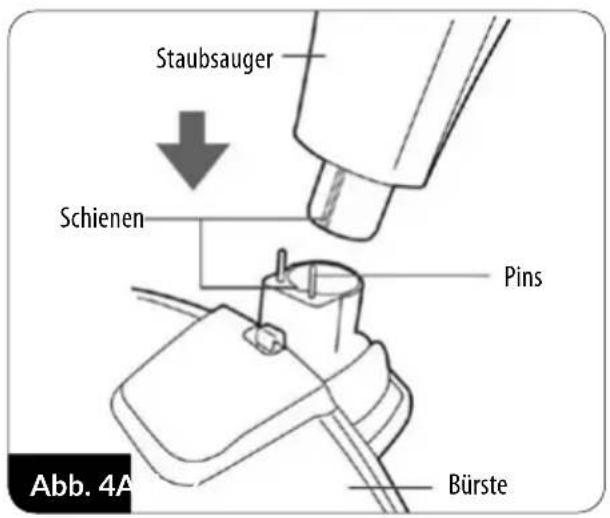
natural_image
Diagram showing a foot and seat assembly with a magnified inset highlighting a circular component (no text or symbols)Abb. 6 A
natural_image
Diagram of a vacuum cleaner connected to an electrical outlet, showing part assembly and wiring (no text or symbols)
natural_image
Line drawings of a vacuum cleaner with various designs and components, including a close-up inset showing hand positioning and part details (no text or symbols)natural_image
Diagram of a vacuum cleaner with a close-up view of its body and cable, showing no text or symbols.natural_image
Line drawings of Joonis 9 vacuum cleaner components including handle, arm, and brush (no text or symbols)Read the instructions carefully before use.
The unit may only be used with the power supply supplied with the whole set.
-The appliance is intended for domestic use only.
-Use the vacuum cleaner only indoors and only for vacuuming dry surfaces. Dry wet cleaned carpets before vacuuming.
- Do not use the appliance for purposes other than those for which it was intended.
- Do not use the unit to suck up liquids, ash, cigarette butts, oils and sharp objects, etc. This can damage the appliance or even cause fire! Do not vacuum near flammable liquids or substances either!
- Do not point the suction elements of the vacuum cleaner towards people or animals. Pay particular attention not to bring the suction elements close to your eyes, ears and hair.
-Do not use the unit without correctly mounted filters.
-Take special care when children are near the appliance.
- Do not immerse the unit, electric brush, cable or plug in water or other liquids!
-Do not leave the appliance unattended during operation.
-Always unplug the unit when not in use.
- Always remove the plug from the mains socket before cleaning/maintenance.
-Check the housing regularly for damage.
- Never use a damaged appliance, including one with a damaged cord or plug, in which case have it repaired at an authorised service centre.
-Use of accessories not recommended by the manufacturer may cause damage to the appliance, fire or personal injury.
-Do not use the appliance outdoors.
- Do not cover the appliance during operation, do not cover the inlet/outlet holes.
-Keep the vacuum cleaner away from all heat sources (radiators, cookers, etc.) due to its plastic housing.
-Do not bend or hang the cord on sharp edges.
- Only several surfaces are intended to be touched during the appliance operation, i.e. handles, adjustment knobs, etc.
- This equipment may be used by children of at least 8 years of age and by persons of diminished physical, mental capacity and lack
of experience and knowledge of the equipment if supervision or instruction is provided regarding the safe use of the equipment so that the hazards involved are understood. Unsupervised children should not perform cleaning and maintenance of the equipment.
- Keep the appliance and its cord out of reach of children under 8 years of age.
-The appliance is not a toy and should not be used as such by children.
- Check that the power parameters on the appliance's rating plate correspond to the parameters of your power supply network.
-Do not connect the plug to the power socket with wet hands.
- Do not pull the plug out of the power socket by pulling the cord.
-Do not pull the appliance by its cord.
- The appliance is equipped with a battery consisting of several cells connected in one unit, its replacement may only be carried out by suitably trained persons.
-Do not try to open the battery housing on your own.
- Do not expose the battery to fire, extreme temperatures (below -10, above + 50C°), water, humidity or prolonged sunlight.
- Do not store the battery together with metal objects, e.g. paper clips, nails, coins, etc., or intentionally short-circuit the negative and positive terminals - risk of ignition, explosion.
- Do not allow a situation that may result in deformation of the battery, e.g. significant shocks, vibrations, mechanical pressure, etc. - do not use the battery if it has been damaged (mechanical damage, substance leakage, etc.).
-Do not allow the deep battery discharge.
-Check the battery charge regularly - do not leave the battery without control for a longer period of time.
-If there is any leakage from the battery, do not touch the substance that has leaked out of the battery.
- Packaging is not a toy! Please keep packaging components (plastic bags, cartons, styrofoam, etc.) out of the reach of children.
- WARNING! Do not allow children to play with the film. Danger of suffocation!
DEVICE DESCRIPTION
The MOD-38 vacuum cleaner combines the convenience of a cyclonic and cordless vacuum cleaner. Cyclone technology allows you to filter dust without using a dust bag by means of centrifugal force, which means you only need to empty the dust container over the dustbin. The lithium-ion rechargeable battery with one of the highest ratios of stored energy to its weight makes the device lightweight and ensures a long operating time after charging. The vacuum cleaner is equipped with a two-stage suction power adjustment.
- Vacuum cleaner switch on the handle
- Main handle assembly.
- Main handle folding button
- Button for releasing the vacuum cleaner from the main handle
- Vacuum cleaner
- Vacuum cleaner switch
- Status lamp
- Dust container release button
- Hook with connection
- HEPA filter
- Filter body
-
Dust container
-
Electric brush release button
- Electric brush
- Electric brush roll release button
- Backlight diodes (LED)
- Charger
- Docking station (stand) base
- Docking station (stand) base
- Charger socket
- Guide rails for accessory holders
- Accessory holders
- Small brush
- Crevice brush
BEFORE FIRST USE
- Remove the vacuum from the box; remove all stickers, transport protectors, bags and fillers.
- Check the vacuum for any damages that might have occurred during transport. If you have any doubts, contact the seller.
- Assemble the docking station (stand) correctly – attach the body (19) to the docking station base (18) as shown (fig.1). The docking station can be removed by releasing the locking mechanism underneath the base (18). Install holders (22) in the guides (21) where you can park additional vacuum cleaner accessories.
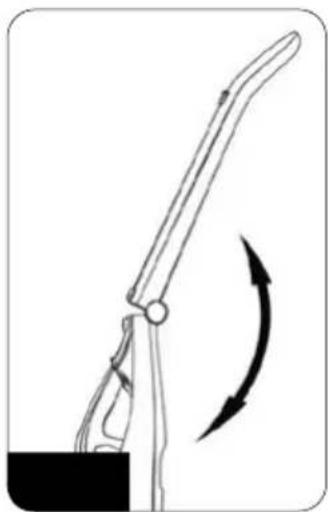
- Unfold the handle assembly (2) and lock in the extended position (fig.2). Folding of the handle is possible by pressing the button (3).
- Mount the vacuum cleaner (5) in the handle assembly (2) as shown in the picture (fig.3).
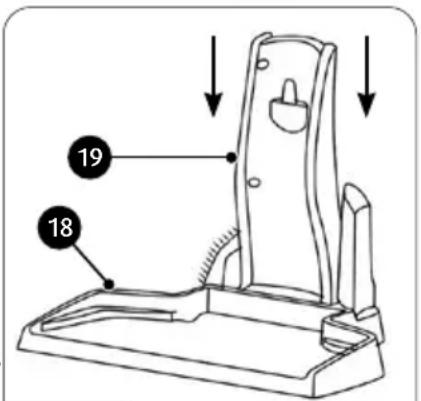
fig. 1
- Install the electric brush (14) in the lower slot of the main handle. Pay attention to the delicate power supply pins so as not to damage them. The main handle is equipped with a guide for mounting the electro-brush in one correct position (fig.4).
natural_image
Diagram of a robotic arm with motion arrows indicating rotation (no text or symbols)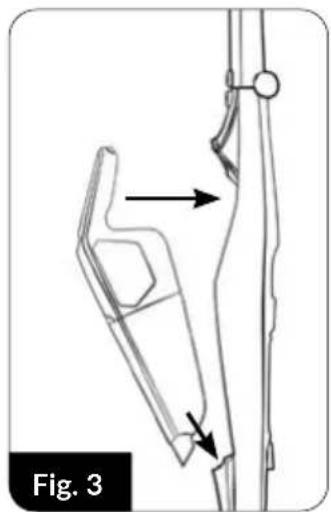
natural_image
Technical line drawing of a mechanical component with arrows indicating motion or force direction (no text or symbols)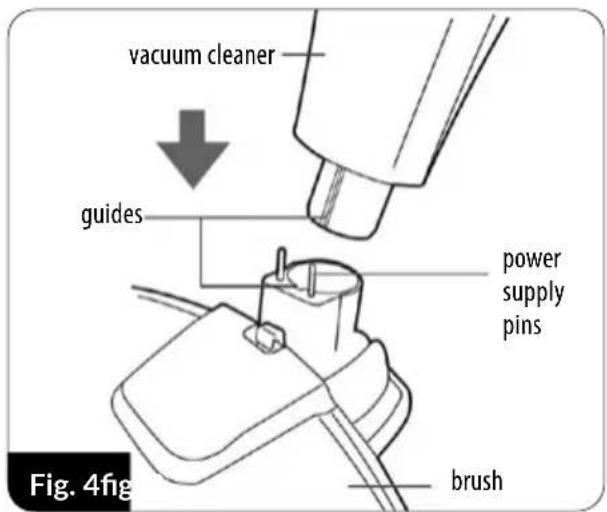
- Charge the vacuum cleaner battery as described in the section "CHARGING THE BATTERY".
CAUTION! The vacuum cleaner, power brush and main handle are equipped with electrical connector pins. Do not damage or short-circuit them.
BATTERY CHARGING
CAUTION! Charge the battery before using the vacuum cleaner for the first time. The time required to charge the battery is approximately 3.0 – 3.5 hours.
CAUTION! Only charge the battery with the supplied charger. While the battery is charging, the vacuum cleaner cannot be started.
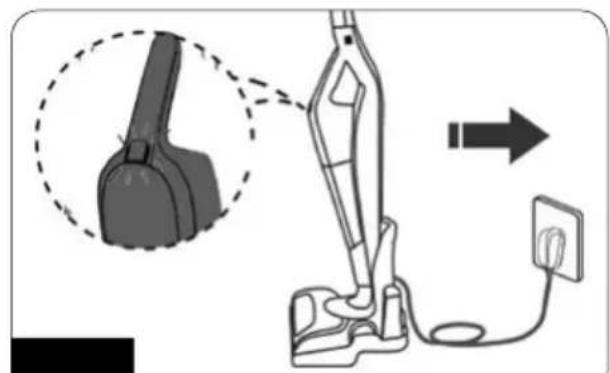
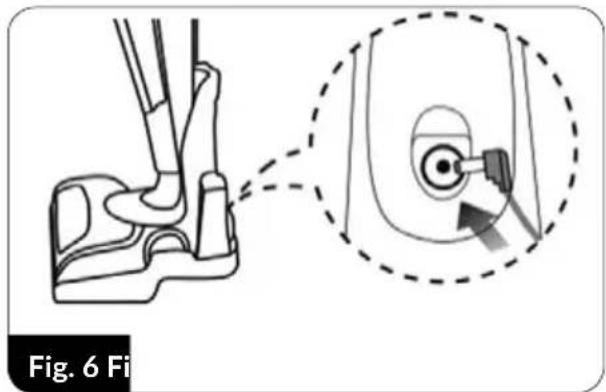
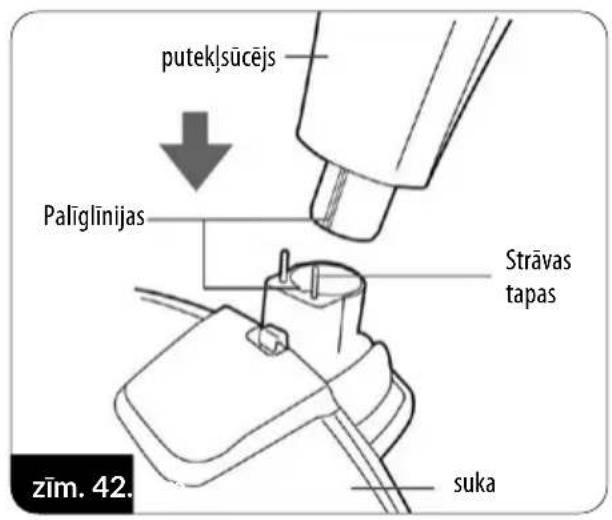
- Connect the charger cable (17) to the charger socket (20) on the docking station (fig.6).
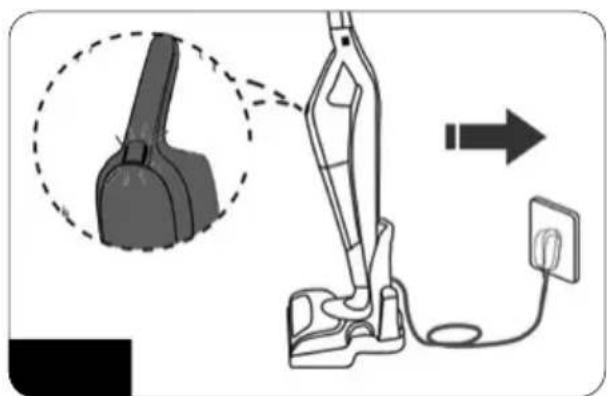
- Place the correctly assembled vacuum cleaner with the main handle and the electric brush on the docking station (fig.7). Connect the charger to the power supply network.
natural_image
Diagram showing a foot and seat assembly with a magnified inset highlighting the circular detail of the seat (no text or symbols present)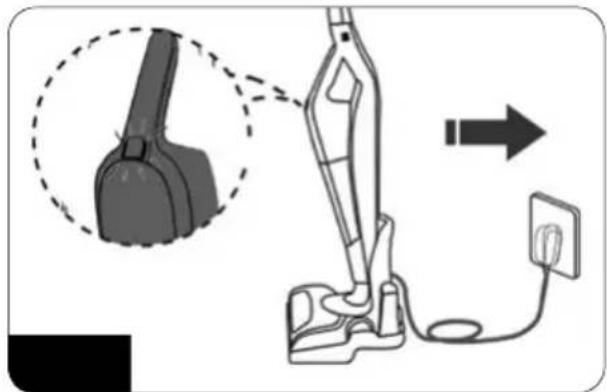
natural_image
Diagram of a vacuum cleaner with attached power outlet, showing mechanical components and wiring (no text or symbols)The status light (7) will flash to indicate that the battery is being charged.
- A steady light (7) indicates that the battery has been recharged – disconnect the charger from the mains when you plan to stop using the vacuum cleaner for a while.
- Charge the battery after each use of the vacuum cleaner
CAUTION! Gentle heating of the charger is normal during the charging process.
USING THE VACUUM CLEANER
- Make sure the vacuum cleaner is properly assembled and the battery is charged.
- Start the vacuum cleaner with the button (6) directly on the vacuum cleaner or with the button (1) on the main handle (fig.8). The operation of the buttons is independent of each other as long as the vacuum cleaner is in the main handle.
- Pressing the power button again makes the vacuum cleaner work with high suction power. Another press of the power button switches off the vacuum cleaner.
- The electric brush (15) with LEDs (16) illuminating the vacuumed surface is activated together with the vacuum cleaner. The multifunctional electric brush is suitable for vacuuming all types of hard surfaces and carpets.
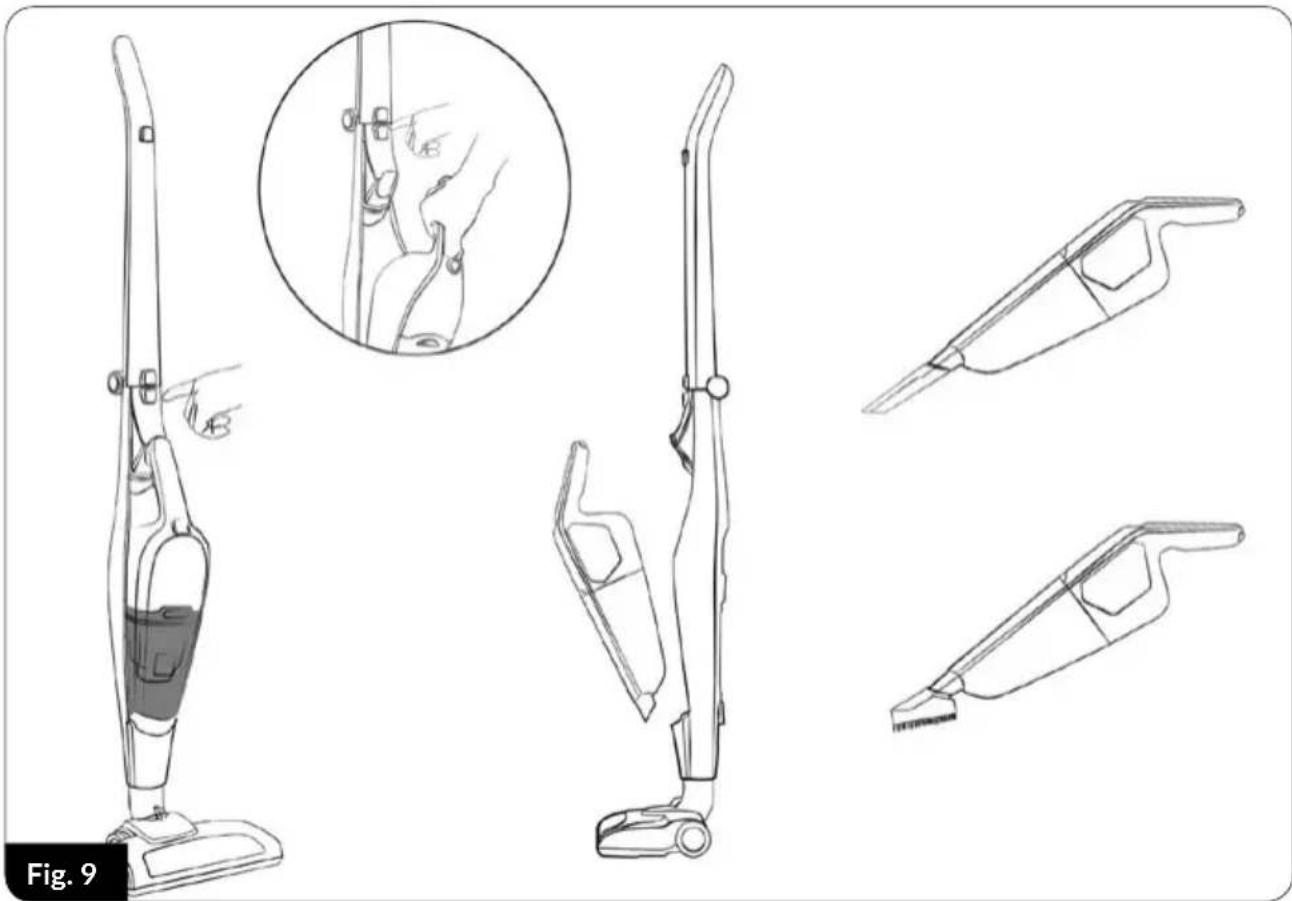
- The use of additional vacuum cleaner accessories (small brush, crevice brush) is possible after re
moving the vacuum cleaner from the main handle. Press the button (4) and remove the vacuum cleaner from the main holder (2) and then connect a suitable accessory to the end of the vacuum cleaner (fig.9).
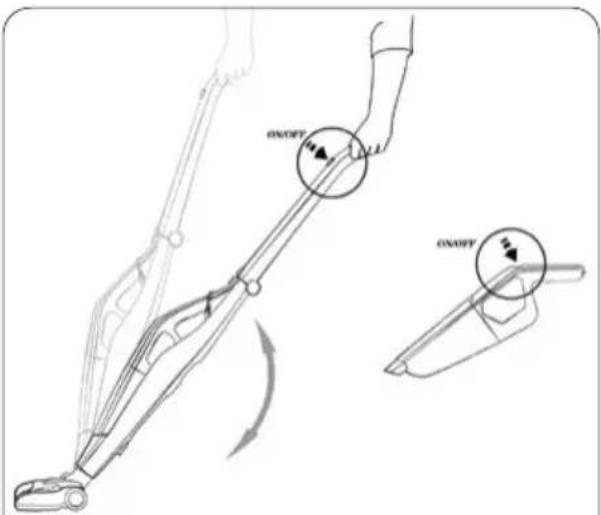
Fig. 8
natural_image
Line drawings of a vacuum cleaner with various hand positions and internal components, shown from top to side (no text or symbols)- Keep the dust container (12) level under regular control. An overfilled container reduces vacuuming efficiency, increases energy consumption and causes the filters to become dirty more quickly. To empty the dust container, switch off the vacuum cleaner by removing it from the main handle with the button (8), free the dust container (12) from the vacuum cleaner, pull out the HEPA filter (10) and the filter body (11) from the container. Empty the contents of the container into the waste bin (fig.10).
- Once the container is empty, fit the filter body and HEPA filter into the container and fit the container into the vacuum cleaner – continue vacuuming.
CAUTION! Do not allow the dust container to be overfilled! The dust level in the container must not exceed the "MAX" level.
CAUTION! If the vacuum cleaner's suction power has noticeably decreased, the nozzle is clogged and/or the dust container is full. Clear the suction nozzle and/or empty the dust container.
- When you have finished vacuuming, switch off the vacuum cleaner, clean the dust container and recharge the battery. A fully charged battery is able to provide up to 40 minutes of vacuuming at low suction power. Discharging of the battery is indicated by the pulsating of the status light (7) and a significant drop in suction power.
CLEANING AND MAINTENANCE
CAUTION! Do not submerge the vacuum cleaner, charger and docking station in water!
CAUTION! To achieve the best possible performance, clean the filters and the dust container after each use.
CAUTION! Maintenance work must be carried out with the vacuum cleaner switched off and the charging cable disconnected!
- Clean the outer surfaces of the vacuum cleaner with a damp cloth and then wipe it dry. Use a mild cleaning agent for stubborn dirt.
- Empty the dust container and remove the filter body (11) and HEPA filter (10) from the container. Clean it with a soft bristle brush and wipe it off with a damp cloth. Be careful not to damage the delicate structure of the HEPA filter and the mesh on the filter body. Clean the inside of the dust container with a damp cloth.
CAUTION! Do not immerse the dust container, HEPA filter and filter body in water.
- Charge the battery after each use of the vacuum cleaner. Do not store the vacuum cleaner with a discharged battery. Only charge the battery with the supplied charger. Do not short-circuit the battery. Replace only with the same type.
CAUTION! Do not dispose of the used battery in the waste bin. Only discard it in proper pick-up points or at the store. Do not dispose of the battery in fire!
- Periodically clean the rotating electric brush roller. The roll can be removed by pressing the button (15) on top of the electric brush. After cleaning the roll, place it back in the electric brush and lock the roll lock.
TROUBLESHOOTING
PROBLEM CAUSE SOLUTION
| Battery discharged Charge the battery | ||
| The vacuum cleaner is not starting | Charging process in progress Wait until the process is completed | |
| Clogged brush Remove the cause of clogging | ||
| Low suction power | Dust container full Empty the dust container | |
| Dust escapes to the outside of the vacuum cleaner | Clogged filters Clean the filters | |
| Improperly assembled container Assemble the container correctly | ||
| Very fast pulsation of the status light | Damage to the vacuum cleaner's internal circuit | Contact an authorised service centre |
TECHNICAL DATA
Technical specifications are given on the product nameplate.
Maximum noise level: 69 dB


charger
CAUTION! MPM agd S.A. reserves the right to technical changes.
Proper disposal of the product (waste electrical and electronic equipment)
Marking on the product indicates that after the service-life of the product expires, it should not be disposed with other type of municipal waste. Used equipment may have a negative impact on the environment and health of people due to potentially containing hazardous substances, mixtures and components.
Mixing electric waste with other types of waste or disassembling those in an unprofessional manner may cause a release of substances that are hazardous to the environment and health. Used equipment should
be handed-over to a point for collection of electric waste. In order to obtain detailed information regarding the electric waste collection points, the user should contact the municipal point of electric waste collection or used equipment processing department.
Proper disposal of the product (batteries and/or accumulators)
The crossed-out bin icon indicates that batteries/batteries are subject to separate collection and recycling. Among other things, this means that they cannot be disposed of in containers with other waste. Rechargeable batteries/batteries must be collected or recycled in accordance with current legislation.
natural_image
Diagram of a manual tool with a curved arrow indicating rotation or movement (no text or symbols present)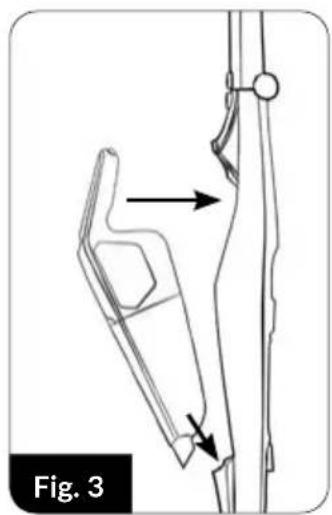
natural_image
Technical line drawing of a mechanical component with arrows indicating motion or assembly (no text or symbols)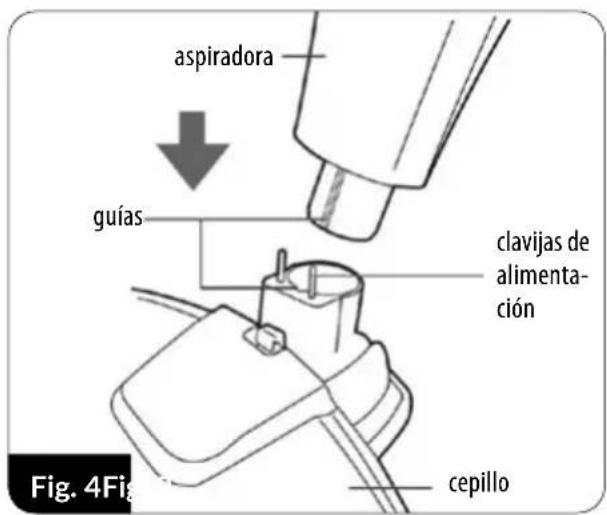
natural_image
Diagram showing a foot and seat assembly with a magnified inset highlighting the circular component (no text or symbols)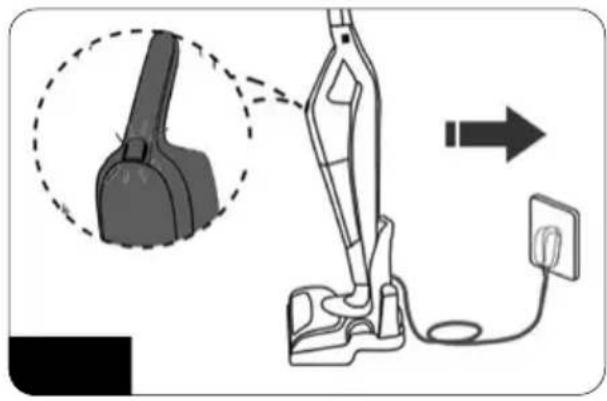
natural_image
Diagram of a vacuum cleaner with a handbag and plug, showing the outline and wiring (no text or symbols)natural_image
Line drawings of a vacuum cleaner with various hand positions and internal components, shown from top to side (no text or symbols)natural_image
Four technical illustrations of a knife with arrows indicating motion, labeled Fig. 10 (no text or symbols on the diagrams themselves)LIMPIEZA Y MANTENIMIENTO
natural_image
Diagram of a robotic arm with curved motion arrows indicating rotation (no text or symbols)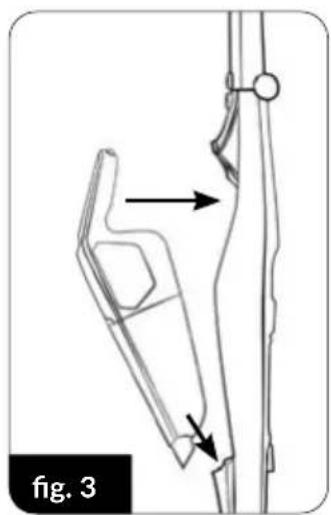
natural_image
Technical line drawing of a mechanical component with arrows indicating motion or assembly (no text or symbols)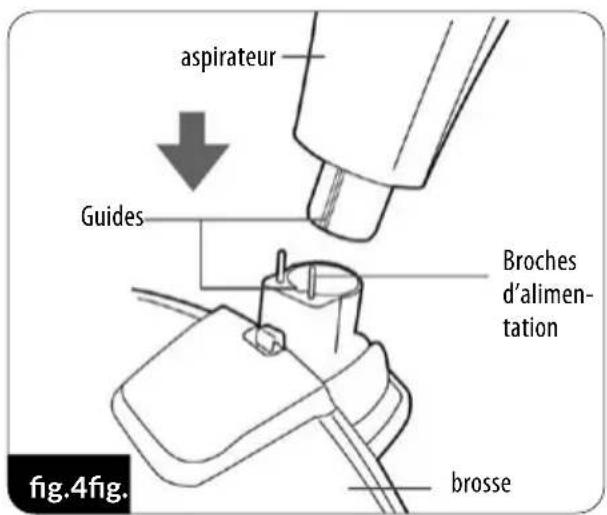
natural_image
Diagram showing a foot and seat assembly with a magnified inset highlighting the detail of the seat (no text or symbols present)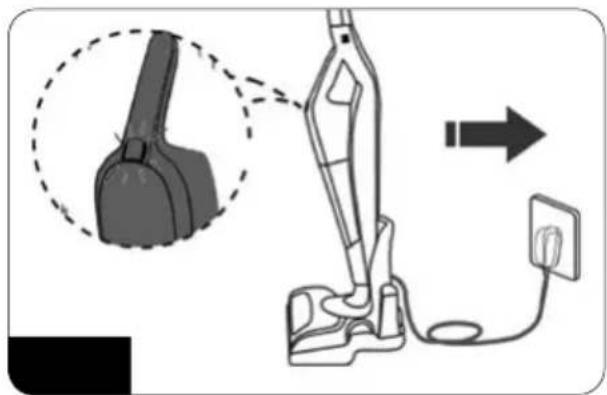
natural_image
Diagram of a vacuum cleaner with a close-up view showing the component being connected to a power outlet (no text or symbols present)natural_image
Line drawings of a vacuum cleaner with various hand positions and internal components, shown from top to side (no text or symbols)PROBLÈME CAUSE ACTION REQUISE
natural_image
Diagram of a vacuum cleaner with a close-up view showing the component and wiring (no text or symbols)natural_image
Line drawings of a vacuum cleaner with labeled parts, showing front, side, and top views (no text or symbols on the main diagram)natural_image
Diagram of a robotic arm with motion arrows indicating rotation (no text or symbols)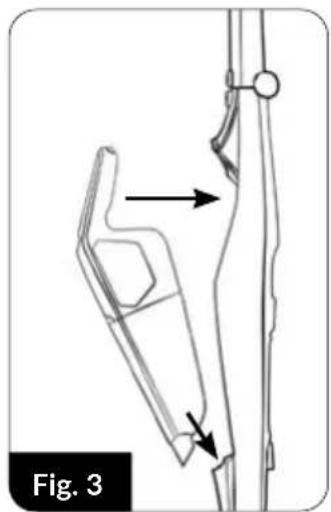
natural_image
Technical line drawing of a mechanical component with arrows indicating motion or force direction (no text or symbols)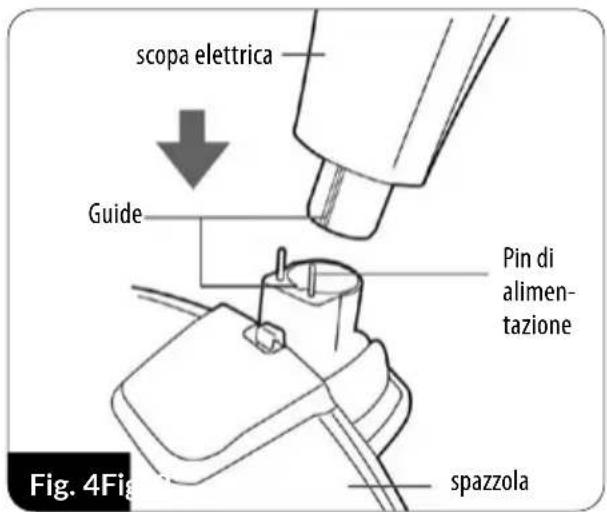
natural_image
Diagram showing a foot and seat assembly with a magnified inset highlighting the circular detail of the seat (no text or symbols present)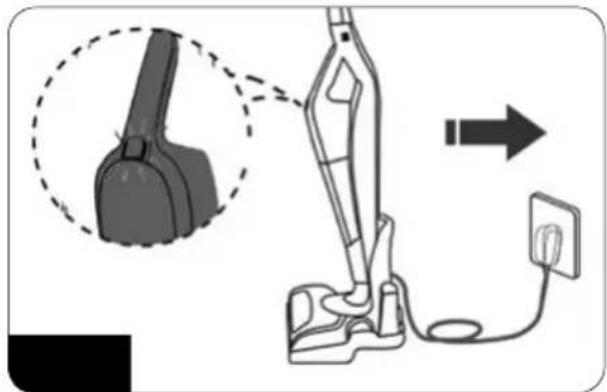
natural_image
Diagram of a vacuum cleaner with a close-up view showing the component being connected to a power outlet (no text or symbols present)natural_image
Line drawings of a vacuum cleaner with various hand positions and internal components, shown from top to side (no text or symbols)natural_image
Diagram of a vacuum cleaner with a close-up view showing the component and wiring (no text or symbols)natural_image
Line drawings of a vacuum cleaner with labeled parts and a magnified inset showing the interior detail (no text or symbols on the device itself)natural_image
Diagram of a robotic arm with motion arrows indicating rotation (no text or symbols)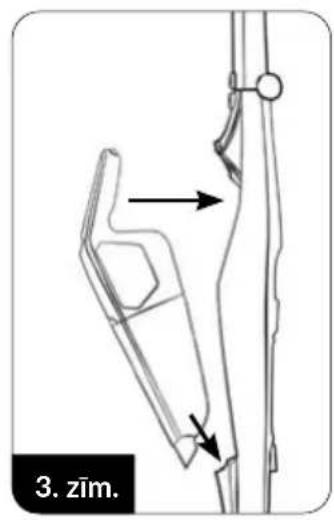
natural_image
Diagram of a vacuum cleaner with a close-up view showing the component being connected to a power outlet (no text or symbols present)natural_image
Line drawings of a vacuum cleaner with various designs and accessories, including a close-up inset showing hand positioning and component details (no text or symbols)BESCHRIJVING VAN HET APPARAAT
natural_image
Diagram showing a foot and seat assembly with a magnified inset highlighting the detail of the seat (no text or symbols present)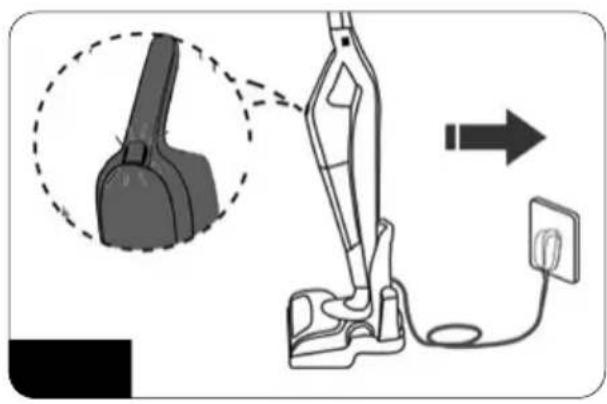
natural_image
Diagram of a vacuum cleaner with a close-up view of its body and arm, connected to a power outlet (no text or symbols present)natural_image
Line drawings of a vacuum cleaner with hand positioning and close-up details (no text or symbols)natural_image
Four technical illustrations of a kitchen knife with arrows indicating motion, labeled Fig. 10 (no text or symbols on the images themselves)REINIGING EN ONDERHOUD
PROBLEEM OORZAAK OPLOSSING
natural_image
Diagram of a vacuum cleaner connected to a power outlet, showing mechanical components and wiring (no text or symbols)natural_image
Line drawings of a vacuum cleaner with various hand positions and internal components, shown from top to side (no text or symbols)PROBLEMY I SPOSÓB ICH USUWANIA
PROBLEM PRZYCZYNA SPOSÓB USUNIĘCIA
natural_image
Diagram showing a foot and seat assembly with a magnified inset highlighting the detail of the seat (no text or symbols present)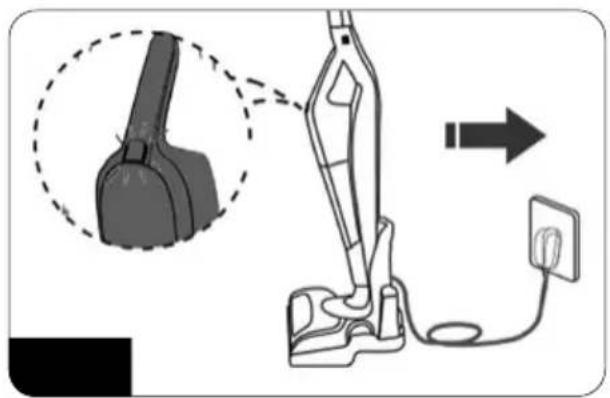
natural_image
Diagram of a vacuum cleaner with a close-up view showing the component and wiring (no text or symbols)natural_image
Line drawings of a vacuum cleaner with various hand positions and internal components, shown from top to side (no text or symbols)PROBLEMĂ CAUZĂ CUM SE ELIMINĂ
natural_image
Diagram of a manual tool with a curved arrow indicating rotation or movement (no text or symbols present)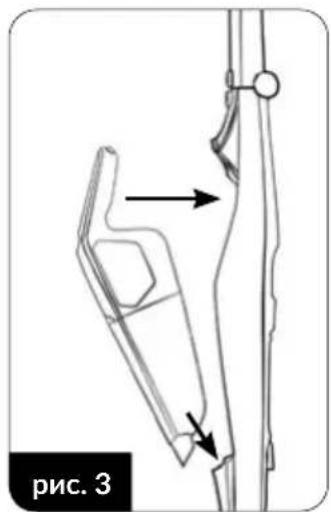
natural_image
Technical line drawing of a mechanical component with arrows indicating motion or assembly (no text or symbols)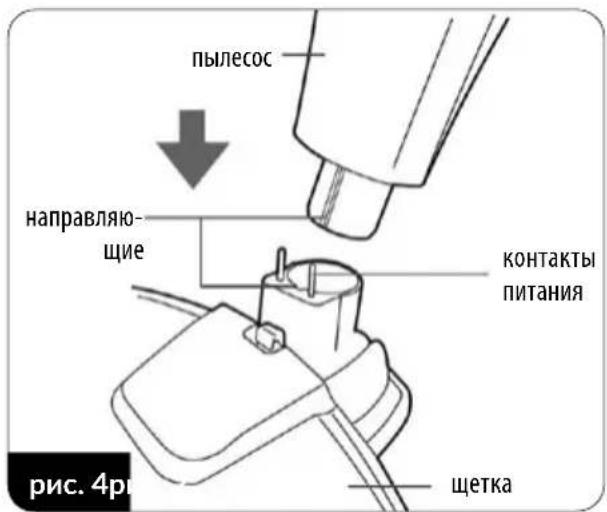
natural_image
Diagram of a vacuum cleaner connected to a power outlet, showing part assembly and wiring (no text or symbols)natural_image
Line drawings of a vacuum cleaner with various hand positions and internal components, shown from different angles (no text or symbols)natural_image
Diagram of a robotic arm with motion arrows indicating rotation (no text or symbols)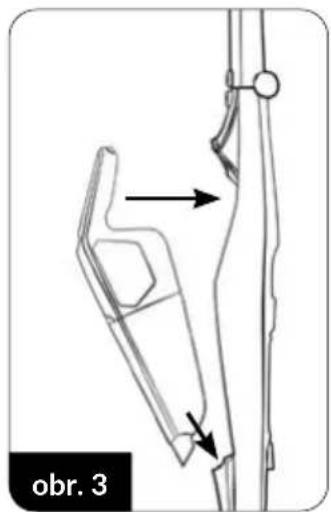
natural_image
Technical line drawing of a mechanical component with arrows indicating motion or force direction (no text or symbols)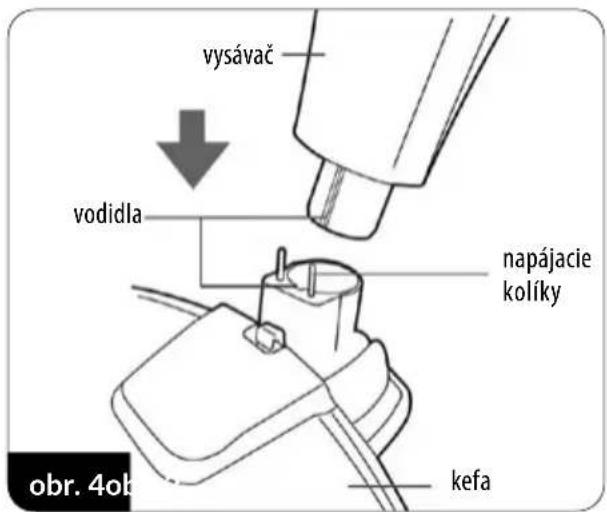
natural_image
Diagram of a vacuum cleaner connected to a power outlet, showing part assembly and wiring (no text or symbols)natural_image
Line drawings of a vacuum cleaner with various hand positions and internal components, shown from front and side views (no text or symbols)natural_image
Diagram showing a foot and seat assembly with a magnified inset highlighting a circular component (no text or symbols)рис. 6 р
natural_image
Diagram of a vacuum cleaner with a close-up view showing the handle and cable connection (no text or symbols)natural_image
Line drawings of a vacuum cleaner with various hand gestures and accessories, shown from different angles (no text or symbols)- BEZPEČNOSTNÍ POKYNY PŘI POUŽÍVÁNÍ
- DEVICE DESCRIPTION
- BEFORE FIRST USE
- BATTERY CHARGING
- USING THE VACUUM CLEANER
- CLEANING AND MAINTENANCE
- TROUBLESHOOTING
- TECHNICAL DATA
- Proper disposal of the product (waste electrical and electronic equipment)
- Proper disposal of the product (batteries and/or accumulators)
- LIMPIEZA Y MANTENIMIENTO
- BESCHRIJVING VAN HET APPARAAT
- REINIGING EN ONDERHOUD
- PROBLEMY I SPOSÓB ICH USUWANIA
Brand : MPM
Model : MOD38
Category : Vacuum Cleaner