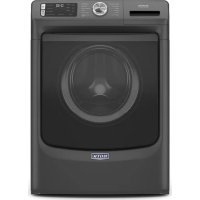
MHW6630MBK - Washing machine MAYTAG - Free user manual and instructions
Find the device manual for free MHW6630MBK MAYTAG in PDF.


| Product Type | Front Load Washer |
| Brand | Maytag |
| Model | MHW6630MBK |
| Power Supply | 120 V AC, 60 Hz, 15/20 A |
| Connectivity | Wi-Fi 2.4 GHz with WPA2 security |
| Wash Programs | Normal, Heavy Duty, Quick, Clean Washer with affresh |
| Wash Options | Extra Rinse, TumbleFresh / Fresh Air Dry Spin |
| Load & Go Dispenser | Up to 67.6 oz (2 L) of HE liquid detergent |
| Optimal Dispenser | Up to 14.3 oz (424 ml) of HE liquid detergent |
| Recommended Water Pressure | 20 to 100 lb/in² (137.9 to 689.6 kPa) |
| Hot Water Temperature | 120 °F (49 °C) recommended |
| Required Detergent Type | High Efficiency (HE) only |
| Programmed Cleaning | Clean Washer with affresh cycle (every 30 washes) |
| Door Seal Maintenance | Monthly cleaning with Affresh wipe or diluted bleach |
| Dispenser Cleaning | Remove and rinse with running water, dishwasher not recommended |
| Drain Pump Filter | Periodic cleaning, accessible via the dispenser drawer |
| Safety | Grounding required (3-prong outlet) |
| Parts Supplied | Drain hose with clamp, U-form, and cable ties |
| Parts Required (not supplied) | Water inlet hoses with flat washers |
| Repairability | Manufacturer-recommended spare parts (no 3D printed parts) |
Frequently Asked Questions - MHW6630MBK MAYTAG
User questions about MHW6630MBK MAYTAG
0 question about this device. Answer the ones you know or ask your own.
Ask a new question about this device
Download the instructions for your Washing machine in PDF format for free! Find your manual MHW6630MBK - MAYTAG and take your electronic device back in hand. On this page are published all the documents necessary for the use of your device. MHW6630MBK by MAYTAG.
USER MANUAL MHW6630MBK MAYTAG
FRONT LOAD WASHER OWNER'S MANUAL MANUEL DE L'UTILISATEUR DE LA LAVEUSE À CHARGEMENT FRONTAL
Table of Contents/Table des matieres
WASHER SAFETY 2
CHOOSING THE RIGHT DETERGENT 4
Choosing the Right Detergent. 4
Adding Laundry Products 4
WASHER MAINTENANCE AND CARE 5
Cleaning the Washer Location 5
Water Inlet Hoses 5
Washer Care. 5
Clean Washer Cycle Reminder 7
Removing the Dispenser 7
Cleaning Load & Go™ Containers (on some models)
Nonuse and Vacation Care 8
Winter Storage Care. 8
Transporting Your Washer 8
Reinstalling/Using Washer Again 8
Cleaning the Drain Pump/Draining Residual Water (or models) 9
Additional Cleaning 9
INSTALLATION INSTRUCTIONS 10
REQUIREMENTS 10
Tools and Parts 10
Location Requirements 10
Drain System 11
Electrical Requirements 12
INSTALLATION 13
Unpacking 13
Connect Drain Hose 13
Connect Inlet Hoses 14
Level Washer 15
Complete Installation Checklist 16
SECURITE DE LA LAVEUSE 17
CHOIX DU DETERGENT APPROPRIÉ 19
CHOIX DU DETERGENT APPROPRIÉ 19
Your safety and the safety of others are very important.
We have provided many important safety messages in this manual and on your appliance. Always read and obey messages.

This is the safety alert symbol.
This symbol alerts you to potential hazards that can kill or hurt you and others.
All safety messages will follow the safety alert symbol and either the word "DANGER" or "WARNING." words mean:
ADANGER
WARNING
You can be killed or seriously injured if you don't immediately follow instructions.
You can be killed or seriously injured if you don't follow instructions.
All safety messages will tell you what the potential hazard is, tell you how to reduce the chance of injury, and tell you what can happen if the instructions are not followed.
IMPORTANT SAFETY INSTRUCTIONS
WARNING: To reduce the risk of fire, electric shock, or injury to persons when using your appliance, follow basic precautions, including the following:
Read all instructions before using the appliance.
- Do not wash articles that have been previously cleaned remove washed in, soaked in, or spotted with gasoline, dry-cleaning not solvents, or other flammable or explosive substances, as moving. they give off vapors that could ignite or explode. - Do not
- Do not add gasoline, dry-cleaning solvents, or other exposed flammable or explosive substances to the wash water. Do not use these substances give off vapors that could ignite or explode. Do not use any
Under certain conditions, hydrogen gas may be produced maintenance instructions or in published user-repair in a hot-water system that has not been used for 2 insti tions that you understand and have the skills to c more. HYDROGEN GAS IS EXPLOSIVE. If the hot-waterout. system has not been used for such a period, before using use replacement parts that have not been washing machine, turn on all hot-water faucets and let the recommended by the manufacturer (e.g. parts made at water flow from each for several minutes. This will release using a 3D printer). any accumulated hydrogen gas. As the gas is flammable do not smoke or use an open flame during this time. See the Installation Instructions for grounding requirements and installation.
- Do not allow children to play on or in the appliance. Close supervision of children is necessary when the appliance is used near children.
SAVE THESE INSTRUCTIONS
WARNING
Certain internal parts are intentionally not grounded and may present a risk of electric shock only during servicing. Service Personnel - Do not contact the thermostat bracket while the appliance is energized.
Internet Connectivity Guide for Connected Appliances Only
IMPORTANT: Proper installation of your appliance prior to use is your responsibility. Be sure to read and follow the installation instructions that came with your appliance.
Connectivity requires Wi-Fi and account creation. App features and functionality are subject to change. Data rates may apply. Once installed, launch the app. You will be guided through the steps to set up a user account and to connect your app
You Will Need:
A home wireless router supporting Wi-Fi, 2.4 Ghz with WPA2 security. If you are unsure of your router's capabilities, refer to the router manufacturer's instructions.
The router to be on and have a live internet connection.
The 10-character SAID code for your appliance. The SAID code is either printed on a label on the appliance or found on the LCD screen.
Federal Communications Commission (FCC) Compliance Notice
This device complies with Part 15 of the FCC Rules. Operation is subject to the following two conditions:
- This device may not cause harmful interference, and
- This device must accept any interference received, including interference that may cause undesired operation.
Changes or modifications not expressly approved by the party responsible for compliance could void the user's authority to operate the equipment.
Industry Canada (IC) Compliance Notice
This Device complies with Industry Canada License-exempt RSS standard(s). Operation is subject to the following two conditions:
- This device may not cause interference.
- This device must accept any interference, including interference that may cause undesired operation of the device.
Under Industry Canada regulations, this radio transmitter may only operate using an antenna of a type and maximum (or lesser) gain approved for the transmitter by Industry Canada. To reduce potential radio interference to other users, the antenna type and its gain should be so chosen that the equivalent isotropically radiated power (e.i.r.p.) is not more than that necessary for successful communication.
To comply with FCC and Industry Canada RF radiation exposure limits for general population, antenna(s) used for this transmitter must be installed such that a minimum separation distance of 20~cm is maintained between the radiator (antenna) and all persons at all times and must not be co-located or operating in conjunction with any other antenna or transmitter.
If this equipment does cause harmful interference to radio or television reception, which can be determined by turning the equipment off and on, the user is encouraged to try to correct the interference by one of the following measures:
Reorient or relocate the receiving antenna.
■ Increase the separation between the equipment and
- Connect the equipment into an outlet on a circuit different from the receiver to which the receiver is connected.
■ Consult the dealer or an experienced radio/TV technician for help.
CHOOSING THE RIGHT DETERGENT
Use only High Efficiency detergents. The package will be "HE" or "High Efficiency." Low-water washing creates excess suding with a non-HE detergent. Using non-HE detergent is likely result in longer cycle times and reduced rinsing performance. It may also result in component failure and, at time, buildup of mold or mildew. HE detergents should be suding and quick-dispersing to produce the right amount for the best performance. They should hold soil in suspec is not redeposited onto clean clothes. Not all detergents as High Efficiency are identical in formulation and their are reduce suds. For example, natural, organic, or homemade detergents may generate a high level of suds. If you use
these and see an "Sd" or "Sud" error code appear in IMPORANT: Do not overfill, dilute, or use more than the consider using a different HE detergent. Always follow themanufacturer-recommended quantity of fabric softener. Do not I detergent manufacturer's instructions to determine the amouplastof the "MAX" line. Overfilling dispenser will cause fabric so detergent to use. Do not go over the Max line on thetodispensately dispense into washer.
Adding Laundry Products
Adding HE detergent to basket:
Single-dose laundry packets, Oxi-type boosters, color-safe bleach, or scented crystals can be added to the drum prior to adding laundry. When using single-dose laundry packets, make sure that the bulk dispenser is disabled (on some models) or off.
NOTE: Follow the manufacturer's instructions to determine amount of laundry products to use.
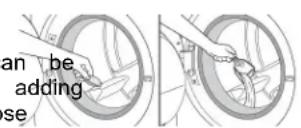
Adding liquid chlorine bleach to single-load dispenser:
Add liquid chlorine bleach to the bleach compartment. Do not overfill, dilute, or use more than 2/3 cup (165 mL). Do not use color-safe bleach or Oxi in the same cycle with liquid chlorine bleach.
IMPORTANT:
Always measure liquid chlorine bleach. Use a measuring of laundry. with a pour spout; do not guess.
■ Do not fill beyond the "MAX" line. Overfilling could cause fill bulk dispensers (on some models): garment damage.
■ Do not use thickened, easy-pour, or no-splash bleach when running the Clean Washer with® afforeesh as excess suds may occur.
■ On some models: Do not add liquid chlorine bleach to the bulk dispenser.
Slowly close dispenser drawers. Make sure the drawers are closed completely (on some models). Open
fill bulk dispensers (on some models):
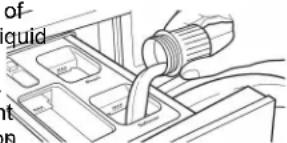
Adding liquid fabric softener to single-load dispenser:
Pour a measured amount of liquid fabric softener into liquid marked softener compartment. Always follow manufacturer's
directions for correct amount of fabric softener, based on your load size. Disable the 1 literow-Load &TM Gdispenser if not used to dispense
dergent (on some models). labeled
e 1
ticto softener is always dispensed in the last rinse, even Extra Rinse is selected.
one of
IMPOPTA: Do not overfill, dilute, or use more than the manufacturer-recommended quantity of fabric softener. Do not use a spatof the "MAX" line. Overfilling dispenser will cause fabric so hot to disperse directly dispense into washer.
■ Do not spill or drip any fabric softener onto the clothes.
- Do not use liquid fabric softener dispenser balls in this w They will not dispense correctly.
■ Do not use fabric softener sheets, as they can stain the
Adding HE detergent to Optimal Dispense Printer (on some models):
This compartment holds up to-14.3 oz (424 ml) of liquid HE detergent allowing you to avoid having to refill detergent for each load. Also, this will use just the right amount of detergent required for a particular load/cycle.
NOTE: Do not add single-dose laundry packets, Oxi-type boosters, color-safe bleach, or fabric softener crystals to dispensers. They will not dispense correctly. The Optimal Dispense Drawer cannot be disabled.
Adding HE detergent to Load &TM Go dispenser (on some models):
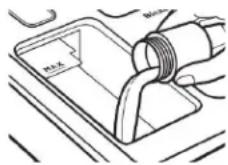
Use only High Efficiency (HE) liquid detergents. The bulk dispensers will hold about 67.6 oz (2 L) or 33.8 oz (1 L) HE detergent, depending on dispenser, or enough for many
of laundry.
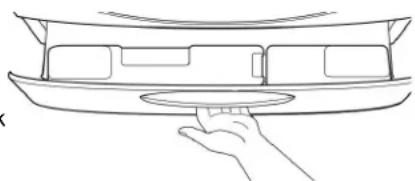
Open the dispenser drawer by pulling on the handle at the the washer. If desired, the drawer can be completely removed from the washer.
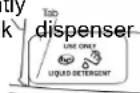
Locate the Load & Bulk dispenser. Gently
pull up on the tab located on the bulk
lid to lift the fill door.
Fill to the "MAX" line (see illustrations at right) with HE liquid detergent or liquid fabric softener (1 liter dispenser only). Close fill door. It will click into place. Make sure the concentration setting is correct (see the online "Cycle Guide"). It is recommended that you rinse out the Load & Go™ containers when refilling, when changing detergent types or concentrations, or when the washer will not be used for an extended period. For instructions on cleaning the dispenser cartridge, see "Washer Care" in the "Washer Maintenance and Care" section of your Owner's Manual.
Adding HE detergent to single-load dispenser:
Pour a measured amount of HE detergent into detergent compartment. For powdered detergent, lift the selector to the high position. For liquid detergent, push down the selector to the low position
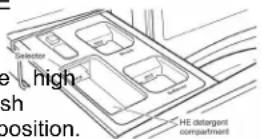
Do not overfill; adding too much detergent may cause to be dispensed into the washer too early.
IMPORTANT:
- Disable the Load &thalf Option before starting a single (on some models). The Optimal Dispense Printer can be disabled.
- Do not add single-dose laundry packet to dispenser
Powdered detergent: Liquid detergent:
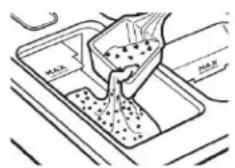
Lift the selector to the higPush down the selector to position. Add directly to theow position. Add directly to compartment. the compartment.
NOTE: Unless the Optimal Dispense Printer is empty, it recommended to use powdered detergent.
WASHER MAINTENANCE AND CARE
Cleaning the Washer Location
Keep washer area clear and free from items that would block airflow. This includes clearing piles of laundry in front of the washer.
Water Inlet Hoses
Replace inlet hoses after 5 years of use to reduce the risl failure. Periodically inspect and replace inlet hoses if bulges, kinks, cuts, wear, or leaks are found.
When replacing your inlet hoses:
■ Mark the date of replacement on the label with a permanent marker.
- Check that the old washers are not stuck on the washer valves.
■ Use new washers in the new inlet hoses to ensure a p seal.
Washer Care
dRecommendations to Help Keep Your Washer Clean and Performing at Its Best
-
Always use High Efficiency (HE) detergents and follow the bad detergent manufacturer's instructions regarding the amount of not be detergent to use. Do not use more than the recommended amount because that may increase the rate at which detergent and soil residue accumulate inside your washer, which, in turn, may result in undesirable odor.
-
Use warm or hot water washes sometimes (not exclusively cold water washes), because they do a better job of controlling the rate at which soils and detergent accumulate
- Always leave the washer door open between uses to help out the washer and avoid the buildup of odor-causing re
- Periodically clean residue from all interior surfaces of the window. For better care, wipe the entire inside of the damp cloth.
Cleaning Your Front-Loading Washer
thRead these instructions completely before beginning the routine cleaning processes recommended below. This Washer Maintenance Procedure should be performed, at a minimum, once per month or every 30 wash cycles, whichever occurs sooner, to control the rate at which soils and detergent may otherwise accumulate in your washer.
Cleaning the Door Seal
- Open the washer door and remove any clothing or items the washer.
-
Inspect the gray-colored seal between the door opening and the drum for stained areas, soil buildup, or lint. Pull back seal to inspect all areas under the seal and to check foreign objects or lint.
-
If stained areas, soil buildup, or lint are found, wipe 2dochlorine Bleach Procedure:
these areas of the seal using either of the following two. a. Open the washer door and remove any clothing or it procedures: b. Open the dispenser drawer and add liquid chlorine ble
a. Affresh® Machine Cleaning Wipes Procedure:
RomanNum.When the cycle is complete, gently pull bar the rubber door seal and clean the entire surface the textured side of an ^ 念 affreshme Cleaning Wipe.
to the mask lever in both the bleach compartment and back fabric softener compartment. Either traditional or HE withchlorine bleach can be used.
IMPORTANT: Do not use thickened, easy-pour, or no-splash bleach as excess suds may occur.
b. Dilute Liquid Chlorine Bleach Procedure:
RomanNum.Mix a dilute bleach solution, using 3/4 cup (177 mL) of liquid chlorine bleach and 1 gallon of warm tap water.
NOTE: Use of more liquid chlorine bleach than is recommended above could cause washer damage over time (3.8) Close the washer door and the dispenser drawer.
romanNum.Wipe the seal area with the dilute solution, using a damp cloth.
d. Do not add any detergent or other chemicals to the washer when following this procedure.
romanNum.Let stand 5 minutes.
e. Select the Clean Washer with @ affesh
romanNum.Wipe down area thoroughly with a dry cloth and let washer interior air dry with door open.
f. On some models: Select the FanFableFreshTM/ Fresh HoRtFresh SpinTM option to help dry the washer interior after the cycle is complete.
IMPORTANT:
Wear rubber gloves when cleaning with bleach.
NOTE: The washer remembers your last option selection and will use it for future wash cycles until you deselect that. Touch and hold Start/Pause to begin the cycle. See "Description of Clean Washer with @ affreesh Operation" section.
Refer to the bleach manufacturer's instructions for pro
NOTE: For best results, do not interrupt cycle.
Cleaning the Inside of the Washer
This washer has a special cycle that uses higher water vol combination with affres Washer Cleaner or regular liquid Des chlorine bleach to thoroughly clean the inside of the washe Steam washer models also utilize steam to enhance cleaning this special cycle.
IMPORTANT: Do not use thickened, easy-pour, or no-splash bleach when running the Clean Washer withbychaffress excess suds may occur.
NOTE: Read these instructions completely before beginning the cleaning process.
Begin Procedure
- Clean Washer with affreshCycle Procedure (Recommended for best performance):
a. Open the washer door and remove any clothing or
b. Use an affresMachine Cleaning Wipe or a soft, dam cloth or sponge to clean the inside door window.
c. Add an affresWasher Cleaner tablet to the washer drum.
d. Do not add the affesher Cleaner tablet to the dispenser drawer.
e. Do not add any detergent or other chemical to when following this procedure.
f. Close the washer door.
g. Select the Clean Washer with affoesh
h. On some models: Select the FanFreemAhleFreshTM/ Fresh Hot/Fresh SpinTM option to help dry the interior after the cycle is complete.
The Clean Washer with affothe will determine whether clothing or other items are in the washer.
If no items are detected in the washer, it will proceed cycle.
a. If any items are detected in the washer, "rL" (remove load) will be displayed. The door will unlock. Open washer and remove any garments from the washer dr b. Touch Power to clear the "rL" code.
c. Touch and hold Start/Pause to restart the cycle.
- Steam models only: During the first 20 minutes of the cycle, it will activate the steamer but the drum will not spin down for longer. You may see condensation on the door window during this initial phase. If you are using a washer/press cleaner
tablet, it will not dissolve completely during the steam phase. This is normal.
After the cycle is complete, leave the door open slightly allow for better ventilation and drying of the washer inter
Cleaning the Dispensers
After a period of using your washer, you may find some new buildup in the washer's dispensers.
For the Single-Load or Optimal dispenser: Remove the drawer and wipe the surfaces with an Maffresh Cleaning Wipe or ash-damp cloth, and towel dry either before or after you run a Clean Washer with affresbe. Use an all-purpose surface
pleamed, if needed.
For the load & dispenser: Lift the handle on the dispenser out and pull to remove it from the washer cabinet; then the dispenser thoroughly with running water. Wipe the outside dispenser surface with an affeshine Cleaning Wipe or a damp cloth, and towel dry. Use an all-purpose surface clean needed.
Replace the dispenser in the washer cabinet and make sure is correctly seated.
IMPORTANT: Dispensers are not dishwasher-safe.
Cleaning the Outside of the Washer
IMPORTANT: To avoid damaging the washer's finish, do abrasive products.
Use an affresh Machine Cleaning Wipe or a soft, damp cloth disp sponge to wipe up any spills. Occasionally wipe the outside of your washer to help keep it looking new. UsMachineaffresh Cleaning Wipe or mild soap and water.
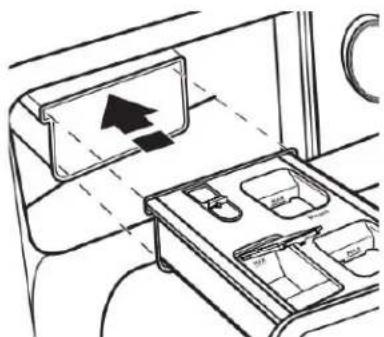
To replace:
1ot Slide cover panel back onto posts on dispenser.
- Align edges of dispenser with guides in washer; then slide both dispenser back into slot.
Clean Washer Cycle Reminder
NOTE: Not all models have the Clean Washer® w/ble affresh reminder light.
The Clean Washer with affinesage will flash at the end of a wash cycle when the washer has run 30 wash cycles. This is a reminder to run the Clean Washer with bycycle fresh
If the Clean Washer with® efexshis not run, the message will stop flashing at the end of a wash cycle after running three more regular wash cycles. After 30 more wash cycles are completed, the Clean Washer with® affesage will again To remove flash at the end of a wash cycle as a reminder.
Removing the Dispenser
Optimal Dispenser Driver (on some models)
To remove:
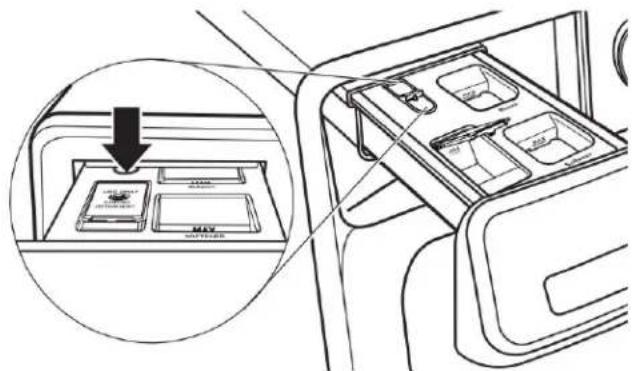
- Pull dispenser drawer out until it stops.
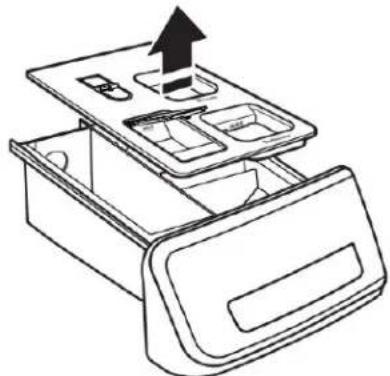
- Press down on the release tab and pull straight out to the dispenser.
- Lift off cover panel by pulling straight up.
Single-Load Dispenser Driver (on some models)
To remove:
- Pull dispenser drawer out until it stops.
- Press down on the release tab and pull straight out to the dispenser.
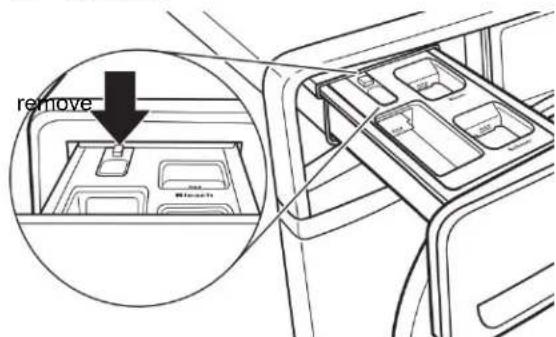
- Lift off cover panel by pulling straight up.
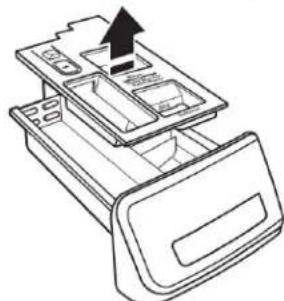
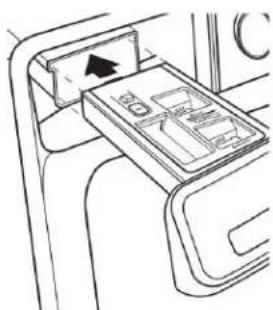
To replace:
- Position cover panel back onto posts on dispenser. Apply slight pressure on cover panel to seat it.
- Align edges of dispenser with guides in washer; then slide dispenser back into slot.
Cleaning Load & Go™ Containers (on some models)
IMPORTANT: Containers are not dishwasher-safe.
It is recommended that you rinse out the™ LoadtaiβersGo when refilling, when changing detergent types or concent or when the washer will not be used for an extended
- Pull the dispenser drawer out until it stops.
- Lift out the Load & dBotainers.
- Lift the fill lid and flush interior thoroughly with warm
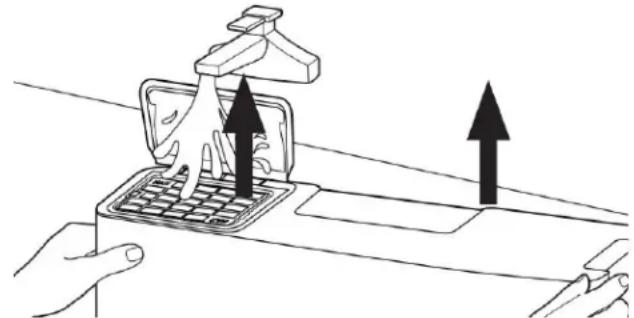
4. Allow to air dry.
Nonuse and Vacation Care
Operate your washer only when you are home. If moving using your washer for a period of time, follow these ste
- Unplug or disconnect power to washer.
- Turn off water supply to washer to avoid flooding due pressure surges.
HELPFUL TIP: Attach a reminder note to the washer the water back on before washer's next use.
- Clean the dispensers. See "Cleaning the Dispensers."
Winter Storage Care
IMPORTANT: To avoid damage, install and store washer will not freeze. Because some water may stay in hoses can damage washer. If storing or moving during freezing winterize your washer.
To winterize washer:
- Shut off both water faucets; disconnect and drain water hoses.
HELPFUL TIP: Attach a reminder note to the washer the water back on before washer's next use.
- Remove drain pump filter.
- Put 1 quart (1 L) of R.V.-type antifreeze in drum and washer on Normal cycle for about 2 minutes to mix and remaining water.
- Unplug washer or disconnect power.
Transporting Your Washer
- Shut off both water faucets. Disconnect and drain water hoses.
- If washer will be moved during freezing weather, follow "Winter Storage Care" directions before moving.
drain hose from drain system and from back of the peridisher.
- Unplug power cord.
- Place inlet hoses and drain hose inside drum.
6.wBtendle power cord with a rubber band or cable tie to from hanging to the ground.
IMPORTANT: Call for service to install new transport bolts. Reuse transport bolts. Washer must be transported in the up position. To avoid structural damage to your washer, it must properly set up for relocation by a certified technician.
Reinstalling/Using Washer Again
AWARNING

or not Electrical Shock Hazard
Plug into a grounded 3 prong outlet.
To water remove ground prong.
Do not use an adapter.
Do not use an extension cord.
Failure to follow these instructions can result in death, fire, or electrical shock.
Towereinstall washer after nonuse, vacation, winter storage, or moving:
weather, 1. Refer to Installation Instructions to locate, level, and connewer washer.
2. Before using again, run washer through the following filter inlet recommended procedure:
To use washer again:
Flugh water pipes and hoses.
2. Reconnect water-inlet hoses.
3. Turn on both water faucets.
4. Bng into a grounded 3-prong outlet or reconnect power.
5. Ruffezer Washer through Heavy Duty/Power Wash cycle to clean washer and remove antifreeze, if used. Use only HE detergent. Use half the manufacturer's recommended amount for a medium-size load.
Cleaning the Drain Pump/Draining Residual Water (on some models)
- Remove large clumps of lint by hand from the filter and lint in a suitable waste container. Remove remaining resid from the filter by rinsing with water.
IMPORTANT: Make sure the washer is off before cleaning the drain pump filter.
NOTE: Perform the following procedure occasionally.
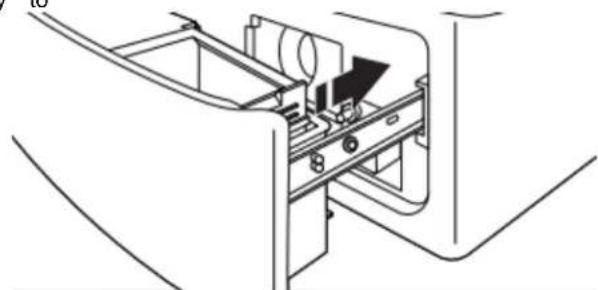
- Open the dispenser drawer by pulling on the handle at the base of the washer. This will reveal the drain pump filter. Remove the drawer by releasing the tab on each side.

With your finger, push down on tab on right side and up on tab on left side of drawer.

- Place a broad, flat container beneath the drain pump filter to collect the drain water. Release the black hose from the hose rails simultaneously when replacing the drawer. You clip, remove the plug, and drain the hose into the container. Empty the container. Repeat this procedure if necessary until all the water has drained. Make sure that the black hose is properly placed on the drawer, pull out fully. Th completely dry, replace the plug, and secure the hose in the drawe should be fully engaged and the rails locked in clip.
NOTE: If water does not drain well, push in hose slightly remove any possible kinks.
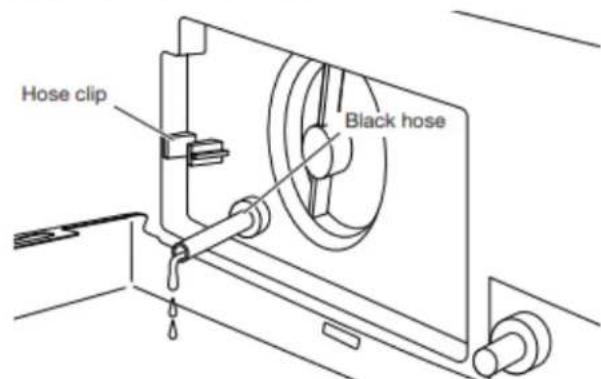
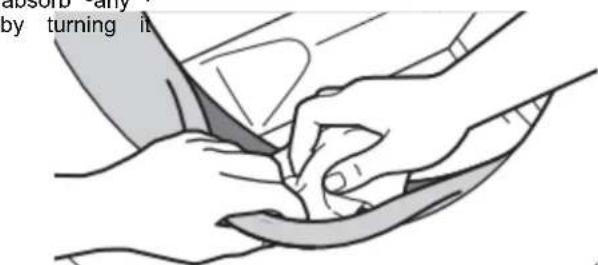
- Lay a cotton cloth beneath the drain pump filter to water still in it. Then remove the drain pump filter counterclockwise.
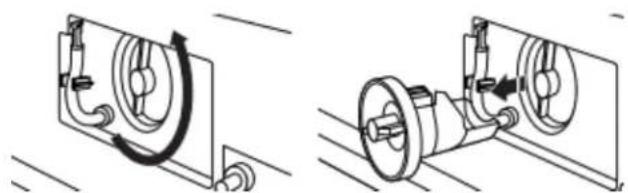
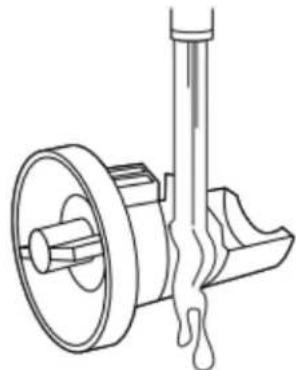
- Reinsert the drain pump filter by turning it clockwise. Make sure to turn it in as far as it will go, with the filter remaining as close as possible to the vertical position.
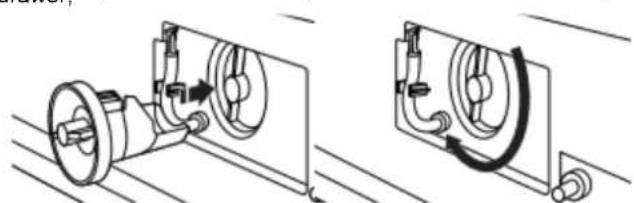
Filter to Replace and close the dispenser drawer. Make sure to in the both rails simultaneously when replacing the drawer. You container a clicking sound that indicates the rails have engaged until ensure proper placement of the drawer, pull out fully. The drawer should be fully engaged and the rails locked in. Make sure the drain hose is secured in the hose clip tucked underneath the cutout.
Additional Cleaning
Gently pull back the rubber door seal and clean any stained soil buildup, or lint with the textured side ^ 假 machineaffresh Cleaning Wipe.
INSTALLATION INSTRUCTIONS REQUIREMENTS
Tools and Parts
Gather required tools and parts before starting installation.
Tools Needed:
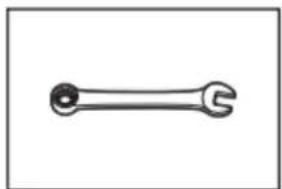
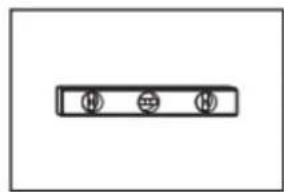
Adjustable or open end wrenches 1 / 2'' (13 mm), 5 / 8'' (16 mm), and 9 / 16'' (14.3 mm)
Level
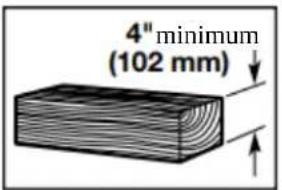
Wood block Ruler or measuring tape
Adjustable piers that open to 1^9 / 16 (39.7 mm)
Flashlight
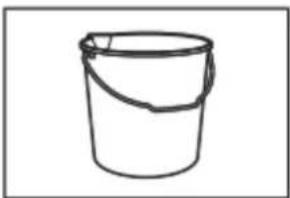
Bucket
Parts Supplied:
NOTE: All parts supplied for installations are in the washer.
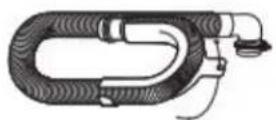
Drain hose with clamp, U-form, and cable tie
Parts Needed: (if not supplied with washer)
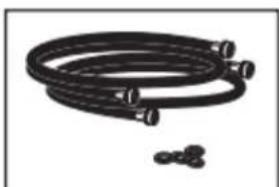
NOTE: Various inlet hose options are available; check your Quick Start Guide for ordering information.
Inlet hoses with flat washers
Available Accessories
An optional matching pedestal is available for your washer. Please contact your retailer for ordering information, or see your Quick Start Guide.
Alternate Parts (not supplied with washer)
Your installation may require additional parts. To order, please refer to contact information on your Quick Start Guide.
| If you have: You will need: |
| Overhead sewer Standard 20 gallons (76 L) 39" (990 mm) tall drain tub or utility sink, sump pump, and connectors (available from local plumbing suppliers) |
Location Requirements
IMPORTANT: Do not install, store, or operate washer where it will be exposed to weather or in temperatures below 32^ (0^) . Water remaining in washer after use may cause damage in low temperatures. See "Washer Maintenance and Care" for winterizing information.
Select proper location for your washer to improve performance and minimize noise and possible "washer walk." Install your washer in a basement, laundry room, closet or recessed area.
Proper installation is your responsibility.
You will need
A water heater set to 120^ (49^)
A grounded electrical outlet located within 6 feet (1.8m) of power cord on back of washer.
Hot and cold water faucets located within 4 feet (1.2m) of hot and cold water fill valves on washer, and water pressure of 20-100 psi (137.9-689.6 kPa).
A level floor with maximum slope of 1" (25 mm) under entire washer. Installing on carpet or surfaces with foam backing is not recommended.
Floor must support washer's total weight (with water and load) of 315 pounds (143kg)
All dimensions show minimum spacing allowed. For each arrangement, consider allowing more space for ease of installation and servicing, and spacing for companion appliances and clearances for walls, doors, and floor moldings. Space must be large enough to allow door to fully open. Add spacing of 1" (25 mm) on all sides of washer to reduce noise transfer. Doors must be louvered or equivalent and have at least 24 in ^2 (155 cm ^2 ) bottom and 48 in ^2 (310 cm ^2 ) top open area.
NOTE: For additional details (or information) specific to your model, refer to your Quick Start Guide.
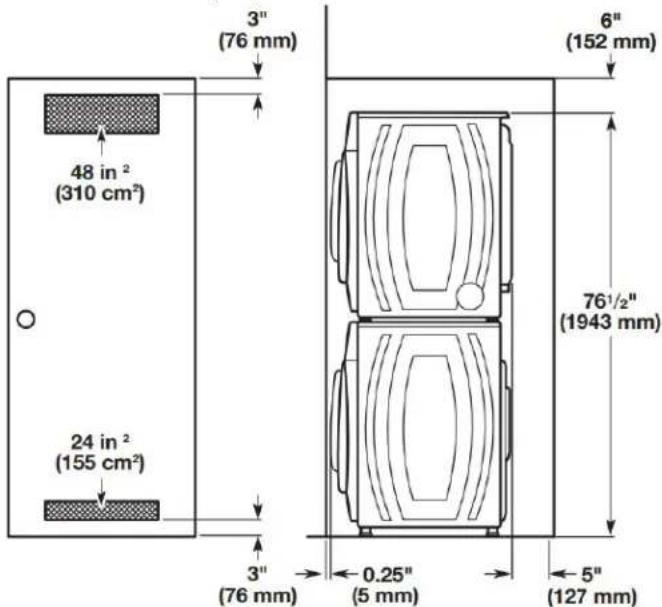
Recessed area or closet installation (stacked washer and dryer)
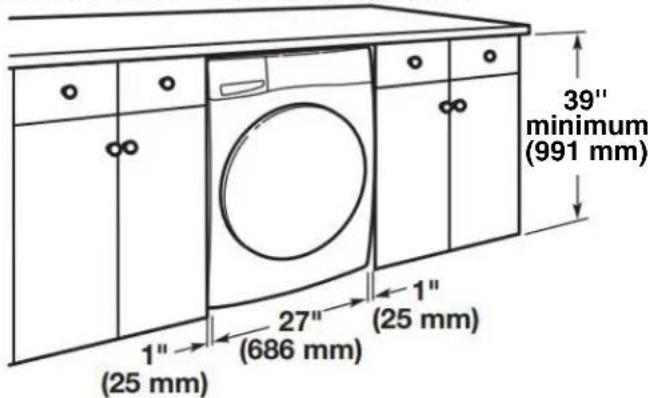
Custom under counter installation
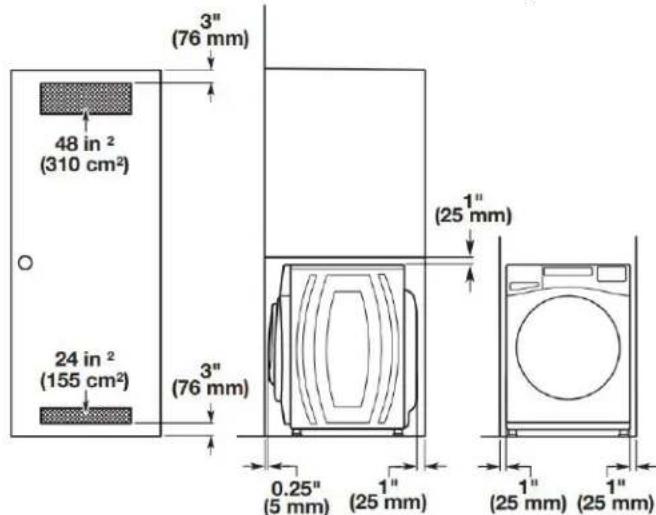
Recessed area or closet installation (washer only)
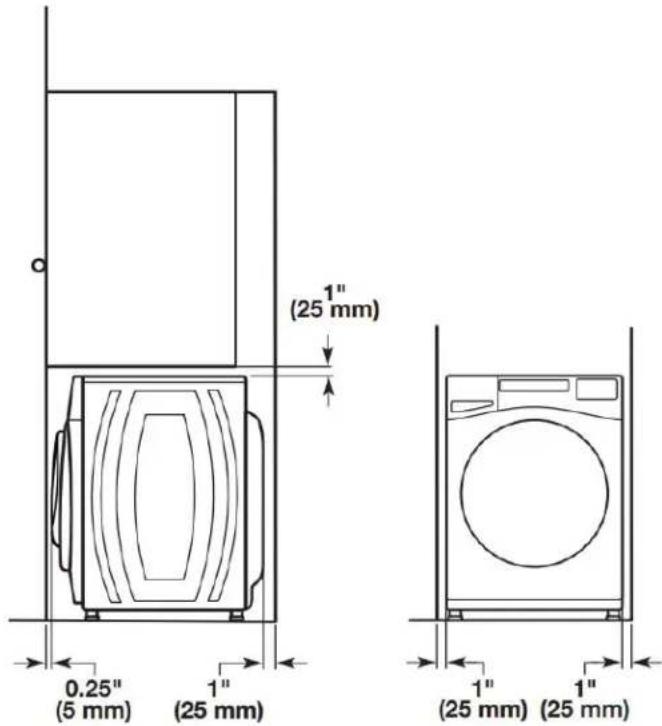
Custom cabinet installation
Drain System
It is the responsibility of the installer to install and secure hose in to the provided plumbing/drain in a manner that will the drain hose coming out of or leaking from the plumbing/Drain system can be installed using a floor drain, wall standfloor standpipe, or laundry tub. Select the method you need.
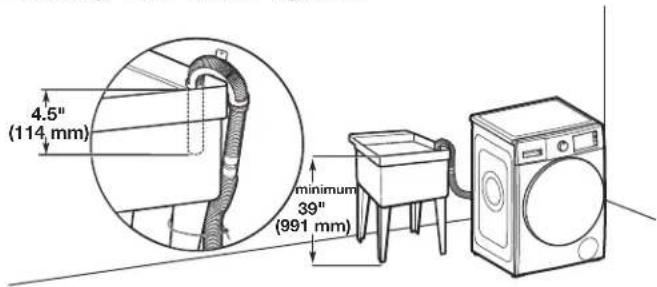
IMPORTANT: To avoid siphoning, only 4.5" (114 mm) of drain hose should be inside standpipe. Always secure drain hose cable tie.
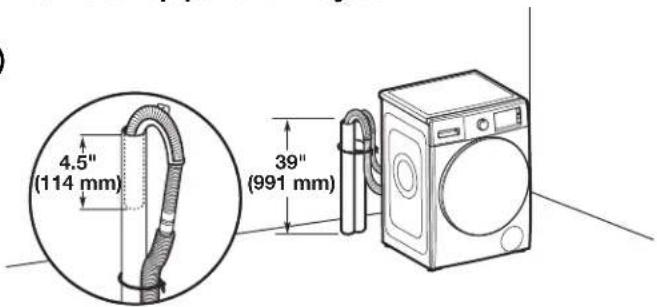
Floor standpipe drain system
Minimum diameter for a standpipe drain: 2" (51 mm). Minimc carry-away capacity: 17 gallons (64 L) per minute. A 1/4" (diameter to 1" (25 mm) diameter Standpipe Adapter Kit is available; refer to the Quick Start Guide for online ordering information. Top of standpipe must be at least 39" (762 mn install no higher than 48" (1.2 m) from bottom of washer. have an overhead sewer and need to pump higher than 48 (1.2 m), a sump pump and associated hardware are needed "Alternate Parts."
Wall standpipe drain system
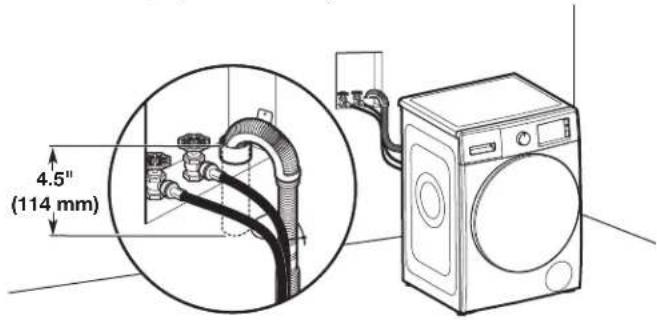
See requirements in "Floor standpipe drain system."
Laundry tub drain system
Minimum capacity: 20 gallons (76 L). Top of laundry tub at least 39'' (991 mm) from the floor; install no higher (1.2 m) from bottom of washer.
Floor drain system
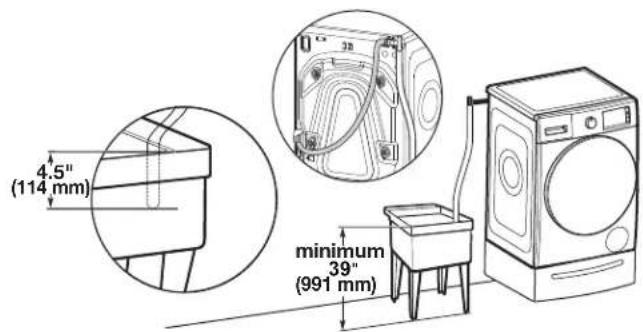
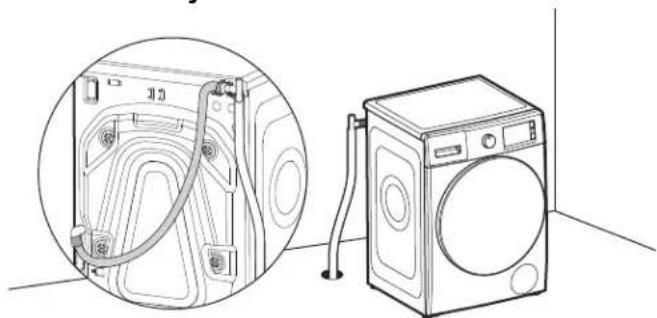
Floor drain system requires a Siphon Break Kit, 2 Connector and an Extension Drain Hose that may be purchased separately refer to the Quick Start Guide for online ordering information. Minimum siphon break height: 28" (710 mm) from bottom of washer. (Additional hoses may be needed.)
Electrical Requirements
AWARNING

Electrical Shock Hazard
Plug into a grounded 3 prong outlet.
Do not remove ground prong.
Do not use an adapter.
Do not use an extension cord.
Failure to follow these instructions can result in death, fire, or electrical shock.
A 120 V, 60 Hz, AC only, 15 or 20 A, fused electrical required. A time-delay fuse or circuit breaker is recommended. It is recommended that a separate circuit breaker serving this appliance be provided.
This washer is equipped with a power supply cord having 3-prong grounding plug.
To minimize possible shock, the cord must be plugged int mating, 3-prong, grounding-type outlet, grounded in naustordence with local codes and ordinances. If a mating this available, it is the personal responsibility and obliga of the customer to have the properly grounded outlet inst by a qualified electrician.
If codes permit and a separate ground wire is used, it is recommended that a qualified electrician determine that the ground path is adequate.
■ Do not ground to a gas pipe.
Check with a qualified electrician if you are not sure the washer is properly grounded.
■ Do not have a fuse in the neutral or ground circuit.
GROUNDING INSTRUCTIONS
For a grounded, cord-connected appliance:
This appliance must be grounded. In the event of a malfunction or breakdown, grounding will reduce the risk of electric shock by providing a path of least resistance for electric current. This appliance is equipped with a cord that has an equipment-grounding conductor and a grounding plug. The plug must be plugged into an appropriate outlet that properly installed and grounded in accordance with all local codes and ordinances.
WARNING: Improper connection of the equipment-grounding conductor can result in a risk of electric shock. Check with a qualified electrician or serviceman if you are doubt as to whether the appliance is properly grounded. D not modify the plug provided with the appliance: If it will the outlet, have a proper outlet installed by a qualified electrician.
SAVE THESE INSTRUCTIONS
INSTALLATION
Unpacking
AWARNING
Excessive Weight Hazard
Use two or more people to move and install or uninstall appliance.
Failure to do so can result in back or other injury.
1. Move washer

It is necessary to remove all shipping materials for operation and to avoid excessive noise from washer. Move washer to within 4 feet (1.2 m) of its final must be in a fully upright position.
2. Locate transport bolts
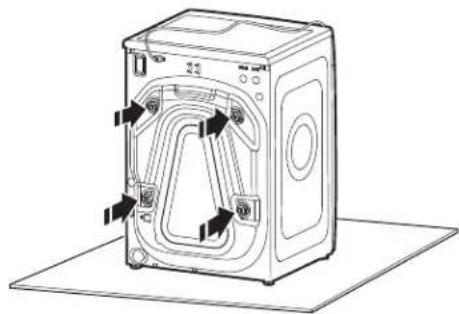
Locate four transport bolts on rear of washer.
3. Remove transport bolts from washer
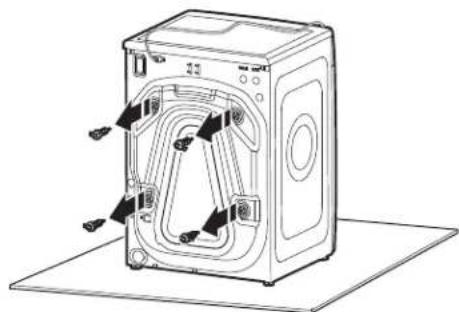
Loosen bolts with a 5/8" (16 mm) wrench. Slide each bolt and spacer to center of hole. Pull bolts and plastic spacers from back of washer. Discard bolts and spacers.
IMPORTANT: Do not plug washer in until installation has been completed.
Connect Drain Hose
4. Attach drain hose to drain port
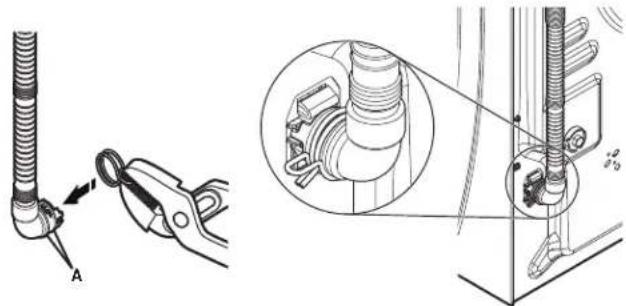
A - Ribs
If clamp is not already in place on elbow end of drain squeeze clamp with pliers and slide it over end of host centering it between the ribs, as shown. Squeeze clamp pliers and slide elbow end of drain hose onto drain po secure with clamp.
For a laundry tub or standpipe drain, go to step 6. For a floor drain, remove the preinstalled drain hose for shown in step 5. You may need additional parts with s directions. See "Alternate Parts."
It is the responsibility of the installer to install and secure proper drainage hose into the provided plumbing/drain in a manner will avoid the drain hose coming out of or leaking from plumbing/drain.
5. Remove drain hose form (floor drain installations only)
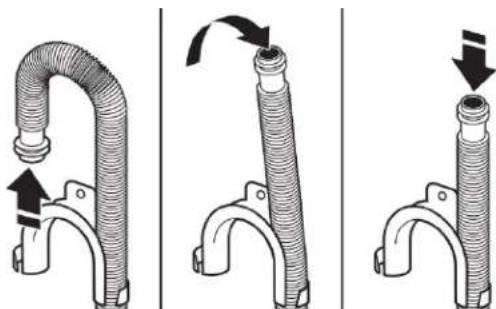
For floor drain installations, you will need to remove the hose form from the end of the drain hose. You may additional parts with separate directions; refer to the Quick Start Guide.
6. Place drain hose in standpipe
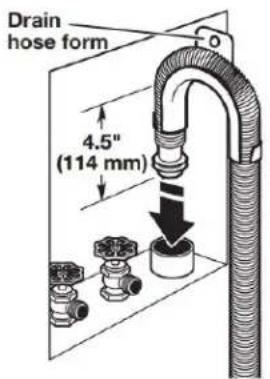
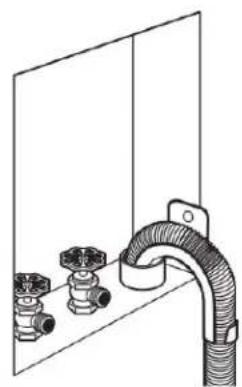
Place hose into standpipe (shown in picture) or over laundry tub.
IMPORTANT: 4.5" (114 mm) of drain hose should be in
standpipe; do not force excess hose into standpipe on
bottom of laundry tub. Drain hose form must be used.
Connect Inlet Hoses
IMPORTANT: To avoid leaks, check that your water inlet has have flat washers at both ends. Washer must be connected water faucets with new inlet hoses with flat washers (not provided). Do not use old hoses. Do not use hoses without washers.
7. Insert new flat washers

Washer
Coupling
8. Connect inlet hoses to water faucets
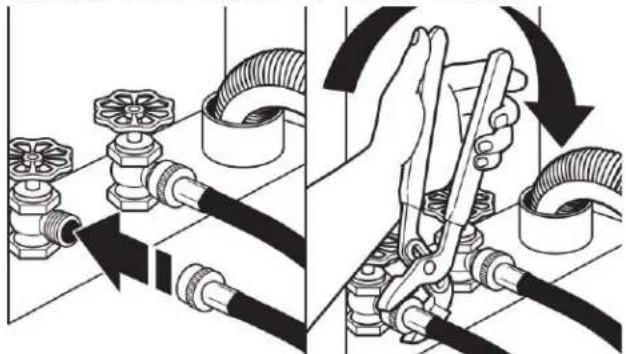
IMPORTANT: Do not overtighten or use tape or sealants valve when attaching to faucets or washer. Damage can result.
Attach the hose labeled hot to hot water faucet. Screw on coupling by hand until it is seated on washer. Use adjustable pliers to tighten couplings an additional two-thirds turn. Repeat this step with the hose labeled cold for the cold water faucet. Both hoses must be connected for washer to work slowly properly.
HELPFUL TIP: Make note of which hose is connected to hot water to help in attaching hoses to washer correctly. In most standard configurations, hoses will cross over each other when attached correctly.
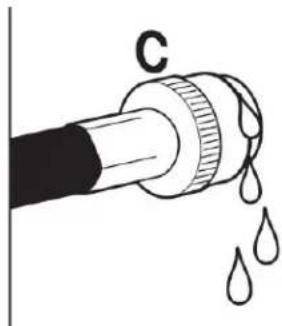
9. Clear water lines
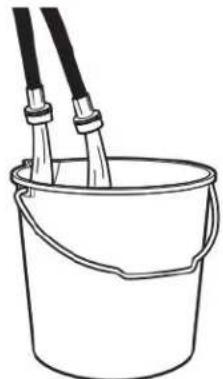
Run of water for a few seconds through hoses into a lair, sub, drainpipe, or bucket to avoid clogs. Water should run clear.
Connect inlet hoses to washer
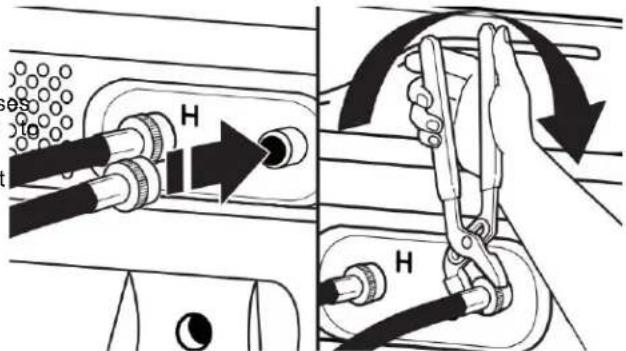
IMPORTANT: To reduce risk of hose failure, replace the hoses every 5 years. Record hose installation or replaced dates for future reference.
- Do not overtighten hose or use tape or sealants on valve. Damage to the valves can result.
Periodically inspect and replace hoses if bulges, kinks, cuts, wear, or leaks are found.
Attach hot water hose to hot water inlet valve. Screw coupling by hand until it is snug. Use adjustable pliers tighten couplings an additional two-thirds turn. Repeat with cold water inlet valve.
11. Check for leaks
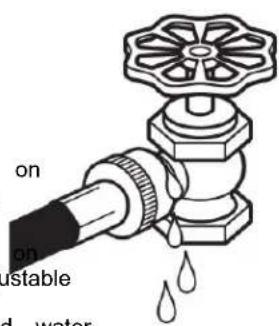
Iowslowly turn on water faucets to check for leaks. A smal amount of water may enter washer. It will drain later.
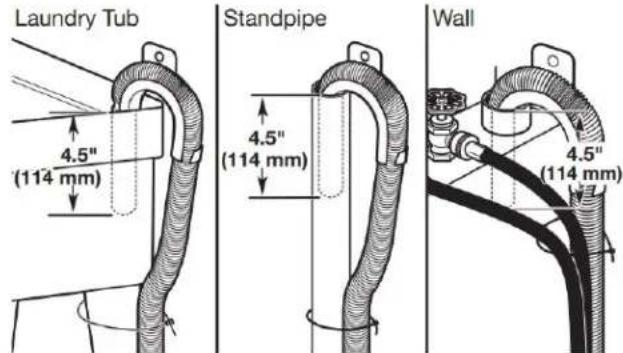
12. Secure drain hose
Secure drain hose to laundry tub leg, drain standpipe, hoses for wall standpipe with cable tie or beaded tie. It is the responsibility of the installer to install and set drain hose in to the provided plumbing/drain in a manner will avoid the drain hose coming out of or leaking into plumbing/drain.
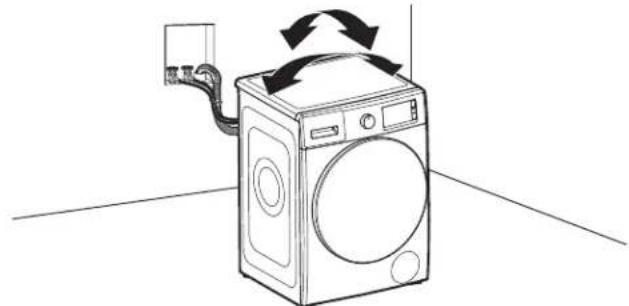
14. Rock washer to test foot contact
Grip washer from top and rock back and forth, making all four feet are firmly on floor. Repeat, rocking washer side to side. If washer rocks, go to step 15 and adjust feet. If all four feet are in firm contact with floor, go
nnerAdjust leveling feet
Level Washer
IMPORTANT: Leveling your washer properly reduces excess noise and vibration.
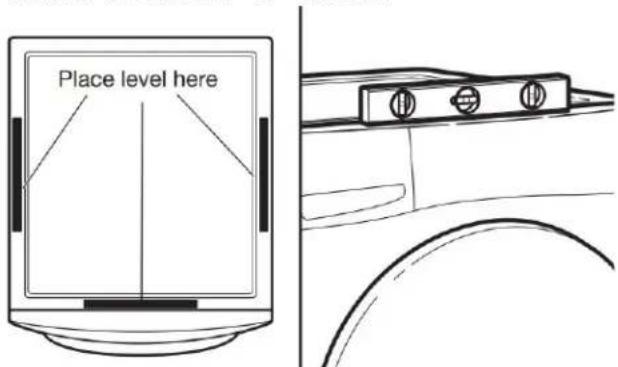
13. Check levelness of washer
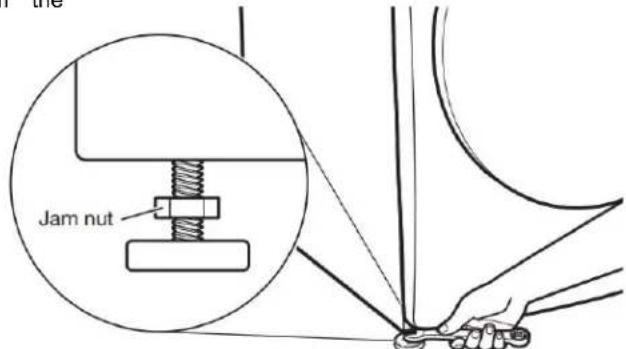
If washer is not level, use a 9/16" (14.3 mm) open-end adjustable wrench to turn jam nuts clockwise on feet ur they are about 1 / 2" (13 mm) from the washer cabinet. turn the leveling foot clockwise to lower the washer or counterclockwise to raise the washer. Do not exceed 2" (50 mm) from bottom of foot to bottom of cabinet. Rec levelness of washer and that all four feet are firmly in with the floor. Repeat as needed.
Remove cardboard from beneath washer. Place a level of top edges of washer, checking each side and front. If level, tip washer and adjust feet up or down as shown steps 15 and 16, repeating as necessary.
HELPFUL TIP: You may want to prop up front of washer about 4^ (102 mm) with a wood block or similar object will support weight of washer.
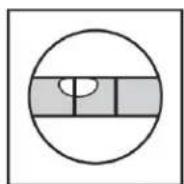
Not Level
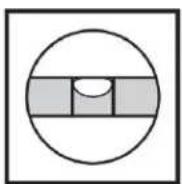
LEVEL
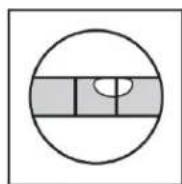
Not Level
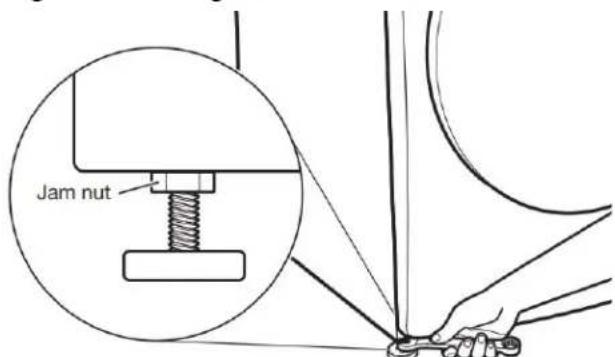
16. Tighten leveling feet
When washer is level and all four feet are firmly in c with the floor, use a 9/16" (14.3 mm) open-end or adjwrench to turn jam nuts counterclockwise on leveling feet tightly against washer cabinet.
HELPFUL TIP: You may want to prop washer again with wooden block.
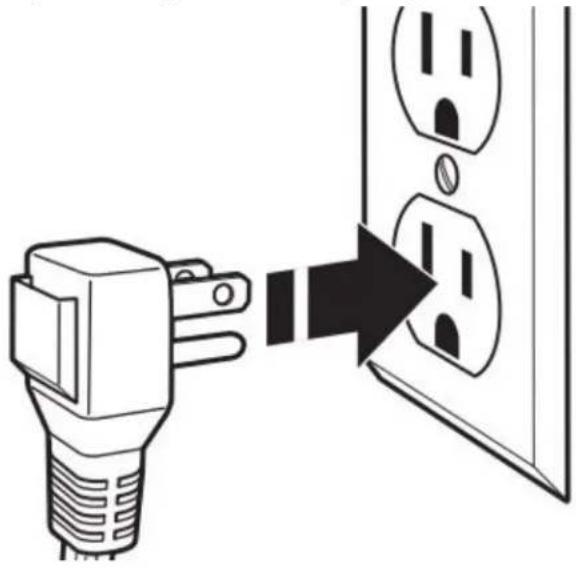
AWARNING

Electrical Shock Hazard
Plug into a grounded 3 prong outlet.
Do not remove ground prong.
Do not use an adapter.
Do not use an extension cord.
Failure to follow these instructions can result in death, fire, or electrical shock.
17. Plug into a grounded 3 prong outlet
Complete Installation Checklist
Check electrical requirements. Be sure you have correct electrical supply and recommended grounding method.
Check that all parts are now installed. If there is an ext go back through steps to see what was skipped.
Check that you have all of your tools.
Check that shipping materials were completely removed from washer.
Check that the washer is level.
Check that water faucets are on.
Check for leaks around faucets and inlet hoses.
Remove protective film from console and any tape remain in on washer.
Check that washer is plugged into a grounded 3-prong ou
■ Dispos of/recycle all packaging materials.
Read the "Washer Maintenance and Care" section.
To test and clean your washer, press Power and choose Quick cycle and run it without clothes. Use only HE deter Use 1/2 the manufacturer's recommended amount for a medium-size load.
SECURITE DE LA LAVEUSE
CHOIX DU DÉTERGENT APPROPRIÉ
- Remove drain hose form (floor drain installations only)
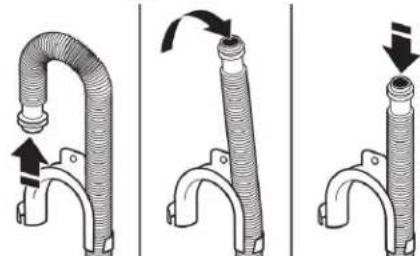
For floor drain installations, you will need to remove the important : Ne pas serrer excessivement ni utiliser de hose form from the end of the drain hose. You may rean adhesif ou de disposits d'etanchete lors de la fix additional parts with separate directions; refer to the Quicks robinets ou de la machine. Cela pourrait entrainer c Start Guide. dommages.


- FRONT LOAD WASHER OWNER'S MANUAL MANUEL DE L'UTILISATEUR DE LA LAVEUSE À CHARGEMENT FRONTAL
- Table of Contents/Table des matieres
- Your safety and the safety of others are very important.
- ADANGER
- WARNING
- IMPORTANT SAFETY INSTRUCTIONS
- SAVE THESE INSTRUCTIONS
- Internet Connectivity Guide for Connected Appliances Only
- You Will Need:
- Federal Communications Commission (FCC) Compliance Notice
- Industry Canada (IC) Compliance Notice
- CHOOSING THE RIGHT DETERGENT
- Adding Laundry Products
- Adding HE detergent to basket:
- Adding liquid chlorine bleach to single-load dispenser:
- IMPORTANT:
- Adding liquid fabric softener to single-load dispenser:
- Adding HE detergent to Optimal Dispense Printer (on some models):
- Adding HE detergent to Load &TM Go dispenser (on some models):
- Adding HE detergent to single-load dispenser:
- Powdered detergent: Liquid detergent:
- WASHER MAINTENANCE AND CARE
- Cleaning the Washer Location
- Water Inlet Hoses
- Washer Care
- dRecommendations to Help Keep Your Washer Clean and Performing at Its Best
- Cleaning Your Front-Loading Washer
- Cleaning the Door Seal
- Cleaning the Inside of the Washer
- Begin Procedure
- Cleaning the Dispensers
- Cleaning the Outside of the Washer
- Clean Washer Cycle Reminder
- Removing the Dispenser
- Optimal Dispenser Driver (on some models)
- Single-Load Dispenser Driver (on some models)
- To replace:
- Cleaning Load & Go™ Containers (on some models)
- Nonuse and Vacation Care
- Winter Storage Care
- To winterize washer:
- Transporting Your Washer
- Reinstalling/Using Washer Again
- AWARNING
- To use washer again:
- Cleaning the Drain Pump/Draining Residual Water (on some models)
- Additional Cleaning
- INSTALLATION INSTRUCTIONS REQUIREMENTS
- Tools and Parts
- Alternate Parts (not supplied with washer)
- Location Requirements
- Drain System
- Electrical Requirements
- GROUNDING INSTRUCTIONS
- For a grounded, cord-connected appliance:
- INSTALLATION
- Unpacking
- Move washer
- Locate transport bolts
- Remove transport bolts from washer
- Connect Drain Hose
- Attach drain hose to drain port
- Remove drain hose form (floor drain installations only)
- Place drain hose in standpipe
- Connect Inlet Hoses
- Insert new flat washers
- Connect inlet hoses to water faucets
- Clear water lines
- Connect inlet hoses to washer
- Check for leaks
- Level Washer
- Plug into a grounded 3 prong outlet
- Complete Installation Checklist
- SECURITE DE LA LAVEUSE
- CHOIX DU DÉTERGENT APPROPRIÉ
Brand : MAYTAG
Model : MHW6630MBK
Category : Washing machine