FEHS39L6A - TV Furrion - Free user manual and instructions
Find the device manual for free FEHS39L6A Furrion in PDF.
| Product Type | HD LED TV |
| Brand | Furrion |
| Model | FEHS39L6A |
| Screen Size (Diagonal) | 39 inches |
| Maximum Resolution | 1366 x 768 @ 60 Hz (HD) |
| Dimensions without Stand (H x W x D) | 514 x 886 x 71 mm |
| Power Supply | 100-240 V ~ 50/60 Hz |
| Power Consumption | Not specified |
| VESA Wall Mount | 200 x 200 mm, screws PM6 x 35 mm (4) |
| HDMI Inputs | 3 (1 with ARC) |
| VGA (PC) Input | 1 |
| PC Audio Input | 1 |
| Composite Video Input | 1 (shared with green component) |
| Component Video Input YPbPr | 1 |
| RF Input (Antenna/Cable) | 1 |
| USB Port | 1 (photo and MP3 playback) |
| Optical Audio Output | 1 |
| Coaxial Audio Output | 0 |
| Analog Audio Output (R/L) | 1 pair |
| Headphone Jack | 1 |
| Main Features | Digital/Analog TV Tuner, OSD menu, parental lock, voice guide, subtitles, CEC, USB media player |
| Included Accessories | Remote control (Unimote), 2 AAA batteries, instruction manual, warranty card, wall mount screws |
| Care and Cleaning | Use a dry cloth. Do not expose to rain or moisture. |
| Safety | FCC Class B compliant. Do not open the casing. Avoid unstable surfaces. Do not block ventilation openings. |
| Spare Parts and Repairability | Contact a qualified technician. Spare parts from the manufacturer. |
Frequently Asked Questions - FEHS39L6A Furrion
User questions about FEHS39L6A Furrion
0 question about this device. Answer the ones you know or ask your own.
Ask a new question about this device
Download the instructions for your TV in PDF format for free! Find your manual FEHS39L6A - Furrion and take your electronic device back in hand. On this page are published all the documents necessary for the use of your device. FEHS39L6A by Furrion.
USER MANUAL FEHS39L6A Furrion
natural_image
Dark screen with diagonal light effect, no visible text or symbols on screenThank you for purchasing this Furrion® LED HD TV. Before operating your new product, please read these instructions carefully. This instruction manual contains information for safe use, installation and maintenance of the product.
Please keep this instruction manual in a safe place for future reference. This will ensure safe use and reduce the risk of injury. Be sure to pass on this manual to new owners of this product.
The manufacturer does not accept responsibility for any damages due to not observing these instructions.
If you have any further questions regarding our products, please contact us at support@furrion.com
Contents
Welcome....1
Contents 2
Safety Warnings....3
Important Safety Instructions....3
Safety Precautions 6
Function Overview ......7
Control Panel 7
Connections....8
Unimote 9
Before Operation 11
What's in the box....11
Preparation of your Remote Control....11
Set up....12
Settings 13
Setup 13
Picture Settings....15
Sound Settings 16
Time Settings 17
Lock Settings....18
Channel Settings....20
PC Settings....21
USB Player 22
Troubleshooting....23
Specifications 24
Warranty....25
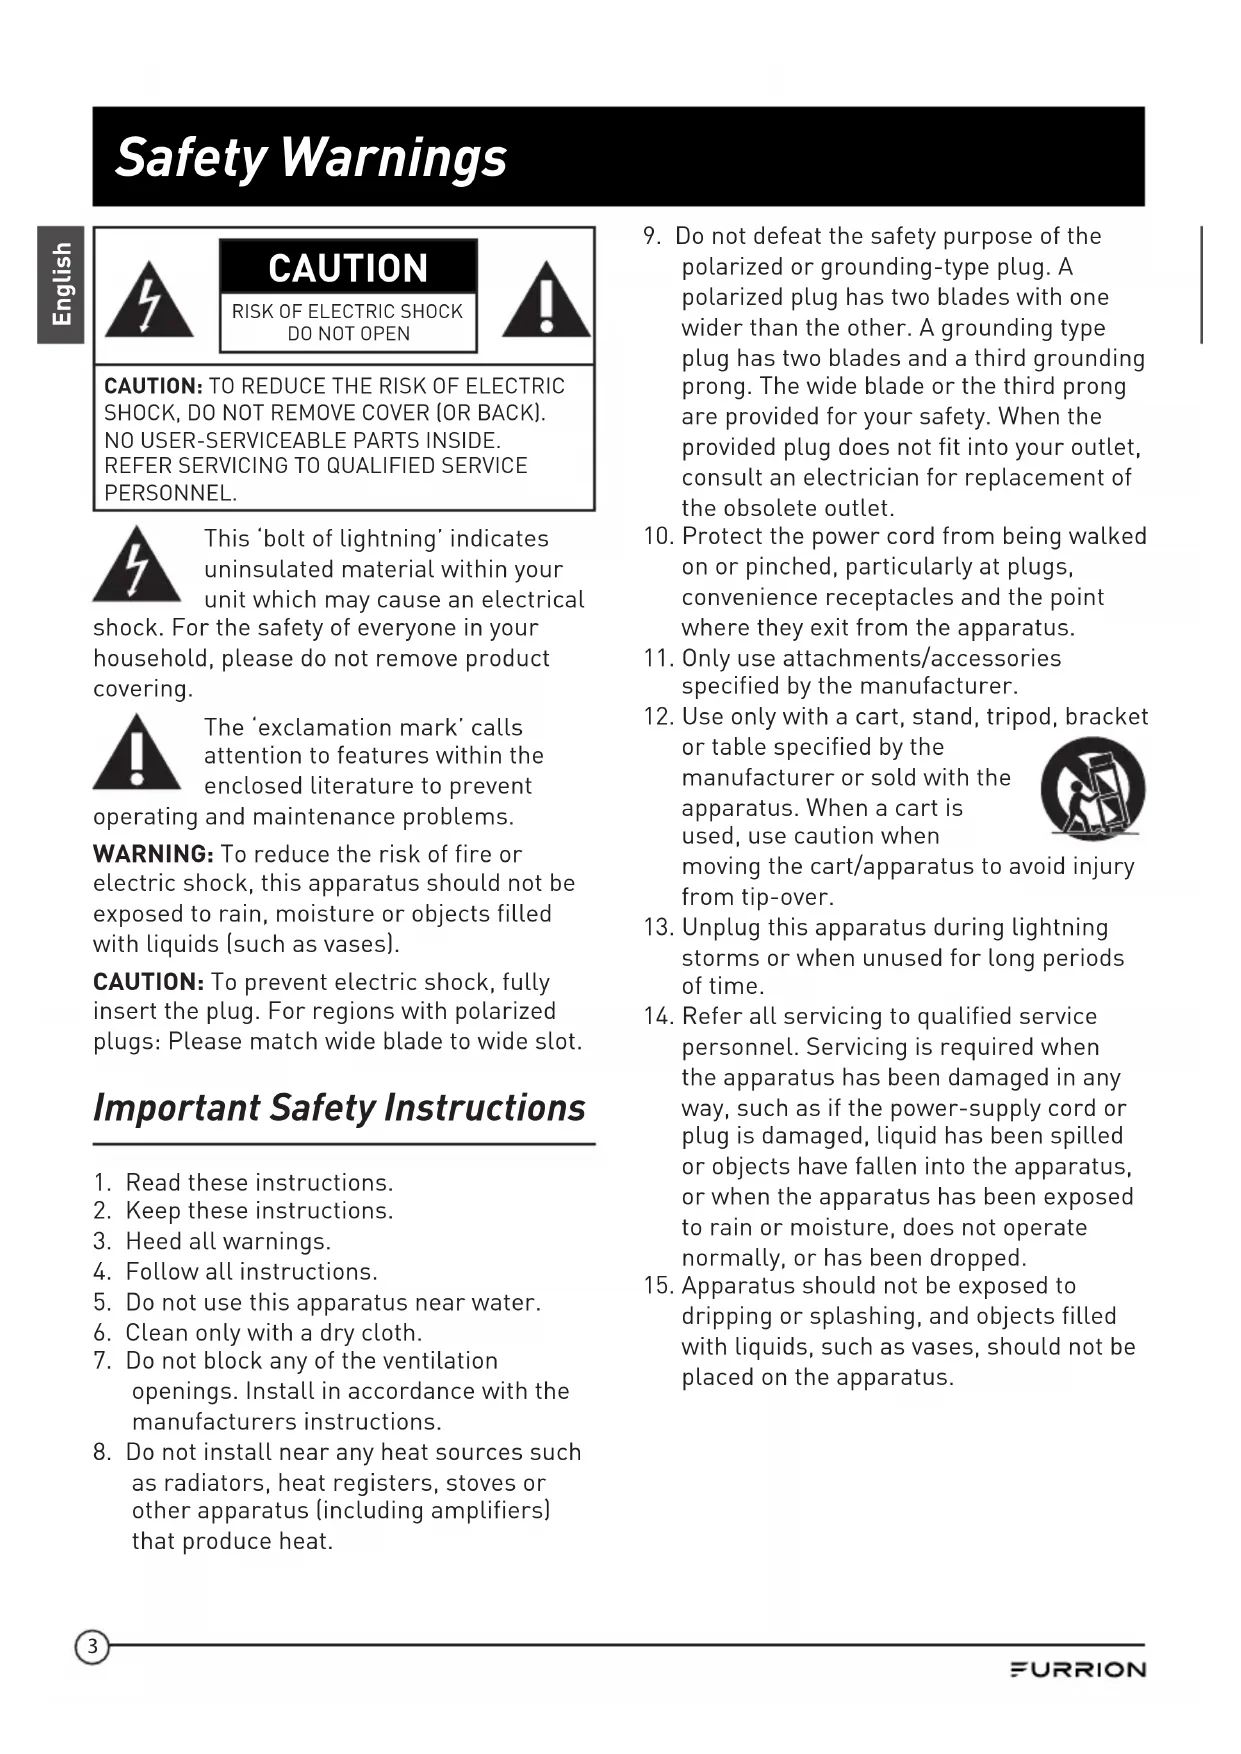
Safety Warnings

CAUTION
RISK OF ELECTRIC SHOCK DO NOT OPEN

CAUTION: TO REDUCE THE RISK OF ELECTRIC SHOCK, DO NOT REMOVE COVER (OR BACK). NO USER-SERVICEABLE PARTS INSIDE. REFER SERVICING TO QUALIFIED SERVICE PERSONNEL.

This 'bolt of lightning' indicates uninsulated material within your unit which may cause an electrical
shock. For the safety of everyone in your household, please do not remove product covering.

The ‘exclamation mark’ calls attention to features within the enclosed literature to prevent
operating and maintenance problems.
WARNING: To reduce the risk of fire or electric shock, this apparatus should not be exposed to rain, moisture or objects filled with liquids (such as vases).
CAUTION: To prevent electric shock, fully insert the plug. For regions with polarized plugs: Please match wide blade to wide slot.
Important Safety Instructions
- Read these instructions.
- Keep these instructions.
- Heed all warnings.
- Follow all instructions.
- Do not use this apparatus near water.
- Clean only with a dry cloth.
- Do not block any of the ventilation openings. Install in accordance with the manufacturers instructions.
-
Do not install near any heat sources such as radiators, heat registers, stoves or other apparatus (including amplifiers) that produce heat.
-
Do not defeat the safety purpose of the polarized or grounding-type plug. A polarized plug has two blades with one wider than the other. A grounding type plug has two blades and a third grounding prong. The wide blade or the third prong are provided for your safety. When the provided plug does not fit into your outlet, consult an electrician for replacement of the obsolete outlet.
- Protect the power cord from being walked on or pinched, particularly at plugs, convenience receptacles and the point where they exit from the apparatus.
- Only use attachments/accessories specified by the manufacturer.
- Use only with a cart, stand, tripod, bracket
or table specified by the manufacturer or sold with the apparatus. When a cart is used, use caution when moving the cart/apparatus to a from tip-over.

- Unplug this apparatus during lightning storms or when unused for long periods of time.
- Refer all servicing to qualified service personnel. Servicing is required when the apparatus has been damaged in any way, such as if the power-supply cord or plug is damaged, liquid has been spilled or objects have fallen into the apparatus, or when the apparatus has been exposed to rain or moisture, does not operate normally, or has been dropped.
- Apparatus should not be exposed to dripping or splashing, and objects filled with liquids, such as vases, should not be placed on the apparatus.
Safety Warnings
- An outside antenna system should not be located in the vicinity of overhead power lines or other electric light or power circuits, or where it can fall into such power lines or circuits. When installing an outside antenna system, extreme care should be taken to eliminate touching power lines or circuits as contact might be fatal.
- Do not overload wall outlets, extension cords, or integral convenience receptacles as this can result in a risk of fire or electric shock.
- Never push objects of any kind into this product through openings as they may touch short-out parts or dangerous voltage points that could result in a fire or electric shock. Never spill liquid of any kind on the product.
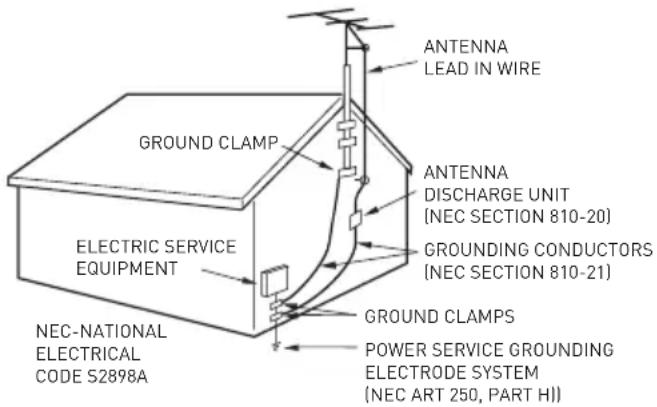
- If an outside antenna or cable system is connected to the unit, be sure the antenna or cable system is grounded to provide some protection against voltage surges and built-up static charges, Section 810 of the National Electrical Code, ANSI/NFPA 70, provides information with respect to proper grounding of the mast and supporting structure, grounding of the lead-in wire to an antenna discharge unit, size of grounding conductors, location of antenna discharge unit, connection to grounding electrodes, and requirements for the grounding electrode.
EXAMPLE OF ANTENNA GROUNDING AS PER THE NATIONAL ELECTRICAL CODE
text_image
ANTENNA LEAD IN WIRE GROUND CLAMP ANTENNA DISCHARGE UNIT (NEC SECTION 810-20) GROUNDED CONDUCTORS (NEC SECTION 810-21) ELECTRIC SERVICE EQUIPMENT GROUND CLAMPS POWER SERVICE GROUNDING ELECTRODE SYSTEM (NEC ART 250, PART HI) NEC-NATIONAL ELECTRICAL CODE S2898A- When replacement parts are required, be sure the service technician uses replacement parts specified by the manufacturer or those that have the same characteristics as the original part. Unauthorized substitutions may result in fire, electric shock or other hazards.
- Upon completion of any service or repairs to this unit, ask the service technician to perform safety checks to determine that the unit is in proper operating condition.
- When you connect the product to other equipment, turn off the power and unplug from the wall outlet. Failure to do so may cause an electric shock and serious personal injury. Read the owner's manual of the other equipment carefully and follow the instructions when making any connections.
- Sudden high volume may cause hearing or speaker damage. When you use headphones (if the unit is equipped with a headphone jack), keep the volume at a moderate level. If you use headphones continuously with high volume, you may suffer hearing damage.
- Do not allow the product to output distorted sound for extended periods of time. This may cause speaker overheating and fire.
- This reminder is provided to call the cable TV system installer's attention to Article 820-40 of the NEC that provides guidelines for proper grounding and, in particular, specifies the cable ground shall be connected to the grounding system of the building, as close to the point of cable entry as practical.
- The socket-outlet must be installed near the unit and easily accessible.
- The main plug is used as the disconnect and shall remain readily operable.
Safety Warnings
CONDENSATION
Moisture will form in the operating section of the unit if the unit is brought from cool surroundings into a warm room or if the temperature of the room rises suddenly. When this happens the unit's performance will be impaired. To prevent this, let the unit stand in its new surroundings for about an hour before switching on, or make sure the room temperature rises gradually. Condensation may also form during the summer if the unit is exposed to the breeze from an air conditioner. In such cases, change the location of the unit.
HOW TO HANDLE THE LCD PANEL
- Do not press hard or jolt the LCD panel. It may cause the LCD panel glass to break and injury may occur.
- If the LCD panel is broken, make absolutely sure you do not touch the liquid in the panel. This may cause skin inflammation.
- If the liquid gets in your mouth, immediately gargle and consult with your doctor. Also, if the liquid gets in your eyes or touches your skin, consult your doctor after rinsing for at least 15 minutes in clean water.
Possible Adverse Effects on LCD Panel: If a fixed (non-moving) pattern remains on the LCD panel for long periods of time, the image can become permanently engrained and cause subtle but permanent ghost images. This type of damage is NOT COVERED BY YOUR WARRANTY. Never leave your LCD panel on for long periods of time while it is displaying the following formats or images:
- Fixed images, such as stock tickers, video game patterns, TV station logos and websites.
- Special formats that do not use the entire screen. For example, viewing letterbox style (16:9) media on a normal (4:3) display (black bars at top and bottom of screen); or viewing normal style (4:3) media on a wide screen (16:9) display (black bars on left and right sides of screen).
The following symptoms are not signs of malfunction but technical limitation.
Therefore we disclaim any responsibility for these symptoms.
- LCD panels are manufactured using an extremely high level of precision technology, however sometimes parts of the screen may be missing picture elements or have luminous spots. This is not a sign of a malfunction.
- Do not install the LCD panel near electronic equipment that produces electromagnetic waves. Some equipment placed too near this unit may cause interference.
- Effect on infrared devices – there may be interference while using infrared devices such as infrared cordless headphones.
Power source: This LED TV is designed to operate on 100\~240 volt 50/60 Hz, AC current. Insert the power cord into a 100\~240 volt 50/60 Hz outlet.
To prevent electric shock, do not use the LED TV's (polarized) plug with an extension cord, receptacle, or other outlet unless the blades and ground terminal can be fully inserted to prevent blade exposure.
Warning: To reduce the risk of fire or electric shock, do not expose this apparatus to rain or moisture.
Safety Warnings
Caution: Never remove the back cover of the LED TV as this can expose you to very high voltages and other hazards. If the TV does not operate properly, unplug the LED TV and call your authorized dealer or service center. Adjust only those controls that are covered in the instructions, as improper changes or modifications not expressly approved by Furrion could void the user's warranty.
Declaration of Conformity
WARNING: This equipment has been tested and found to comply with the limits for a Class B digital device, pursuant to Part 15 of the FCC Rules. These limits are designed to provide reasonable protection against harmful interference in a residential installation. This equipment generates, uses and can radiate radio frequency energy and, if not installed and used in accordance with the instructions, may cause harmful interference to radio communications. However, there is no guarantee that interference will not occur in a particular installation. If this equipment does cause harmful interference to radio or television reception, which can be determined by turning the equipment off and on, the user is encouraged to try to correct the interference by one or more of the following measures:
– Reorient or relocate the receiving antenna.
– Increase the separation between the equipment and receiver.
- Connect the equipment to an outlet on a circuit different from that to which the receiver is connected.
- Consult the dealer or an experienced radio/TV technician for help.
CAUTION: Changes or modifications not expressly approved by the party responsible for compliance with the FCC Rules could void the user's authority to operate this equipment.
Safety Precautions
WARNING: Never place a television set in an unstable location. A television set may fall, causing serious personal injury or death. Many injuries, particularly to children, can be avoided by taking simple precautions such as:
- Using cabinets or stands recommended by the manufacturer of the television set.
- Only using furniture that can safely support the television set.
- Ensuring the television set is not overhanging the edge of the supporting furniture.
- Not placing the television set on tall furniture (for example, cupboards or bookcases) without anchoring both the furniture and the television set to a suitable support.
- Not placing the television set on cloth or other materials that may be located between the television set and supporting furniture.
– Educating children about the dangers of climbing on furniture to reach the television set or its controls.
If your existing television set is being retained and relocated, the same considerations as above should be applied.
The unit emits heat when in operation. Do not place any covers or blankets on the unit, this may cause overheating. Do not block ventilation holes, or set up near radiators.
Do not place in direct sunlight. When placing on a shelf leave 4 inches (10 cm) free space around the entire unit, leave 1.5 inches (4 cm) of free space behind the entire device.
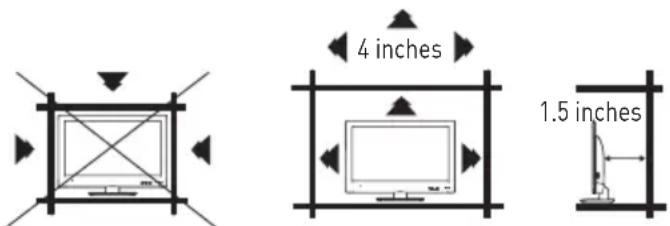
text_image
4 inches 1.5 inchesSafety Warnings Fun
Notes when mounting the LED TV on the wall
If the unit is to be mounted on the wall, contact the retailer where you purchased the LED TV for advice, and have the equipment professionally installed. Incomplete or improper installation may cause injury to you and/or damage to the LED TV.
Please refer to the table below to ensure the correct size VESA mount is used with the TV
VESA MOUNTING PATTERN
| TV Model | Width mm | Height mm | Screw Size Quantity | |
| FEHS39L6A | 200 200 | PM6*35mm | 4 | |
Notice for TV Cabinet
If the unit is to be mounted on a cabinet smaller than the length of the unit, it could result in an unstable location. The unit may tumble over, making a risk of personal, possibly fatal injury. This would also damage the product seriously. Accordingly, Furrion accepts no responsibility or liability for any injuries or property damage resulting from the improper installation.

text_image
YES!! NO!!WARNING:
- Do not use this TV with wall mounts that allow the TV to tilt vertically. Vertical tilting wall mounts may cause structural damage to the TV.
- Use ONLY fixed or horizontal swiveling wall mounts with this TV.
tion Overview
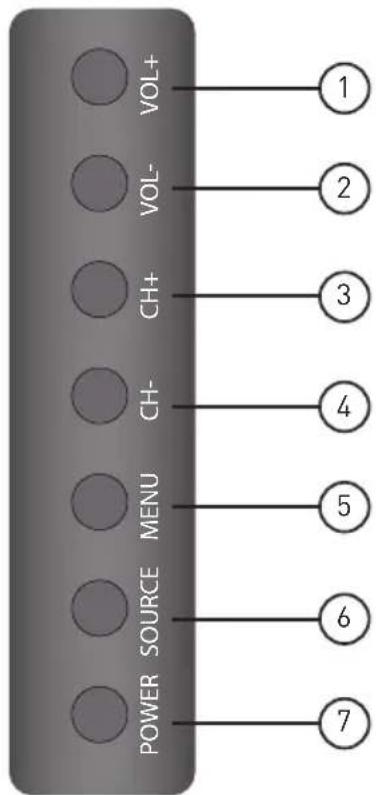
Control Panel
flowchart
graph TD
    A["POWER SOURCE"] --> B["VOL+"]
    A --> C["VOL-"]
    A --> D["CH+"]
    A --> E["CH-"]
    A --> F["MENU"]
    A --> G["VOOL+"]
    B --> H["1"]
    C --> I["2"]
    D --> J["3"]
    E --> K["4"]
    F --> L["5"]
    G --> M["6"]
    G --> N["7"]
*Please note that the button layout of the controls may vary from model to model.
| Item Button Function | ||
| 1 | VOL+ Increase the volume. | |
| 2 | VOL- | Decrease the volume. |
| 3 | CH+ Skip to the next channel. | |
| 4 | CH- | Skip to the previous channel. |
| 5 | MENU | Enter the main menu. |
| 6 | SOURCE | Select the input source. |
| 7 | POWER Switch the TV on/off. | |
Function Overview
Connections
Connect other devices to the TV Set.
Your Furrion HD TV Set offers multiple connection options. Please consult the DVD player, Games Console or other devices manual to ensure proper connection and use.
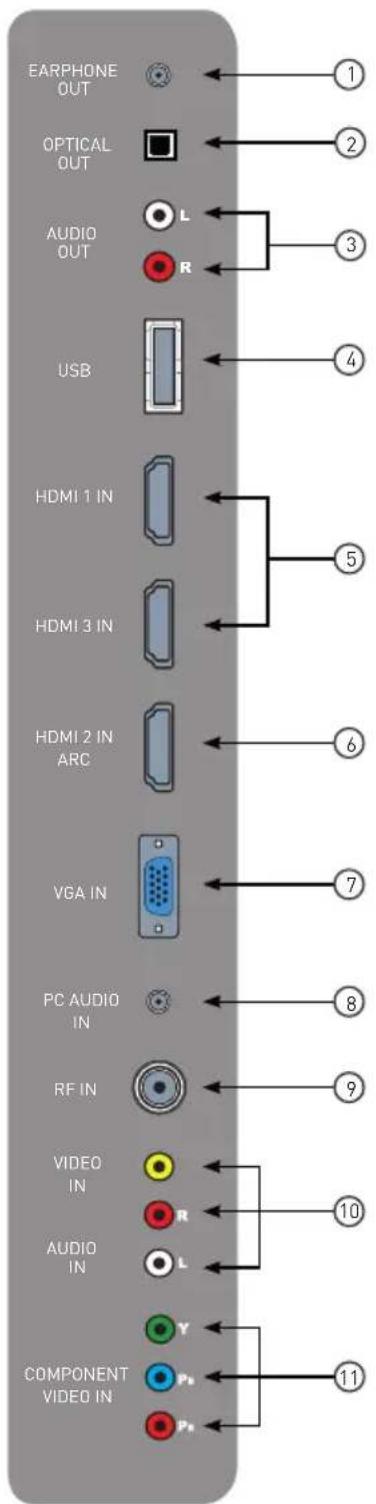
text_image
EARPHONE OUT OPTICAL OUT AUDIO OUT USB HDMI 1 IN HDMI 3 IN HDMI 2 IN ARC VGA IN PC AUDIO IN RF IN VIDEO IN AUDIO IN COMPONENT VIDEO IN*The configuration of the connection ports may vary from model to model.
| Item Connection Function | ||
| 1 | EARPHONE OUT | Connects to 3-conductor(TRS)phone connector of earphone, compatibility of earphone with 4-conductor(TRRS)phone connector is not guaranteed. |
| 2 | OPTICAL OUT | Connects to the OPTICAL AUDIO IN port of an audio device. |
| 3 | AUDIO OUT (R/L) | Connects to the AUDIO IN ports of an audio device. |
| 4 | USB | USB Port, view pictures and listen to MP3s via a compatible USB stick. |
| 5 | HDMI 1 IN | Connects to the HDMI OUT port of a DVD Player, Games Console, Cable box or other HDMI device.CEC Consumer Electronics Control.When connected to the compatible Furrion Entertainment Systems (or other CEC Compatible devices), the TV links with the system to give extra functionality. |
| HDMI 3 IN | ||
| 6 | HDMI 2 IN ARC | Connects to the HDMI OUT port of a DVD Player, Games Console, Cable Box or other HDMI device.ARC Audio Return Channel.When connected with a HDMI 1.4 cable to an ARC compatible audio system, the TV links with the device to give extra audio functionality. |
| 7 | VGA IN | Connects to the VGA OUT port of a PC to use the TV as a monitor. |
| 8 | PC AUDIO IN | Connects to the AUDIO OUT port of a PC. |
| 9 | RF IN | Connects to the ANTENNA, CABLE, or CABLE BOX. |
| 10 | VIDEO IN | Connects to the COMPOSITE VIDEO/AUDIO OUT ports of a DVD PLAYER, Cable Box or other compatible device. |
| AUDIO IN (R/L) | ||
| 11 | COMPONENT VIDEO IN (Y/PB/PR) | Connect to the COMPONENT VIDEO OUT ports of a DVD Player, Cable Box or other compatible device. |
Function Overview
Unimote
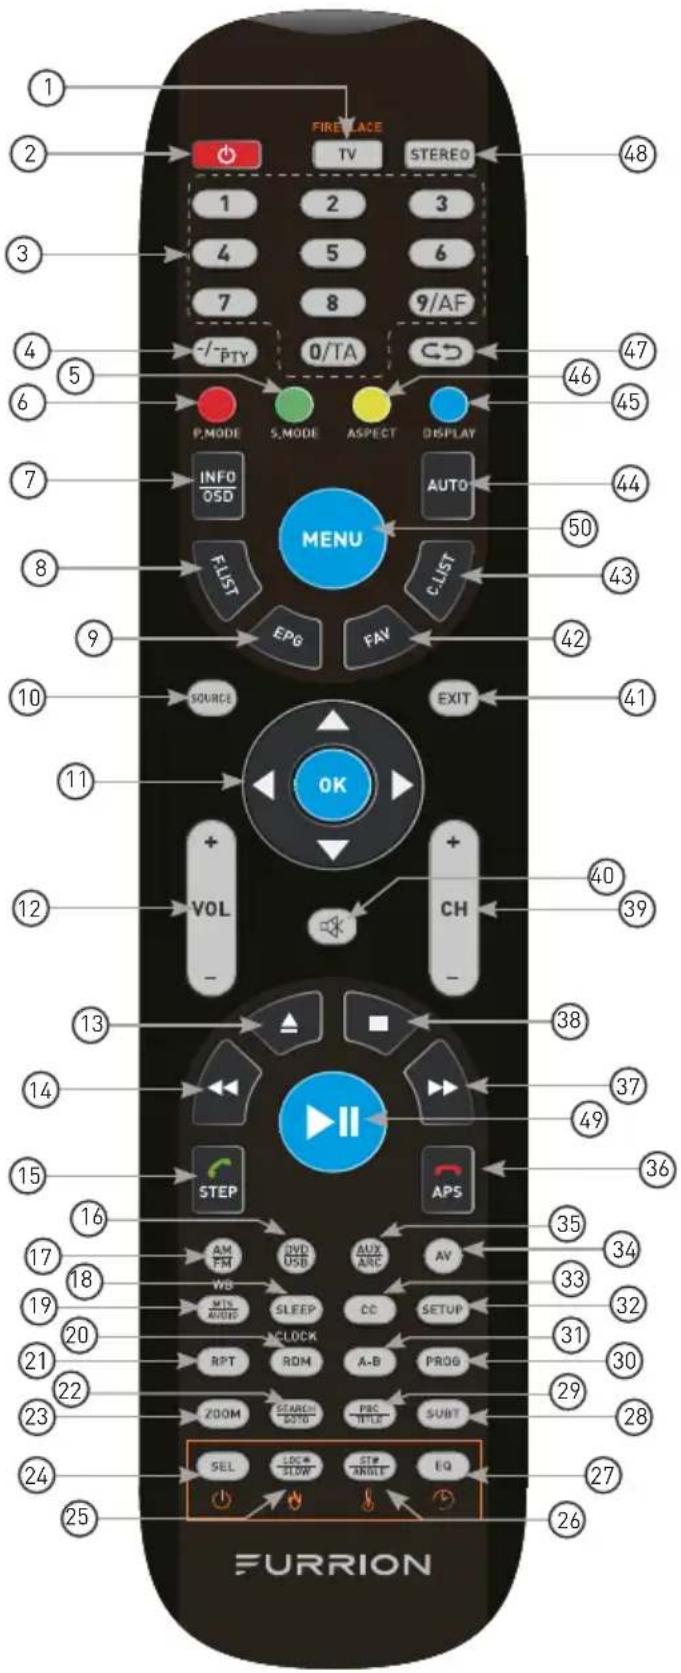
text_image
1 2 3 4 5 6 7 8 9/AF -/-PTY 0/TA P:MODE S:MODE ASPECT DISPLAY INFO OSD MENU AUTO F:LIST C:LIST EPG FAV SOURCE EXIT 10 11 12 VOL CH 13 14 15 STEP APS 16 AM FM DVD USB AUX ARC AV WB MTL AVOUT SLEEP CC SETUP V:CLOCK RPT ROM A-B PROG 20 21 22 23 24 25 26 27 28 29 30 31 32 33 34 35 36 37 38 39 40 41 42 43 44 45 46 47 48| Item | Button Function | |
| 1 | TV Switch to TV mode. | |
| TV/FIREPLACE | Select Furrion fireplace remote control functions.*Please refer to your Furrion fireplace manual for more information. | |
| 2 | Turn the TV/Entertainment System on/off. | |
| 3 | NUMBER BUTTONS | Enter numbers or select channels. |
| 4 | Toggle between single and double digit input. | |
| 5 | S.MODE Cycle through sound modes. | |
| 6 | P.MODE Cycle through picture modes. | |
| 7 | INFO/OSD | In TV mode, press to display information on the selected TV channel.In Stereo mode, press to display DVD playback status. |
| 8 | F.LIST Display favorites list. | |
| 9 | EPG Display the program guide. | |
| 10 | SOURCE Cycle through input sources. | |
| 11 | NAVIGATION BUTTONS | Confirm selections. |
| 12 | VOL+/- Increase/decrease volume. | |
| 13 | Eject DVD/CD. | |
| 14 | During playback, press to select the previous track/chapter.Press and hold to rewind.Automatic or manual tuning in radio mode. | |
| 15 | STEP | Press to forward frame by frame during DVD/VCD playback.Dial or accept a call (when the system is connected to a cell phone). |
Function Overview
| Item | Button Function | |
| 16 | DVD/USB Select DVD/USB. | |
| 17 | AM/FM Select AM/FM/WB Radio. | |
| 18 | SLEEP/CLOCK | Set the sleep timer. |
| 19 | MTS/AUDIO | Cycle through MTS sound modes. |
| 20 | RDM | Toggle random playback mode on and off. |
| 21 | RPT | Press to select repeat playback modes. |
| 22 | SEARCH/GOTO | Jump to a specific time on a DVD/VCD/MP3/WMA or CD. |
| 23 | ZOOM Press to enlarge screen images. | |
| 24 | SEL | Toggle between Volume, Bass, Treble and Balance; Adjust Hours and Minutes. |
| 25 | LOC*/SLOW | Toggle radio reception strength. Press to start slow motion playback. |
| 26 | ST#/ANGLE | Toggle Stereo and Mono sound/ switch viewing angles on compatible media. |
| 27 | EQ | Toggle the sound mode Cinema, Rock, Classic and Flat. |
| 28 | SUBT | Press to display subtitles on compatible media. Repeatedly press to cycle through subtitle options. |
| 29 | PBC/TITLE | Display DVD/VCD Title lists. Toggle Play Back Control (PBC) on and off. |
| 30 | PROG | Use to start the programmed playback function. |
| 31 | A-B | Press to start the A-B repeat function ( playback loop of a segment of track). |
| 32 | SETUP | Enter the Setup menu for the entertainment system. |
| Item Button Function | ||
| 33 | CC | Toggle Closed Captions On and Off. |
| 34 | AV Select | AV Mode. |
| 35 | AUX/ARC Select AUX/ ARC Mode. | |
| 36 | APS | Press to scan radio stations: A brief press searches through each stored station. Press and hold to scan and store the 6 strongest stations.End or reject a call (when the system is connected to a cell phone). |
| 37 | ▶ | During playback, press to select the next track/ chapter. Press and hold to fast forward. Automatic or Manual tuning in radio mode. |
| 38 | ■ | Stop playback. |
| 39 | CH+/- Channel Up/Down. | |
| 40 | Toggle audio On or Off. | |
| 41 | EXIT Exit the current menu. | |
| 42 | FAV | Press to add the channel to favorite list |
| 43 | C.LIST Display the channel list. | |
| 44 | AUTO | Automatically adjust the picture in PC mode. |
| 45 | DISPLAY | Toggle on screen on the selected source On and Off. |
| 46 | ASPECT | Cycle through available display aspect ratios. |
| 47 | Toggle between the current and previous channel. | |
| 48 | STEREO Switch to Stereo mode. | |
| 49 | ▶II | Start, Pause or restart playback. |
| 50 | MENU Enter the main menu. | |
Before Operation
What's in the box
Thanks for purchasing this Furrion LED HD TV. This manual will help you set up and begin using your TV. Please read this manual thoroughly and keep this manual in a safe place for future reference.
First, check the contents of your box with the parts checklist below:
- LED HD TV
- Remote Control
- AAA battery × 2
- Instruction Manual
- Warranty Card
• Wall-mount screws x 4 (PM6 X 35mm*4)
Now you can get started!
Preparation of your Remote Control
BATTERY INSTALLATION
- Open battery compartment cover.
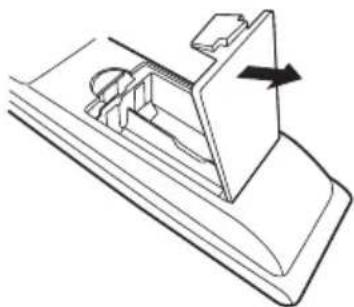
natural_image
Technical line drawing of a mechanical component with an arrow indicating direction (no text or symbols)- Install two AAA batteries.
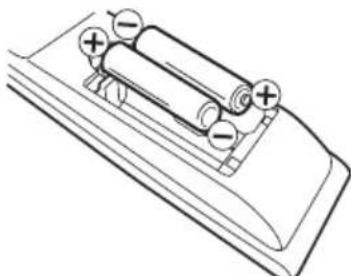
natural_image
Simple line drawing of a battery mounted on a surface with two positive charges, no text or symbols present.- Close the cover of the battery compartment.
NOTE: Use two "AAA" size batteries. The batteries may last approximately one year
depending on usage. For best performance, it is recommended the batteries should be replaced on a yearly basis, or when the remote operation becomes erratic. Do not mix old and new batteries or different types.
BATTERY PRECAUTIONS
These precautions should be followed when using batteries in this device:
- Use only the size and type of batteries specified.
- Be sure to follow the correct polarity when installing the batteries as indicated in the battery compartment. Reversed batteries may cause damage to the device.
- Do not mix different types of batteries together (e.g. Alkaline and Carbon-zinc) or old batteries with fresh ones.
- If the device is not to be used for a long period of time, remove the batteries to prevent damage or injury from possible battery leakage.
- Do not try to recharge batteries not intended to be recharged; they can overheat and rupture. (Follow battery manufacturer's directions.)
- Please use caution when inserting batteries to avoid battery damage. If the spring terminal in the remote control remains in contact with a side of a damaged battery it can cause a short circuit. Never use damaged batteries as they can become very hot and are dangerous.
Set up
Using the Menu
Press TV to select TV Mode and then press POWER button to turn on the TV. Press MENU button to enter the menu.
Use the ▲/▼ ◀/▶ keys to navigate the menus and select settings.
Press OK to confirm selections & settings and enter sub menus.
Press EXIT at any time to exit the menu.
Setup Wizard
For the first time the TV is turned on, the SETUP WIZARD will start. The wizard will assist in configuring the TV for use and scan for available channels.
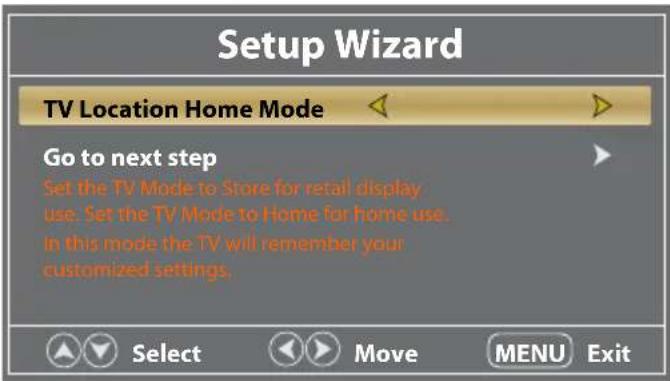
- Use ▲r key to highlight TV Location, then press ◀r ▶elect Home Mode or Retail Mode.
Press ▲ or ▼ to highlight Go to next step, press OK or ▶ to go to the next step.
text_image
Setup Wizard TV Location Home Mode Go to next step Set the TV Mode to Store for retail display use. Set the TV Mode to Home for home use. In this mode the TV will remember your customized settings. Select Move MENU Exit- Use ▲r key to highlight Menu
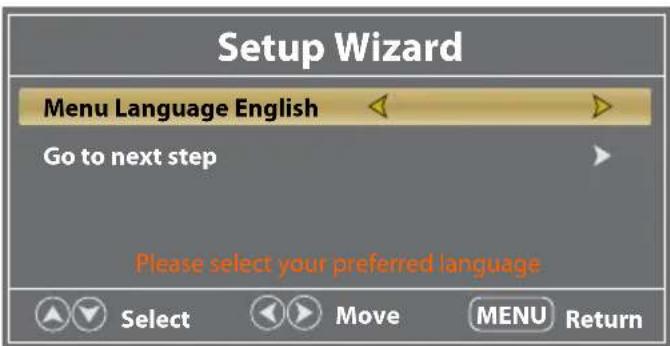
Language, then press ◀ or ▶ to select the desired language.
Press ▲ or ▼ to highlight Go to next step, press OK or ▶ to go to the next step.
text_image
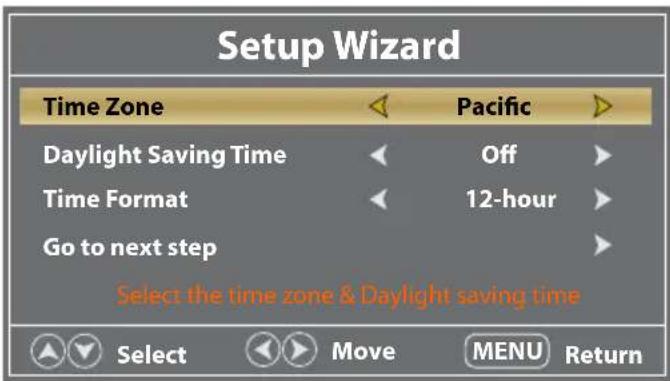
Setup Wizard Menu Language English Go to next step Please select your preferred language Select Move MENU Return- Use ▲r key to highlight Time Zone, then press ◀ or ▶ to select desired time zone.
Use ▲ or ▼ key to highlight Daylight Saving Time, then press ◀ or ▶ to select On or Off. Use ▲ or ▼ key to highlight Time Format, then press ◀ or ▶ to select 12-hour or 24-hour. Press ▲ or ▽ to highlight Go to next step, press OK or ▶ to go to the next step.
text_image
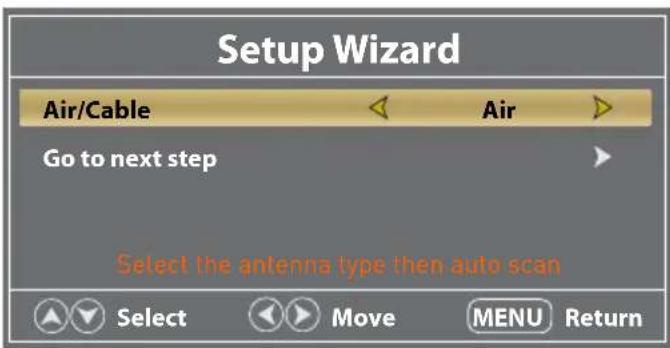
Setup Wizard Time Zone Pacific Daylight Saving Time Off Time Format 12-hour Go to next step Select the time zone & Daylight saving time Select Move MENU Return- Use ▲r key to highlight Air/Cable, then press ◀r ▶to select Air or Cable base on your connection.
Press ▲ or ▼ to highlight Go to next step, press OK or ▶ to start the auto scan.
text_image
Setup Wizard Air/Cable Air Go to next step Select the antenna type then auto scan Select Move MENU ReturnThe Setup Wizard will now automatically scan for available channels.
Please note that the scanning may take some time.
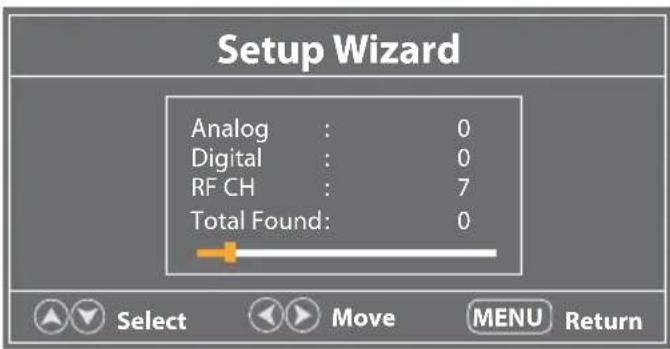
text_image
Setup Wizard Analog : 0 Digital : 0 RF CH : 7 Total Found: 0 Select Move MENU ReturnSettings
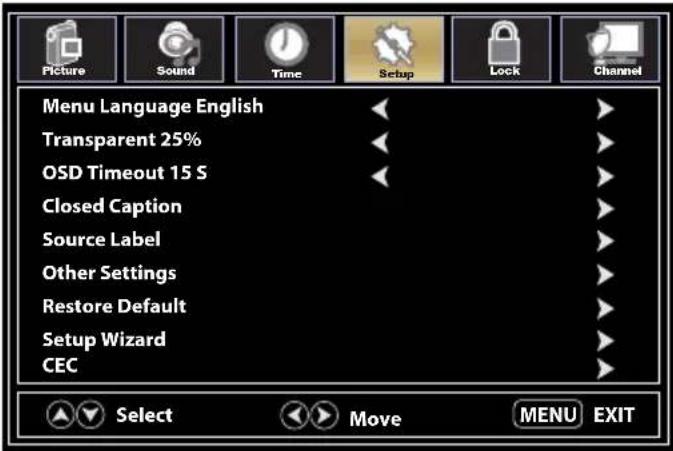
Setup
The Setup Menu allows control of various settings of the TV Set.
- Press MENU button to enter the menu.
- Use ▲/▼◀▶ keys to navigate the menus and select settings.
- Press OK to confirm selections & setting and enter sub menus.
- Press EXIT at any time to exit the setting.
text_image
Picture Sound Time Setup Lock Channel Menu Language English Transparent 25% OSD Timeout 15 S Closed Caption Source Label Other Settings Restore Default Setup Wizard CEC Select Move MENU EXITSetup Menu
| Menu Language | Selects the menu language. | Pressorto select English, French, Spanish or Portuguese language. | ||
| Transparent | Controls the transparency level of the menu. | Pressorto select 0% / 25% / 50% / 75% / 100% transparency level. | ||
| OSD Timeout | Selects the time that the OSD stays on the screen. | Pressorto select 5S, 15S, 30S,45S, or 60S. | ||
| Closed Caption | Configures Closed Caption | CC Mode | Pressorto select CC On, CC Off or CC On Mute. | |
| Analog CC | Pressorto select select settings for CC 1-4 or Text 1-4. | |||
| Digital CC | Pressorto select digital CC Service 1-6. | |||
| Option | Options to configure Closed Caption appearance - font ,color, opacity, background. | |||
| Source Label | Allows labeling of input sources | Pressarto select a character.Press orto navigate the characters. (Maximum of 10 characters) | ||
Settings
| Setup Menu | |||
| Other Settings | Blue Screen | Pressorselect On or Off. | |
| Audio Only | Pressorselect On or Off. | ||
| Restore Default | Resetsettingssto factory defaults | Pressorselect Yes or No. | |
| Setup Wizard | Startsthe Setup Wizard | See Page 12. | |
| CEC | Configure CEC functions | CEC Control | Pressorselect Off or On. |
| Device Auto Power Off | If On, when the TV is turned off, all HDMI CEC connected devices will go into standby. | ||
| TV Auto Power On | If On, when a HDMI CEC connected device is turned, the TV will turn on and switch to the source the device is connected to. | ||
| Audio Receiver (ARC) | If On, the TV will output audio to an ARC compatible connected device. | ||
| Device Lists Lists all connected CEC devices. | |||
| Connect Connects to devices on the CEC devices. | |||
| Root Menu Shows the root menu of connected devices. | |||
Settings
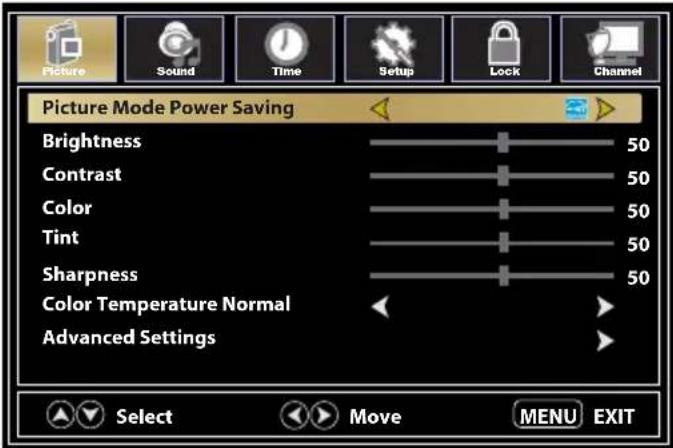
Picture Settings
The Picture Menu allows control of the display settings.
- Press MENU button to enter the menu.
- Use △▼key to navigate the menus and select settings.
- Press OK to confirm selections & settings and enter sub menus.
- Press EXIT at any time to exit the menu.
text_image
Picture Mode Power Saving Brightness 50 Contrast 50 Color 50 Tint 50 Sharpness 50 Color Temperature Normal Advanced Settings Select Move MENU EXITPicture Menu
| Picture Mode | Selects the display mode | Pressorto select Standard, Vivid, Soft, User or Power Saving display modes. | |
| Brightness | Controls the brightness level of the picture | Pressorto adjust the brightness to desired level. | |
| Contrast | Controls the contrast level of the picture | Pressorto adjust the contrast to desired level. | |
| Color | Controls the color level of the picture | Pressorto adjust the color to desired level. | |
| Tint Controls picture tint | Pressorto adjust the tint to desired level.*Only available under NTSC mode. | ||
| Sharpness | Controls the sharpness of the picture | Pressorto adjust the sharpness to desired level. | |
| Color Temperature | Selects the color mode | Pressorto select Normal, Cool or Warm. | |
| Advanced Settings | Advanced picture settings | Aspect Ratio | Pressorto select Wide, Zoom, Cinema or Normal screen ratios. |
| Noise Reduction | Pressorto select Off, Low, Medium, High or Auto. | ||
| Dynamic Contrast | Pressorto select On or Off. | ||
Settings
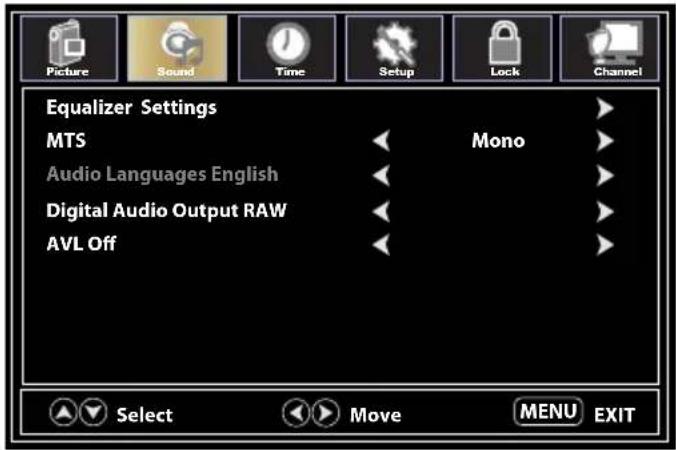
Sound Settings
The Sound Menu allows control of the audio settings.
- Press MENU button to enter the menu.
- Use ▲▼key▶to navigate the menus and select settings.
- Press OK to confirm selections & settings and enter sub menus.
- Press EXIT at any time to exit the menu.
NOTE: The display menu may be vary while different input source was selected.
Sound Menu
When the Input Source is TV
text_image
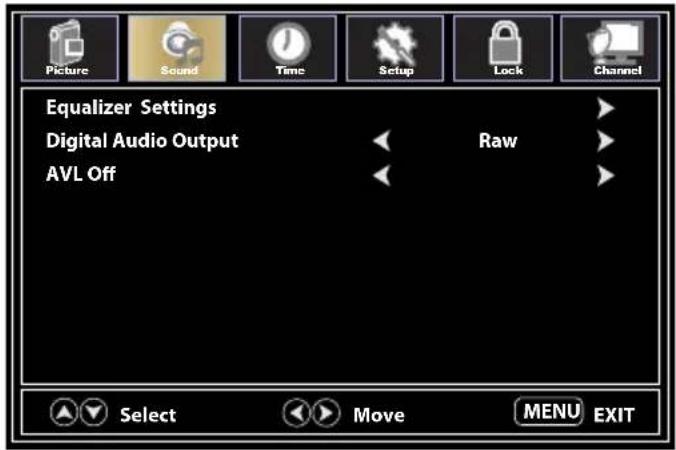
Picture Sound Time Setup Lock Channel Equalizer Settings MTS Mono Audio Languages English Digital Audio Output RAW AVL Off Select Move MENU EXITSound Menu
When the Input Source is HDMI, AV, COMPONENT or PC
text_image
Picture Sound Time Setup Lock Channel Equalizer Settings Digital Audio Output Raw AVL Off Select Move MENU EXITSound Menu
| Equalizer Settings | Controls the levels of various sound frequencies | Press ▶ or ▶ to select Standard, Music, Movie or Sports preset sound settings. | |
| User | Press ▶r to select 150Hz/500Hz/1K Hz/5K Hz/10K Hz. | ||
| MTS | Controls the Multi Channel TV Sound (Analog broadcasts only) | Press ▶r ▶ select Stereo, SAP (Secondary Audio when available) or Mono MTS settings | |
| Audio Languages | If available on digital broadcast, this selects the audio language | Press ▶or ▶ to select English, French or Spanish language | |
| Digital Audio Output | Selects the Digital Audio Output mode | Press ▶or ▶ to select RAW, PCM or Off digital audio output mode | |
| AVL | Automatic Volume Level - increases or decreases the TV volume to a set level | Press ▶r ▶ select On or Off | |
Settings
| Sound Menu | |||
| Voice Guidance | Control the Voice Guidance functions. | Voice Guidance | Press ▶r ▶set as On or Off |
| Volume | Press ▶or ▶to select Low, Middle or High | ||
| Speed | Press ▶r ▶to select Slow, Normal or Fast. | ||
| Pitch | Press ▶or ▶to select Low, Middle or High | ||
| Video Description | Controls the video description function | Press ▶r ▶select On or Off | |
Time Settings
The Time Menu allows control of the time settings.
- Press MENU button to enter the menu.
- Use ▲/▼key to navigate the menus and select settings.
- Press OK to confirm selections & settings and enter sub menus.
- Press EXIT at any time to exit the menu.
text_image
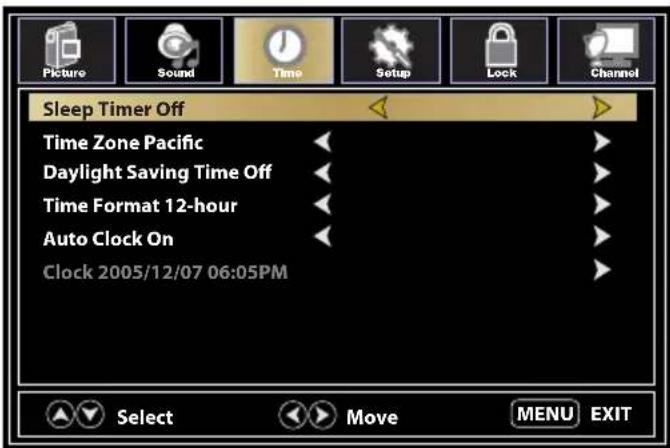
Sleep Timer Off Time Zone Pacific Daylight Saving Time Off Time Format 12-hour Auto Clock On Clock 2005/12/07 06:05PM Select Move MENU EXIT| Time Menu | ||
| Sleep Timer | Sets the TV to standby after a set period of time | Off / 5 / 10 / 15 / 30 / 60 / 90 / 120 / 180 / 240 Mins |
| Time Zone Sets the time zone | Pacific, Alaska,Hawaii, Samoa, Newfoundland, Atlantic, Eastern, Central, Mountain | |
| Daylight Saving Time | Toggles daylight saving On - Off | |
| Time Format | Selects the time display format | 12-hour24-hour |
| Auto Clock | Sets automatic time adjustment | Press ▶r ▶select On or Off. |
| Clock Sets the date and time displaying format. | ||
Settings
Lock Settings
The Lock Menu allows control of the security settings.
- Press MENU button to enter the menu.
- Use △/▼key to navigate the menus and select settings.
- Press OK to confirm selections & settings and enter sub menus.
- Press EXIT at any time to exit the menu.
text_image
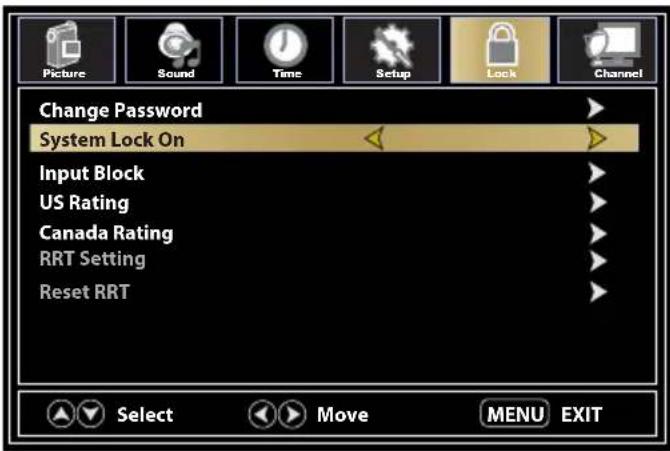
Change Password System Lock On Input Block US Rating Canada Rating RRT Setting Reset RRT Select Move MENU EXIT| Lock Menu | |||
| Change Password | Changes the User Password | Press ▼ to enter password. Press OK or ▶ to adjust.*Default password is 0000*If you forgot the password, use 8888 to enter any locked menu | |
| Key Lock Locks | the TV control panel keys | Press ▶r ▶select On or Off | |
| System Lock P | Password locks the system | Press ▶r ▶select password lock On or Off | |
| Input Block | Password locks inputsPress ▶r ▶Block or Unblock | TV Block - Unblock | |
| AV Block - Unblock | |||
| Component Block - Unblock | |||
| HDMI 1 Block - Unblock | |||
| HDMI 2 Block - Unblock | |||
| HDMI 3 Block - Unblock | |||
| PC Block - Unblock | |||
| Media Block - Unblock | |||
| US Rating | Sets parental locks based on US rating system | Set Locks based on age and genre. | Block - Unblock |
| Canada Rating | Sets parental locks based on Canadian rating system | Set Locks based on age and genre. | Block - Unblock |
Settings
English
text_image
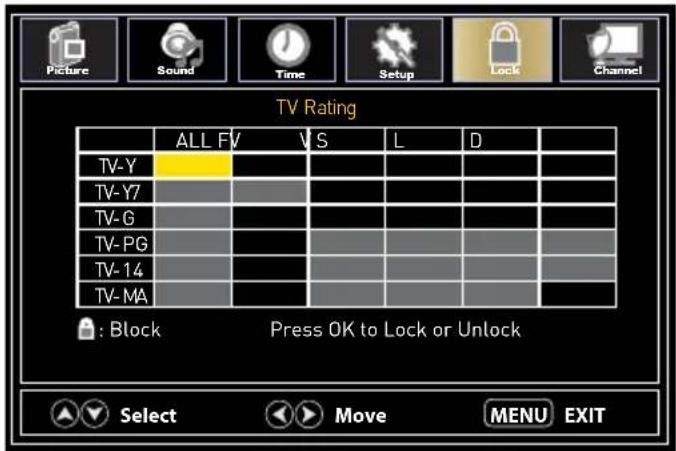
TV Rating ALL FV VS L D TV-Y TV-Y7 TV-G TV-PG TV-14 TV-MA : Block Press OK to Lock or Unlock Select Move MENU EXIT| Genre | |
| ALL All | |
| FV Fantasy Violence | |
| V Violence | |
| S Sex | |
| L Language | |
| D Dialogue | |
| US Rating System | |
| Off All Children | |
| G All Ages | |
| PG Parental Guidance | |
| PG-13 Parental Guidance below 13 | |
| R Parental Guidance below 17 | |
| NC-17 17 Years old or above | |
| X Adults Only | |
| Age | |
| TV-Y All Children | |
| TV-Y7 7 Years old or above | |
| TV-G General Audience | |
| TV-PG Parental Guidance | |
| TV-14 14 Years old or above | |
| TV-MA 17 Years old or above | |
| Canadian Rating System | |
| Off All | Children |
| C All Ages | |
| C8+ | Children below 8 |
| G General Audience | |
| PG | Parental Guidance |
| 14+ | Programming contains themes or content which may not be suitable for viewers under the age of 14 |
| 18+ | Adult |
Settings
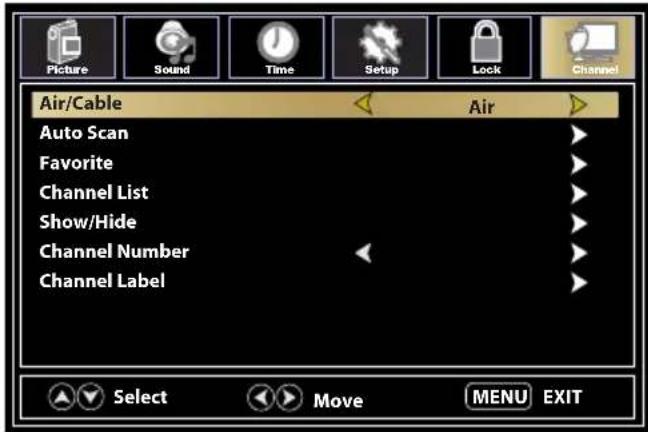
Channel Settings
The Channel Menu allows control of the channel settings.
- Press MENU button to enter the menu.
- Use △▼key▶to navigate the menus and select settings.
- Press OK to confirm selections & settings and enter sub menus.
- Press EXIT at any time to exit the menu.
text_image
Air/Cable Auto Scan Favorite Channel List Show/Hide Channel Number Channel Label Air Select Move MENU EXIT| Channel Menu | ||
| Air/Cable Set the reception type | Press ←r →select Air or Cable | |
| Auto Scan | Automatically scans for available channels | Press ←r →start Automatically scanning channels |
| Favorite | Adds Channels to the Favorite list | Press →r →to select a channel. Press OK or to →elect or deselect as a favorite |
| Channel List Lists available channels | Press OK or →to list available channels | |
| Show/Hide | Allows channels to be shown or hidden | Press →or →to select a channel. Press OK or →to show or hide the channel |
| Channel Number | Selects the channel number for labeling | Press ←r →to select a channel |
| Channel Label | Allows to define the name of channels | Press →r →to select a character. Press or →to navigate the characters. (Maximum of 7 characters) |
Settings
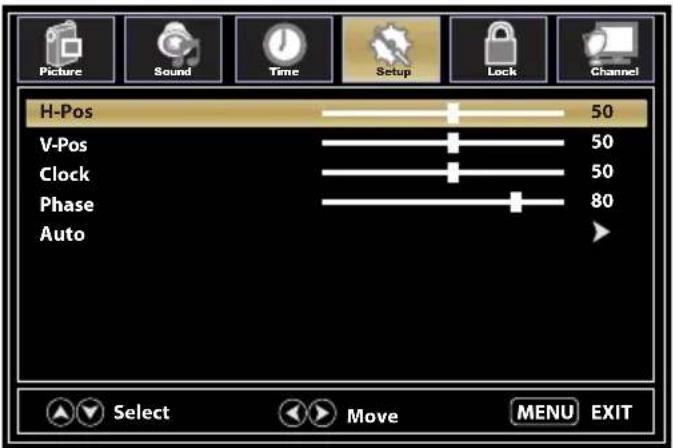
PC Settings
The PC Menu allows control of the PC settings.
- Press MENU button to enter the menu.
- Use ▲▼key▶to navigate the menus and select settings.
- Press OK to confirm selections & settings and enter sub menus.
- Press EXIT at any time to exit the menu.
The PC Menu is only accessible when a PC is connected via the VGA connection.
text_image
H-Pos 50 V-Pos 50 Clock 50 Phase 80 Auto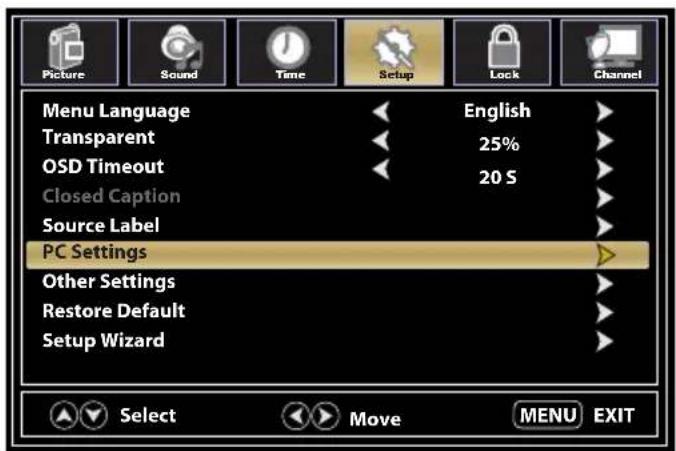
text_image
Menu Language Transparent OSD Timeout Closed Caption Source Label PC Settings Other Settings Restore Default Setup Wizard English 25% 20 S Select Move MENU EXITPC Menu
| H-Pos Configures the horizontal position of the TV image. | Press r move the screen horizontally |
| V-Pos Configures the vertical position of the TV image. | Press r move the screen vertically |
| Clock Adjusts the pixel Clock (vertical) for a clearer image. | Press r adjust |
| Phase Adjusts the phase Clock (horizontal) for a clearer image. | Press r adjust |
| Auto Automatically adjusts the PC settings. | Press OK or to adjust all PC settings automatically. |
PC MONITOR DISPLAY MODES
| Mode Resolution | Refresh Rate | |
| VGA 640 X 480 | 60 / 75 Hz | |
| VGA 720 X 400 | 70 Hz | |
| VGA 1366 X 768 | 60 Hz | |
| SVGA 800 X 600 | 60 / 75 Hz | |
| XGA 1024 X 768 | 60 / 70 / 75 Hz | |
| WXGA 1280 X | 720 60 Hz | |
| WXGA 1360 X | 768 60 Hz |
PC MONITOR DISPLAY MODES
| Mode Resolution | Refresh Rate | |
| SXGA 1280 X 1 | 024 60 Hz | |
| WXGA+ | 1440 X 900 60 Hz | |
| WSXGA+ | 1680 X 1050 | 60 Hz |
| FHD | 1920 X 1080 | 60 Hz |
*Please note that on non FHD TVs some functionality may be limited.
Settings
USB Player
The USB function allows viewing of photo & listening of music files from a USB flash drive.
- After connecting a flash drive, press SOURCE button and select Media.
- Choose to view Photo or Music.
- Navigate to the desired file or folder. Use ▲/▼ keys to navigate the files and folders on the USB drive.
- Press OK to confirm selections.

text_image
USB 2.0 Photo Music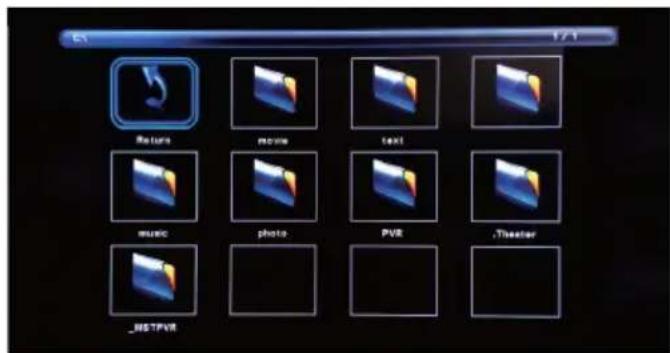
text_image
51 171 Return movie text music photo PVR Theater _RESTPVR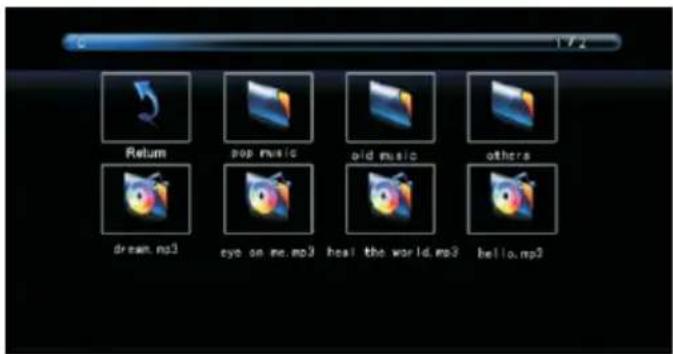
text_image
172 Return pop music oid music others dream.mp3 eye on me.mp3 host the world.mp3 hello.mp3When viewing photos, this photo viewer tool will allow to control the slide show, play music and provide information on the file.

text_image
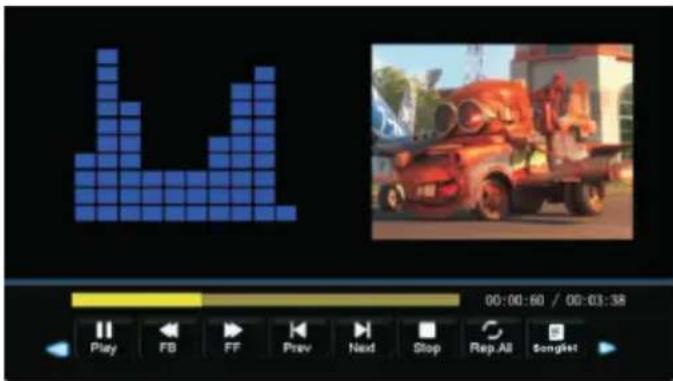
Pause Prev Next Stop Repeat Music Playful InfoThe photo viewer displays .jpg photo format files.
Playback of music is via this music player, which gives playback controls and information on the file.
text_image
Video editing interface showing a blue grid bar chart and a red truck image with playback controlsThe music player plays MP3 audio format files.
Troubleshooting
| Problem Solution/Issue | |
| TV does not operate | Make sure the power cord is plugged in.Try another AC outlet.Power is off, check fuse or circuit breaker.Unplug unit for an hour, then plug it back in. |
| Normal picture,but no sound | Check the volume settings.Sound muted? Press MUTE button.Try another channel.Check audio cable connections. |
| The remote controldoes not work | Ensure the remote control is in range with no obstructions.Check the batteries.Correct operating mode set: TV, VCR etc. |
| Poor sound or nosound | Station or Cable TV experiencing problems, tune to another station.Check sound adjustments (Volume or Mute).Check for sources of possible interference. |
| Poor picture or nopicture | Station or Cable TV experiencing problems, tune to another station.Make sure channels are set into memory.Check antenna or Cable TV connections, adjust antenna.Check for sources of possible interference.Check picture control adjustments. |
| Poor TV reception | Ensure the antenna amplifier is turned on for Antenna TV.Adjust the antenna position to a stronger signal receiving angle.Check the Antenna connection is tight to the TV.Check there is power supplied to the Antenna distribution box.Confirm your incoming cable is connected to the correct cable / antenna wall connection inside the RV.Ensure the internal RV coax jump cable is connected to the correct port. |
| Poor Cable /Satellite TVReception | Ensure antenna amp is turned off for able signal.Check incoming Cable is connected correctly to RV.Ensure cable splitter box has power.Confirm the incoming cable is connected to the correct cable / Satellite wall connection inside your RV.Ensure the internal RV coax jump cable is connected to the correct port.Check dish if has obstruction. |
| TV shuts off | Sleep Timer is set.Power interrupted. |
| Black and whiteimage from theconnected AVdevice | Check video connections on both the TV and connected AV device. Ensure the colors match between the connectors and sockets: green (Y), blue (Pb/Cb) and red (Pr/Cr) for component connection, and yellow (VIDEO) for composite connection.Ensure all video cables are connected firmly. |
Specifications
text_image
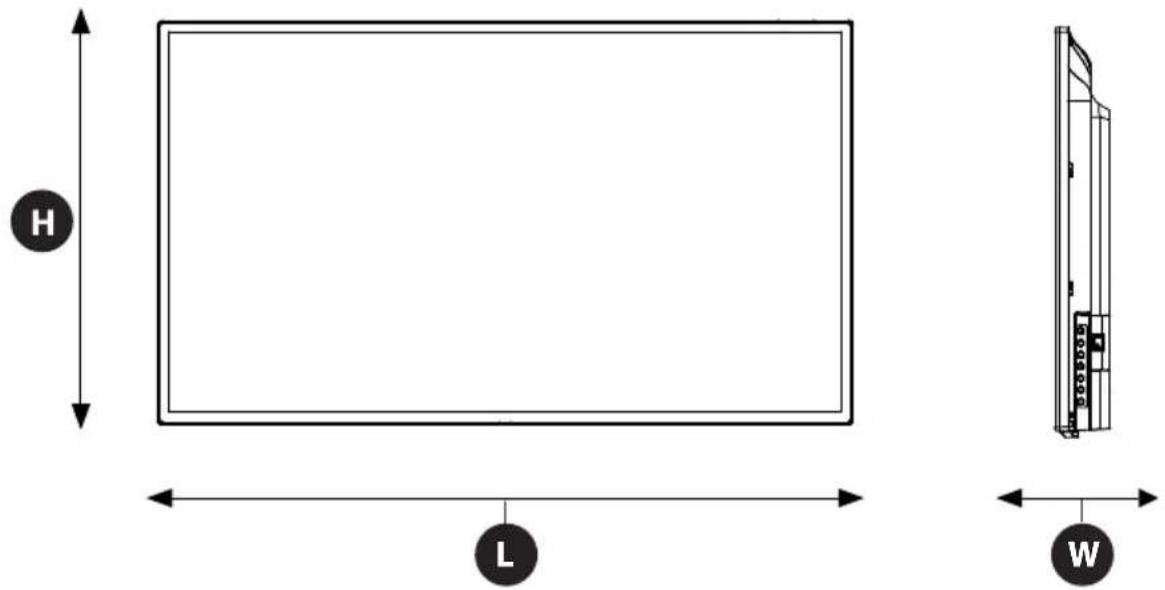
H L WMODEL, DIMENSION and RESOLUTION
| TV Model | Dimension without Stand (H*L*W) | Max Resolution |
| FEHS39L6A 514 x 886 x 71 | mm 1366 x 768 @ 60Hz HD |
INPUT and OUTPUT CONNECTIONS
| TV Model | HDMI In | VGA (PC) In | Audio (PC) In | Coaxial Audio Out | Optical Audio Out | USB | Audio Out | Audio In | Composite Video In | Component YP_BPR Video In | Ear-phones | RF in |
| FEHS39L6A | 3 1 1 | 0 1 1 | 1 x Right (Red)1 x Left (White) | 1 x Right (Red)1 x Left (White) | 1 x Yellow/Green* | 1 | 1 | |||||
| 1 x Blue1 x Red | ||||||||||||
*This connection serves as both a Composite Video In and a Component Video In (green) input.
Warranty
FURRION WARRANTS FOR A PERIOD OF 1 YEAR FROM DATE OF RETAIL PURCHASE BY THE ORIGINAL END-USE PURCHASER, THAT THIS PRODUCT, WHEN DELIVERED TO YOU IN NEW CONDITION, IN ORIGINAL PACKAGING, FROM A FURRION AUTHORIZED RESELLER AND USED IN NORMAL CONDITIONS, IS FREE FROM ANY DEFECTS IN MANUFACTURING, MATERIALS, AND WORKMANSHIP. IN CASE OF SUCH DEFECT, FURRION SHALL REPLACE OR REPAIR THE PRODUCT AT NO CHARGE TO YOU. THIS WARRANTY DOES NOT COVER: PRODUCTS WHERE THE ORIGINAL SERIAL NUMBERS HAVE BEEN REMOVED, ALTERED OR CANNOT READILY BE DETERMINED; DAMAGE OR LOSS CAUSED BY ACCIDENT, MISUSE, ABUSE, NEGLECT, PRODUCT MODIFICATION, FAILURE TO FOLLOW INSTRUCTIONS IN INSTRUCTION MANUAL, COMMERCIAL OR INDUSTRIAL USE; DAMAGE OR LOSS CAUSED TO THE DECORATIVE SURFACE OF PRODUCT; TO ANY DATA, SOFTWARE OR INFORMATION; AND NORMAL WEAR AND TEAR. THIS WARRANTY ONLY PROTECTS THE ORIGINAL END-USER ("YOU") AND IS NOT TRANSFERABLE; ANY ATTEMPT TO TRANSFER THIS WARRANTY SHALL MAKE IT IMMEDIATELY VOID. THIS WARRANTY IS ONLY VALID IN THE COUNTRY OF PURCHASE.
THIS WARRANTY AND REMEDIES SET FORTH ABOVE ARE EXCLUSIVE AND IN LIEU OF ALL OTHER WARRANTIES, REMEDIES AND CONDITIONS, WHETHER ORAL OR WRITTEN, EXPRESS OR IMPLIED. FURRION SPECIFICALLY DISCLAIMS ANY AND ALL IMPLIED WARRANTIES, INCLUDING, WITHOUT LIMITATION, WARRANTIES OF MERCHANTABILITY AND FITNESS FOR A PARTICULAR PURPOSE. IF FURRION CANNOT LAWFULLY DISCLAIM IMPLIED WARRANTIES UNDER THIS LIMITED WARRANTY, ALL SUCH WARRANTIES, INCLUDING WARRANTIES OF MERCHANTABILITY AND FITNESS FOR A PARTICULAR PURPOSE ARE LIMITED IN DURATION TO THE DURATION OF THIS WARRANTY.
No Furrion reseller, agent, or employee is authorized to make any modification, extension, or addition to this warranty.
FURRION IS NOT RESPONSIBLE FOR DIRECT, INDIRECT, SPECIAL, INCIDENTAL OR QUENTIAL DAMAGES RESULTING FROM ANY BREACH OF WARRANTY OR CONDITION, OR UNDER ANY OTHER LEGAL THEORY, INCLUDING BUT NOT LIMITED TO LOST PROFITS, DOWNTIME, GOODWILL, DAMAGE TO OR REPLACEMENT OF ANY EQUIPMENT OR PROPERTY, ANY COSTS OF RECOVERING, REPROGRAMMING, OR REPRODUCING ANY PROGRAM OR DATA STORED IN OR USED WITH FURRION PRODUCTS. FURRION'S TOTAL LIABILITY IS LIMITED TO THE REPAIR OR REPLACEMENT OF THIS PRODUCT PURSUANT TO THE TERMS OF THIS WARRANTY.
SOME STATES DO NOT ALLOW THE EXCLUSION OR LIMITATION OF INCIDENTAL OR CONSEQUENTIAL DAMAGES OR EXCLUSIONS OR LIMITATIONS ON THE DURATION OF IMPLIED WARRANTIES OR CONDITIONS, SO THE ABOVE LIMITATIONS OR EXCLUSIONS MAY NOT APPLY TO YOU. THIS WARRANTY GIVES YOU SPECIFIC LEGAL RIGHTS, AND YOU MAY ALSO HAVE OTHER RIGHTS THAT VARY BY STATE OR (WHERE APPLICABLE IN THE COUNTRIES WHERE FURRION HAS NON-US/CANADIAN AUTHORIZED DEALERS) COUNTRY. NO ACTION OR CLAIM TO ENFORCE THIS WARRANTY SHALL BE COMMENCED AFTER THE EXPIRATION OF THE WARRANTY PERIOD.
Keep your receipt, delivery slip, or other appropriate payment record to establish the warranty period. Service under this warranty must be obtained by contacting Furrion at
warranty@furrion.com
Product features or specifications as described or illustrated are subject to change without notice.
Bienvenue
natural_image
Line drawing of a mechanical component with an arrow indicating direction (no text or symbols)natural_image
Simple line drawing of a battery with two batteries and one partially open, mounted on a flat base (no text or symbols)text_image
Assistant de configuration TV Ubicación Home Mode Go to next step Set the TV Mode to Store for retail display use. Set the TV Mode to Home for home use. In this mode the TV will remember your customized settings. Select Move MENU Terminer| Genre | |
| ALL Tous | |
| FV Violence fictive | |
| V Violence | |
| S Sexe | |
| L Langage | |
| D Dialogue | |
text_image
USB 2.0 Photo Musque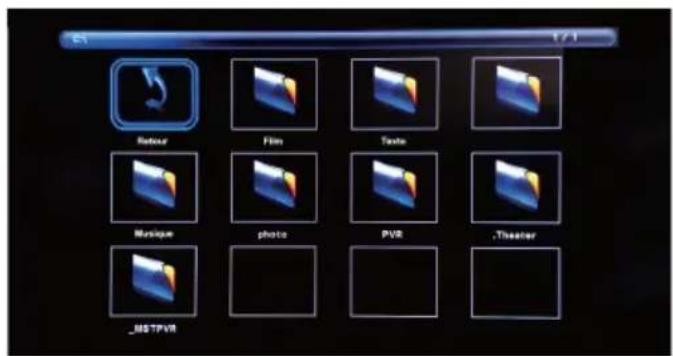
text_image
12 Retour pop music oid music others dream.mp3 eye on me.mp3 heal the world.mp3 hello.mp3text_image
Pause Prev Next Stop Repeat Music Playtal Infotext_image
Video editing interface showing a blue grid bar graph and a red truck photo with playback controlsFurrion Innovation Center & Institute of Technology
● 52567 Independence Ct., Elkhart, IN 46514, USA ● Toll free:1-888-354-5792
- Email: support@furrion.com
©2007-2018 Furrion Ltd. Furrion® and the Furrion logo are trademarks licensed for use by Furrion Ltd. and registered in the U.S. and other countries.