
PDU12IEC - Power strip Tripp Lite - Free user manual and instructions
Find the device manual for free PDU12IEC Tripp Lite in PDF.

User questions about PDU12IEC Tripp Lite
0 question about this device. Answer the ones you know or ask your own.
Ask a new question about this device
Download the instructions for your Power strip in PDF format for free! Find your manual PDU12IEC - Tripp Lite and take your electronic device back in hand. On this page are published all the documents necessary for the use of your device. PDU12IEC by Tripp Lite.
USER MANUAL PDU12IEC Tripp Lite
PDU Rackmount Power Strip for 19-inch Racks
Model: PDU12IEC
(Series Number: AGIB24016RMPDU)
Important Safety Instructions 2
Installation 2
Features 3
Specifications 3
Limited Warranty 4
Espanol 5
Français 9
Pycckn 13
Deutsch 17


1111 W. 35th Street, Chicago, IL 60609 USA • www.triplite.com/support
Copyright © 2019 Tripp Lite. All rights reserved.
Important Safety Instructions
This manual contains information concerning the proper installation and use of Tripp Lite's Rackmount Power Strips.
SAVE THESE INSTRUCTIONS.

Do not connect your power strip to an ungrounded outlet. Do not use it with extension cords or adapters that eliminate its connection to ground. Your power strip is designed for indoor use only. Install it away from heat emitting devices such as radiators and heat registers. Do not install where excessive moisture or other conductive contaminants are present. Never install electrical wiring during a lightning storm.
The power requirement of each device connected to an outlet of your power strip must not exceed the Output Power Rating of your power strip (see Specifications). The total power requirements of all devices connected to your power strip must not exceed the Maximum Load Rating of your power strip (see Specifications).
CAUTION Only those who are properly trained or qualified to use this device should do so. Anyone who is not trained or qualified should not use this device unless it is under the supervision of someone who is properly trained or qualified to do so.
Children must be supervised to ensure that they do not use the device as a toy.
Never use the device if the cord and plug are damaged; if it is not working properly, or if it has been dropped or damaged, take it to an authorized service center for inspection and repair.
If the power cord is damaged, it must be replaced by the manufacturer, its authorized service agent, or by qualified personnel in order to avoid a danger.
Installation
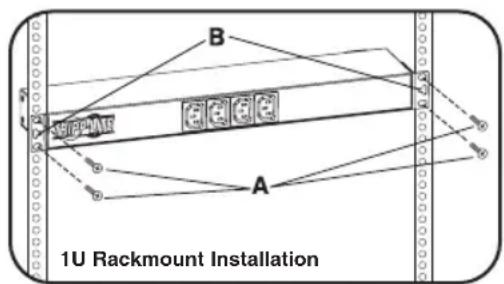
1U Rackmount Installation
To Mount Unit in Rack: Put four user-supplied rackmount screws (A) through the unit's mounting ears (B) and into the rack rails as shown. The user must determine the fitness of the rackmount screws to hold the unit in the rack before installation.
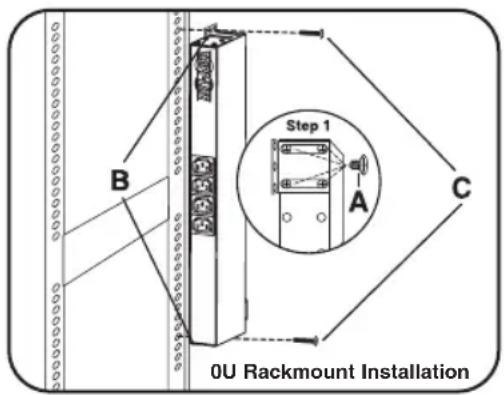
OU Rackmount Installation
-
Reorient Mounting Ears: Unscrew the screws (A) holding the unit's mounting ears (B) to the sides of the unit. Use the screws from Step 1 (A) to reattach the mounting ears (B) to the unit as shown. Use only the manufacturer-supplied screws or their equivalent (#6-32, 14 flat head) to reattach the mounting ears.
-
Mount Unit on Outside of Rack Rails: Put four user-supplied screws (C) or similar mounting hardware through the unit's mounting ears (B) and into the side of the rack as shown. The user must determine the fitness of the user-supplied mounting hardware to support the unit before mounting.
Installation
Wallmount/Under Counter Installation
Reorient the unit's mounting ears as per the OU Rackmount Installation above, then put four user-supplied screws or similar mounting hardware through the unit's mounting ears and into the mounting surface. The user must determine the fitness of the user-supplied mounting hardware to support the unit before mounting.
Connecting the PDU
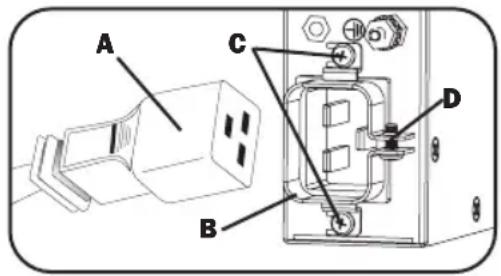
Note: The PDU12IEC has no power cord. Instead, it has an IEC C20 inlet receptacle. To connect the PDU12IEC to utility power, the user must supply a detachable power cord with an IEC C19 plug on one end and a plug appropriate for the local utility outlets on the other.
Attach a user-supplied power cord to the PDU by inserting the IEC C19 connector (A) of the power cord into the cable clamp and IEC C20 power inlet (B) located near the end of the PDU. Install the cable clamp to the PDU chassis (C) using the provided screws. Then install and tighten the third screw (D) as needed to secure the power cord connection. Connect the other end of the input power cord to a compatible source of AC power, such as a UPS system, PDU or utility outlet.
Features
Worldwide Compatibility for Maximum Application Flexibility
The PDU12IEC accepts 16A input power over a 100-240V range, making it compatible worldwide. The IEC C20 inlet accepts any country-specific power cord with an IEC C19 connector, and the 12 IEC C13 (four front-facing, eight rear-facing) and two rear IEC C19 outlets offer additional flexibility when connecting multiple items of equipment. All outlets can be adapted for specific applications with an appropriate plug adapter.
Circuit Breaker(s)
If the current draw of the equipment connected to your power strip exceeds your model's Maximum Load Rating (see Specifications) for longer than a few seconds, a circuit breaker will trip to prevent any possible damage. When a circuit breaker trips, its plunger will pop up. Remove excess equipment and allow the breaker to cool one minute before depressing its plunger to reset the breaker.
Grounding Lug
Use this screw (located by the power strip's receptacles) to connect your power strip to ground.
Specifications
| Nominal Voltage/Frequency: 100V to 240V/50 or 60Hz |
| Output Power Rating (amps): 15 amps for 100V to 120V or 16 amps for 208 to 240V |
| AC Receptacles: 4 x IEC C13 (front), 8 x IEC C13 / 2 x IEC C19 (rear) |
| AC Line Cord: N/A (IEC C20 inlet) |
| Maximum Load Rating (amps): 16 amps |
| Circuit Breaker(s) (Resettable): 2 x 16 amps |
| Dimensions (HxWxD): 13/4 × 171/4 × 33/4 in. (44 x 445 x 108 mm) |
Limited Warranty
Seller warrants this product, if used in accordance with all applicable instructions, to be free from original defects in material and workmanship for a period of 5 years (except internal UPS system batteries outside USA and Canada, 1 year) from the date of initial purchase. If the product should prove defective in material or workmanship within that period, Seller will repair or replace the product, in its sole discretion. Service under this Warranty can only be obtained by your delivering or shipping the product (with all shipping or delivery charges prepaid) to: Tripp Lite, 1111 W. 35th Street, Chicago, IL 60609 USA. Seller will pay return shipping charges. Visit www.triplite.com/support before sending any equipment back for repair.
THIS WARRANTY DOES NOT APPLY TO NORMAL WEAR OR TO DAMAGE RESULTING FROM ACCIDENT, MISUSE, ABUSE OR NEGLECT. SELLER MAKES NO EXPRESS WARRANTY OTHER THAN THE WARRANTY EXPRESSLY SET FORTH HEREIN. EXCEPT TO THE EXTEND PROHIBITED BY APPLICABLE LAW, ALL IMPLIED WARRANTYES, INCLUDING ALL WARRANTYES OF MERCHANTABILITY OR FITNESS, ARE LIMITED IN DURATION TO THE WARRANTY PERIOD SET FORTH ABOVE; AND THIS WARRANTY EXPRESSLY EXCUSES ALL INCIDENTAL AND CONSEQUENTIAL DAMAGES. (Some states do not allow limitations on how long an implied warranty lasts, and some states do not allow the exclusion or limitation of incidental or consequential damages, so the above limitations or exclusions may not apply to you. This Warranty gives you specific legal rights, and you may have other rights which vary from jurisdiction to jurisdiction).
WARNING: The individual user should take care to determine prior to use whether this device is suitable, adequate or safe for the use intended. Since individual applications are subject to great variation, the manufacturer makes no representation or warranty as to the suitability or fitness of these devices for any specific application.
Tripp Lite has a policy of continuous improvement. Specifications are subject to change without notice.


1111 W. 35th Street, Chicago, IL 60609 USA • www.triplite.com/support
Manual del usuario
1111 W. 35th Street, Chicago, IL 60609 USA • www.triplite.com/support
8 x IEC C13 / 2 x IEC C19 (pare posterior)
Cordón de la linea de CA: N/A (IEC C20 inlet)
Valor nominal de energia maxima (amperios): 16 amperios
Circuito de interruptores (Reconfigurable): 2 x 16 amperios
1111 W. 35th Street, Chicago, IL 60609 USA • www.triplite.com/support
21-03-410 93-3401 RevD
1111 W. 35th Street, Chicago, IL 60609 USA • www.triplite.com/support
Dimensions (H x L x P): 44 x 445 x 108 mm
Garantie Limitée
1111 W. 35th Street, Chicago, IL 60609 USA • www.triplite.com/support
21-03-410 93-3401 RevD
PykoBODCTBO N0lb30BaTeJia
PQyKunHbIcuEeO KHeC78.
1111 W. 35th Street, Chicago, IL 60609 USA - www.triplite.com/support Oxpaharetca ABTOPCKM npabom © 2019 Tripp Lite. Nepeneuata zapeuaetca.
BaXhble yka3aHnna nO TexHnke 6e30NaChocTn
B hactoem pykoobctbe codepknTcHnHphiMaun, kacaoaonca Hndkauero npraKa yctahOBKn nCnoNb3oBaHn CtoeHbIX ydnnntene NHTAHm MapKn Tripp Lite.
COXPAHNTE HACTOUINE YKA3AHNA.

He npcklouaTe ydnHntenb nHTAHN K He3a3eMnEHn p03eTke. He nCNoIb3yTe erO cyDnHnTeNbHbIMn shypamnnnepeXoHNKAMn, He nMeIOUmm 3a3eMnEHH. DaHHb yDnHnTeB nTaN Hn npedHa3NaueH dna NcNoB3OBAHmTOBko B 3akpbItbIX NOMeueHHx. UctahabnBaIte erO Ha 6e3oNaChom pacCToHHN OT TEnIOBbIeJeHIOx uYcToPCTB (hAnpImep, padnatoPob OtonleHHu N o6OrpeBaTeNE). He yctahabnBaIte erO B6NI3N nCTOHNKOB m36bItoHNOBnAarrnnn 3aPr3HNTeNe. Hn B KOHe Cnyae He BblONHnTe MOHTAX 3eKTPnpoBoDN BO BpeMa rpo3bl.
Iotppe6nemar Moohocb Kaqdo yctpoictba, noKIOeHHOR KyHINHTENIO NtAHN, He OJXHa npeBbiWAtb erO HOMHahbHyb bixoNDyMOUHOCTb (cm. TexHueckne XapaKTepnCTKN). CymmaH aotpe6nemar MOOHcTB Bcex yctpoictb, noKIOeHHbIX KyHINHTENIO NtAHN, He OJXHa npeBbiWAtb erO MAKCHMaJIbHO donyCTMMyo Harpy3Ky (cm. TexHueckne XapaKTepnCTKN).
yCTaHOBka
1111 W. 35th Street, Chicago, IL 60609 USA • www.triplite.com/support

Manufacturing Excellence.
1111 W. 35th Street, Chicago, IL 60609 USA • www.triplite.com/support
21-03-410 93-3401 RevD