
FGL202ASS - Grill plate Furrion - Free user manual and instructions
Find the device manual for free FGL202ASS Furrion in PDF.
| Product type | Barbecue / grill plate for recreational vehicle |
| Usage | Outdoor only |
| Available models | FGL200A-SS (without cover), FGL202A-SS (with cover) |
| Burner power | 8500 BTU (minimum) - 10000 BTU (maximum) |
| Gas pressure | LPG, 11 in W.C. (27.9 mbar) |
| Ignition type | Integrated piezoelectric (push and turn) |
| Effective cooking surface | 155 in² (99 990 mm²) |
| Main material | Stainless steel |
| Required cutout dimensions | Width 19 in (482.6 mm), Depth 13 in (330.2 mm), Minimum drawer thickness 6½ in (165.1 mm) |
| Minimum overhead clearance | 30 in (762 mm) for any overhanging material |
| Minimum side clearance | 3½ in (88.9 mm) on each side |
| Minimum rear/front clearance | 2 in (50.8 mm) on each side |
| Clearance under the barbecue | 12 in (305 mm) for combustible materials |
| Gas connection | Female flare fitting 5/8 in - 18UNF + quick connect supplied |
| Flame adjustment | Continuous from HI (high) to LO (low) |
| Drip tray | Removable, clean after each use |
| Safety | Manual gas shutoff, do not close the drawer within 30 minutes after use |
| Maintenance | Regular cleaning of the grill, tray and burners |
Frequently Asked Questions - FGL202ASS Furrion
Do not cover the grill more than 75% with aluminum foil or utensils.
User questions about FGL202ASS Furrion
0 question about this device. Answer the ones you know or ask your own.
Ask a new question about this device
Download the instructions for your Grill plate in PDF format for free! Find your manual FGL202ASS - Furrion and take your electronic device back in hand. On this page are published all the documents necessary for the use of your device. FGL202ASS by Furrion.
USER MANUAL FGL202ASS Furrion
US RV Grill (with/without lid)
Thank you for purchasing this Furrion® product. Before operating your new appliance, please read these instructions carefully. This instruction manual contains information for safe use, installation and maintenance of the appliance.
Please keep this instruction manual in a safe place for future reference. This will ensure safe use and reduce the risk of injury. Be sure to pass on this manual to new owners of this appliance.
The manufacturer does not accept responsibility for any damages due to not observing these instructions.
DANGER
If you smell gas:
- Shut off gas to the appliance.
- Extinguish any open flame.
- Open lid.
- If odor continues, keep away from the appliance and immediately call your gas supplier or your fire department.
WARNING
- Do not store or use gasoline or other flammable liquids or vapors in the vicinity of this or any other appliance.
- An LP cylinder not connected for use shall not be stored in the vicinity of this or any other appliance.
Table of Contents
Table of Contents 1
Explanation of Symbols 2
Important Safety Instructions 2
General Safety Instructions 2
Important Instructions for Cleaning Your Grill 3
Product Overview 3
Installation 4
What's in the Box. 4
Cut Out Dimensions & Clearance 4
Install the Grill 5
Gas Connection 7
Checking for Leaks 7
Close the Drawer After Use 7
Ventilation Requirements 8
Operation 8
Lighting Instructions 8
The Burner Flame 9
Grilling Tips 9
Maintenance 9
General Cleaning Guide 10
Explanation of Symbols
This manual has safety information and instructions to help you eliminate or reduce the risk of accidents and injuries. Always respect all safety warnings identified with these symbols. A signal word will identify safety messages and property damage messages, and will indicate the degree or level of hazard seriousness.

DANGER
Indicates an imminently hazardous situation which, if not avoided, will result in death or serious injury.

WARNING
Indicates a potentially hazardous situation which, if not avoided, could result in death or serious injury.

CAUTION
Indicates a potentially hazardous situation which, if not avoided, may result in minor or moderate personal injury, or property damage.
Important Safety Instructions
Warning and important safety instructions appearing in this guide are not meant to cover all possible conditions and situations that may occur. Common sense, caution, and care must be exercised when installing, maintaining, or operating the appliance.
Always contact the manufacturer about problems or conditions you do not understand.
Read and follow all instructions before using this appliance to prevent the potential risk of fire, electric shock, personal injury or damage to the appliance as a result of improper usage of the appliance. Use appliance only for its intended purpose as described in this guide.
If an external electrical source is utilized, the appliance must be electrically grounded in accordance with state or other codes or, in the absence of such codes, with the National Electrical Code, ANSI/NFPA 70. Do not attempt to adjust, repair, service or replace any part of your appliance unless it is specifically recommended in this guide. All other servicing should be referred to a qualified service technician.
General Safety Instructions
- Remove all tape and packaging before using the appliance. Recycle/dispose of the carton and plastic bags after unpacking the appliance. Never allow children to play with packaging material.
- Be sure your appliance is properly installed by a qualified technician in accordance with state or other codes. Install only per installation instructions provided in the literature package for this appliance.
Ask your dealer to recommend a qualified technician and an authorized repair service.
- Do not repair or replace any part of the appliance unless specifically recommended in the manuals.
All other servicing should be done only by a qualified technician. This may reduce the risk of personal injury and damage to the appliance. - Never modify or alter the construction of a appliance by removing leveling legs, panels, anti-tip brackets/ screws, or any other part of the product.

WARNING
For outdoor use only.
Do not install this grill in an enclosed cabinet.

WARNING
NEVER use this appliance as a space heater to heat or warm the room. Doing so may result in carbon monoxide poisoning and overheating of the appliance.

WARNING
- Do not close drawer for 30 minutes after grill is turned off to allow unit to cool.
- Remove and clean the drip pan underneath of the grill after each use.
- Disconnect the gas supply line and then close the drawer once the grill has adequately cooled.

WARNING
FIRE, EXPLOSION, BURN INJURY CARBON MONOXIDE POISONING
- The cooking appliance must be completely separated and/or sealed from other air moving or air consuming devices such as, but not limited to furnaces, microwave ovens clothes dryers, cooling fans and doors or drawers in common cabinets. Failure to do so will affect the appliance(s) combustion air supply by creating either a negative or positive draft.
- NEGATIVE DRAFT caused by air moving appliances may draw the burner flame down into or toward the grill resulting in grill damage, burn hazard, explosion possibility and/or carbon monoxide buildup.
- POSITIVE DRAFT may blow out the burner flame during use resulting in an explosion and/or fire hazard and/or injury to the occupants of the vehicle.
DO NOT operate the appliance in excessive windy conditions as this may cause a negative or positive draft.
Directions that direct current electrical supply conductors
must be provided with strain relief at the appliance.
- The appliance must be isolated from the gas supply piping system by closing its isolation valve during any pressure testing with a pressure 11 to 13.8 water columns.
- Storage on appliance - Flammable materials should not be stored near surface burners and/or cabinet areas around the appliance. This includes paper, plastic and cloth items, such as cookbooks, plasticware and towels, as well as flammable liquids. Do not store explosives, such as aerosol cans, on or near the appliance. Flammable materials may explode and result in fire or property damage.
Children should not be left alone or unattended in the area where the appliance is in use.

WARNING
DO NOT TOUCH THE GRILL RACKS, LID or ANY SURROUNDING AREAS AROUND THE GRILL WHILE GRILLING. These may become HOT and could cause burns to the skin.

WARNING
NEVER LEAVE THE GRILL UNATTENDED WHILE COOKING.
-
DO NOT TOUCH GRADE OR AREAS NEAR GRADE. The grate may be hot even though flames are not visible. Areas near grate may become hot enough to cause burns. During and after use, do not touch, or let clothing or other flammable materials touch these areas until they have had sufficient time to cool. Among these areas are the lid and firebox, surfaces facing the grate, the firebox vent openings and surfaces near these openings, warming rack and lid.
-
Wear proper apparel - Loose fitting or hanging garments should never be worn while using the appliance. Do not let clothing or other flammable materials contact hot surfaces.
- Do not use water or flour on grease fires - Smother the fire with a pan lid, or use baking soda, a dry chemical or foam-type extinguisher.
- When heating fat or grease, watch it closely. Fat or grease may catch fire if allowed to become too hot.

WARNING
Gas leaks may occur in your system and result in a dangerous situation. Gas leaks may not be detected by smell alone. Gas suppliers recommend you purchase and install a UL approved gas detector. Install and use in accordance with the manufacturer's instructions.

WARNING
In case of fire or gas leak, be sure to turn off the main gas shutoff valve.
- Use only dry potholders - Moist or damp potholders on hot surfaces may result in burns from steam. Do not let potholders touch hot heating burners. Do not use a towel or other bulky cloth instead of a potholder.
- Do not heat unopened food containers - Buildup of pressure may cause container to burst and result in injury.
Important Instructions for Cleaning Your Grill
- Clean the appliance regularly to keep all parts free of grease that could catch fire.
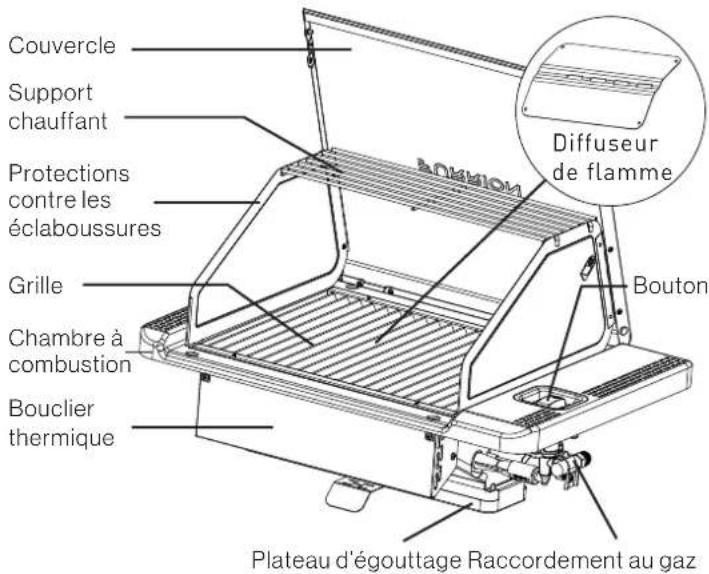
Product Overview
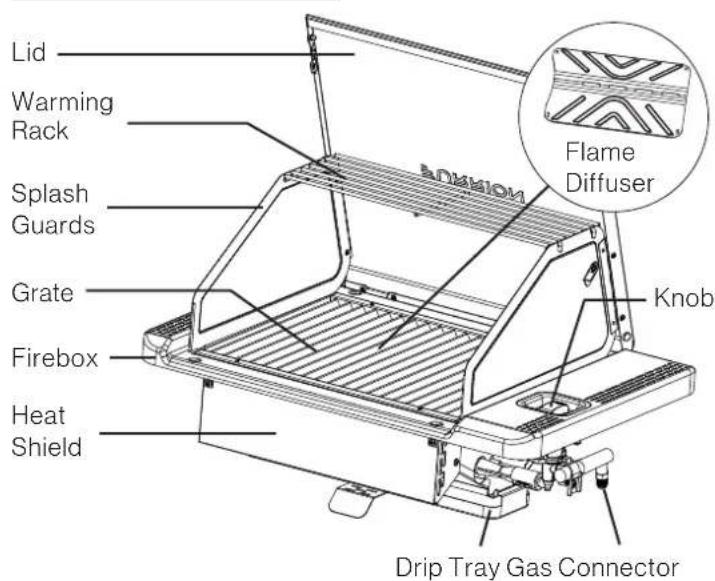
FGL202A-SS (with lid)
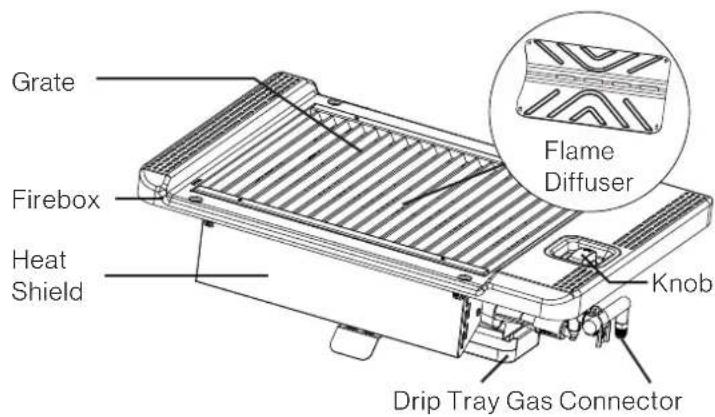
FGL200A-SS (without lid)
Cooking Functions and Features
The product is a grill, with adjustable burner strength.
The usable grill surface is: 155 inch² (99990 mm²)
The flame diffuser, in combination with the adjustable burner
strength allows for good heat management.
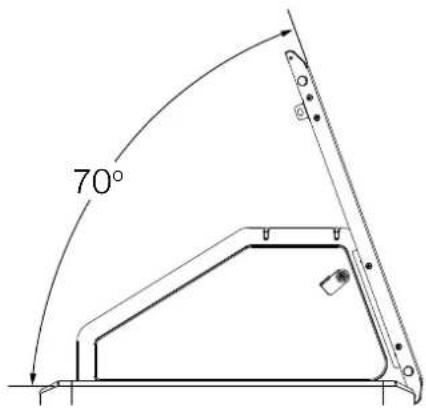
Product Main Performance
Grill Specification:
Minimum 8500 BTU, Maximum 10.000 BTU
Gas pressure:LPG 11"W.C.
Piezo ignite system
The maximum open angle is 70
Installation

WARNING
If this appliance is used under an extended overhang, leave min. 30^ (762mm) distance from drawer counter top surface to the overhang above. See overhang material requirements below. Failure to comply could result in a fire or personal injury.
The installation must conform with local codes or, in the absence of local codes, with either the National Fuel Gas Code, ANSI Z223.1/NFPA 54, or the Standard for Recreational Vehicles, ANSI A119.2/NFPA 1192, and CSA Z240 RV Series, Recreational Vehicle Code, as applicable.
What's in the Box
FGL202A-SS
Lid
Warming Rack
- Grate
Firebox
- Drip Tray
- 5 % -18UNF Quick Connector
- User Manual
Warranty Manual
FGL200A-SS
- Grate
Firebox - Drip Tray
- 5 / 8 -18UNF Quick Connector
- User Manual
Warranty Manual
Cut Out Dimensions & Clearance
Drawer material requirements: The grill can be installed in a noncombustible drawer with minimum clearance to the surfaces around or if using a combustible material to use a material rated for a minimum of 260^ (130^) .
Outdoor overhang material requirements: Overhang material can be a noncombustible type material or a combustible material with a temperature rating of 149F (65^) at a minimum distance of 30^
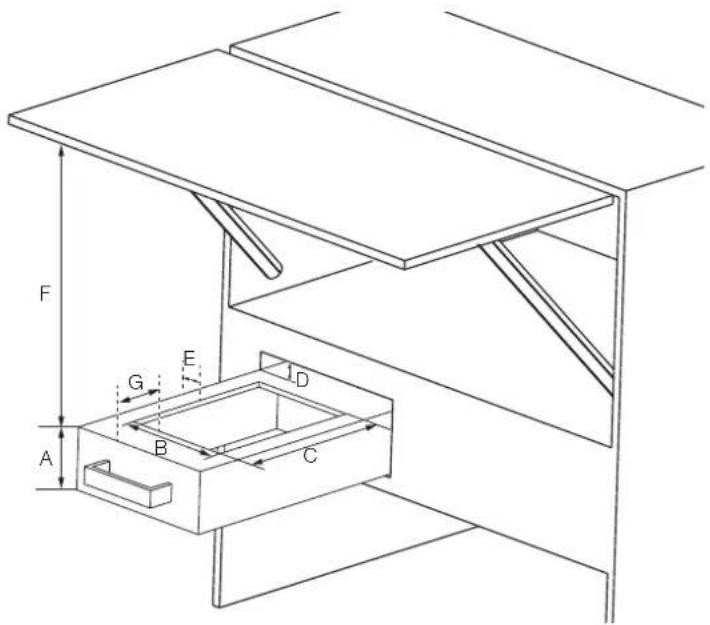
Side Facing Installation
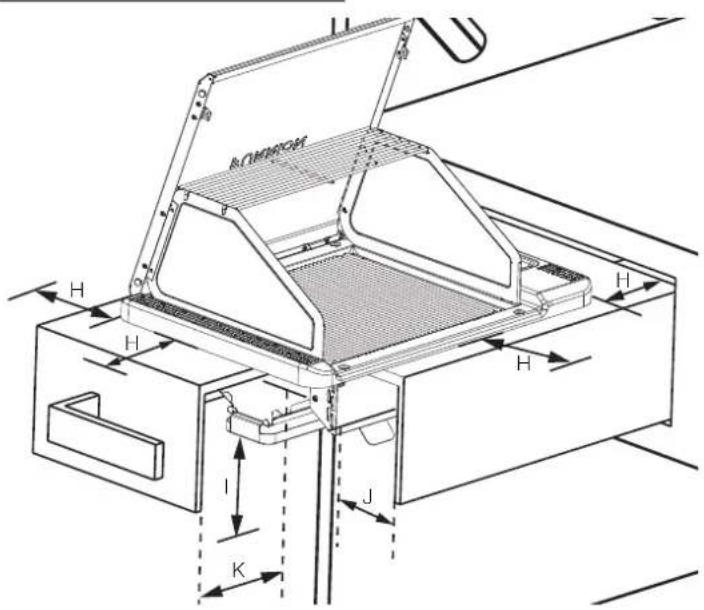
Front Facing Installation
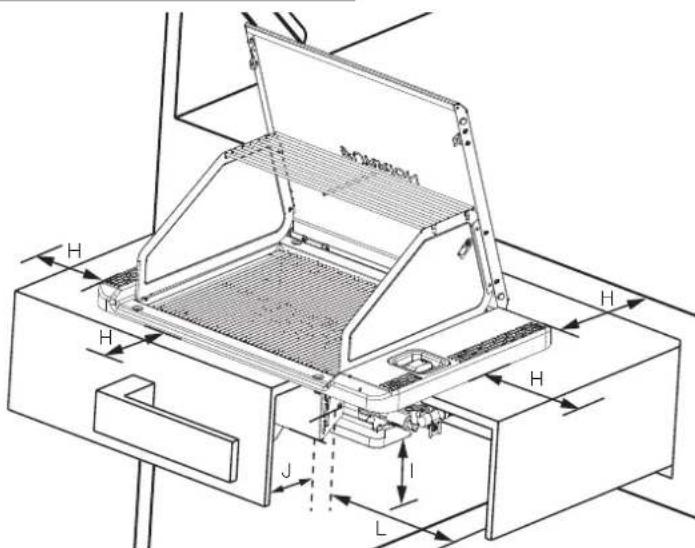
NOTE: All dimensions in the Side Facing and the Front Facing illustrations apply for any grill installation.
| A | Min. 6½" (165.1mm) thickness of the drawer for grill install |
| BThe depth of cut out size: 13" (330.2mm) | |
| CThe width of cut out size: 19" (482.6mm) | |
| D | Min. 2" (50.8mm) from the drawer counter surface to the top of the drawer opening |
| E | Min. 2" (50.8mm) distance to the front and rear sides of the cut out to support the grill |
| F | Min. 30" (1016mm) distance from drawer counter top surface to the overhang material above. Temperature requirement minimum is 149°F (65°C) |
| G | Min. 3½" (88.9mm) distance to the left and right sides of the cut out to support the grill |
| H | Min. 3" (76.2mm) clearance around the grill to the combustible material above the counter top surface |
| I | Min. 12" (305mm) clearance from bottom of the grill to any combustible material below the drawer (if you install something below the drawer) |
| J | Min. 2" (50.8mm) distance from the front and rear heat shield surfaces to the combustible material on the inner front and rear surfaces of the drawer |
| K | Min. 5" (127.0mm) distance from the left side heat shield surface to the combustible material on the inner left side surface of the drawer |
| L | Min. 6½" (165.1mm) distance from the right side heat shield surface to the combustible material on the inner right side surface of the drawer |

WARNING
For outdoor use only.
You grill is designed to be installed into an exterior counter top and a pull-out drawer that extends away from the RV. It is not designed to be installed in an enclosed cabinet.
When in use, the bottom of the grill must be free and clear
from all combustibles.
The grill must only be installed in a pull-out drawer. Combustible wall and overhead clearances must be maintained.
A safety shut off valve must be installed for easy accessibility to turn off the gas to the grill.

WARNING
After the installation is completed, the grill and gas connection must be checked for any leaks.
Install the Grill
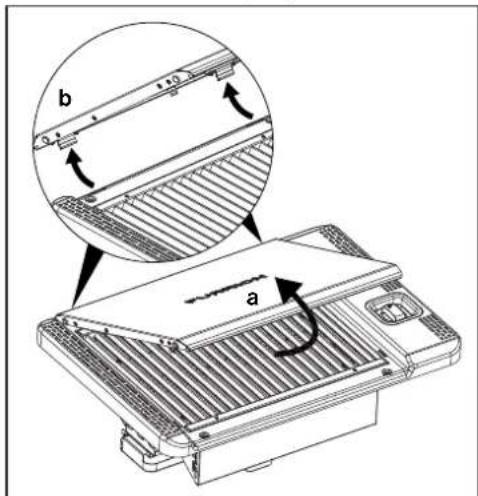
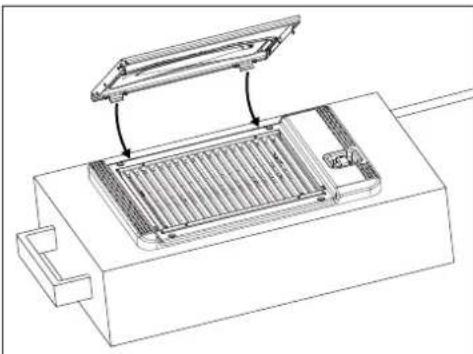
- Lift up the front of the lid (a), hold both sides of the lid and push it a little to make the lid hinges separate from the grill base (b), then take the lid off (only for model FGL202A-SS).
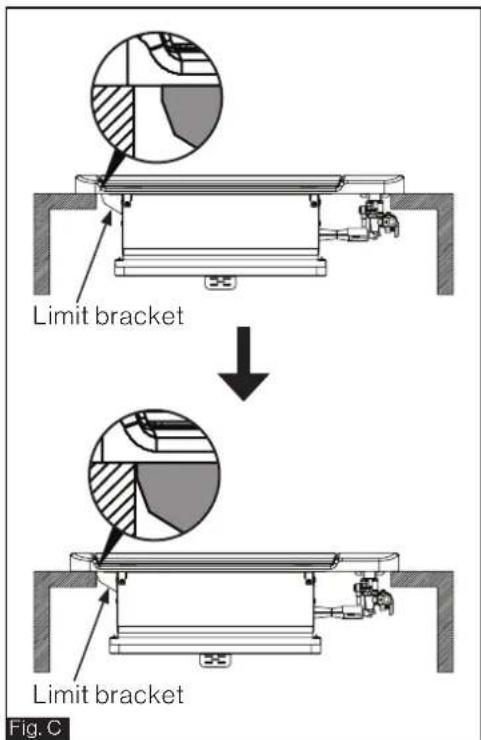
- Place the grill into the cutout at a 30 degree angle as shown in illustration Fig.A, Fig.B, and Fig.C. a. Place the grill knob side into the cabinet (Fig.A).
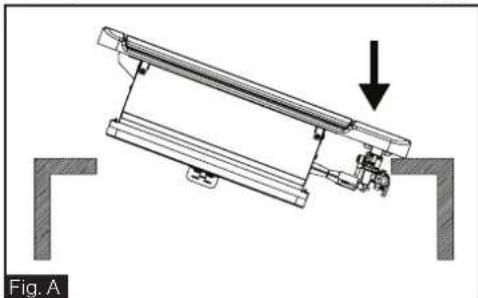
b. Push down on the left side to seat the grill into the cutout (Fig.B).
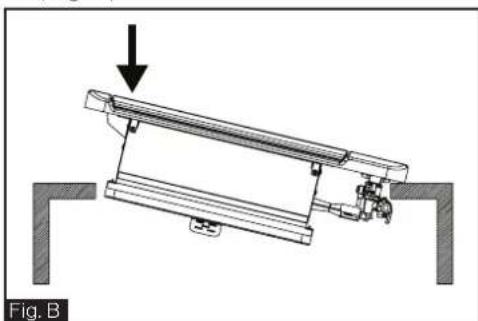
c. Pull back the grill to the left until the limit bracket hits the cabinet cutout (Fig. C).
3. Mount the grill with 4 screws (not included) on the drawer. Recommend using a #8 type stainless screw that is designed for adhering to the counter top material.
4. Re-attach the lid to the grill by inserting the 2 angled tabs on the bottom of the lid down into the slot openings in the grill.
5. Rotate the splash guard holder first, then release the splash guards and rotate them to the appropriate position, push down the front corners into the slots.
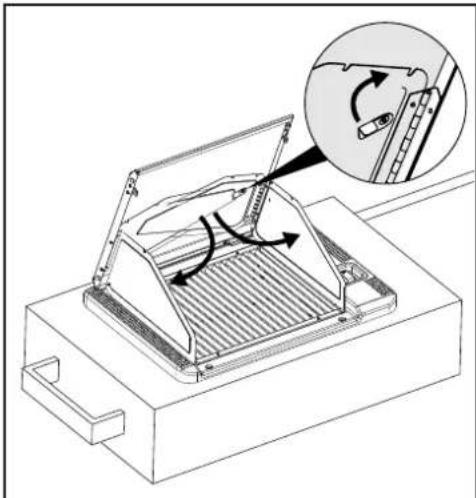
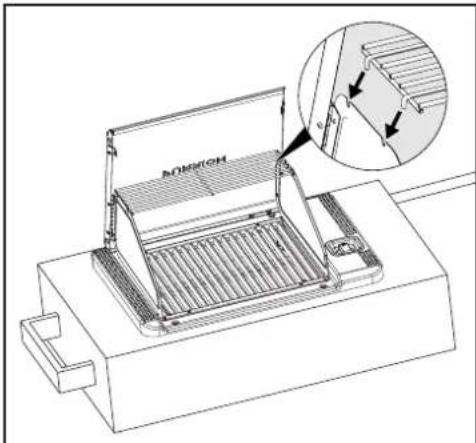
6. Attach the warming rack in the appropriate slots on the splash guards.
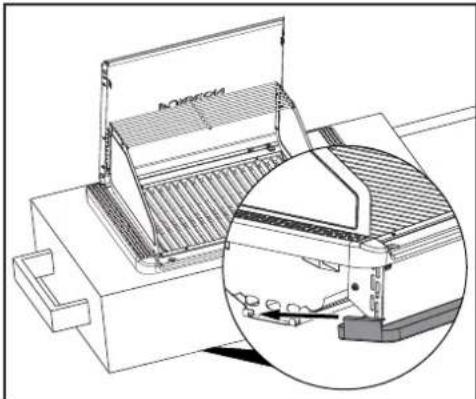
7. Attach the drip tray to the bottom of the grill body. Ensure the grease tray is attached correctly as detailed below.
Gas Connection
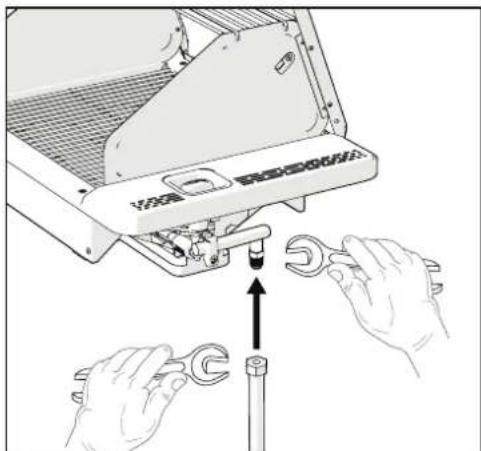
- This product is for LP gas use only. Connect the gas supply hose with a 3 % female flare fitting with a 5 % -18UNF thread connection to the grill. Tighten the gas supply hose to the grills gas connection using 2 wrenches.
- Attach the gas supply hose onto the drawer to prevent it from loosening from the fixing point when the drawer is pulled out. (The gas supply hose holder is not included.)
NOTE: The % " -18UNF quick connector provided can be threaded on to the grill gas pipe prior to connecting the gas supply line from the RV.
Checking for Leaks

WARNING
When checking for or repairing leaks or if you smell gas, extinguish all flames and do not turn on any device that could cause a spark such as lights, power tools, cooking appliances or this grill. If you cannot repair the leak, turn the gas off and call a qualified service technician to repair the leak.

WARNING
Never use a flame to check for leaks. Doing so may cause serious injury, property damage or death.

WARNING
If this product maybe damaged using 12 psig or more during test it must be disconnected.
After installing the grill or after any service or repair you must check all gas connections for leaks.
Spray or brush a solution of 50% water and 50% liquid soap on to all gas connections and the valve. Make sure the gas is turned on and wait up to five minutes. If bubbles appear there is a leak.
To repair the leak, tighten the connection. If the leak persists, shut off the gas and get a qualified service technician to repair the leak. Liquefied Petroleum (LP) has an odorant added to the gas. If you smell an odor, you may have a gas leak. Follow the leak check instructions above.
Close the Printer After Use

WARNING
Allow grill to cool to touch before moving or storing. Failure to do so could result in fire resulting in property damage, personal injury or death.
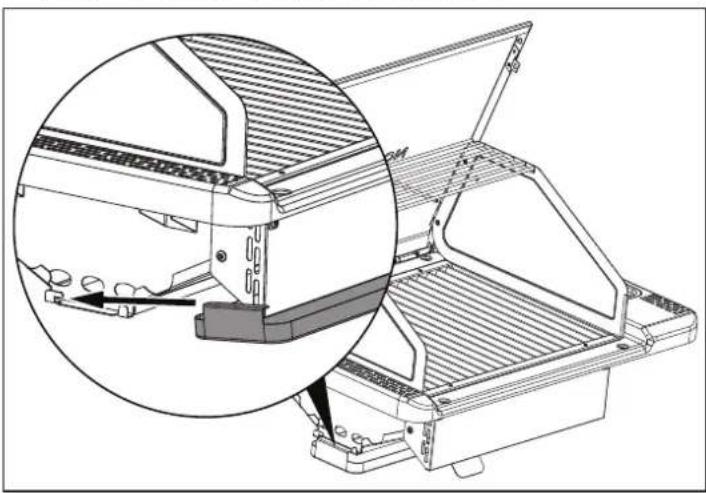
- Remove the warming rack after the grill has cooled for at least 30 minutes, put it beside the grill.
- Lift up the splash guards a little, rotate the right splash guard (a) to the lid first, then rotate the other one (b), use
the splash guard holder to secure them together.

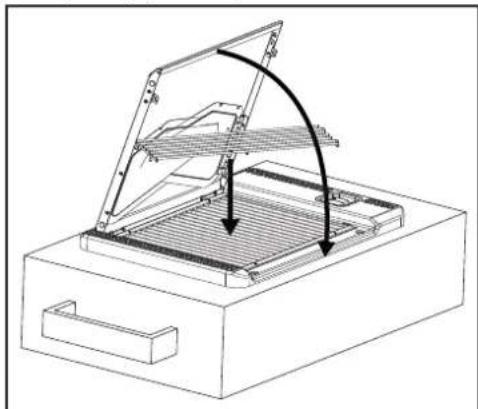
- Position the warming rack as shown below on the grate (it should sit flat on top of the grate), close the lid according to the arrow direction to close it. Ensure the lid locks into the 2 front slots by firmly pressing down on the lid.
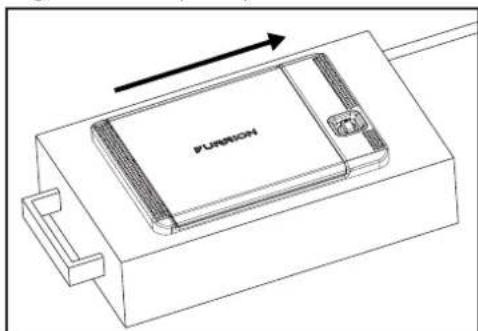
- Always remove and clean the drip tray after each use (See page 10).
- Disconnect the gas supply line and then close the drawer once the grill has adequately cooled.
Ventilation Requirements

CAUTION
Your grill requires proper ventilation.

CAUTION
The grill is designed for recreational vehicle outdoor use, and not designed for indoor use and can not be installed in an enclosed cabinet.

WARNING
The appliance should not be installed with a ventilation system that blows air downward toward the grill since this type of the ventilation system may cause ignition and combustion problems with the gas cooking appliance resulting in personal injury or unintended operation.
Operation

WARNING
NEVER LEAVE THE GRILL UNATTENDED WHILE COOKING.
The product will have 1 rotary knobs to control the gas valve, and piezo ignition.
- Piezo ignition, creating a spark by pushing the knob down and rotate counterclockwise.
OFF-HI-LO control
OFF-The grill is shut off when the knob is in this position.
- HI-Push and Turn the knob to this position, the grill is in maximum flame.
- LO-Turn the knob to this position for the minimum flame.

OFF position
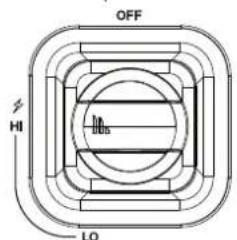
HI position
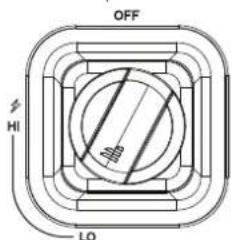
LO position
NOTE: Please be sure to shut off the gas valve after you turn off the grill.

WARNING
Immediately after turning the grill on, all surfaces of the grill become extremely hot. Do not touch any part of the grill except for the knob to adjust the cooking temperature or to turn the grill off.

WARNING
- Do not close drawer for 30 minutes after grill is turned off to allow unit to cool.
- Remove and clean the drip pan underneath of the grill after each use.

WARNING
Never use rocks, coal, charcoal, or anything else on or below the grate.

WARNING
Do not cover the grate area exceeding 75% when using foil, grilling cooking sheets, pots or pans or any other cooking utensils. Exceeding this could possibly cause damage to the drawer materials.
Lighting Instructions

WARNING
Keep your arms and face away from being directly above the cooking area. Open the lid and secure the splash guards before lighting the burner. Do not close the lid during cooking. If ignition does not occur in 5 seconds, turn the burner control off, wait 5 minutes, and repeat the lighting procedure.
- Inspect the grill regulator/gas supply hose before each use for any leaks, cuts, abrasions, or excessive wear. Replace any damaged components before using. Call your dealer for replacement parts for this grill.
- Ensure the grease drip tray is secured under the grill (see page 10 for how to attach the grease drip tray).
- Open the lid and secure the side panels in the appropriate slots.
- Place warming rack into position (if used).
- Push down on the gas knob and turn to anti-clockwise until you hear a clicking sound.
NOTE: If the burner does not light, repeat by turning the gas knob back to OFF and repeat step 5.
- Adjust knob position for desired setting.
Ensure the grill and grate have cooled prior to removing the grate.
The Burner Flame
Flames should appear similar to the good flame shown in diagram below.
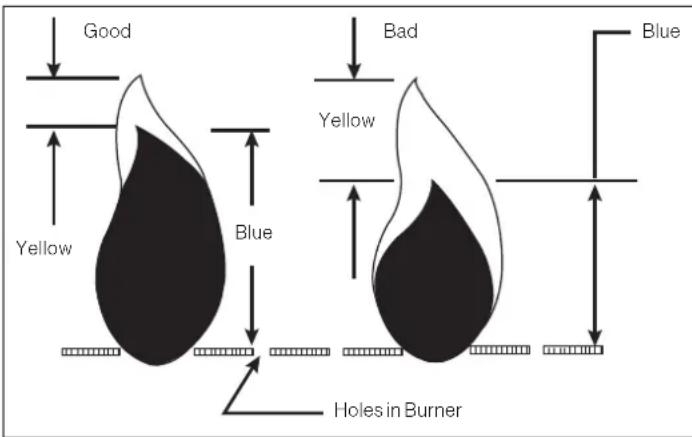
A good flame should be blue with a yellow tip.
Some yellow tips on flames up to 1" (25.4mm) in length are acceptable as long as no carbon or soot deposits appear. If flames are excessively yellow and irregular, the oil residue may not be completely burned off, or the venturi may be clogged or may not be properly positioned over the orifices.
Grilling Tips

WARNING
Food Poisoning Hazard
- Do not let food sit more than one hour before or after cooking.
- Doing so can result in food poisoning sickness.
Before Grilling
Thaw food before grilling.
- Turn on burner on HIGH for 10 minutes to preheat your grill, which can provide high heat enough to brown and seal the juices of the food.
- Brush a little oil on the grates or food when grilling low-fat
Maintenance
Your grill requires occasional cleaning. Always apply a Stainless. Shine Cleaner to all external parts of your grill after cleaning, this will keep the finish of your grill like new for many years. Keeping the grill clean will also prevent fires and flair ups. Always follow the manufacturers' directions & warnings when using cleaners & degreasers. The cooking grate should be cleaned after each use. When needed, it should be cleaned with soap & water.
There is a grease drip pan underneath of the grill that should be cleaned after each use.
- Keeping outdoor cooking gas appliance area clear and free from combustible materials, gasoline and other flammable vapors and liquids.
- Do not obstruct the flow of combustion and ventilation air.
- Keeping the ventilation opening(s) of the cylinder enclosure free and clear from debris.
- Visually checking burner flames including pilot burner flame, refer to "The Burner Flame" section.
- Cleaning outdoor cooking gas appliance, including special surfaces with non-abrasive cleaners or degreasers.
foods of meat, poultry, fish, shrimp or vegetables, which will prevent the foods being burned or stuck on the grate.
- Trim excess fat from food prior to cooking to reduce flare-ups.
During Grilling
- Turn foods only once. Turning foods multiple times may cause the food to become dry.
- Turn foods over when juices just begin to appear on the surface.
- Add barbecue sauce only during the last 10 minutes of cooking to avoid burning the sauce.
-
Cooking times will vary and could take longer in comparison to your home grill.
-
Checking and cleaning burner/venturi tubes for insects and insect nests. A clogged tube can lead to a fire beneath the grill.
General Cleaning Guide

CAUTION
Before cleaning, ensure the grill is turned off and completely cooled prior to removing any components and/or cleaning.
Types of Cleaners
Consider the possibility of scratching and the potential for post-cleaning corrosion caused by incompletely removed cleaners. Avoid using abrasive cleaners unless absolutely necessary.
General Cleaning
A soft cloth and clean warm water should always be the first choice for mild stains and loose dirt and soils. A final rinse with clean water and a dry wipe will complete the process and eliminate the possibility of water stains.
Stainless Steel Care and Cleaning Advice
In order to maintain the good looks and lifespan of your grill, follow these summary tips on the care of stainless steel: When new or when cleaned and dried, we recommend the owner apply a thin coat of olive oil to stainless steel surfaces which should then be polished in.
Cleaning method:
Use clean, soft cloths or sponges to clean your grill.
- Carbon steel brushes or steel wool should never be used.
After cleaning, rinse thoroughly with water and wipe dry.
-
Cleaning with chloride-containing detergents must be avoided.
-
On polished finishes, rubbing or wiping should be done in the direction of the polish lines, NOT across them.
- Care must be taken when cleaning the fascia. Printed information may be erased with heavy cleaning.
Grate and Drip Tray Cleaning Advice
Cleaning method:
- The drip tray and cooking grate can be put into the dishwasher to clean.
- Use only non-abrasive cleaners or degreasers designed for use on Stainless Steel.
- Suggest to use a non scratch scrub sponge with soap and water to clean the grate before each use.
Burner Cleaning Advice
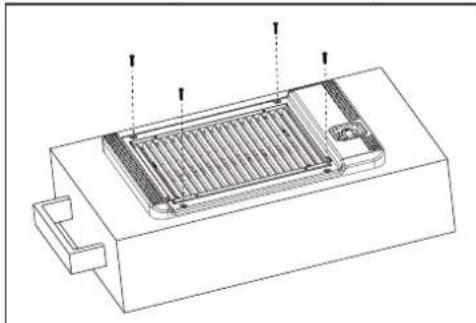
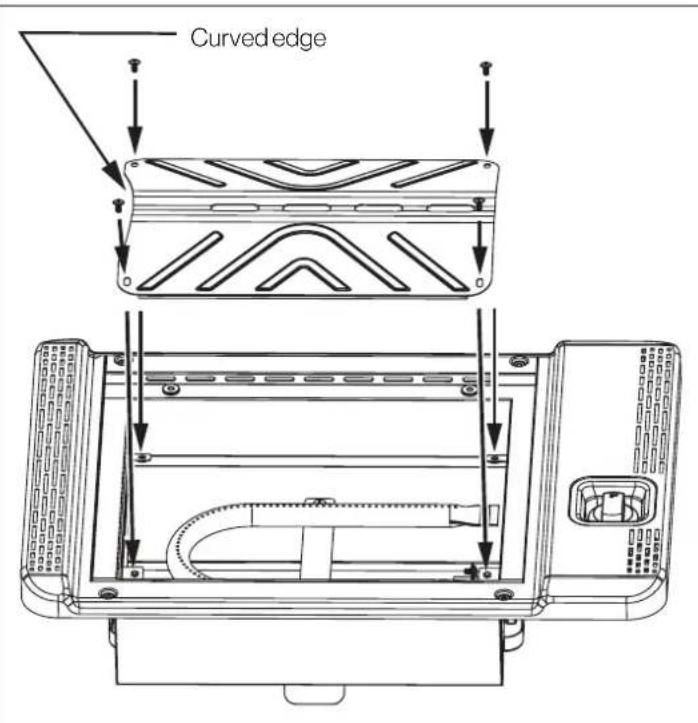
- Lift to remove the grate from the grill.
- Remove the flame diffuser by unscrewing the 4 screws.
- Wire-brush loose corrosion from the burner exterior.
Clean clogged gas port holes with an opened paper clip.
- Replace the flame diffuser and attach with the 4 screws.
NOTE: Make sure the curved edge is facing left while replacing the flame diffuser.
FGL200A-SS (sans couvercle)

Furrion Innovation Center & Institute of Technology
52567 Independence Ct., Elkhart, IN 46514, USA Toll free: 1-800-789-3341
- Email: support@furrion.com
©2007-2020 Furrion Ltd. Furrion® and the Furrion logo are trademarks licensed for use by Furrion Ltd.
and registered in the U.S. and other countries.