
VP6130 - Vacuum Cleaner Concept - Free user manual and instructions
Find the device manual for free VP6130 Concept in PDF.



| Product type | Cordless stick vacuum cleaner |
| Brand | Concept |
| Model | VP6130 |
| Battery voltage | DC 29.6 V |
| Motor power | 450 W |
| Turbo brush power | 30 W |
| Noise level | ≤83 dB |
| Battery capacity | 2500 mAh |
| Maximum runtime | 60 min (MIN mode) |
| Charging time | 4 h |
| Operating modes | MIN, AUTO, MAX |
| Filter type | Washable HEPA filter |
| Included accessories | Large turbo brush, small turbo brush, crevice tool, small brush nozzle, flexible hose, flexible extension, PET brush, hard floor brush, carpet brush |
| Wall mount | Included |
| Removable battery | Yes |
| Usage | Domestic |
| Warranty | 24 months |
| Display | LED with battery indicator and error codes |
| Automatic dirt detection | Yes (AUTO mode) |
| Maintenance | Water-washable filters, removable dust container |
Frequently Asked Questions - VP6130 Concept
User questions about VP6130 Concept
0 question about this device. Answer the ones you know or ask your own.
Ask a new question about this device
Download the instructions for your Vacuum Cleaner in PDF format for free! Find your manual VP6130 - Concept and take your electronic device back in hand. On this page are published all the documents necessary for the use of your device. VP6130 by Concept.
USER MANUAL VP6130 Concept
natural_image
Black vacuum cleaner with attached tool set to a series of five different accessories (no text or symbols on the device itself)CZ ROENSK PL HU LV DE FR IT ES
PODĚKOVÁNÍ
CZ
concept
POPIS DISPLEJE
natural_image
3D mechanical assembly diagram showing two views of a device with no visible text or symbolsPOUŽITÍ
obr. 3 obr. 4
PŘÍSLUŠENSTVÍ
natural_image
Two-step illustration showing a device being processed and then emitting particles (no text or symbols)VYJMUTÍ PRACHOVÉ NÁDOBY
natural_image
Three-step diagram showing a device being processed, with no visible text or symbols.DEMONTÁŽ FILTRU
natural_image
Three-step diagram showing a piston-cylinder assembly with internal components and directional arrows (no text or symbols)VYJMUTÍ KARTÁČE
SK
concept
POPIS DISPLEJA
MIN Pri malom množstve nečistôt
natural_image
3D CAD model of a mechanical assembly with two views, one labeled 'installation' (no other text or symbols)POUŽÍVANIE
natural_image
Two-step illustration showing a device being processed and then emitting particles (no text or symbols)VYBRATIE NÁDOBY NA PRACH
Stlačte tlačidlá na uvolnenie nádoby na prach a pohybom dolu a od spotrebiča vyberte nádobu na prach.
natural_image
Three-step diagram showing a device being processed, with no visible text or symbols.DEMONTÁŽ FILTRA
natural_image
Three-step diagram showing a piston-cylinder assembly with internal components and directional arrows (no text or symbols)VYBRATIE KEFY
flowchart
graph LR
    A["Initial Component"] --> B["Step 1: Internal parts on Robot"]
    B --> C["Step 2: Internal parts on Robot"]
    C --> D["Step 3: Internal parts on Robot"]
    D --> E["Step 4: Internal parts on Robot"]
OHYBNÝ SPOJOVACÍ NÁSADEC
OPIS WYŚWIETLACZA
natural_image
Diagram showing two mechanical components with an arrow labeled 'installation' indicating a transformation or installation process (no text beyond label)UŻYWANIE
natural_image
Two-step industrial process showing a device being processed and then emitting particles (no text or symbols visible)WYJĘCIE POJEMNIKA NA KURZ
natural_image
Three-step diagram showing a device being processed, with no visible text or symbols.DEMONTAŻ FILTRÓW
natural_image
Three-step diagram showing mechanical assembly of a piston-cylinder component, with arrows indicating direction (no text or symbols)WYJĘCIE SZCZOTKI
natural_image
Illustration of a vacuum cleaner with a labeled component (16), showing blade and handle assembly (no text or symbols beyond label)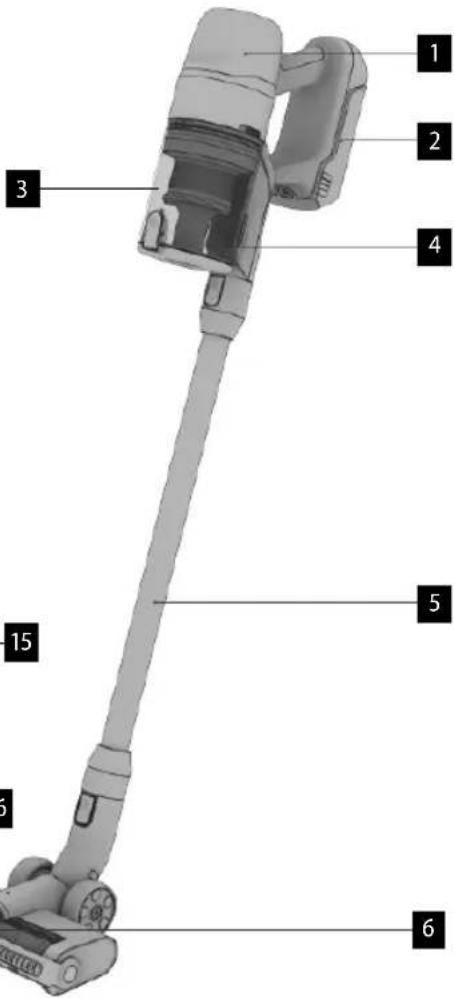
HU
concept
A KIJELZÖ LEÍRÁSA
natural_image
3D CAD model of a mechanical assembly with two views, one labeled 'installation' (no other text or symbols)HASZNÁLAT
natural_image
Two-step illustration showing a device being processed and then emitting particles (no text or symbols)A PORTARTÁLY KIVÉTELE
natural_image
Three-step diagram showing a robotic device being processed, with no visible text or symbols.A SZÜRÖ LESZERELÉSE
natural_image
Three-step diagram showing mechanical assembly of a piston-cylinder component, with arrows indicating direction (no text or symbols)A KEFE KIVÉTELE
flowchart
graph LR
    A["Initial Component"] --> B["Step 1: Internal parts on Robot"]
    B --> C["Step 2: Internal parts on Robot"]
    C --> D["Step 3: Internal parts on Robot"]
    D --> E["Step 4: Internal parts on Robot"]
HAJLÍTHATÓ CSATLAKOZÓTOLDALÉK
LV
concept
DISPLEJA APRAKSTS
MIN Nelielam netīrumu daudzumam
natural_image
3D rendering of two mechanical components with no visible text or symbols, labeled 'installation' (text is part of the diagram)IZMANTOŠANA
natural_image
Two-step illustration showing a device being processed and then emitting particles (no text or symbols)PUTEKŁU TVERTNES IZNEMŠANA
Nospiediet puteklu tvertnes atbrivošanas taustinu un virziet to lejup no ierīces, lai izņemtu puteklu tvertni.
natural_image
Three-step diagram showing a device being processed, with no visible text or symbols.FILTRU NONEMŠANA
natural_image
Three-step diagram showing a piston-cylinder assembly with arrows indicating process flow (no text or symbols)BIRSTES NONEMŠANA
flowchart
graph LR
    A["Hand Tool"] --> B["Assembly Step 1"]
    B --> C["Assembly Step 2"]
    C --> D["Final Assembly"]
ELASTİGAIS SAVIENOJUMA UZGALIS
IERICES UZLÄDĘŠANA SIENAS TURĘTÄJÄ
Thank you for purchasing a Concept product. We wish you much joy with your new appliance every day you use it. Please read the instruction manual carefully before initial use. To refer to this manual any time you need to, we recommend you to keep it in a safe place. And please pass it to any future owner of the appliance.
| Technical specifications | |
| Battery voltage DC 29,6 V | |
| Input 450 W motor + 30 W turbo nozzle | |
| Sound level ≤83 dB | |
| Battery 2500 mAh | |
| Max. operating time at MIN power 60 min | |
| Full charging time 4 hrs. | |
IMPORTANT SAFETY PRECAUTIONS
- Do not use the appliance in any other way than as described in this manual.
- Make sure the mains voltage and current protection correspond to the values on the rating plate of the charging station.
- Do not leave the appliance without supervision when it is switched on.
- When disconnecting the unit from the wall outlet, never pull the power cord, grasp the charger and disconnect it by removing it from the receptacle.
- Do not allow children or unauthorized people to handle the appliance, use it out of their reach.
- Pay extra attention if the appliance is used near children.
- Do not use the appliance as a toy.
- Do not use any accessories other than those recommended by the manufacturer.
- Do not use a charger with a damaged cord or plug and have it repaired immediately by an authorized service centre.
- Keep the appliance away from heat sources such as radiators, ovens and other, protect it from direct sunlight and humidity.
- Do not touch the appliance with wet hands.
- Do not insert any objects into the openings. Do not use the appliance if any of the openings is clogged.
• Take extra caution when vacuuming on stairs.
EN
concept
- If the appliance intake is clogged, switch off the appliance and remove the dirt before switching on again.
- When attaching accessories during cleaning or in the event of a malfunction, switch off the appliance and disconnect the charger from wall socket.
- The appliance is only suitable for home use and is not intended for commercial use.
- Do not vacuum anything burning like cigarettes, matches or hot ash.
- Do not use the appliance in rooms with increased air humidity, do not vacuum flammable liquids such as petrol and do not use the appliance in rooms where these substances may be present.
- Never vacuum without vacuum cleaner filters. Every time you use the appliance, make sure the vacuum cleaner filters are properly installed.
- Do not immerse the power cord or the charger in water or any other liquid.
- Check the appliance and the charger cord for damage regularly.
- Never switch on a damaged appliance.
- Before cleaning and after use of the appliance, switch off the appliance and allow it to cool down.
- Before vacuuming, remove all large or sharp objects from the surface intended for vacuum cleaning, such objects may damage the vacuum cleaner filter.
- Do not use the appliance with dirty filters.
- Do not put the battery in fire or expose it to temperatures above 40 °C.
- Do not touch the moving parts of the appliance during operation.
- Do not repair the appliance yourself. Contact an authorized service centre.
- This appliance can be used by children aged from 8 years and above and persons with reduced physical, sensory or mental capabilities or lack of experience and knowledge if they have been given supervision or instruction concerning the use of the appliance in a safe way and understand the hazards involved. Cleaning and maintenance performed by the user must not be carried out by children unless they are at least 8 years old and under supervision.
- Children aged under 8 years of age must be kept away from the appliance and its power cord. Do not let children play with the appliance.
Damages from failure to follow the manufacturer's instructions are not covered by the warranty.
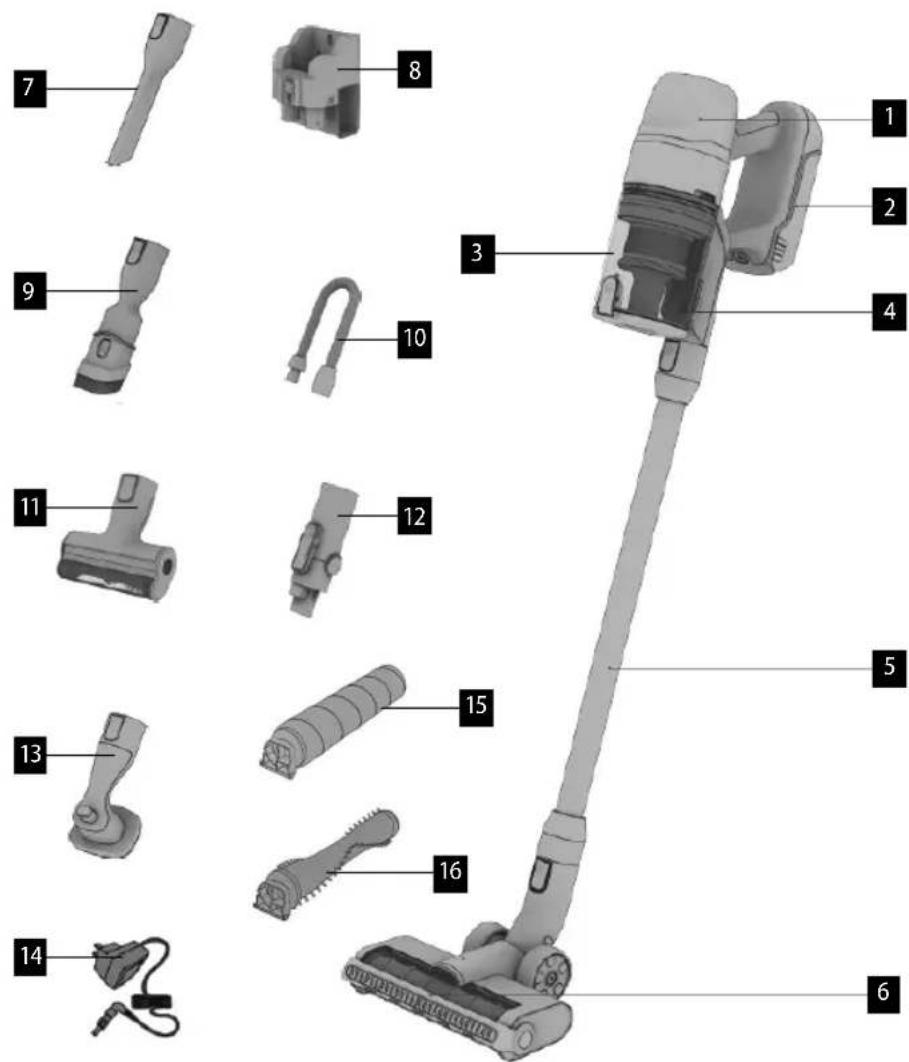
PRODUCT DESCRIPTION
1 Appliance body
2 Battery
3 Dust container
4 Dust container release button
5 Suction tube
6 Big turbo brush
7 Slot nozzle
8 Wall bracket
9 Slot nozzle with brush
10 Flexible hose
11 Small turbo brush
12 Flexible connection attachment
13 Pet brush
14 Charger
15 Hardfloor brush
16 Carpet brush
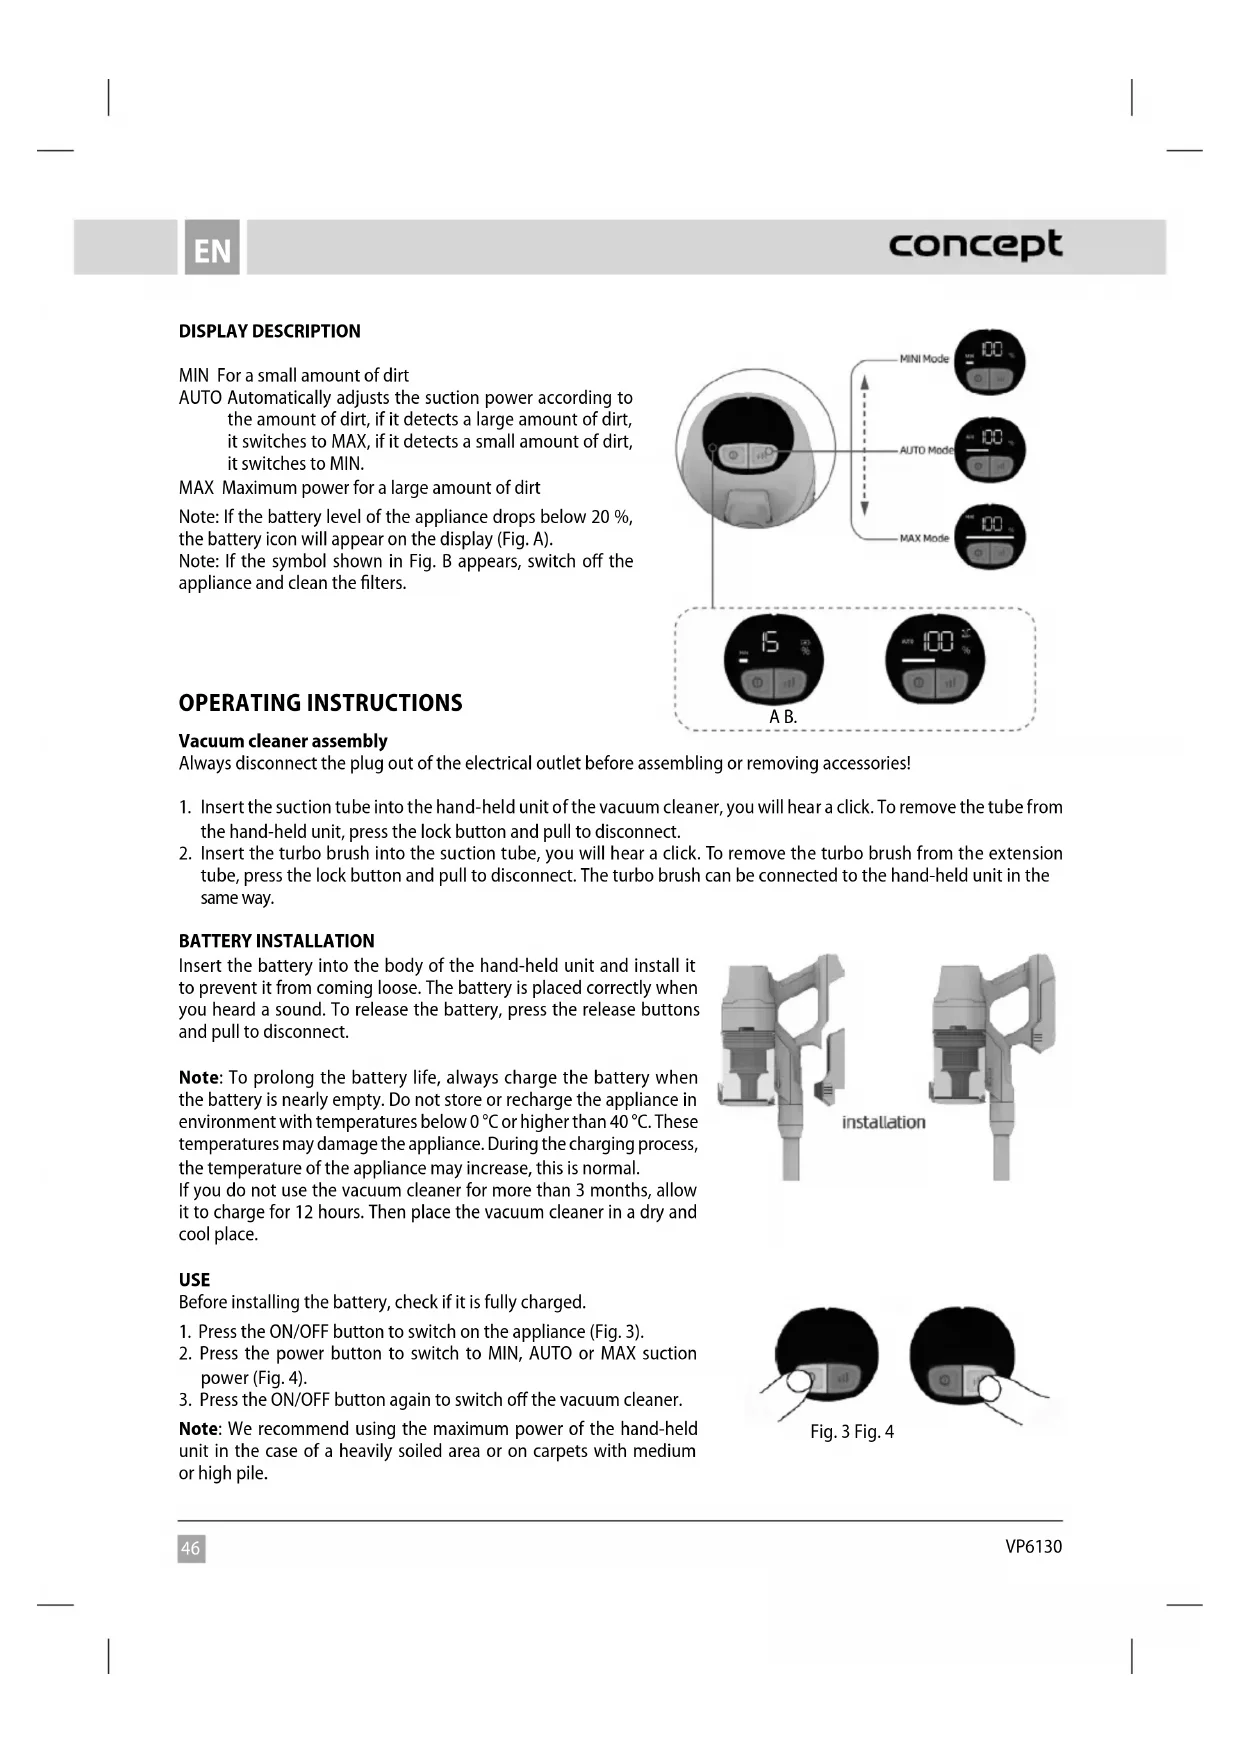
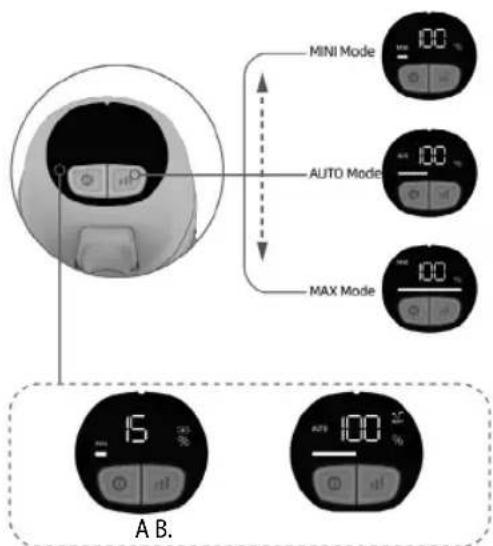
DISPLAY DESCRIPTION
MIN For a small amount of dirt
AUTO Automatically adjusts the suction power according to the amount of dirt, if it detects a large amount of dirt, it switches to MAX, if it detects a small amount of dirt, it switches to MIN.
MAX Maximum power for a large amount of dirt
Note: If the battery level of the appliance drops below 20 %, the battery icon will appear on the display (Fig. A).
Note: If the symbol shown in Fig. B appears, switch off the appliance and clean the filters.
OPERATING INSTRUCTIONS
Vacuum cleaner assembly
Always disconnect the plug out of the electrical outlet before assembling or removing accessories!
-
Insert the suction tube into the hand-held unit of the vacuum cleaner, you will hear a click. To remove the tube from the hand-held unit, press the lock button and pull to disconnect.
-
Insert the turbo brush into the suction tube, you will hear a click. To remove the turbo brush from the extension tube, press the lock button and pull to disconnect. The turbo brush can be connected to the hand-held unit in the same way.
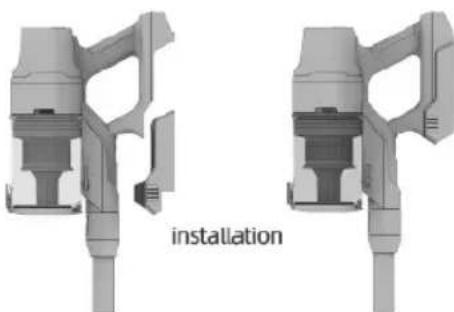
BATTERY INSTALLATION
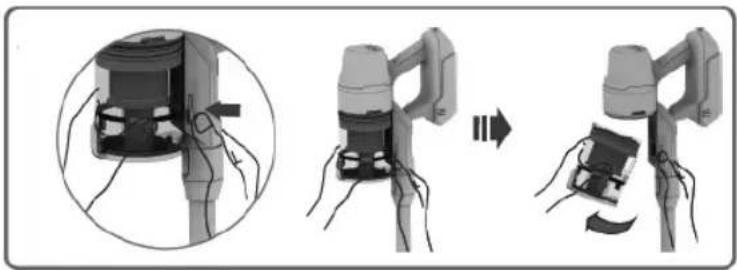
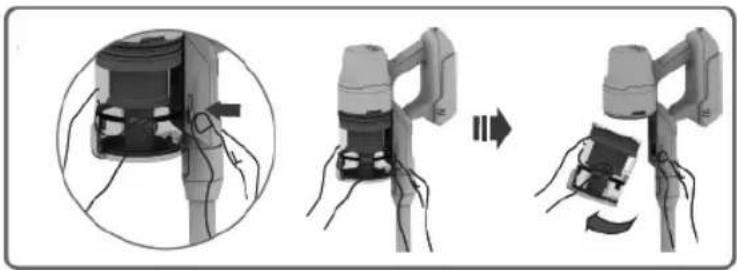
Insert the battery into the body of the hand-held unit and install it to prevent it from coming loose. The battery is placed correctly when you heard a sound. To release the battery, press the release buttons and pull to disconnect.
Note: To prolong the battery life, always charge the battery when the battery is nearly empty. Do not store or recharge the appliance in environment with temperatures below 0 °C or higher than 40 °C. These temperatures may damage the appliance. During the charging process, the temperature of the appliance may increase, this is normal.
If you do not use the vacuum cleaner for more than 3 months, allow it to charge for 12 hours. Then place the vacuum cleaner in a dry and cool place.
natural_image
3D CAD model of two mechanical assembly components, one labeled 'installation' (no other text or symbols)USE
Before installing the battery, check if it is fully charged.
-
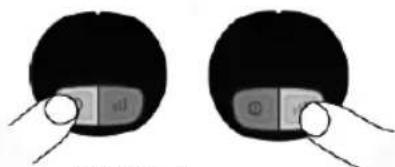
Press the ON/OFF button to switch on the appliance (Fig. 3).
-
Press the power button to switch to MIN, AUTO or MAX suction power (Fig. 4).
-
Press the ON/OFF button again to switch off the vacuum cleaner.
Note: We recommend using the maximum power of the hand-held unit in the case of a heavily soiled area or on carpets with medium or high pile.
natural_image
Two identical diagrams showing a device with control buttons, no text or symbols presentFig. 3 Fig. 4
ACCESSORIES
Select the accessories according to the nature of the surface to be cleaned.
Mini turbo brush – suitable for bed linen, fabric, sofas, etc.
Slot nozzle – suitable for wall corners, car cushioning, radiators, etc.
Slot nozzle with brush – suitable for bed linen, fabric, sofas, etc.
EMPTYING THE DUST CONTAINER
To empty the dust container, press the emptying button. Open the container, empty the dust and close the container cover.
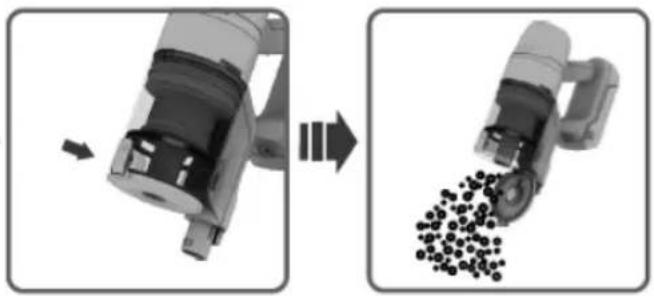
natural_image
Two-step industrial process showing a device being processed and then emitting particles (no text or symbols visible)REMOVING THE DUST CONTAINER
Press the buttons to release the dust container and move down and away from the appliance to remove the dust container.
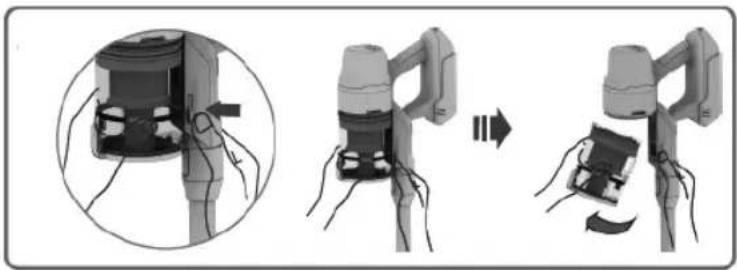
natural_image
Three-step diagram showing a device being processed, with no visible text or symbols.REMOVING THE FILTER
Remove the filters from the dust container upwards. Turn the coarse filter to the left and the HEPA filter to the right to separate the filters. The filters can be rinsed in water. Allow the filters to dry before placing back into the dust container.
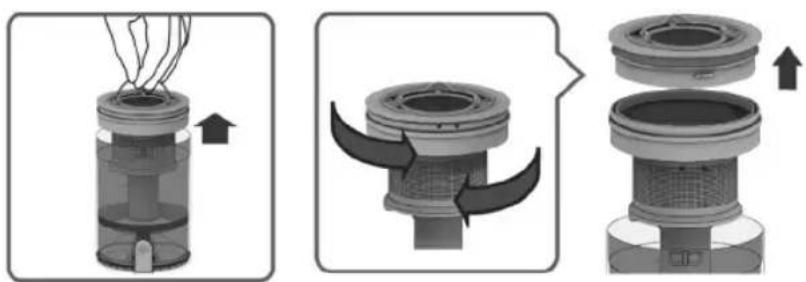
natural_image
Three-step diagram showing a piston-cylinder assembly with internal components and directional arrows (no text or symbols)REMOVING THE BRUSH
There is a brush release button on the side of the turbo brush, slide the button to release the brush, then the brush can be removed
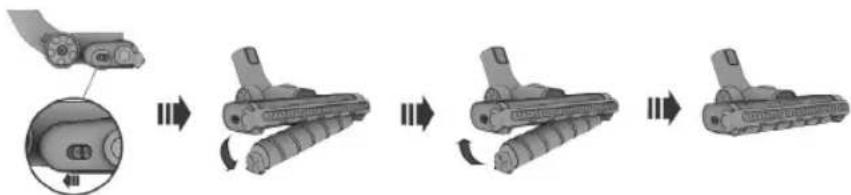
flowchart
graph LR
    A["Initial Component"] --> B["Step 1: Internal Roll"]
    B --> C["Step 2: Internal Pulling"]
    C --> D["Step 3: Internal Rotation"]
    D --> E["Step 4: Final Assembly"]
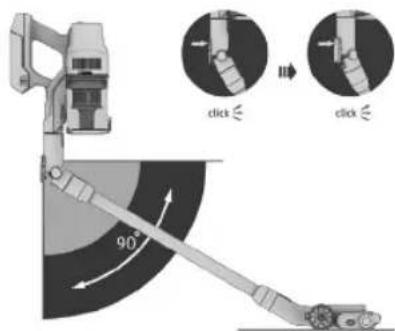
FLEXIBLE CONNECTION ATTACHMENT
- Insert the flexible connection attachment from the bottom of the appliance.
- Insert the suction pipe and then the large turbo brush into the attachment.
- Press the release button on the flexible connection attachment to bend the appliance.
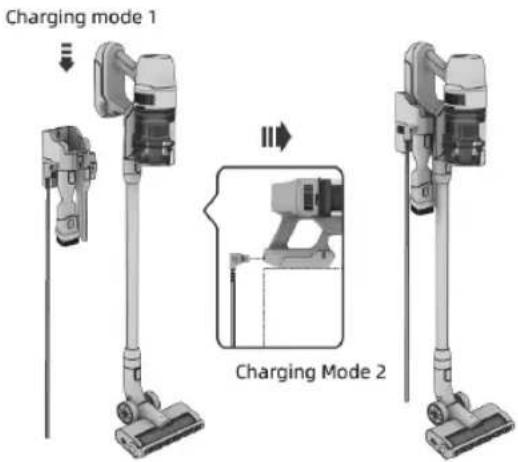
CHARGING THE APPLIANCE IN THE WALL BRACKET
Plug the adapter into the wall bracket. Place the appliance into the wall bracket. After charging, all the bars will light up.
CHARGING WITHOUT THE WALL BRACKET
Plug the adapter into the charging connector on the appliance handle. After charging, all the bars on the battery will light up.
| Error Problem Remedy | |
| E1 Battery error Must be taken to an authorised service centre | |
| E2 Charging error Make sure that you are using an original adapter. | |
| E3 Turbo brush short circuit Must be taken to an authorised service centre | |
| E4 The brush is blocked. Check the brush to see if it is spinning.Clean the brush of dirt. | |
| E5 Motor error Must be taken to an authorised service centre | |
| E6 Charging error Must be taken to an authorised service centre | |
| E7 The motor is blocked. Clean the filters, dust container and suction tube of dirt. | |
SERVICE
Extensive maintenance or repair, which requires access to internal parts of the product, has to be performed by a qualified service centre.
ENVIRONMENTAL CONCERNS
- Packaging materials and old appliances should be recycled.
- Packaging materials may be disposed of as sorted waste.
- Dispose the plastic bags made of polyethylene (PE) of as sorted waste.
Recycling of the appliance at the end of its lifespan
This appliance is labelled in accordance with European Directive 2012/19/EU concerning used electrical and electronic appliances (Waste Electrical and Electronic Equipment - WEEE). The symbol on the product or on its packaging indicates that this product may not be treated as household waste. Instead, it should be taken to the appropriate collection point for the recycling of electrical and electronic equipment. By ensuring this product is disposed of correctly, you will help prevent potential negative consequences for the environment and human health, which could otherwise be caused by inappropriate waste handling of this product. The disposal of such material has to be done according to the recycling regulations. For more detailed information about recycling of this appliance see the authorized local office or service for household waste disposal or the shop, where you purchased the appliance.

The product meets all the necessary requirements of the EU directives applicable to the specific product.
Changes in text, design, and technical specifications are subject to change without notice and we reserve the right to change them.
concept
DANKSAGUNG
natural_image
Two 3D mechanical components with an arrow indicating a transformation or installation process (no text or symbols present)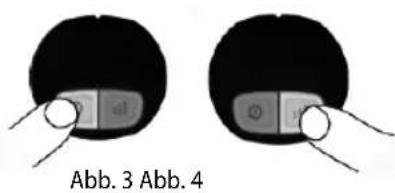
DE
concept
natural_image
Two-step illustration showing a device being processed and then emitting granular material (no text or symbols)natural_image
Three-step diagram showing a device being handled, with no visible text or symbols.FILTERAUSBAU
natural_image
Three-step diagram showing a piston-cylinder assembly with arrows indicating process flow (no text or symbols)BÜRSTENAUSBAU
flowchart
graph LR
    A["Hand Tool"] --> B["Assembly Step 1"]
    B --> C["Assembly Step 2"]
    C --> D["Assembly Step 3"]
FR
concept
DESCRIPTION DE L'AFFICHAGE
natural_image
3D CAD model of two mechanical assembly components, one labeled 'installation' (no other text or symbols)natural_image
Two identical diagrams showing a black circular object with internal components, labeled 'fig. 3 fig. 4' (no text or symbols on the objects themselves)natural_image
Two-step illustration showing a device being processed and then emitting particles (no text or symbols)natural_image
Three-step diagram showing a device being processed, with no visible text or symbols.DÉMONTAGE DU FILTRE
natural_image
Three-step diagram showing a piston-cylinder assembly with arrows indicating force application (no text or symbols)RETIRER LA BROSSE
flowchart
graph LR
    A["Hand Tool"] --> B["Assembly Step"]
    B --> C["Assembly Step"]
    C --> D["Final Assembly"]
EXTENSION FLEXIBLE
natural_image
3D diagram of two mechanical components with an arrow indicating assembly or installation, no text or symbols presentUTILIZZO
natural_image
Two identical diagrams showing a black object with a segmented rectangular component, being pointed at by fingers (no text or symbols present)Fig. 3 Fig. 4
IT
concept
ACCESSORI
natural_image
Two-step illustration showing a device being processed and then emitting particles (no text or symbols)natural_image
Three-step diagram showing a device being processed, with no visible text or symbols.natural_image
Three-step diagram showing mechanical assembly of a piston-cylinder component, with arrows indicating direction (no text or symbols)ES
concept
natural_image
Mechanical component diagram showing two views of a device with an arrow indicating transformation (no text or symbols present)USO
natural_image
Two identical circular diagrams showing a device with control buttons, no text or symbols present.Fig. 3 Fig. 4
ACCESORIOS
natural_image
Two-step illustration showing a device being processed and then emitting particles (no text or symbols)DESMONTAR EL COLECTOR DE POLVO
natural_image
Three-step diagram showing a device being handled, with no visible text or symbols.DESMONTAR EL FILTRO
natural_image
Three-step diagram showing a piston-cylinder assembly with directional arrows indicating motion (no text or symbols)DESMONTAR EL CEPILLO
flowchart
graph LR
    A["Hand Tool"] --> B["Assembly Step"]
    B --> C["Assembly Facility"]
    C --> D["Final Assembly"]
RO
concept
DESCRIEREA DISPLAYULUI
natural_image
3D rendering of two mechanical components with a label 'installation' indicating installation (no other text or symbols)UTILIZARE
natural_image
Two-step illustration showing a device being processed and then emitting particles (no text or symbols)SCOATEREA RECIPIENTULUI DE PRAF
natural_image
Three-step diagram showing a device being processed, with no visible text or symbols.DEMONTAREA FILTRULUI
natural_image
Three-step diagram showing a piston-cylinder assembly with arrows indicating process flow (no text or symbols)SCOATEREA PERIEI
flowchart
graph LR
    A["Hand Tool"] --> B["Assembly Step 1"]
    B --> C["Assembly Step 2"]
    C --> D["Assembly Step 3"]
ADAPTOR DE CONECTARE FLEXIBIL
The manufacturer (or importer) is responsible for ensuring the product complies with the requirements of applicable legal regulations as well as those of the relevant technical standards. Moreover, they are responsible for ensuring the product has the properties the manufacturer described in documents related to the goods or those reasonably expected by the customer with regard to the nature of the goods or based on advertising produced by the manufacturer, and further they are responsible for ensuring the product is fit for the purpose proposed by the manufacturer or that a product of the same type is normally used for.
The quality warranty term is 24 months from product takeover by the customer.
The warranty does not apply to wear and tear caused by regular use. The customer shall not be entitled to any warranty claims if, prior to taking the product over, they knew the product contained a defect or if the defect is attributable to the customer.
The warranty specifically does not apply:
- if the product installation, operation and service conditions stipulated in the product operating manual have not been adhered to,
- to malfunctions caused due to mechanical, heat or chemical damage, short circuit, over voltage or incorrect installation,
- to malfunctions caused by an inexpert third-party intervention,
• to malfunctions caused by natural disaster, - to malfunctions caused by insufficient or inappropriate maintenance in violation of the operating manual, including malfunctions caused by water and other sediments,
• to changes in colour of the heating surface or to scratching of the surface caused as a result of using the products in an unusual manner,
• to appearance and functional changes caused by exposure to sunlight, thermal radiation of water and other sediments, - if the service life of certain product parts expires, e.g. for accumulators, bulbs, etc.
The warranty does not apply to any products and services provided along with the product (gifts, promotional articles, etc.).
Filing a complaint
A complaint against a product defect must be filed as soon as identified, yet no later than before the end of the warranty term.
The customer must file a product complaint with the dealer from which they have purchased the product, or with any authorised service centre, a list of which is included in the product package, or available at www.my-concept.com.
While filing a product complaint, the product must be duly cleaned and securely packed so as to prevent any damage during its transport to an authorised service centre, where relevant, unless the product is delivered in person.
The customer must submit proof of having concluded a purchase contract for the product by producing the receipt.
While filing their complaint, the customer must indicate the noted defect and identify the preferred complaint application method.
Complaints processing
As long as the noted defect may be removed, the user has the right to have the defect duly removed free of charge on a timely basis.
Where such a procedure is not reasonable with regard to the nature of the defect, the user may require to be supplied a new defect-free product (replacement), or, where the defect applies to a part of the product only, replacement of the part concerned. However, if replacement of the product or any part thereof is not proportionate with regard to the nature of the defect, especially if the defect can be removed without undue delay, the customer has the right to have the defect removed free of charge.
concept
If the noted defect is not removable, or if the customer becomes entitled to replacement of the product or a part thereof, yet the replacement is not possible, for example due to the product having been sold out, the customer has the right to return the product (withdrawal from the contract).
The customer shall have the right to a new product (replacement) or to replacement of a part of the product even if the defect can be removed, provided they cannot properly use the product due to repeated occurrence of the defect or due to a high number of such defects. In such a case, the customer also has the right to return the product (by withdrawing from the contract).
If the product is not returned (the customer does not withdraw from the contract), or if the customer does not apply the right to a new defect-free product (replacement), to replacement of a part thereof or to repair of the product, they may request a reasonable discount. The customer also has a right to a reasonable discount if a new defect-free product cannot be supplied to them, or if a product part cannot be replaced or the product repaired unless the situation is remedied within a reasonable time limit, or if remedying the situation would create major discomfort on the part of the customer.
The seller, authorised service centre or a staff member authorised by them must decide about each complaint immediately or within three business days in complicated cases. This term does not include a reasonable period of time, depending on the type of product concerned,
required for the defect to be assessed by an expert. A complaint, including defect removal, must be dealt with without any undue delay, yet no later than within 30 calendar days of the complaint filing date, unless the seller and the customer agree on a later deadline.
On returning the product (withdrawing from the contract) the customer must return any accessories and documents supplied along with the product.
The customer does not have the right to keep the defective parts and components of the product replaced as part of a repair of the product.
This shall be without prejudice to any other rights the customer may have in relation to the purchase of the product.
Remark: Complaints against products damaged in transport are governed by the carrier's complaints procedure.
Manufacturer
Jindřich Valenta - Concept
Vysokomýtská 1800, 565 01 Choceň
Czech Republic
tel.: +420 465 471 400
fax +420 465 473 304
Company ID No. 13216660
email: servis@my-concept.cz
www: www.my-concept.com
Product data
| Model: | |
| Production number: | |
| Date of purchase: Seal and signature of vendor: | |
DEGARANTIEBEDINGUNGEN
Garantie
FR CONDITIONS DE GARANTIE
Garantie

- PODĚKOVÁNÍ
- CZ
- concept
- POPIS DISPLEJE
- POUŽITÍ
- PŘÍSLUŠENSTVÍ
- VYJMUTÍ PRACHOVÉ NÁDOBY
- DEMONTÁŽ FILTRU
- VYJMUTÍ KARTÁČE
- SK
- POPIS DISPLEJA
- POUŽÍVANIE
- VYBRATIE NÁDOBY NA PRACH
- DEMONTÁŽ FILTRA
- VYBRATIE KEFY
- OHYBNÝ SPOJOVACÍ NÁSADEC
- OPIS WYŚWIETLACZA
- UŻYWANIE
- WYJĘCIE POJEMNIKA NA KURZ
- DEMONTAŻ FILTRÓW
- WYJĘCIE SZCZOTKI
- HU
- A KIJELZÖ LEÍRÁSA
- HASZNÁLAT
- A PORTARTÁLY KIVÉTELE
- A SZÜRÖ LESZERELÉSE
- A KEFE KIVÉTELE
- HAJLÍTHATÓ CSATLAKOZÓTOLDALÉK
- LV
- DISPLEJA APRAKSTS
- IZMANTOŠANA
- PUTEKŁU TVERTNES IZNEMŠANA
- FILTRU NONEMŠANA
- BIRSTES NONEMŠANA
- ELASTİGAIS SAVIENOJUMA UZGALIS
- IERICES UZLÄDĘŠANA SIENAS TURĘTÄJÄ
- IMPORTANT SAFETY PRECAUTIONS
- EN
- Damages from failure to follow the manufacturer's instructions are not covered by the warranty.
- PRODUCT DESCRIPTION
- DISPLAY DESCRIPTION
- OPERATING INSTRUCTIONS
- Vacuum cleaner assembly
- BATTERY INSTALLATION
- USE
- ACCESSORIES
- EMPTYING THE DUST CONTAINER
- REMOVING THE DUST CONTAINER
- REMOVING THE FILTER
- REMOVING THE BRUSH
- FLEXIBLE CONNECTION ATTACHMENT
- CHARGING THE APPLIANCE IN THE WALL BRACKET
- CHARGING WITHOUT THE WALL BRACKET
- SERVICE
- ENVIRONMENTAL CONCERNS
- Recycling of the appliance at the end of its lifespan
- DANKSAGUNG
- DE
- FILTERAUSBAU
- BÜRSTENAUSBAU
- FR
- DESCRIPTION DE L'AFFICHAGE
- DÉMONTAGE DU FILTRE
- RETIRER LA BROSSE
- EXTENSION FLEXIBLE
- UTILIZZO
- IT
- ACCESSORI
- ES
- USO
- ACCESORIOS
- DESMONTAR EL COLECTOR DE POLVO
- DESMONTAR EL FILTRO
- DESMONTAR EL CEPILLO
- RO
- DESCRIEREA DISPLAYULUI
- UTILIZARE
- SCOATEREA RECIPIENTULUI DE PRAF
- DEMONTAREA FILTRULUI
- SCOATEREA PERIEI
- ADAPTOR DE CONECTARE FLEXIBIL
- Filing a complaint
- Complaints processing
- Manufacturer
- DEGARANTIEBEDINGUNGEN
- Garantie
- FR CONDITIONS DE GARANTIE
Brand : Concept
Model : VP6130
Category : Vacuum Cleaner