
Ramsés - Water filter ASTRALPOOL - Free user manual and instructions
Find the device manual for free Ramsés ASTRALPOOL in PDF.
| Brand | AstralPool |
| Model | Ramsés |
| Product Type | Pool Water Filter |
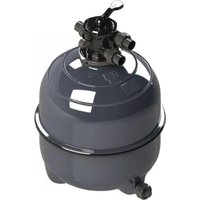
| Category | Sand Filter with Multiport Valve |
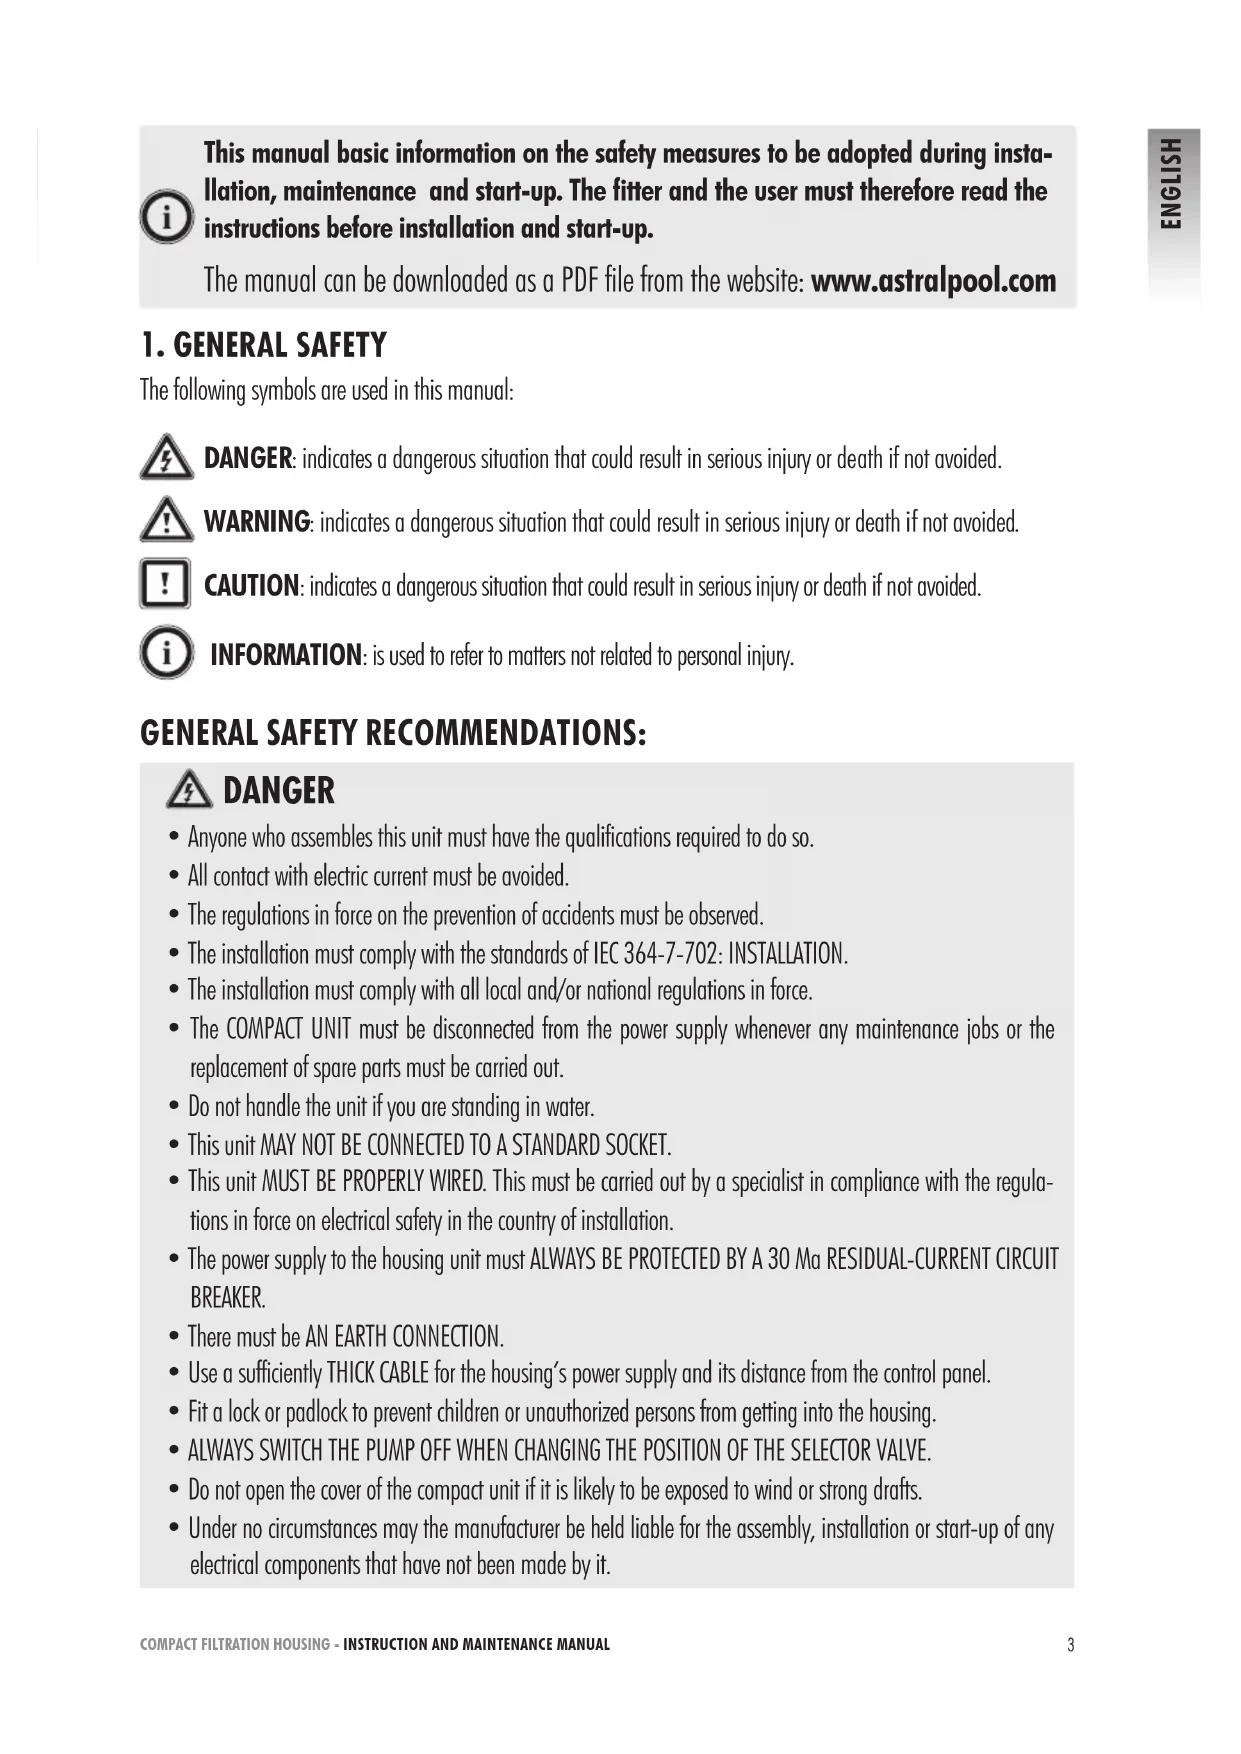
| Technical Room Dimensions (L x W x H) | 109 cm x 107 cm x 90 cm (Ramsés) |
| Electrical Supply | 230 V / 50 Hz, single-phase or three-phase |
| Required Electrical Protection | 30 mA RCCB and thermal-magnetic circuit breaker |
| Valve Functions | Filter, Backwash, Rinse, Recirculate, Drain, Closed |
| Filter Media | Silica sand 0,4-0,8 mm, filled to 2/3 of the filter |
| Normal Filtration Pressure | 0.8 kg/cm² (11.4 PSI) |
| Recommended Backwash Pressure | 1.3 kg/cm² (18.5 PSI) |
| Prefilter Maintenance | Clean the basket regularly to avoid pressure drops |
| Sand Replacement | Every 3 years approximately |
| Important Safety Instructions | Disconnect power before maintenance; do not open the lid in strong wind |
| Intended Use | Pool water filtration |
| Warranty | 2 years from delivery |
Frequently Asked Questions - Ramsés ASTRALPOOL
User questions about Ramsés ASTRALPOOL
0 question about this device. Answer the ones you know or ask your own.
Ask a new question about this device
Download the instructions for your Water filter in PDF format for free! Find your manual Ramsés - ASTRALPOOL and take your electronic device back in hand. On this page are published all the documents necessary for the use of your device. Ramsés by ASTRALPOOL.
USER MANUAL Ramsés ASTRALPOOL
INSTRUCTION AND MAINTENANCE MANUAL MANUEL D'INSTALLATION ET D'ENTRETIEN MANUAL DE INSTRUCCIONES Y MANTENIMIENTO MANUALE DI USO E MANUTENZIONE BEDIENUNGS- UND WARTUNGSANLEITUNG MANUAL DE INSTRUÇÕES E MANUTENÇÃO ΕΓΧΕΙΡΙΔΙΟ ΟΔΗΓΙΩΝ ΧΡΗΣΗΣ ΚΑΙ ΣΥΝΤΗΡΗΣΗΣ
CE
natural_image
Technical line drawing of a square heat exchanger or cooling unit with cooling fins and internal components (no text or symbols)KEOPS
natural_image
Line drawing of a multi-tiered medical or laboratory equipment unit with no visible text or symbolsRAMSES
natural_image
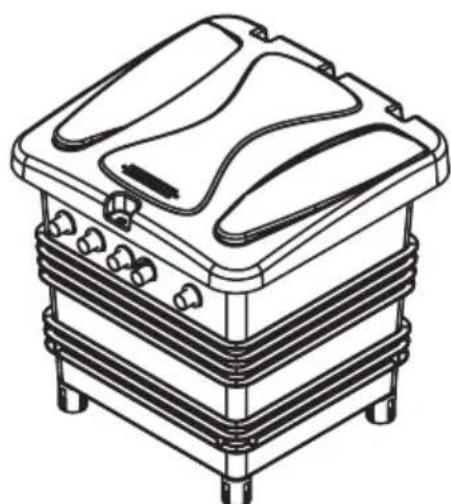
Isometric line drawing of a two-story building with vertical slats and a curved roof (no text or symbols)RAMSES UP
natural_image
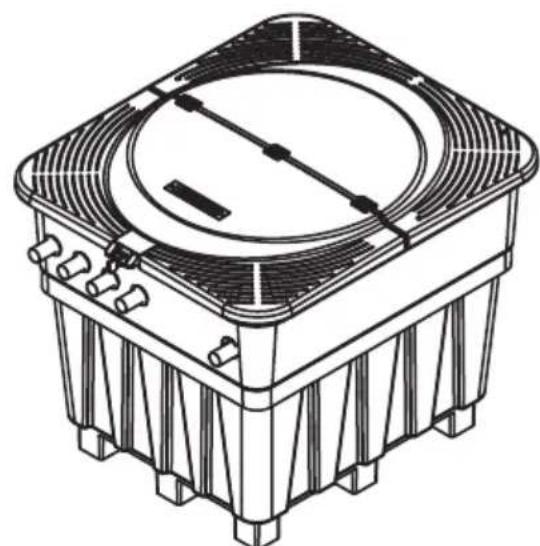
Technical line drawing of an open mechanical device with internal gears and housing (no text or symbols)KEFREN
English - COMPACT FILTRATION HOUSING
INSTRUCTION AND MAINTENANCE MANUAL 3
Français - LOCAUX COMPACTS DE FILTRATION
MANUEL D'INSTRUCTIONS ET D'ENTRETIEN 17
This manual basic information on the safety measures to be adopted during installation, maintenance and start-up. The fitter and the user must therefore read the instructions before installation and start-up.
The manual can be downloaded as a PDF file from the website: www.astralpool.com
1. GENERAL SAFETY
The following symbols are used in this manual:

DANGER: indicates a dangerous situation that could result in serious injury or death if not avoided.

WARNING: indicates a dangerous situation that could result in serious injury or death if not avoided.

CAUTION: indicates a dangerous situation that could result in serious injury or death if not avoided.

INFORMATION: is used to refer to matters not related to personal injury.
GENERAL SAFETY RECOMMENDATIONS:

DANGER
- Anyone who assembles this unit must have the qualifications required to do so.
- All contact with electric current must be avoided.
- The regulations in force on the prevention of accidents must be observed.
- The installation must comply with the standards of IEC 364-7-702: INSTALLATION.
- The installation must comply with all local and/or national regulations in force.
- The COMPACT UNIT must be disconnected from the power supply whenever any maintenance jobs or the replacement of spare parts must be carried out.
- Do not handle the unit if you are standing in water.
- This unit MAY NOT BE CONNECTED TO A STANDARD SOCKET.
- This unit MUST BE PROPERLY WIRED. This must be carried out by a specialist in compliance with the regulations in force on electrical safety in the country of installation.
- The power supply to the housing unit must ALWAYS BE PROTECTED BY A 30 Ma RESIDUAL-CURRENT CIRCUIT BREAKER.
• There must be AN EARTH CONNECTION. - Use a sufficiently THICK CABLE for the housing's power supply and its distance from the control panel.
- Fit a lock or padlock to prevent children or unauthorized persons from getting into the housing.
- ALWAYS SWITCH THE PUMP OFF WHEN CHANGING THE POSITION OF THE SELECTOR VALVE.
- Do not open the cover of the compact unit if it is likely to be exposed to wind or strong drafts.
- Under no circumstances may the manufacturer be held liable for the assembly, installation or start-up of any electrical components that have not been made by it.
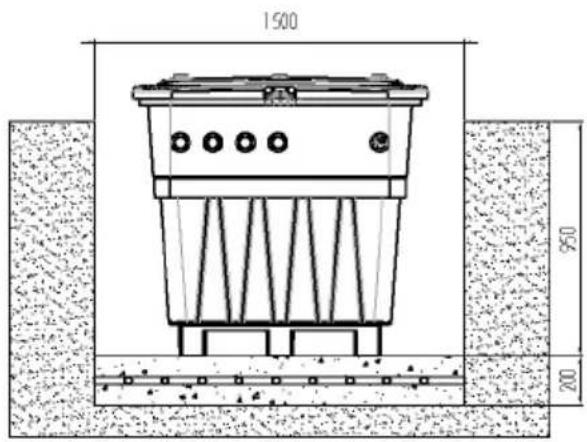
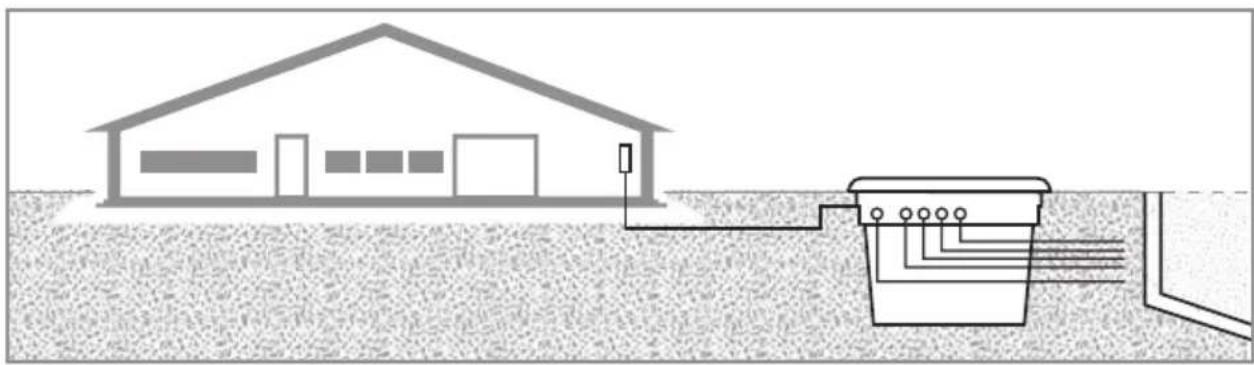
2. INSTALLATION
2.1. LOCATION
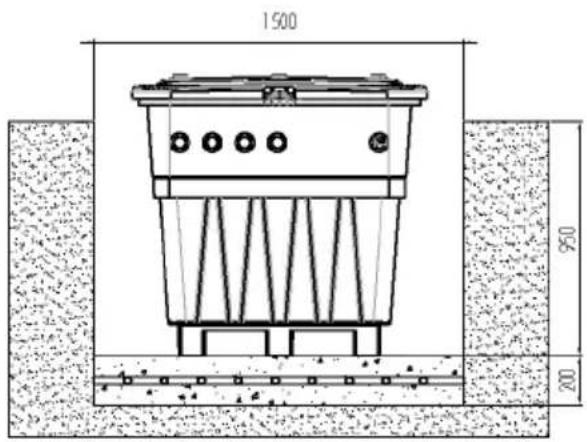
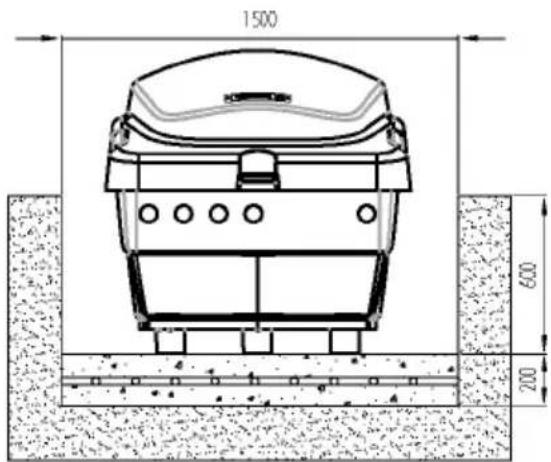
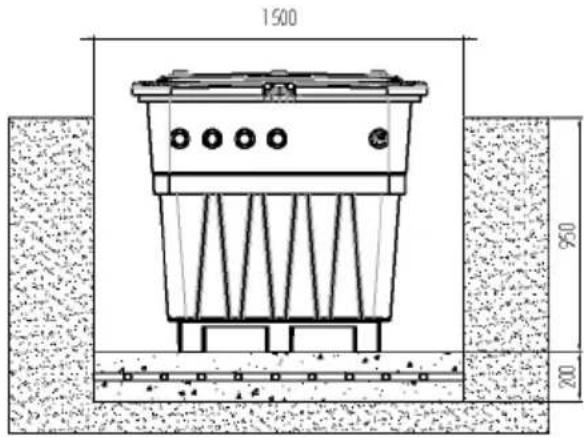
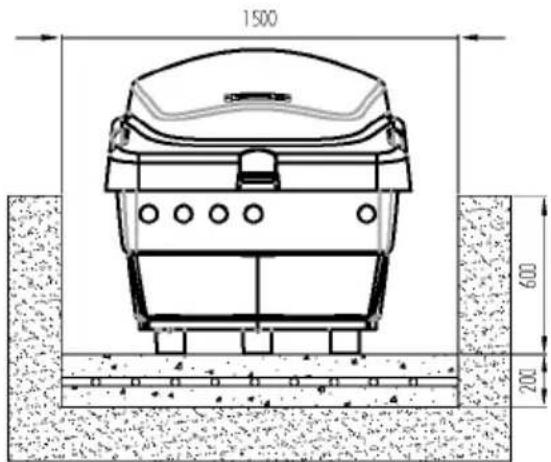
It is recommended that the unit be placed at least 3.5 m from the edge of the pool, and in compliance with the regulations in force at any given time.
2.2. PROCEDURE
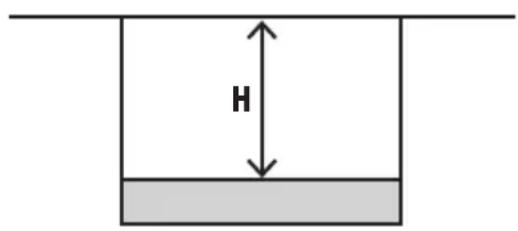
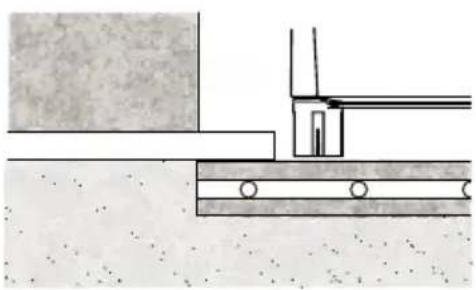
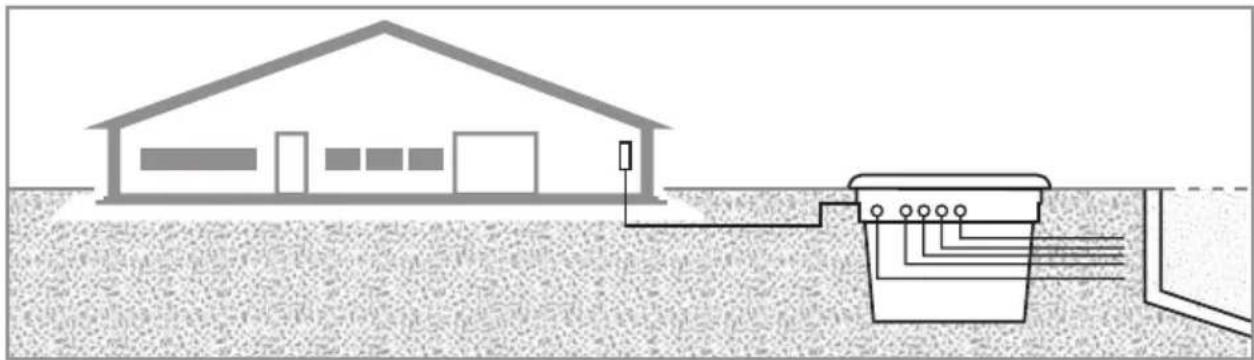
Dig a hole large enough for the housing, as well as for the water pipes and electrical wiring required. (Only applies to RAMSES, KEOPS and KEFREN housing)
- Level the bottom of the hole and compact the soil.
- Put the housing in place.
- Fit the water pipes, including the waste water pipe, and the electrical wiring protected by corrugated conduit.
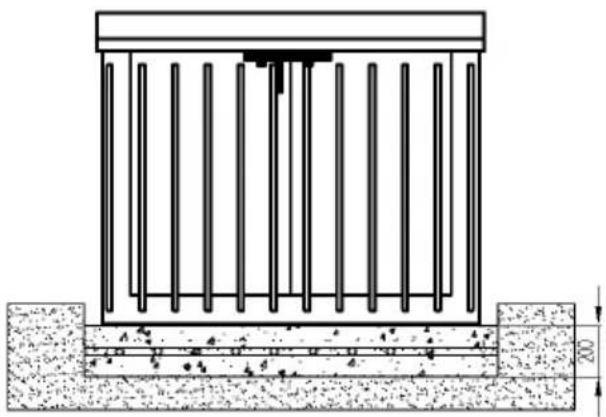
- For in-ground housing, put in a concrete base that just covers the legs (15–20 cm).
- Fill the remaining space in the hole with gravel for drainage and compact it. Leave a slight incline at the top to prevent flooding.
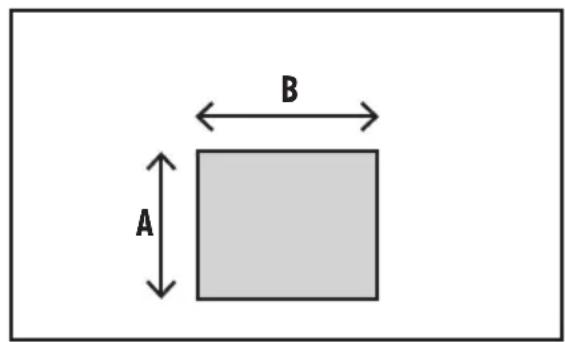
| A B H | |||
| KEOPS 113 cm 120 cm 95 cm | |||
| KEFREN 115 cm 115 cm 60 cm | |||
| RAMSES 109 cm 107 cm 90 cm | |||
| RAMSES UP 120 cm 146 cm - | |||
EXCAVATION WORK
RAMSES RAMSES UP

natural_image
Technical diagram of a structural support system with vertical columns and a horizontal base, showing dimension 'd' and 'mm' (no text or symbols present)KEOPS KEFREN


Dig out underground channels in a bed of sand for drainage down the main drain
For in-ground housing, build a retaining wall filled with gravel for drainage, with an incline at the top to prevent flooding in the hole dug out.
natural_image
Technical line drawing of a structural joint or bracket assembly (no text or symbols)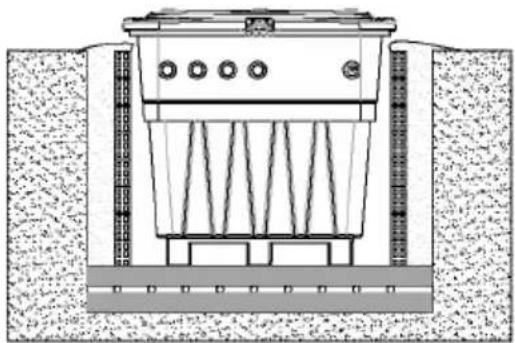
natural_image
Cross-sectional diagram of a mechanical or electrical component with no visible text or symbolsFor KEOPS housing on soft soil, fit inner reinforcement (ref. 31105R1000)

Compact the soil before putting the housing on the ground. Place concrete slabs on the bottom to make the housing more stable.
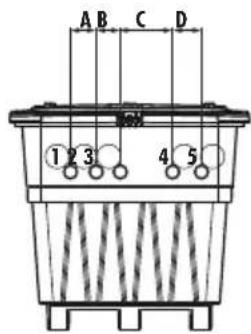
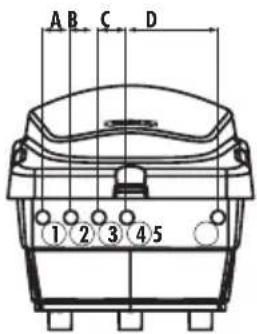
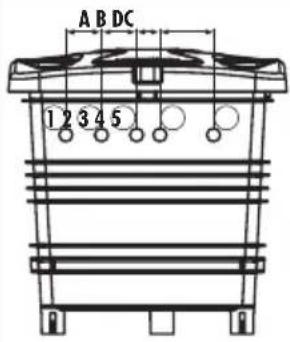
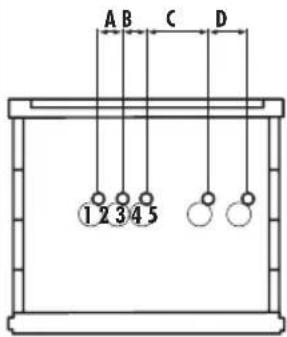
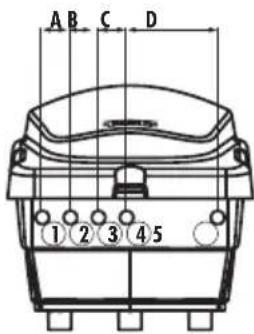
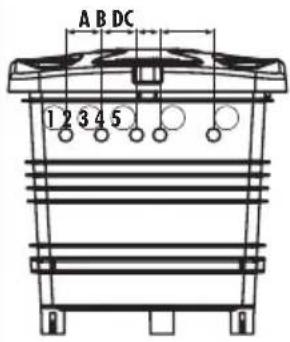
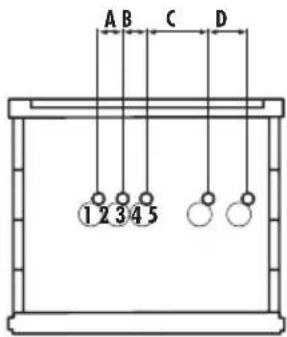
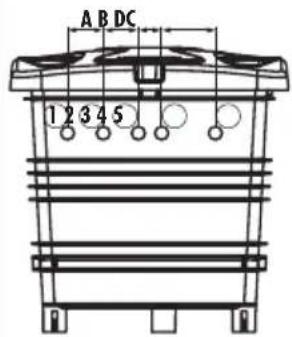
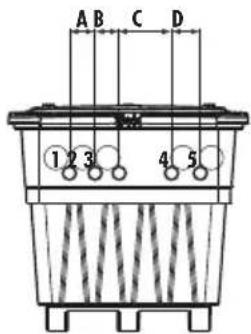
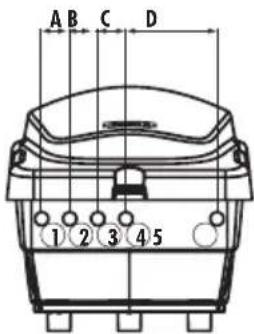
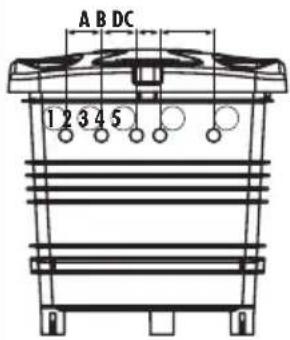
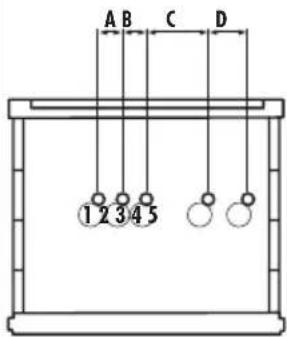
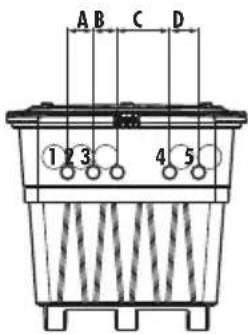
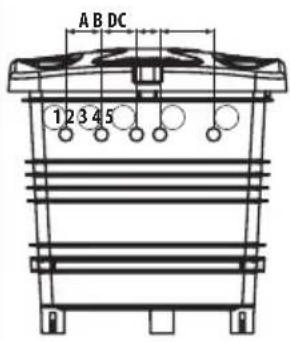
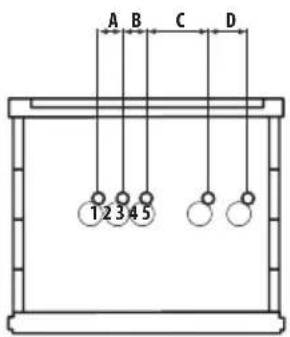
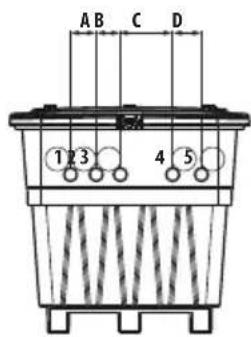
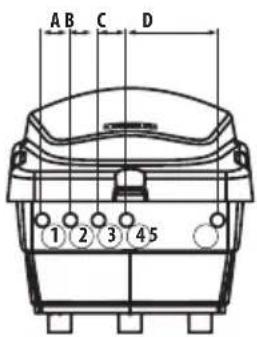
2.3. PIPING AND VALVES
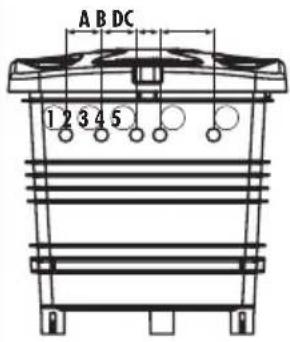
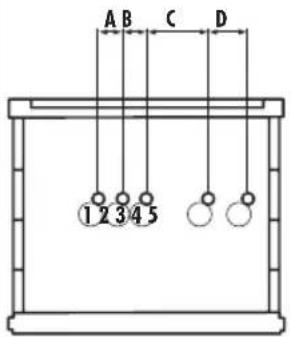
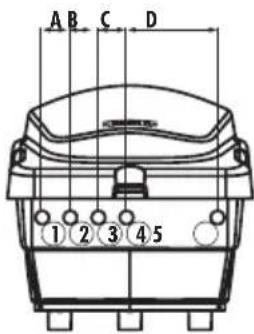
RAMSES RAMSES UP KEOPS KEFREN
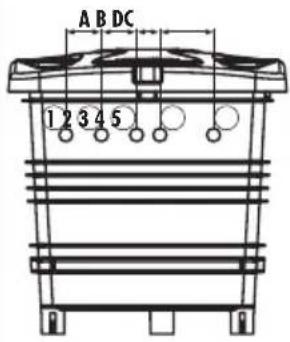
| A | B | C | D |
| 180 mm | 180 mm | 130 mm | 280 mm |
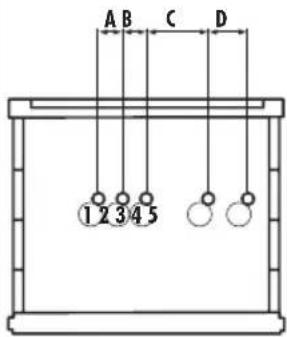
| A | B | C | D |
| 132 mm | 132 mm | 295 mm | 205 mm |
| A | B | C | D |
| 132 mm | 132 mm | 282 mm | 164 mm |
| A | B | C | D |
| 132 mm | 132 mm | 132 mm | 428 mm |
| IN | OUT | |||
| 1. SKIMMER (050) | 2. MAIN DRAIN (050) | 3. SUCTION INLET (050) | 4. WASTE WATER PIPE (050) | 5. RETURN TO POOL (050) |

natural_image
Diagram showing a house and a pipeline system with no text or symbolsTo connect the piping, glue it to the fittings supplied with the pump: the fittings to the pump's suction and return inlets are threaded and come with watertight seals to prevent leaking.
i Ensure the return pipes are fitted completely perpendicular to and perfectly aligned with the inlet to be connected to prevent the pump and the piping being subject to external forces, which besides making assembly difficult could even break them.
Fit the suction pipes slightly inclined towards the pump (2%) to prevent pockets of air from forming.
For the pump to work properly, prime the pump's prefilter until the water flows out of the suction conduit.
To prevent damage during shipping, the filtration housing is disconnected from the pump's waste water pipe. It must be glued before proceeding with its external connection
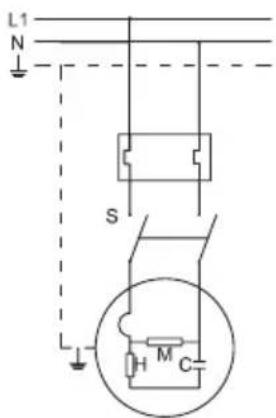
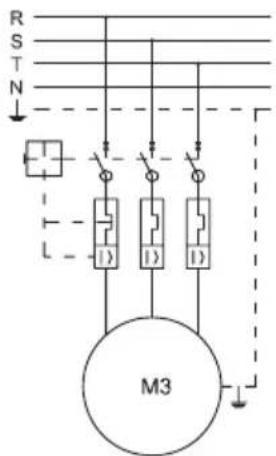
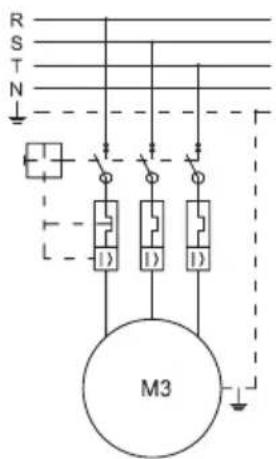
2.4. WIRING
Make a hole in the side of the housing into which the power supply is to be fed of the same diameter as the cable to be fitted. It is recommended that a H07-RNF cable be used. Calculate the diameter of the cable based on power consumption and voltage drop. Fit cable glands to the cable inlet suitable for the size of the cable. It is recommended that the cable be protected with a suitable conduit throughout its length.

This unit MAY NOT BE CONNECTED TO A STANDARD SOCKET.

This unit MUST BE PROPERLY WIRED. This must be carried out by a specialist in compliance with the regulations in force on electrical safety in the country of installation.

The unit must be connected to a 230 V AC mains supply at 50 Hz.

The power supply to the housing unit must ALWAYS BE PROTECTED BY A 30 Ma RESIDUAL-CURRENT CIRCUIT BREAKER.

There must be AN EARTH CONNECTION.

A multiple disconnection device must be used with a separation of at least 3 mm between contacts in order to disconnect the filter from the mains.

Use a sufficiently THICK CABLE for the housing's power supply and its distance from the control panel.

The electrical installation must comply with STANDARD VDE 0100, Part 702. The installation must also comply with all local and/or national regulations in force.
To complete the electrical installation, ascertain whether there is a distribution board. If there is a distribution board, proceed to point 2.4.1, “With distribution board inside the housing”. If there is not a distribution board, proceed to point 2.4.2, “Without distribution board”.

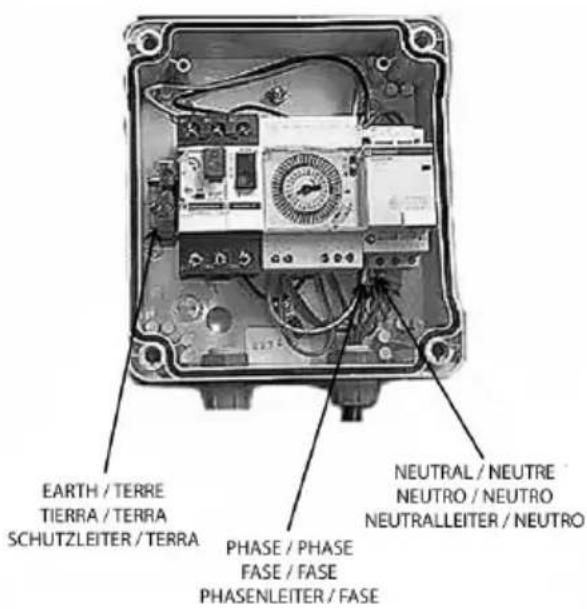
Whilst connecting the power cables to the unit, take special care in the layout of the wiring inside the junction box, check that no pieces of cable have been left inside after closing it and that the earth conductor has been properly connected.

Particular attention must be paid to ensure that no water whatsoever is able to get into the motor or any of the live electrical components.

Should the intended use not be as described, further adjustments may have to be made and additional technical standards may apply.

It is recommended that no holes be made in the filter housing as water in the surrounding land may penetrate any holes buried underground.
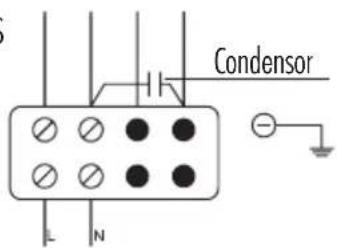
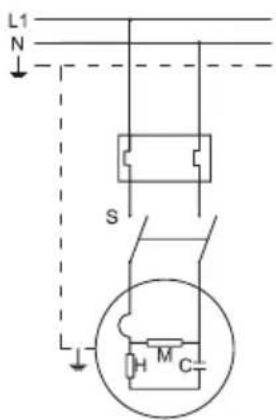
2.4.1. WITH DISTRIBUTION BOARD INSIDE THE HOUSING
For safety, place terminal strips of a suitable size on the ends of the cables to be connected.
TIMER, layout of the distribution board WITH/WITHOUT TRANSFORMER
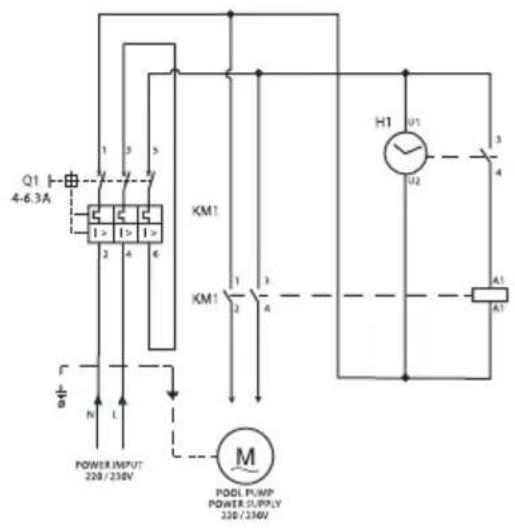
WARNING!
CONNECT INLET GROUND WIRE
TO MOTOR PUMP
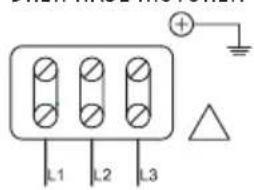
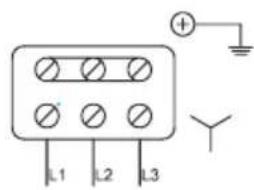
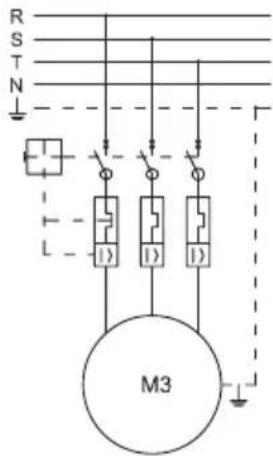
2.4.2. WITHOUT DISTRIBUTION BOARD
The following diagram shows the terminal board (junction box) of the pump, which may be SINGLE-PHASE OR THREE-PHASE.
SINGLE-PHASE MOTORS
THREE-PHASE MOTORS

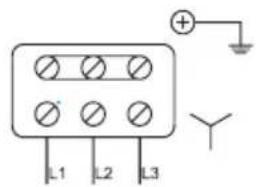
THREE-PHASESINGLE-PHASE

This unit MUST BE PROPERLY WIRED. This must be carried out by a specialist in compliance with the regulations in force on electrical safety in the country of installation.
3. START-UP
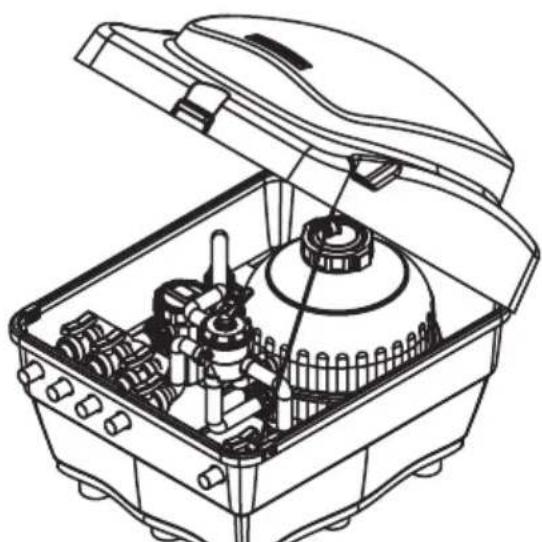
- Take the cover(s) off the housing in order to begin the start-up. Unscrew the 6 screws that join the cover to the hinge, before lifting it off.
- Open the filter and fill with water half way up. Protect the diffuser inside the filter so that no sand can get into it.
- Fill the filter with silex sand of a 0.4–0.8 grain size with the amount shown on the label or 2/3 of the way up the total filter height.
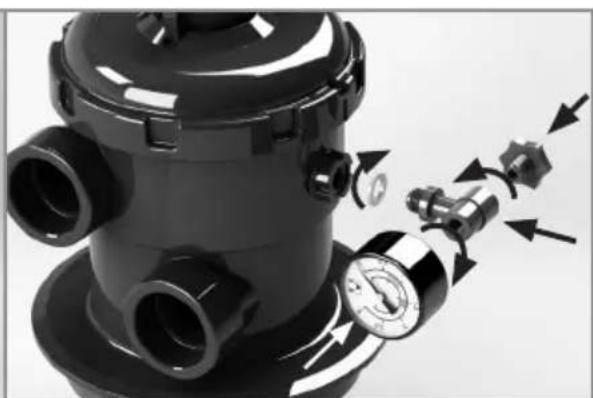
- Assemble the pressure gage, the seal and the air bleed cap. It is not necessary to use Teflon seal tape, as the seal makes this joint watertight. Do not use any tools to tighten the pressure gage's T-piece. Tightening it by hand will suffice.

natural_image
Mechanical assembly diagram showing fluid flow from a pressure pump to a tank (no text or symbols)Pressure gage assembly (with side valve)
natural_image
Close-up of a mechanical valve assembly with directional arrows indicating motion (no text or symbols visible)Pressure gage assembly (with top valve)
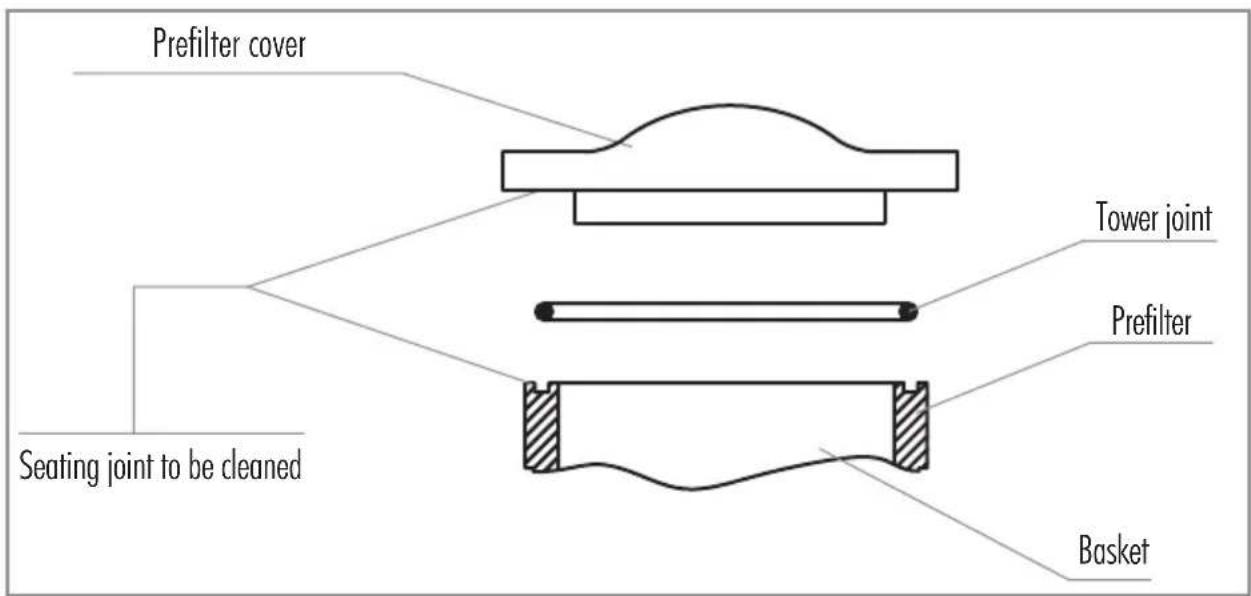
- Clean any remaining sand off the opening and the cover, as well as off the seal housing and close the filter. For further information, see the filter's manual.
- If the housing were above the pool's water level, the pump must be primed by opening the prefilter and filing it with water.
- If the housing were below the pool's water level, just open the pressure and check valves, and open the air bleed valve until the filter and pump are full of water.
-
Place the valves in the following positions.
-
SKIMMER: OPEN
- MAIN DRAIN: OPEN
-POOL CLEANER:OPEN - CHECK VALVE: OPEN
-
SELECTOR VALVE: BACKWASH
-
Turn the filter on and backwash it. Backwash until crystal clear water can be seen through the selector valve's sight glass.
-
Turn the pump off. Put the selector valve in the rinse position and turn on the pump for 15 seconds. Turn the pump off again and put the selector valve in the filtration position.
-
Turn the pump on.
- Put the housing cover(s) back on by screwing the screws back in at the rear of the cover(s).

Turn the pump off whenever the selector valve is being handled. Otherwise the filter and the whole installation could be damaged.

It is recommended that a lock or padlock be fitted to prevent children or unauthorized persons from getting into the housing.

Before switching the unit on, check the calibration of the motor protection circuit breakers, and that protection devices against electric shocks and mechanical failures are properly positioned and fitted.

Do not start the pump up if there is no water in the pool.

Do not run the filtration unit if the water level does not cover the skimmer's flap.
3.1. PUMP
Before starting the pump up, perform the following operations:
Take the prefilter cover off.
Fill the pump with water through the prefilter until it flows out of the suction conduit.
Put the basket back inside the prefilter, if it had to be removed to perform the previous operations, so that large particles are unable to get inside the pump that could block it.
Check that the mains voltage and frequency correspond to the figures displayed on the pump's rating plate.
Put the prefilter cover in place and close it, without forgetting to place the seal in its housing.
Under no circumstances should the pump be run without having filled the prefilter with water beforehand, otherwise this could damage the mechanical seal, which in turn will cause water leakage.
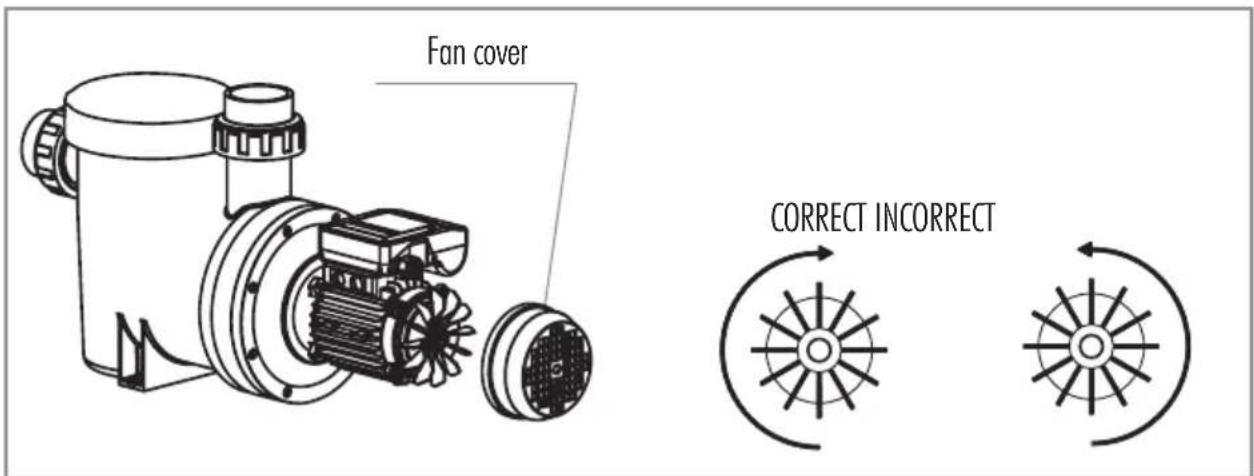
Check that the motor rotates in the right direction by observing the fan at the back of the motor through the sight glass on the fan's cover.
Open all the valves and turn the motor on.
Self-prime the piping and wait for a reasonable amount of time for this to be completed.
4. OPERATION
4.1. FILTRATION
Turn the lever on the selector valve to the "FILTRATION" position while the pump is off. Start the pump. While it is working it is advisable to look at the pressure gage from time to time, as the reading given will show the filter's saturation level.
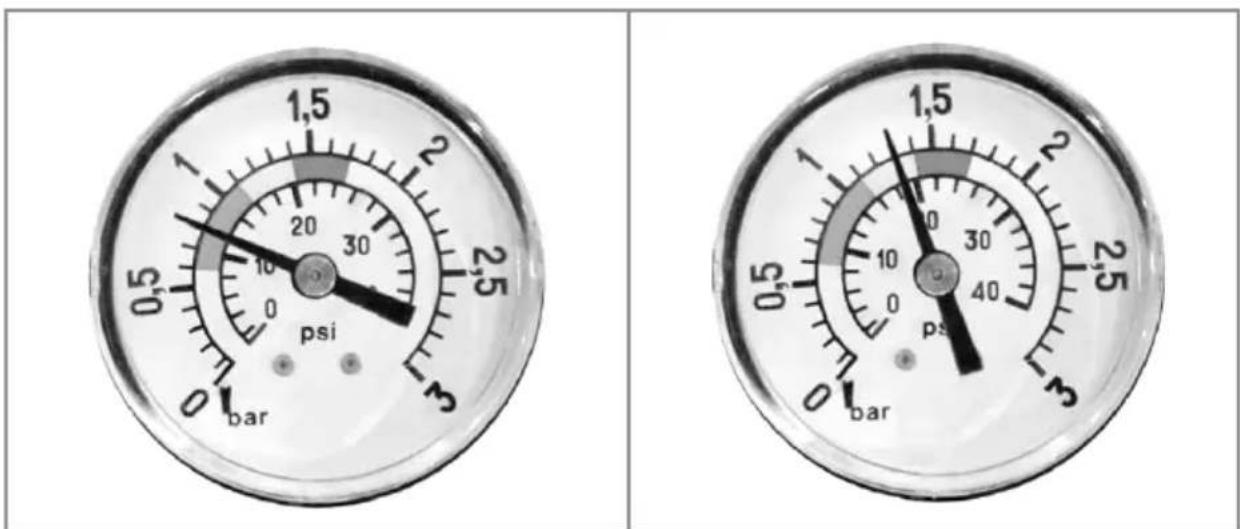
normal pressure at the start of a filtration cycle this pressure reading shows that the filter should be backwashed
4.2. BACKWASHING
The solid particles in a pool that are collected in the main drain and skimmers are retained by the sand in the filter and, therefore, the amount of water that passes through it constantly decreases. This is why the pressure gradually rises. When the pressure reaches 1,3 kg / cm ^2 , a “BACKWASH” must be performed.
This is done as follows:
The selector valve should be set to the "BACKWASH" position and the pump will start to work. Let it run for 2 minutes. The selector valve's sight glass should nevertheless be observed to check that this is the right time, as the process will depend on how much dirt has built up in the filter.
4.3. RINSING
After having performed a filter "BACKWASH" and before turning the filtration system on, it is recommended to "RINSE" the filter to prevent the initially cloudy water following the backwashing process from flowing directly into the pool. To do so, turn the valve to the "RINSE" position while the pump is off. Then let the pump run for approximately 1 minute. The selector valve's sight glass should nevertheless be observed to check that this is the right time, as the process will depend on how much dirt has built up in the filter.
4.4. RECIRCULATION
When the selector valve is in this position, the water from the pump circulates directly into the pool without going through the filter.
4.5. DRAINING
Should there not be a drain at the bottom of the pool, it can be drained through the filter pump by setting the valve to the "DRAIN" position. To perform this operation, open the valves on the main drain and close the skimmers and pool cleaner.
4.6. CLOSED
This position stops water from going into the filter.
5. MAINTENANCE
5.1. FILTER
Do not use solvents to clean the filter, as this could damage the gloss coating on the filter housing.
Replace any damaged components and seals whenever required.
Backwash and rinse the filter as per the operating instructions.
To get the most out of the sand, clean it once a year using solid or liquid ASTRAL Filnet. It is recommended that the sand be changed approximately every 3 years.
Winterizing:
In order to prevent damage to the filter over winter, the following operations should be performed:
- Backwash and rinse the filter as per the above instructions.
- Drain all the water out of the filter.
• Take the cover of the filter off so that it is well ventilated while not being used. - When the filter is to be put back into operation, follow the START-UP instructions.
5.2. PUMP
Clean the prefilter basket regularly to avoid pressure drops. Do not hit the basket during the cleaning process as this could potentially damage it.
If the pump stops, check that the motor's amp reading while in operation is the same or below that displayed on the manufacturer's rating plate, failing which contact your nearest approved service engineer.
Drain the pump in the event that it will spend some time without running, i.e., mainly in cold countries where there is also a risk of freezing temperatures.
To drain the pump, remove the air purge cap (10).
Every time the prefilter is opened, clean off any dirt on the seal and its housing to ensure the cover is watertight when closed.
The pump components that are prone to wear and tear through routine use must be regularly replaced for the pump to maintain good performance. The pump's perishable components and consumables are listed in the table below along with their estimated service life.
| COMPONENT DESCRIPTION ESTIMATED SERVICE LIFE | |
| O-rings and seals in general 1 year | |
| Mechanical seal 1 year | |
| Bearings 1 year | |
The estimated service life of the above components has been calculated based on the product's normal conditions of use in a standard installation.
Follow the instructions in the installation manual for the pump to run to the end of its service life.
5.3. OTHER COMPONENTS

For the rest of the components in the housing, check the user and maintenance manual for each component and proceed as instructed in order to ensure that the unit as a whole runs safely to maximum capacity.

Avoid absolutely all contact, even accidental, with the unit's moving parts.

Wait until the unit has completely stopped before attempting to carry out any maintenance work.

Before carrying out any maintenance work on electrical or mechanical parts, ensure that the unit has been disconnected from the mains and that start-up devices have been blocked.

Ensure that the ground is dry before touching any electrical components.

Do not handle the unit if you are standing in water.
6. TROUBLESHOOTING TABLE
| PROBLEM REASONS SOLUTIONS | ||
| The unit does not filter but it recirculates the water. | The filter is operating without the cartridge. | Check that the filter cartridge is correctly installed. |
| The unit does not circulate the water. | No electrical power. | Check the electrical connection and ensure that electricity reaches the socket. |
| Motor protector is not properly adjusted. | Check the pump's consumption and adjust the motor protector on the control panel. | |
| The unit only circulates a little water. | The filter is saturated. Perform a filter backwash. | |
| Prefilter of the pump or skimmer is blocked. | Clean the pump prefilter or the skimmer basket. | |
| Air enters the suction pipe. | Check the condition of connectors and suction pipe joints. | |
| Water level of the swimming pool is insufficient. | Fill the swimming pool until the water covers half the hinged gate of the skimmer. | |
| Incorrect voltage. | Check that the mains voltage matches the voltage indicated on the motor's rating plate. | |
| Pressure drops in suction. | Check that no elements causing are abnormal pressure drops. | |
| The pump does not prime. Air intake. | Check all pipe connections and the pump cover. Fill the prefilter of the water pump. | |
| The housing fills with water. | The drain of the box has not been installed. | Install a drain to remove water from the box. |

natural_image
Technical diagram of a structural component with vertical supports and a base, showing dimension lines (no text or symbols)KEOPS KEFREN

natural_image
Architectural cross-section diagram showing structural components and ground level (no text or labels)natural_image
Cross-sectional diagram of a mechanical or electrical device with internal components and mounting base (no text or symbols)RAMSES RAMSES UP KEOPS KEFREN
| A | B | C | D |
| 180 mm | 180 mm | 130 mm | 280 mm |
| A | B | C | D |
| 132 mm | 132 mm | 295 mm | 205 mm |

| A | B | C | D |
| 132 mm | 132 mm | 282 mm | 164 mm |
| A | B | C | D |
| 132 mm | 132 mm | 132 mm | 428 mm |
| IN | OUT | |||
| 1. SKIMMER (050) | 2. SIPHON (050) | 3. BOUCHE D'ASPIRATION (050) | 4. ÉVACUATION (050) | 5. RETOUR À PISCINE (050) |
natural_image
Diagram showing a house and a water channel with pipes and valves (no text or symbols)


natural_image
Mechanical assembly diagram showing fluid flow from a pressure vessel to a mechanical component (no text or symbols)natural_image
Close-up of a mechanical pressure regulator with valve and adjustment knobs (no visible text or symbols)natural_image
Technical diagram of a structural support system with vertical columns and base plate (no text or symbols)KEOPS KEFRÉN


natural_image
Technical line drawing of a structural joint or connection detail (no text or symbols)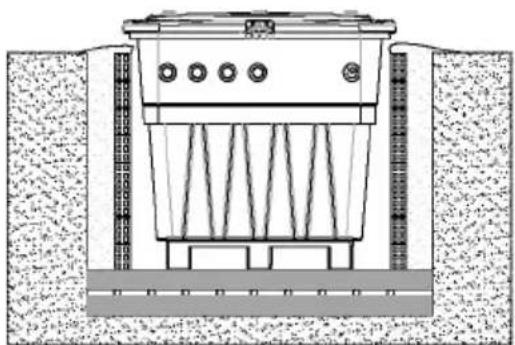
natural_image
Cross-sectional diagram of a mechanical or electrical device with internal structural elements and no visible text or symbolsRAMSES RAMSES UP KEOPS KEFRÉN
| A | B | C | D |
| 180 mm | 180 mm | 130 mm | 280 mm |
| A | B | C | D |
| 132 mm | 132 mm | 295 mm | 205 mm |

| A | B | C | D |
| 132 mm | 132 mm | 282 mm | 164 mm |

| A | B | C | D |
| 132 mm | 132 mm | 132 mm | 428 mm |
natural_image
Diagram showing a house and a pipeline system with no text or symbols


natural_image
Mechanical assembly diagram showing fluid flow and component placement on a cylindrical tank (no text or symbols)natural_image
Close-up of a mechanical valve assembly with directional arrows indicating flow or movement (no text or symbols visible)natural_image
Technical diagram of a structural support system with vertical columns and a base, showing dimension 'd' and 'mm' (no text or symbols present)KEOPS KEFREN


natural_image
Architectural cross-section diagram showing structural components and ground level (no text or labels)natural_image
Cross-sectional diagram of a mechanical or electrical component with no visible text or symbolsRAMSES RAMSES UP KEOPS KEFREN
| A | B | C | D |
| 180 mm | 180 mm | 130 mm | 280 mm |

| A | B | C | D |
| 132 mm | 132 mm | 295 mm | 205 mm |
| A | B | C | D |
| 132 mm | 132 mm | 282 mm | 164 mm |
| A | B | C | D |
| 132 mm | 132 mm | 132 mm | 428 mm |
natural_image
Simple line drawing of a house and a utility box with pipes, no text or symbols present


natural_image
Mechanical assembly diagram showing fluid flow around a cylindrical component (no text or symbols)natural_image
Close-up of a mechanical valve assembly with pressure gauge and directional arrows indicating flow (no text or symbols)natural_image
Technical diagram of a structural component with vertical supports and a 200mm dimension label (no text or symbols beyond basic geometry)KEOPS KEFREN
natural_image
Technical line drawing of a structural joint or connection detail (no text or symbols)natural_image
Cross-sectional diagram of a mechanical or structural assembly with no visible text or symbolsRAMSES RAMSES UP KEOPS KEFREN
A
-
[Non-Text]
-
[Non-Text]
三、表决结果
180 mm
180 mm
130 mm
280 mm
[Non-Text]
-
F
|
C
-
132 mm
132 mm
295 mm
205 mm

-
m = 311
B
|
C
-
132 mm
132 mm
282 mm
164 mm
。
m = 311
B
-
C
[Non-Text]
132 mm
132 mm
132 mm
428 mm
| IN | OUT | |||
| 1. SKIMMER (050) | 2. GULLI (050) | 3. ANSAUGDÜSE (050) | 4. WASSERABLAUF (050) | 5. RÜCKLAUF IN DEN POOL (050) |

natural_image
Diagram showing a house and a pipeline system with no text or symbols
DREIPHASE MOTOREN
DREIPHASIGEINPHASIG

natural_image
Mechanical assembly diagram showing a valve, pump, and housing components with directional arrows indicating motion (no text or labels)natural_image
Close-up of a mechanical valve assembly with directional arrows indicating flow or movement (no text or symbols visible)natural_image
Technical diagram of a structural component with vertical supports and a 200mm dimension label (no text or symbols beyond basic geometry)KEOPS KEFREN


natural_image
Technical line drawing of a structural joint or bracket assembly (no text or symbols)natural_image
Cross-sectional diagram of a mechanical device with internal components and mounting base (no text or symbols)RAMSES RAMSES UP KEOPS KEFREN
A
-
m = 311
1
[Non-Text]
[Non-Text]
1
m
1
m
13
mn
2
0n
A
|
1
-
c
广力云智慧零售收银系统
1
2n
13
mn
2
m
20
A
|
1
-
C
广力云智慧零售收银系统
1
m
13
mr
2
m
16

A
|
B
| x - 2x| = | x + 2x| = | x - 4| .
c
-
1
2m
1
32
m
32
nm
42
| IN | OUT | |||
| 1. SKIMMER (050) | 2. ESCOADOURO (050) | 3. BOCA DE ASPIRAÇÃO (050) | 4. RALO (050) | 5. RETORNO PARA A PISCINA (050) |
natural_image
Diagram showing a house and a utility box with grounding lines, no text or symbols present

natural_image
Mechanical assembly diagram showing fluid flow from a pressure pump to a tank (no text or symbols)natural_image
Close-up of a mechanical valve assembly with directional arrows indicating motion (no text or symbols visible)natural_image
Technical diagram of a structural support system with vertical columns and a central beam, showing dimension 'd' and 'd0' (no text or symbols beyond basic geometry)KEOPS KEFRÉN
natural_image
Architectural cross-section diagram showing structural components and ground level (no text or labels)natural_image
Cross-sectional diagram of a mechanical or structural assembly with no visible text or symbolsRAMSES RAMSES UP KEOPS KEFRÉN
| A | B | C | D |
| 180 mm | 180 mm | 130 mm | 280 mm |
| A | B | C | D |
| 132 mm | 132 mm | 295 mm | 205 mm |
| A | B | C | D |
| 132 mm | 132 mm | 282 mm | 164 mm |
| A | B | C | D |
| 132 mm | 132 mm | 132 mm | 428 mm |
natural_image
Diagram showing a house and a grid connection with a pipe or channel (no text or symbols)
natural_image
Mechanical assembly diagram showing fluid flow from a cylindrical component to a tank (no text or symbols)natural_image
Close-up of a black industrial valve with pressure gauge and directional arrows indicating flow or movement (no text or symbols)WARRANTIES, TERMS AND CONDITIONS
1. OVERVIEW
1.1. The vendor warrants that the Product covered by this warranty is free of all defects at the time of delivery.
1.2. The Warranty Period for the Products is two (2) years to be counted from the time of its delivery to the purchaser.
1.3. Should the product show any defects and the purchaser notifies the vendor of such during the Warranty Period, the vendor must cover the cost of repairing or replacing the Product wherever considered most convenient, unless this were impossible or disproportionately burdensome.
1.4. If the Product cannot be repaired or replaced, the purchaser may request a proportional reduction in its price or, if the defect were a major one, that the sales agreement be terminated.
1.5. The parts that are replaced or repaired under this warranty shall not extend the term of the original Product warranty, although such parts shall be subject to a separate warranty.
1.6. In order for this warranty to become effective, the purchaser must provide proof of the date of the Product's purchase and delivery.
1.7. If over six months have elapsed since the Product was delivered to a purchaser who claims it has a defect, the purchaser must prove the origin and existence of the alleged defect.
1.8. This Warranty Certificate shall not limit or overturn mandatory national consumer protection laws.
2. SPECIAL CONDITIONS
2.1. For this warranty to be valid, the purchaser must strictly follow the Manufacturer's instructions included in the documentation that comes with the Product, provided such documentation applies to the Product range and model.
2.2. If there is a set schedule for the replacement, maintenance or cleaning of certain Product parts or components, the warranty shall only be valid if the schedule has been properly followed.
3. LIMITATIONS
3.1. This warranty only applies to the sales made to consumers, the term "consumer" being understood as the person who acquires the Product for purposes unrelated to his or her professional activities.
3.2. No warranty is extended on the Product's normal wear and tear. With regard to replaceable parts, components and/or materials, namely, consumables such as mechanical seals, bearings and watertight fittings, the instructions in the documentation that comes with the Product shall apply.
3.3. The scope of this warranty does not cover accessories to the Product not specifically included with it.
3.4. The warranty shall solely cover defects in materials and/or workmanship. The warranty does not cover cases in which the Product: (I) has been subject to mishandling; (II) has been installed, repaired, maintained or handled by an unauthorized person; or (III) has been repaired or maintained using non-original spare parts. The scope of this warranty does not cover damage caused by accidents or unsuitable use, such as use other than filtering pool water or other unintended uses.
3.5. Whenever a Product defect is the result of improper installation or start-up, this warranty shall only cover defects when the installation or start-up are included in the Product sale agreements and has been carried out by the vendor or under its supervision.
GARANTIES ET CONDITIONS
1. ASPECTS GÉNÉRAUX
- Declares under their own responsibility that all the products: RAMSES, RAMSES UP, KEOPS & KEFREN, Single-phase and Three-phase. Manufactured since 03/10/2019, independent of the serial number, are in compliance with:
• 2006/42/EC Machine Directive Safety prescriptions
• 2014/35/EU Low voltage directive
• 2000/14/EC Noise emission directive
• EN 60335-1:2012/A2:2019
• EN 60335-2-41:2003/A2:2010
• EN 62233:2008 EMF measurement of home appliance (human exposure)
• EN 50581:2012 / EN 63000:2018 RoHS III technical documentation
• 1907/2006/EC REACH
This symbol is required by European Community Directive 2012/19/UE on WEEE (Waste Electrical and Electronic Equipment) and means that your appliance must not be thrown into a normal bin. It will be selectively collected for the purpose of reuse, recycling or transformation. Any substances it may contain which are potentially dangerous to the environment shall be eliminated or neutralized. Request information on recycling procedures from your retailer.
Recyclage
69829-0008 / Rev. 02
- We reserve the right to totally or partially change our products' features or the content of this document without prior warning.
- Nous nous réservons le droit de modifier tout ou en partie les caractéristiques de nos articles ou le contenu de ce document sans avis préalable.
- Nos reservamos el derecho de cambiar total o parcialmente las características de nuestros artículos o contenido de este documento sin previo aviso.
- Ci riserviamo il diritto di cambiare totalmente o parzialmente le caratteristiche tecniche dei nostri prodotti ed il contenuto di questo documento senza nessum preavviso.
- Wir behalten uns das Recht vor, die Merkmale unserer Produkte und den Inhalt dieser Beschreibung ohne vorherige Unkündigung ganz oder teilweise zu ändern.
- Reservamo-nos o direito de alterar total ou parcialmente as características dos nossos artigos ou o conteúdo deste documento sem aviso prévio.
- Διατηρούμε το δικαίωμα να τροποποιήσουμε εν όλω ή εν μέρει τα χαρακτηριστικά των ειδών μας ή το περιεχόμενο αυτού του εγγράφου, χωρίς προηγούμενη ειδοποίηση.

- CE
- GENERAL SAFETY
- GENERAL SAFETY RECOMMENDATIONS:
- DANGER
- INSTALLATION
- LOCATION
- PROCEDURE
- EXCAVATION WORK
- PIPING AND VALVES
- WIRING
- WITH DISTRIBUTION BOARD INSIDE THE HOUSING
- WITHOUT DISTRIBUTION BOARD
- START-UP
- PUMP
- OPERATION
- FILTRATION
- BACKWASHING
- This is done as follows:
- RINSING
- RECIRCULATION
- DRAINING
- CLOSED
- MAINTENANCE
- FILTER
- Winterizing:
- PUMP
- OTHER COMPONENTS
- TROUBLESHOOTING TABLE
- WARRANTIES, TERMS AND CONDITIONS
- OVERVIEW
- SPECIAL CONDITIONS
- LIMITATIONS
- GARANTIES ET CONDITIONS
- ASPECTS GÉNÉRAUX
- Recyclage
- 69829-0008 / Rev. 02
Brand : ASTRALPOOL
Model : Ramsés
Category : Water filter