
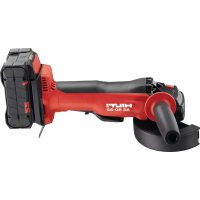
NPU 10022 - Grinder HILTI - Free user manual and instructions
Find the device manual for free NPU 10022 HILTI in PDF.
| Brand | Hilti |
| Model | NPU 10022 |
| Category | Charger for Li-Ion battery |
| Product type | Portable charger |
| Weight | 0.55 kg (according to EPTA Procedure 01) |
| Nominal output voltage | 10.8 V – 21.6 V |
| Maximum output power | 90 W |
| Storage temperature | -20 °C to 70 °C |
| Operating temperature | -17 °C to 60 °C |
| Status display | Green LED (ready), flashes for charging and errors |
| Battery charge indicator | 4 green LEDs, yellow/red flashing |
| Maintenance | Clean with a slightly damp cloth, no silicone |
| Safety | Double insulation, short-circuit protection, RCD switch recommended |
| Included accessories | Charger, instruction manual |
| Battery compatibility | Hilti Nuron 21.6 V Li-Ion batteries |
| Wall mounting | Yes, mounting holes |
| Power cable | Replaceable, multiple versions by country |
| Warranty | Manufacturer warranty, contact Hilti |
Frequently Asked Questions - NPU 10022 HILTI
User questions about NPU 10022 HILTI
0 question about this device. Answer the ones you know or ask your own.
Ask a new question about this device
Download the instructions for your Grinder in PDF format for free! Find your manual NPU 10022 - HILTI and take your electronic device back in hand. On this page are published all the documents necessary for the use of your device. NPU 10022 by HILTI.
USER MANUAL NPU 10022 HILTI
natural_image
3D model of a mechanical housing component with a numbered annotation (6) pointing to a feature, no readable text or symbols present.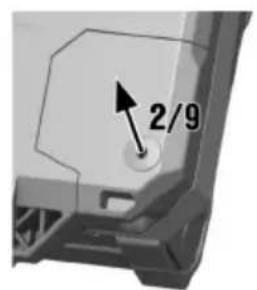
natural_image
Close-up of an electronic device showing internal components and wiring (no text or symbols visible)C 4-22 (02)

natural_image
3D model of a mechanical component with a numbered label pointing to a feature (no text or symbols on the object itself)Original operating instructions
1 Information about the operating instructions
1.1 About these operating instructions
- Warning! Read and understand all accompanying documentation, including but not limited to instructions, safety warnings, illustrations, and specifications provided with this product. Familiarize yourself with all the instructions, safety warnings, illustrations, specifications, components, and functions of the product before use. Failure to do so may result in electric shock, fire, and/or serious injury. Save all warnings and instructions for future reference.
- HILTI products are designed for professional users and only trained, authorized personnel are permitted to operate, service and maintain the products. This personnel must be specifically informed about the possible hazards. The product and its ancillary equipment can present hazards if used incorrectly by untrained personnel or if used not in accordance with the intended use.
- The accompanying documentation corresponds to the current state of the art at the time of printing. Please always check for the latest version on the product's page on Hilti's website. To do this, follow the link or scan the QR code in this documentation, marked with the symbol .
- Ensure that these operating instructions are with the product when it is given to other persons.
1.2 Explanation of symbols
1.2.1 Warnings
Warnings alert persons to hazards that occur when handling or using the product. The following signal words are used:

DANGER
DANGER !
- Draws attention to imminent danger that will lead to serious personal injury or fatality.

WARNING
WARNING !
- Draws attention to a potential threat of danger that can lead to serious injury or fatality.

CAUTION
CAUTION !
- Draws attention to a potentially dangerous situation that could lead to personal injury or damage to the equipment or other property.
1.2.2 Symbols in the operating instructions
The following symbols are used in these operating instructions:
 | Comply with the operating instructions |
 | Instructions for use and other useful information |
| [25GS] | Dealing with recyclable materials |
 | Do not dispose of electric equipment and batteries as household waste |
 | Hilti Li-ion battery |
 | Hilti charger |
1.2.3 Symbols in illustrations
The following symbols are used in illustrations:
| 2 | These numbers refer to the illustrations at the beginning of these operating instructions. |
| 3 | The numbering reflects the sequence of operations shown in the illustrations and may deviate from the steps described in the text. |
| 11 | Item reference numbers are used in theoverview illustrationand refer to the numbers used in the key in theproduct overviewsection. |
| ! | These characters are intended to specifically draw your attention to certain points when handling the product. |
1.3 Product-dependent symbols
1.3.1 Symbols on the product
The following symbols can be used on the product:
 | The product supports near-field communication (NFC) technology compatible with iOS and Android platforms. |
 | Double insulated |
 | For indoor use only |
 | Direct current (DC) |
 | Alternating current |
 | If applied on the product, the product has been certified by this certification body for the US and Canadian markets according to the applicable standards. |
2 Safety
2.1 General safety instructions
WARNING Study all safety instructions and other instructions, images and technical data with which this power tool is provided. Failure to observe the instructions below can result in electric shock, fire and/or serious injury.
Keep all safety instructions and instructions for future reference.
▶ Persons (including children) with reduced physical, sensory or mental abilities or lack of experience and knowledge are not permitted to use this product.
- Do not allow children to play with the product.
▶ Install the charger in such a way that a battery inserted into it cannot fall out.
2.2 Battery charger use and care
▶ To avoid injury, use the charger only to charge Hilti Li-ion batteries approved for use with this charger.
The location at which the charger is used should be clean, cool, dry and protected from frost.
The charger must be able to emit heat while in operation. The air vents must therefore remain unobstructed. Do not operate the charger inside a closed container.
- Maintain the product carefully. Make sure that no parts are broken or damaged in such a way that the product no longer functions correctly. If parts are damaged or broken, have the product repaired prior to further use.
▶ Use chargers and the corresponding batteries in accordance with these instructions and as is specified for this particular model. Use of chargers for applications different from those intended could result in hazardous situations.
▶ Recharge the batteries only with the chargers specified by the manufacturer. A charger that is suitable for a certain type of battery may present a risk of fire when used with other types of battery.
- When not in use, keep the battery and the charger away from paper clips, coins, keys, nails, screws or other small metal objects that could cause a short circuit at the battery terminals or the charging contacts. A short circuit between the battery terminals or charging contacts may cause injuries (burns) and result in fire.
- Do not store the battery on the charger. Always remove the battery from the charger when the charging operation has completed.
2.3 Careful handling and use of batteries
- Comply with the following safety instructions for the safe handling and use of Li-ion batteries.
Failure to comply can lead to skin irritation, severe corrosive injury, chemical burns, fire and/or explosion.
▶ Use only batteries that are in perfect working order.
▶ Treat batteries with care in order to avoid damage and prevent leakage of fluids that are extremely harmful to health! - Do not under any circumstances modify or tamper with batteries!
- Do not disassemble, crush or incinerate batteries and do not subject them to temperatures over 80 °C (176 °F).
▶ Never use or charge a battery that has suffered an impact or been damaged in any other way. Check your batteries regularly for signs of damage.
▶ Never use recycled or repaired batteries.
▶ Never use the battery or a battery-operated power tool as a striking tool.
▶ Never expose batteries to the direct rays of the sun, elevated temperature, sparking, or open flame. This can lead to explosions.
Do not touch the battery poles with your fingers, tools, jewelry, or other electrically conductive objects. This can damage the battery and also cause material damage and personal injury. - Keep batteries away from rain, moisture and liquids. Penetrating moisture can cause short circuits, electric shock, burns, fire and explosions.
▶ Use only chargers and power tools approved for the specific battery type. Read and follow the relevant operating instructions. - Do not use or store the battery in explosive environments.
If the battery is too hot to touch, it may be defective. Put the battery in a place where it is clearly visible and where there is no risk of fire, at an adequate distance from flammable materials. Allow the battery to cool down. If it is still too hot to touch after an hour, the battery is faulty. Consult Hilti Service or read the document entitled "Instructions on safety and use for Hilti Li-ion batteries".

Observe the special guidelines applicable to the transport, storage and use of lithium-ion batteries. Read the instructions on safety and use of Hilti Li-ion batteries that you can access by scanning the QR code at the end of these operating instructions.
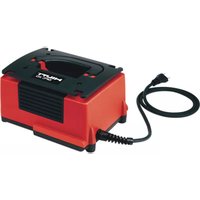
3 Description
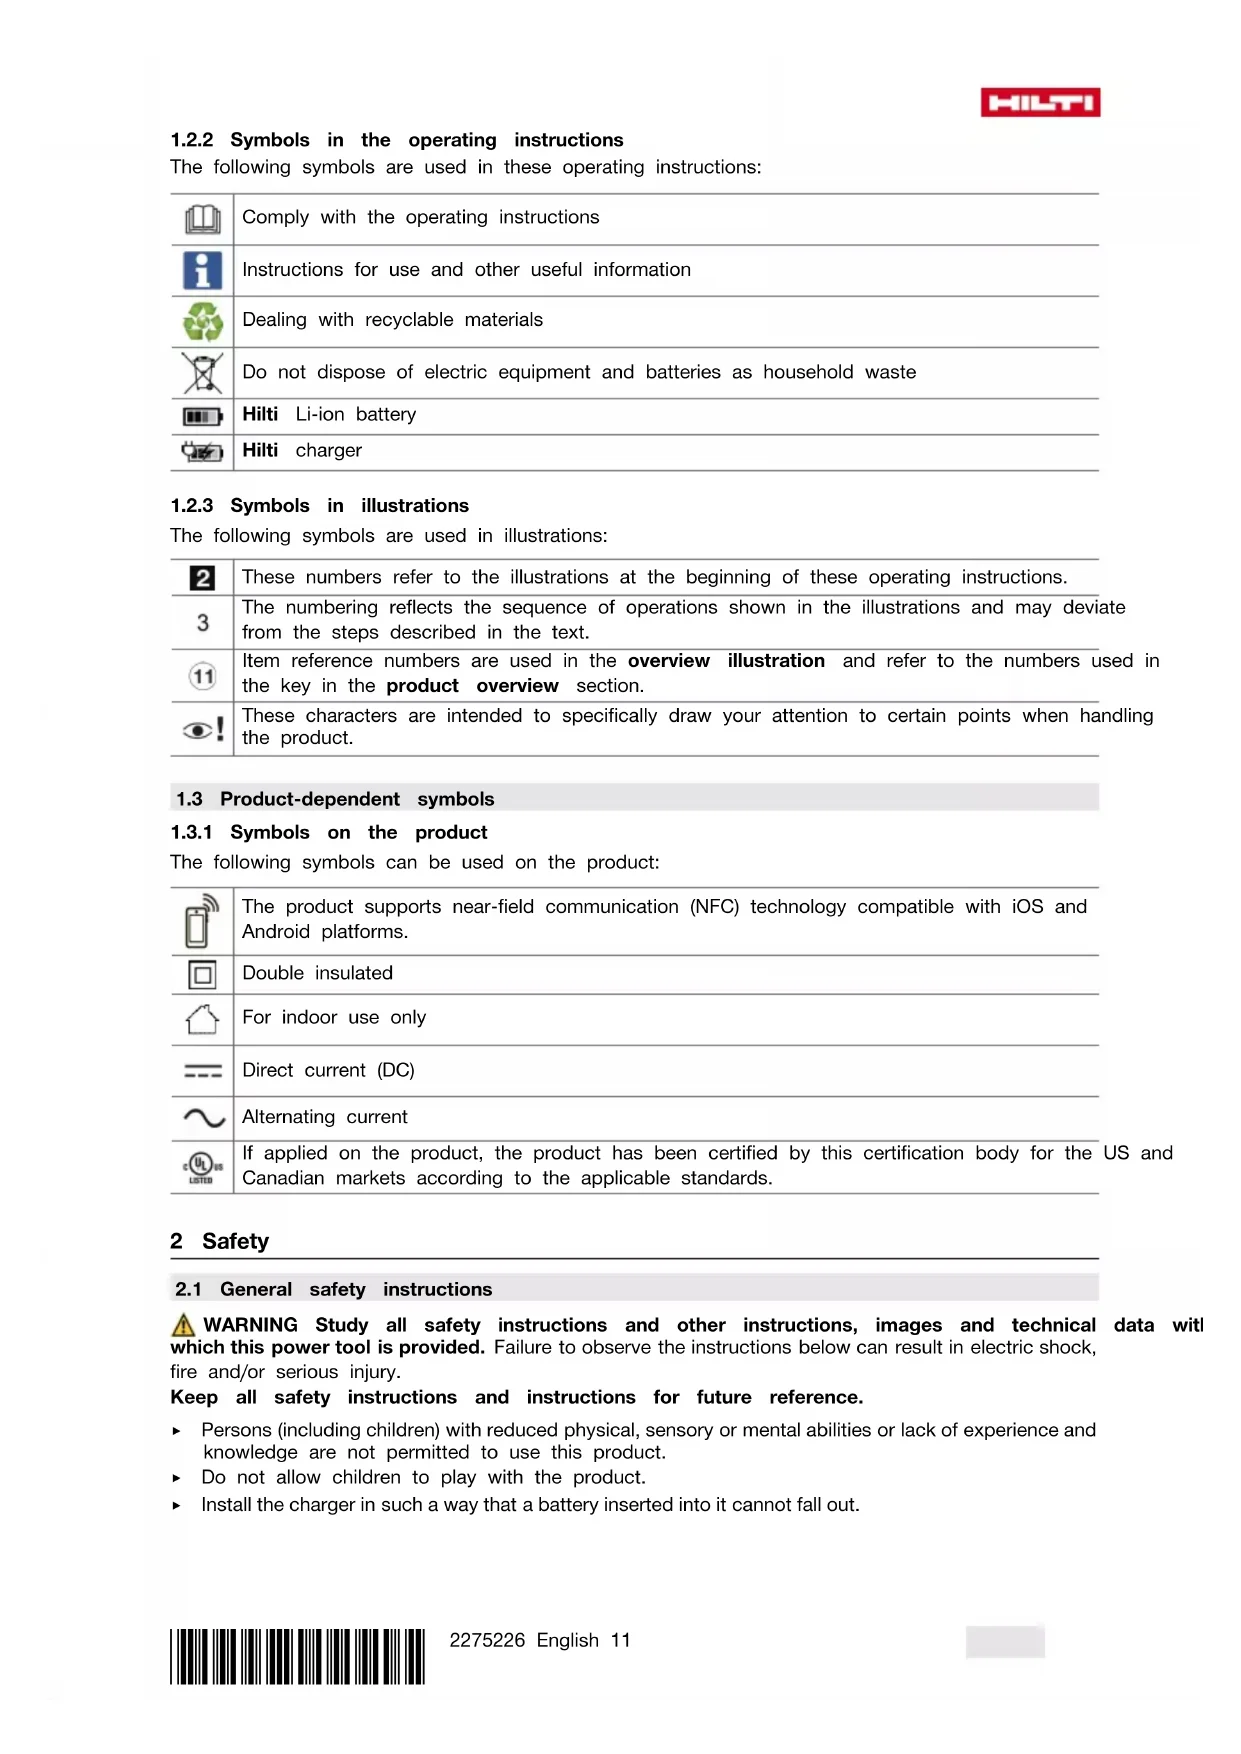
3.1 Product overview
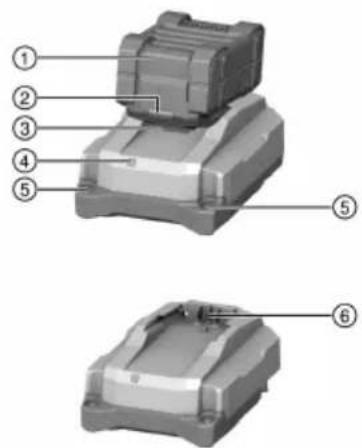
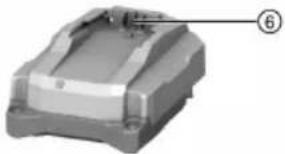
① Battery
② Battery status indicator
③ Battery release button
④ Charger operating status indicator
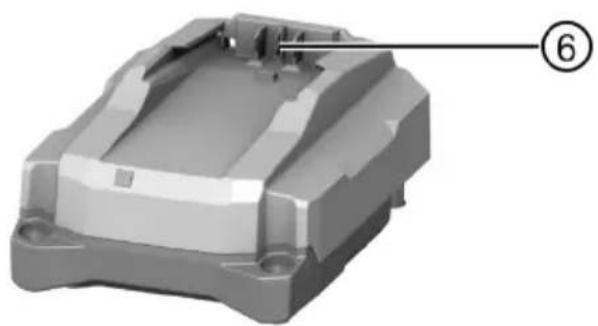
⑤ Holes for wall-mounting
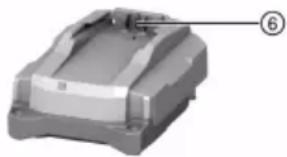
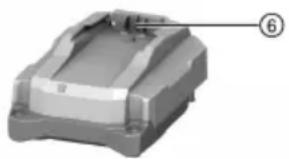
⑥ Battery interface
3.2 Intended use
The product described is a portable battery charger for Hilti Li-ion batteries with a rated voltage of 21.6 volts. It is designed to be connected to power outlets providing an AC (alternating current) voltage of 100 to 127 volts or 220 to 240 volts (depending on country-specific version).
The charger can be set on a flat surface or mounted on the wall.
• The Hilti Li-ion batteries approved for use with this product can be found in this list.
- Not all batteries are available in all markets.
Product information
| Charger C 4-22 | |
| Generation 02 | |
| Serial no. 1 - 999999999999 |
3.3 Operating status indicator of the charger
| Status Meaning | |
| LED shows green. Charger is ready for use. | |
| LED doesn’t light. Charger is not ready for use. |
3.4 Status indicators of the Li-ion battery during charging
When a Hilti Nuron Li-ion battery is connected to a Hilti charger, the status indicator of the battery shows the state of charge and also fault messages, if applicable.
| Status Meaning | |
| One (1) LED slow-flashes green | The battery is being charged, state of charge: ≤ 20 % |
| One (1) LED shows green, one (1) LED slow-flashes green | The battery is being charged, state of charge: 21 % to 40 % |
| Two (2) LEDs show green, one (1) LED slow-flashes green | The battery is being charged, state of charge: 41 % to 60 % |
| Three (3) LEDs show green, one (1) LED slow-flashes green | The battery is being charged, state of charge: 61 % to 80 % |
| Four (4) LEDs show green | The battery is being charged, state of charge: ≥ 80 % |
| No LED showing | The battery is fully charged, charging has ended. |
| One (1) LED quick-flashes yellow, then one or more LEDs show green | Charging interrupted. The battery might be outside the permissible temperature range.Charging resumes automatically as soon as the applicable parameters return to specification. If necessary, bring the battery to the recommended charging temperature. |
| One (1) LED quick-flashes red The Li-ion battery | is locked and cannot be used.Consult Hilti Service. |
3.5 Indicators showing the state of health of the Li-ion battery
Hilti recommends checking the state of health of the Li-ion battery every time before charging.
To check the battery's state of health, press the release button of the battery and hold it down for longer than three seconds. The system does not detect a potential malfunction of the battery due to misuse, for example battery dropped or pierced, external heat damage, etc.
| Status Meaning | |
| All LEDs show in sequence, followed by one (1) LED showing constantly green. | The battery can remain in use. |
| All LEDs show in sequence, followed by one (1) LED quick-flashing yellow. | The check to ascertain the battery's state of head did not complete. Repeat the procedure, or cons Hilti Service. |
| All LEDs show in sequence, followed by one (1) LED showing constantly red. | If a connected product can still be used, the remaining battery capacity is below 50%. If a connected product can no longer be used, battery has reached the end of its useful life and has to be replaced. Consult Hilti Service. |
3.6 Items supplied
Charger, operating instructions.
Other system products approved for use with this product can be found at your local Hilti Store or at: www.hilti.group
4 Technical data
| C 4-22 | |
| Weight in accordance with EPTA Procedure 01 | 0.55 kg(1.213 lb) |
| Rated output voltage | 10.8 V ... 21.6 V |
| Maximum output power | 90 W |
| Storage temperature | -20 °C ... 70 °C(-4.0 °F ... 158.0 °F) |
| Ambient temperature for operation | -17 °C ... 60 °C(1.4 °F ... 140.0 °F) |
5 Operation
WARNING
A damaged supply cord presents a hazard! If the supply cord or extension cord is damaged while work is in progress, immediately disconnect the product and the cord from the electricity supply. Do not touch the damaged part of the cord!
▶ Regularly check all supply cords.
- Replace defective extension cords.
▶ Otherwise, contact Hilti Service.
Use of a ground fault circuit interrupter (residual current device, RCD) with a maximum tripping current of 30 mA is recommended.
5.1 Switching on charger and charging battery

WARNING
Explosion hazard if any attempt is made to charge unapproved batteries. Injuries and damage to the charger can result.
- Do not attempt to charge non-rechargeable batteries.
▶ Use only Hilti-approved batteries with this charger.

CAUTION
Short-circuit due to moisture or dampness Damage to the product is the result.
▶ Use the product only indoors.
- Keep the product away from moisture and dampness.
-
Plug the supply cord into the power outlet.
▶ The LED shows green. -
Engage the battery on the battery interface.
▶ The battery is charging.
- When the battery is fully charged, remove it from the charger.
6 Care and maintenance

WARNING
Electric shock hazard! Attempting care and maintenance with the supply cord connected to a power outlet can lead to severe injury and burns.
▶ Always unplug the supply cord before carrying out care and maintenance tasks.
Care
- Carefully remove stubborn dirt from the tool.
- Use only a slightly damp cloth to clean the casing. Do not use cleaning agents containing silicone as these can attack the plastic parts.
Maintenance
- Check all visible parts and controls for signs of damage at regular intervals and make sure that they all function correctly.
- Do not operate the product if signs of damage are found or if parts malfunction. Have it repaired immediately by Hilti Service.
• After cleaning and maintenance, fit all guards or protective devices and check that they function correctly.

To help ensure safe and reliable operation, use only genuine Hilti spare parts and consumables. Spare parts, consumables and accessories approved by Hilti for use with the product can be found at your local Hilti Store or online at: www.hilti.group.
6.1 Replacing the supply cor 2

DANGER
Risk of injury! Risk of electric shock.
The product may be serviced and repaired only by authorized, trained personnel! This personnel must be specially informed of any possible hazards.
If it is damaged, the supply cord has to be replaced.

Comply with the country-specific regulations for electrical safety.
-
Unplug the charger's supply cord from the power outlet.
-
Pull the rubberized foot out of the cover and remove the securing screw exposed by removal of the rubberized foot.
Materials
Torx ^® screwdriver T10
-
Flip the cover open.
-
Take a photo or draw a sketch so that you will be able to recall the routing and conductor-to-terminal assignment of the supply cord.
-
Carefully depress one of the terminal clips with a flat screwdriver to release the conductor. Disengage the conductor from the terminal clip. Repeat this step for the second conductor and then remove the faulty power cord.
-
Install the new supply cord. Depress one terminal clip with a flat screwdriver and insert the end of the conductor into the terminal clip. Release the terminal clip and check that the conductor is secure in the terminal clip. Repeat this step for the second conductor.
Materials
Supply cord
2289588 (EU, 220-240V)
2289589 (US, 110-120V)
Select the supply cord of a type suitable for use with this charger from this table or contact Hilti Service.
-
Seat the supply cord in the cable guide exactly as the original cable was routed prior to replacement. Use the photo taken beforehand or the sketch you drew as reference.
-
Flip the cover closed and re-install the securing screw.
-
Push the rubberized foot back into the cover.
-
Plug the supply cord into a power outlet and check that the charger is in full working order.
▶ LED shows: Charger is in full working order.
▶ LED does not light up: Charger is not in full working order.
▶ Contact Hilti Service.
7 Transport and storage
Transport
▶ Make sure that the equipment is held securely throughout all transport operations.
▶ After transporting, always check all visible parts and controls for signs of damage and make sure that they all function correctly.
Storage
▶ Always store this product with the electric supply cable unplugged from the electricity supply.
- Store this product in a dry place, where it cannot be accessed by children or unauthorized persons.
▶ After a long period of storage, always check all visible parts and controls for signs of damage and make sure that they all function correctly.
8 Troubleshooting
If the trouble you are experiencing is not listed in this table or you are unable to remedy the problem by yourself, contact Hilti Service.
| Malfunction Possible cause | Action to be taken | |
| LED doesn’t light. Supply cord | not connected to electricity supply. | Plug the supply cord into the power outlet. |
| Product malfunction. ▶ Unplug the product and then plug it back in. If the LED remains off, consultHilti Service. | ||
| Supply cord faulty. | Replace the supply cord.→ page 15 | |
| The charger is defective. ▶ Have the product repaired byHilti Service. | ||
9 Disposal
Most of the materials from which Hilti tools and appliances are manufactured can be recycled. The materials must be correctly separated before they can be recycled. In many countries, your old tools, machines or appliances can be returned to Hilti for recycling. Ask Hilti Service or your Hilti representative for further information.

- Do not dispose of power tools, electronic equipment or batteries as household waste!
10 FCC statement (applicable in US) / IC statement (applicable in Canada)
This device complies with Part 15 of the FCC Rules and RSS-210 of IC. Operation is subject to the following two conditions:
- this device may not cause harmful interference, and
- this device must accept any interference received, including interference that may cause undesired operation.
11 Manufacturer's warranty
▶ Please contact your local Hilti representative if you have questions about the warranty conditions.
12 Further information
13 Hilti Li-ion batteries
Instructions for safety and use
This documentation uses the term battery to describe rechargeable Hilti Li-ion battery packs containing several Li-ion cells joined together. These batteries are to be used in Hilti power tools exclusively. Use only genuine Hilti batteries!
Description
Hilti batteries have cell-management and cell-protection systems.
The batteries are composed of cells that contain lithium-ion storage materials capable of providing high specific energy density. Li-ion cells have a minimal memory effect, but they are very susceptible to external impact, deep discharge, and high temperatures.
The products approved for use with Hilti batteries can be found in your Hilti Store or at: www.hilti.group
Safety
- Comply with the following safety instructions for the safe handling and use of Li-ion batteries. Failure to comply can lead to skin irritation, severe corrosive injury, chemical burns, fire and/or explosion.
▶ Treat batteries with care in order to avoid damage and prevent leakage of fluids that are extremely harmful to health! - Do not under any circumstances modify or tamper with batteries!
- Do not disassemble, crush or incinerate batteries and do not subject them to temperatures over 80 °C.
▶ Never use or charge a battery that has suffered an impact or been damaged in any other way. Check your batteries regularly for signs of damage.
▶ Never use recycled or repaired batteries.
HILTI
▶ Never use the battery or a battery-operated power tool as a striking tool.
▶ Never expose batteries to the direct rays of the sun, elevated temperature, sparking, or open flame. This can lead to explosions.
Do not touch the battery poles with your fingers, tools, jewelry, or other electrically conductive objects. This can damage the battery and also cause material damage and personal injury.
- Keep batteries away from rain, moisture and liquids. Penetrating moisture can cause short circuits, electric shock, burns, fire and explosions.
▶ Use only chargers and power tools approved for the specific battery type. Read and follow the relevant operating instructions.
- Do not use or store the battery in explosive environments.
If the battery is too hot to touch it may be defective. Put the battery in a place where it is clearly visible and where there is no risk of fire, at an adequate distance from flammable materials. Allow the battery to cool down. If it is still too hot to touch after an hour, the battery is faulty. Follow the instructions in the section headed What to do in case of a battery fire.
What to do in case of damaged batteries
▶ Always contact Hilti when a battery is damaged.
▶ Never use a battery that is leaking fluid.
- Avoid direct eye and/or skin contact with fluid leaking from a battery. Always wear protective gloves and eye protection when undertaking tasks involving battery fluid.
▶ Use a chemical spill cleanup kit to remove leaked battery fluid. Comply with the locally applicable cleanup regulations for battery fluid.
To store a damaged battery, place the battery in a non-flammable container and cover the battery with dry sand, chalk powder (CaCO3) or silicate (Vermiculite). Then seal the lid air-tight and store the container away from flammable gases, liquids or objects.
- Dispose of the container at your Hilti Store, or consult your local governmental garbage disposal or public health and safety resources for disposal instructions. Comply with the locally applicable regulations for transporting damaged batteries!
What to do in case of dysfunctional batteries
▶ Watch for abnormal battery behavior, such as faulty charging, unusually long charging times, noticeable power loss, unusual LED activity, or leaking fluids. These are signs of an internal problem.
▶ If you suspect an internal battery problem, contact Hilti Service.
▶ A battery that no longer works, cannot be recharged or leaks fluid has to be disposed of correctly. See the section headed Maintenance and disposal.
What to do in case of a battery fire
WARNING
Battery fire hazard! A burning battery releases hazardous and potentially explosive liquids and fumes that can lead to corrosion injuries, burns or explosions.
▶ Wear your personal protective equipment when you tackle a battery fire.
- Provide sufficient venting to permit hazardous and potentially explosive fumes to escape.
Leave the room immediately in case of intense smoke emission. - Consult a doctor in case of any skin or respiratory irritation.
- Alert the fire service before you start tackling the fire.
▶ Use only water to tackle a battery fire and keep as far from the fire as effective extinguishing permits. Powder fire extinguishers and fire blankets are ineffective with Li-ion batteries. Fire in nearby materials can be extinguished with appropriate extinguishing agents. - Do not try to move large quantities of burning batteries. Instead, isolate the batteries by removing unaffected materials from the immediate vicinity.
In the case of a battery that does not cool down, or a smoking or burning battery:
- Scoop the battery up with a shovel and drop it into a bucket of water, which will reduce the risk of igniting adjacent cells that have not yet reached run-away temperature.
Leave the battery in the bucket for at least 24 hours until it has cooled down completely.
▶ See the section headed What to do in case of damaged batteries.
Shipping and storage
- Ambient operating temperature to be kept between -17°C and +60°C / 1°F and 140°F.
Storage temperature to be kept between -20°C and +40°C / -4°F and 104°F. -
Do not store batteries on the charger. Always remove the battery from the charger when the charging operation has completed.
-
Store batteries in a cool and dry place. Cool storage will increase battery life. Never store batteries where they are exposed to direct sunlight, on sources of heat or behind glass.
- Do not send batteries through the mail. Consult your shipper for instructions on how to ship undamaged batteries.
▶ Never transport batteries in bulk form (loose, unprotected). During transport, batteries should be protected from excessive shock and vibration and isolated from any conductive materials or other batteries that may come in contact with the terminals and cause a short circuit. Comply with the locally applicable regulations for transporting batteries.
Maintenance and disposal
- Keep the battery free of oil and grease. Do not permit dust or dirt to accumulate unnecessarily on the battery. Clean the battery with a dry, soft brush or a clean, dry rag.
▶ Never use a battery with clogged ventilation slots. Clean the ventilation slots carefully using a dry, soft brush.
▶ Prevent unnecessary exposure of the battery to dust or debris and never subject the battery to soaking moisture (e.g., submerged in water or left out in the rain).
If a battery is exposed to soaking moisture, treat it as a damaged battery and isolate it in a non-flammable container.
▶ See the section headed What to do in case of damaged batteries.
- Improper disposal may cause health hazards from leaking gases or fluids. Dispose of the battery at your Hilti Store, or consult your local governmental garbage disposal or public health and safety resources for disposal instructions. Comply with the locally applicable regulations for transporting damaged batteries!
- Do not dispose of batteries as household waste.
- Dispose of your battery out of the reach of children. Cover the terminals with a non-conductive material (such as electrical tape) to prevent short circuiting.
① Accu
② Statusweergave accu
③ Accu-ontgrendelingstoets
④ Statusaanduiding acculader
⑤ Gaten voor wandmontage
⑥ Accu-interface
natural_image
3D model of a mechanical component with a labeled part (6), no visible text or symbols on the object itself.3.2 Correct gebruik
natural_image
3D model of a mechanical housing component with a numbered label pointing to a feature (no text or symbols on the housing itself)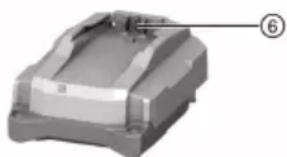
natural_image
3D model of a mechanical component with a labeled part (6), no visible text or symbols beyond the label.natural_image
3D model of a mechanical housing component with labeled part (6), no visible text or symbols beyond the label
natural_image
3D model of a mechanical housing component with a numbered callout (no text or symbols on the part itself)
natural_image
3D model of a mechanical component with a labeled part (6), no visible text or symbols on the object itself.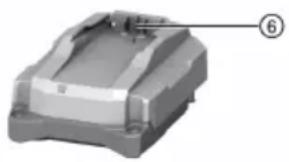
natural_image
3D model of a mechanical component with a numbered label pointing to a feature (no text or symbols on the object itself)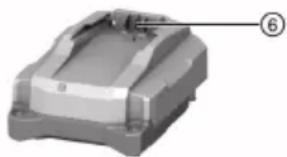
natural_image
3D model of a mechanical housing component with a labeled part (6), no visible text or symbols on the object itself.① Batteri
② Statusindikator batteri
③ Låseknapp for batteri
④ Driftsmodusindikator for lader
⑤ Hull for veggmontering
⑥ Batterigrensesnitt
3.2 Forskriftsmessig bruk
Det beskrevne produktet er en bærbar lader for Hilti Li-Ion-batterier med en nominell spenning på 21,6 V.

natural_image
3D rendered mechanical part with a numbered annotation (6) pointing to a feature, no visible text or symbols on the object itself.natural_image
3D model of a mechanical component with labeled part (6), no visible text or symbols beyond the labelnatural_image
3D model of a mechanical component with a labeled part (6), no visible text or symbols on the object itself.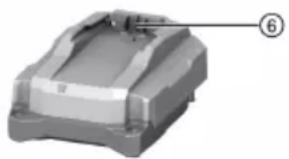
natural_image
3D model of a mechanical housing component with a numbered label pointing to a feature (no text or symbols on the housing itself)
natural_image
3D model of a mechanical component with labeled part (6), no visible text or symbols beyond the number markernatural_image
3D model of a mechanical component with a numbered annotation (6) pointing to a feature on the top surface.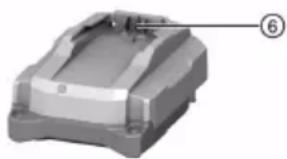
natural_image
3D model of a mechanical housing component with labeled part (6), no visible text or symbols beyond the label① Akumulatorska baterija
② Indikator stanja akumulatorske baterije
③ Gumb za sprostitev akumulatorske baterije
④ Prikaz stanja polnilnika
⑤ Luknje za namestitev na steno
⑥ Vmesnik za akumulatorsko baterijo
3.2 Namenska uporaba
Opisani izdelek je prenosni polnilnik za litij-ionske akumulatorske baterije Hilti z nazivno napetostjo 21,6 V.

natural_image
3D model of a mechanical housing component with mounting holes and a numbered label (6) pointing to a feature on the top surface.① Akumulatorska baterija
② Statusni prikaz akumulatorske baterije
③ Tipka za deblokadu akumulatorske baterije
④ Indikator radnog stanja punjača
⑤ Rupe za montažu na zid
⑥ Sučelje akumulatorske baterije
① Akumulatorska baterija
② Prikaz statusa akumulatorske baterije
③ Taster za deblokiranje baterije
④ Prikaz radnog stanja punjača
⑤ Otvori za montažu na zid
⑥ Priključak za akumulatorsku bateriju
3.2 Namenska upotreba
Opisani proizvod je mobilni punjač za Hilti Li-lon akumulatorske baterije sa nazivnim naponom od 21,6 volti. Namenjen je, u zavisnosti od nacionalne izvedbe, za priključivanje na utičnice od 100 V do 127 V ili od 220 do 240 V naizmeničnog napona.
Punjač možete da postavite na ravnoj površini ili da montirate na zid.
- Hilti litijum-jonske akumulatorske baterije koje su odobrene za ovaj proizvod možete pogledati u ovoj listi.
- Nisu sve akumulatorske baterije dostupne na svim tržištima.
Podaci o proizvodu
| Punjač C 4-22 | |
| Generacija 02 | |
| Serijski br. 1 - 999999999999 |
3.3 Prikaz radnog stanja punjača
| Stanje Značenje | |
| LED lampica svetli zeleno. Punjač je spreman za rad. | |
| LED lampica ne svetli. Punjač nije spreman za rad. | |
3.4 Prikazi Li-Ion akumulatorske baterije tokom postupka punjenja
Kada je Hilti Nuron Li-Ion akumulatorska baterija priključena na punjač Hilti, prikaz statusa akumulatorske baterije pokazuje stanje punjenja i eventualne poruke o grešci.
| Stanje Značenje | |
| Jedna (1) LED dioda treperi polako zeleno | Akumulatorska baterija se puni, nivo napunjenosti: ≤ 20% |
| Jedna (1) LED lampica svetli zeleno, a jedna (1) LED lampica polako treperi zeleno | Akumulatorska baterija se puni, nivo napunjenosti: 21% do 40% |
| Dve (2) LED lampice svetle zeleno, a jedna (1) lampica polako treperi zeleno | LARumulatorska baterija se puni, nivo napunjenosti: 41% do 60% |
| Tri (3) LED lampice svetle zeleno, jedana (1) LED lampica polako treperi zeleno | DAkumulatorska baterija se puni, nivo napunjenosti: 61% do 80% |
| Četiri (4) LED lampice svetle zeleno | Akumulatorska baterija se puni, nivo napunjenosti: ≥ 80% |
| Ne svetli nijedna LED lampica Akumulatorska baterija je potpuno napunjena, postupak punjenja je okončan. | |
| Jedna (1) LED lampica brzo treperi žuto, zatim je postupak punjenja je prekinut. Akumulatorska baterija se možda nalazi van dozvoljenog opsega temperature.Postupak punjenja se automatski nastavlja čim sponovo ostvare potrebni parametri. Ukoliko je potrebno, akumulatorsku bateriju dovedite na preporučenu radnu temperaturu. | |
| Jedna (1) LED dioda treperi brzo crveno Li-lon akumulatorska baterija je blokirana i više ne može da se upotrebljava. Obratite se Hilti servis | |
3.5 Prikazi stanja Li-Ion akumulatorske baterije
Hilti preporučuje da pre svakog postupka punjenja proverite stanje akumulatorske baterije.
Za očitavanje stanja akumulatorske baterije, držite pritisnut taster za deblokiranje akumulatorske baterije više od tri sekunde. Sistem ne prepoznaje potencijalne nepravilne funkcije baterije usled zloupotrebe, kao što su npr. pad, ubodi, eksterna oštećenja od toplote.
| Stanje Značenje | |
| Sve LED diode svetle kao radno svetlo i jedna LED dioda nakon toga svetli konstantno zeleno. | 1)Akumulatorska baterija može dalje da se koristi. |
| Sve LED diode svetle kao radno svetlo i nakon jedna (1) LED dioda brzo treperi žuto. | 1)dgat prikaza stanja akumulatorske baterije nije mo-gao da izvrši. Ponovite postupak ili se obratite Hilti servisu. |
| Sve LED diode svetle kao radno svetlo i jedna LED dioda nakon toga svetli konstantno crveno. | 1)Ako priključeni proizvod može i dalje da se koristi, preostali kapacitet baterije je manji od 50%. Ako priključeni proizvod više ne može da se koristi, akumulatorska baterija je na kraju svog roka trajanja i potrebno je da se zameni. Obratite se Hilti servisu. |
natural_image
3D model of a mechanical housing component with a numbered label pointing to a feature (no text or symbols on the housing itself)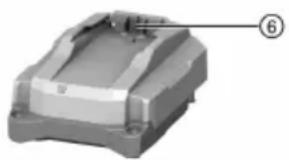
natural_image
3D model of a mechanical housing component with a numbered label pointing to a feature (no text or symbols on the housing itself)
natural_image
3D model of a mechanical component with a labeled part (6), no visible text or symbols on the object itself.
natural_image
3D model of a mechanical component with labeled part (6), no visible text or symbols beyond the label
natural_image
3D model of a mechanical housing component with a numbered label pointing to a feature (no text or symbols on the housing itself)
natural_image
3D model of a mechanical housing component with labeled part (6), no visible text or symbols beyond the label

- C 4-22 (02)
- Original operating instructions
- Information about the operating instructions
- About these operating instructions
- Explanation of symbols
- Warnings
- DANGER
- DANGER !
- WARNING
- WARNING !
- CAUTION
- CAUTION !
- Symbols in the operating instructions
- Symbols in illustrations
- Product-dependent symbols
- Symbols on the product
- Safety
- General safety instructions
- Battery charger use and care
- Careful handling and use of batteries
- Description
- Product overview
- Intended use
- Status indicators of the Li-ion battery during charging
- Indicators showing the state of health of the Li-ion battery
- Items supplied
- Technical data
- Operation
- Switching on charger and charging battery
- Care and maintenance
- Care
- Maintenance
- Replacing the supply cor 2
- Materials
- Transport and storage
- Transport
- Storage
- Troubleshooting
- Disposal
- FCC statement (applicable in US) / IC statement (applicable in Canada)
- Manufacturer's warranty
- Further information
- Hilti Li-ion batteries
- Instructions for safety and use
- Description
- Safety
- HILTI
- What to do in case of damaged batteries
- What to do in case of dysfunctional batteries
- What to do in case of a battery fire
- In the case of a battery that does not cool down, or a smoking or burning battery:
- Shipping and storage
- Maintenance and disposal
- Correct gebruik
- Forskriftsmessig bruk
- Namenska uporaba
- Namenska upotreba
- Prikaz radnog stanja punjača
- Prikazi Li-Ion akumulatorske baterije tokom postupka punjenja
- Prikazi stanja Li-Ion akumulatorske baterije
Brand : HILTI
Model : NPU 10022
Category : Grinder