
IHC200 - Humidifier Inkbird - Free user manual and instructions
Find the device manual for free IHC200 Inkbird in PDF.

| Product Type | Humidity Controller |
| Brand | Inkbird |
| Model | IHC200 |
| Power Supply | 100-230 V~, 50/60 Hz, 10 A |
| Maximum Power | 1200 W (120 V~) / 2200 W (220 V~) |
| Humidity Measurement Range | 10 to 99% RH |
| Humidity Accuracy (10-95% RH) | Typical ±3% RH, Max ±5% RH |
| Display Resolution | 0.1% RH |
| Operating Temperature | -20 to 40°C / -4 to 104°F |
| Storage Temperature | 0 to 60°C / 32 to 140°F |
| Storage Humidity | 20 to 80% RH (non-condensing, no frost) |
| Main Functions | Humidification and dehumidification control, dual relay output, PV/SV displays, calibration, high/low alarms, dehumidification delay, built-in Wi-Fi |
| Connectivity | Wi-Fi 2.4 GHz, Inkbird Pro app (iOS/Android) |
| Safety | Probe fault detection (ER display), audible alarm, auto shutdown |
| Maintenance and Cleaning | Unplug before cleaning; do not immerse; use a dry cloth |
| Spare Parts and Repairability | External humidity probe, power cable; professional repair recommended |
| Warranty | Controller: 2 years; Probe: 1 year |
| Dimensions (approx.) | 13 x 9 x 5 cm (estimated) |
| Weight (approx.) | 250 g (estimated) |
| Package Contents | Controller, probe, power cable, quick guide |
Frequently Asked Questions - IHC200 Inkbird
User questions about IHC200 Inkbird
0 question about this device. Answer the ones you know or ask your own.
Ask a new question about this device
Download the instructions for your Humidifier in PDF format for free! Find your manual IHC200 - Inkbird and take your electronic device back in hand. On this page are published all the documents necessary for the use of your device. IHC200 by Inkbird.
USER MANUAL IHC200 Inkbird
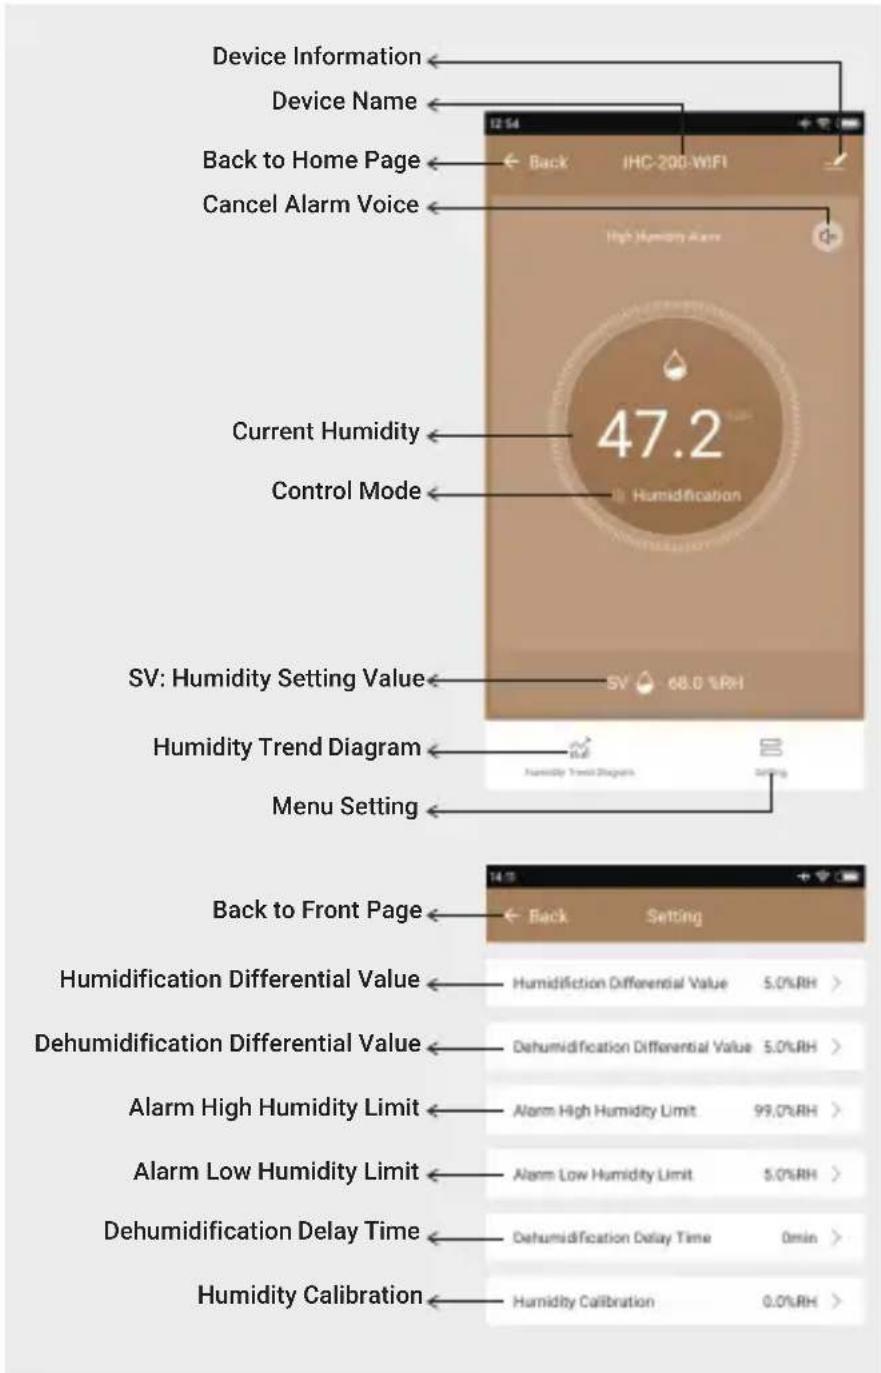
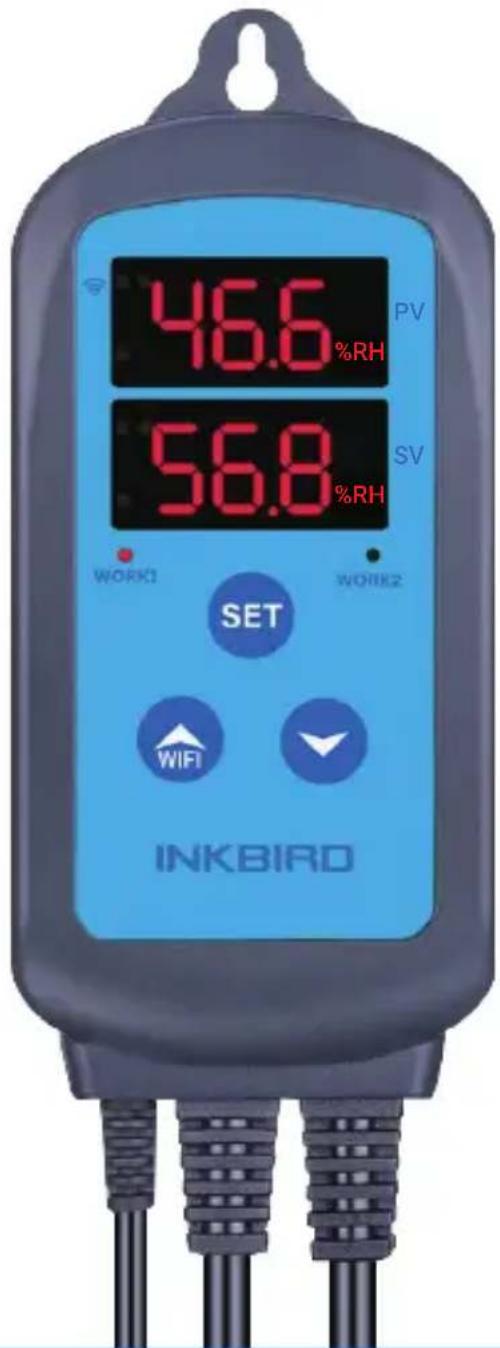
(1) PV: In the normal mode, it displays current humidity; in the setting mode, it displays menu code.
(2) SV: In the normal mode, it displays the setting humidity value; in the setting mode, it displays the setting value.
③ Red Indicator Light: The indicator light will turn red when the humidification output is on and the indicator light will turn off when the humidification output is off.
4 / 5 Green Indicator Light: The indicator light will turn green when the dehumidification output is on and the indicator light will turn off when the humidification output is off. If the green indicator light blinks, the device is in the mode of dehumidification delay protection state and the humidification output is off.
(6) WORK1: Humidification Output Socket.
(7) WORK2: Dehumidification Output Socket.
Setting Button (SET) , Increase Button (↑) , Decrease Button (↓) : More details on Settings.
02 Product Features
Plug-n-Play
- Dual Relay Output: Support both humidifying equipment and dehumidifying equipment at the same time.
- Display Screens: Display set humidity value and the measured humidity value at the same time.
- Support Humidity Calibration
- Support Dehumidification Control Delay Protection
- Settable High/Low Humidity Alarm
Probe Fault Alarm
Wi-Fi Smart App
03 Specifications
Voltage: 100-230Vac 50/60Hz
Current: 10A
Maximum Power: 1200W (120Vac), 2200W (220Vac)
- Humidity Measurement Range:10~99%RH
- Humidity Display Accuracy: 0.1% RH
- Relative Humidity Accuracy (10% to 95%RH): Typ: ±3%RH, Max: ±5%RH
- Display Unit: %RH
- Operating Ambient Temperature: -20°C~40°C/-4°F~104°F
Storage Temperature: 0^ 60^ / 32^ 140^
Storage Humidity: 20 80% RH
(not frozen or dewed)
Warranty:
Controller: 2 years
Probe: 1 year
04 Wi-Fi Connection
4.1 Download Inkbird Pro App
Search the keyword "Inkbird Pro" in Appstore or Google Play to get the app, or you can scan the following QR code directly to download and install the app.

Scan QR code to download
Inkbird Pro APP
4.2 Connect to your phone
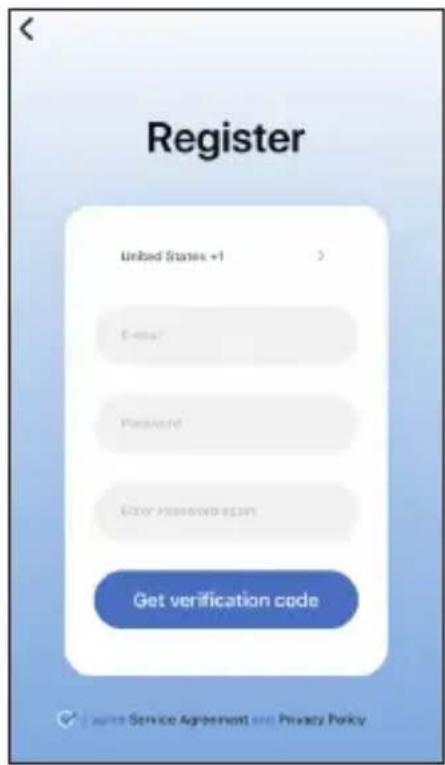
① Register before using the Inkbird Pro app.
Select your Country/Region, enter your e-mail, then a verification code will be sent to your mailbox, enter it to confirm your identity and the registration is done.
(2) Then press "Add Home" button to create your home.
③ Tap "+" or "add device" button in home page of the APP to add the device.
4 Press and hold the button for 2 seconds to reset the Wi-Fi when the controller is under normal working state. The controller will enter the Smartconfig configuration state by default. You can short press the button to switch between the Smartconfig configuration mode and the AP mode.
As the WIFI module need time for data processing, so it will take about 5 seconds to display the corresponding LED symbol and state if the Wi-Fi states change.
4.3 Quick Connection
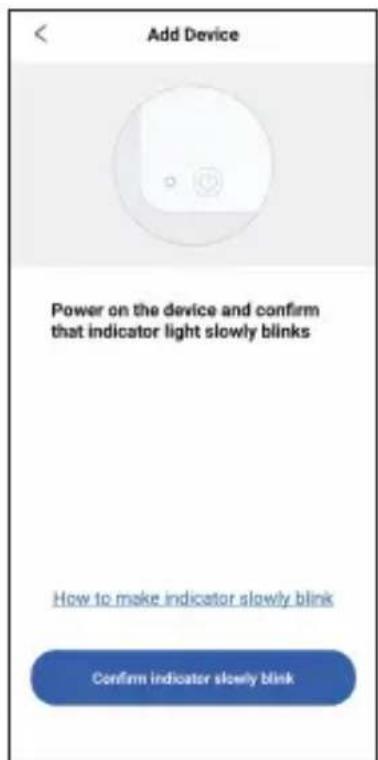
(1) Plug the device in the socket and make
sure that the device is in the Smartconfig state (the LED symbol is flashing rapidly, interval flashing 250ms).
(2) Check if the LED symbol is blinking rapidly and confirm on your app if it is, then enter your Wi-Fi password to connect to wireless network, click "Confirm" to connect the device.
Note: The device only supports 2.4GHz Wi-Fi router.
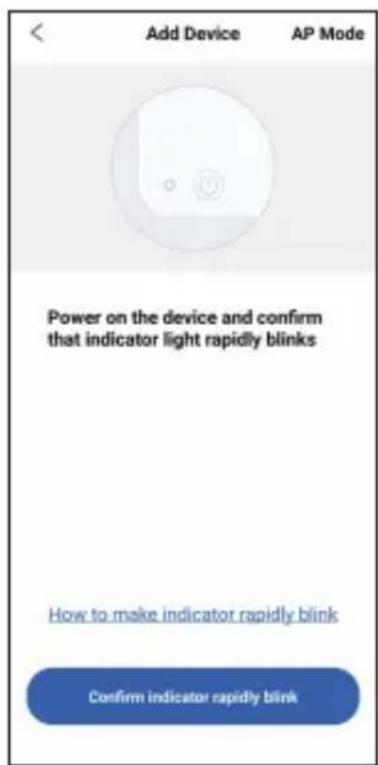
4.4 Connect the device in AP mode
① Plug the device in the socket and make sure that the device is in the AP Configuration State (the LED symbol is flashing slowly, interval flashing 1500ms).
② Click "Confirm indicator slowly blink" ar then select Wi-Fi network, enter Wi-Fi password, click "Confirm" to enter
connection process.
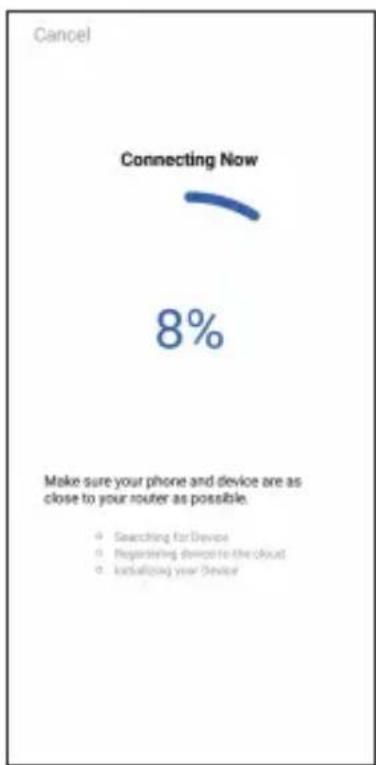
③ Press "Connect now" and it will go to your WLAN Setting interface on your smart phone, select the "SmartLife-XXXX" to directly connect to the router without putting in password.
④ Go back to the app to enter into the automatic connection interface.
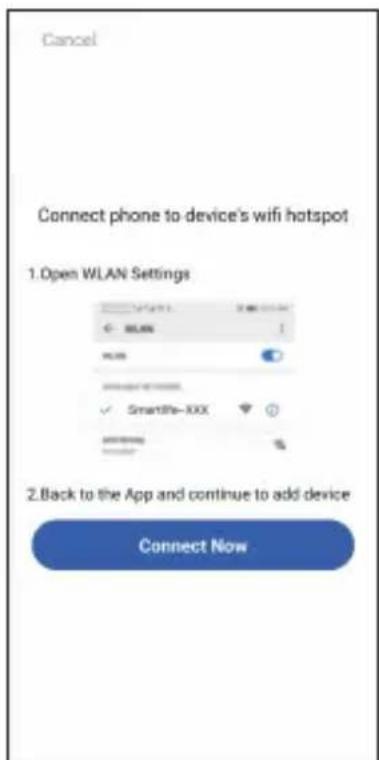
⑤ Click "Done" after adding device successfully and enter into the device controlling interface.
⑥ In the humidity control mode, users can do some control function settings with the app.
4.5 Wi-Fi State
- Smartconfig State: The Wi-Fi indicator light is flashing rapidly, interval flashing 250ms.
- AP State: The Wi-Fi indicator light is flashing slowly interval flashing 1500ms.
- Connection Fail State: The Wi-Fi indicator light turns off.
- Connection Succeed State: The Wi-Fi indicator light keeps on.
05 Settings
5.1 Key Setting
5.1.1 Factory Reset
Hold the button and turn on the device, the buzzer will beep shortly to remind the users that all parameters of the the humidity probe are restored to factory settings.
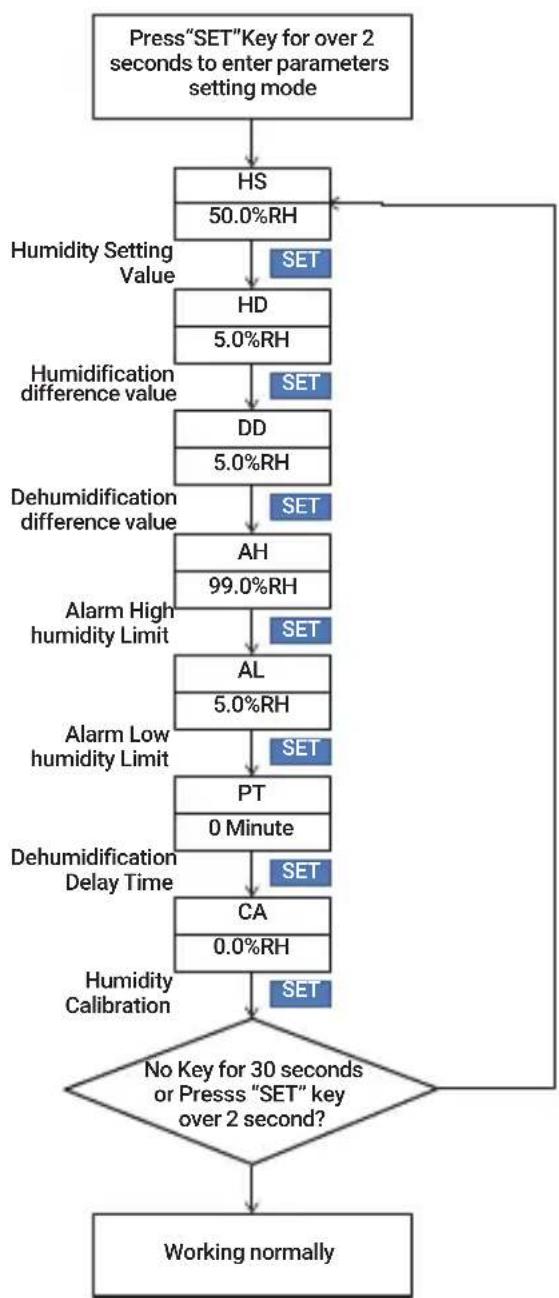
5.1.2 Fast Setting
Press the SET button lightly to enter quick set-up mode and set the value, the SV screen will display the current setting value and keep flashing. Press the button or the button to change the value, hold the button or the button to change the value quickly, press the SET button again to save settings and quit the setting mode, the controller will also save settings and quit the setting mode if there is no operation for 10 seconds.
5.1.3 Normal Setting
Hold the button for 2 seconds to enter setting mode when the controller working normally, the PV screen will display the code "HS" of the first menu item and the SV screen will display the corresponding setting value. Press the button to switch between menu items, press the button or
the button to change the value, the value will be saved automatically when you switch to another menu item by pressing the SET button.
Press and hold the SET button for 2 seconds to save settings and quit the setting mode, the controller will also quit the setting mode and turn to normal working mode if there's no operation for 30 seconds.
5.2 Flowchart of the Settings
5.3 Icons in this Manual
| IconSymbol Function | Setting Range | factory Settings | Note | ||
| HS | HS | Humidity Setting Value | 5.0%RH~99.0%RH 50.0%RH | 6.1 | |
| HD | HD | Humidification Difference Value | 1.0%RH~20.0%RH 5.0%RH See | ||
| DD | dd | Dehumidification Difference Value | 1.0%RH~20.0%RH 5.0%RH | ||
| AH | RH | Alarm High Humidity Limit | 5.0%RH~99.0%RH 99.0%RH | See 6.2 | |
| AL | AL | Alarm Low Humidity Limit | 5.0%RH~99.0%RH | 5.0%RH | |
| PT | PT | Dehumidification Delay Time | 0~10 Minutes 0 Minute | See 6.3 | |
| CA Humidity Calibration -20.0%RH~20.0%RH 0.0%RH | See 6.4 | ||||
06 Basic Operations
6.1 Instructions for Humidity Control Setting(HS,HD,DD)
The PV Screen displays the measured value of current humidity when working normally, recognize and switch between humidification mode and dehumidification mode automatically.
If the measured Humidity (PV) ≤ Humidity Setting Value (HS)-Humidification Differential Value (HD), the equipment will enter humidification state, the red led is on, WORK1 output socket turns on. If the measured Humidity (PV) ≥ Humidity Setting Value (HS), the red led is off, WORK1 output socket turns off.
If the measured Humidity (PV) ≥ Humidity Setting Value (HS) + Dehumidification Differential Value (DD), the equipment will enter dehumidification state, the green led is on, WORK2 output socket turns on. If the green led is blinking, indicating that the dehumidification device is in the state of the dehumidification delay protection, WORK2 output socket turns off. If the measured Humidity (PV) ≤ Humidity Setting Value (HS), the green led is off, WORK2 output socket turns off.
Example: HS=50.0%RH, HD=5.0%RH, DD=8.0%RH, If PV (the measured humidity) ≥ 58.0%RH (HS+DD), the equipment will enter the dehumidification state, the green led is on, WORK2 output socket turns on. If PV ≤ 55.0%RH (HS), the green led is off, WORK2 output socket turns off.
If PV ≤ 45.0% RH (HS-HD), the equipment will enter the humidification state, the red led is on, WORK1 output socket turns on. If PV ≥ 50.0% RH (HS), the red led is off, WORK1 output socket turns off.
Note: There is no need to judge the differential value of humidification or dehumidification when power on or exiting the setting state. For example: when power on or exiting the setting state HS=50.0%RH, HD=5.0%RH, DD=8.0%RH. If PV (the measured humidity) > 50.0%RH (HS), it will enter the dehumidification state. When PV ≤ 50.0%RH (HS), the dehumidification stops, then return to normal humidity control mode. If PV < 50.0%RH, it will enter the humidifica
tion state. When PV ≥ 50.0% RH, the humidification stops, then return to normal humidity control mode.
6.2 High/Low Humidity Alarm (AH,AL)
The equipment will alarm if the value of measured humidity (PV) ≥ the set value of high humidity alarm (AH), the PV screen will display the set value of high humidity alarm (AH) and the current humidity value alternately, the buzzer will alarm like "bi-bi-Biii" until the value of measured humidity (PV) < the set value of high humidity alarm (AH). You can also stop the alarming by pressing any button of the equipment.
The equipment will alarm if the value of measured humidity (PV) ≤ the set value of Low humidity alarm (AL), the PV screen will display the set value of low humidity alarm (AL) and the current humidity value alternately, the buzzer will alarm like "bi-bi-Biii" until the value of measured humidity (PV) > the set value of low humidity alarm (AL). You can also stop the alarming by pressing any button of the equipment.
Note: The setting value of low humidity alarm (AL) should be less than the setting value of high humidity alarm(AH).
6.3 Dehumidification Delay Time (PT)
The equipment will not start immediately in
the mode of dehumidification for the first time if the measured value is larger than the sum value of set humidity value and dehumification return difference, the equipment will start to dehumidify after the set delay time.
The equipment will dehumidify immediately if the interval time of two adjacent dehumidification is longer than the delay time. The equipment will dehumidify after delay time if the interval time of two adjacent dehumidification is shorter than the delay time.
The delay time start timing when last dehumidification is done.
Note: There is no need to judge the delay time when power on or exiting the setting state.
6.4 Humidity Calibration (CA)
If the measured humidity differs from the standard humidity, you can calibrate the device by adding or reducing the correction value to align the measured humidity to the standard humidity. The calibrated humidity = the measured humidity value + the calibration value.
07 Sensor Fault Alarm
If the humidity sensor is in circumstances of short circuit or open circuit, the controller will enter probe fault mode and stop running, the buzzer will alarm and the screen will display ER. You can press any key to stop the buzzer and the controller will back to normal working state when all malfunctions are resolved.
08 Important Safeguards
It's important that you take special care when using electrical appliances. Follow our tips to stay safe.
- Read all instructions.
- Check that flexible leads and the appliance are in good condition.
- Check your plug sockets are not overloaded with too many electrical appliances as this can lead to overheating.
- Do not use appliance for other than intended use.
- Do not cut the cord, or put it on hot surfaces.
- Do not place on or near a hot gas or electric burner, or in a heated oven.
-
Don't try to clean or repair the appliance when it is still plugged in.
-
Don't wrap flexible cables around the appliance when it is still warm.
- Switch off the device when not in use.
- Please disconnect the power as soon as possible if the device falls into the water, the Warranty does not include water damage.
- This appliance is not intended for use by persons (including children) with reduced physical, sensory or mental capabilities, or lack of experience and knowledge, unless they have been given supervision or instruction concerning use of the appliance by a person responsible for their safety. Children should be supervised to ensure that they do not play with the appliance. Close supervision is necessary when any appliance is used by or near children.
09 Warranty
This Limited Warranty applies only to Inkbird IHC-200-WIFI Humidity Controller.
What is Covered and for How Long
Inkbird warrants that all new products are free from defects in manufacturing, materials and workmanship for a period of one year from date of retail purchase.
What this Warranty Does not Cover
The warranty does not cover defects or malfunction caused by misuse, abuse or improper maintenance, failure to follow operating instructions, or use with equipment with which it is not intended to be used. Also, the warranty will not apply to damage caused by unauthorized alteration, modification or repair of the product. Inkbird does not warrant or provide service or support for any third party products, including, but not limited to iPhones and Android Phones.
How to Obtain Warranty Service
To obtain warranty service for products purchased from a third-party, retail or directly from Inkbird you must return the product with proof of purchase using the following procedures:
- Contact Inkbird Customer Support for specific return and shipping instructions by email.
Email Address: support@ink-bird.com You may be asked to complete a warranty service request form. And to help ensure warranty claims are for Inkbird products, our technical support department may also require you to email a copy of your purchase receipt to us.
- Label and ship the product, freight prepaid, to the address provided by Inkbird.
Exclusions and Limitations
THIS WARRANTY IS YOUR EXCLUSIVE WARRANTY AND REPLACES ALL OTHER WARRANTYES OR CONDITIONS, EXPRESS OR IMPLIED, INCLUDING, BUT NOT LIMITED TO, ANY IMPLIED WARRANTY OR CONDITIONS OF MERCHANTABILITY OR FITNESS FOR A PARTICULAR PURPOSE. AS SOME STATES OR JURISDICTIONS DO NOT ALLOW THE EXCLUSION OF EXPRESS OR IMPLIED WARRANTYES, THE ABOVE EXCLUSION MAY NOT APPLY TO YOU. IN THAT EVENT, SUCH WARRANTYES APPLY ONLY TO THE EXTENT AND FOR SUCH DURATION AS REQUIRED BY LAW AND ARE LIMITED IN DURATION TO THE WARRANTY PERIOD. AS SOME STATES OR JURISDICTIONS DO NOT ALLOW LIMITATIONS ON THE DURATION OF AN IMPLIED WARRANTY, THE ABOVE LIMITATION ON DURATION MAY NOT APPLY TO YOU.
IHC-200-WIFI

Scan QR code to download
Inkbird Pro APP
4.2 Collegare ad Uno Smartphone

Scan QR code to download
Inkbird Pro APP
DD=8.0%rF. Wenn PV (die gemessene
What this Warranty Does not Cover
The warranty does not cover defects or malfunction caused by misuse, abuse or improper maintenance, failure to follow operating instructions, or use with equipment with which it is not intended to be used. Also, the warranty will not apply to damage caused by unauthorized alteration, modification or repair of the product. Inkbird does not warrant or provide service or support for any third party products, including, but not limited to iPhones and Android Phones.
Quittung an uns.Label and ship the product, freight prepaid, to the address provided by Inkbird.
Support@ink-bird.com
www.ink-bird.com
+86-755-25738050
Shenzhen,GD,518000,China
