Recital 61 - Piano ALESIS - Free user manual and instructions
Find the device manual for free Recital 61 ALESIS in PDF.
| Product Type | Portable Digital Piano |
| Brand | Alesis |
| Model | Recital 61 |
| Number of Keys | 61 keys (velocity-sensitive) |
| Voices | 10 voices (5 original + 5 variations) |
| Polyphony | 64 notes (estimated) |
| Effects | Reverb (5 types), Chorus (5 types) |
| Modes | Split, Layer, Lesson, Metronome |
| Advanced Functions | Transpose, Touch Sensitivity (3 levels + off), Voice Volume, MIDI Channel |
| Power | 9V DC power adapter (included) or 6 AA batteries (not included) |
| Connectivity | USB MIDI, Line outputs (R/L mono), Headphone output (6.35 mm), Sustain pedal input |
| Speakers | Built-in (disabled when headphones connected) |
| Dimensions (approx.) | 100 cm (W) x 30 cm (D) x 10 cm (H) |
| Weight (approx.) | 5 kg |
| Included Accessories | Music stand, power cable, user guide |
| Sustain Pedal | Not included (optional compatible pedal) |
| Auto Power Off | After 30 minutes of inactivity (disablable) |
| Care and Cleaning | Wipe with a dry, soft cloth. Do not use solvents or abrasive cleaners. |
| Safety | Do not expose to moisture, extreme temperatures or shocks. Use only the included adapter. |
| Spare Parts and Repairability | Repairs must be performed by a qualified technician. Spare parts available through Alesis after-sales service. |
Frequently Asked Questions - Recital 61 ALESIS
User questions about Recital 61 ALESIS
0 question about this device. Answer the ones you know or ask your own.
Ask a new question about this device
Download the instructions for your Piano in PDF format for free! Find your manual Recital 61 - ALESIS and take your electronic device back in hand. On this page are published all the documents necessary for the use of your device. Recital 61 by ALESIS.
USER MANUAL Recital 61 ALESIS
User Guide (English)
Introduction
Box Contents
Recital 61 Digital Piano
User Guide
Power Adapter
Safety & Warranty Manual
Music Rest
Support
For the latest information about this product (system requirements, compatibility information, etc.) and product registration, visit alesis.com.
For additional product support, visit alesis.com/support.
Setup
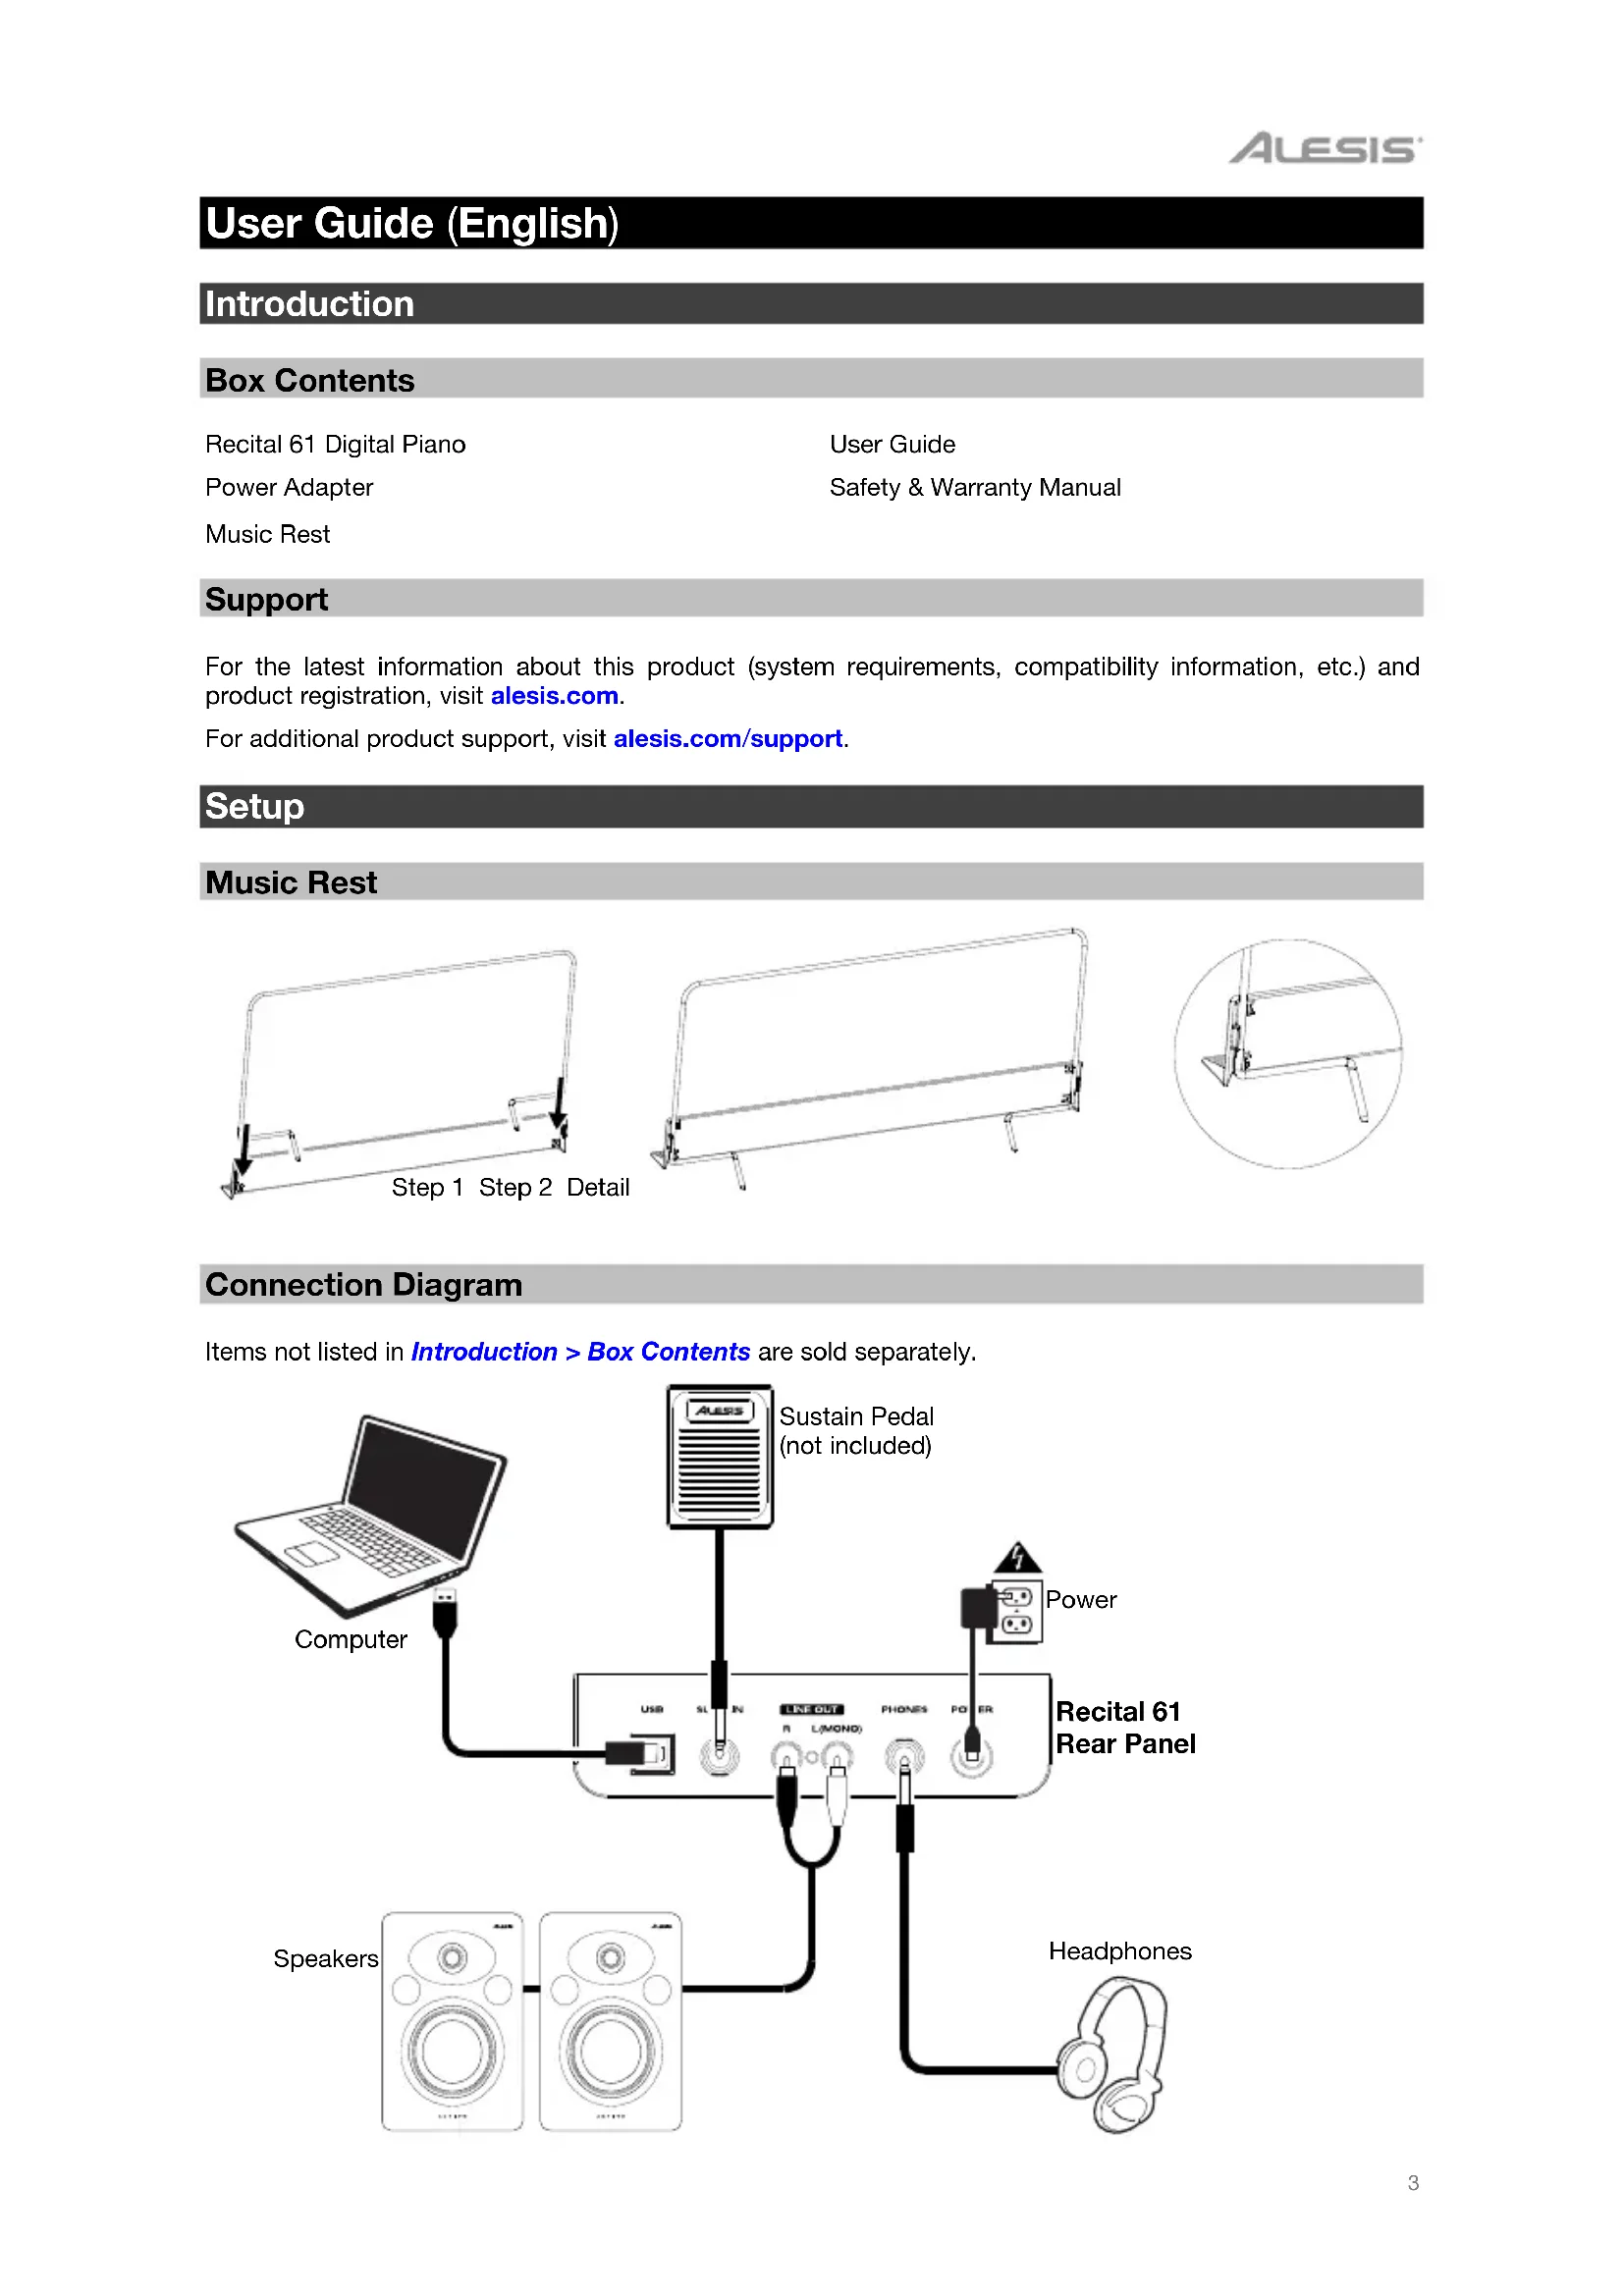
Music Rest
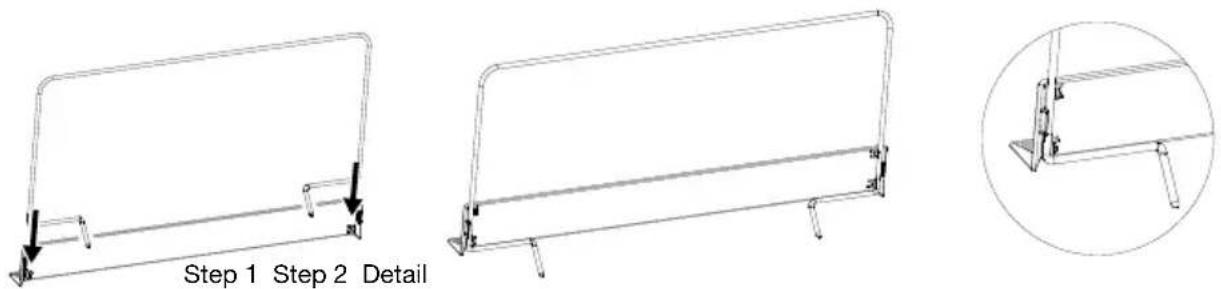
Connection Diagram
Items not listed in Introduction > Box Contents are sold separately.

flowchart
graph TD
    A["Computer"] --> B["USB"]
    B --> C["SL"]
    C --> D["IN"]
    D --> E["LREF OUT"]
    E --> F["R"]
    F --> G["L(MOND)"]
    G --> H["PHONES"]
    H --> I["POWER"]
    I --> J["Power"]
    K[" Speakers"] --> L["Headphones"]
    M["Sustain Pedal (not included)"] --> N["Power"]
Features
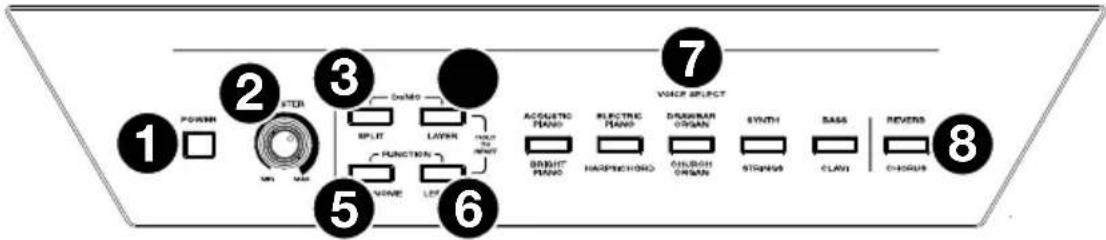
Top Panel
text_image
1 POWER 2 STER 3 DMMO 5 INPUT 6 LAYER 7 VANCE SELECT 8 ACQUASTRO PLANS 9 ELECTRIC PLANS 10 DRUMBRAN ORGAN 11 STRONG 12 SENS 13 CLAVI 14 REVERS 15 CHORUS- Power: This switch turns the piano's power on or off. In order to save energy, the piano will automatically shut down after 30 minutes if it is not used.
- Master Volume: This knob adjusts the master volume for the Line Output and Headphone Output.
Note: The internal speakers will be muted if there are headphones plugged into the Headphone Output. If the internal speakers do not produce any sound, make sure the Master Volume knob is not set too low and that headphones are not plugged into the Headphone Output.
- Split: Press this button to enter or exit Split Mode. Press the Split button and the Layer button at the same time to start Demo playback.
- Layer: Press this button to enter or exit Layer Mode. Press the Layer button and the Split button at the same time to start Demo playback. Press and hold the Layer button and the Lesson button at the same time for 5 seconds to reset the Recital 61 to its factory default settings.
- Metronome: Press this button to turn the metronome on or off. Press the Metronome button and the Lesson button at the same time to enter Advanced Function Mode.
- Lesson: Press this button to turn the Lesson Mode on or off. Press the Lesson button and the Metronome button at the same time to enter Advanced Function Mode. Press and hold the Lesson button and the Layer button at the same time for 5 seconds to reset the Recital 61 to its factory default settings.
- Voice Select: Press one of these buttons to select a preset voice. See Operation > Voices to learn more.
- Reverb/Chorus: Press this button to turn the reverb and/or chorus effects on or off. See Operation >Effects to learn more.
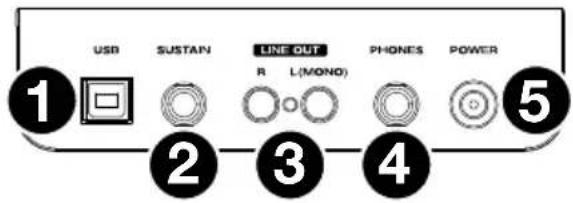
Rear Panel
- USB Port: Allows for transfer of MIDI data to a computer.
- Sustain Pedal Input: Connect the included sustain pedal here.
- Line Output: Connect external audio equipment such as an amplifier, mixer, or recorder. Use the R and L outputs for stereo output or just the L output for mono output.
- Headphone Output: Connect stereo headphones with a 1/4" (6.35mm) stereo connector. When headphones are connected, the internal speakers will automatically turn off and sound will only be heard from the headphones.
- Power Connector: Connect the included power adapter here.
Bottom Panel
- Battery Compartment: Install 6 "AA" batteries here to power the Recital 61 digital keyboard if you are not using the power adapter.
text_image
USB SUSTAIN LINE OUT R L(MONO) PHONES POWER 1 2 3 4 5
natural_image
Simple diagram with a monitor, an arrow pointing up, and a numbered circle (1) above it, no text or symbols present.Operation
Demos
Playing Demo Songs
The Recital 61 Digital Piano features 2 demo songs.
To play the demo songs:
- Press and release the Split and Layer buttons at the same time. The Recital 61 will enter Demo Mode and play the demo songs in a continuous loop. The two button LEDs will flash during demo playback.
- To exit Demo Mode, press and release the Split and Layer buttons again.
Playing Voice Demos
Each Voice on the panel is preset with a voice demo. Hold the Split and Layer buttons together, then press one of the Voice buttons to play a voice demo.
Voices
The Recital 61 digital piano features 10 voices. Each of the 5 Voice buttons has an Original voice and a Variation voice to choose from:
| Button No. | Original / Variation Voice Name |
| 1 Acoustic Piano | / Bright Piano |
| 2 Electric Piano | / Harpsichord |
| 3 Drawbar Organ | / Church Organ |
| 4 | Synth / Strings |
| 5 Bass / Clavi |
To choose one of the Original voices, press the corresponding Voice button. The button LED will be lit green. When you play the piano keys, the Original voice will sound.
To choose one of the Variation voices, press the corresponding Voice button twice (or once if this button's Original voice is currently selected). The button LED will be lit red. When you play the piano keys, the Variation voice will sound.
Layer Mode
Layer Mode allows for two different voices to be layered together for a fuller and richer sound.
To enable Layer Mode:
- Press the Layer button to enter Layer Mode. The Layer button LED will be lit green.
- Select the first voice by pressing one of the Voice buttons to choose between its Original or Variation voice.
- Press the Layer button again. The Layer button LED will be lit red.
- Select the second voice by pressing one of the Voice buttons to choose between its Original or Variation voice.
- Press the Layer button again. The Layer button LED will be lit amber.
- Play the keys to hear the two different voices layered together.
To disable Layer Mode, press the Layer button again.
Note: When you are selecting which voices will be layered, the first voice you select will be set as the Upper voice, and the second voice you select will be set as the Lower voice. See Operation > Voice Volume to learn how to adjust the volume levels of the Upper and Lower voices.
Split Mode
Split Mode allows you to split the 61 keys into two zones so that you can have two different voices for each of your hands. For example, you may want the Acoustic Piano voice for your right hand and the Bass voice for your left hand. When Split Mode is enabled, the left-hand voice is referred to as the Split voice.
To enable Split Mode:
- Select the voice that you would like to be in the right-hand zone.
- Press and hold the Split button and then press one of the Voice buttons to select the Split voice for the left-hand zone. Release the Split button to enter Split Mode. The Split button LED will be lit when Split Mode is enabled.
- Play the keys and you will hear that the right-hand and left-hand zones have different voices.
To disable Split Mode, press the Split button again. The Split button LED will turn off when Split Mode is disabled.
To set the key for the split point between the right-hand voice and left-hand voice, use the following procedure:
- Press and hold the Split button, and then press the key where you would like the split to occur.
- Release the Split button to confirm the new split point.
Note: When you are using Split Mode and Layer Mode at the same time, the right-hand zone will play both layered voices, and the left-hand zone will play the Split voice only.
Note: See Operation > Voice Volume to learn how to adjust the volume level of the Split voice.
Advanced Function Mode
You can edit many functions on your Recital 61 by entering Advanced Function Mode.
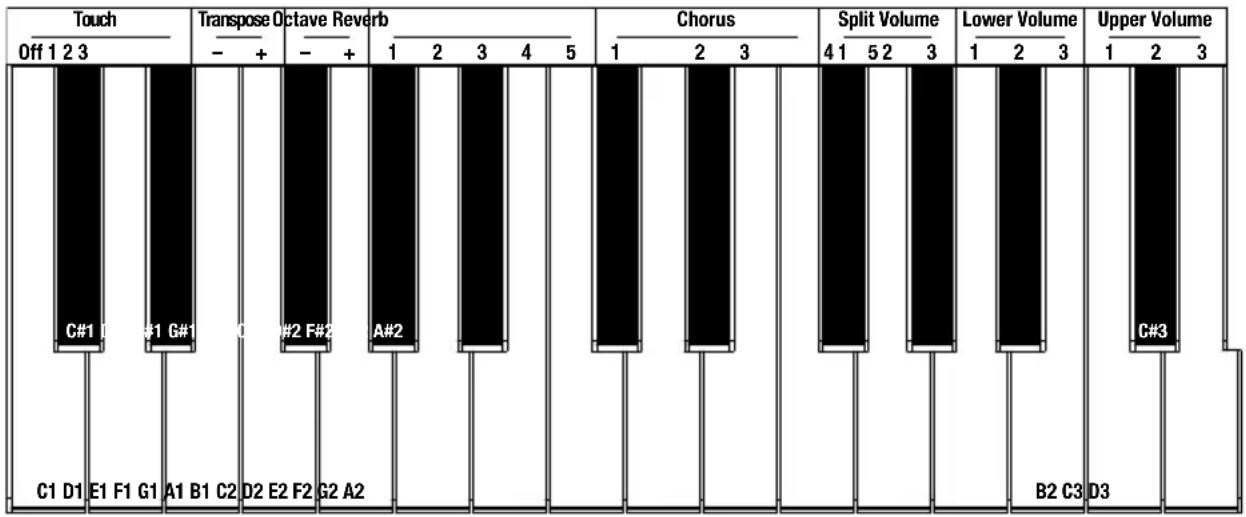
To enter Advanced Function Mode, press the Metronome and Lesson buttons at the same time. The two button LEDs will be lit. Then use the keys corresponding to the desired setting (as pictured below). More details on the adjustable settings can be found in the next few pages of this user guide.
To exit Advanced Function Mode, press the Metronome and Lesson buttons at the same time again.
text_image
Touch Off 1 2 3 C#1 I #1 G#1 C#2 F#2 A#2 A#2 C1 D1 E1 F1 G1 A1 B1 C2 D2 E2 F2 G2 A2 Transpose Octave Reverb - + - + Chorus 1 2 3 Split Volume 4 1 5 2 3 Lower Volume 1 2 3 Upper Volume B2 C3 D3 C#3

text_image
Click Midi Ch. - + Pedal Res. Auto Pwr On Off F#5 G#5 A#5 E5 F5 G5 A5 B5 C6Voice Volume
You can set the volume of each voice in Layer Mode and the split voice in Split Mode.
To set the volume of the upper voice in Layer Mode:
- Press the Metronome and Lesson buttons at the same time to enter Advanced Function Mode. The two button LEDs will be lit.
- Following the diagram on page 7, use the keys marked Upper Volume 1-2-3 to set the volume. 1 is the lowest volume, and 3 is the highest volume.
- Press both the Metronome and Lesson buttons again to exit Advanced Function Mode.
To set the volume of the lower voice in Layer Mode or the split voice in Split Mode: Follow the steps above but instead use the Lower Volume 1-2-3 or Split Volume 1-2-3 keys.
Setting the MIDI Channel
You can also set the MIDI channel for the USB-MIDI output.
To set the MIDI Out channel:
- Press the Metronome and Lesson buttons at the same time to enter Advanced Function Mode. The two button LEDs will be lit.
- Following the diagram on page 7, use the keys marked Midi Ch. - or Midi Ch. + to set the MIDI Out channel from 1–16. Press both keys at the same time to restore the default channel setting to 1.
Note: Recital 61 uses only one MIDI channel at a time, even if you are using Split Mode or Layer Mode. - Press both the Metronome and Lesson buttons again to exit Advanced Function Mode.
Setting the Click Tone
When the click tone is on, you will hear a click sound whenever you change a setting.
To turn the click tone on or off:
- Press the Metronome and Lesson buttons at the same time to enter Advanced Function Mode. The two button LEDs will be lit.
- Following the diagram on page 7, press the key marked Click to turn the tone on or off.
- Press both the Metronome and Lesson buttons again to exit Advanced Function Mode.
Touch Sensitivity
The Recital 61 Digital Piano is equipped with touch response for controlling volume level with your playing strength—just like an acoustic piano. That means the harder you play the keys, the more volume you'll hear from the speakers. Turning this function off results in a fixed volume level, no matter how hard or soft you play the keys. The touch settings are Off, 1, 2, and 3.
To set the touch sensitivity:
-
Press the Metronome and Lesson buttons at the same time to enter Advanced Function Mode. The two button LEDs will be lit.
-
Following the diagram on page 7, use the keys marked Touch Off-3 to select the desired touch level:
| Setting | Description |
| Off | Fixed |
| 1 | Soft |
| 2 | Medium |
| 3 | Hard |
- Press the Metronome and Lesson buttons at the same time to exit Advanced Function Mode.
Transpose
This function allows the overall pitch of the piano to be transposed up or down in semitone increments (to a maximum of twelve semitones).
To transpose the keyboard between -12 and +12 semitones:
-
Press the Metronome and Lesson buttons at the same time to enter Advanced Function Mode. The two button LEDs will be lit.
-
Following the diagram on page 7, use the keys marked Transpose - or Transpose + to set the transpose value. Press both keys together to reset the transposition back to the default value of 0.
-
Press both the Metronome and Lesson buttons again to exit Advanced Function Mode.
Metronome
The metronome feature provides a steady beat to aid in practicing at a consistent tempo.
To turn the metronone on or off, press the Metronome button. When the metronome is in use, the Metronome button LED will flash along with the current tempo. The tempo of the metronome can be freely adjusted from 30 to 280 beats per minute.
To set the metronome tempo:
- Press the Metronome and Lesson buttons at the same time to enter the Advanced Function mode. The two button LEDs will be lit.
-
Take one of these steps:
-
Following the diagram on page 7, use the keys marked Tempo – or Tempo + to lower or raise the tempo. If you press both keys at the same time, the metronome will be restored to the default tempo of 120.
- Following the diagram on page 7, use the keys marked Tempo 0–9 to enter an exact tempo. You will need to press 3 of these keys in total to enter the tempo value. For example, press 1, 2, 0 in sequence to enter a tempo value of 120, or press 0, 6, 4 in sequence to set a tempo value of 64.
-
Following the diagram on page 7, repeatedly press the key marked Tap at the desired tempo. The piano will adjust the Metronome to the speed of the last two presses.
-
Press both the Metronome and Lesson buttons again to exit Advanced Function Mode.
To set the metronome time signature:
- Press the Metronome and Lesson buttons at the same time to enter Advanced Function Mode. The two button LEDs will be lit.
- Following the diagram on page 7, use the keys marked Metronome 0–9 to set the time signature.
- Press both the Metronome and Lesson buttons again to exit Advanced Function Mode.
To set the metronome volume level:
- Press the Metronome and Lesson buttons at the same time to enter Advanced Function Mode. The two button LEDs will be lit.
- Following the diagram on page 7, use the keys marked Metronome Vol. 1-2-3 to set the metronome volume. 1 is the lowest volume, and 3 is the highest volume.
- Press both the Metronome and Lesson buttons again to exit Advanced Function Mode.
Effects
With the Recital 61, you can add adjustable Reverb and/or Chorus effects to your sound.
To enable the effects:
- Press the Reverb/Chorus button once to turn on the reverb effect. The button LED will be lit green when only the Reverb effect is enabled.
- Press the Reverb/Chorus button again to turn off the reverb effect and turn on the chorus effect. The button LED will be lit red when only the Chorus effect is enabled.
- Press the Reverb/Chorus button again to turn on both the reverb and chorus effects. The button LED will be lit amber when both effects are enabled.
- Press the button again to turn off all effects. The LED will be off when no effects are enabled.
To adjust the reverb type:
- Press the Metronome and Lesson buttons at the same time to enter Advanced Function Mode. The two button LEDs will be lit.
- Following the diagram on page 7, use the keys marked Reverb 1–5 to select the desired reverb type.
| Setting Reverb Type | |
| 1 | Room |
| 2 | Hall |
| 3 | Church |
| 4 | Delay |
| 5 | Pan Delay |
- Press both the Metronome and Lesson buttons again to exit Advanced Function Mode.
To adjust the chorus type:
- Press the Metronome and Lesson buttons at the same time to enter Advanced Function Mode. The two button LEDs will be lit.
- Following the diagram on page 7, use the keys marked Chorus 1–5 to select the desired chorus type.
| Setting Chorus Type | ||
| 1 | Chorus | 1 |
| 2 | Chorus | 2 |
| 3 | Chorus | 3 |
| 4 | Flanger | |
| 5 | Rotary | |
- Press both the Metronome and Lesson buttons again to exit Advanced Function Mode.
Pedal Resonance
Pedal resonance is a function that simulates the reverberation of notes when pressing the sustain pedal on an acoustic piano. When you use the included sustain pedal with Pedal Resonance enabled, the Recital 61 reproduces the rich harmonics and other unique sound characteristics of an acoustic piano.
To turn Pedal Resonance on or off:
- Press the Metronome and Lesson buttons at the same time to enter Advanced Function Mode. The two button LEDs will be lit.
- Following the diagram on page 7, press the key marked Pedal Res. to turn the function on or off.
- Press both the Metronome and Lesson buttons again to exit Advanced Function Mode.
Note: When Pedal Resonance is activated, the chorus effect will be automatically disabled.
Note: If you switch the Pedal Resonance on/off while performing, there may be a slight pause in the Recital 61's signal output.
Lesson Mode
For instructional purposes, the Lesson Mode feature divides the 61 keys into two zones with the same pitch-range and voice. This enables both student and teacher to easily watch each other and play together without having to move away from the piano, take turns, or reach over each other.
To enable or disable Lesson Mode, press the Lesson button.
To select a voice for both zones in Lesson Mode, press one of the Voice buttons.
To set the key for the split point between the two zones, press and hold the Split button, press a key between C2 and C5, and then release the Split button. The default split point is E3.
To change the octave of the two zones in Lesson Mode:
- Press the Metronome and Lesson buttons at the same time to enter Advanced Function Mode. The two button LEDs will be lit.
- Following the diagram on page 7, use the keys marked Octave - and Octave + to lower or raise the octave. Press both keys together to reset the octave back to the default value.
- Press both the Metronome and Lesson buttons again to exit Advanced Function Mode.
Note: In Lesson Mode, Layer and Split Modes are automatically disabled.
Auto Power Off
In order to save energy, the Recital 61 Digital Piano will automatically shut down after 30 minutes if it is not used.
To enable or disable the Auto Power Off function:
- Press the Metronome and Lesson buttons at the same time to enter Advanced Function Mode. The button LEDs will be lit.
- Following the diagram on page 7, use the key marked Auto Pwr to enable or disable the Auto Power Off function.
- Press both the Metronome and Lesson buttons again to exit Advanced Function Mode.
Restore Factory Default Settings
To restore your Recital 61 to the factory default settings, press and hold the Layer and Lesson buttons for 5 seconds. All settings will be reset to their default values.
Note: Recital 61 cannot be in Advanced Function Mode when you restore it to the factory default settings.
Troubleshooting
| Problem Possible Cause and Solution | |
| The speakers produce a pop sound whenever the power is turned on/off. | This is normal and is no cause for alarm. |
| The speakers do not produce sound when the keys are played. | Check if the master volume is set too low or if headphones are plugged into the Headphone Output. The speakers will be muted if there are headphones plugged into the Headphone Output.If the issue is still occurring, press and hold the Layer and Lesson buttons for 5 seconds to factory reset the voice volume settings of the unit. |
| The speakers are producing noise or interference. | Using a mobile phone in close proximity to the Recital 61 Digital Piano may produce interference. To prevent this, turn off the mobile phone or keep it away from the piano. |
| Certain notes produce the wrong pitch. | Make sure that the transpose value is set to 0. If that does not work, then press and hold the Layer and Lesson buttons for 5 seconds to restore the factory default settings. |
| The notes sound weak or distorted. | If the keyboard is being powered with batteries, make sure new batteries are installed. |
natural_image
Pure technical line drawing of a rectangular frame with mounting feet (no text or symbols)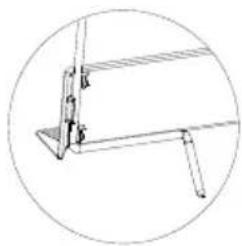
natural_image
Pure technical line drawing of a mechanical bracket or bracket assembly without any text, numbers, or symbolsnatural_image
Simple diagram showing a monitor with a numbered circle and an upward arrow, no text or symbols present.Funcionamiento
Canciones demo
text_image
Click Midi Ch. - + Pedal Res. Auto Pwr On Off F#5 G#5 A#5 E5 F5 G5 A5 B5 C6Volumen de la voz
Assistance technique
natural_image
Line drawing of a rectangular metal frame with supports at both ends (no text or symbols)
natural_image
Pure technical line drawing of a mechanical bracket or bracket assembly without any text, numbers, or symbolsSchéma de connexion
natural_image
Simple diagram showing a monitor with a numbered circle and an upward arrow at the bottom (no text or symbols)Fonctionnement
Mode Advanced Function
text_image
Click Midi Ch. - + Pedal Res. Auto Pwr On Off F#5 G#5 A#5 E5 F5 G5 A5 B5 C6Volume des voix
natural_image
Simple diagram with a numbered circle and a small arrow pointing to it, no text or symbols present.Operazione
Canzoni Demo
text_image
Touch Off 1 2 3 C#1 C #1 G#1 A1 B1 C2 D2 E2 F2 G2 A2 Transpose Octave Reverb - + - + A#2 A#2 Chorus 1 2 3 Split Volume 4 1 5 2 3 Lower Volume 1 2 3 Upper Volume C#3 B2 C3 D3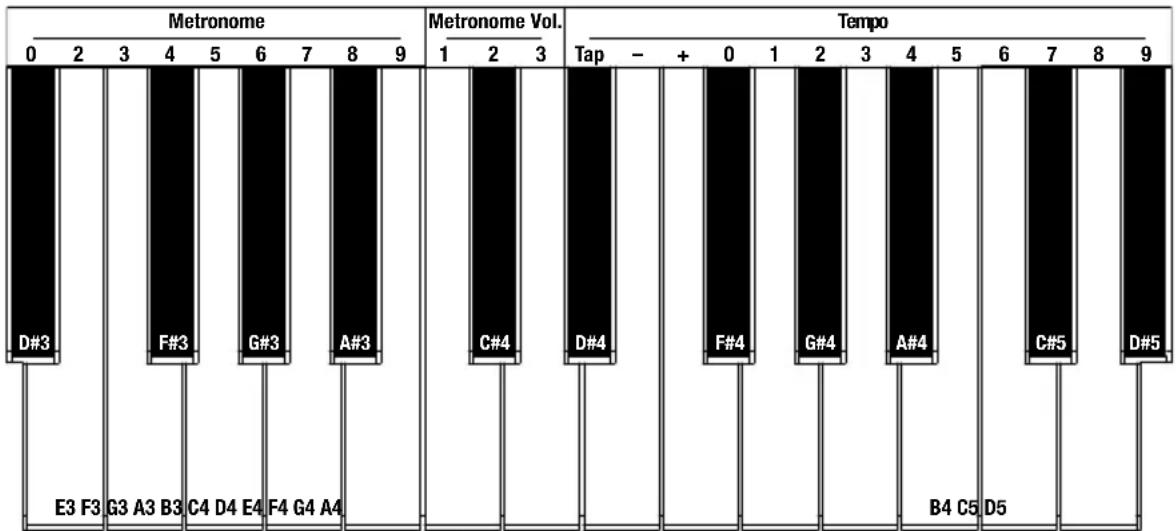
bar
| Category | Count | |---|---| | Metronome | 0 | | Metronome | 2 | | Metronome | 3 | | Metronome | 4 | | Metronome | 5 | | Metronome | 6 | | Metronome | 7 | | Metronome | 8 | | Metronome | 9 | | Tempo | 1 | | Tempo | 2 | | Tempo | 3 | | Tempo | Tap - + 0 1 2 3 4 5 6 7 8 9 | | E3 F3 | | | G3 A3 B3 | | | C4 D4 E4 | | | F4 G4 A4 | | | C#4 | | | D#4 | | | F#4 | | | G#4 | | | A#4 | | | B4 C5 | | | D5 | | | C#5 | | | D#5 | |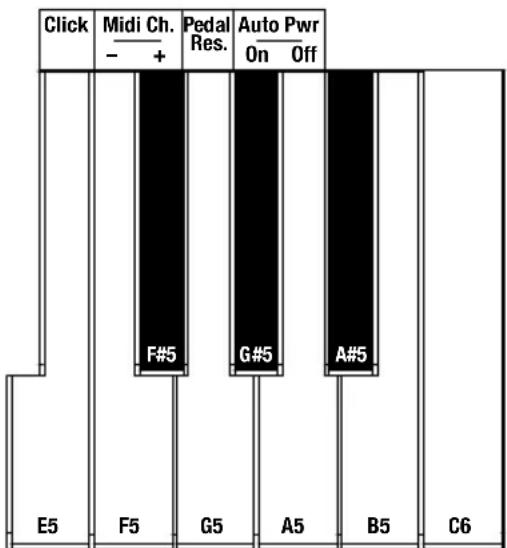
text_image
Click Midi Ch. - + Pedal Res. Auto Pwr On Off F#5 G#5 A#5 E5 F5 G5 A5 B5 C6Volume delle voci
natural_image
Simple line drawing of a rectangular frame with two vertical supports and a base, labeled 'Schritt 1 Schritt 2' below (no other text or symbols)Schritt 1 Schritt 2 Detail

natural_image
Pure technical line drawing of a rectangular frame with mounting feet (no text or symbols)
natural_image
Technical line drawing of a mechanical assembly with no visible text or symbolsAnschlussdiagramm
natural_image
Simple diagram showing a monitor with a numbered circle and an upward arrow, no text or symbols present.Betrieb
Demo-Songs
bar
| Note | Value | | :--- | :--- | | Touch Off 1 2 3 | C#1 | | Touch Off 1 2 3 | #1 G#1 | | Touch Off 1 2 3 | A1 B1 C2 | | Transpose Octave Reverb Off 1 2 3 4 5 | - + | | Transpose Octave Reverb - + | #2 F#2 | | Chorus 1 2 3 | A#2 | | Chorus 1 2 3 | | | Split Volume 4 1 5 2 3 | | | Split Volume 1 2 3 | | | Lower Volume 1 2 3 | | | Lower Volume 1 2 3 | C#3 | | Upper Volume D3 | | B2 C3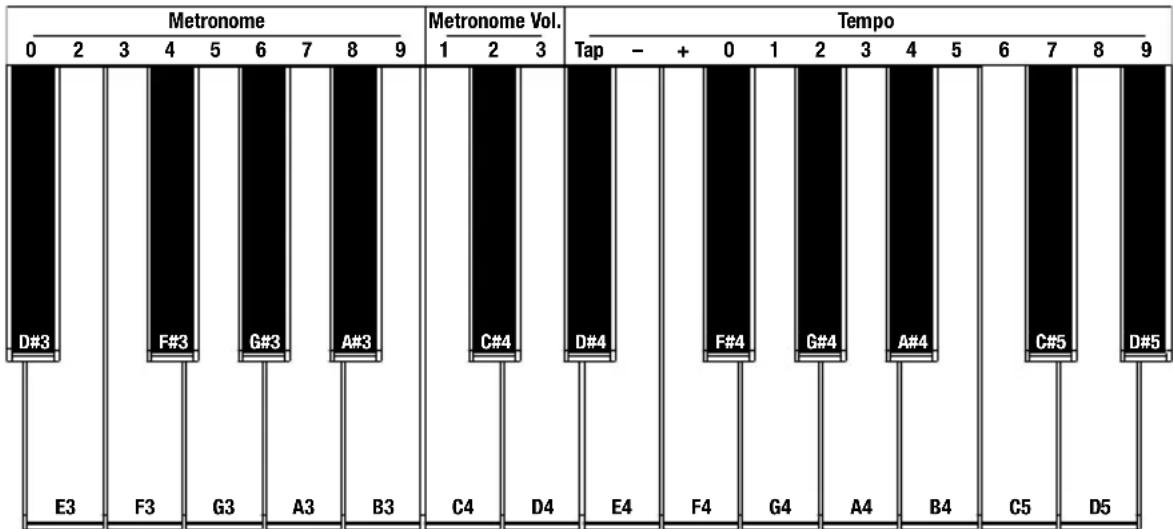
bar
| Instrument | Metronome | Tempo | |---|---|---| | D#3 | 0 | - | | F#3 | 2 | + | | G#3 | 3 | - | | A#3 | 4 | - | | C#4 | 5 | - | | D#4 | 6 | - | | E4 | 7 | - | | F#4 | 8 | + | | G#4 | 9 | + | | A#4 | 10 | + | | B4 | 11 | + | | C5 | 12 | + | | D5 | 13 | + |
text_image
Click Midi Ch. - + Pedal Res. Auto Pwr On Off F#5 G#5 A#5 E5 F5 G5 A5 B5 C6Voice-Pegel
Technical Specifications
| Keyboard | 61 semi-weighted keys with velocity sensitivity |
| Polyphony | 128 voices |
| Sounds | 10 |
| Demos | 2 piano demo songs10 tone/voice demo songs |
| Metronome Tempo Range | 30–280 BPM |
| Speakers | (2) 10 W woofers(2) 20 W tweeters |
| Power | 12V DC, 2A (center positive) power supply or 6 “AA” batteries |
| Dimensions(width x depth x height) | 11.5” x 3.5” x 35.6”29.2 x 8.9 x 90.4 cm |
| Weight | 14.3 lbs.6.5 kg |
Specifications are subject to change without notice.
Trademarks & Licenses
Alesis is a trademark of inMusic Brands, Inc., registered in the U.S. and other countries.
All other product or company names are trademarks or registered trademarks of their respective owners.