
09069 - Vacuum Cleaner Cleanmaxx - Free user manual and instructions
Find the device manual for free 09069 Cleanmaxx in PDF.
User questions about 09069 Cleanmaxx
0 question about this device. Answer the ones you know or ask your own.
Ask a new question about this device
Download the instructions for your Vacuum Cleaner in PDF format for free! Find your manual 09069 - Cleanmaxx and take your electronic device back in hand. On this page are published all the documents necessary for the use of your device. 09069 by Cleanmaxx.
USER MANUAL 09069 Cleanmaxx
www.service-shopping.de
Intended Use 15
Safety Instructions 15
Scope of delivery and device overview 18
Assembly 19
Operation 20
Cleaning and care 21
Storage 22
Troubleshooting 23
Technical Data 23
Disposal 24
Explanation of Symbols

Safety instructions:
Read through these carefully and follow them to prevent personal injury.

Supplementary information

Protection class II

Read instructions before use!
Explanation of Signal Words
DANGER
warnings of serious injuries and danger to life.
WARNING
wars of possible serious injuries and danger to life.
CAUTION
warnings of slight to moderate injuries.
NOTE
wars of damage to property.
Dear Customer,
We are delighted that you have chosen this cyclone vacuum cleaner.
Before using the device for the first time, please read the instructions carefully and keep them for future reference. If the device is given to someone else, these instructions should also be handed over with it.
The manufacturer and importer do not accept any liability if the information in these instructions is not complied with.
Please note: The illustrations used in these instructions may differ from the actual device.
If you have any questions about the device and about spare parts / accessories, contact the customer service department via our website:
www.service-shopping.de
Intended Use
- This device is designed for vacuum cleaning normal household dust.

On no account should the device be used to suck up the following:
- liquids or wet substances (e.g. wet carpet shampoo)
glowing ash, cigarette ends, matches, etc. - i n fl ammable or explosive substances
-
very fine dust (e.g. concrete dust), ash or toner
pointed, hard objects such as large pieces of broken glass -
The device is for personal use only and is not intended for commercial applications.
- The device should only be used as described in these instructions. Any other use is deemed to be improper.
- The following are excluded from the warranty: all defects caused by improper handling, damage or unauthorised attempts at repair. This also applies to normal wear and tear.
Safety Instructions
This device may be used by children aged 8 and over and by people with reduced physical, sensory or mental abilities or a lack of experience and/or knowledge if they are supervise have received instruction on how to use the device safely and have understood the dangers resulting from failure to comply with the relevant safety precautions.
Children must not play with the device.
- Cleaning and user maintenance may not be performed by children, unless they are older than 8 years of age and are supervised.
Children younger than 8 years of age and animals must be kept away from the device and the mains cable.
- The device must always be disconnected from the mains power when it is left unattended and before assembling, disassembling or cleaning the device.
- Never immerse the device, mains cable or mains plug in water or other liquids and ensure that they cannot fall into water or become wet.
In the interest of your own safety, you should inspect the device for damage each time before you use it. The device may only be used if it has no visible signs of damage! If the device, the mains cable or the mains plug of the device is damaged, it must be replaced by the manufacturer, customer service department
or a similarly qualified person (e.g. specialist workshop) in order to avoid any hazards.

DANGER - Danger of Electric Shock from Water!
Use and store only in closed rooms.
Do not use the device in rooms with high humidity.
Should the device fall into water, switch off the power supply immediately. Do not attempt to pull the device out of the water while it is still connected to the mains power!
- Never touch the device, mains cable or mains plug with wet hands when these components are connected to the mains power.
- Never suck up liquids. Do not pour liquids into the dust container. Keep the motor unit away from moisture or wet conditions!

WARNING - Danger of Electric Shock from Damage and Inappropriate Use!
- Only connect the device to a plug socket with safety contacts that is properly installed and matches the technical data of the device. The plug socket must also be readily accessible after connection so that the connection to the mains can quickly be isolated.
Only use suitable extension cables whose technical data is the same as that of the device. - Remove the mains plug from the plug socket if a fault occurs during operation or before a thunderstorm.
The device must be switched off when inserting or removing the mains plug. Always pull the mains plug and never the mains cable to disconnect the device from the mains power.

WARNING - Danger of Injuries!
Warning of strangulation! Make sure that the mains cable is always kept out of the reach of small children and animals.
- Beware of becoming stuck! Keep animals, hair, jewellery, wide clothing, fingers and all other body parts away from the nozzles of the device. They could become stuck to the device. Should the vacuum cleaner become stuck, switch the device off immediately.
Beware of falling! Make sure that the connected mains cable does not present a trip hazard.

WARNING - Danger of Fire!
- Do not use the device in rooms containing easily ignitable substances or poisonous and explosive fumes.
- Do not use the device in the vicinity of highly flammable materials (curtains, textiles, etc.).
17 EN
- Do not cover the device during operation in order to prevent it from catching fire. Do not insert anything into the openings of the device and make sure that these do not become clogged.
In the event of a fire: Do not extinguish with water! Smother the flames with a fireproof blanket or a suitable fire extinguisher.
NOTICE - Risk of Damage to Material and Property
Make sure that the mains cable is not squashed, bent or laid over sharp edges and does not come into contact with hot surfaces. Do not wrap the mains cable around the device (danger of the cable breaking).
The device should only be used if it has been completely and correctly assembled! The dust container and the filters must be inserted and must not be damaged. If the dirt were to get inside the motor unit, this could damage the motor.
Note the MAX marking on the dust container. If during use the marking is reached, empty the dust container. The filters must also be regularly cleaned in order to prevent overloading of the motor.
Never pull or carry the device by the mains cable.
- Protect the device from heat, naked flames, freezing temperatures, persistent moisture, wet conditions and collisions.
Use only original spare parts from the manufacturer. - Do not place or lay any heavy objects on the device, the mains adapter or the mains cable.
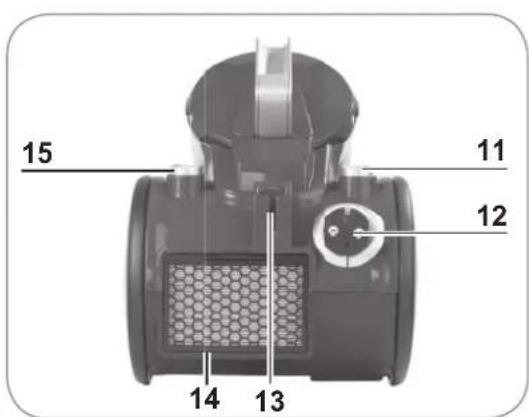
Scope of delivery and device overview

NOTE!
WARNING - Danger of suffocation! Keep children and animals away from the packaging material.
- Unpack all parts and check the items supplied for completeness and transport damage. If you find any damage to the components, do not (!) use them, but contact our customer service department.
- Avant l'utilisation de l'appareil, retirez tous les emballages et les évientuelles étiquettes qui se trouvent sur l'appareil et qui ont servi de protection pendant le transport ou de support publicitaire.
- Please keep in mind that there may be residual dirt in the dust bin or filters. This dirt residue is present because of quality controls and does not constitute reasons for a warranty claim.
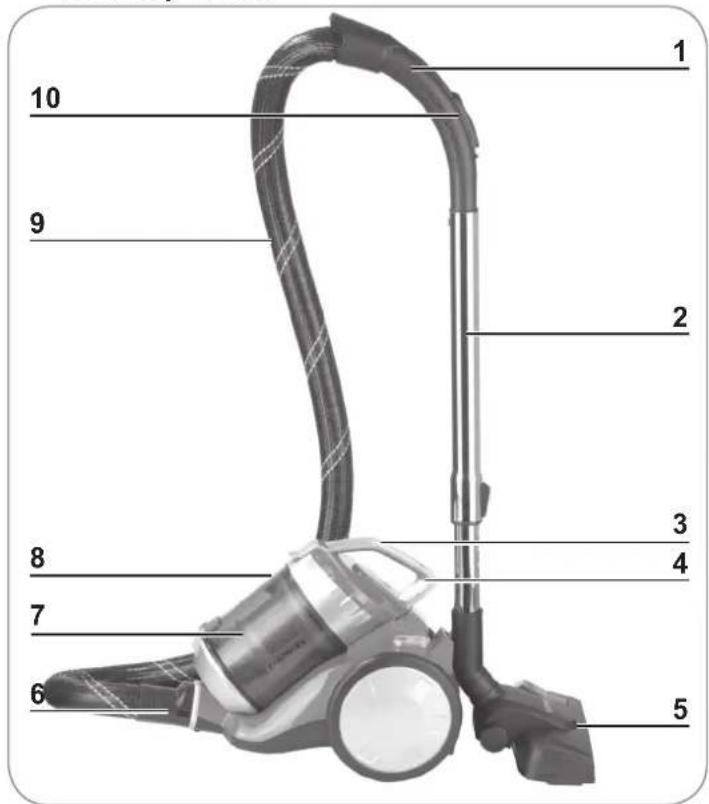
1 Suction hose handle
2 Telescopic tube
3 Dust container lid with handle
4 Dust container release button
5 Floor nozzle
6 Connection piece
7 Cyclone insert with 2 motor filters (sits inside the dust container)
8 Dust container
9 Suction hose
10 Auxiliary air vent
11 button for cable retraction
12 Mains cable with plug
13 Floor nozzle holder
14 Exhaust hatch (the HEPA exhaust air filter is located behind this hatch)
15 ① On / Off switch
Suction nozzles
NOTE!
Always turn off the vacuum cleaner first before changing the nozzles.
Floor nozzle
The floor nozzle is suitable both for carpets and smooth floors. With the foot switch, you can switch between smooth floor and carpet. A brush is deployed on the bottom for smooth floors.
Tile / brush nozzle
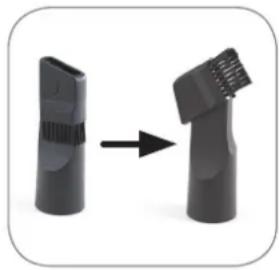
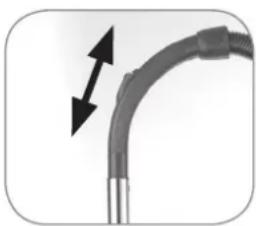
Turn the end piece in the direction of the arrow to convert the tile nozzle into a brush nozzle:
- The tile nozzle is suitable for cushions, cleaning the inside of passenger vehicles as well as all nooks and crannies that can't be reached with other nozzles.
- The brush nozzle is suitable for all uneven objects, furniture, lamps, profi ling strips and skirting boards, window sills etc.
Assembly
Inserting/removing the suction hose
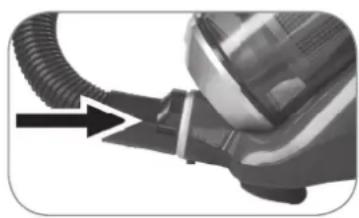
- Insert the connection piece of the suction hose in the suction opening on the device and turn it slightly clockwise. It must audibly lock into place.
- To remove the suction hose turn it slightly anticlockwise and pull the hose out at the same time.
Inserting / removing the telescopic tube
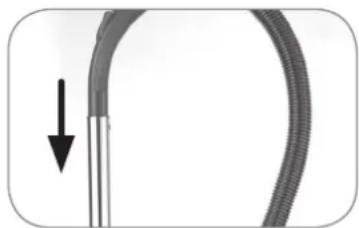
- Insert the open end of the handle into the corresponding opening of the telescopic tube. At the same time twist the handle gently backwards and forwards. Afterwards, check the connection for secure seating.
- To remove the telescopic tube, pull it out of the handle.
Adjusting the length of the telescopic tube
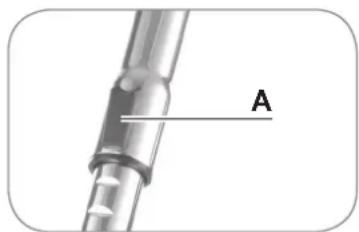
- Pull the slider (A) on the telescopic tube down and set the desired length.
- Release the slider and move the tube forward until it locks into place.
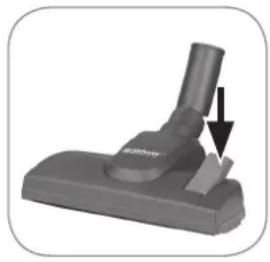
Mounting / removing suction nozzles
- Insert the free end of the telescopic tube as far as it will go into one of the suction nozzles supplied. At the same time twist the nozzle gently backwards and forwards.
- For greater flexibility the suction nozzles can also be connected directly to the suction hose without using the telescopic tube.
- To remove a suction nozzle simply pull it out.
Operation

NOTE!
Only turn on the vacuum cleaner once you are sure that all parts have been completely assembled and that all filters are correctly inserted.
To ensure that the mains cable does not heat up during operation, pull at least two thirds of its entire length out of the device housing before switching on the vacuum cleaner. In order to avoid damage do not tug out the mains cable as far as it will go (no further than the red mark on the cable)!
- If you have not already done so, attach the desired suction nozzle to the telescopic tube or suction hose (see chapter "Assembly", section "Mounting / removing suction nozzles" and chapter "Product contents and device overview", section "Suction nozzles").
- Pull the mains cable out of the housing, ideally as far as the yellow mark but in any case no further than the red mark on the cable!
- Insert the mains plug in a properly installed socket that is easily accessible.
- Press theOn/Off switch to turn the vacuum cleaner on.
- Move the nozzle over the surface you want to clean. You can pull the vacuum cleaner like a sled when vacuum cleaning.

Tipp: There is an auxiliary airflow vent on the handle. Open this (by sliding the cover) in order to reduce the suction power when vacuuming upholstery, carpets or lightweight, easily movable objects.
The auxiliary airflow vent should normally be kept closed so that the suction power is not unnecessarily reduced.
- After vacuum cleaning, press the ① On/Off switch again to turn off the device.
- Remove the mains plug from the mains socket, hold on to the mains cable and press the cable retraction button with your foot. By holding the mains cable, you prevent it from lashing against body parts such as your legs.
- For optimum performance, empty the dust container after each use and clean the cyclone insert, motor filters and HEPA exhaust air filter regularly (see chapter "Cleaning and care").
Cleaning and care
NOTE!
- Empty the dust container when it reaches the MAX mark and clean the cyclone insert, motor filters and HEPA exhaust air filter regularly in order to prevent the motor from overheating.
Do not clean the HEPA exhaust air filter with water! - Do not use any corrosive or abrasive cleaners or cleaning pads for cleaning. They could damage the surface.

Over time the filters may become discoloured. This is normal and does not affect the functionality.
Emptying the dust container
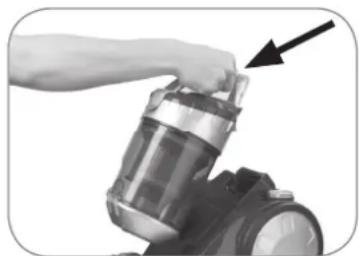
- Push the release button of the dust container and take it out of the device by the handle.
- Hold the dust container over an open dustbin. The dust container should be as close as possible to the dustbin so that the dust from the container falls only into the bin and is not spread over the surrounding area.
- Press the button to open the dust container. The bottom of the dust container will open and the dirt will fall out.
- Shut the dust container bottom again. The fastener must audibly lock into place.
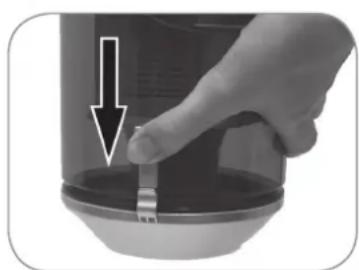
- Put the dust container in the device: Take it by the handle and insert it bottom first into the device. Then push the handle towards the device housing until the dust container audibly clicks into place. Hold the device by the dust container handle and lift it up to check that the dust container is correctly locked into place.
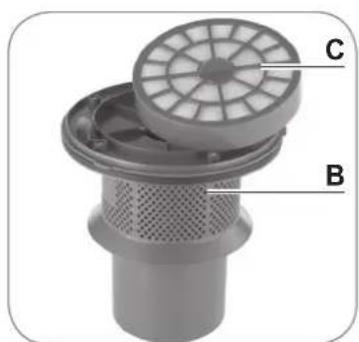
Cleaning the cyclone insert and motor fi Iters
The cyclone insert is situated inside the dust container. The motor filters are situated in the fiiter holder on the cyclone insert.
- Remove the dust container from the device and empty it (see section "Emptying the dust container").
- Turn the lid of the dust container as far as it will go in an anticlockwise direction.
-
Remove the lid with the cyclone insert (B) from the dust container.
-
Lift the tab on the lid, open the lid and remove the filter holder (C) and remove the foam filter.
Please note: The second motor filter is attached to the filter holder and cannot be removed from the holder!
-
Tap out all the parts over a bin and brush away any loose dirt.
-
You can clean the cyclone insert and dust container with a damp cloth.
- After drying, place the foam filter back into the filter holder and replace the holder onto the cyclone insert. Close the lid so that it audibly locks into place.
Attention: Never put damp parts back into the dust container!
- When all parts are dry, replace the cyclone insert in the dust container.
- Put the lid on the dust container so that the arrow symbol on the dust container points to the symbol on the lid. Close the lid by turning it as far as it will go. The arrow symbol should now be pointing to the symbol.
- Put the dust container in the device. Make sure that it audibly locks into place.
Cleaning the HEPA exhaust air fi Iter
The HEPA exhaust air filter is situated behind the protective grill on the back of the vacuum cleaner.

- Pull down the exhaust hatch latch with filter (D) and remove the hatch simultaneously.
- Tap it out over a garbage bin. If necessary, clean it with a soft brush.
Attention: Do not clean the HEPA exhaust air filter with water!
- Brush or wipe the filter compartment if required.
- Place the exhaust hatch with filter in the device and close the hatch. The hatch must audibly lock into place.
Cleaning the housing and nozzles
If needed, clean the housing with a damp, soft cloth.
Regularly remove hair and lint from the nozzles.
Storage
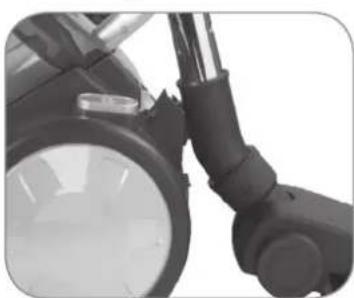
- For storage you hook the floor nozzle into the holder on the back of the device (see figure) and close down the telescopic tube as far as it will go.
- Store the vacuum cleaner in a cool dry indoor room where it cannot be reached by children or animals.
Troubleshooting
If the device should stop working properly, first check whether you are able to correct the problem yourself.

Do not attempt to repair a defective electrical device yourself!
| Problem Possible cause / solution | |
| The vacuum cleaner has no suction power. | ·Is the mains plug not correctly connected with a socket? Correct the position of the mains plug. ·Is the socket defective? Try another socket. ·Check the fuse for your mains connection. |
| The suction performance is poor. | ·Is the suction power set too low on the suction power control? Turn the suction power control more towards MAX. ·Is the auxiliary air vent on the handle open? Close it. ·Is the dust container too full? Empty the container. ·Are the filters heavily laden with dirt? Clean the cyclone insert, motor filters and HEPA exhaust air filter. ·Is the nozzle, telescopic tube or suction hose clogged? Turn the device off, pull the mains plug out of the socket and remove the obstruction (also see chapter “Assembly”). |
| The device emits dust when vacuuming. | ·Has the dust container not been closed properly and/or is it not (properly) inserted in the device? Correct this. ·Are the filters heavily laden with dirt? Clean the cyclone insert, motor filters and HEPA exhaust air filter. |
| The mains cable will not completely retract. | ·The mains cable has not been correctly retracted into the device. Pull it out a little and press the cable retraction button again. |
| An unpleasant odour develops when vacuuming. | ·Are you using the device for the first time? An odour often develops when using new devices for the first time. The odour should disappear once you have used the device a few times. |
Technical Data
Article numbers: 08302 (gold)
08318 (red)
09897 (blue / silver)
04765 (pink / silver)
09096 (zebra design)
Model number:
C-320-70/C-320-80
Voltage supply:
220 - 240V 50 / 60Hz
Power:
700W
Protection class:
II
Customer Service / Importer:
DS Produkte GmbH
Am Heisterbusch 1
19258 Gallin
Germany
Tel.: +49 38851 314650
(Calls to German landlines are subject to charges. The cost varies depending on the service provider.)

Disposal

The packaging material is recyclable. Please dispose of it in an environmentally friendly manner and take it to a recycling centre.
Dispose of the article at a recycling centre for used electrical and electronic devices. You can obtain more information from your local authorities.
Sommaire
Chere cliente, cher client,
www.service-shopping.de
www.service-shopping.de