Lilli 360TG - Rototiller Texas - Free user manual and instructions
Find the device manual for free Lilli 360TG Texas in PDF.
User questions about Lilli 360TG Texas
0 question about this device. Answer the ones you know or ask your own.
Ask a new question about this device
Download the instructions for your Rototiller in PDF format for free! Find your manual Lilli 360TG - Texas and take your electronic device back in hand. On this page are published all the documents necessary for the use of your device. Lilli 360TG by Texas.
USER MANUAL Lilli 360TG Texas
natural_image
Technical line drawings of two tiller machines with no visible text or symbols| 1 | 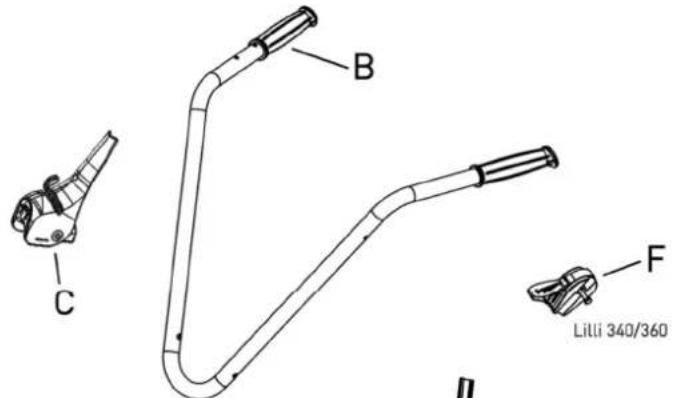 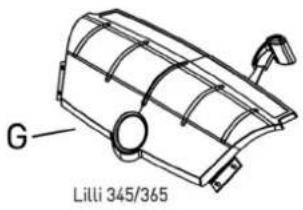  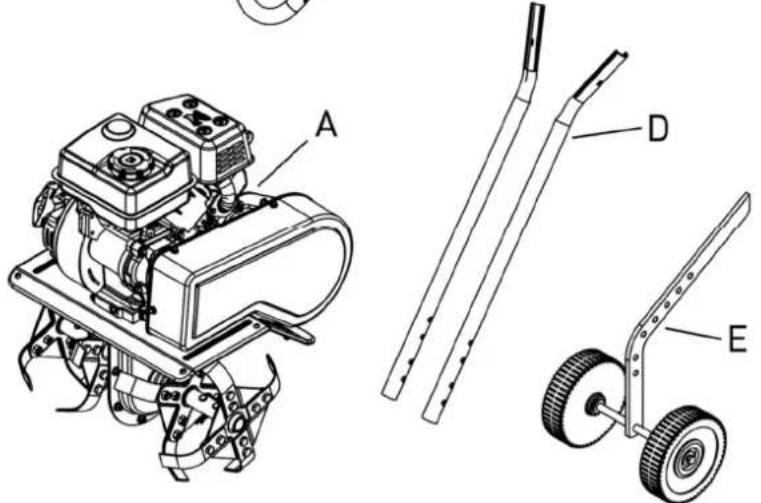 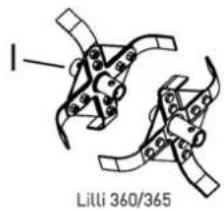 | ||
| 2 | 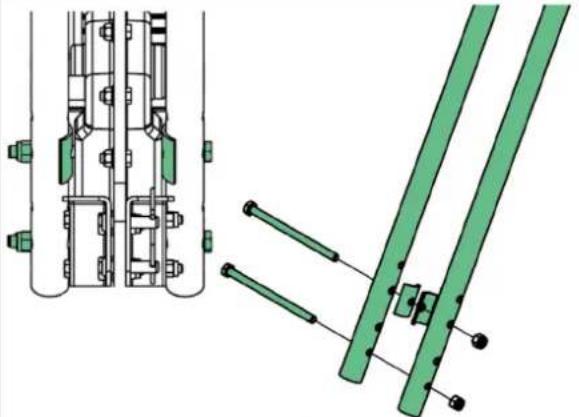 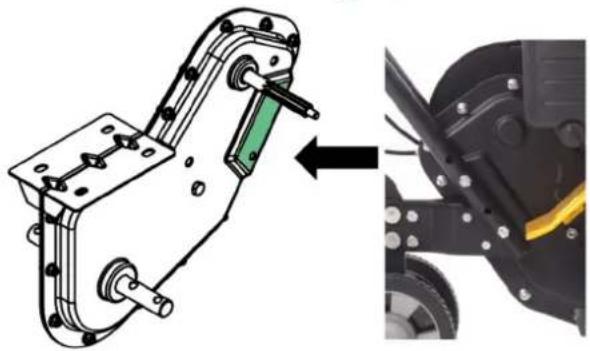 | 3 | 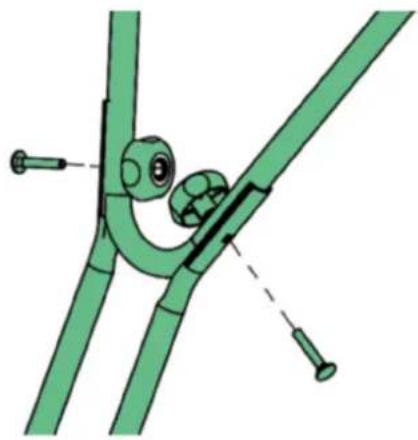 |
| 4 | 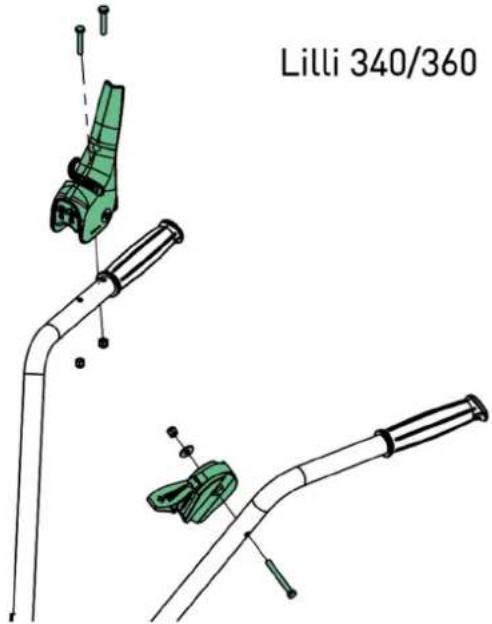 | 5 |  |
| 6 |  | 7 | 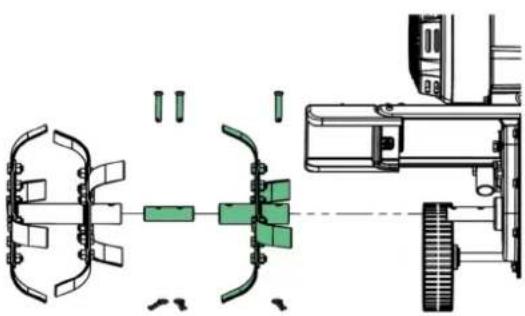 Lilli 360/365 Lilli 360/365 |
| 8 | 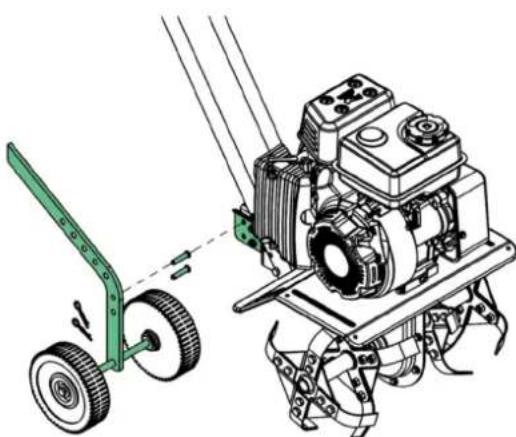 | 9 | 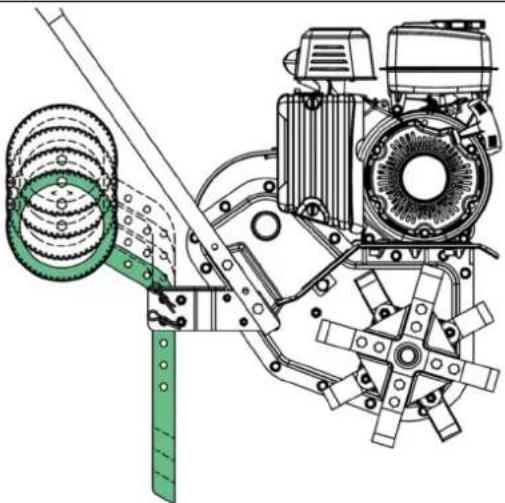 |
| 10 | 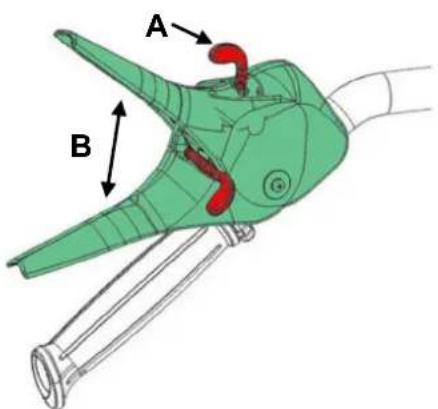 | 11 | 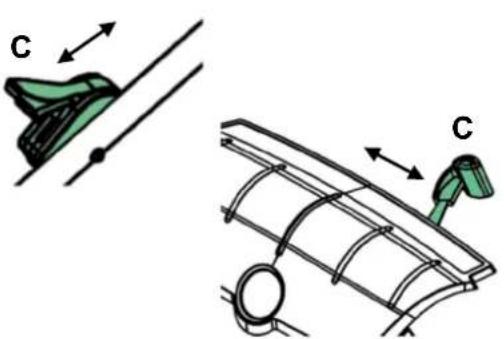 |
| 12 | 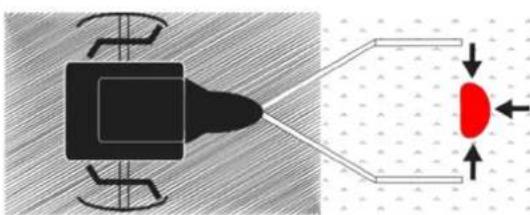 | 13 | 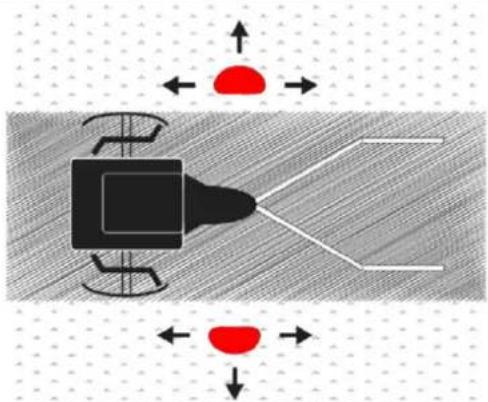 |
| 14 |  | 15 |  |
| 16 | 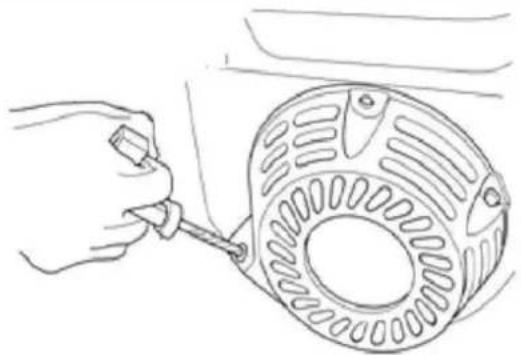 | 17 |  Max 0,45 L. SAE30 Max 0,45 L. SAE30 |
Advarselssymboler / Warning symbols / Warnsymbole / Symboles d'avertissement / Symbole ostrzegawcze / Opozorilni simboli / Simboli di pericolo
 |  |  |  |  |
| DK | ||||
| Advarsel:Pas på roterende knive! | Læs betjenings-vejledningen grundigt før maskinen benyttes. | Benyt høreværn og sikkerhedsbriller. | Benyt sikkerhedshandsker. | Benyt skridsikkert sikkerhedsfodtøj. |
| GB | ||||
| Warning:Pay attention to rotating blades! | Please read the user manual carefully before operating the machine. | Always wear eye and ear protection. | Wear safety gloves. | Wear nonskid safety footwear. |
| D | ||||
| Warnung:Achten Sie auf rotierende Messer! | Bitte lesen Sie das Benutzerhandbuch aufmerksam durch, bevor Sie den Maschinen in Betrieb nehmen. | Tragen Sie immer Auge und Ohr Schutz. | Schutzhandschuhe tragen. | Tragen Sie rutschfeste Sicherheitsschuhe |
| F | ||||
| Avertissement:Faites attention à lames rotatives! | S’i vous plaît lire attentivement le manuel de l'utilisateur avant de faire fonctionner le moteur. | Toujours porter une protection oculaire et auditive. | Porter des gants de sécurité. | Porter des chaussures de sécurité antidérapantes |
| PYC | ||||
| Предупреждение:Внимание,вращающиеся фрезы! | Перед запуском двигателя внимательно прочитайте инструкцию по эксплуатации | Всегда надевайте средства защиты органов слуха и зрения. | Работайте в защитных перчатках. | Работайте в закрытой обуви с нескользящей подошвой. |
| SI | ||||
| Opozorilo:Bodite pozorni na vrteča rezila! | Pred uporabo motorja pozorno preberite navodila za uporabo. | Vedno nosite zaščito vida in sluha. | Nosite zaščitne rokavice. | Nosite zaščitno obutev z nedrsečim podplatom. |
| HR | ||||
| Upozorenje:Obratite pozornost na rotirajuće oštrice! | Molimo pažljivo pročitajte priručnik za korisnike prije rada s motorom. | Uvijek nosite zaštitu vida i sluha. | Nosite zaštitne rukavice. | Nosite zaštitnu obuću s protukliznim potplatom. |
| CZ | ||||
| Varování:Dávejte pozor na rotující nože | Před použitím stroje si prosím pečlivě prostudujte příručku. | Vždy použivejte ochranu očí a sluchu. | Použivejte ochranné rukavice. | Použivejte neklouzavou bezpečnostní obuv. |
| IT | ||||
| Attenzione:Prestare attenzione alle lame rotanti! | Leggere attentamente il manuale d’uso prima di utilizzare la macchina. | Indossare sempre protezioni per occhi e orecchie. | Indossare guanti protettivi. | Indossare calzature antiscivolo. |
GB - Table of Contents - "Original instructions"
Illustrations 2
Warning symbols.... 5
Safety precautions.... 10
Assembly....11
Clothing 11
Operating the tiller 11
Operation zone.... 12
Adjusting the wheel/ depth skid 12
Lubrication of gearbox 12
Starting and stopping the engine.... 12
Cleaning the tiller.... 12
Changing the oil 12
Air filter maintenance.... 12
Spark plug maintenance....12
Storage.... 13
Troubleshooting.... 13
Noise, vibration and precautionary measures 13
Warranty terms and conditions.... 13
Specifications 36
Accessories 40
EC Declaration of conformity.... 41
Congratulations on purchasing your new tiller. Please read this instruction manual carefully, especially the safety warnings marked with the symbol:

Spare parts
Spare part drawings for the specific product can be found on our website www.texas.dk If you find the part numbers yourself, this will facilitate more rapid service.
For purchase of spare parts, please contact your dealer. You will find a list of dealers on the Texas website.
Safety precautions
Setup
Do not put hands or feet near or under rotating parts.
Read this manual carefully. Make sure that you are familiar with the different controls, settings and handles of the equipment.
Know how to stop the unit and ensure that you are familiar with emergency stop.
Never allow children or people unfamiliar with these instructions to use the machine. Note, that local regulations can restrict the age of the operator.
If you feel unwell, tired or have consumed alcohol or drugs, do not operate the machine.
Always inspect the machine before usage Ensure that no parts are worn or damaged.
1 Replace worn out or damaged elements and bolts in sets to preserve balance.
The operator of the machine is responsible for people's safety.
Never use the machine near children or animals.
The operator of the machine is held liable for any accidents or hazards to other people and their property.
Thoroughly inspect the area, where the equipment is to be used, if necessary, remove any foreign objects.
Do not refuel gasoline indoors or while the engine is running.
Spilled gasoline is extremely flammable; never refuel while the engine is still hot.
Wipe off any spilled gasoline before starting the engine. It may cause a fire or explosion!
Beware of hazards, while working on difficult soil hence; extremely stony or hard soil.
Boots with non-slip soles with steel jacket is required. Avoid loose-fitting clothes.
Operation
Always start the engine from safety zone.
Do not leave the safety zone while operating the machine, if it is necessary to leave the safety zone, turn off the engine before leaving the zone.
After striking a foreign object, stop the engine immediately, remove the spark plug cap and inspect the machine thoroughly for damage. Repair the damage before continuing
If the machine should start to vibrate abnormally, stop the engine and check immediately for the cause. Vibration is generally a warning of damage.
Always disengage the levers, turn off the engine, and remove the spark plug, when the unit is left unattended.
Always turn off the engine and ensure that all moving parts have come to a complete stop before making any repairs, adjustments, or inspections.
Exercise extreme caution when operating on slopes.
Never operate the machine at a fast pace.
Do not overload machine capacity by attempting to work at too fast a rate.
Do not carry passengers.
Pay attention, while the machine is in reverse.
Never allow any bystanders in front of unit.
Always disengage the blades, if not in use.
1 Only operate the machine at daylight or in fully illuminated areas
Ensure a stable foothold and always keep a firm hold on the handles. Always walk, never run.
Do not operate the equipment when barefoot or wearing sandals.
Exercise extreme caution when changing direction on slopes
By rear tillers, ensure that the blades are protected by safety shield, only the part of the blades that works into the soil must be free.
Never attempt to make any adjustments, while the engine is running.
⚠ Use extreme caution when reversing or pulling the machine backwards
Never operate the engine indoor or in areas with low ventilation. The exhaustion from the engine contains carbon monoxide. Failure to observe could result in permanent injury or death.
Gasoline safety
Use extreme care in handling gasoline. Gasoline is extremely flammable, and the fumes are explosive.
A Serious personal injury can occur, when gasoline is spilled on yourself or your clothes. Rinse your skin and change clothes immediately!
⚠ Use only an approved gasoline container. Do not use soft drink bottle or similar!
Extinguish all cigarettes, cigars, pipes and other sources of ignition.
⚠️ Never refuel your machine indoors.
Let the engine cool down before refilling
Never fill the fuel tank to more than 2.5 cm below bottom of filler in order to provide space for fuel to expansion.
After refueling, ensure that the cap tighten securely.
Never use the lock-function on the gasoline gun, when refueling.
Do not smoke while refueling.
Never refuel inside a building or where gasoline fumes may get in contact with an ignition source.
Keep gasoline and engine away from appliance, pilot lights, barbecues, electric appliances, power tools, etc.
⚠️ If the fuel tank has to be drained, this shall be done outdoors
Maintenance and storage
The engine shall be stopped when carrying out maintenance and cleaning operations, when changing tools and when being transported by means other than under its own power.
Check regularly that all bolts and nuts are tightened. Retighten if necessary.
The engine must be completely cooled before storing indoors or covered.
If the machine unused for a period of time, please refer to the instructions in this manual.
Maintain or replace safety and instruction labels, as necessary.
Only use original spare parts or accessories. If not original parts or accessories is used, the liability is no longer applied.
⚠️ Replace faulty silencers.
Miscellaneous
The gears are delivered pre-greased. However, always ensure they are well greased before each use.
The motor is not pre-filled with oil.
⚠ Factory-fitted control devices, such as the handle-mounted clutch cable, must not be removed or exposed.
Only drain the fuel tank outdoors. Gasoline is extremely flammable, and the fumes are explosive.
⚠ Ensure that the machine is properly secured when transported on a flatbed etc.
⚠️ Reduce the throttle during engine shutdown and close the fuel valve.
Due to vibrations, it is recommended to take a break for every 30 minutes use to avoid fatigue in your arms.
Assembly
Please follow the steps in figure:
(Actual model may vary from the illustration shown)
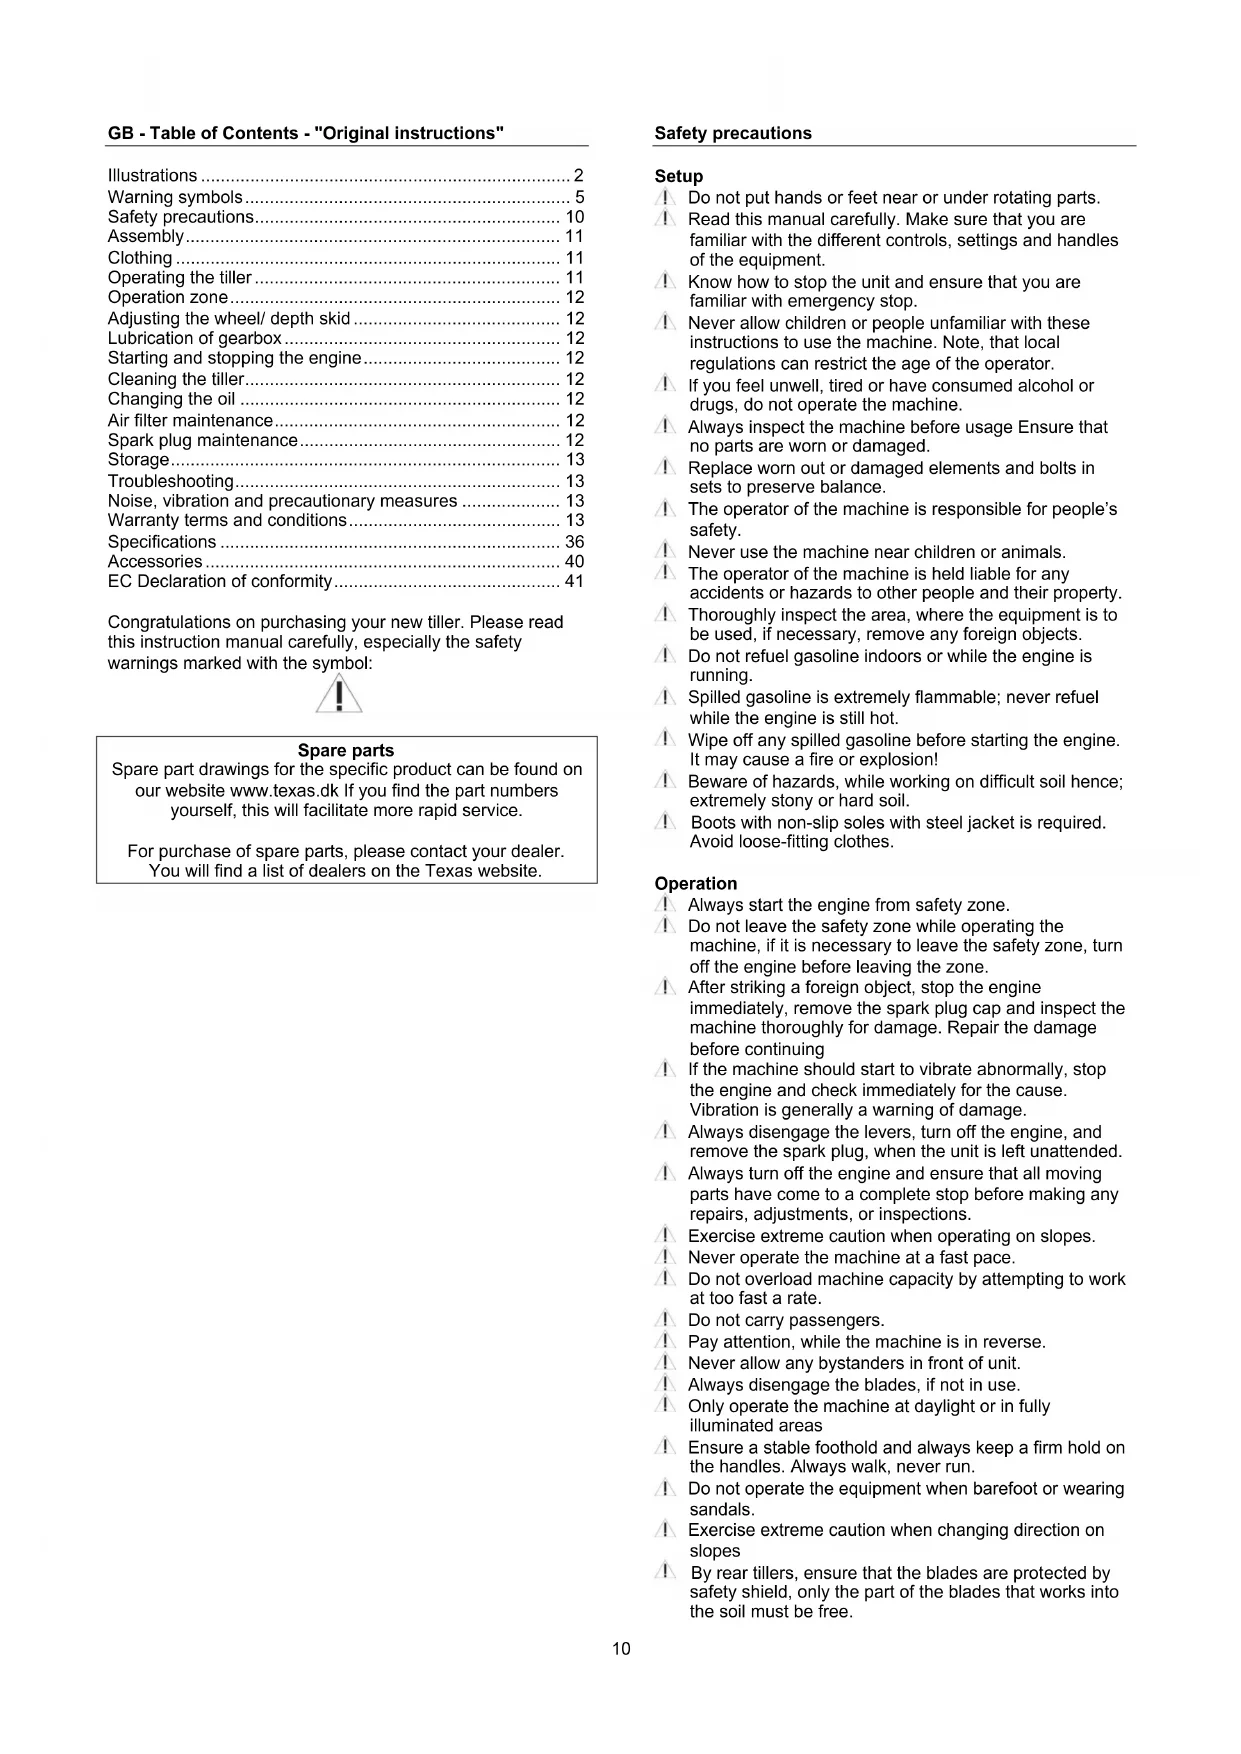
1. Box content
A. Tiller with blades
B. Upper handlebar
C. Clutch handle
D. Lower handlebars
E. Depth skid/support wheels
F. Throttle control (Lilli 340/360)
G. Panel (Lilli 345/365)
H. Side guards (Lilli 360/365)
I. Extension blades (Lilli 360/365)
- Fit the lower handlebar section. Use the supplied mountings and bolts. You can choose between 2 different heights of handlebar.
- Fit the upper handle. Use the supplied assembly kit as shown.
- Mount the clutch handle and throttle control as shown on the picture. Only Lilli 340/360.
- Mount the clutch handle, panel and throttle control as shown on the picture. Only Lilli 345/365.
- Mount the side guards using the bolts and nuts supplied. Note the side guard must go under the body frame.
- Mount the extension blades using the cotter bolts and pins. Only Lilli 360/365.
- Mount the support wheels with the cotter bolt and pin.
- The support wheels can be turned, so it works as a depth skid. Depth can be adjusted.
Fill the engine with oil. See changing the oil section for more details.
Clothing
When using the machine, wear close-fitting work clothes, hard-wearing work gloves, ear defenders and non-slip boots with steel toecaps.
Operating the tiller
⚠ Ensure the machine is placed on a level surface with the support wheels lowered prior to start.
Remove all foreign objects from the work area before using the machine. Stones, glass, branches and similar items may damage the tiller. Also, check the bolts on the tiller are tightened.
Start the motor as per the instructions below. Stand clear of the machine's moving parts.
Never attempt to move the machine in any way other than intended for normal use while the motor is running.
The tiller is designed for use in vegetable gardens and flowerbeds. Ensure that you are familiar with these instructions before operating the machine, in particular the motor start and stop procedures.
Fig 10: To use the black clutch handle the red control stick (A) must first be activated. By tilting the control stick to the right or left side and then activate the black handle lever, the tiller will move forward or backwards.
Pay attention while reversing. It is important that the area is cleared, for any obstacle before reversing. Never reverse the tiller against a wall, tree or any other fixed obstacle.
Only model Lilli 345 and Lilli 365 have reverse gear.
Operation zone
While the machine is being operated and the motor is running, do not leave the operation zone marked Fig. 12. If it is necessary to leave the operation zone, for example to attach an accessory, first stop the engine.
It is normally necessary to drive the tiller over a section of earth 2-3 times from different directions. Do not till very wet soil, as clods of earth will form that are difficult to break up.
Adjusting the wheel/ depth skid
Fig. 8: Use the support wheels for transportation.
Fig. 9. The depth skid can be set in different depths. The deeper it extends into the soil, the deeper the tilling blades will work and the slower the machine will advance. Setting the correct tilling depth will significantly reduce the effort required. The depth skid should always be adjusted to suit the ground conditions. We recommend testing several depths to see which works best.
Lubrication of gearbox
The gearbox is permanently lubricated at the factory, never open the gearbox.
Starting and stopping the engine
Remember: Always check the oil level prior to use!
The oil level must always be between the min. and max. Mark on the dipstick. Always use SAE-30 oil (0,45 L.). Use only unleaded E5 gasoline. Never over-fill the gas tank.
Warning: Stay out of dashed zone, while starting the engine! Always start the engine from dotted operation zone. See Fig. 13.
Starting the engine
- Set the throttle control on the handle to max. Fig. 11/14
- Position the choke at max. Move the choke lever fully to the left. Fig. 15.
The choke is not required if the motor is hot. - Pull the start cord to start the motor. Always feed the start cord back into the motor by hand. Fig. 16.
- When the motor is started, set the choke to minimum (fully to the right) Reduce the throttle slightly.
Stopping the engine
-
Set the throttle control to "low" and let the motor run for approx. 30 seconds.
-
When the motor idles, set the throttle control to full stop.

Vibrations may travel up into the handle during use. We therefore recommend taking a break every 30 minutes.
Cleaning the tiller
The tiller should be cleaned after use. Use a garden hose to wash off soil and dirt. Remove any grass, etc. from the rotor shaft. The chassis number should only be cleaned with a damp cloth to avoid unnecessary wear. Avoid using a high-pressure washer during cleaning.
Changing the oil
The oil should initially be changed after the first 5 hours of use, and thereafter once per year.
- Let the motor run for 5 minutes to heat up the oil. This allows the oil to run more freely and makes for a more complete oil change.
- After 5 minutes, stop the motor. Remove the spark plug cap. Drain the oil by unscrewing the sump plug. Remember to drain the oil into a container of sufficient capacity. NB: The motor must not be tipped backwards more than 45 degrees.
- Screw the sump plug back in and pour new oil into the motor. Do this by removing the oil cap and pouring in the recommended quantity of oil.
- Refit the spark plug cap.
Alternatively, use an oil extractor kit.
- Suck the oil up through the oil filler hole using the syringe. Use the hose to reach the sump.
- Transfer the used oil to the container.
- Fill the engine with new SAE-30 oil (0,45 l.).
- Always check that the oil level is visible and to edge of the fill hole. Fig. 17.
Remember to dispose of used oil in a safe way. Oil and oil extractor kit are not included
Air filter maintenance
Please inspect and clean the air filter on a regular basis. If the filter has not been cleaned for a longer period, this will have influence on the engines power take-off and the exhaustion.
- Cleanaround the air filter before being opened.
- Loosen the nut and remove cover.
- Now carefully remove the air filter element.
- Inspect and remove the dust from the air filter by tapping the element easily a few times. Replace the air filter if it is very dirty.
- Clean the base and cover.
- Reattach the air filter element, cover and fasten the nut.
- Please check that all parts are assembled correctly
IMPORTANT: Under no circumstances must oil or water be applied on the air filter!
Spark plug maintenance
- Remove the spark plug cap.
- Brush away any dirt and deposit of the spark plug.
- Loosen the spark plug using a spark plug socket.
- Check the insulation is intact.
- Clean the spark plug using a wire brush.
- Measure the electrode gap 0.7–0.8 mm. Avoid damaging the electrode.
- If it is damaged, replace it with a new one.
- Refit the spark plug.
- Refit the spark plug cap.
Storage
- If the machine is likely to be stored unused for prolonged periods, follow the instructions below. This will ensure longer machine lifetime.
- Use a garden hose to wash off soil and dirt. Remove any grass, etc. from the rotor shaft. The chassis number should only be cleaned with a damp cloth to avoid unnecessary wear. Avoid using a high-pressure washer during cleaning.
- Wipe the tiller with a damp cloth so that all surfaces are clean. Wipe the surfaces down with an oily cloth to prevent rust.
• Always store the machine in a dry, clean location.
Troubleshooting
The motor will not start
- Check the fuel control is set correctly.
- Check the spark plug.
- Check there is fresh gas in the tank.
- See separate motor instructions for further troubleshooting.
The motor is not running smoothly
-
Ensure the throttle control is not set to max.
-
Check there is fresh gas in the tank.
The blades will not rotate
- Check for stones lodged between the blades.
- Release any stones by removing the blades.
- Check the cables are in good working order and fitted correctly.
- Check the belt is in good working order and fitted correctly.
- Ensure the belt tensioner is adjusted correctly.
The blades will not stop
- Stop the engine and contact your dealer.
Noise, vibration and precautionary measures
- Long-term exposure to noise levels exceeding 85 dB (A) are damaging. Always use ear defenders when the machine is being used.
- Reduce the running speed of the motor to reduce vibration and noise levels.
- To reduce noise levels further, only use the machine in an open environment.
- Vibrations can be reduced further by holding the handle firmly.
- To avoid disturbing others, the machine should only be used during the daytime.
- Always wear close-fitting work clothes, hard-wearing work gloves, ear defenders and non-slip boots with steel toecaps.
- Take a 30-minute break every 2 working hours.
- A worn belt must be replaced/ serviced by an authorized dealer
Warranty terms and conditions
The warranty period is 2 years for private end users in EU countries.
Products sold for commercial use, only have a warranty period of 1 year.
The warranty covers material and/or fabrication faults.
Restrictions and requirements
Normal wear and replacement of wearing parts are NOT covered by the warranty.
Wearing parts, which are NOT covered for more than 12 months:
- Blades
- Cables
- Belts
- Switches
- Membranes/gaskets
- Spark plugs
• Engine liquids (oil, gasoline) - Starter cords
- Filters
If you start the engine without adding oil, it will be damaged and cannot be repaired and therefore not covered by the warranty.
The warranty does NOT cover damages/faults caused by:
- Lack of service and maintenance
- Structural changes
- Exposure to unusual external conditions
- Damages to the bodywork, deck, handles, panels etc.
- If the machine has been improperly used or overloaded
- Wrong use of oil, gasoline or other liquid types, which are not recommended in this user manual
- Bad or dirty gasoline, which results in contamination of the fuel system
- Use of unoriginal spare parts.
- Other conditions where Texas cannot be held responsible.
Whether a case is a warranty claim or not is determined in each case by an authorized service center.
Your receipt is your warranty note, why it should always be kept safe.
REMEMBER: The purchase of spare parts as well as any request for warranty repair, art. no. (e.g. 900611XX), year and serial number should always be informed. It can be found on the CE-label on the machine!
* We reserve the right to change the conditions and accept no liability for any misprints
natural_image
Yellow and black lawn mower with visible blades and control panel (no text or symbols)Art. no. 91033600100

natural_image
Yellow and black LILLI agricultural tiller machine with attached equipment (no visible text or symbols)Art. no. 91031500100 + 91032000100 + 451224

natural_image
Yellow and black ULLI utility tiller with visible blade and control panel (no text or symbols)Art. no. 91032500100 + 91032000100 + 451224

natural_image
Yellow and black ULLI utility tiller with attached metal frame, no visible text or symbols on the device itself.Art. no. 91031100100 + 91032000100
Fabrikant • Manufacturer • Hersteller • Fabricant • Producent • Proizvajalec • Costruttore
Texas Andreas Petersen A/S
Erklærer herved at materiel • Hereby certifies that the following • Bescheinigt hiermit das die nachfolgenden • Certifie ici que • Niniejszym zaświadcza, że niżej wymieniona • Ovime potvrđuje da je sljedeće • Con la presente si certifica quanto segue:
Benzin havefræser • Gasoline cultivator • Benzin-Motorhacke • Motoculteur de jardin Essence • Glebogryzarka • Bencin kultivator • Coltivatore a benzina
Lilli 340TG - Lilli 345TG - Lilli 360TG - Lilli 365TG
Er fremstillet i overensstemmelse med fölgende direktiver • Is in compliance with the specifications of the machine directive and subsequent modifications • Steht im Einklang mit den folgenden Richtlinien • Est fabriqué en conformité avec les directives suivantes • Zgodność z wymaganiami dyrektywy maszynowej następujące • Je v skladu z zahtevami direktive o strojih in poznejših sprememb • Rispettano le specifiche della direttiva sulle macchine e le sue successive modifiche
2006/42/EC - 2014/30/EU - 2000/14/EC amended by 2005/88/EC
Materiellet er udført i overensstemmelse med følgende standarder • Conforms with the following standards • In Übereinstimmung mit den folgende Standards • Conformément aux normes suivantes • Jest zgodna z następującymi normami • V skladu z naslednjimi standardi • Sono conformi alle seguenti norme
EN709: 1997+A4:2009, EN709+A4/AC:2012, EN14982:2009
L_wA : 93 dB(A) L
pA: 81.0 dB(A), K=3 dB
Vibrations A_h : 4.7 m/s ^2
Serial numbers:
Lilli 340TG 2303023210000 - 2503023299999
Lilli 345TG 2303023310000 - 2503023399999
Lilli 360TG 2303023410000 - 2503023499999
Lilli 365TG 2303023510000 - 2503023599999
Texas Andreas Petersen A/S
Knullen 22 • DK-5260 Odense S 25.07.2022
Responsible for documentation
Johnny Lolk

text_image
Henry TahnJohnny Lolk
Managing Director