
Smart 5105WS - Lawn mower Texas - Free user manual and instructions
Find the device manual for free Smart 5105WS Texas in PDF.
| Product Type | Petrol Lawn Mower |
| Brand | Texas |
| Model | Smart 5105WS |
| Engine | Petrol, gasoline |
| Fuel | Unleaded petrol E5 |
| Engine oil capacity | 0.5 litre (SAE-30 oil) |
| Cutting height | 6 positions, from 28 mm to 75 mm |
| Blade brake | Yes, stops engine and blade in 3 seconds |
| Water injector | Yes, for cleaning the deck |
| Air filter | Paper and foam, cleanable |
| Spark plug | Gap 0.7-0.8 mm |
| Blade | Steel, replaceable, sharpenable |
| Number of wheels | 4 |
| Handle adjustment | Yes, adjustable height |
| Mulching function | Yes, with included adapter |
| Side protection | Yes |
| Starting | Recoil starter with primer |
| Oil change | First time after 5 hours, then annually |
| Winter storage | Drain petrol, add oil to the cylinder |
| Warranty | 2 years |
| Compliance | CE |
| Spare parts | Available: blade, spark plug, air filter, etc. |
Frequently Asked Questions - Smart 5105WS Texas
User questions about Smart 5105WS Texas
0 question about this device. Answer the ones you know or ask your own.
Ask a new question about this device
Download the instructions for your Lawn mower in PDF format for free! Find your manual Smart 5105WS - Texas and take your electronic device back in hand. On this page are published all the documents necessary for the use of your device. Smart 5105WS by Texas.
USER MANUAL Smart 5105WS Texas
DENKEN SIE DARAN, VOR
INBETRIEBNAHME MOTOROL (SAE-30)
AUFZUFULLEN!
ID
M1
M2
M3
M5
M6
M7
F1

F2

F3
A1
A2
A3

Adverselssymboler / Warning symbols / Warnsymbole / Simboluri de avertizare


D
DK
Laas betjenings-vejoladingen
grundigt for maskinen
benytes
Benyt herevaarn og
sikkerhedsbriller.
Advarsel:
Please read the user manual carefully before operating the machine.
Always wear eye and ear
protection.
Warning:
Safety information about hazards that can result in personal injury
Warning:
Pay attention to thrown objects
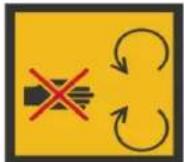
Do not use on hills above 22^ Do not touch rotating parts
Remove the spark plug cap from the spark plug before service or repair
Stop the engine before cleaning of work area.
Keep distance to other people, children and animals
Warning:
The blade is sharp, do not
touch the knife
Do not place hands or feet under cutting deck
15.4 × 20 = 68.4( 20)
Warning:
Always use correct tools and
original spare parts
D
Identification of dele 2
Montering 2
Kabeljustering 2
Bettening 2
Vaskestuds. 3
Olieskift 3
Luftfilter 3
Kniv. 3
Taendrør 3
GB Original instructions
Safety 5
Identification of the parts 6
Mounting 6
Cable Adjustment 6
Operation 6
Water nozzle 7
Oil change 7
Air Filter. 7
Blade 7
Spark plug. 7
Storage and maintenance 8
Warranty terms and conditions.. 8
Technical specifications 30
Troubleshooting 32
EC Certificate of conformity. 38
Safety
Setup
Do not put hands or feet near or under rotating parts.
Read this manual carefully. Make sure that you are familiar with the different controls, settings and handles of the equipment.
4 Know how to stop the unit and ensure that you are familiar with emergency stop.
4 Never allow children or people unfamiliar with these instructions to use the machine. Note, that local regulations can restrict the age of the operator.
If you feel unwell, tired or have consumed alcohol or drugs, do not operate the machine.
Always inspect the machine before usage Ensure that no parts are worn or damaged.
Replace worn out or damaged elements and bolts in sets to preserve balance.
4 The operator of the machine is responsible for people's safety.
1 Never use the machine near children or animals.
The operator of the machine is held liable for any accidents or hazards to other people and their property.
Thoroughly inspect the area, where the equipment is to be used, if necessary remove any foreign objects.
4 Do not refuel gasoline indoors or while the engine is running.
Spilled gasoline is extremely flammable, never refuel while the engine is still hot.
1 Wipe off any spilled gasoline before starting the engine. Spilled gasoline on a hot engine may cause a fire or explosion!
4 Boots with non-slip soles with steel jacket is required. Avoid loose-fitting clothes.
Operation
After striking a foreign object, stop the engine immediately, remove the spark plug cap and inspect the machine thoroughly for damage. Repair the damage before continuing.
If the machine should start to vibrate abnormally, stop the engine and check immediately for the cause. Vibration is generally a warning of damage.
Always turn off the engine and ensure that all moving parts have come to a complete stop before making any repairs, adjustments, or inspections.
Exercise extreme caution when operating on slopes.
4 Never operate the machine at a fast pace.
1 Do not overload machine capacity by attempting to push at too fast a rate.
Do not carry passengers.
1 Never allow any bystanders in front of unit.
Only operate the machine at daylight or in fully illuminated areas.
Ensure a stable foothold and always keep a firm hold on the handles. Always walk, never run.
4 Do not operate the machine when barefoot or wearing sandals.
Exercise extreme caution when changing direction on slopes
1 Never attempt to make any adjustments, while the engine is running.
Use extreme caution when reversing or pulling the machine backwards
1 Never operate the engine indoor or in areas with low ventilation. The exhaustion from the engine contains carbon monoxide. Failure to observe could result in permanent injury or death.
Due to vibrations from the handle, long time use can result in white fingers. If fatigue is felt in arms, hands or fingers - or visible signs of white fingers is appearing, the work should be stopped immediately, and a sufficient time of break should be taken for recovery. To avoid white fingers, each user should operate the machine for no more than 1.5 hours per day.
Gasoline safety
Use extreme care in handling gasoline.
Gasoline is extremely flammable and the fumes are explosive. Serious personal injury can occur, when gasoline is spilled on yourself or your clothes. Rinse your skin and change clothes immediately!
Use only an approved gasoline container. Do not use soft drink bottle or similar!
Extinguish all cigarettes, cigars, pipes and other sources of ignition.
1 Never refuel your machine indoors.
1 Let the engine cool down before refilling
1 Never fill the fuel tank to more than 2.5cm below filler in order to provide space for fuel to expansion.
After refueling, ensure that the cap tighten securely.
1 Never use the lock-function on the gasoline gun, when refueling.
Do not smoke while refueling.
1 Never refuel gasoline inside a building or where gasoline fumes may get in contact with an ignition source.
1 Keep gasoline and engine away from appliance, pilot lights, barbecues, electric appliances, power tools, etc.
Maintenance and storage
The engine shall be stopped when carrying out maintenance and cleaning operations, when changing tools and when being transported by means other than under its own power.
1 Check regularly that all bolts and nuts are tightened. Retighten if necessary.
The engine must be completely cooled before storing indoors or covered.
If the machine unused for a period of time, please refer to the instructions in this manual.
1 Maintain or replace safety and instruction labels, as necessary.
Only use original spare parts or accessories. If not original parts or accessories is used, the liability is no longer applied.
Miscellaneous
The motor is not pre-filled with oil.
Always before start check the engine oil level.
Factory-fitted control devices, such as the handle-mounted clutch cable, must not be removed or exposed.
Only drain the fuel tank outdoors. Gasoline is extremely flammable and the fumes are explosive.
Ensure that the machine is properly secured when transported on a flatbed etc.
The lawnmower is manufactured according to the latest safety requirements. These include a blade brake that stops the motor and blade in 3 seconds when the blade brake. Every precaution is only effective when it is followed exactly. Use the following description when you mount your lawnmower.
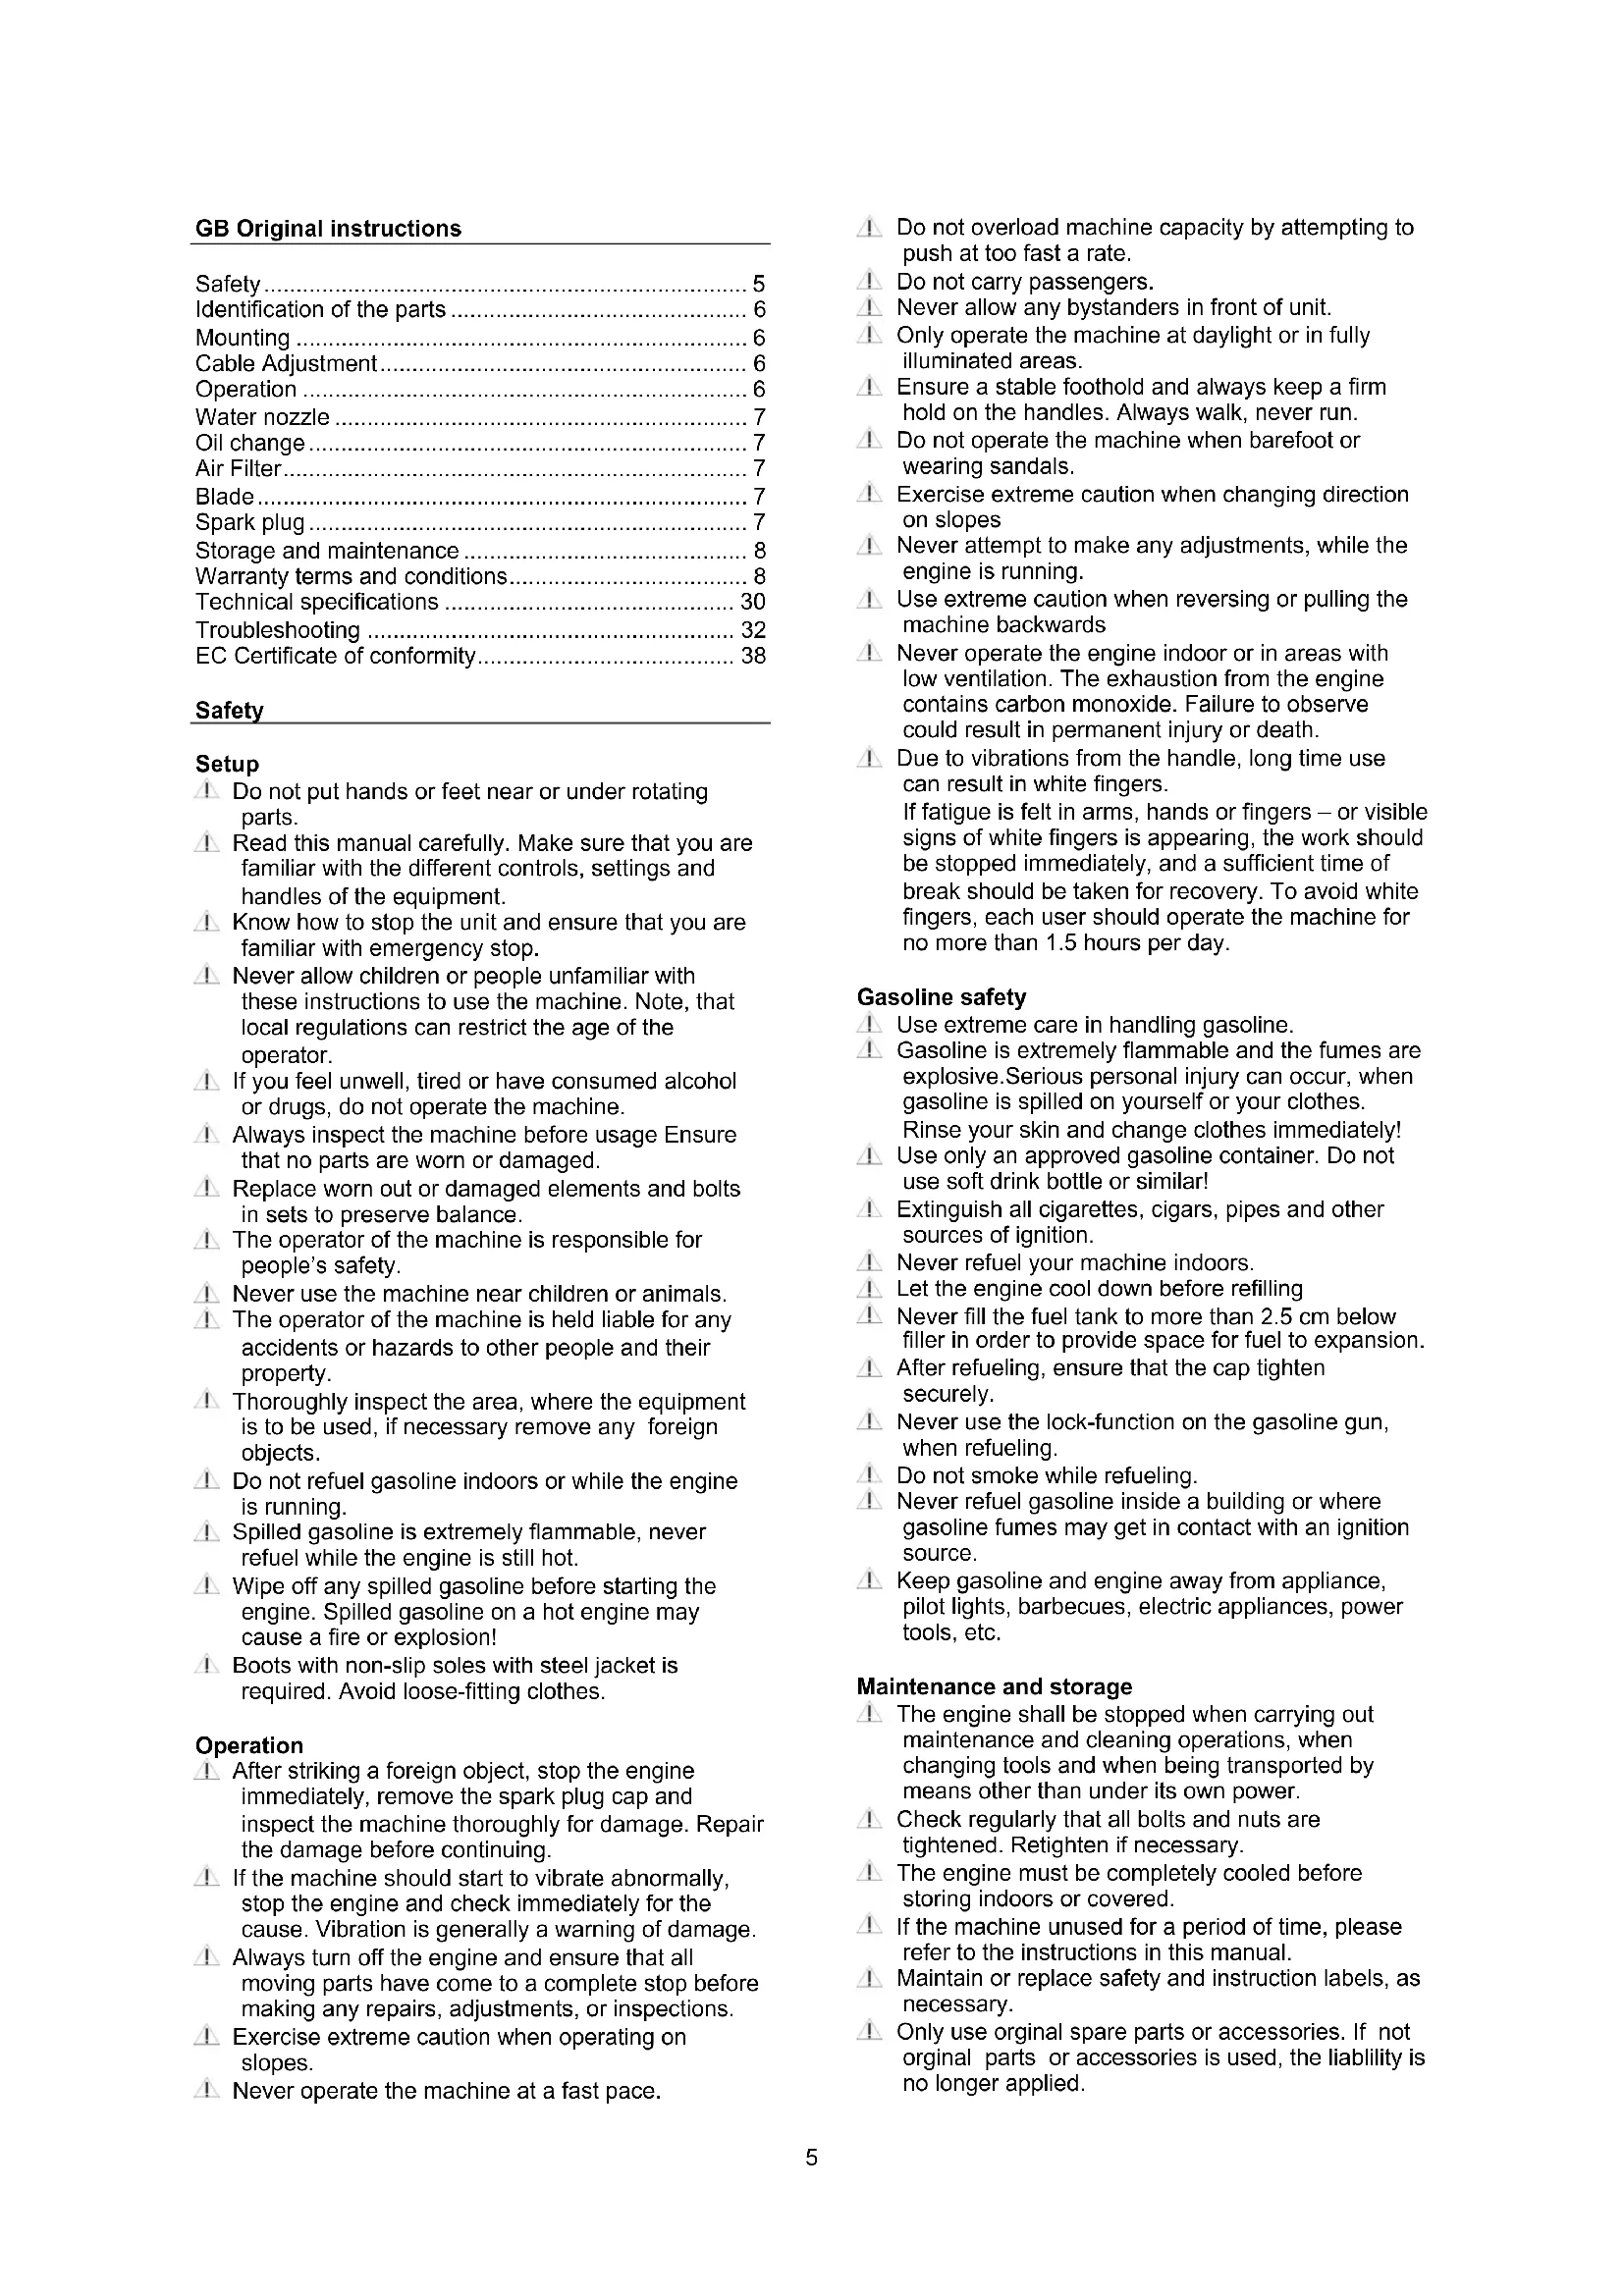
Identification of the parts
See Illustration ID
Notice: the illustrations may vary from your present model
B. Handlebar for engine brake
C. Recoil starter
D. Wing nut
H. Gasoline filling cap
I. Air Filter
J. Exhaust
K. Spark plug
L. Oi
P. Height adjustment
Q. Side discharge guard
R. Primer*
- may vary from your actual model.
Mounting
Unpacking: Illustration M1
Remove the mower from the box by pulling the machine out form the side. The box contains:
1 pcs mower
4 pcs wing nut set consisting of wing nuts, bolts and washers. (See ID; D)
Warning: Ensure that cables are not pinched.
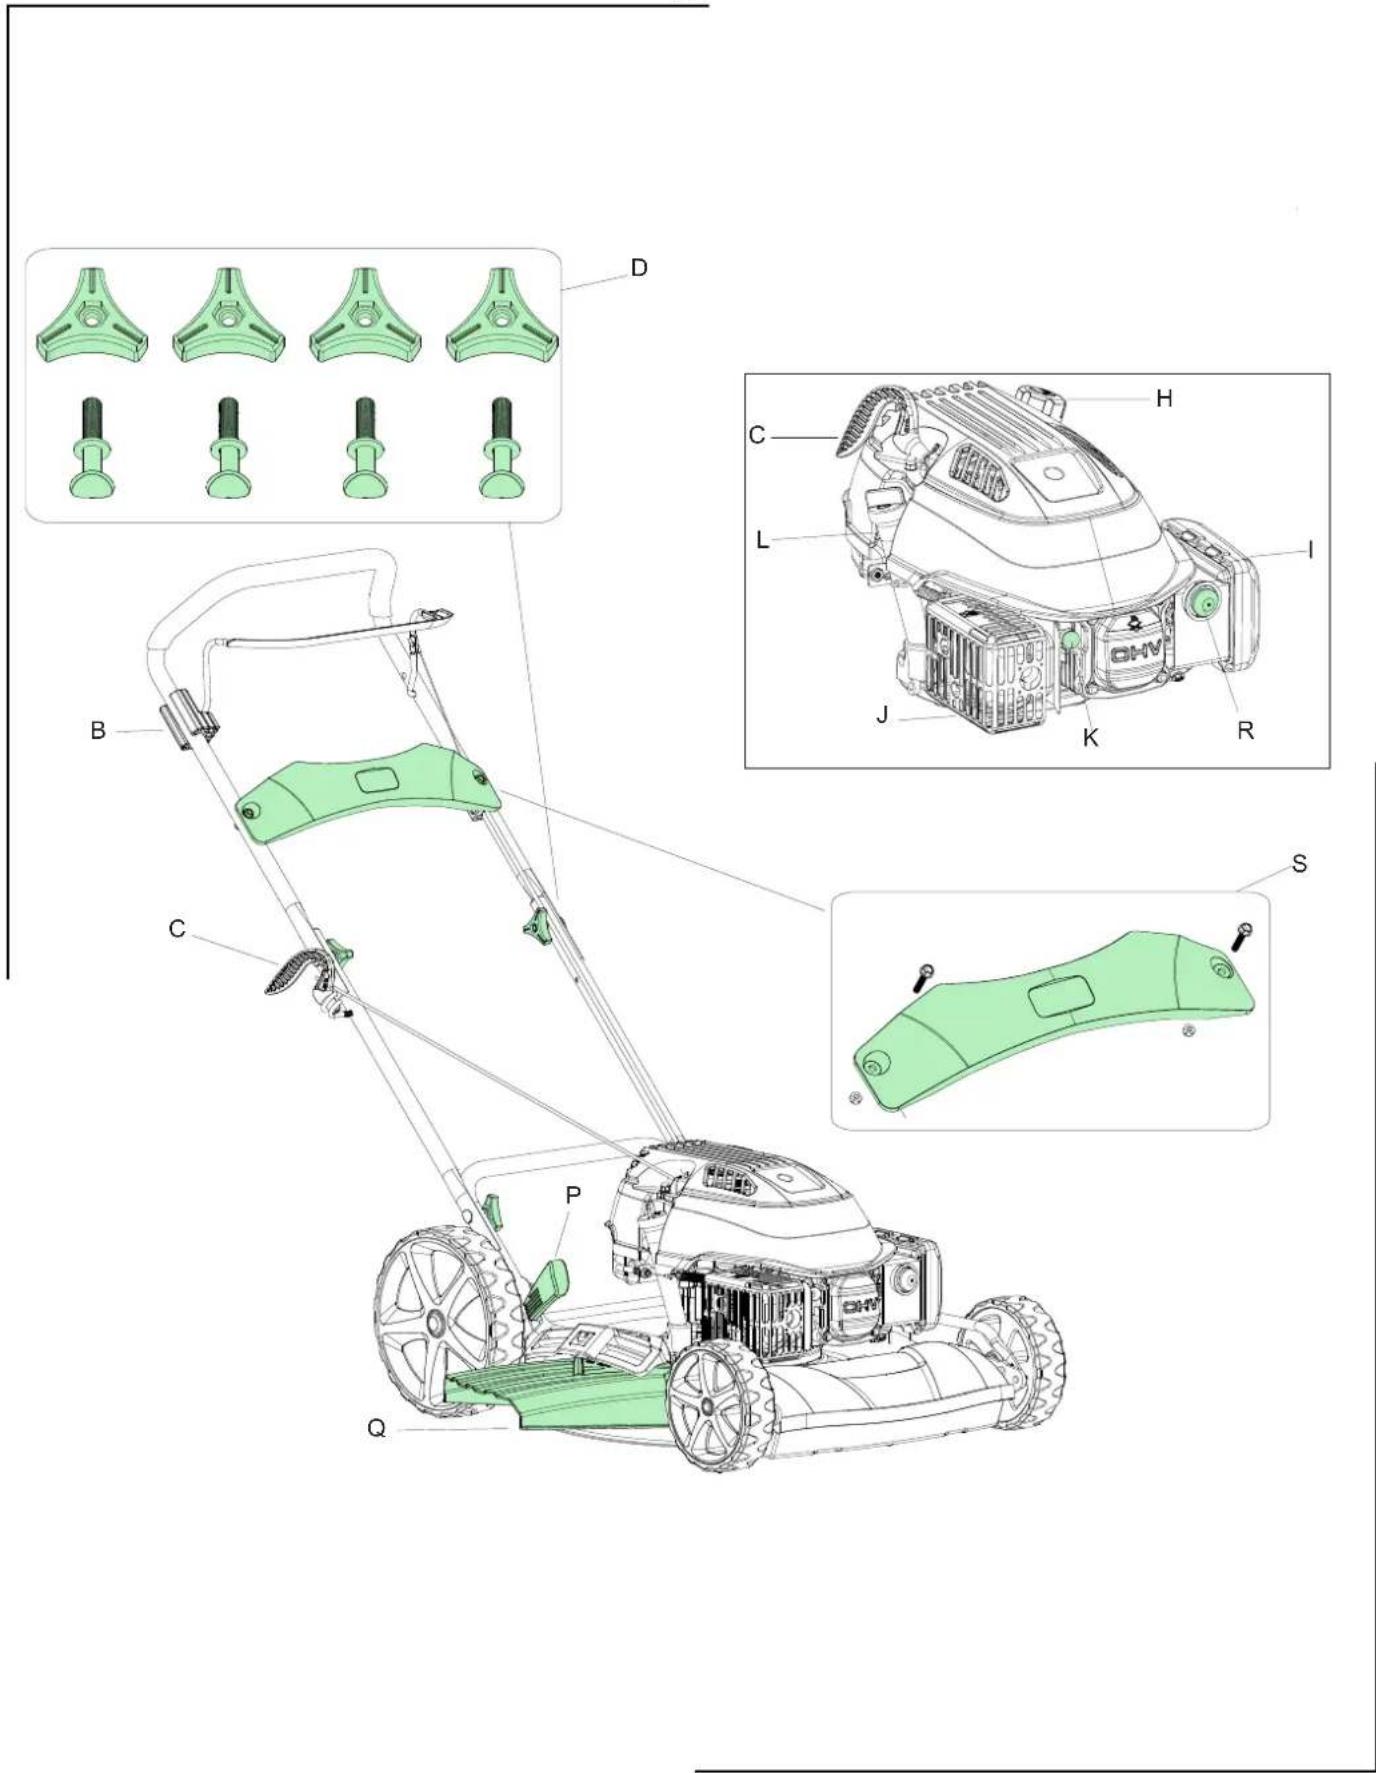
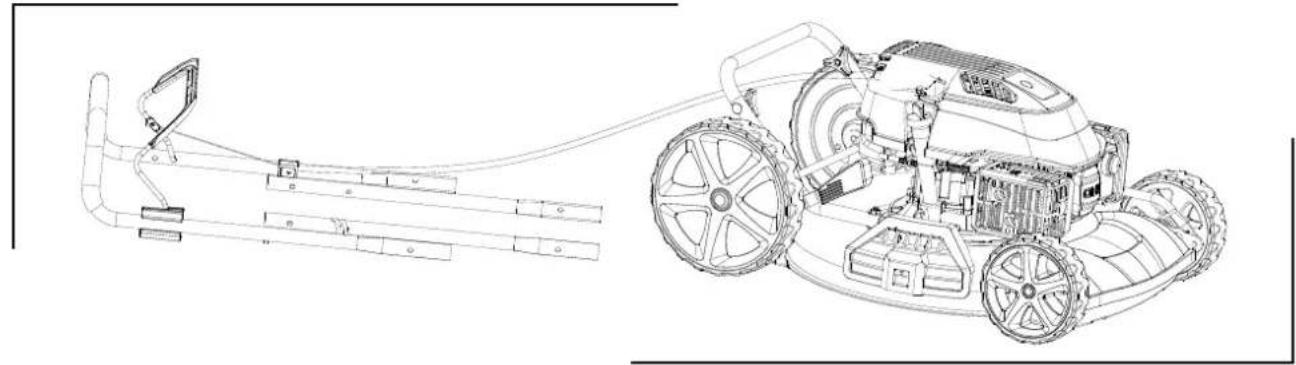
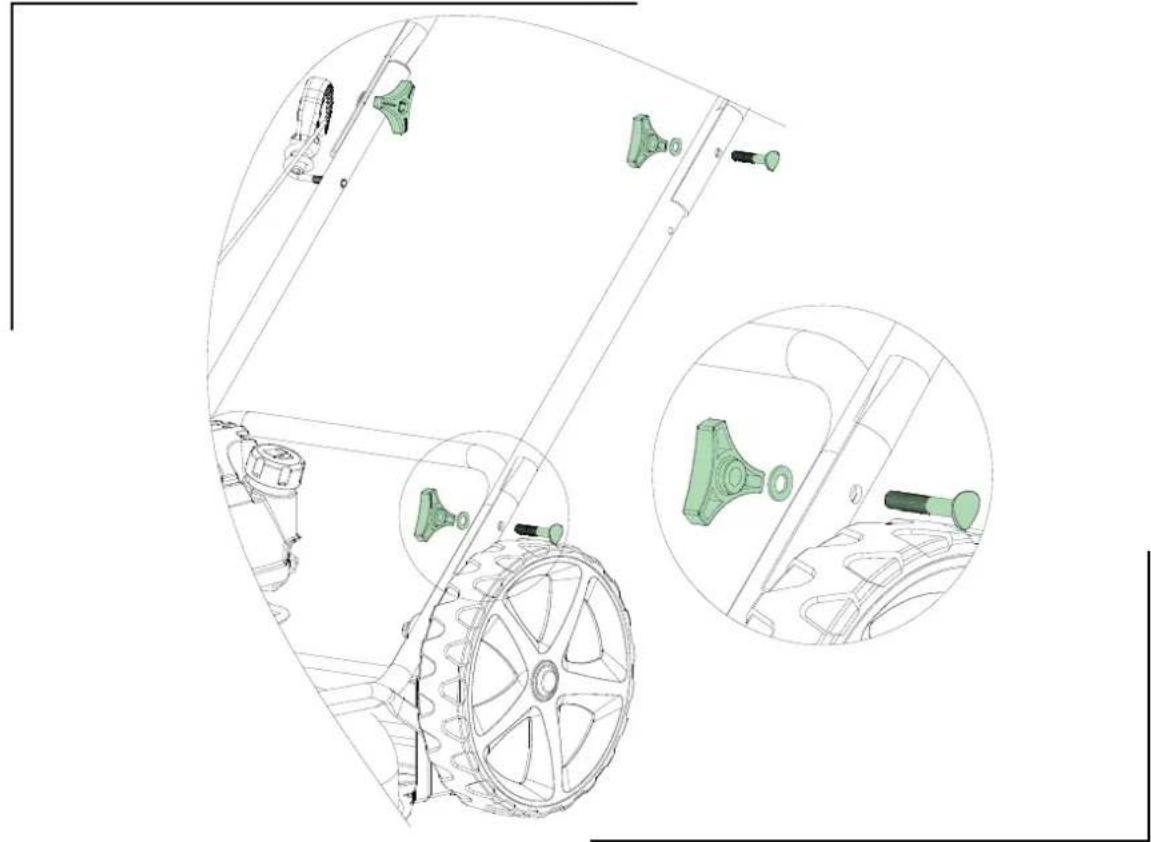
Handlebar and height adjustment: Illustration M2
The handlebar is height adjustable. This means that they can be adjusted so that it best fits you. Before you install the handlebar, it may be a good idea to have decided which height is best for you.
- Mount the middle handlebar tube to the lower handlebar tube.
- Attach the wing nut from the inside of the side bracket and into the lower handlebar.
- Attach the upper handlebar on the lower. Fasten with wing nut from the inside of the handlebar.
- Customize cable and secure with cable clamps
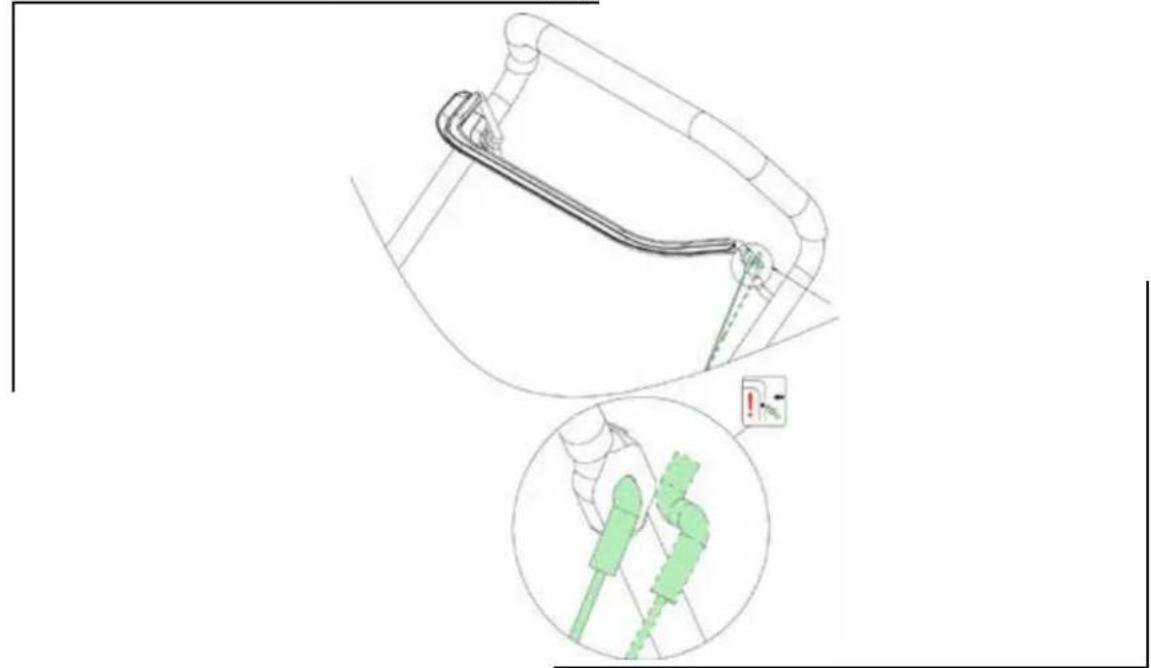
Mounting the engine brake cable: Illustration M3
- Gently push the top handlebar ID:B forward
- Insert the engine brake cable from the outside, into the hole in the bracket on handlebar ID:B and lock.
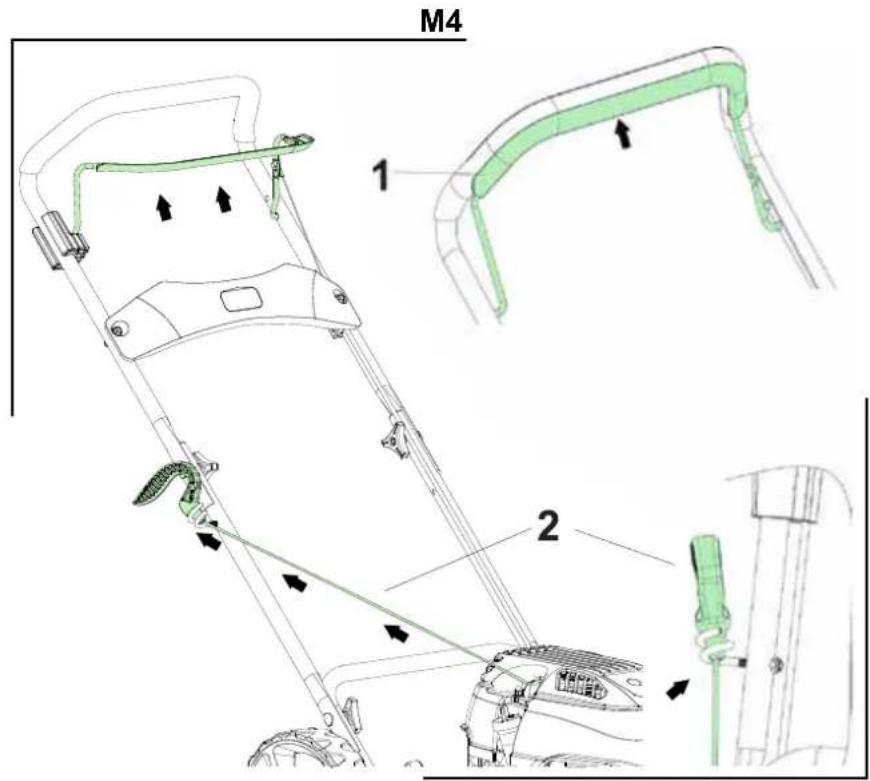
Mounting the recoil-starter: Illustration M4
- Pull the engine brake handlebar and hold, in order to release the starter cord on the engine.
- Pull gently the starter cord from the engine (Engine brake handlebar MUST be hold)
- Attach the starter grip on the rack of handlebar.
- Release the engine brake handlebar and the starter grip.
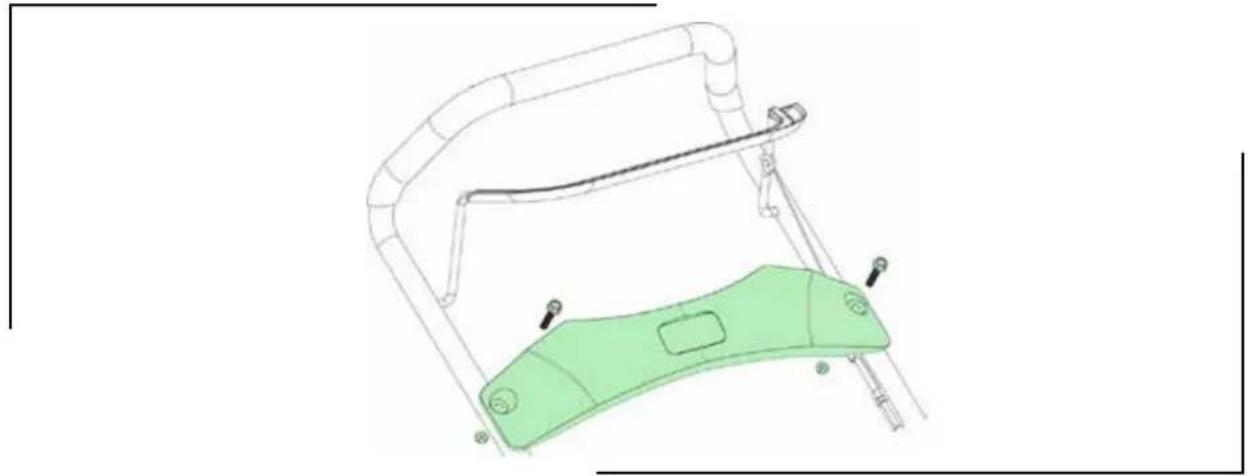
Mounting the breastplate: illustration M5*
- For models with breastplate with cup holder follow illustration M5-1
-
For models with breastplate follow illustration M5-2
-
Note: Not all models do have breastplate
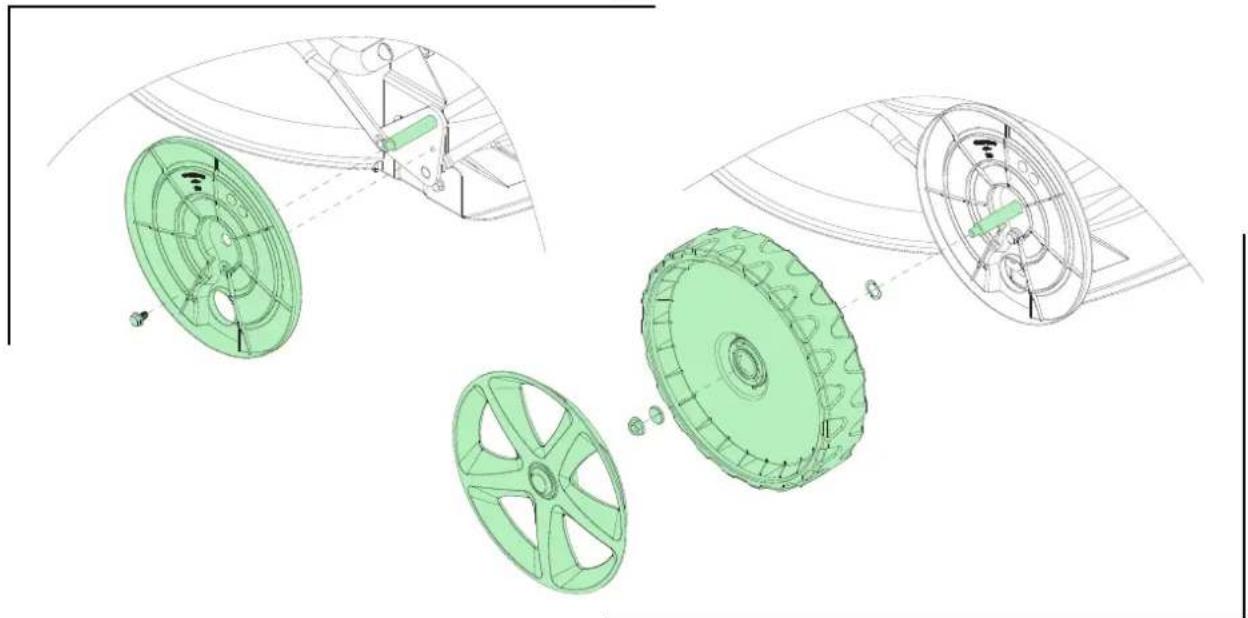
Mounting the wheel illustration M6*
- Mount the inner wheel covers with the bolts
-
Mount the 2 front and 2 rear wheels as shown in the illustration.
-
The illustration may vary from your present model
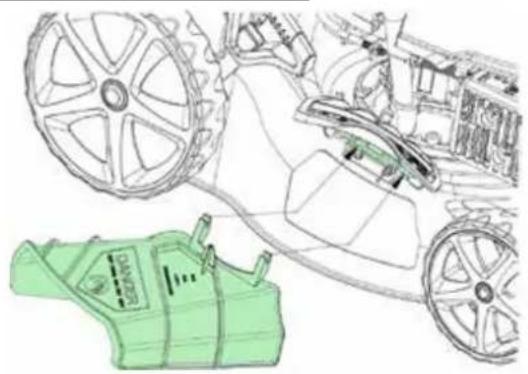
Side discharge guard: Illustration M7*
- Lift the side guard and insert side discharge guard. Then insert the mulching plug in rear discharger to mow with side discharge function.
Cable Adjustment
The following cables may be necessary to readjust: Illustration A1
Adjusting the engine brake cable
If you experience slack in engine brake cable, this can be solved simply by tighten or loosen the bolt on the engine block.
Operation
Always check and refill oil before the start! Read and apply the instructions given in the enclosed start guide!
The oil level should always be between min. and max on the dipstick. Fill with SAE-30 oil. There should be total 0.5 liter oil in the engine. Use only unleaded E5 fuel to the engine. Never overfill the tank.
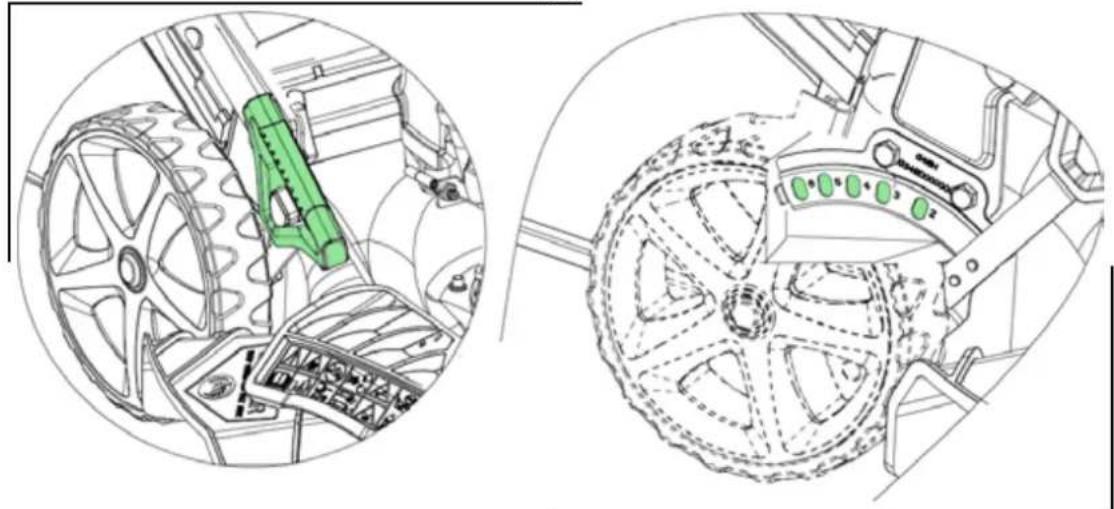
Cutting height adjustment: Illustration F1
(the illustrations may vary from your actual model)
The mower has 6 different heights. The cutting height ranges from 28mm to 75mm
Start: Never start the mower directly on long grass.
Recoil with primer: Illustration F2
- Push the primer several times, first time push 1-3 times, if necessary supplement with up to 3-5 times.
Note: It is not possible to drown engine.
2. Hold the handlebar for the engine brake; this will release the engine brake.
3. Pull the recoil starter gently until you feel resistance in the rope, then pull quickly and energetic. Do not at any time let go of the recoil starter but slide it gently into starting position.
Stop: Illustration F3
- Release the engine brake and self-propelled bar to turn off the mower and the engine
Note: The blades will still rotate at up to 3 seconds after stopping.
Water nozzle
The left side of the mower deck is fitted with a water nozzle for washing the deck*. (See Illustration ID-F)
- When using the water nozzle, the machine must be in the lowest height position and placed on the lawn. This ensures that the water remains under the deck during cleaning.
- Attach a hose to the nozzle
- Turn on the water and start the engine.
- The rotations of the blades will ensure that the water will clean the underside of the deck.
Note: For best result clean the deck with the water nozzle function right after each mowing. If the grass dries out, this function will not work optimally.
- Note: Not all models have water nozzle
Oil change
Oil should be changed for the first time after 5 hours, then at least 1 time per year.
You will need an oil extractor kit. Art. no. 40-11336 Oil and oil extractor kit is not included
Use an extractor kit and do as follows:
- Turn on the engine and let it run for 5 min or until the engine is hot. A hot engine liquefies the oil which makes it easier to drain.
- Suck the oil up through the oil filler hole using the syringe that came with the oil extractor kit. Use the hose to reach the sump.
- Transfer the used oil into a empty container.
- Fill the engine with SAE-30 oil.
- Check the oil level using the dipstick. (Min / Max)
Remember to dispose the used oil so that it does no harm to nature. Use your local recycling station.
Air Filter
The air filter should be inspected and cleaned regularly. If the filter has not been cleaned for a long time, the engine's power will drop.
See Illustration A2
- Clean around the air filter before removing the cap.
- Push the two flaps down and gently pull the cover
- Carefully remove the paper filter and inspect it. Brush it with a soft brush. If it is very dirty, replace it. Be careful that no dirt gets into the inlet.
- Wash the black foam element in the right side in warm water and soap.
- Press the water out of the foam element and let it dry. Put a few drops of SAE-30 oil on the filter to moisten it lightly. Carefully squeeze any surplus oil out of the foam element and reattach.
- Please note that all parts are assembled correctly and properly closed, as shown in the picture.
Blade
Inspection of the blade
- Tilt the mower with the front upwards.
- Inspect blade for damage, cracks or excessive rust or corrosion.
- Check that the blade bolt is tightened.
Note: A dull blade can be sharpened! But a blade that is worn, bent, cracked or otherwise damaged must be replaced.
Removing the blade: See illustration A3
If you remove the blade to sharpen or replace it, you must use a torque wrench and some heavy gloves to protect your hands.
- Loosen the blade bolt. Use a piece of wood to prevent the blade from turning around.
- Remove the bolt, washer, blade and blade holder in that order
- Sharpen or replace the blade.
- Insert the blade holder, blade, washer and bolt in that order.
- Tighten the blade bolt with 50Nm . Use a piece of wood to prevent the blade from turning around.
Warning: A blade must be sharpened so it is in 100% balance, otherwise it may cause vibrations that could damage the engine. Damage to engine due to faulty sharpening is not covered by warranty. We therefore recommend letting a service center sharpen the blade.
Spark plug
- Remove the spark plug.
- Brush off dirt from the spark plug.
- Use a spark plug wrench to loosen the spark plug.
- Check the insulation is intact.
- Clean the spark plug with a wire brush.
- Measure the electrode, taking care not to damage the electrode.
- The distance should be: 0.7 to 0.8mm
- If the spark plug is undamaged refit or replace. Art.no.40-11294
- Reattach the spark plug.
Storage and maintenance
Maintain your lawnmower: Check all bolts, screws, nuts and deck. Dismount the blade and the belt plastic cover for regular cleaning. Always make sure that the blade is sharp. It's a good idea to take your lawn mower to an annual service check with your authorized service dealer. See your nearest service center at www texas.dk.
Storage: After use the lawnmower kept in a dry and clean room. Clean the machine after every use. Grass and dirt must be removed from the underside of the deck. By tipping the mower (for cleaning) is recommended to tilt the front up (max. 45 degrees). If you tilt it sideways, the carburetor and air filter always face upwards, since oil may run out and destroy the engine. Be aware that removing the spark plug before the mower maintenance.
Winter storage: Empty the fuel tank and let the engine run until the gasoline in the carburetor is used up. Spark plug removed. Remove the spark plug and add a teaspoon of oil (engine oil) in the hole. Pull the starter to distribute oil. Mount the spark plug, but not the spark plug cap. Change oil as described in the section above. Spray silicone lubrication into the cables and move them.
Finally, clean the mower thoroughly. Dip a cloth in oil and luricate metal parts to prevent rust.
Warranty terms and conditions
The warranty period is 2 years for private end users in EU countries. Products sold for commercial use, only have a warranty period of 1 year.
The warranty covers material and/or fabrication faults.
Restrictions and requirements
Normal ear and replacement of wearing parts are NOT covered by the warranty.
Wearing parts, which are NOT covered for more than 12 months:
Blades
Cables
Belts
Fuses
Switches
- Membranes/gaskets
Spark plugs
Engine liquids (oil, gasoline)
- Starter cords
- Filters
- Battery: If the battery is not stored correct (frost-free and recharged every 3 months), the durability is only guaranteed for 6 months.
If you start the engine without adding oil, it will be damaged and cannot be repaired and therefore not covered by the warranty.
The warranty does NOT cover damages/faults caused by:
- Lack of service and maintenance
Structural changes - Exposure to unusual external conditions
- Damages to the bodywork, deck, handles, panels etc.
- If the machine has been improperly used or overloaded
- Wrong use of oil, gasoline or other liquid types, which are not recommended in this user manual
- Bad or dirty gasoline, which results in contamination of the fuel system
- Use of unoriginal spare parts.
- Other conditions where Texas cannot be held responsible.
Whether a case is a warranty claim or not is determined in each case by an authorized service center.
Your receipt is your warranty note, why it should always be kept safe.
REMEMBER: The purchase of spare parts as well as any request for warranty repair, art. number (e.g. 900665XX), year and serial number should always be informed. It can be found on the CE-label located on the rearpart of the cutting deck behind the engine!
- We reserve the right to change the conditions and accept no liability for any misprints
HaToJKNHyBunbc Ha NoCTOpOHn IpeImet, HEmeDInEHHo 3aRlyWnte DBrIaTeJIb, CHMIMTE KOJNaQOK CBeH N3axKraHnN TuaTeJIbHO
OCMOtpnte MaunHy Ha npedMeT NOBpeKdHm. PpeKde Yem npoDOnkntb pa60ty, yCTpaHnTe NOBpeKdHne
EcnBBoBpempaobtMaunHbnoBnTc HeeCTeCTBeHHaBnBpaun,3arnyuTe DnRaTeNb uycTaHOBnte npuHHy HeNoJaKn.BnBpaun,ka K npabNIO,raBnETc npn3HaKOM NOJOMKn.
BcerdaIpyuHte DBnraTeNb n y6eDntecb, YTO BCE BpaUaOuIeNcA qACTn NOJHOCTbIO OCTaHOBUNCb, npexJe cH MaVaTb OCMOT pIIN pa6oTbI no peMOHTy, HAcTPOKe.
Будъпгельноoctopoxны BOВрмя pa60ы NaCKIOHax.
HnKorda He 3KnnyaTnpyTe MaunHy C BbICOKM TEMNOM.
He npeBbIaIte DonyCTMMyo Harpy3Ky Ha MaunHy, nbITaRc paOToTaC BblcOKoI CKOPoCTbIO.
He npebo3nte naccaxnpoB.
He donyckaTe noBneHnNoctopoHHnx nepeD yCTaHOBko.
3KcnpyntpyMeMaHnHYTOJIbKOdHemNnHaXopoOoOCBeUeHHbIXNPOaKaX
1 ObecneBte HaedexHyo onopy dHn HOr n Kpenko depKnte pykOaTKn. Bcerda xOaNTe, HNKoRa He 6eraTe.
He 3KcNpyaTnpyTe 60bOpOBAHnE 6e3 6bYBn nB HenoDxOJaIe O6bYn.
Будte npedeJIbHO ocToPOxHbI npi CMeHe HappaBneHnHa CKIoHax.
He bTaIeBbINIOJIHrTb HAcTpOry BO BpeMpa60tbl DBnraTeJr.
БудTe npeДeNBHO BHIMATEJbHbI BO BpEmЯ
ДВИКЕнгЯ 3aДнHM XODOM IIN 6yKcnpOBKe
MaUNHbI Ha3aI
HnKOrJa He 3anyckaIte DnBraTeNb BHyTpIn NOMeHn HnHa yactkax C nIOXoN BeHTnIaIeN. BbIXon DnBraTeNcOepJxNT OKncb YrIepOa. HeBbINONHeHne NHCtpyKuM MoKeT CTaTb npUHHoYBeBya nnCmepTN.
Mepbl npedoctopoxhoctn npn 6paueHHN C 6eH3HHOM
БудteчрзвуаиоoctopoxнblnpoobapueHn c6eH3HOM.6eH3NHЯBJIaTcra JERKOBOCJIaMeHryIOUMCBAECETBOM,aero npbI B3pbIBOONaCHbl.
1 PpOJIHTbH Ha TeNo UIN OJExKJy 6eH3nM oKeT Bbl3BaTb CepBe3HyU TpaBMy. IpPOMTe Koxy HEMeIeHHO CMeHInTE OJExKJy!
1 NcnoIb3yIe KaHnCtpbl, npEHa3HaueHHbIe CneuaJIbHO nIg 6eH3nHa. He nCNoIb3yIe MArKHe 6yTbIKn I3-IOd HAnNTKOB nIOo6HyIO Tapy!
Ioracnte crrapetbl,crrapbl,KypntelhbHbte Tpy6kn I npTne nctOHHKBOcPnAmHeHnA.
HnKOrda He 3anpaBnIe MaunHy BHyTpni NOMEueHn.
1 DaTe DnBraTeIIO OCTbITb, npexKe Yem npNCTyNTb K 3anpaBke
HnKOrJa He 3aNoJIHnIe Te 6eH3O6ak DoBepxY - octAAbbTe He MeHee 2,5 cm Do HnKHeRo Kpa 3aINBHOr OTBepCTN, TaK KaK 6eH3nH MoKeT paCUnPraTbCra.
1 Pocne 3anpaBkn y6eHNTecb, YTO KpbIuKa HAdexKHO 3aKpbI Ta.
HnKOrda He nCNoB3yIe FyHKUHO 3aMbKaHn3anpaBOuHoro NmCToJeta npn 3anpaBke.
He Kypnte BO Bpem3anpaBKn.
HnKOrJa He BbInOnHraTe 3anpaBky BHyTpN 3aHn HnTAM, rpe Napbl 6eH3nHa Moryt BcTynntB KOHTAKTC NCTOCHNKOM BOCnJaMeHeHn.
XpaHnTe 6eH3nH n pacnonaraaTe DnBraTeJIb NOdaJIbwe OT yCTpOINCTB, naJIbHbIX IaMn, 6ap6ekIO, 3NeKTPoPnIb6OpOB, 3NeKTPnuEckORO INHCTpyMeHTa N T. D.
06cnyxmbaHne H xpaHeHne
4 IpnO6cnyKuBaHmN uNCTKe, CMeHe HnCTpyMeHTOB N nepeBO3Ke He CBOUM XoDM Heo6XoIMo IJyWntb DBnraTeJIb.
Pernyrpo npoepeyte 3aTgky BCex 60tOBn raek. Pnp Heo6xOUMOCTN 3aTAHNTe NOBTOHO.
1 DnIraTeNb DOJIKeH NONHOCTbIO OCTbITb, npEKeJde Yem MaUNHa 6yDet NOCTaBNeHa Ha XpaHeHne HnHaKpbTa YexlOM.
EcnMaunHa He NcNOJb3yETcIINTeJIbHoe BpemO3HaKOMbTEcB C INHCTpyKUmaB B 3TOM pyKOBOCTBE NOJb3OBaTeJRA.
4 CoxpaHnTe nIIN 3aMeHNTe npEduynpeXdaIOUne INHΦopMaUNOHbIe HAKNeIKN,ecNI 3TO Heo6xoJIMO.
1 NcnoJb3yIe TOnbKO opnHaJIbHbIe 3aNactu n akceccyapbl. Pnp NCNoJb3ObaHnn HeopnHaJIbHbIX 3aNacteU INJn AkceccyapOB rapaHTnHbIe 063aTeJIbCTBa He Co6JIIOJaIOTCr.
Dpyrue cBeeden
1 N3haaBbHO DnuratEn He 3anpaBneH MacnO.
3IeMeHTbI ynpabHeHn,ycTaHOBHeHHbIe Ha 3aBOJe, HApnPmEe TpOc pyHoro pbYuara CcENHeHn, He cJeDyET demoHTnpoBaT bNIOdBepraTb BO3DeiCTBnO OKpyKaIOuei Cpebl.
CnBaTe 6eH3nH TOnbKO Ha yInCe. BeH3nH YBnIeTcJ IeKOBocPiMaHeHIOUIMcR BeIecTBOM, a erO napbl B3pbIB0ONaCHbl.
Ipn TpaHcnpOpBKe MaunHbHa nPaTΦopMe Heo6xOJIMo HaDexKHO 3Ty MaunHy 3aKpeINITb.
Ta3OHOKOcNlka IpnON3BeDeHa B COOTBETCTBnC nocJeHNMM HOpMaMm TEXHKn 6e3OnaCHOCTn. DaHHbIe Tpe6OBaHNBaKIIIOaIOT B ce6r TOPMO3,OCtHaBnIBaOuIN DnBraTeJIb HHOX B TeueHne 3-XcekyHd Nocne Haana TopMOKeHnA.
KaKdoepnepocTepeKeHHe 3ΦeKTHBHO NIMb
TOrda,KoIda emy CneDyIOT HeyKOCHNTJIbHO.
BocnoJb3yInTeCb CneDyUOuM OINcAHnEM BO BpeMa
C6OpKn r30HOKOCnIKN.
0603haueHne coCTaBbix qacteI
Cm. pucyHok ID
PpmeaHHe: pucyHKM OryT OTJNUaTbCRAOT HMeUeIeY BAC MOeJI.
B. RyKoTb TOPMOKeHn DnIraTeJIa
C. shhypoBoi cTape
D. Bapaшковая raиka
H. 3arnyka natpyka 6eH303a npaBkn
I. Bo3dyuHbIΦnIbTp
J. BbIXlonHa cncTeMa
K CBeea 3aXnraHn
L 3aNyyka macNo3aHnBHO naTp6ka
P. PerynipOBKa BbICOTbl
Q. OrpaJckHe 60KOBOr BbIbpoCa
R. Iyckoboi Haoc
S. udnHo ynp*
- Moryt OTlHuTaBc8 OT BaSeH MoDeJIH.
C6opka
PacnaKOBka: PncyHOK M1
N3Bneyra3OHOKOcNIky n3 KOp06Kn, BbITraHyB ee c60ky. Kop06Ka coedePKT:
ra3OHOKOJka-1wT.
KOMnJIeKT 6apaWkoBbIX raeK, COCToIuN u3 yka3aHHbIX raeK, 6oTob u Wai6-4 uT. (CM. ID; D)
OctopoxHo:Y6eHntecb,HTo TpocnKn Hnrde He nepexKaTbl.
PykoTb nperynnpOBKa BbcOTb: PncyHOK M2
BbICota pyKoTepeRyInpyeTc.3To 03HauaET,TO Bb MoKeTe OTperyInpoBaTb IN BbICOTy yO6HbIM IIN BAC O6pa3OM.PekomeHdyEM ONpeJeNTbcr C HxKHO Bam BbICOTOn Do yCTaHOBKn pyKoTe.
- YctahOBInTe CpeHIOpyKHa HIXHIOIO pyKy
- YctahOBHTe 6apaIKKOByIraKy C BHyTpeHHen CTOpOHbI 6OKOBOrO KpoHHTeHa N B BepxHIOpyKoRrB.
- YctahOBHTe BepxHIOpyKoTb Ha HIXHIO. 3aTAHNTe raKy C BHyTpEHHEn CTOpOHbl pyKoTn.
- IoproHnTe TpOcNk N3aKpeNte ero BCneuaJbHbIX 3aXImax.
MOHTAK TPOCnKa TOPMOKeHn ABurateJr: PmM3
- AkkypaTHo npeBnHbTe BnpeE BepxHOpyKoTb (ID:B).
- BctabbTe TPOcNK TOPMOXeHnI DnuratEnIa ChapyKnBpa3bEm KPOHHTeHa pyKoTn (ID:B) n 3aueenknHe erO.
YctaHOBka shypoBoro cTapTepa: PucyHok M4
- Notaryte pykOaTb TOPMOxKeHnI DBrarTeJIyDexKnaIe ee, YTObI OcBOoDHTb UHyp CTapTepa Ha DBiratene.
- OctopoxHO BbITAHTE UHyp CTapTepa n3 DBnraTeTn (pyKOaTb TOPMOxHn A DBnraTeTn DOJXKHA ydePKNBaTbcR)
- YcTaHOBInTe 3axIM cTApTepa Ha paMe pyKoRrN.
- Ocbobodte pykoTb TOPMOKeHnIBnIaTeNn 3axkIM CTapTepa.
YctaHObKa rpydHoro ynopa: pncyHOK M5\*
1.ДЯ moJeIe C rpyHbIM ynpom n
chaKoIepXaTeIeM o6paTnTEc b K pncyHky M5- 1
2.ДЯ moJenToIbKO c rpyHbIM ynopom obaTnTeCb K pncyHky M5-2
*PpmeaHne:HeBceMoJeNIObOpyObaHbIpynHbIM ynpom
MOHTAX KOJeca: nllnoctpaunM6\*
- YctaHOBNTe BHyTpEHnE KpbIuKn KOJec C NOMOUsbKO6oTTOB
- YcTaHOBnTe 2 nepeHne n 23aHHe KOleca, KaK POKa3aHo Ha pncyHke.
*PnmuueaHHe: pncyHKMOrT OTnUaTbCRAOT mHeoIeNcY BAC MoJeN.
OrpaxdHHe 60KOBoro BbIbPoca: PucyHok M7
- POnHnMnTe 60KOBoe orpaXdHeHne n yctaHOBnTe orpaXdHeHne 60KOBOr BbIbPoCA.3aTeM BCTaBBTe MyJbUpyIOuN KInH B 3aHmB bIbPacbBaTeJIb YTO6bl KocNTb, IcNoIb3yra3aHmB bIbPoC TpaBbl.
Perylnpobkata trocika
Yka3aHHbIe TpOcNKn BO3MOxHO pNiDeTcra OtperyLInpoBaTb 3aHOBo: PncyHOK A1
PeryunpoBka TpOcNk TOPMOKeHn IbIraTeIa
EcIn Bbl 6hApynn Cna6Hy TpocnKa TpoMoKeHnBnIaTeJI,3o peWaeTc ype3BbUaHNo npocTo -noTtHnTE nnOcnA6bTe 6oTn Ha 6JIOke DnIaTeJI.
McnoB3OBAHne
Bcerda npoBepaTe ndoNbaTe macNo nepe3anyckom!
M3yHte N pIIMeHnIte HNCTpyKuIN npIIOKeHHOrO pykoBOdCTBa no 3KcnnNyataun!
YpOBeHb Macna Bcerda DoJXKeH 6bTbB Dnana3OHe MeKdy MInHMaJIbHOH N MaKcHMaJIbHOr OTMeTKAMn Ha MacJHOM Uyne. 3aONHnte Macnom SAE-30. Bcero B DBIratene DOJXHO HaxoNtbcra 0,5 n Macna. DnBiratena IcNOnb3yIte ToJbKO He3TuINpOBaHHoe roPouee C OKTaHObIM YncJom 98/100. HkOrda He nepenonHnTe EMKocTb.
PerynnpOBKa BbICOTbI NOKoca: PucyHok F1 (pucyHKMOryT OTNmuTbcra OT NMeIOueeY Bac MOdenn)
Ta3OHOKOCINKa NMeet 6 ypOBHeB BbICOTb CTPNXKN. BbICota CtpNXKn BapbNpyETc OT 28 do 75 MM.
Nyck: HnKorda He 3anyckaIte ra3oHOKOcNIky HENOCpeDCTBeHHO Ha HEKOWeHHoTpabe.
3anyck c nomoosbno npaMepa, pncyHok F2
- Heckolbko pa3 haxmnte Ha KhoNky npcKOBOr npaMepa: 1-3 haxatn IJn nepBoro pa3a n do 3-5 haxatn B cIyae Heo6xOIMocTn. PImeuaHHe: 3aIITb DniratTeNb HeBO3MOXHO.
- YdepxkBaIte pykoTb IJIa TOpMOxHnIy DInrataIe,3TOOCBO6OuNTTOPM03a.
- Cnerka notaHnTe shyp cTape, noKa He noCyBCTByeTe conpOtnBnHe nHpya, TOrda depHnTe ero 6bIcTpO n3HepnHNo. Hn npu KaNX o6ctOraTeNbCTbX He OTnyckaiTe shHypoBoi cTapTeP, MeDneHNO daIte emy BepHyTbcB B INCXoNDHe NOJoxKeHne.
OctahOBKa: PncyHok F3
- Otnyctnte pykky topmo3a DnurateIg npkoarb camoxoHoro pexima dIg OTKIOUeHHa KocNIKIN ee DBurateJIg.
PpmeaHHe: HOx npoOJIkaeT BpaauOTcA Do 3-x cekynd nocne octaHOBKn.
Hacadka dan pa36pb3rbanna
B JIeBOJ YacTn DeKn r3oHOKOcNJK paCNoJoxKeHa HacaJa dny pa36pb3rBaHAn, oCyueCTbIyIOUaJ npombky DeKn. (CM. pncyHok ID-F)
- Pn INCNOB3OBaHHN BNYcKa BOdI MaHINHa DOJXHb 6blb yCTaHOBJIeHa Ha MNHMaJIbHyIO BbICOTy n pacNoJIOKeHa Ha rA3OHe. BnaRoJapr 3TOMy BOda OCTaHETcnoD HnIeM.
- PnKpeHNTe K HacaKe WNaHr.
BknHouHTe BOy n 3anyCTne DnurTaTeNb.
BpaueHHe HOKa rapaHTnpyeT BoHyIO OChCTky HxKHeuactn DeKn Ra3OHOKOcNkn.
PpmeaHHe: HnHnyUero pe3yIbTaTata, nocne KaKdOro NOKoca OUnsAte Deky C NOMOuBIO noD6Horo pa36pb13rBuaHna. He donyckaTe BbCbxHAnra TpaBbl -eE 6yET TpydNo ydaNtB.
- He BCE MoDJIEN IMeIOT φyHKJIO HaCaJka dJIpa36pbI3rNBaHn
3aMeHa Macna
IepBbI pa3 MacNo Heo6xOIMO CmEHnTb Ypee3 IBa yaca, 3aTeM - He peKe Ondoro pa3a B roJ.
Bam notpe6yETcHabOpIJIa3MeHbMaCna. HOMep cTaTbN:40-11336
MaNo Ha6Op 3aMeHb MaCna He BKJIIOUeHb B IocTabky
IcnoJIb3yIte Ha6op IJra 3aMeHbI MaCna CneDyUOUM o6pa30m:
- 3anyCTNe DbIrataTeNb KocNkN i daTe emy npa6oTaB MnHyT 5 nnn Do HarpeBa. HarpeTbI dBratBe pa3KnKaet MacNo, o6JeYra erO cToK.
- CneTe MacNo uee3 OTBepCTne MacnHOro
PnIbTpA, C NMOUbIO CNPIHcOBKn, NOCTaBJIeMOn
BMecTe C KOMNJIeKToM DnIaMeHbI Macna.
INONb3yIte WNaHr YTO6bl Do6paTbcrdo Hn3a
MacnHOrO KapTepa. - IepeneTe Otpa6oTaHHoe MaCNo B npCToKoHTeHep.
- 3aJIeTe B DnIraTeNb MacJIo SAE-30.
- PpOBepe ypoBeHb Macna MacnIaHbIM LcynOM. (MnH./MaKc.)
POMHnTe, YTO OTPa6oTaHHOe MaCNo HxKHO yTINn3nPoBaTb, He npuynHra BpeD OkpyXaIoUein cpe. BocnoIb3yInTeCb yCnyramn MeCTHO ceHTpa nepepa6oTKn OTXoOB.
06cnyXnBaHne Bo3dyuHoro nIbTp
Ioxaanyncta, npOBepaTte n uHCTnTe BO3dyHbIn ΦnBtp Ha peryraPno OCHOBE. Ecnn pnt He 6blOuHSeH B TeueHne dNITeBHoro nepNoDa, 3TO MOKET NOBnAHTb Ha paobTy dBVaTeNa n npnbectn K erO nonomke.
CM.A2
- OuHCTnTe MeCTo BOKpyr BO3DyUHOrO FInIbTpappea CHaTHeM.
- AkkypaTHO CHIMNTE 6yMaXHbI ΦnIbTp n npOBepbTe erO. OuHCTnTe erO c NMOUHO MRAKOI ueTKI. EcII nΦnIbTp oeyHb3aRpy3HeH, 3aMeHNTe erO.
- BbIMoTe npOIOHOBbI 3eMeHb TepNo MBbHOB BOe n npocuHTe erO.
4.CMOHTeΦnJIbTpMacJOMSAE-30.AKKypaTHOBblabNTeN3NJWkMACna.YCTaHOBNTeHaMeCTO. - Y6eIITcB, YTO BCE DeTaN YcTaHOBnHeHb npaBnIbHO n 3aKpOITe KpbIuKy, KaK NOKa3aHO Ha pncyHKe.
Hox
Поберка Нossa
- IonoKnte KocnIky nepedHne YacTbIO BBePx.
- PpOBePbTe HOx Ha npEmdT NOBpeXdEnH, HAdIOMOB, Ype3MepHO pKxABuHbI IIN Kopp0HN.
PpOBepeTe 3aTgKky 60JTa HOXa.
PnmeaHne: 3atynBmnc HOK MOKHO 3aToHTb! Ondako CneDeYet 3ameHrTb CTapbIe, nOrHyBWeCeR, TpeChyBWe Ne Nk KAK-TO INHaYe NOBpeKeDeHHbIe HOKn.
CHRTHe HOXA: CM. pncyHOK A3
Ecnn Bbl CHImaeTe HOX, YTO6bI HATOHTb NIN 3aMeHnTb ERO, BOCIOJIb3yIteCb DnHAMOMETPnueCKIM KJIIOYOM I IIOTHbIMN IepuATKAMN IIN 3aUNTbI pyK.
- Otnyctnte 6oJr HOxA. IcnoJIb3yIte DepeBHHbI 6pycok, YTo6bl He dOnyctntb NobopoT HOxA.
- CHIMITE 60NT, 7a86y, ne3Bne n depkaTeNb HOXa NMeHHO B TAKoI NOcJIeIOBaTeJbHOCTN.
- HatoHTe NIN 3aMeHInTe HOK.
- BepHnTe He MeCTo DePkateJB HOXA, HOX, 7aB6y H60T NMeHHO B TAKOINIOeIOBATEJBHOCTN.
- 3aTnHtE 6oHT HoKa. NcNoBbayTe DepeBraHHbIb6pyCok, YTO6bI He DOnyCTNTb NobOpOT HoKa.
Octopoxho: HOXdoJIXeH 6bIb HatoyeH Do 100%-ro 6baHaC, HNaue OH MOxET Bb3BaTb ONaCHbe Iy DnBnraTeN Bn6paun. NOBpeKDeHna DBnraTeNBAcJeCTBn PINOxo NIN HeBepHO 3aTOoehHOr NO3BnHOXA, rapaHTn He NoJnxKaT. NToTMy, Jn 3aTOOHNLe3Bm, Mbl peKOMeHdyem BOCNOJIb3OBaTbCyrCyYrMaNC cepBnCHOrO ceHTpa.
XpaHHeHne n 06cnyKnBaHne
- Cbeya 3axnraHna
- CHIMITE CBeHou KOJInaQok.
- OuHCTIte MeCTo BOKpyr CBeU 3aXnRanHn 1eTKoN
- CBeuHbIM KJIIOHOM BbIKpyTtNE CBeHy.
- PpOBePbTe ueIOCTHOCTb 30JrTopa CbeuN.
- OuHCTnTe CBeuy KOpIeTkoJ
7.ИЗмерьтесс�нгшемждэлктpo damn. - PacToHHe MeKdy 3NeKtpoDAMN DOJIHXO 6bITb: 0,7-0,8 MM.
- Пи NOBpeXdEHNrX CBeu -3aMeHnTe e. HOMep cTaTbN: 40-11294
- YctaHOBInTe CBeHNoK KOJINaOcK Ha MeCTo.
Texnueckoe 06cnyxuBaHne
PeryIpaHNo 06cIyKbAaTe Ra3OHOKocNkky: IpoBepbTe 3atXkky BCero Kpenexa. PeryIpaHNo npOBepaTe COCToHnE HOx.Hox DoJKeH 6bITb BcERda OCTpbIM. PeKOMeHNyETcM HeTb HOx HpeKe Yem pa3 B Dba rOda. PeKOMeHNyETcO bpaaTaBCra B cepBnCHbI cHTp ODNH pa3 B rOd nJa IpoBeDeHnRA TexHnueCKOrO 6cIyKnBaHnR.
XpaHeHne: XpaHnTe ra3OHOKOCJky B cyxOM, YIcTOM NOMeUeHN. OuHuaTe ra3OHOKOCJky NocJe KaKDoRO MCNOJIb3OBAHnA, OuHuaTe BHYTpEHnIO NOBepXHOCTb DEKn OT TpaBbI rpr3N. POnHMaJIte NepeDnHO YoAcTb RA3OHOKOCJKN DnA OUnCTKn BHyTpEHnE NOBepXHOCTn DEKn Ha yron He 6oJee 45 rpaYcoB. He HAKNoHnTe ra3OHOKOCJky Habok, TaK KApn EToM MaCNo MoKet NONaTb B UINHdp, Kap6OpaTop n BO3dyuHbI PhInbTp n NobpeDnTB DBnraTeNb. PpNCTynar K TEX06CnykBaHnIO yBeDnTEcb, YTO CBEchOH KOIINaOK CHrT.
3MHee xpaHHe: OnyctoWnte ToNINBHy 6ak n 3anyCTte DnIraTeInb, YTO6bl BbIpaBoTaTb OCTaTKI TOINBa n3 Kap6bOpatopa.CHMNTe CBeHoi KOJNaOH. BkpyTne CBeHy 3axnHaHHn I 3aJeHTe He6OJIbWoE KOJNUcHcTBO (PpIMepHO cToIOByIO NOKy) MOTOPHOrO MaCnA B OTBepCTne UINHnDpa. HeCKoJIbKO pa3 NotAHnTE uHyp cTapTepa. YCTaHOBnTE CBeHy 3axnHaHHn Ha MeCTo, HO He HadeBaHTe CBeHuON KOJNaOK.PomeHnTE MacNo TAK, KaK ONCaHO B COOTBETCTByUoem pa3dene.OChCTne rAOHOKOCnKy. CMOHTe BeToCb He6OJIbWm KOnIuYeCTBOM Macna n CMAxkbTe Deky n MetaIINuYeCKNe qactn dnn PpeDTBpaueHnOBpa3OBaHHnI.
TapaTna
- TapaANTna Ha Bauyra3oHokocnky coCTaBnaTe OINrOc dAteI npOdaXn.
- Fapantna pacnpoctpaehcra Ha depekthbie. actn n 3aBODCKyO c6opky.
- TapaHTnHe paCnpocTpaHareTcHa noBpeXdeHn H NOIOMKn, Bbl3BaHHbIe HENpaBnIbHbIM NcNoJIb3OBAHnEM n O6cnyKbAHnEM ra3OHOKoNlKn.
- Fapantna He pacnpoctpaHreTcHa YnCTky TOnJIbHOB CnCTeMbI, 3aMeHy nN peryIpObKy UHypa CTapTepa, npyKInbI CTapTepa, CBeCy 3aKInraHn, HOx, depKatEnb HOxa, peMeHb I TPOCbI.
- TapaHTnHe paCnpocTpaHareTc npn nCNoJIb3OBAHn HeOpuRHaJIbHbIX 3aNaChbIX qacteI.
OnpeeneHne cTaTyca noIOMKn B KOMnTeHcNToJIbKO aBTopu3ObaHHoro cepBnCHOro ceHTpa.
Ecnn Bbl 3anyckaete DniratEnb, He 3aINB Macna, To DniratEnb 6yDet NOBpeKDeH 6e3 BO3MOXHOCTN BOCCTAHOBJIeHNA, INOTOMY rapaHTNI NOJNEKAtb He 6yDet.
Troubleshooting
If your problem is not described above, please contact an approved service centre or Texas A/S.
| Difficult to start | ||
| Problem | Cause | Solution |
| Generally difficult to start | Wrong starting procedure | Follow the starting instructions in the manual precisely. |
| The start cable is very tight (will not start) | The brake handle is not being activated The machine is placed in high grass | Activate the brake handle and pull the start cord. Move the machine away from the high grass and repeat the start procedure. Set the height adjustment in the highest position, so that the blade is lifted free of the grass. |
| The machine will not start when the start cord is pulled | The brake handle is not being activated The brake cable is incorrectly adjusted The machine is standing in high grass Engine is not primed before starting No more gasoline in fuel tank The gasoline is more than 3 months old | Activate the engine brake handle Adjust the engine brake cable, following the instructions in the manual. Move the machine away from the high grass to start it. Tip the machine when starting. Set the height adjustment in the highest position, so that the blade can run freely. Push the primer 1-3 times before starting. Check and fill fuel tank with gasoline. Empty the fuel tank and carburetto r from old gasoline, and fill with new gasoline. |
| No ignition spark (cannot start) | The spark plug cap is loose The spark plug is damp or dirty Incorrect gap between the spark plug and the electrode The air filter is dirty or defective | Check that the cap is firmly attached to the spark plug. Check that there is no dirt on the spark plug, following the instructions in the manual. Check and adjust the spark plug gap, following the instructions in the manual. Aalternatively, replace the spark plug. Check the air filter for dirt and clean it, following the instructions in the manual. |
| The mower starts, but runs unevenly | ||
| Problem | Cause | Solution |
| Insufficient engine revolutions | Lever is in the "Choke" position The throttle lever is set for "Turtle" | Set the lever in the "Run" position. Set the throttle lever for "Rabbit". |
| The engine runs irregularly and/or its performance becomes poor as you are working | The spark plug cap is loose The spark plug is dirty Incorrect gap between the spark plug and the electrode The air filter is dirty or defective Evaporation of fuel in the carburettor Loose throttle cable Dirt in the carburettor | Check that the cap is firmly attached to the spark plug. Check that the spark plug is clean and not damaged, following the instructions in the manual. Check and adjust the spark plug gap, following the instructions in the manual. Check the air filter for dirt and clean it, following the instructions in the manual. Wait a few minutes, and then try to start again. Tighten the throttle cable, following the instructions in the manual. Clean the carburetto r. |
| The engine will not stop | ||
| Problem | Cause | Solution |
| The machine does not stop after 5 seconds | The engine brake cable runs too tightly | Check and adjust the engine brake cable, following the instructions in the manual. |
Fehlerbehebung
2000/14/EC amended by 2005/88/EC
Materiellet er udfört i overensstemmelse med følgende standarder • Conforms with the following standards • In Übereinstimmung mit den folgende Standards • Conformément aux normes suivantes • jest zgodna z nastepujacymi normami • Echipament se face in conformitate cu urmätoarele standarde •
EN ISO 14982: 2009
EN ISO 5395-1:2013
EN ISO 5395-2:2013
Serial numbers: 2201000001 - 2412009999
Model
Guaranteed

Measured wAL

Smart 5105WS 98 dB(A) 94.7 dB(A) 81.4 dB(A)
Razor 5110WS 98 dB(A) 94.7 dB(A) 81.4 dB(A)
Texas Andreas Petersen A/S
Knullen 22 · DK-5260 Odense S
06.10.2021

Johnny Lolk
Managing Director
Responsible for documentation
Johnny Lolk
TEXAS
EQUIPMENT