
Threesixty 2 - Heating DUUX - Free user manual and instructions
Find the device manual for free Threesixty 2 DUUX in PDF.
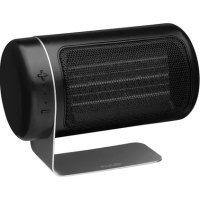
| Product type | Ceramic heater |
| Brand | Duux |
| Model | Threesixty 2 |
| Dimensions (diameter x height) | 30 cm x 22 cm |
| Weight | 2.4 kg |
| Power | 600 - 1800 W |
| Power supply | 220-240 V, 50/60 Hz |
| Noise level | 56 dB |
| Heating settings | 3 levels (I, II, III) |
| Fan settings | 2 speeds (Eco, Boost) |
| Heating element | PTC ceramic |
| Materials | ABS, PA & GF |
| Connectivity | Wi-Fi 2.4 GHz, Duux app |
| Model | DXCH07 |
| Maximum heating area | 30 m² |
| Overheat protection | Yes |
| Automatic shut-off when tipped over | Yes |
| Care | Clean with dry cloth or vacuum cleaner |
Frequently Asked Questions - Threesixty 2 DUUX
User questions about Threesixty 2 DUUX
0 question about this device. Answer the ones you know or ask your own.
Ask a new question about this device
Download the instructions for your Heating in PDF format for free! Find your manual Threesixty 2 - DUUX and take your electronic device back in hand. On this page are published all the documents necessary for the use of your device. Threesixty 2 by DUUX.
USER MANUAL Threesixty 2 DUUX
natural_image
Abstract geometric logo with white triangular and circular elements on teal background (no text or symbols)Threesixty
smart ceramic heater
user manual | gebruikershandleiding | manuel d'utilisation
manual de usuario | Bedienungsanleitung
duux®
Thank you for choosing Duux.
We're so glad you decided to read the instructions to your new Duux ceramic heater. Many users casually dismiss instructions and sock to figure it out on their own. But auditors show that people who read instructions will get up to speed more quickly and efficiently than those who poke around with trial and error.
At Dux we believe in the importance of a comfortable and healthy living environment. Enhancing your well-being by designing appealing, functional and effective products is the passion that drives us every day. With our range of innovative air treatment products we aim to provide you the best possible indoor air quality.
Crazy up with the Duxx Threesixy Cervees Smart Heater - the perfect companion for cold winter stays. This compact heater has a unique organic design and a capacity of 1,800 watts, making it much more powerful than you'd expect. Thanks to the built-in fan. Threesixy accelerates the heating process in any room up to 30mA, warming it up in no time. And with the free Duxx app, operating this handy nearer is a piece of cake.
Table of contents
-
Important safety instructions 4
-
Product overview 5
-
Installation 7
-
Maintenance and storage 9
-
Functions 15
-
Technical specifications 16
-
Frequently asked questions 15
B. Disposal instructions 16
1. Important safety instructions
Note: Some parts of this product can become very hot and coarse burns. Particular attention has to be given where children and vulnerable people are present.
Note: The sticker icon Ⓧ indicates the product should never be covered.
When using electronic equipment, the standard safety warnings must be taken into consideration at all times, including the following safety instructions:
• To become familiar with the controls, safety features and use of the heater, we recommend you carefully read all the instructions before using it.
- Do not insert any objects into the air inlet or air outlet.
- This product is not a toy. Do not allow children to play with the product, regardless if the product is plugged into a wall socket or not.
- Children between the ages of 3 and 8 shall only switch on/off the appliance provided that it has been placed or installed in its intended normal operating position and they have been given supervision or instruction concerning use of the appliance in a safe way and understand the
hazards involved
Children between the ages of 3 and 8 shall not plug in, regulate and clean the appliance or perform user maintenance.
- Cleaning and user maintenance shall not be made by children without supervision. Children under the age of 3 should be kept away from the product unless continuously supervised.
This appliance can be used by children aged from 8 years and above and persons with reduced physical, sensory or mental capabilities or lack of experience and knowledge. If they have been given supervision or instruction concerning use of the appliance in a safe way and understand the hazards involved.
- Switch off the heater via the control panel, then wait for the heater to cool down switch off the appliance using the orvoff button on the bottom and then remove the plug from the wall socket before carrying out the following operations:
Clean the heater
- Carry out maintenance on the heater.
- Move the heater.
- Unwind the power cable completely before pugging the power cable into the wall socket, and make sure the cable does not come into contact with the heater or ecoome exposed to heat. Do not route the cable under curtain, do not cover it with masks, runners or such like, and lay the cable.
In such a way that it does not constitute a trip hazard. Ensure the cable cannot be stepped on and that no furniture is put on it. Do not route the cable around sharp corners, and do not wind it up, too lightly after use.
• To prevent overhealing, the hearer must never be loved.
- Do not use the heater cutters.
- Please do not extend the power cable yourself. The use of an extension cable is not recommended, this may cause overheating and/or fire. If the use of an extension cable is unavoidable, ensure it is an undamaged and approved extension cable with a minimum diameter of 3 x 2.5 mm² and an authorized power rating of at least 2,000 Watt/10 Amp. Always unwind the cable completely to prevent overheating.
- Remove the plug from the wall socket by pulling it by the plug. Never pull on the cable to remove the plug from the wall socket.
- Please remove the plug from the wall socket when the product is left unsupervised for longer periods of time
- Keep commustices material such as furniture, cushions, bedding, paper, clothes, curtains, etc. at least. * 00cm away from the heater.
- Keep the air inlet and outlet free from objects at least 50cm around the heater.
- If the power cable gets damaged, it must be replaced by certified personnel.
Do not use the heater in places that are not used or visited for long periods of time. - Do not use accessories on the heater that have not been recommended by Linux
- I base connections between the heater plug and the electrical outlet can cause the plug to overheat.
• To avoid overload and burnt-out fuses, do not connect other appliances to the same wall socket.
• The heater is only intended for indoor use. Only use the heater for supplementary heating.
• Do not position the heater in a place where objects may fall on it from above. This can cause the heater to break down or malfunction. - Do not place the heater near other appliances that are not suitable for exposure to hot air, such as PCs or smartphones. This can cause the appliance to break down or malfunction.
- Only connect the heater to a single-phase socket with a main voltage as specified on the rating plate.
- Do not leave your home while the heater is in function ensure that, the heater is OFF completely.
- This heater is not equipped with a device to control the room temperature. Do not use this heater in small rooms when they are occupied by
persons not capable of leaving the room on the row, unless constant supervision is provided.
- The heater should not be placed directly under, rear, or directed towards a wall socket.
- The heater must be placed on a stable surface where it cannot be easily toppled or shocked.
- This heater is not suitable for use in wet or clamp areas such as bathrooms, washrooms, etc. Do not place it run a tap, bath, shower, swimming pool, fountain or suchlike. Make sure the appliance can never fall into water and prevent water from entering the heater. Should the heater come into contact with water, takes the plug out of the wall socket first. A heater with wet internal parts can no longer be used. The appliance must be sent for repair first. Never increase the heater, cable or plug in water or other liquids and never touch the heater with wet hands.
-
In case the heater is malfunctioning in any way, shape or form it must turned off and unplugged following the correct procedure immediately and returned to the point of sale.
-
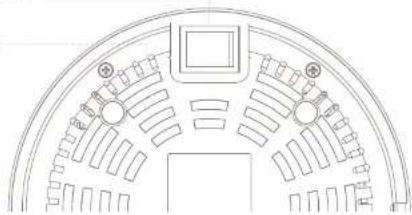
Product overview

Control panel

Bottom of the product
12 Power button
1 Air inlet
natural_image
Top-down schematic of a circular mechanical or architectural component with symmetrical slots and central hub (no text or symbols)3. Installation
Note: Carefully read the safety instructions (Chapter 1) and the installation and operation instructions below before using the product
Installation
Note: See Chapter 2 for the product overview and references
- Insert the plug into the wall socket.
2 Position the heater on a hand at surface, at least 50cm away from the wall or any other objects.
Turn the on/off switch on the bottom of the appliance to the "on position", the fan heater is now in stand by mode
4. Maintenance and storage
Note: Carefully read the safety instructions (Chapter 1) and the installation and operation instructions below before using the product
Caution: Allow the heater to cool down for a minimum of 30 minutes before moving the product. The top surface of the product can be very hot. Do NOT touch before the product is cooled down."
• To avoid the risk of electric shock, do not clean the heater with water and do not immerse it. Clean the housing with a dry or slightly demo cloth. Do not use aggressive soaps, sprays, cleaners or abrasives, waxes, pol shes or chemica agents. Make sure the device is completely dry before switching it on again
- If necessary, dust particles accumulated in the air inlet and outlet openings may be removed with a vacuum cleaner. This maintenance should be done regularly to assure the good operation of the appliance. Dust particles in the appliance may cause overheating.
- Be careful not to touch or damage any internal parts during cleaning. The heater contains no other parts which require further maintenance.
When the heater will not be used for a prolonged period, please store the cleaned heater safely, optionally in the original packaging. Store the product in the upright position in a cool, dry and dust-lift location.
5. Functions

Power
- Press the O to turn on the appliance. The heater will turn on and the indicator at Power position I and Fan speed position I will illuminate.
- Pressing the O again will set the heater to power setting II and speed II. The corresponding LEDs will illuminate. When increasing the power output, the fan speed automatically increases as well to prevent overheating of the products.
- Pressing the again activates the highest heat setting, and the light at power position III will illuminate.
Note: power level II & III can only be used in combination with speed II (boost)
- Pressing the() once more will reset the heat and fan speed setting to 1
- To switch off the appliance, the must be pressed for 2 secs.
• After switching off the heater, the fan will remain on for +30 seconds to cost the heating element down. After this, the appliance automatically returns to the stand-by mode.

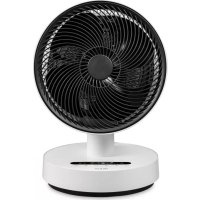
Fan speed
- Pressing the O when the product is in stand by mode increases the fan speed and the Power output. This is indicated by the LED from Indicators Fan spend I and Indicator Power level II.
- Pressing the again will reset the far speed and power level to 1.
- Pressing the O for 1.5 secs. activates the WiFi pairing mode.

Wifi
- When turning on the heater using the main power switch (item "2 in chapter 2), the WH will automatically be activated and start pairing mode. The WH indicator (item 10 in chapter 2) will be linked for 5 minutes or until pairing has been successful.
- Pairing mode can be re-activated pressing the for +7.5 seconds.
- The pairing mode will automatically be deactivated when the product is unable to connect to a device within 5 minutes.
- When pairing is successful, the WiFi indicator will turn blue.
- For further instructions on how to pair your product to Wi-Fi, please refer to the Dual App.
WIFI and APP operation
Scan below QR code to download the Duxx APP or search DUXx APP in the App Store or Google Play Store to start the procedure to download the APP. Once installed, enter your e-mail address and complete the registration.


APP STORE PLAY STORE
Connect to WIFI
Once registered, click "add dlux device" on the main screen or use the "+" button in the top-right corner to add a new device.
Search for "Treesixry" and press to continue
3 Connect to your preferred WiFi network and enter the corresponding password
Follow the instructions in the app to complete the pairing process.
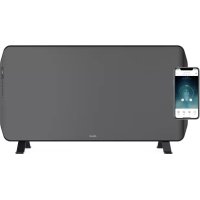
The 360° heater that lets you cozy up anywhere
6. Technical specifications


Weight:
2.4kg

Power consumption
600-1800W

Noise level
56dB

Heating settings:
3

Heating element
PTC Ceramic

Main materials
ABS, PA & GF

Duroin settings:
2

WiFi
2.4Ghz

Mode no.
DXCH07
The appearance and specification of the device may be changed without notice.
7. FAQ
Q. The appliance does not switch on.
A. Make sure the on/off switch on the bottom of the product x "on".
Q. Can the appliance be used in the bathroom?
A. The appliance is not suitable for wet rooms and can be used in a bathroom.
Q. What happens when the appliance is knocked over?
A Should the appliance be knocked while in use, a safety mechanism will be operated, and the appliance will switch itself off automatically. If the appliance is put back on its feet, it will indicate so and illuminate all LEDs. The product can be switched on using the 📄 again.
Q. Can I connect multiple appliances to the same wall socket?
A. Due to the power required being in excess of 1,800 watts, it is not advisable to connect several appliances on the same wall socket.
Q. When the appliance is switched off, the fan continues to run for a while. Is this correct?
A. This is correct. In order to cool the ceramic heating element, the far remains on for approximately 30 seconds before the appliance goes into stand-by mode.
Q. Can I use an extension cable?
A. Use of an extension cable is not recommended. If necessary, only make use of an approved extension cable with a minimum cross section of 3 x 2.5 mm² and an authorized power rating of at least 2.000 Watt/10Amp.
Q. The appliance is emitting a strong odor.
A. A strong door may be re eased when the appliance is used for the first time. This will disappear after a while.
Q. I'm having trouble connecting my device to the Duux Smart App
A: Please refer to the FAQ in the Duck App for further pairing instructions.
Disposal
The European Directive 2012/19/FC on Waste Electrical and Electronic Equipment (WEEE), states that old electrical household appliances must not be disposed of in the normal municipal, unsorted waste strum. Old appliances must be collected separately in order to optimise recycling and reuse of the materials they contain and to mail gate any consequences to the environment, and public health. The symbol with the crossed-out wheelchair on the product reminds you of your obligation to ensure the appliance is collected separately for disposal. Consumers must contact their local authority or vendor for information regarding proper disposal of their old appliance.

natural_image
Top-down architectural diagram of a circular seating space with seating arrangement and decorative elements (no text or labels)3. Installatie
4. Maintenance and storage
natural_image
Top-down schematic of a circular fan or dome structure with internal compartments and labeled air inlet (no text or symbols beyond basic diagram)3. Installation
Limplane care factor
natural_image
Top-down architectural diagram of a circular seating area with seating arrangement and decorative elements (no text or labels)3. Instalación
natural_image
Top-down architectural diagram of a circular seating space with seating arrangement and decorative elements (no text or labels)3. Installation
Designed in The Netherlands bij Duux BV. Made in P.R.C. Duux BV, P.O. Box 145, 5400 AC Uden Netherlands, www.duux.com
© 2020 Duux. All rights reserved.
DUUX® is a trademark of Duux BV, registered in the EU and other countries.
The brand cited belongs exclusively to the respective owners.
Specifications are subject to modification without notice.
duux®

- Threesixty
- Thank you for choosing Duux.
- Table of contents
- Important safety instructions
- Bottom of the product
- Installation
- Installation
- Maintenance and storage
- Functions
- Power
- Fan speed
- Wifi
- WIFI and APP operation
- Connect to WIFI
- The 360° heater that lets you cozy up anywhere
- Technical specifications
- FAQ
- Disposal
- Installatie
- Instalación
Brand : DUUX
Model : Threesixty 2
Category : Heating