
EPA100MF - Heating Toyotomi - Free user manual and instructions
Find the device manual for free EPA100MF Toyotomi in PDF.

| Brand | Toyotomi |
| Model | EPA100MF |
| Product type | Electric radiator / Convector |
| Power | 1000 W (low: 500 W, high: 1000 W) |
| Power supply | 220-240 V, 50 Hz |
| Dimensions (W x H x D) | 480 x 413 x 113 mm |
| Weight | 3.5 kg |
| Power settings | Off, low, high (via rotary switch) |
| Thermostat | Yes, adjustable with click-off automatic shut-off |
| Indicator light | Yes, lights up when operating |
| Mounting | Wall-mounted (bracket provided) or on feet with wheels (included) |
| Minimum safety distance | 0.9 m in front and above, avoid blocking the grilles |
| Overheat protection | Yes (do not cover, do not use on soft surfaces) |
| Outdoor use | No, indoor use only |
| Cleaning | Unplug, cool down, dry cloth, vacuum air grilles |
| Warranty | 24 months (limited, material and manufacturing defects) |
| After-sales service | Contact: Toyotomi Europe Sales B.V., info@toyotomi.eu |
| Included accessories | Wall bracket, foot kit with wheels, screws |
| Repairability | Spare parts available through approved service, repair by professional |
Frequently Asked Questions - EPA100MF Toyotomi
User questions about EPA100MF Toyotomi
0 question about this device. Answer the ones you know or ask your own.
Ask a new question about this device
Download the instructions for your Heating in PDF format for free! Find your manual EPA100MF - Toyotomi and take your electronic device back in hand. On this page are published all the documents necessary for the use of your device. EPA100MF by Toyotomi.
USER MANUAL EPA100MF Toyotomi
natural_image
Exterior view of a modern office building (no signage)EPA-100MF EPA-150MF EPA-200MF
Electric convector heater
OPERATING MANUAL ENGLISH P. 1
MANUAL D'UTILISATION FRANÇAIS P. 7
BEDIENUNGSANLEITUNG
GEBRUIKSAANWIJZING
WHEN USING ELECTRICAL APPLIANCES, BASIC PRECAUTIONS SHOULD ALWAYS BE FOLLOWED TO REDUCE RISK OF FIRE, ELECTRICAL SHOCK AND INJURY TO PERSONS OR PROPERTY, INCLUDING THE FOLLOWING
When switching on the appliance for the first time, allow it to run at full power for about two hours to get rid of the unpleasant smell. Make sure that the room in which the appliance is located is well ventilated during this operation. It is normal for the appliance to emit small cracking sounds when you turn it on if the first time.
- Read all instructions before using this heater.
- This heater is hot when in use. To avoid burns, DO NOT let bare skin touch hot surfaces. Use handle when moving the unit. Keep combustible materials, such as furniture, pillows, bedding, papers, clothes and curtains at least 3 feet (0.9 meters) from the front and top of the radiator and keep them away from the sides and rear. Keep the rear grille away from walls or drapes so as not to block the air intake.
- Extreme caution and supervision is necessary when any heater is used near children or pets and whenever the heater is left operating and unattended.
- ALWAYS unplug heater when not in use.
- DO NOT operate any heater with a damaged cord or plug or after the heater malfunctions, has been dropped or damaged in any manner. Return the heater to an authorized service facility for examination, electrical or mechanical adjustment or repair.
- DO NOT use outdoors.
- This heater is not intended for use in any area where there is standing water. NEVER locate heater where it may fall into a bathtub or other water container.
- DO NOT run cord under carpeting. DO NOT cover cord with throw rugs, runners or the like. Arrange cord away from traffic area where it will not be tripped over.
- To disconnect the heater, turn controls to OFF, then remove the plug from the outlet.
- Connect to properly polarized outlets only.
- DO NOT insert or allow foreign objects to enter any ventilation or exhaust opening as this may cause electric shock, fire or damage to the heater.
- To prevent possible fire, DO NOT block air intakes or exhaust in any manner. DO NOT use on soft surfaces, like a bed, where openings may become blocked.
- A heater has hot or arcing or sparking pads inside. DO NOT use it in areas where gasoline, paint or flammable liquids are used or stored.
- Use this heater only as described in this manual. Any other use not recommended by the manufacturer may cause fire, electric shock, injury to persons or other damage to property.
- To prevent overload and blown fuses, be sure that no other appliance is plugged into the same outlet (receptacle) or into another outlet (receptacle) wired into the same circuit.
ENGLISHENGLI
- It is normal for the heater's plug and cord to feel warm to the touch. A plug or cord which becomes hot to the touch or becomes distorted in shape may be a result of a worn electrical outlet. Worn outlets or receptacles should be replaced prior to further use of the heater. Plugging heater into a worn outlet/receptacle may result in overheating of the power cord or fire.
- Ensure the heater is on a stable, secure surface to eliminate the potential of tipping it over.
- We DO NOT recommend use of an extension cord as it may overheat and cause a risk of fire. However, if you have to use an extension cord, the cord should be No. 14 AWG minimum size and rated not less than 1875 watts, and has to be used only for supplying power to this heater.
- Be sure that the plug is fully inserted into appropriate receptacle. Please remember that receptacles also deteriorate due to aging and continuous use: check periodically for signs of overheating or deformations evidenced by the plug. DO NOT use the receptacle and CALL your electrician.
- Check that neither the appliance nor the power cable has been damaged in any way during transportation.
- Make sure that no pieces of polystyrene or other packaging material have been left between elements of the appliance. It may be necessary to pass over the appliance with a vacuum cleaner.
- The appliance is not to be used by persons (including children) with reduced physical, sensory or mental capabilities, or lack of experience and knowledge, unless they have been given supervision or instruction.
- Children being supervised not to play with the appliance.
- In order to avoid overheating, DO NOT cover the heater. Heater is not located immediately below a socket-outlet. The heater is to be installed so that switches and other controls cannot be touched by a person in the bath or shower.
- Children of less than 3 years should be kept away unless continuously supervised. Children aged from 3 years and less than 8 years shall only switch on/off the appliance provided that it has been placed or installed in its intended normal operating position and they have been given supervision or instruction concerning use of the appliance in a safe way and understand the hazards involved. Children aged from 3 years and less than 8 years shall not plug in, regulate and clean the appliance or perform user maintenance.
- ▲CAUTION — Some parts of this product can become very hot and cause burns. Particular attention has to be given where children and vulnerable people are present.
▲CAUTION: TO PREVENT ELECTRIC SHOCK, MATCH WIDE BLADE OF PLUG TO WIDE SLOT, FULLY INSERT.
Control function
Check the household voltage to ensure it matches the appliance's rated specification.
Be sure to plug into a 220-240V, 50Hz outlet.
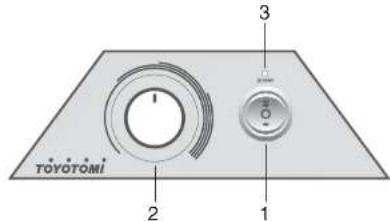
Introduce of the control panel:
- Main switch
- Thermostat knob
- Indicator light
Operation:
- Heater is equipped with three power setting. When switch turn to " " position, the heater is power off.
When switch turn to " =" position, the power is half setting.
When switch turn to "≡" position, the power is full setting: - Turn the thermostat knob clockwise until you reach the maximum position on the graduated scale. When the room temperature reaches a comfortable temperature, slowly turn the knob anti-clockwise until the heater turns off (you will hear a click). The heater will now cycle on and off maintain the set comfort level. Take note of this position setting for future use.
Installation the panel heater
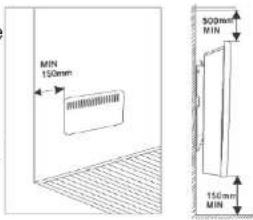
Recommended Installation The convector shall be installed so that produced heat will mix maximum volume of air. The convector should be attached in accordance with applicable requirements. The switch and other mechanisms should be away from a person who takes bath or shower. The device should not be exposed to water splashes. If the device is covered there is a risk of overheating. It is strictly forbidden to cover or plug inlets and outlets (air grids) as it can cause an accident or damage the device. DO NOT place the convector behind curtains, doors, under wall opening or ventilation hole. Keep minimum distance required for installation on floor, surface, near furniture, etc. (Figure 1).
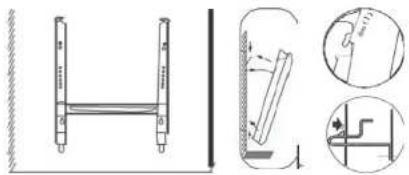
Wall Mounting:
DO NOT fit the castors to the base of the heater. Make sure the heater is unplugged from the mains power and the wall is suitable for mounting the panel heater and there are the correct clearances. Make sure the panel heater is within 1 meter of a power socket.
Detach the mounting bracket from the rear of the heater by compressing the 2 bracket clips, pulling the clips out of the heater rear & removing the bracket hooks from the heater.
Figure 1
ENGLISH ENGLISH
Position the bracket on the wall in the desired position & drill holes for two mounting screws. Once the holes are drilled, use two screws (appropriate for the type of wall) to fix the bracket firmly in place. Check for strength.
Carefully place the heater (slightly tilted forward) onto the hooks at the bottom of the bracket & rotate back so the clips fix back into their original holes. Check that they are fixed correctly. If possible, have a second person help to check for alignment as the heater is attached. The heater is now ready to connect to the mains power.
Floor Mounting:
The device can be mounted on special legs enabling to move it in the room.
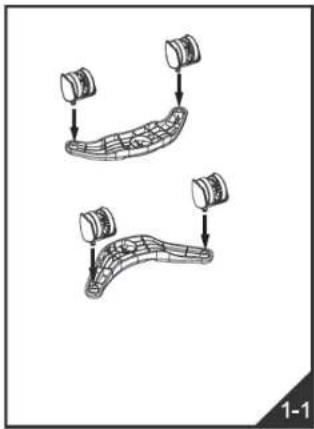
Support foots are attached as follows:
Turn the convector upside down;
Take one of support foots with rollers;
Place the plate of the support foot to the attaching point on the convector so that the dome-shaped part of the plate will be tightly attached to the convector close to its rear panel the screw holes should match;
Tighten the support foots with the screws in parts kitting.
natural_image
Diagram showing two mechanical components with cylindrical heads and curved surfaces, no text or symbols present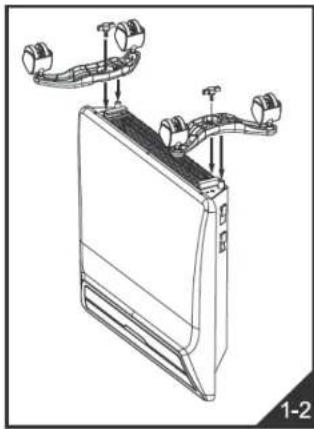
natural_image
Technical line drawing of a device with attached piping and ventilation ducts (no text or symbols)ENGLISHENGLISH
MAINTENANCE

This product contains recyclable materials. DO NOT dispose this product as unsorted municipal waste. Please contact your local municipality for the nearest collection point.
The heater requires regular cleaning to ensure trouble free operation.
Unplug the heater from the mains supply before cleaning.
Ensure that the heater has been allowed to cool down completely before cleaning.
◆ Unplug the heater from the mains supply before cleaning.
◆ Ensure that the heater has been allowed to cool down completely before cleaning.
Periodically, clean the appliance with a dry cloth to remove the dust. DO NOT use detergents or abrasive products.
◆ Using a vacuum cleaner, clean the dust from the intake grill and the air output openings.
To clean behind the heater (when mounted on a wall), unfasten the two locking screws located on the top of the mounting bracket, press down on the two release catches on the mounting bracket to tilt the heater forward. When the heater is tilted forward, it is easier to clean behind it.
◆ Ensure the heater is dry before plugging back into the mains supply.
If the appliance is not to be used for any length of time, we recommend returning it to its original package and storing it in a dry, dust-free place.
TROUBLE SHOOTING
| Problem | Cause | Solution |
| The appliance does not heat. 1) The power cord is not properly connected.2) The power switch is on at the off position.3) The indicator light is off when power switch is on. | 1) Connect the cable correctly.2) Press the switch to the "-" or "-" position.3) Contact authorized service center. | |
| Dust burning smell when using the convector for the first time. | It is not a defect. The smell disappears as the convector is used for several minutes. |
If the problems persist after trying the solutions, contact authorized service center.
SPECIFICATIONS
| MODEL EPA-100MF EPA-150MF EPA-200MF | |||
| POWER SOURCE 220-240V, 50Hz | |||
| POWER CONSUMPTION 1000 W | 1500 W | 2000 W | |
| WEIGHT | 3.5kg | 4.4kg | 4.9kg |
| DIMENSIONS (W×H×D) | 480×413×113 | 640×413×113 | 800×413×113 |
LIMITED WARRANTY
TOYOTOMI CO., LTD. (TOYOTOMI) warrants each product and any parts thereof sold by it to be free from defects in materials or workmanship under normal use and service for TWENTY FOUR (24) MONTHS from the date of delivery to the original purchaser at retail subject to the following terms and conditions:
WHAT IS COVERED: Product or any parts thereof which are defective in materials or workmanship.
WHAT IS NOT COVERED:
This warranty does not extend to any defect due to the negligence of others: failure to install, operate or maintain unit in accordance with instructions (operating and maintenance instructions are furnished with each new unit); unreasonable use, accidents, alteration, use of unauthorized or non-standardized TOYOTOMI parts and accessories; electrical malfunction, i.e., as resulting from large power surges, short circuit, etc.; incorrect installation; or repair by anyone other than a service facility specified by TOYOTOMI.
WHO IS COVERED: The original purchaser at retail.
WHAT WE WILL DO: TOYOTOMI will either repair or replace, at its opinion, all defective parts free of charge that are covered by this limited warranty on a carry-in basis, to your nearest authorized dealer or distributor of TOYOTOMI.
WHAT YOU MUST DO FOR WARRANTY SERVICE: You must return the defective Product or part to any authorized dealer or distributor of TOYOTOMI with this LIMITED WARRANTY. If service is not available locally, please contact our CUSTOMER RELATIONS DEPARTMENT at:
TOYOTOMI EUROPE SALES B.V.
E-MAIL: info@toyotomi.eu
INTERNET: www.toyotomi.eu
THE FOREGOING EXPRESS ALL OF TOYOTOMI'S OBLIGATIONS AND LIABILITIES WITH RESPECT TO THE QUALITY OF PRODUCT FURNISHED BY IT. ALL OTHER WARRANTIES, EXPRESSED OR IMPLIED, INCLUDING THE WARRANTIES OF MERCHANTABILITY OR FITNESS FOR A PARTICULAR PURPOSE ARE DISCAILED. TOYOTOMI SHALL NOT BE LIABLE FOR THE LOSS OF USE OF THE PRODUCT, INCONVENIENCE, LOSS OR ANY OTHER DAMAGES, DIRECT OR CONSEQUENTIAL ARISING OUT OF, THE USE OF, OR INABILITY TO USE. THE PRODUCT OR DAMAGES RESULTING FROM OR ATTRIBUTABLE TO DEFECTS IN THE PRODUCT.
No other than TOYOTOMI has authority to extend or modify the terms of this Limited Warranty in any manner whatsoever.
Some states do not allow the exclusion or limitation of incidental or consequential damages or limitations on how long an implied warranty lasts, so these limitations or exclusions may not apply to you. This Limited Warranty gives you specific legal rights and you may also have other rights which vary from state to state.
PRÉCAUTIONS IMPORTANTES
VEUILLEZ LIRE TOUTE LES INSTRUCTIONS AVANT D'UTILISER CE RADIATEUR
LORS DE L'UTILISATION D'APPAREILS ÉLÉCTRIQUES, DES PRÉCAUTIONS DE BASE DOIVENT TOUJOURS ÊTRE PRISES POUR RÉDUIRE LE RISQUE D'INCENDIE, DE CHOC ÉLECTRIQUE ET DE BLESSURES AUX PERSONNES OU AUX BIENS. PAR EXEMPLE :
FRANÇAISFRANC
Montage du fond :
natural_image
Diagram showing two mechanical components with cylindrical heads and curved surfaces, no text or symbols present
natural_image
Line drawing of a device with attached pipes and connectors (no text or symbols)FRANÇAISFRANÇAIS
MAINTENANCE

DEUTSCHDEUTS
Montage am Boden:
natural_image
Diagram of two mechanical components with cylindrical heads and curved surfaces, no text or symbols present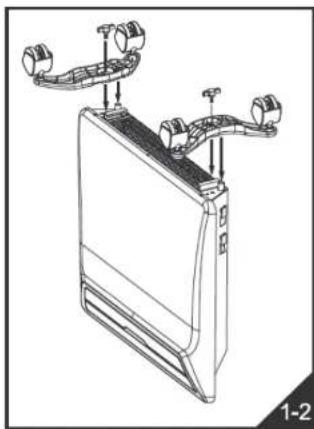
natural_image
Line drawing of a device with attached pipes and connectors (no text or symbols)DEUTSCHDEUTSCH
WARTUNG

NEDERLANDNEDEI
natural_image
Diagram of two mechanical components with cylindrical parts, shown in side-by-side assembly (no text or symbols)
natural_image
Technical line drawing of a device with attached pipes and connectors (no text or symbols)NEDERLANDNEDERLAND
ONDERHOUD

ITALIANOITALIA
natural_image
Diagram of two mechanical components with cylindrical parts and connecting rods, labeled 1-1 (no text or symbols on the components themselves)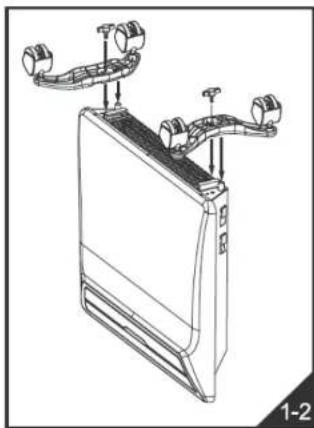
natural_image
Line drawing of a refrigerator with attached air ducts and ventilation pipes (no text or symbols)MANUTENZIONE

ESPAÑOLESPAR
Montaje en suelo:
natural_image
Diagram of two mechanical components with cylindrical parts mounted on curved surfaces, no text or symbols present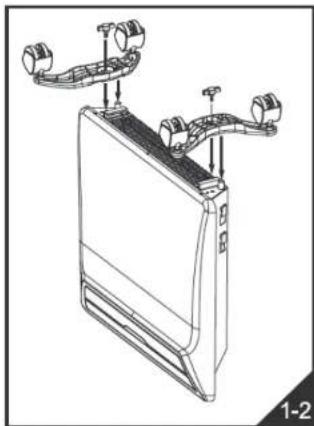
natural_image
Line drawing of a device with attached pipes and ventilation slots (no text or symbols)MANTENIMIENTO
PORTUGUÊSPORTL
Montagem no piso:
natural_image
Diagram showing two mechanical components with cylindrical heads and curved surfaces, no text or symbols present
natural_image
Technical line drawing of a device with attached pipes and connectors (no text or symbols)MANUTENÇÃO

DANSKDANS
Montering på gulvet:
natural_image
Diagram of two mechanical components with cylindrical heads and curved surfaces, no text or symbols present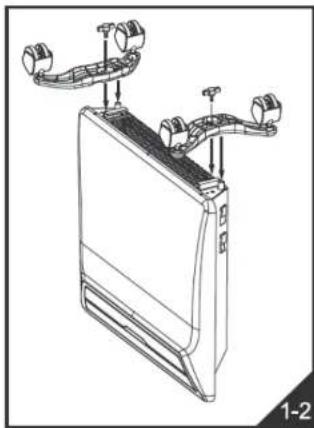
natural_image
Line drawing of a device with attached pipes and fans, labeled '1-2' (no text or symbols on the diagram itself)VEDLIGEHÖLDELSE
